display MAZDA MODEL CX-7 2010 (in English) Owner's Guide
[x] Cancel search | Manufacturer: MAZDA, Model Year: 2010, Model line: MODEL CX-7, Model: MAZDA MODEL CX-7 2010Pages: 510, PDF Size: 8.55 MB
Page 290 of 510
Black plate (290,1)
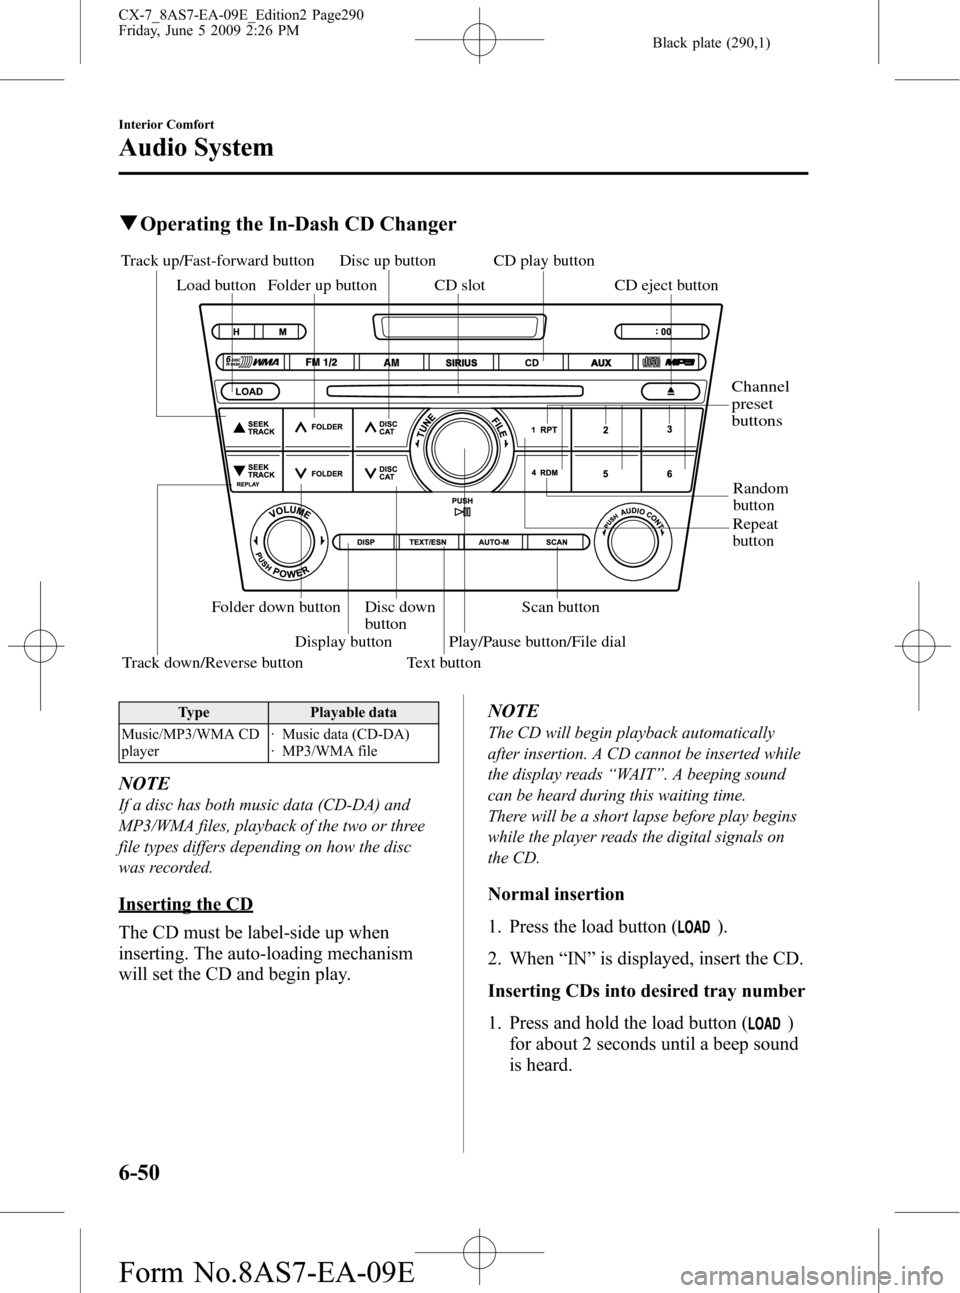
qOperating the In-Dash CD Changer
Scan button
Random
button
Track down/Reverse button Track up/Fast-forward button
Load button
Repeat
button CD play button
CD eject button
Folder up button CD slot
Disc up button
Disc down
button Folder down button
Display button
Text buttonPlay/Pause button/File dial
Channel
preset
buttons
Type Playable data
Music/MP3/WMA CD
player· Music data (CD-DA)
· MP3/WMA file
NOTE
If a disc has both music data (CD-DA) and
MP3/WMA files, playback of the two or three
file types differs depending on how the disc
was recorded.
Inserting the CD
The CD must be label-side up when
inserting. The auto-loading mechanism
will set the CD and begin play.NOTE
The CD will begin playback automatically
after insertion. A CD cannot be inserted while
the display reads“WAIT”. A beeping sound
can be heard during this waiting time.
There will be a short lapse before play begins
while the player reads the digital signals on
the CD.
Normal insertion
1. Press the load button (
).
2. When“IN”is displayed, insert the CD.
Inserting CDs into desired tray number
1. Press and hold the load button (
)
for about 2 seconds until a beep sound
is heard.
6-50
Interior Comfort
Audio System
CX-7_8AS7-EA-09E_Edition2 Page290
Friday, June 5 2009 2:26 PM
Form No.8AS7-EA-09E
Page 291 of 510
Black plate (291,1)
2. Press the channel preset button for the
desired tray number while“WAIT”is
displayed.
3. When“IN”is displayed, insert the CD.
NOTE
The CD cannot be inserted to the desired tray
number if the number is already occupied.
Multiple insertion
1. Press and hold the load button (
)
for about 2 seconds until a beep sound
is heard.
2. When“IN”is displayed, insert the CD.
3. When“IN”is displayed again, insert
the next CD.
NOTE
The first-inserted CD will be played
automatically when:
lNo other CD is inserted within 15 seconds
after“IN”is displayed.
lThe CD trays are full.
Displaying the CD-inserted tray
number
When you want to know the number for a
CD-inserted tray, press the display button
(
). The tray number will be displayed
for 5 seconds.
Ejecting the CD
Normal ejection
1. Press the CD eject button (
). The
disc number and“DISC OUT”will be
displayed.
2. Pull out the CD.
NOTE
When the CD is ejected during play, the next
CD will be played automatically.
Ejecting CDs from desired tray number
1. Press and hold the CD eject button (
)
for about 2 seconds until a beep sound
is heard.
The“DISC OUT”display flashes.
2. Press the channel preset button for the
desired CD number for less than 5
seconds after the beep sound is heard.
3. Pull out the CD.
Multiple ejection
1. Press and hold the CD eject button (
)
for about 2 seconds until a beep sound
is heard.
The“DISC OUT”display flashes.
2. Press the CD eject button (
) again
for less than 5 seconds after the beep
sound is heard.
NOTE
If the button is not pressed and about 5
seconds have elapsed while“DISC OUT”is
flashing, CDs are automatically ejected.
3. Pull out the CD, then the next CD will
be ejected.
NOTE
lCDs will be ejected starting with the one
with the lowest number.
lAll CDs in the tray will be ejected
continuously.
lCDs can be ejected when the ignition
switch is off. Press and hold the CD eject
button (
) for about 2 seconds and all
CDs will eject.
Playback
Press the CD play button (
) to start
play when a CD is in the unit.
If a CD is not in the unit when the CD
play button (
) is pressed,“NO DISC”
will flash on and off.
Interior Comfort
Audio System
6-51
CX-7_8AS7-EA-09E_Edition2 Page291
Friday, June 5 2009 2:26 PM
Form No.8AS7-EA-09E
Page 292 of 510
Black plate (292,1)
Pause
To stop playback, press the Play/Pause
button (
).
Press the button again to resume
playback.
Fast-forward/Reverse
Press and hold the fast-forward button
(
) to advance through a track at high
speed.
Press and hold the reverse button (
)to
reverse through a track at high speed.
Track search
Press the track up button (
) or turn the
file dial clockwise once to skip forward to
the beginning of the next track.
Press the track down button (
) or turn
the file dial counterclockwise once to skip
back to the beginning of the current track.
Disc search
To change the disc, press the DISC button
(
or) during playback.
Folder search (during MP3/WMA CD
playback)
To change to the previous folder, press the
folder down button (
), or press the
folder up button (
) to advance to the
next folder.
Music scan
This feature helps to find a program by
playing about the first 10 seconds of each
track.
Press the scan button (
) during
playback to start the scan play operation
(the track number will flash).
Press the scan button (
) again to
cancel scan playback.NOTE
If the unit is left in scan, normal playback will
resume where scan was selected.
Repeat playback
During music CD playback
1. Press the repeat button (
) during
playback to play the current track
repeatedly.“RPT”is displayed.
2. Press the button again to cancel the
repeat playback.
During MP3/WMA CD playback
(Track repeat)
1. Press the repeat button (
) during
playback to play the current track
repeatedly.“TRACK RPT”is
displayed.
2. To cancel the repeat playback, press the
button again after 3 seconds.
(Folder repeat)
1. Press the repeat button (
) during
playback, and then press the button
again within 3 seconds to play the
tracks in the current folder repeatedly.
“FOLDER RPT”is displayed.
2. Press the button again to cancel the
repeat playback.
Random playback
Tracks are randomly selected and played.
During music CD playback
1. Press the random button (
) during
playback to play the tracks in the CD
randomly.“RDM”is displayed.
2. Press the button again to cancel the
random playback.
6-52
Interior Comfort
Audio System
CX-7_8AS7-EA-09E_Edition2 Page292
Friday, June 5 2009 2:26 PM
Form No.8AS7-EA-09E
Page 293 of 510
Black plate (293,1)
During MP3/WMA CD playback
(Folder random)
1. Press the random button (
) during
playback to play the tracks in the folder
randomly.“FOLDER RDM”is
displayed.
2. To cancel the random playback, press
the button again after 3 seconds.
(CD random)
1. Press the random button (
) during
playback, and then press the button
again within 3 seconds to play the
tracks on the CD randomly.
“DISC RDM”is displayed.
2. Press the button again to cancel the
random playback.
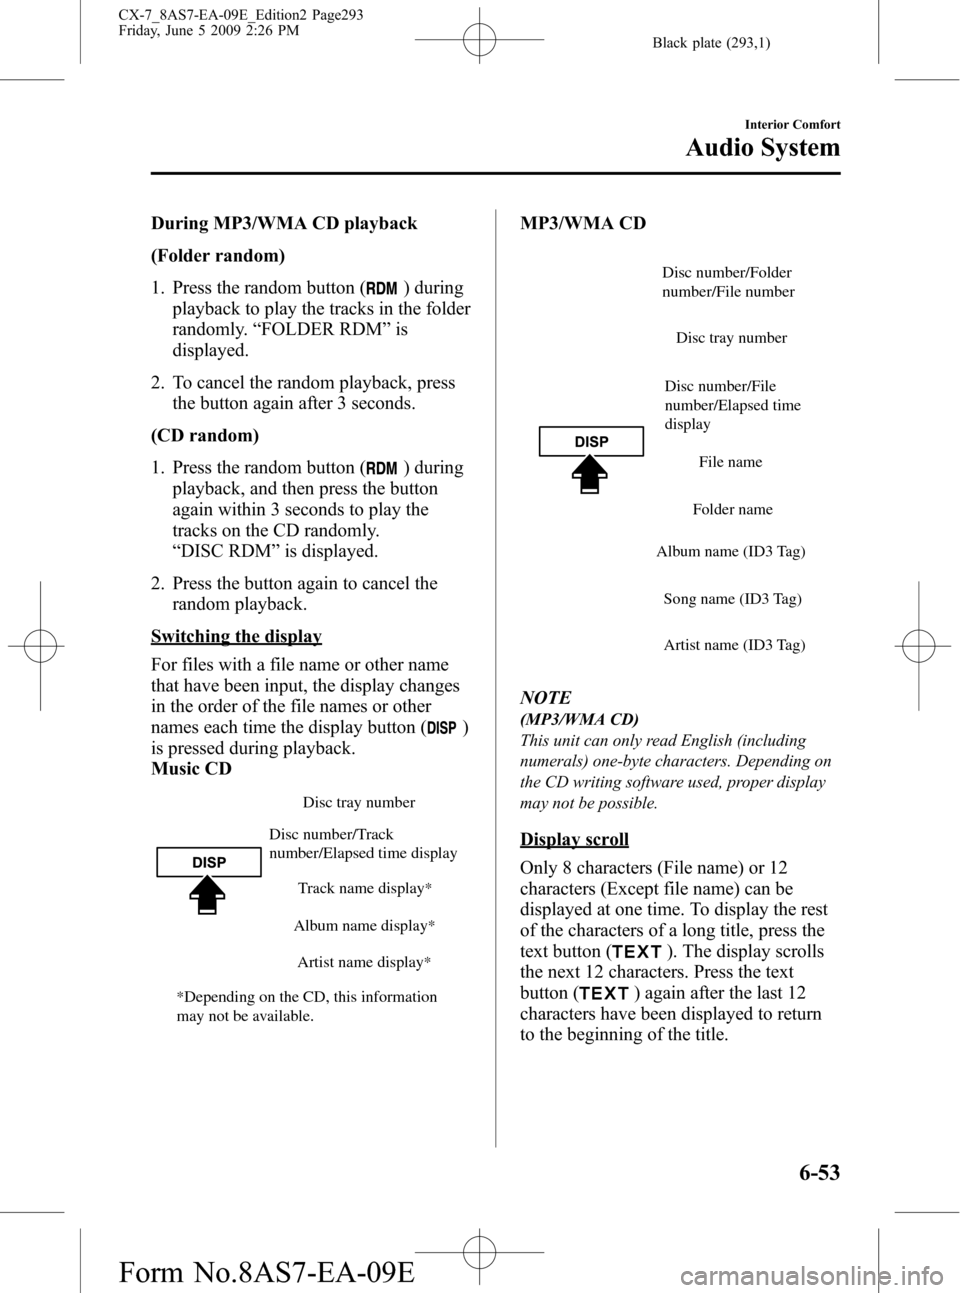
Switching the display
For files with a file name or other name
that have been input, the display changes
in the order of the file names or other
names each time the display button (
)
is pressed during playback.
Music CD
Disc tray number
Track name display
*
Album name display*
Artist name display*
Disc number/Track
number/Elapsed time display
*Depending on the CD, this information
may not be available.
MP3/WMA CD
Disc number/File
number/Elapsed time
displayDisc tray number
File name
Folder name
Album name (ID3 Tag)
Song name (ID3 Tag)
Artist name (ID3 Tag)
Disc number/Folder
number/File number
NOTE
(MP3/WMA CD)
This unit can only read English (including
numerals) one-byte characters. Depending on
the CD writing software used, proper display
may not be possible.
Display scroll
Only 8 characters (File name) or 12
characters (Except file name) can be
displayed at one time. To display the rest
of the characters of a long title, press the
text button (
). The display scrolls
the next 12 characters. Press the text
button (
) again after the last 12
characters have been displayed to return
to the beginning of the title.
Interior Comfort
Audio System
6-53
CX-7_8AS7-EA-09E_Edition2 Page293
Friday, June 5 2009 2:26 PM
Form No.8AS7-EA-09E
Page 294 of 510
Black plate (294,1)
NOTE
The displayable number of characters is
limited. If the number of characters, including
the file extension (.mp3/.wma), exceeds 32
characters, it may not be fully displayed.
Message display
If“CHECK CD”is displayed, it means
that there is some CD malfunction. Check
the CD for damage, dirt, or smudges, and
then properly reinsert. If the message
appears again, take the unit to an
Authorized Mazda Dealer for service.
qOperating the Auxiliary jack
You can connect portable audio units or
similar products on the market to the
auxiliary jack to listen to music or audio
over the vehicle's speakers, refer to
Auxiliary Input (page 6-59).
6-54
Interior Comfort
Audio System
CX-7_8AS7-EA-09E_Edition2 Page294
Friday, June 5 2009 2:26 PM
Form No.8AS7-EA-09E
Page 295 of 510
Black plate (295,1)
qError Indications
If you see an error indication on the display, find the cause in the chart. If you cannot clear
the error indication, take the vehicle to an Authorized Mazda Dealer.
Indication Cause Solution
ACQUIRINGDepending on the
surrounding conditions
(such as large trees, build-
ings, or tunnels) and special
weather conditions,
SIRIUS radio reception
may be diminished or
temporarily interrupted.Improve reception by moving away from possible
obstructions. If the error indication continues to display,
consult an Authorized Mazda Dealer.
ANTENNA FAILSatellite radio antenna
malfunctionCheck the satellite radio antenna, antenna cable and
DLP antenna connector. If the error indication continues
to display, consult an Authorized Mazda Dealer.
CHECK CDCD is inserted upside downInsert the CD properly. If the error indication continues
to display, consult an Authorized Mazda Dealer.
CD is defectiveInsert another CD properly. If the error indication
continues to display, consult an Authorized Mazda
Dealer.
NOTE
If a broken DLP* unit is replaced with a new unit, cancel the license for the broken unit and make
sure to carry out new registration for the replaced unit. If the license for the broken unit is not
canceled, you will be charged a reception fee for both units.
* DLP: Down Link Processor (SATELLITE RADIO Module)
Interior Comfort
Audio System
6-55
CX-7_8AS7-EA-09E_Edition2 Page295
Friday, June 5 2009 2:26 PM
Form No.8AS7-EA-09E
Page 298 of 510
Black plate (298,1)
NOTE
CD, CD changer, SIRIUS digital satellite
radio, and BT audio modes cannot be selected
in the following cases:
· SIRIUS digital satellite radio unit, or BT
audio unit is not equipped on the audio
system.
· CD has not been inserted.
· With the SIRIUS digital satellite radio, the
mode which was selected last is displayed.
The AUX mode is locked out unless you
connect a commercially available portable
audio unit to the auxiliary jack. Connect a
portable audio unit or similar product on the
market to the auxiliary jack to listen to music
or audio over the vehicle's speakers. Change
the audio source to AUX mode (page 6-59).
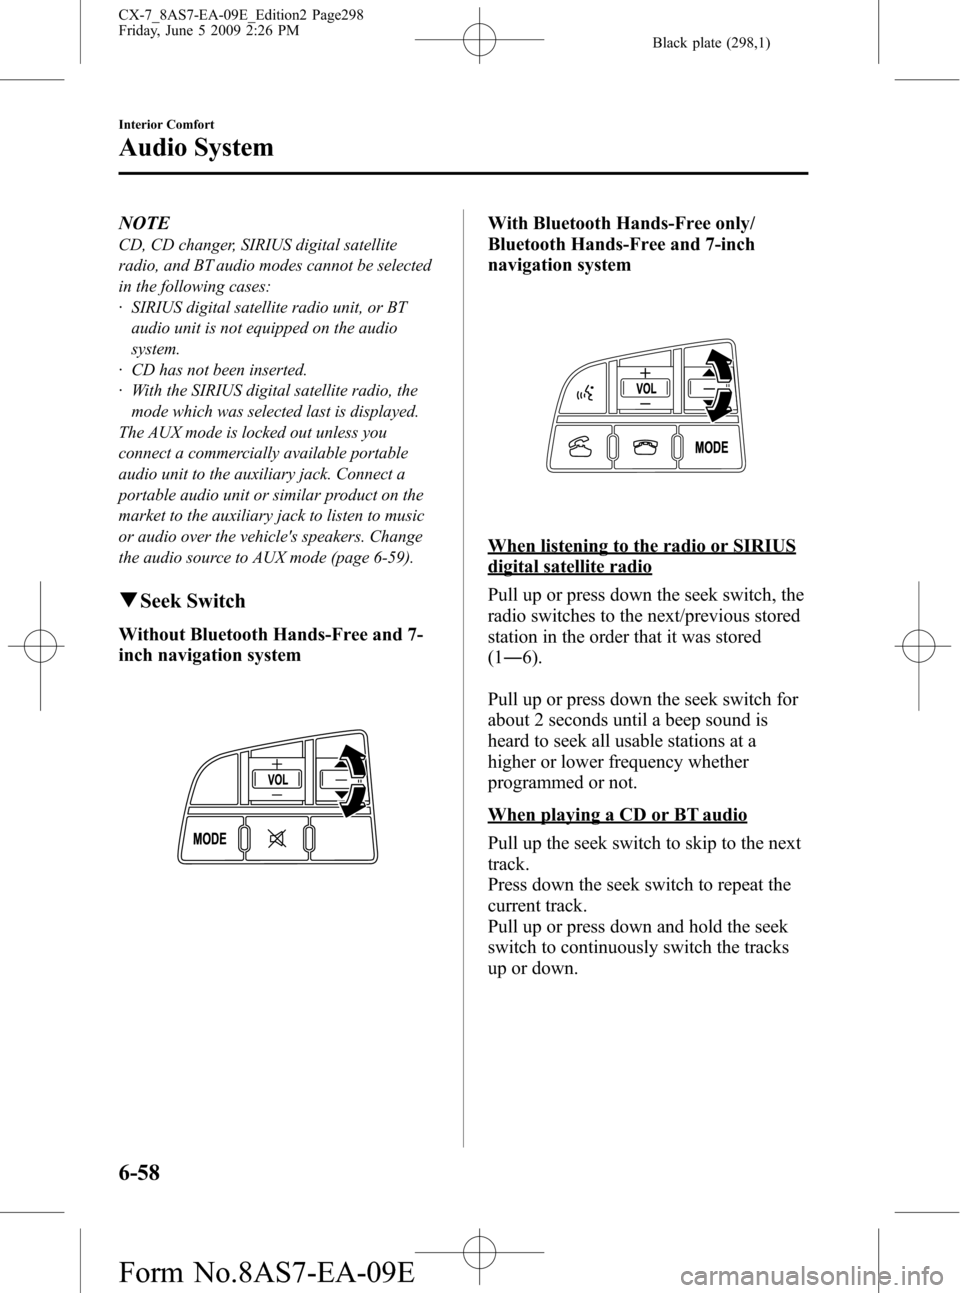
qSeek Switch
Without Bluetooth Hands-Free and 7-
inch navigation system
With Bluetooth Hands-Free only/
Bluetooth Hands-Free and 7-inch
navigation system
When listening to the radio or SIRIUS
digital satellite radio
Pull up or press down the seek switch, the
radio switches to the next/previous stored
station in the order that it was stored
(1―6).
Pull up or press down the seek switch for
about 2 seconds until a beep sound is
heard to seek all usable stations at a
higher or lower frequency whether
programmed or not.
When playing a CD or BT audio
Pull up the seek switch to skip to the next
track.
Press down the seek switch to repeat the
current track.
Pull up or press down and hold the seek
switch to continuously switch the tracks
up or down.
6-58
Interior Comfort
Audio System
CX-7_8AS7-EA-09E_Edition2 Page298
Friday, June 5 2009 2:26 PM
Form No.8AS7-EA-09E
Page 304 of 510
Black plate (304,1)
NOTElIt may not be possible to play a Bluetooth
audio device if it is placed anywhere
transmission is compromised, such as
inside a metal container or the trunk. Move
the Bluetooth audio device to a location
where transmission is possible.
lBattery consumption of Bluetooth audio
devices is higher while Bluetooth-
connected.
lIf a non-Bluetooth device is to be used, a
commercially-available Bluetooth adapter
is required. When playing an audio device
with a Bluetooth adapter installed,
programming of the audio device may not
be possible or audio may not be heard from
the vehicle speakers if the connection of the
adapter and the device is poor. If this
happens, check if the Bluetooth adapter is
properly connected.
qBluetooth Audio Preparation
Bluetooth audio device set-up
Bluetooth audio programming, changes,
deletions, and display of programmed
device information can be performed.
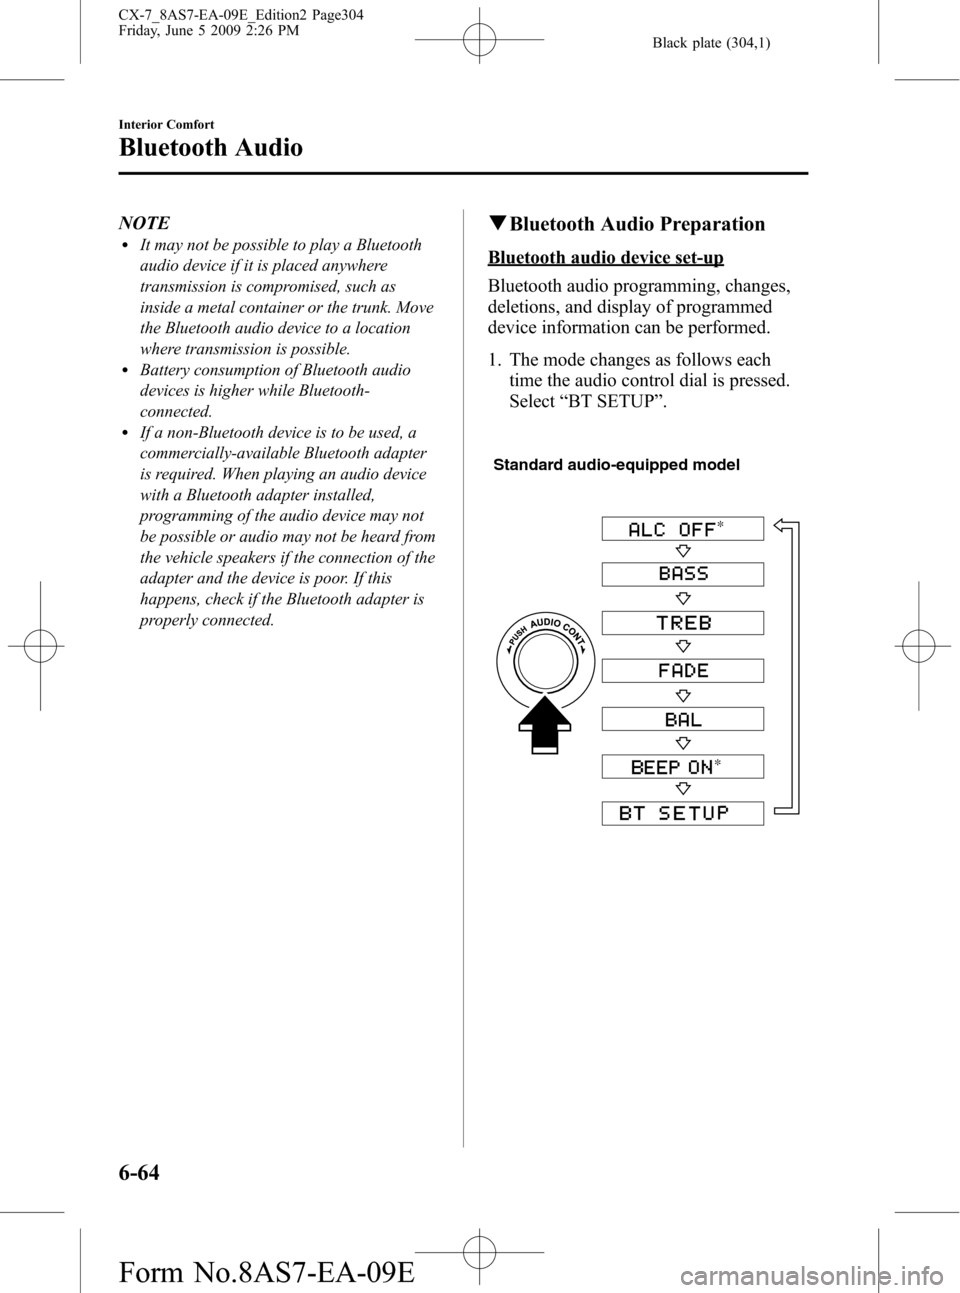
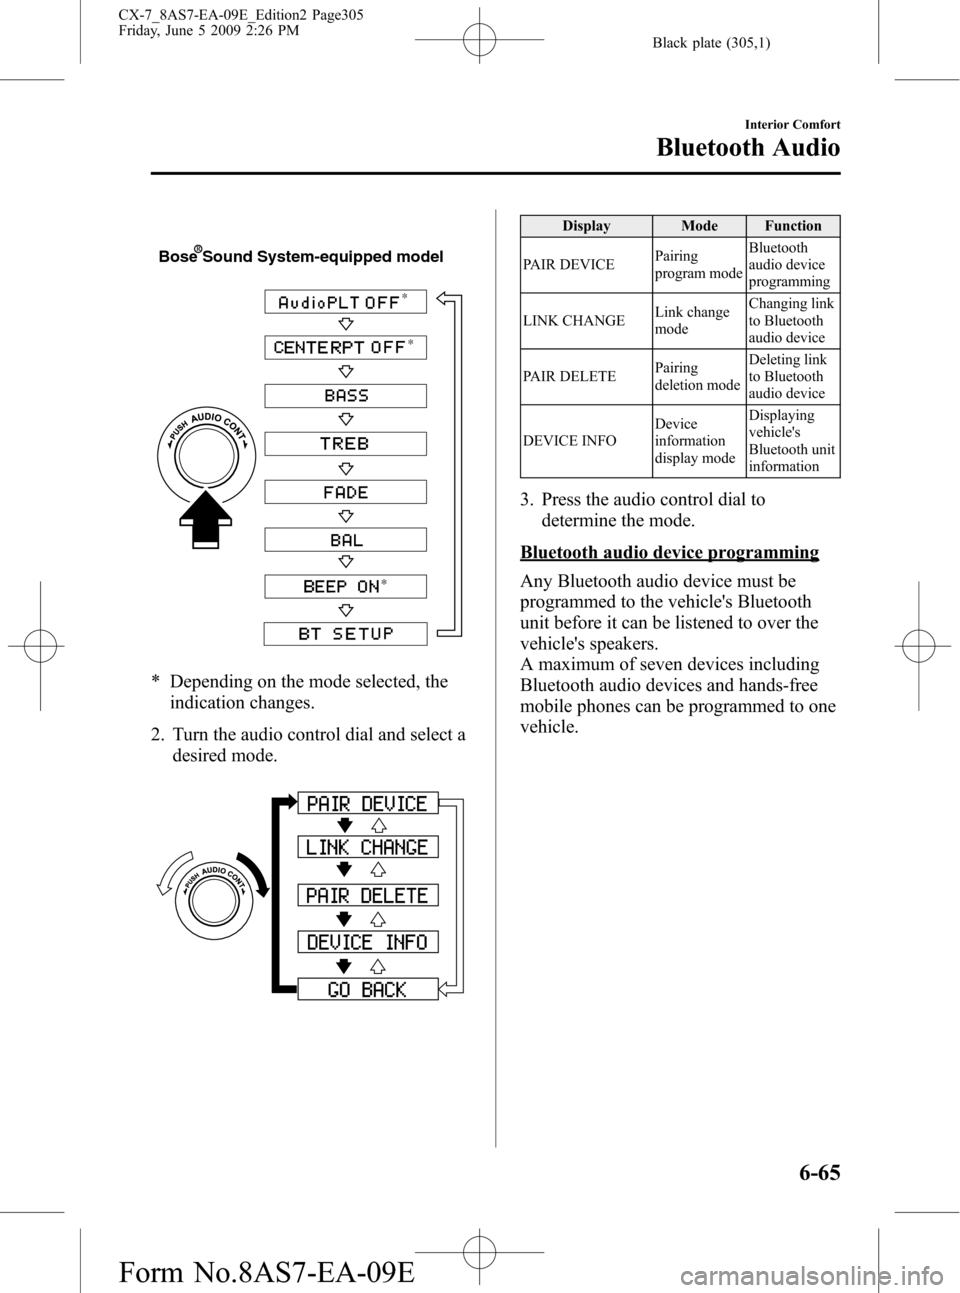
1. The mode changes as follows each
time the audio control dial is pressed.
Select“BT SETUP”.
Standard audio-equipped model
*
*
6-64
Interior Comfort
Bluetooth Audio
CX-7_8AS7-EA-09E_Edition2 Page304
Friday, June 5 2009 2:26 PM
Form No.8AS7-EA-09E
Page 305 of 510
Black plate (305,1)
*
*
*
Bose Sound System-equipped model
* Depending on the mode selected, the
indication changes.
2. Turn the audio control dial and select a
desired mode.
Display Mode Function
PAIR DEVICEPairing
program modeBluetooth
audio device
programming
LINK CHANGELink change
modeChanging link
to Bluetooth
audio device
PAIR DELETEPairing
deletion modeDeleting link
to Bluetooth
audio device
DEVICE INFODevice
information
display modeDisplaying
vehicle's
Bluetooth unit
information
3. Press the audio control dial to
determine the mode.
Bluetooth audio device programming
Any Bluetooth audio device must be
programmed to the vehicle's Bluetooth
unit before it can be listened to over the
vehicle's speakers.
A maximum of seven devices including
Bluetooth audio devices and hands-free
mobile phones can be programmed to one
vehicle.
Interior Comfort
Bluetooth Audio
6-65
CX-7_8AS7-EA-09E_Edition2 Page305
Friday, June 5 2009 2:26 PM
Form No.8AS7-EA-09E
Page 306 of 510
Black plate (306,1)
NOTElAlways perform Bluetooth audio device
programming while the vehicle is stopped.
lIf a Bluetooth device has already been
programmed to the vehicle as a hands-free
mobile phone, it does not need to be
programmed again when using the device
as a Bluetooth audio device. Conversely, it
does not need to be programmed again as a
hands-free mobile phone if it has already
been programmed as a Bluetooth audio
device.
lLook around to be sure other likely
Bluetooth audio devices are not in range
when you start to program. If in doubt,
move your car to another location. The
transmission range of a Bluetooth audio
device is about 10 m (32 ft). Therefore, if
there is another Bluetooth audio device
within a 10 m (32 ft) radius of the vehicle,
the device may be identified and
programmed instead.
lDevice registration can also be done using
voice recognition (page 6-76).
Concerning the operation of a Bluetooth
audio device itself, refer to its instruction
manual.
Some Bluetooth audio devices have PIN
codes (four digits). Refer to the audio
device's instruction manual because the
programming procedure differs depending
on whether it has a PIN code or not.
Programming a Bluetooth audio device
which has a PIN code (4 digits)
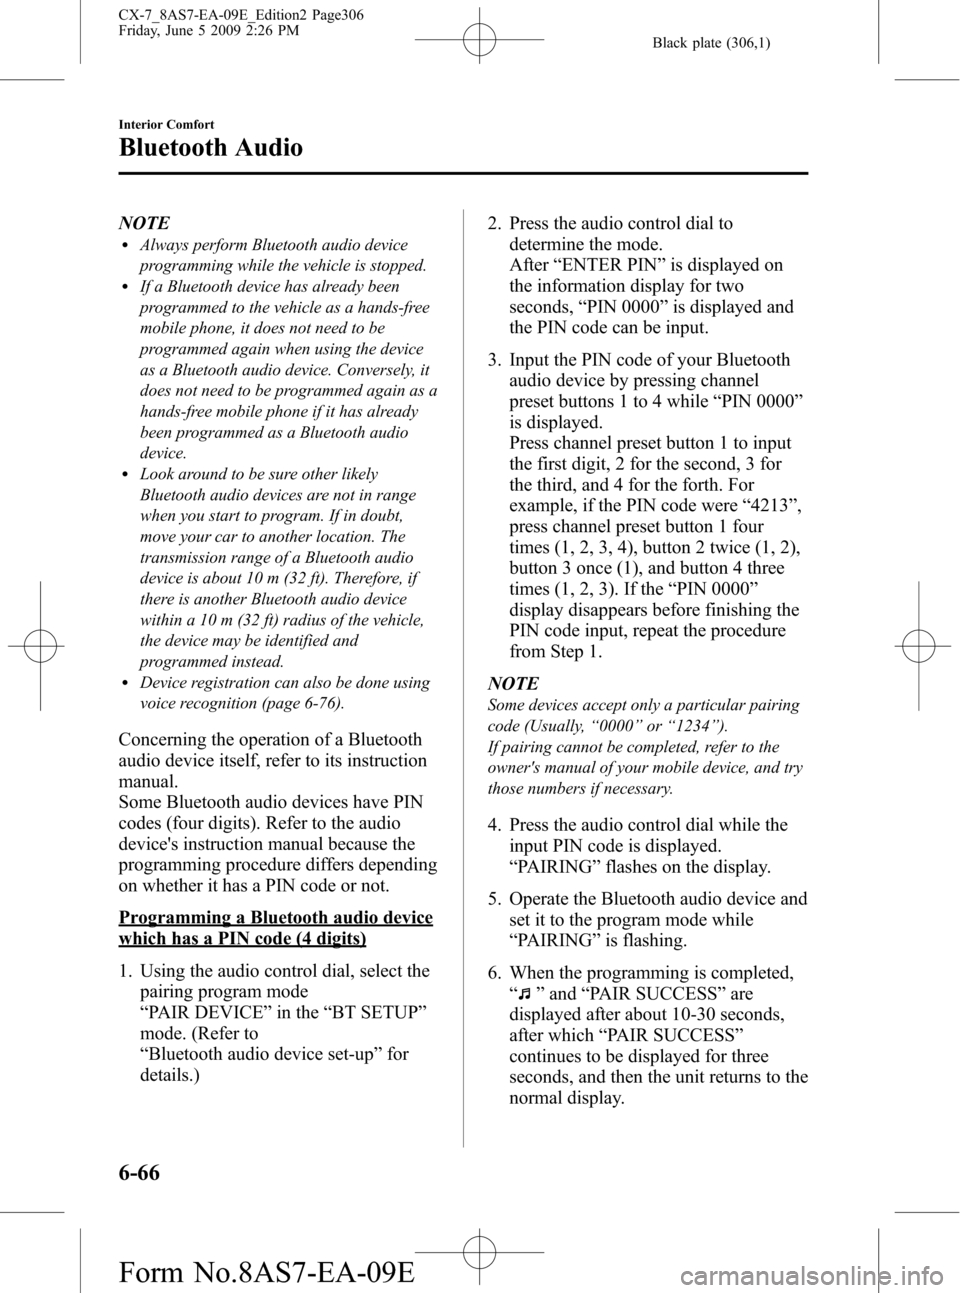
1. Using the audio control dial, select the
pairing program mode
“PAIR DEVICE”in the“BT SETUP”
mode. (Refer to
“Bluetooth audio device set-up”for
details.)2. Press the audio control dial to
determine the mode.
After“ENTER PIN”is displayed on
the information display for two
seconds,“PIN 0000”is displayed and
the PIN code can be input.
3. Input the PIN code of your Bluetooth
audio device by pressing channel
preset buttons 1 to 4 while“PIN 0000”
is displayed.
Press channel preset button 1 to input
the first digit, 2 for the second, 3 for
the third, and 4 for the forth. For
example, if the PIN code were“4213”,
press channel preset button 1 four
times (1, 2, 3, 4), button 2 twice (1, 2),
button 3 once (1), and button 4 three
times (1, 2, 3). If the“PIN 0000”
display disappears before finishing the
PIN code input, repeat the procedure
from Step 1.
NOTE
Some devices accept only a particular pairing
code (Usually,“0000”or“1234”).
If pairing cannot be completed, refer to the
owner's manual of your mobile device, and try
those numbers if necessary.
4. Press the audio control dial while the
input PIN code is displayed.
“PAIRING”flashes on the display.
5. Operate the Bluetooth audio device and
set it to the program mode while
“PAIRING”is flashing.
6. When the programming is completed,
“
”and“PAIR SUCCESS”are
displayed after about 10-30 seconds,
after which“PAIR SUCCESS”
continues to be displayed for three
seconds, and then the unit returns to the
normal display.
6-66
Interior Comfort
Bluetooth Audio
CX-7_8AS7-EA-09E_Edition2 Page306
Friday, June 5 2009 2:26 PM
Form No.8AS7-EA-09E