display MAZDA MODEL CX-7 2010 (in English) User Guide
[x] Cancel search | Manufacturer: MAZDA, Model Year: 2010, Model line: MODEL CX-7, Model: MAZDA MODEL CX-7 2010Pages: 510, PDF Size: 8.55 MB
Page 261 of 510
Black plate (261,1)
05
06
010204
03
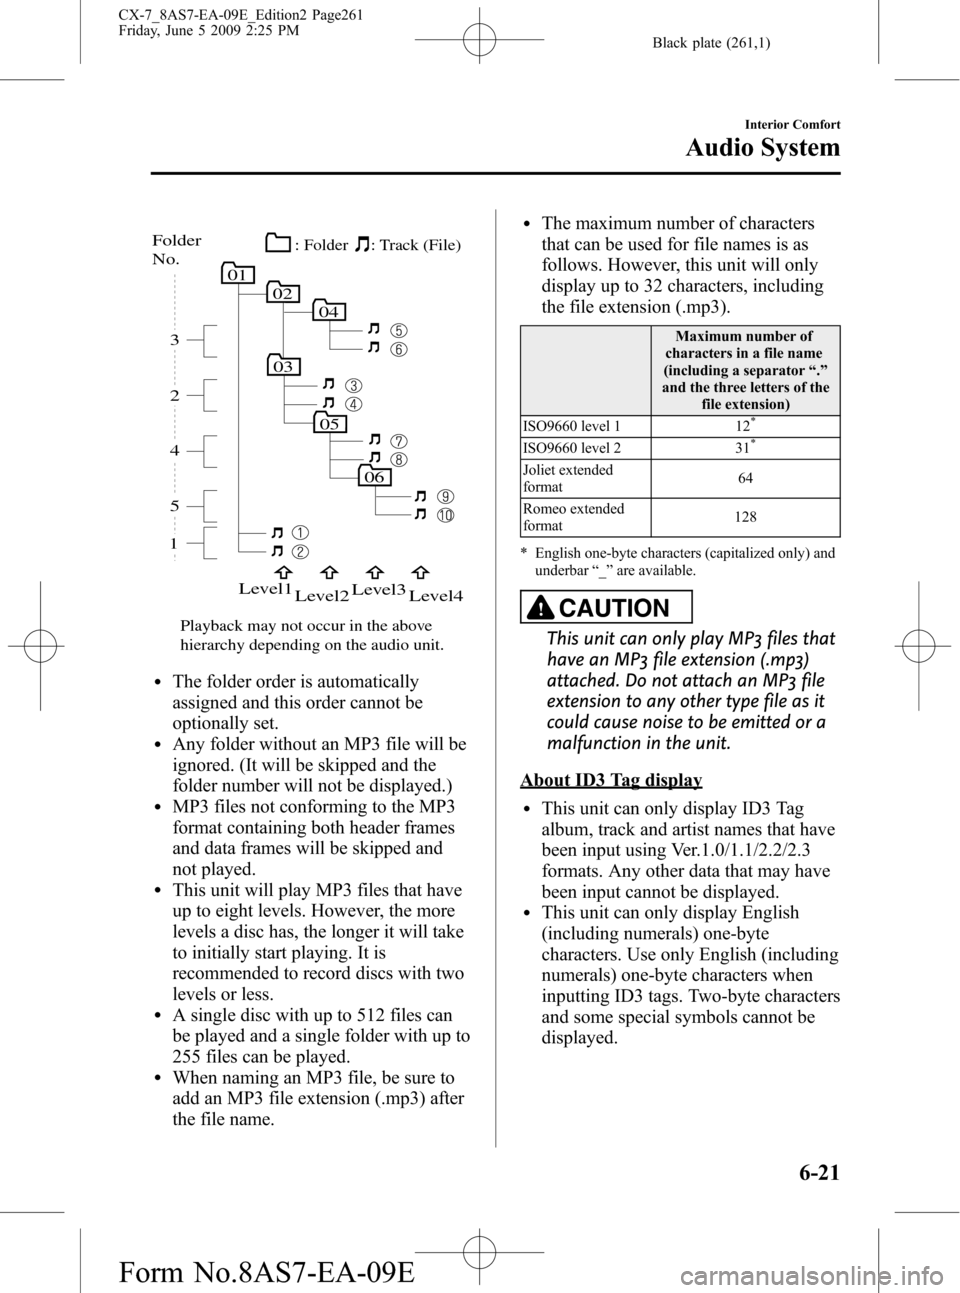
15 4 2 3
Folder
No.
Level1
Level2Level3
Level4
Playback may not occur in the above
hierarchy depending on the audio unit.: Track (File) : Folder
lThe folder order is automatically
assigned and this order cannot be
optionally set.
lAny folder without an MP3 file will be
ignored. (It will be skipped and the
folder number will not be displayed.)
lMP3 files not conforming to the MP3
format containing both header frames
and data frames will be skipped and
not played.
lThis unit will play MP3 files that have
up to eight levels. However, the more
levels a disc has, the longer it will take
to initially start playing. It is
recommended to record discs with two
levels or less.
lA single disc with up to 512 files can
be played and a single folder with up to
255 files can be played.
lWhen naming an MP3 file, be sure to
add an MP3 file extension (.mp3) after
the file name.
lThe maximum number of characters
that can be used for file names is as
follows. However, this unit will only
display up to 32 characters, including
the file extension (.mp3).
Maximum number of
characters in a file name
(including a separator“.”
and the three letters of the
file extension)
ISO9660 level 1 12
*
ISO9660 level 2 31*
Joliet extended
format64
Romeo extended
format128
* English one-byte characters (capitalized only) and
underbar“_”are available.
CAUTION
This unit can only play MP3 files that
have an MP3 file extension (.mp3)
attached. Do not attach an MP3 file
extension to any other type file as it
could cause noise to be emitted or a
malfunction in the unit.
About ID3 Tag display
lThis unit can only display ID3 Tag
album, track and artist names that have
been input using Ver.1.0/1.1/2.2/2.3
formats. Any other data that may have
been input cannot be displayed.
lThis unit can only display English
(including numerals) one-byte
characters. Use only English (including
numerals) one-byte characters when
inputting ID3 tags. Two-byte characters
and some special symbols cannot be
displayed.
Interior Comfort
Audio System
6-21
CX-7_8AS7-EA-09E_Edition2 Page261
Friday, June 5 2009 2:25 PM
Form No.8AS7-EA-09E
Page 263 of 510
Black plate (263,1)
Playable WMA file specification
CD-R and CD-RW including WMA files
can be played with this unit. Discs which
conform to the following formats can be
played.
Playable WMA files are as follows:
Item Content
SpecificationWindows Media
Audio Version 7.0,
8.0, 9.0
Sampling
frequencyBit rate32kHz.......32,40,
48 kbps
44.1kHz.....32,48,
64, 80, 96, 128, 160,
192, 256, 320 kbps
48kHz.......64,96,
128, 160, 192 kbps
VBR (Variable Bit Rate) Supported
Channel mode Stereo/Monaural
WMA tagTitle, artist name,
album name
CAUTION
This unit plays files with the (.wma)
file extension as a WMA file. Do not
use the WMA file extension for files
other than WMA files. It may cause
noise or a malfunction.
lIn a WMA file, the track name, artist
name and album name are recorded
with data called“WMA-Tag”, and the
information can be displayed.
lWMA files which do not comply with
the specific standard may not be played
correctly or its file and folder name
may not be displayed correctly.
lThe file extension may not be provided
depending on the computer operating
system, version, software, or settings.
In this case, add the file extension
“.wma”to the end of the file name, and
then write the disc.
Interior Comfort
Audio System
6-23
CX-7_8AS7-EA-09E_Edition2 Page263
Friday, June 5 2009 2:25 PM
Form No.8AS7-EA-09E
Page 265 of 510
Black plate (265,1)
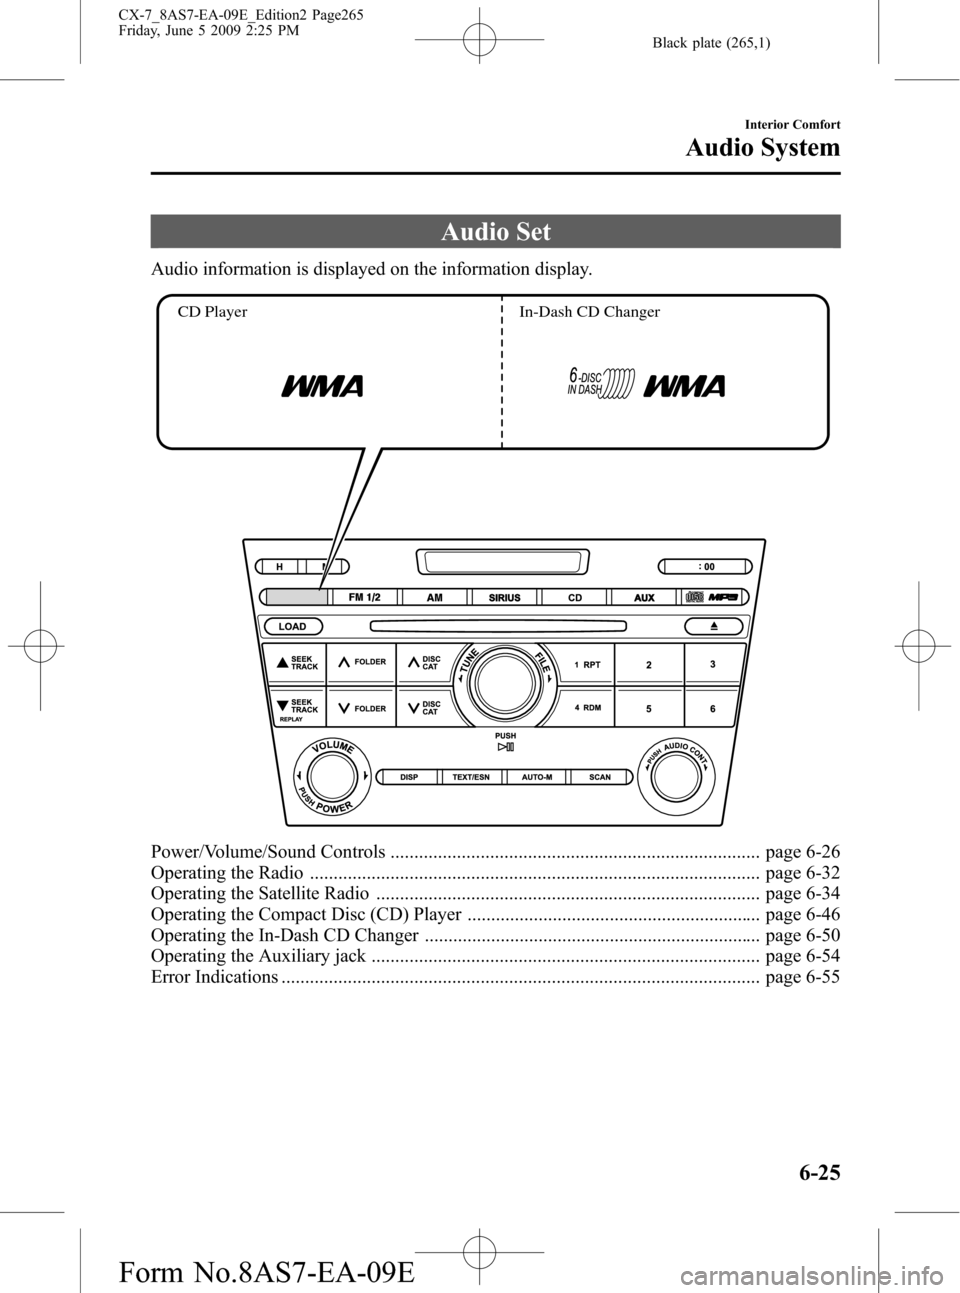
Audio Set
Audio information is displayed on the information display.
CD Player In-Dash CD Changer
Power/Volume/Sound Controls .............................................................................. page 6-26
Operating the Radio ............................................................................................... page 6-32
Operating the Satellite Radio ................................................................................. page 6-34
Operating the Compact Disc (CD) Player .............................................................. page 6-46
Operating the In-Dash CD Changer ....................................................................... page 6-50
Operating the Auxiliary jack .................................................................................. page 6-54
Error Indications ..................................................................................................... page 6-55
Interior Comfort
Audio System
6-25
CX-7_8AS7-EA-09E_Edition2 Page265
Friday, June 5 2009 2:25 PM
Form No.8AS7-EA-09E
Page 268 of 510
Black plate (268,1)
NOTE
About 5 seconds after selecting any mode, the
volume function will be automatically selected.
To reset bass, treble, fade, and balance, press
the audio control dial for 2 seconds. The unit
will beep and“CLEAR”will be displayed.
Automatic Level Control (ALC)
(Standard audio-equipped model)
The automatic level control is a feature
that automatically adjusts audio volume
and sound quality according to the vehicle
speed.
The volume increases in accordance with
the increase in vehicle speed, and
decreases as vehicle speed decreases.
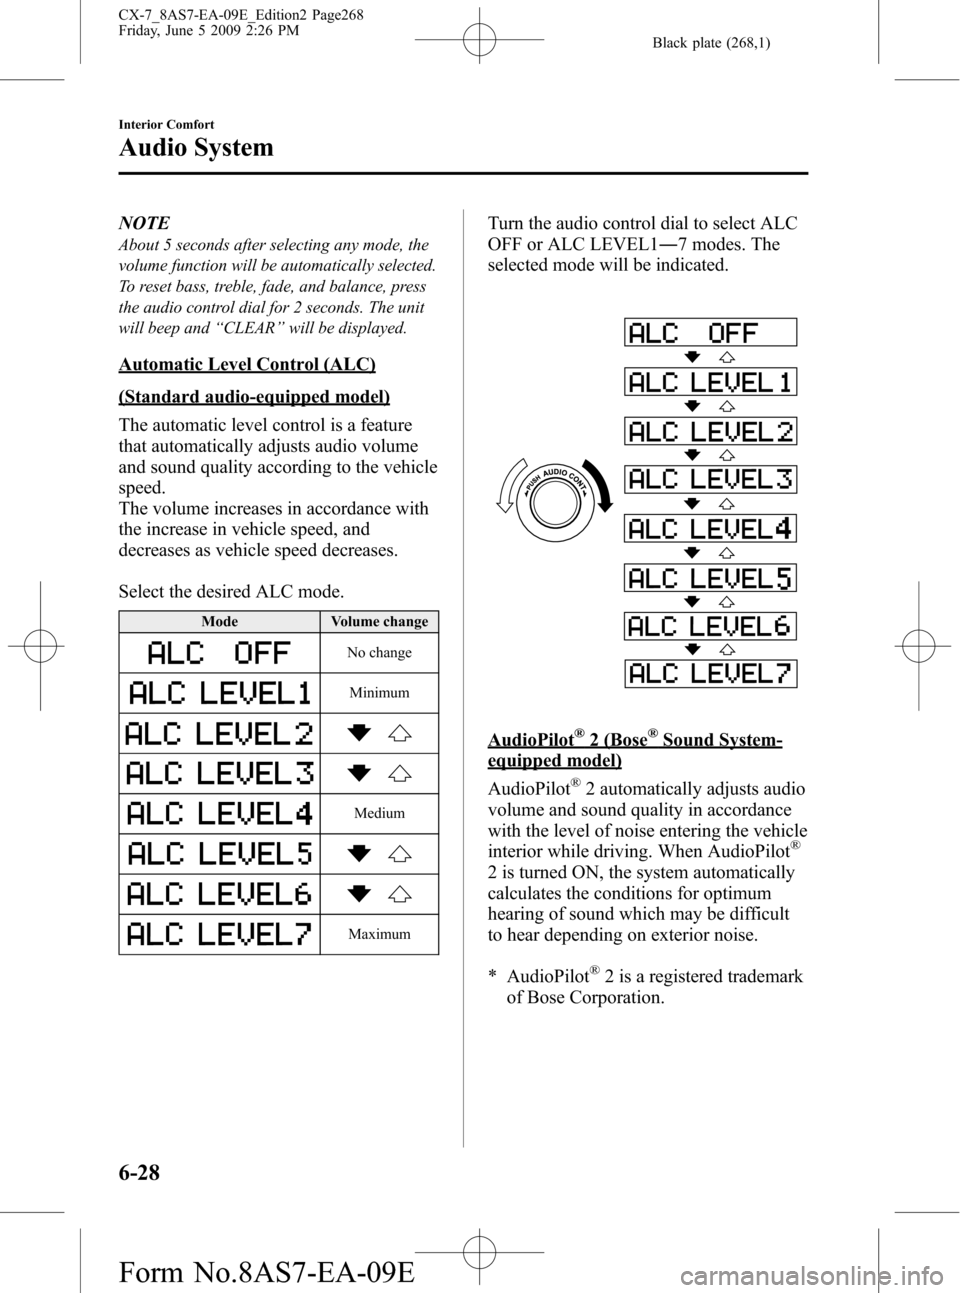
Select the desired ALC mode.
Mode Volume change
No change
Minimum
Medium
Maximum
Turn the audio control dial to select ALC
OFF or ALC LEVEL1―7 modes. The
selected mode will be indicated.
AudioPilot®2 (Bose®Sound System-
equipped model)
AudioPilot
®2 automatically adjusts audio
volume and sound quality in accordance
with the level of noise entering the vehicle
interior while driving. When AudioPilot
®
2 is turned ON, the system automatically
calculates the conditions for optimum
hearing of sound which may be difficult
to hear depending on exterior noise.
* AudioPilot
®2 is a registered trademark
of Bose Corporation.
6-28
Interior Comfort
Audio System
CX-7_8AS7-EA-09E_Edition2 Page268
Friday, June 5 2009 2:26 PM
Form No.8AS7-EA-09E
Page 272 of 510
Black plate (272,1)
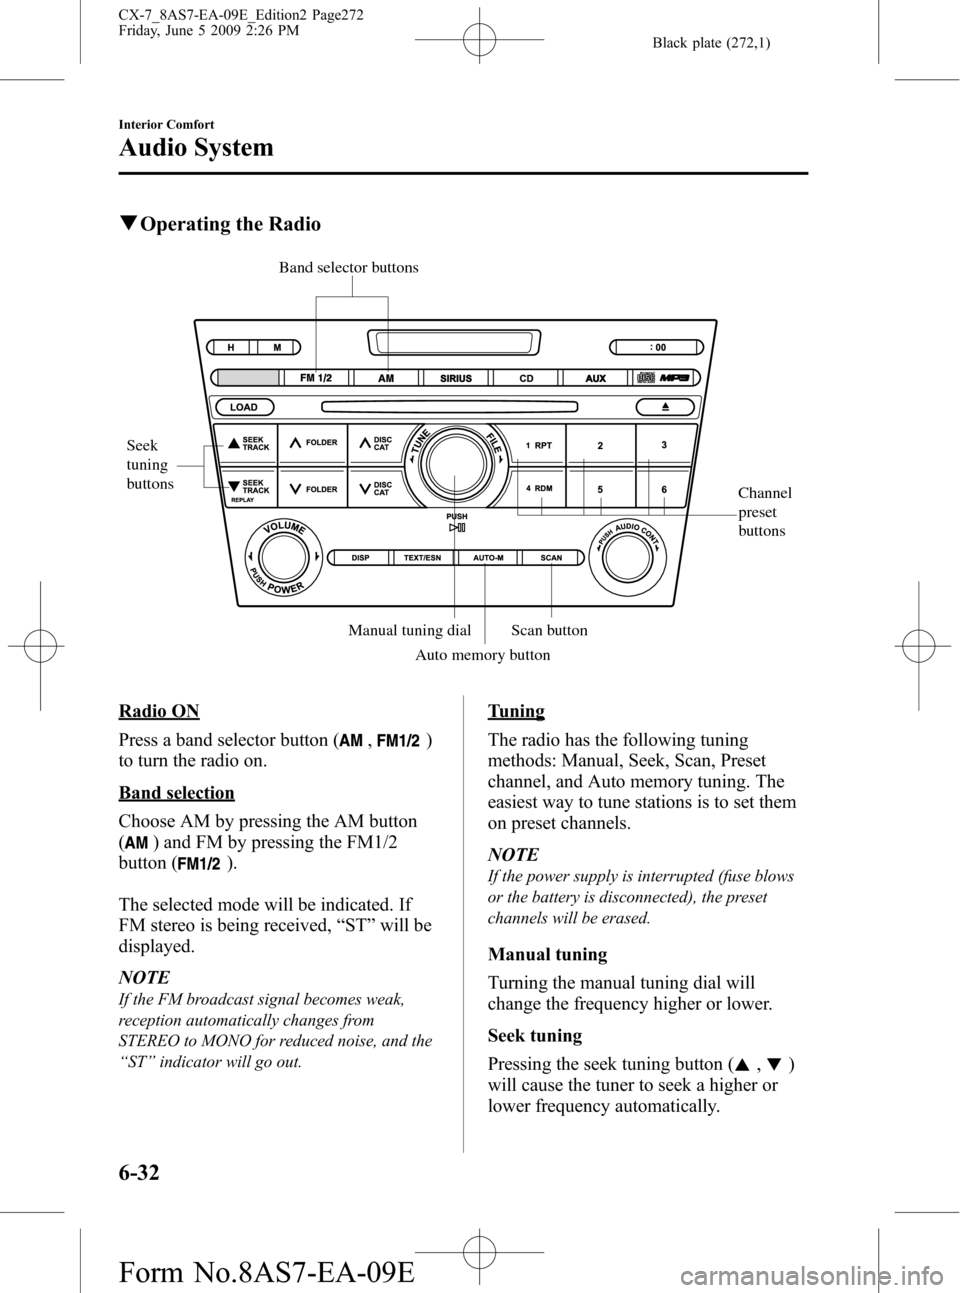
qOperating the Radio
Channel
preset
buttons
Seek
tuning
buttons
Band selector buttons
Scan button Manual tuning dial
Auto memory button
Radio ON
Press a band selector button (
,)
to turn the radio on.
Band selection
Choose AM by pressing the AM button
(
) and FM by pressing the FM1/2
button (
).
The selected mode will be indicated. If
FM stereo is being received,“ST”will be
displayed.
NOTE
If the FM broadcast signal becomes weak,
reception automatically changes from
STEREO to MONO for reduced noise, and the
“ST”indicator will go out.
Tuning
The radio has the following tuning
methods: Manual, Seek, Scan, Preset
channel, and Auto memory tuning. The
easiest way to tune stations is to set them
on preset channels.
NOTE
If the power supply is interrupted (fuse blows
or the battery is disconnected), the preset
channels will be erased.
Manual tuning
Turning the manual tuning dial will
change the frequency higher or lower.
Seek tuning
Pressing the seek tuning button (
,)
will cause the tuner to seek a higher or
lower frequency automatically.
6-32
Interior Comfort
Audio System
CX-7_8AS7-EA-09E_Edition2 Page272
Friday, June 5 2009 2:26 PM
Form No.8AS7-EA-09E
Page 273 of 510
Black plate (273,1)
NOTE
If you continue to press and hold the button,
the frequency will continue changing without
stopping.
Scan tuning
Press the scan button (
)to
automatically sample strong stations.
Scanning stops at each station for about 5
seconds. To hold a station, press the scan
button (
) again during this interval.
Preset channel tuning
The 6 preset channels can be used to store
6 AM and 12 FM stations.
1. To set a channel first select AM, FM1,
or FM2. Tune to the desired station.
2. Depress a channel preset button for
about 2 seconds until a beep sound is
heard. The preset channel number and
station frequency will be displayed.
The station is now held in the memory.
3. Repeat this operation for the other
stations and bands you want to store.
To tune one in the memory, select AM,
FM1, or FM2 and then press its
channel preset button. The station
frequency and the channel number will
be displayed.
NOTE
If the power supply is interrupted (fuse blows
or the battery is disconnected), the preset
channels will be erased.
Auto memory tuning
This is especially useful when driving in
an area where the local stations are not
known. Additional AM/FM stations can
be stored without disturbing the
previously set channels.Press and hold the auto memory button
(
) for about 2 seconds until a beep
sound is heard; the system will
automatically scan and temporarily store
up to 6 stations with the strongest
frequencies in each selected band in that
area.
After scanning is completed, the station
with the strongest frequency will be tuned
and its frequency displayed.
Press and release the auto memory button
(
) to recall stations from the auto-
stored stations. One stored station will be
selected each time; its frequency and
channel number will be displayed.
NOTE
If no stations can be tuned after scanning
operations,“A”will be displayed.
Interior Comfort
Audio System
6-33
CX-7_8AS7-EA-09E_Edition2 Page273
Friday, June 5 2009 2:26 PM
Form No.8AS7-EA-09E
Page 274 of 510
Black plate (274,1)
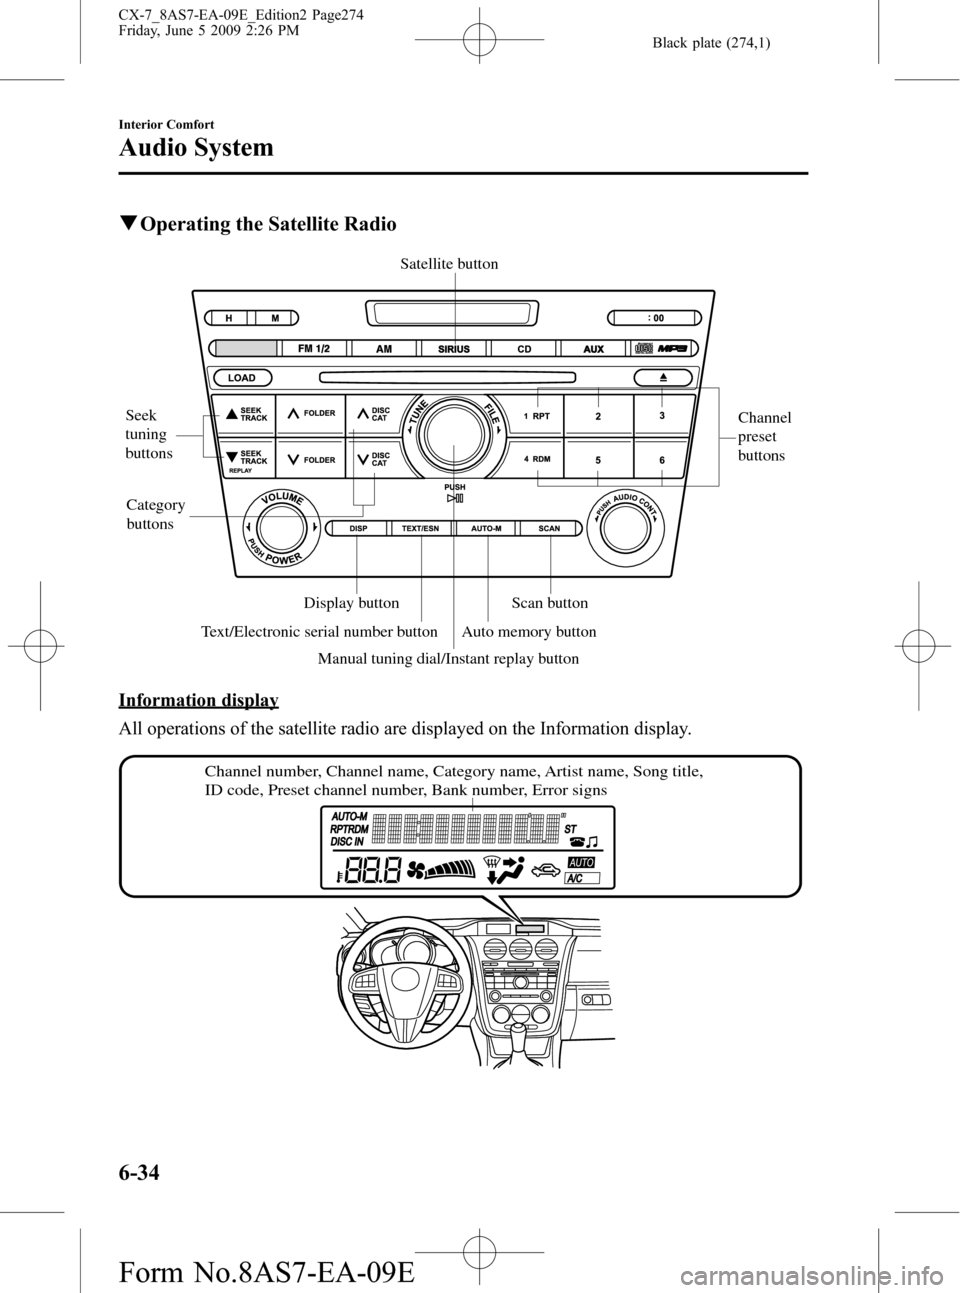
qOperating the Satellite Radio
Seek
tuning
buttonsChannel
preset
buttons
Category
buttons
Scan button Display button
Text/Electronic serial number button
Manual tuning dial/Instant replay buttonAuto memory button Satellite button
Information display
All operations of the satellite radio are displayed on the Information display.
Channel number, Channel name, Category name, Artist name, Song title,
ID code, Preset channel number, Bank number, Error signs
6-34
Interior Comfort
Audio System
CX-7_8AS7-EA-09E_Edition2 Page274
Friday, June 5 2009 2:26 PM
Form No.8AS7-EA-09E
Page 276 of 510
Black plate (276,1)
How to subscribe to satellite radio
Once the system is installed you must first
subscribe to the SIRIUS Radio service to
activate the system.
The SIRIUS Radio service uses an ID
code to identify your radio. This code is
needed to subscribe to SIRIUS Radio, and
if needed, is also used to report any
problems should there be any in the
future. Listeners can subscribe using any
of the following methods:
lVisiting SIRIUS on the web at
www.sirius.com
lSubscribing to SIRIUS customer care,
available 24 hours a day, 7 days a
week.
lCalling 1-888-539-SIRI (7474)lE-mail at: customercare@sirius-
radio.com
lWriting to: SIRIUS XM RADIO
1221 Avenue of the Americas
New York, NY 10020
Attention: Customer Care
Customers should have their SIRIUS
Radio ID Electronic Serial Number (ESN)
ready.
NOTE
Your ESN should have been recorded at the
time of installation. If not, press the ESN
button for 1.5 seconds or longer, or turn the
manual tuning dial to channel 0 to display the
12-digit ESN for the SIRIUS tuner.
Satellite radio activation
For activation and subscription
information call toll-free at 1-888-539-
SIRI (7474). A SIRIUS Customer Care
representative will take the necessary
information and walk you through the
activation process. Or you can visit
SIRIUS online at www.sirius.com.Please have the following information
ready when attempting to activate your
service:
lSIRIUS ID (ESN*)lValid credit card information (type,
number, expiration date)
When you are ready to receive the on-air
activation signals you will be instructed
(for activation via phone) to turn on your
tuner, have the antenna pointed skyward,
and to turn the manual tuning dial to
channel 184.
Once the signal is sent from the national
studio it may take up to ten minutes to be
received by your unit.
NOTE
On-air activation is completed after the
procedure, in most cases from ten seconds to
ten minutes.
*ESN: Electronic Serial Number
SIRIUS operation
All operations of the satellite radio are
conducted by means of the audio unit.
SIRIUS radio mode selection
When the satellite button is pressed during
ACC ON, it will play the last SIRIUS
channel in use before the mode was
switched over to another mode or the
power was turned off.
When the satellite button is pressed in a
mode other than the SIRIUS mode, the
last channel in use will be received.
6-36
Interior Comfort
Audio System
CX-7_8AS7-EA-09E_Edition2 Page276
Friday, June 5 2009 2:26 PM
Form No.8AS7-EA-09E
Page 277 of 510
Black plate (277,1)
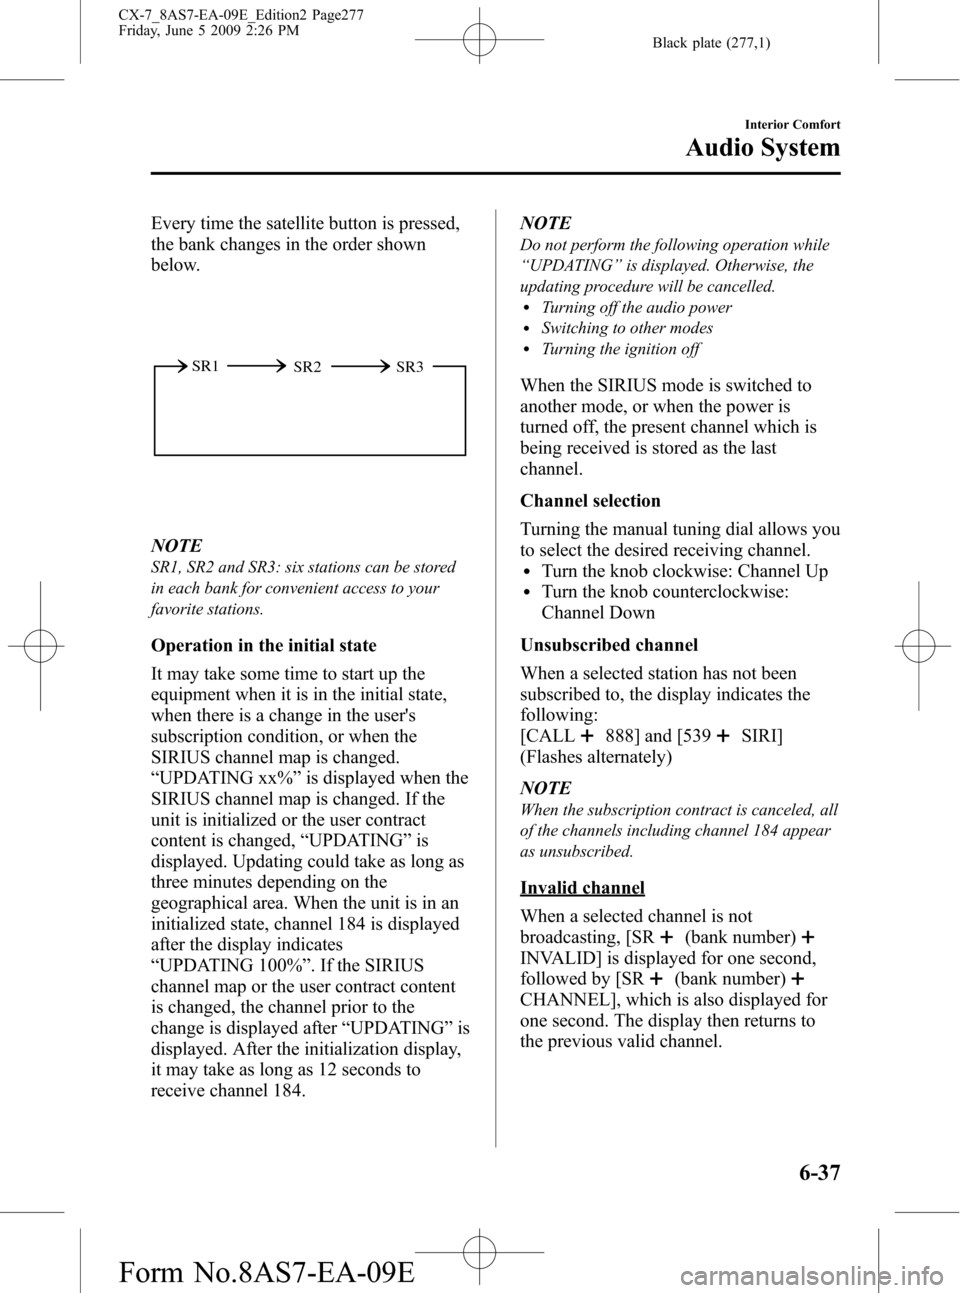
Every time the satellite button is pressed,
the bank changes in the order shown
below.
SR2 SR1
SR3
NOTE
SR1, SR2 and SR3: six stations can be stored
in each bank for convenient access to your
favorite stations.
Operation in the initial state
It may take some time to start up the
equipment when it is in the initial state,
when there is a change in the user's
subscription condition, or when the
SIRIUS channel map is changed.
“UPDATING xx%”is displayed when the
SIRIUS channel map is changed. If the
unit is initialized or the user contract
content is changed,“UPDATING”is
displayed. Updating could take as long as
three minutes depending on the
geographical area. When the unit is in an
initialized state, channel 184 is displayed
after the display indicates
“UPDATING 100%”. If the SIRIUS
channel map or the user contract content
is changed, the channel prior to the
change is displayed after“UPDATING”is
displayed. After the initialization display,
it may take as long as 12 seconds to
receive channel 184.NOTE
Do not perform the following operation while
“UPDATING”is displayed. Otherwise, the
updating procedure will be cancelled.
lTurning off the audio powerlSwitching to other modeslTurning the ignition off
When the SIRIUS mode is switched to
another mode, or when the power is
turned off, the present channel which is
being received is stored as the last
channel.
Channel selection
Turning the manual tuning dial allows you
to select the desired receiving channel.
lTurn the knob clockwise: Channel UplTurn the knob counterclockwise:
Channel Down
Unsubscribed channel
When a selected station has not been
subscribed to, the display indicates the
following:
[CALL
888] and [539SIRI]
(Flashes alternately)
NOTE
When the subscription contract is canceled, all
of the channels including channel 184 appear
as unsubscribed.
Invalid channel
When a selected channel is not
broadcasting, [SR
(bank number)
INVALID] is displayed for one second,
followed by [SR
(bank number)
CHANNEL], which is also displayed for
one second. The display then returns to
the previous valid channel.
Interior Comfort
Audio System
6-37
CX-7_8AS7-EA-09E_Edition2 Page277
Friday, June 5 2009 2:26 PM
Form No.8AS7-EA-09E
Page 278 of 510
Black plate (278,1)
NOTE
If the last channel selected has become
unavailable because of a channel update the
above indication is displayed until any button
is pressed.
Preset channel programming
(Programming with“channel number”
display)
1. Select the desired channel to be
programmed. At this point, the
following is displayed:
[SR
(bank number)(channel
number)]
2. Keep pressing the channel preset
button for 1.5 seconds or more.
The programming process is complete
after the channel number flashes. Then,
[SR
(bank number)] is displayed
and a beep sound is heard at the same
time.
3. [SR
(bank number)CH
(preset number)(channel number)]
are displayed.
(Programming with“text”display (e.g.
channel name))
1. Select the desired channel to be
programmed. At this point, the
following is displayed:
[SR
(bank number)(selected
text (e.g. channel name))]
2. Keep pressing the channel preset
button for 1.5 seconds or more.
The programming process is complete
after the text (e.g. channel name)
flashes. Then, [SR
(bank number)]
is displayed and you will hear beep
sound at the same time.3. SR
(bank number)CH
(preset number)(channel number)]
are displayed.
4. Three seconds later, it returns to normal
display. [SR
(bank number)(text
(e.g. channel name))]
NOTE
Six stations can be stored in each bank, SR1,
SR2, and SR3 for convenient access to your
favorite stations.
Preset channel call-up
Press and release the channel preset
button,
[SR
(bank number)CH(preset
number)
(channel number)] appears.
When the preset button is pressed during
text mode, its channel number is
displayed first for three second and then
its text is displayed.
NOTE
In the initial setting, all channels are preset to
184.
Category change
Press the category button (UP or DOWN)
and select the desired category.
lPress the category button (UP):
Category up
lPress the category button (DOWN):
Category down
Every time the category (UP) button is
pressed for 1.5 second or less, the
category is changed over in the order
shown below.
At this time, the lowest (smallest-number)
channel within the category indicated is
received.
When the highest (or lowest) category is
reached, the category is changed over in
the order shown below.
6-38
Interior Comfort
Audio System
CX-7_8AS7-EA-09E_Edition2 Page278
Friday, June 5 2009 2:26 PM
Form No.8AS7-EA-09E