TPMS MAZDA MODEL CX-9 2008 Quick Tips (in English)
[x] Cancel search | Manufacturer: MAZDA, Model Year: 2008, Model line: MODEL CX-9, Model: MAZDA MODEL CX-9 2008Pages: 15, PDF Size: 2.04 MB
Page 6 of 15

INSTRUMENT CLUSTER
Always check the Owner’s Manual for more operating information and safety features
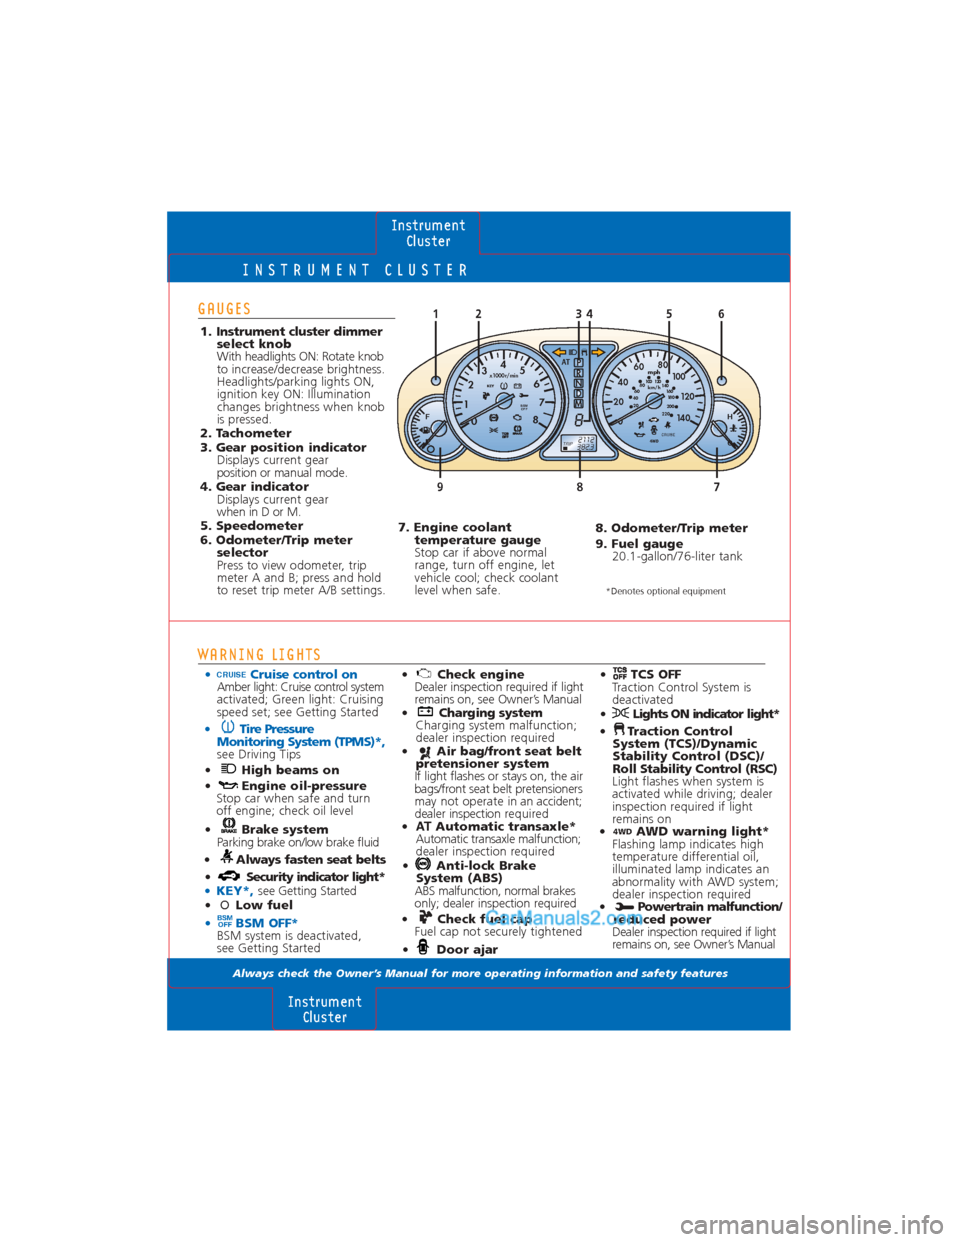
WARNING LIGHTS
• Cruise control onAmber light: Cruise control system
activated; Green light: Cruising
speed set; see Getting Started
• Tire Pressure Monitoring System (TPMS)*,
see Driving Tips
• High beams on • Engine oil-pressure Stop car when safe and turn
off engine; check oil level
• Brake system Parking brake on/low brake fluid
• Always fasten seat belts • Security indicator light*
• KEY*,see Getting Started
• O Low fuel
• BSM OFF*BSM system is deactivated,
see Getting Started
BSM
OFF
GAUGES
1. Instrument cluster dimmer select knob
With headlights ON: Rotate knob
to increase/decrease brightness.
Headlights/parking lights ON,
ignition key ON: Illumination
changes brightness when knob
is pressed.
2. Tachometer
3. Gear position indicator Displays current gear
position or manual mode.
4. Gear indicator Displays current gear
when in D or M.
5. Speedometer
6. Odometer/Trip meter selector
Press to view odometer, trip
meter A and B; press and hold
to reset trip meter A/B settings.
• Check engineDealer inspection required if light
remains on, see Owner’s Manual
• Charging system Charging system malfunction;
dealer inspection required
• Air bag/front seat belt pretensioner system
If light flashes or stays on, the air
bags/front seat belt pretensioners
may not operate in an accident;
dealer inspection r equired
• AT Automatic transaxle*
Automatic transaxle malfunction;
dealer inspection required
• Anti-lock Brake System (ABS)
ABS malfunction, normal brakes
only; dealer inspection required
• Check fuel cap Fuel cap not securely tightened
• Door ajar
7. Engine coolant temperature gauge
Stop car if above normal
range, turn off engine, let
vehicle cool; check coolant
level when safe.
InstrumentCluster
Instrument Cluster
km/h mph
E F H
C
x1000r/min2 3
4
5
6
7
8
TRIP
1 0
0
20 40
60
80
10 0
12 0
140 220
20
40
60
80
100
120
140
160
18 0
200
P
R
N
D
M
8
2112
382.3
8 7 9
4 1 6 2 5
KEY
CRUISE
AT
4WD
3
BSM
OFF
8. Odometer/Trip meter
9. Fuel gauge 20.1-gallon/76-liter tank
CRUISE• TCS OFFTraction Control System is
deactivated
• Lights ON indicator light*
• Traction Control System (TCS)/Dynamic
Stability Control (DSC)/
Roll Stability Control (RSC)
Light flashes when system is
activated while driving; dealer
inspection required if light
remains on
•
4WDAWD warning light*
Flashing lamp indicates high
temperature differential oil,
illuminated lamp indicates an
abnormality with AWD system;
dealer inspection required
• Powertrain malfunction/ reduced power
Dealer inspection required if light
remains on, see Owner’s Manual
*Denotes optional equipment
Page 13 of 15

CARGO AREA
Always check the Owner’s Manual for more operating information and safety features
Cargo Area
Driving Tips
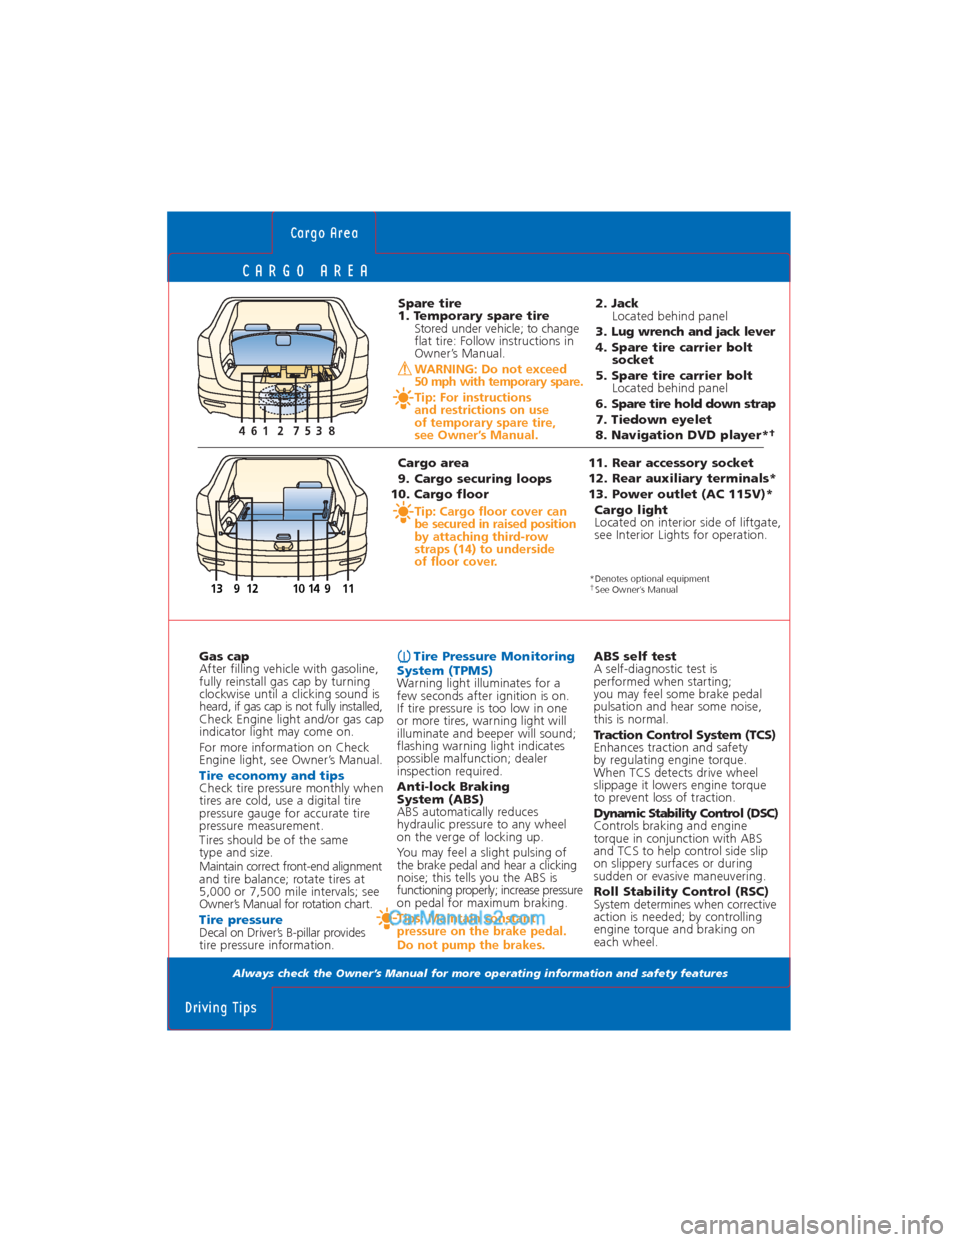
Spare tire
1. Temporary spare tire
Stored under vehicle; to change
flat tire: Follow instructions in
Owner’s Manual.
WARNING: Do not exceed
50 mph with temporary spare.
Tip: For instructions
and restrictions on use
of temporary spare tire,
see Owner’s Manual.
Gas cap
After filling vehicle with gasoline,
fully reinstall gas cap by turning
clockwise until a clicking sound is
heard, if gas cap is not fully installed,
Check Engine light and/or gas cap
indicator light may come on.
For more information on Check
Engine light, see Owner’s Manual.
Tire economy and tipsCheck tire pressure monthly when
tires are cold, use a digital tire
pressure gauge for accurate tire
pressure measurement.
Tires should be of the same
type and size.
Maintain correct front-end alignment
and tire balance; rotate tires at
5,000 or 7,500 mile intervals; see
Owner’s Manual for rotation chart.
Tire pressure Decal on Driver’s B-pillar provides
tire pressure information.
Tire Pressure Monitoring
System (TPMS)
Warning light illuminates for a
few seconds after ignition is on.
If tire pressure is too low in one
or more tires, warning light will
illuminate and beeper will sound;
flashing warning light indicates
possible malfunction; dealer
inspection required.
Anti-lock Braking
System (ABS)
ABS automatically reduces
hydraulic pressure to any wheel
on the verge of locking up.
You may feel a slight pulsing of
the brake pedal and hear a clicking
noise; this tells you the ABS is
functioning properly; increase pressure
on pedal for maximum braking.
Tips: Maintain constant
pressure on the brake pedal.
Do not pump the brakes.
2. Jack
Located behind panel
3. Lug wrench and jack lever
4. Spare tire carrier bolt
socket
5. Spare tire carrier bolt
Located behind panel
6. Spare tire hold down strap
7. Tiedown eyelet
8. Navigation DVD player*
†
Cargo area
9. Cargo securing loops
10. Cargo floor
Tip: Cargo floor cover can
be secured in raised position
by attaching third-row
straps (14) to underside
of floor cover.
11. Rear accessory socket
12. Rear auxiliary terminals*
13. Power outlet (AC 115V)*
Cargo light
Located on interior side of liftgate,
see Interior Lights for operation.
10 9911141312
3 7 12 58 46
ABS self test
A self-diagnostic test is
performed when starting;
you may feel some brake pedal
pulsation and hear some noise,
this is normal.
Traction Control System (TCS)
Enhances traction and safety
by regulating engine torque.
When TCS detects drive wheel
slippage it lowers engine torque
to prevent loss of traction.
Dynamic Stability Control (DSC)
Controls braking and engine
torque in conjunction with ABS
and TCS to help control side slip
on slippery surfaces or during
sudden or evasive maneuvering.
Roll Stability Control (RSC)
System determines when corrective
action is needed; by controlling
engine torque and braking on
each wheel.
*Denotes optional equipment†See Owner’s Manual