turn signal MAZDA MODEL CX-9 2015 (in English) User Guide
[x] Cancel search | Manufacturer: MAZDA, Model Year: 2015, Model line: MODEL CX-9, Model: MAZDA MODEL CX-9 2015Pages: 604, PDF Size: 9.15 MB
Page 245 of 604

Black plate (245,1)
NOTE
The advanced key can be set so that the KEY
indicator light (green) does not flash even if
the battery power is low.
Refer to Personalization Features on page
10-8.
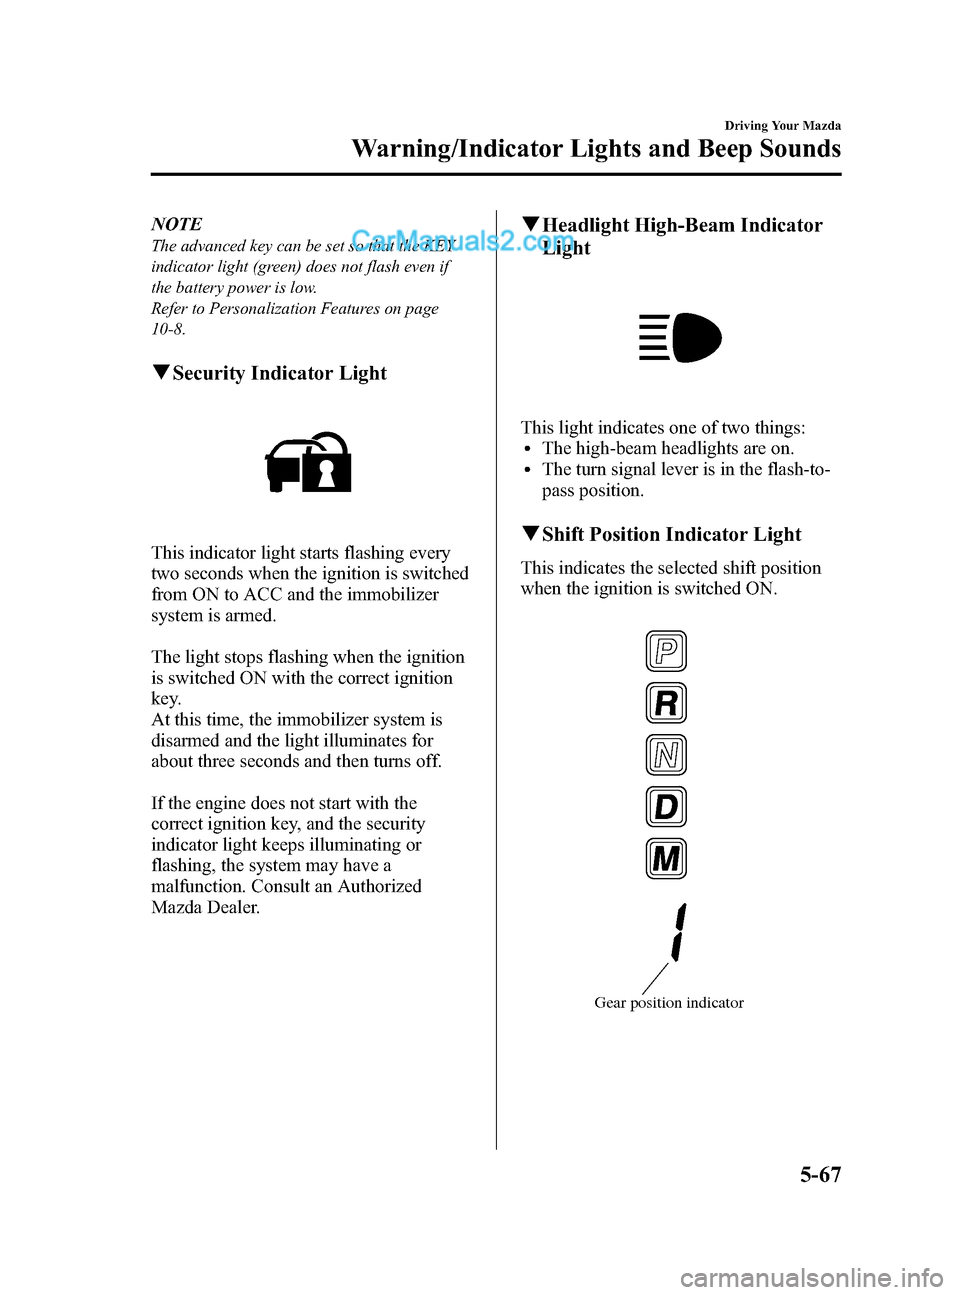
qSecurity Indicator Light
This indicator light starts flashing every
two seconds when the ignition is switched
from ON to ACC and the immobilizer
system is armed.
The light stops flashing when the ignition
is switched ON with the correct ignition
key.
At this time, the immobilizer system is
disarmed and the light illuminates for
about three seconds and then turns off.
If the engine does not start with the
correct ignition key, and the security
indicator light keeps illuminating or
flashing, the system may have a
malfunction. Consult an Authorized
Mazda Dealer.
qHeadlight High-Beam Indicator
Light
This light indicates one of two things:lThe high-beam headlights are on.lThe turn signal lever is in the flash-to-
pass position.
qShift Position Indicator Light
This indicates the selected shift position
when the ignition is switched ON.
Gear position indicator
Driving Your Mazda
Warning/Indicator Lights and Beep Sounds
5-67
CX-9_8DU1-EA-14H_Edition1 Page245
Thursday, June 5 2014 4:18 PM
Form No.8DU1-EA-14H
Page 247 of 604

Black plate (247,1)
Cruise Main Indicator Light (Amber)
The indicator light illuminates amber
when the ON switch is pressed and the
cruise control system is activated.
Cruise Set Indicator Light (Green)
The indicator light illuminates green when
a cruising speed has been set.
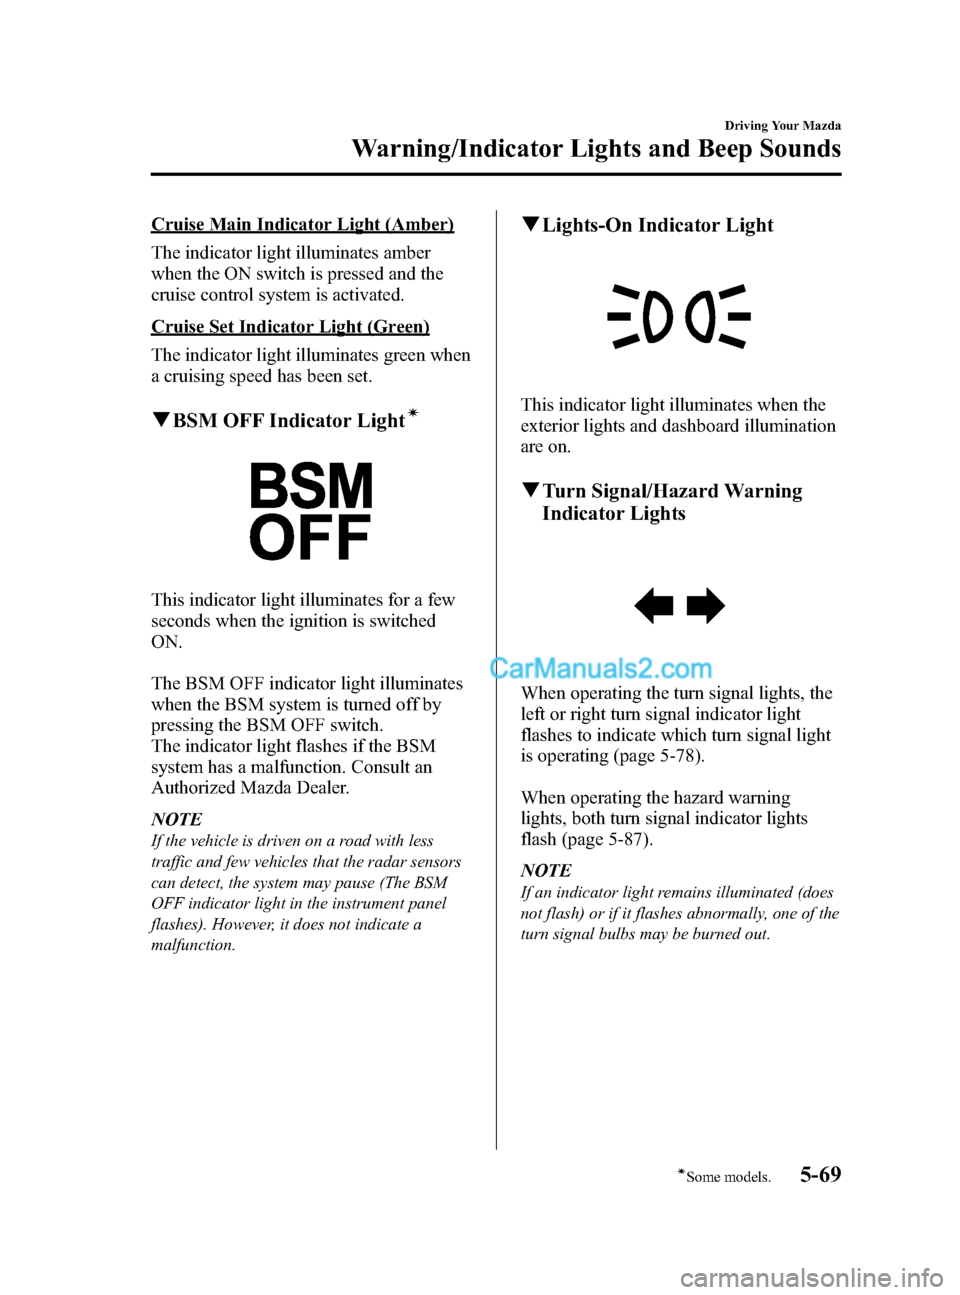
qBSM OFF Indicator Lightí
This indicator light illuminates for a few
seconds when the ignition is switched
ON.
The BSM OFF indicator light illuminates
when the BSM system is turned off by
pressing the BSM OFF switch.
The indicator light flashes if the BSM
system has a malfunction. Consult an
Authorized Mazda Dealer.
NOTE
If the vehicle is driven on a road with less
traffic and few vehicles that the radar sensors
can detect, the system may pause (The BSM
OFF indicator light in the instrument panel
flashes). However, it does not indicate a
malfunction.
qLights-On Indicator Light
This indicator light illuminates when the
exterior lights and dashboard illumination
are on.
qTurn Signal/Hazard Warning
Indicator Lights
When operating the turn signal lights, the
left or right turn signal indicator light
flashes to indicate which turn signal light
is operating (page 5-78).
When operating the hazard warning
lights, both turn signal indicator lights
flash (page 5-87).
NOTE
If an indicator light remains illuminated (does
not flash) or if it flashes abnormally, one of the
turn signal bulbs may be burned out.
Driving Your Mazda
Warning/Indicator Lights and Beep Sounds
5-69íSome models.
CX-9_8DU1-EA-14H_Edition1 Page247
Thursday, June 5 2014 4:18 PM
Form No.8DU1-EA-14H
Page 249 of 604

Black plate (249,1)
qParking Brake Reminder
If the parking brake has not been
completely released and the vehicle is
driven at about 5 km/h (3 mph) or faster, a
continuous beep sound will be heard to
notify the driver that the parking brake
has not been released.
qTire Inflation Pressure Warning
Beepí
The warning beep sound will be heard for
about 3 seconds when there is any
abnormality in tire inflation pressures
(page 5-29).
qAdvanced Keyless Warning (with
Advanced Key)
Warning indicators for the advanced key,
such as “the advanced key removed from
vehicle warning ”, use a beep sound and
warning/indicator lights in the instrument
cluster.
Refer to Warning and Beep Sounds on
page 3-18.
q Blind Spot Monitoring System
Warning Beepí
Driving forward
The warning beep operates when the turn
signal lever is operated to the side where
the BSM warning light is illuminated.
NOTE
The system can be personalized so that the
BSM warning beep does not operate. Refer to
Personalization Features on page 10-8.
Reversing
If vehicles approach from the rear on the
left and right, the BSM warning beep
operates.
Driving Your Mazda
Warning/Indicator Lights and Beep Sounds
5-71íSome models.
CX-9_8DU1-EA-14H_Edition1 Page249
Thursday, June 5 2014 4:18 PM
Form No.8DU1-EA-14H
Page 256 of 604

Black plate (256,1)
Turn and Lane-Change
Signals
Turn signals
Move the signal lever down (for a left
turn) or up (for a right turn) to the stop
position. The signal will self-cancel after
the turn is completed.
If the indicator light continues to flash
after a turn, manually return the lever to
its original position.
(Type A)
Right turnLeft turn
Right lane change
Left lane change OFF
(Type B)
Right turn
Left turn
Right lane change
Left lane change OFF
Green indicators on the dashboard show
which signal is working.
Lane-change signals
Move the lever halfway toward the
direction of the change
―until the
indicator flashes ―and hold it there. It
will return to the off position when
released.
NOTE
If an indicator light stays on without flashing
or if it flashes abnormally, one of the turn
signal bulbs may be burned out.
5-78
Driving Your Mazda
Switches and Controls
CX-9_8DU1-EA-14H_Edition1 Page256
Thursday, June 5 2014 4:18 PM
Form No.8DU1-EA-14H
Page 265 of 604

Black plate (265,1)
Hazard Warning Flasher
The hazard warning lights should always
be used when you stop on or near a
roadway in an emergency.
The hazard warning lights warn other
drivers that your vehicle is a traffic hazard
and that they must take extreme caution
when near it.
Depress the hazard warning flasher and all
the turn signals will flash.
NOTE
lThe turn signals do not work when the
hazard warning lights are on.
lCheck local regulations about the use of
hazard warning lights while the vehicle is
being towed to verify that it is not in
violation of the law.
Driving Your Mazda
Switches and Controls
5-87
CX-9_8DU1-EA-14H_Edition1 Page265
Thursday, June 5 2014 4:18 PM
Form No.8DU1-EA-14H
Page 272 of 604

Black plate (272,1)
5. Press and hold the just-trainedHomeLink button and observe the
indicator light.
If the indicator light stays on constantly,
programming is complete and your
device should activate when the
HomeLink button is pressed and released.
NOTE
To program the remaining two HomeLink
buttons, begin with “Programming ”―step 2.
Do not repeat step 1.
If the indicator light blinks rapidly for
two seconds and then turns to a
constant light, continue with
“ Programming ”steps 6 ―8to complete
the programming of a rolling code
equipped device (most commonly a
garage door opener).
6. At the garage door opener receiver (motor-head unit) in the garage, locate
the “learn ”or “smart ”button. This can
usually be found where the hanging
antenna wire is attached to the motor-
head unit.
7. Firmly press and release the “learn ”or
“ smart ”button. (The name and color of
the button may vary by manufacturer.)
NOTE
There are 30 seconds in which to initiate step
8.
8. Return to the vehicle and firmly press,
hold for two seconds and release the
programmed HomeLink button. Repeat
the “press/hold/release ”sequence a
second time, and, depending on the
brand of the garage door opener (or
other rolling code equipped device),
repeat this sequence a third time to
complete the programming process. HomeLink should now activate your
rolling code equipped device.
NOTE
To program the remaining two HomeLink
buttons, begin with
“Programming ”―step 2.
Do not repeat step 1.
For questions or comments, please contact
HomeLink at www.homelink.com or1-
800-355-3515.
Gate operator/Canadian Programming
Canadian radio-frequency laws require
transmitter signals to “time-out ”(or quit)
after several seconds of transmission ―
which may not be long enough for
HomeLink to pick up the signal during
programming. Similar to this Canadian
law, some U.S. gate operators are
designed to “time-out ”in the same
manner.
If you live in Canada or you are having
difficulties programming a gate operator
by using the “Programming ”procedures
(regardless of where you live), replace
“ Programming HomeLink ”step 3 with
the following:
NOTE
If programming a garage door opener or gate
operator, it is advised to unplug the device
during the “cycling ”process to prevent
possible overheating.
Continue to press and hold the HomeLink
button while you press and release ―
every two seconds (“ cycle ”) your hand-
held transmitter until the frequency signal
has successfully been accepted by
HomeLink. (The indicator light will flash
slowly and then rapidly.) Proceed with
“ Programming ”step 4 to complete.
5-94
Driving Your Mazda
Switches and Controls
CX-9_8DU1-EA-14H_Edition1 Page272
Thursday, June 5 2014 4:18 PM
Form No.8DU1-EA-14H
Page 311 of 604

Black plate (311,1)
Benefits of HD Radio™Technology
(Information)
The song title, artist name and genre will
appear on the screen when available by
the radio station.
(Multicast)
On the FM radio frequency most digital
stations have “multiple ”or supplemental
programs on each FM station.
Listening to HD Radio ™Technology
If
turns on by selecting a radio
station which is an
broadcasting station, the analog broadcast
is switched to an
broadcast
automatically after a few seconds and then
received. For FM,
, and for AM,
is displayed, and theilluminates
in orange.
If the HD Radio broadcast is stopped and
changed to an analog broadcast, press
down
to turn off.
Multicast channel selection (FM)
Press
on-screen button to
switch to the multi-cast channel for the
displayed number.
The number of multi-cast channels which
can be received differs depending on the
radio station. NOTE
lIf an analog broadcast is received once and
is received while HD1 is
selected, the audio unit switches to the
station automatically.lWhen thebutton is
illuminated, there could be a noticeable
difference in sound quality and volume
when a change from digital to analog
signals occurs. If the sound quality and
volume become noticeably diminished or
cut off, touch the HD button to turn off
(button is not
illuminated).
lOnce an analog broadcast is received when
HD1 is selected from the preset channels, it
is switched to
automatically. If
the radio reception conditions are poor, or
is off, switching to
broadcasts is not possible.lWhen an HD specialty channel (HD2 to
HD8) is selected from the preset channels,
“ No HD signal ”is displayed and no audio
is output until
is received. If
the radio reception conditions are poor,
“ No HD signal ”continues to be displayed.
lIf theis not illuminated or does not
illuminate in orange, information such as
song titles of the
station are
received, however, the audio output is
analog. If information can no longer be
received and the non-reception condition
continues,
andon-
screen buttons disappear.
Interior Comfort
Audio System
6-37
CX-9_8DU1-EA-14H_Edition1 Page311
Thursday, June 5 2014 4:18 PM
Form No.8DU1-EA-14H
Page 351 of 604

Black plate (351,1)
Before Operation
qDisplay Opening/Closing
CAUTION
Ø Close the display while the Rear
Entertainment System is not in
use. If the display is left open, a
passenger could be injured by
hitting the display, or the display
could be damaged.
Ø Do not press the monitor screen
while opening the display. It may
cause a malfunction.
Opening the display
Press the monitor screen release knob and
open the display until it is in the lock
position.
Monitor screen
release Knob
Closing the display
Close and press the display until a
clicking sound can be heard. NOTE
lIf the display is closed while the power is
on, it automatically turns off.
lThe display locks in two positions when
opened to 100 or 120-degrees.
q
Disc Insertion/Ejection
CAUTION
If the signal surface of a disc is
touched, it could cause the sound to
skip. Pick up a disc by grasping the
edge of the hole and the outer edge.
NOTE
When no disc is inserted, “No Disc ”is
displayed on the monitor.
Interior Comfort
Rear Entertainment System
6-77
CX-9_8DU1-EA-14H_Edition1 Page351
Thursday, June 5 2014 4:19 PM
Form No.8DU1-EA-14H
Page 357 of 604

Black plate (357,1)
Sound Output
qSound Output from Vehicle Speakers
Press the audio button () andon-screen tab. “AUX ”is displayed on the audio
display and it changes to the Rear Entertainment System sound.
Sound/Music being played by the Rear Entertainment System can be heard from the
vehicle speakers.
Adjust the volume with the dial on the audio unit.
q Using the Headphone Speakers
CAUTION
Ø For safety reasons, the driver should never wear the headphones while driving.
Not being able to hear sound outside of the vehicle could result in a serious
accident.
Ø Use the headphones with the volume set at moderate level. Listening at an
excessive volume level for extended periods of time will have an adverse effect on
your hearing ability.
Ø If the headphone arms are spread excessively is could result in damage.
Ø Do not apply excessive force to the headphones or get them wet. Also, do not
leave the headphones in a place exposed to direct sunlight or high temperature. It
could cause a malfunction.
NOTE
lTo listen to audio other than from the speakers of the rear entertainment system, it is necessary to
use the wireless headphones that are included. For headphone specification, refer to
“ Operation Tips for Headphones ”(page 6-73).
lWhen the headphones are not in use, turn them off.lIf there is no sound produced from a signal for 3 minutes or longer after the headphone power is
turned on, or there is no signal reception, the headphone power turns off automatically.
lIf the headphones are continuously used for 4 hours or more after the sound signal is received, the
headphone power turns off automatically.
Interior Comfort
Rear Entertainment System
6-83
CX-9_8DU1-EA-14H_Edition1 Page357
Thursday, June 5 2014 4:19 PM
Form No.8DU1-EA-14H
Page 388 of 604

Black plate (388,1)
Symptoms and Actions
If any malfunction is suspected, verify the following before requesting a repair.
If the problem cannot be solved after performing the procedure, have the system inspected
at an Authorized Mazda Dealer.
Some functions are not available depending on the disc. Read the instruction manual
attached to the disc before operating.
SymptomCause Action
System
cannot be
turned on The ignition is switched off.
Switch the ignition to ACC or ON.
The remote controller batteries are
weak. Replace the batteries with new ones.
Refer to Remote Controller on page 6-81.
Remote controller batteries poles are
pointed in the wrong direction. Install the batteries in the correct direction.
Refer to Remote Controller on page 6-81.
The vehicle battery is weak. Recharge or replace the vehicle battery.
The cabin temperature
(Rear Entertainment System unit tem-
perature) is high. Retry after the temperature has lowered.
Image
cannot be
displayed The ignition is switched off.
Switch the ignition to ACC or ON.
No disc is inserted. Insert a disc.
An invalid disc is inserted. Insert a disc which can be played by this unit.
Refer to Operating Tips for Disc on page 6-66.
The wrong mode has been selected. Select the correct mode by pressing the SOURCE button.
Refer to Mode on page 6-87.
Disc cannot
be played No disc is inserted.
Insert a disc.
Disc is inserted upside down. Insert the disc with the label-side up.
Parent lock level is set. Clear or change the parent lock level.
Sound
cannot be
output The ignition is switched off.
Switch the ignition to ACC or ON.
Volume is too low. Adjust the volume.
The audio unit is not set in the Rear
Entertainment System mode. Set the audio unit in the Rear Entertainment System mode.
Refer to Sound Output on page 6-83.
An invalid disc has been inserted. Insert a disc which can be played by this unit.
Refer to Operating Tips for Disc on page 6-66.
No disc is inserted. Insert a disc.
Disc is inserted upside down. Insert the disc with the label-side up.
Playback has been paused. Cancel the pause.
The playback is in slow, fast-forward, or
reverse mode. Select normal playback.
Refer to Basic Operation on page 6-88.
Audio is not
output from
vehicle's
speakers or
headphones DTS format language is selected and
played back.
(The vehicle speakers and wireless
headphones cannot playback DTS for-
mat language)
Select audio other than DTS format.
Image
and/or sound
is distorted. The disc is dirty.
Clean the signal surface of the disc.
The disc has a scratch. Replace the disc with another one.
Dew condensation on the disc Clear the dew condensation.
6-114
Interior Comfort
Rear Entertainment System
CX-9_8DU1-EA-14H_Edition1 Page388
Thursday, June 5 2014 4:19 PM
Form No.8DU1-EA-14H