key MAZDA MODEL CX-9 2015 Smart Start Guide (in English)
[x] Cancel search | Manufacturer: MAZDA, Model Year: 2015, Model line: MODEL CX-9, Model: MAZDA MODEL CX-9 2015Pages: 18, PDF Size: 5.42 MB
Page 2 of 18
12
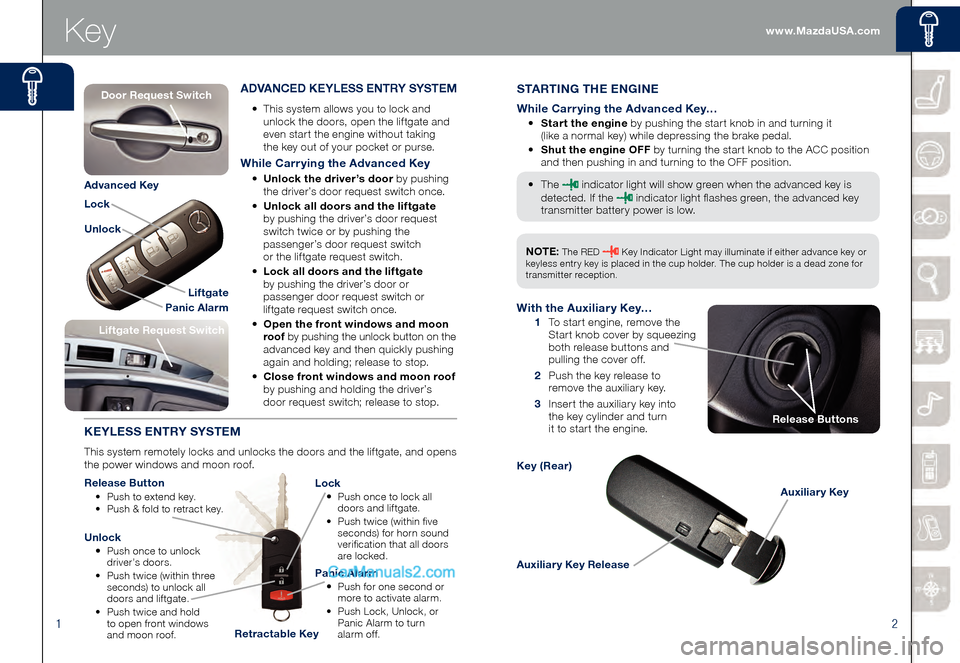
Key
Auxiliary Key Release
Auxiliary Key
Key (Rear)
STARTING THE ENGINE
While Carrying the Advanced Key…
• Start the engine by pushing the start knob in and turning it
(like a normal key) while depressing the brake pedal.
• Shut the engine OFF by turning the start knob to the ACC position
and then pushing in and turning to the OFF position.
• The indicator light will show green when the advanced key is
detected. If the indicator light flashes green, the advanced key
transmitter battery power is low.
ADVANCED KEYLESS ENTRY SYSTEM
• This system allows you to lock and
unlock the doors, open the liftgate and
even start the engine without taking
the key out of your pocket or purse.
While Carrying the Advanced Key
• Unlock the driver’s door by pushing
the driver’s door request switch once.
• Unlock all doors and the liftgate
by pushing the driver’s door request
switch twice or by pushing the
passenger’s door request switch
or the liftgate request switch.
• Lock all doors and the liftgate
by pushing the driver’s door or
passenger door request switch or
liftgate request switch once.
• Open the front windows and moon
roof by pushing the unlock button on the
advanced key and then quickly pushing
again and holding; release to stop.
• Close front windows and moon roof
by pushing and holding the driver’s
door request switch; release to stop.
KEYLESS ENTRY SYSTEM
This system remotely locks and unlocks the doors and the liftgate, and opens
the power windows and moon roof.
Release Button
• Push to extend key. • Push & fold to retract key.
Lock
• Push once to lock all
doors and liftgate.
• Push twice (within five
seconds) for horn sound
verification that all doors
are locked.
Unlock
• Push once to unlock
driver’s doors.
• Push twice (within three
seconds) to unlock all
doors and liftgate.
• Push twice and hold
to open front windows
and moon roof.
Panic Alarm
• Push for one second or
more to activate alarm.
• Push Lock, Unlock, or
Panic Alarm to turn
alarm of f.
Liftgate Request Switch
With the Auxiliary Key…
1 To start engine, remove the
Start knob cover by squeezing
both release buttons and
pulling the cover off.
2 Push the key release to
remove the auxiliary key.
3 Insert the auxiliary key into the key cylinder and turn
it to start the engine.
Liftgate
Panic Alarm
Lock
Unlock
Advanced Key
Retractable Key
Release Buttons
NOTE: The RED Key Indicator Light may illuminate if either advance key or
keyless entry key is placed in the cup holder. The cup holder is a dead zone for
transmitter reception.
Door Request Switch
www.MazdaUSA.com
Page 3 of 18
34
To Program the Driver’s Seat Position and Outside Mirror Angle
1 Park the vehicle.
2 Adjust the seat to the desired position using the slide/tilt and
recline switches.
3 Adjust the outside mirror angles.
4 Push the memory seat SET button followed by one of the programming
buttons (1-3) until a beep is heard. Programming is now complete.
Program the remaining two buttons as desired.
To Program the Driver’s Seat Position and Outside Mirror Angle
with Advanced key/Retractable type key
1 Adjust the seat and outside mirror angle to the desired positions.
2 Switch the ignition off.
3 Push the SET button next to the programming buttons and then the
unlock button on the advanced key/retractable type key you want to
program within about 5 seconds. A beep sound is heard when the
operation is completed.
NOTE:
When the driver's door is unlocked using a programmed advanced key/
retractable type key, the seat and outside mirror angles will move to their programmed
positions if the driver's door is opened within about 40 seconds. A beep sound is
heard after the adjustment to the programmed positions is completed.
To Move the Seat and Outside Mirrors to a Programmed Position
1 Shift the selector lever to the P position.
2 Push the programming button (1-3) that you selected when
programming your seat position.
Seats
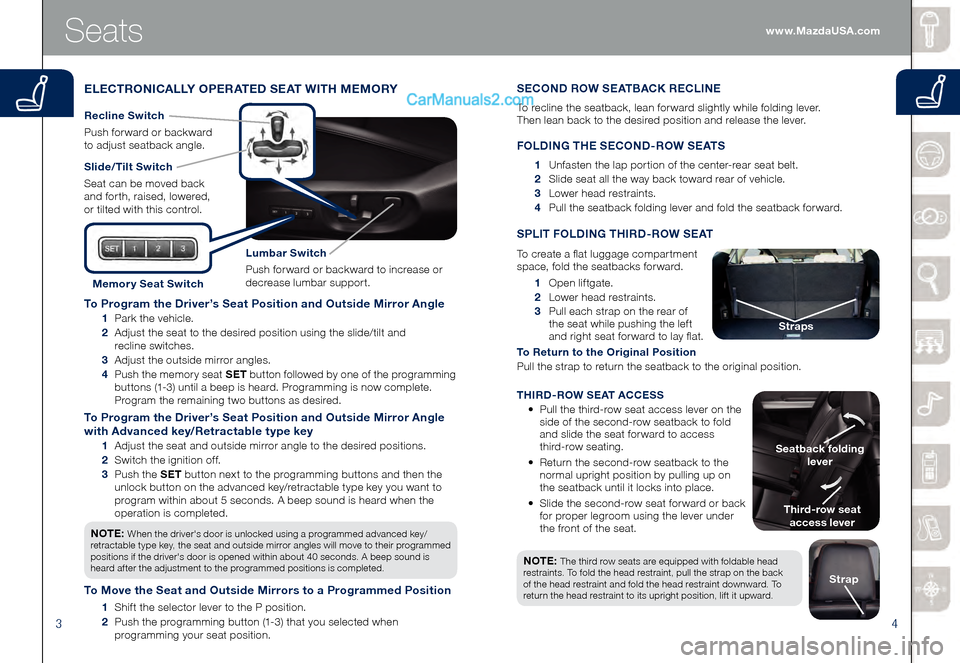
ELECTRONICALLY OPERATED SEAT WITH MEMORY
Slide/Tilt Switch
Seat can be moved back
and forth, raised, lowered,
or tilted with this control.
Lumbar Switch
Push forward or backward to increase or
decrease lumbar support.
Recline Switch
Push forward or backward
to adjust seatback angle.
Memor y Seat Switch 1 Open liftgate.
2 Lower head restraints.
3 Pull each strap on the rear of
the seat while pushing the left
and right seat forward to lay flat.
To Return to the Original Position
Pull the strap to return the seatback to the original position.
SPLIT FOLDING THIRD-ROW SEAT
To create a flat luggage compartment
space, fold the seatbacks forward.
Third-row seat
access lever
Seatback folding
lever
Straps
NOTE: The third row seats are equipped with foldable head
restraints. To fold the head restraint, pull the strap on the back
of the head restraint and fold the head restraint downward. To
return the head restraint to its upright position, lift it upward.
Strap
SECOND ROW SEATBACK RECLINE
To recline the seatback, lean forward slightly while folding lever.
Then lean back to the desired position and release the lever.
FOLDING THE SECOND-ROW SEATS
1 Unfasten the lap portion of the center-rear seat belt.
2 Slide seat all the way back toward rear of vehicle.
3 Lower head restraints.
4 Pull the seatback folding lever and fold the seatback forward.
THIRD-ROW SEAT ACCESS
• Pull the third-row seat access lever on the
side of the second-row seatback to fold
and slide the seat forward to access
third-row seating.
• Return the second-row seatback to the
normal upright position by pulling up on
the seatback until it locks into place.
• Slide the second-row seat forward or back
for proper legroom using the lever under
the front of the seat. www.MazdaUSA.com
Page 5 of 18
78
Instrument Cluster
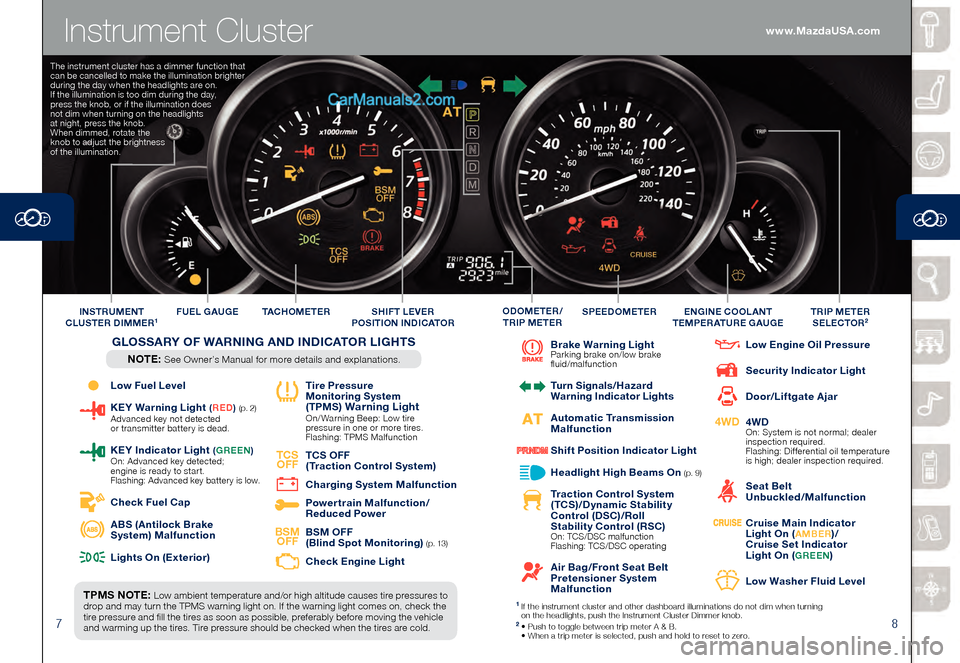
Low Fuel Level
KEY Warning Light (RED ) (p. 2) Advanced key not detected
or transmitter batter y is dead.
KEY Indicator L ight (GREEN ) On: Advanced key detected;
engine is ready to start.
Flashing: Advanced key batter y is low.
Check Fuel Cap
ABS (Antilock Brake
System) Malfunction
Lights On (Exterior)
Tire Pressure
Monitoring System
(TPMS
) Warning Light On/ Warning Beep: Low tire
pressure in one or more tires.
Flashing: TPMS Malfunction
TCS OFF
TCS OFF
(Traction Control System)
Charging System Malfunction
Powertrain Malfunction/
Reduced Power
BSM OFF
BSM OFF
(Blind Spot Monitoring) ( p. 13)
Check Engine Light
Brake Warning Light Parking brake on/low brake
fluid/malfunction
Turn Signals/Hazard
Warning Indicator Lights
Automatic Transmission
Malfunction
Shift Position Indicator Light
Headlight High Beams On (p. 9)
Traction Control System
(TCS)/Dynamic Stability
Control (DSC)/Roll
Stability Control (RSC)
On: TCS/DSC malfunction
Flashing: TCS/DSC operating
Air Bag/Front Seat Belt
Pretensioner System
Malfunction
Low Engine Oil Pressure
Security Indicator Light
Door/Liftgate Ajar
4WD
4WD On: System is not normal; dealer
inspection required.
Flashing: Differential oil temperature
is high; dealer inspection required.
Seat Belt
Unbuckled/Malfunction
Cruise Main Indicator
Light On (AMBER)/
Cruise Set Indicator
Light On (
GREEN)
Low Washer Fluid Level
TPMS NOTE: Low ambient temperature and/or high altitude causes tire pressures to
drop and may turn the TPMS warning light on. If the warning light comes on, check the
tire pressure and fill the tires as soon as possible, preferably before moving the vehicle
and warming up the tires. Tire pressure should be checked when the tires are cold. TAC H O M E T E R
FUEL GAUGE
SPEEDOMETERTRIP METER
SELECTOR2INSTRUMENT
CLUSTER DIMMER1ENGINE COOLANT
TEMPERATURE GAUGEODOMETER/
TRIP METERSHIFT LEVER
POSITION INDICATOR
GLOSSARY OF WARNING AND INDICATOR LIGHTS
NOTE: See Owner’s Manual for more details and explanations.
1 If the instrument cluster and other dashboard illuminations do not dim when tur ning
on the headlights, push the Instrument Cluster Dimmer knob.
2 • Push to toggle between trip meter A & B. • When a trip meter is selected, push and hold to reset to zer o.
The instrument cluster has a dimmer function that
can be cancelled to make the illumination brighter
during the day when the headlights are on.
If the illumination is too dim during the day,
press the knob, or if the illumination does
not dim when turning on the headlights
at night, press the knob.
When dimmed, rotate the
knob to adjust the brightness
of the illumination.
www.MazdaUSA.com
Page 9 of 18
1516
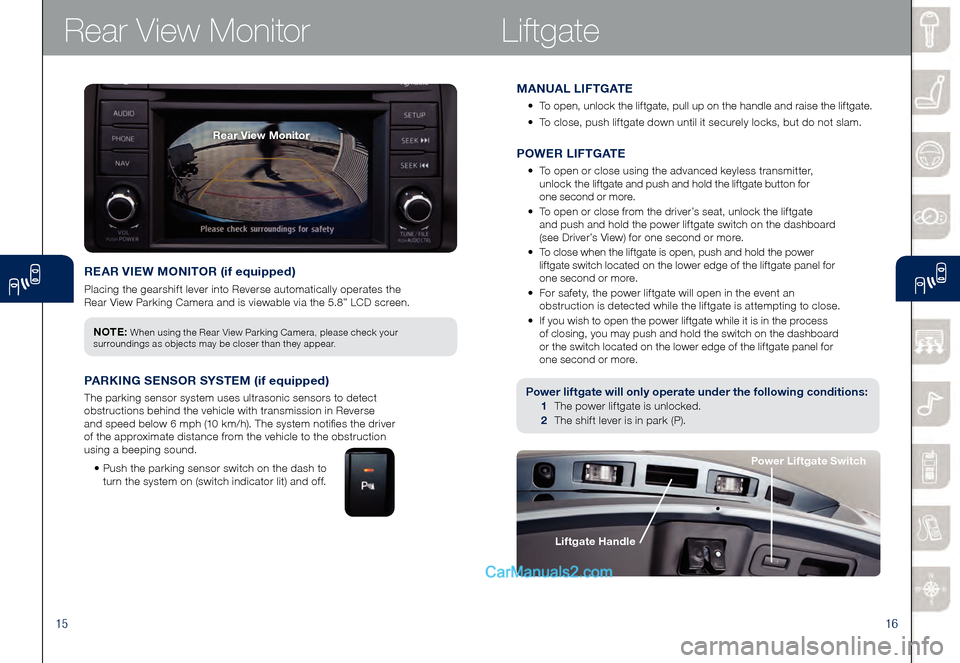
REAR VIEW MONITOR (if equipped)
Placing the gearshift lever into Reverse automatically operates the
Rear View Parking Camera and is viewable via the 5.8” LCD screen.
Rear View MonitorLiftgate
Power liftgate will only operate under the following conditions:
1 The power liftgate is unlocked.
2 The shift lever is in park (P).
NOTE: When using the Rear View Parking Camera, please check your
surroundings as objects may be closer than they appear.
PARKING SENSOR SYSTEM (if equipped)
The parking sensor system uses ultrasonic sensors to detect
obstructions behind the vehicle with transmission in Reverse
and speed below 6 mph (10 km/h). The system notifies the driver
of the approximate distance from the vehicle to the obstruction
using a beeping sound.
• Push the parking sensor switch on the dash to
turn the system on (switch indicator lit) and off.
Liftgate Handle
Power Liftgate Switch
MANUAL LIFTGATE
• To open, unlock the liftgate, pull up on the handle and raise the liftgate.
• To close, push liftgate down until it securely locks, but do not slam.
Rear View Monitor
POWER LIFTGATE
• To open or close using the advanced keyless transmitter,
unlock the liftgate and push and hold the liftgate button for
one second or more.
• To open or close from the driver’s seat, unlock the liftgate
and push and hold the power liftgate switch on the dashboard
(see Driver’s View) for one second or more.
• To close when the liftgate is open, push and hold the power
liftgate switch located on the lower edge of the liftgate panel for
one second or more.
• For safety, the power liftgate will open in the event an
obstruction is detected while the liftgate is attempting to close.
• If you wish to open the power liftgate while it is in the process
of closing, you may push and hold the switch on the dashboard
or the switch located on the lower edge of the liftgate panel for
one second or more.
Page 13 of 18
2324
Navigation
6 Enter the street name.
7 Enter the house number, then touch Done.
8 The location is shown on the map. Touch Select to continue or Back
to enter another address.
9 When the new route is shown, touch Done .
For more information about the route, touch Details .
PLANNING A ROUTE USING YOUR VOICE
You can navigate to any of the following places using your voice:
• An address, including home .
• Fav
orites.
• Ci
ties and towns.
• PO
I (Point of Interest) categories. • PO Is for named brands of,
for example, restaurants, gas
stations, car rental and gyms.
• A re
cent destination.
NOTE: POI in a city searches the system in your present location.
To plan a route to an address using your voice, do the following:NOTE:
Planning a route using your voice can be done while driving the vehicle.
1 Touch the voice control button in the Driving view.
2 When you hear the tone, you can say, for example “Drive to
a n a d d r e s s ”.
3 Say the full address (without zip code) for your destination. For
example “123 Main St., Los Angeles, California”. The system does
not recognize zip codes.
NOTE:
For best results, say the full address without pausing between words.
4 Say “Yes” if the address is correct. If shown a list of addresses, say
the list number for the correct address or say “none of these”.
NAVIGATION SYSTEM FEATURES:
• While driving your vehicle, you can enter a destination address
using your voice, but you cannot enter a destination address using
the keyboard.
• While driving your vehicle, the vehicle speed and the maximum
speed limit (for most roads) can be seen on the bottom left tabs of
the Navigation screen.
NOTE:
• Voice guidance can be skipped by pushing the talk button.
• Refer to the Navigation System Owners Manual for additional navigation
system details or visit www.mazdausa.com/navigation
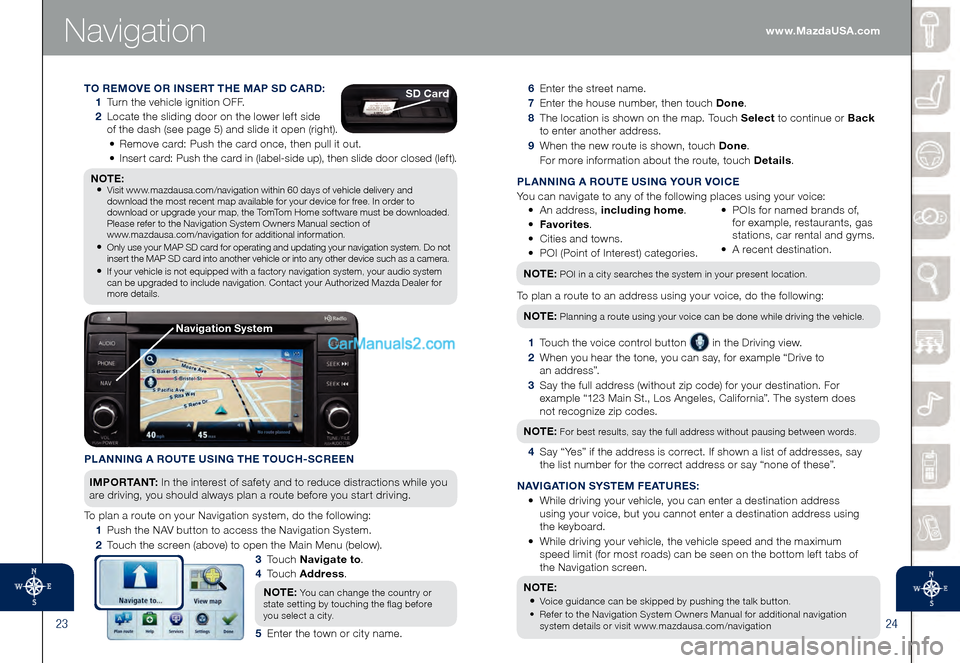
PLANNING A ROUTE USING THE TOUCH-SCREEN
I M P O R TA N T : In the interest of safety and to reduce distractions while you
are driving, you should always plan a route before you start driving.
To plan a route on your Navigation system, do the following:
1 Push the NAV button to access the Navigation System.
2 Touch the screen (above) to open the Main Menu (below).
3 To u c h Navigate to .
4
To u c h Address .
NOTE:
You can change the country or
state setting by touching the flag before
you select a city.
5 Enter the town or city name.
TO REMOVE OR INSERT THE MAP SD CARD:
1 Turn the vehicle ignition OFF.
2 Locate the sliding door on the lower left side
of the dash (see page 5) and slide it open (right).
• Remove card: Push the card once, then pull it out.
• Insert card: Push the card in (label-side up), then slide door closed (left).
NOTE: • Visit www.mazdausa.com/navigation within 60 days of vehicle delivery and
download the most recent map available for your device for free. In order to
download or upgrade your map, the TomTom Home software must be downloaded.
Please refer to the Navigation System Owners Manual section of
www.mazdausa.com/navigation for additional information.
• Only use your MAP SD card for operating and updating your navigation system. Do not insert the MAP SD card into another vehicle or into any other device such as a camera.
• If your vehicle is not equipped with a factory navigation system, your audio system can be upgraded to include navigation. Contact your Authorized Mazda Dealer for
more details.
SD Card
Navigation System
www.MazdaUSA.com
Page 17 of 18
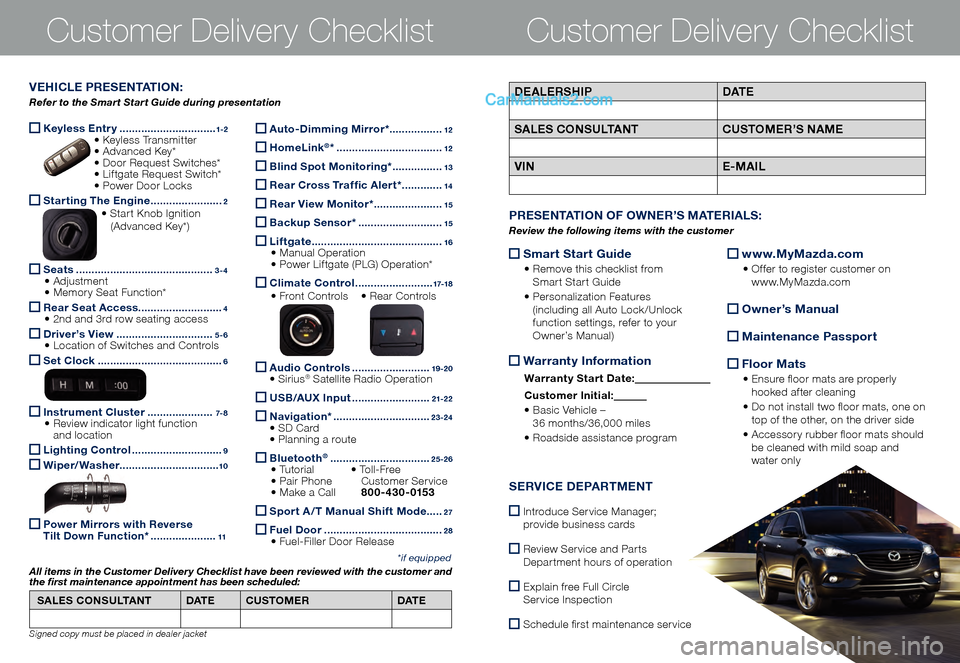
Keyless Entry ...............................1-2 • K
eyless Transmitter • Advanced Key* • Do or Request Switches* • Liftgate Request Switch* • Po wer Door Locks
Starting The Engine .......................2 • Start Knob Ignition (Advanced Key*)
Seats ............................................3-4 • Adjustment • Memory Seat Function*
Rear Seat Access
...........................4 • 2nd and 3rd row seating access
Driver’s View ...............................5-6 • Location of Switches and Controls
Set Clock ........................................6
Instrument Cluster .....................7- 8 • Review indicator light function
and location
Lighting Control .............................9
Wiper/Washer
................................10
Power Mirrors with Reverse
Tilt Down Function* .....................11
Customer Delivery ChecklistCustomer Delivery Checklist
*if equipped
DEALERSHIP DAT E
SALES CONSULTANT CUSTOMER’S NAME
VIN E-MAILVEHICLE PRESENTATION:
Refer to the Smart Start Guide during presentation
Auto-Dimming Mirror* .................12
HomeLink®* ..................................12
Blind Spot Monitoring* ................13
Rear Cross Traffic Alert* .............14
Rear View Monitor* ......................15
Backup Sensor* ...........................15
Liftgate ..........................................16 • Manual Operation • Power Liftgate (PLG) Operation*
Climate Control .........................17-18
• Front Controls • Re
ar Controls
Audio Controls .........................19 -2 0 • Sirius® Satellite Radio Operation
USB/AUX Input .........................21-2 2
Navigation* ...............................23-24 • SD Card • Planning a route
Bluetooth® ................................25-26 • Tutorial • To l l - F r e e • Pair Phone
Cu stomer Service • Make a Call 800-430-0153
Sport A /T Manual Shift Mode .....27
Fuel Door ......................................2 8 • Fuel-Filler Door Release
SALES CONSULTANT
DAT ECUSTOMER DAT E
All items in the Customer Deliver y Checklist have been reviewed with the customer and
the first maintenance appointment has been scheduled:
Signed copy must be placed in dealer jacket
Smart Start Guide
• Remove this checklist from
Smart Start Guide
• Personalization Features
(including all Auto Lock/Unlock
function settings, refer to your
Owner’s Manual)
Warranty Information
Warranty Start Date:
Customer Ini tial:
• Basic Vehicle –
36 months/36,000 miles
• Roadside assistance program
www.MyMazda.com
• Offer to register customer on
www.MyMazda.com
Owner’s Manual
Maintenance Passport
Floor Mats
• Ensure floor mats are properly
hooked after cleaning
• Do not install two floor mats, one on
top of the other, on the driver side
• Accessory rubber floor mats should
be cleaned with mild soap and
water only
PRESENTATION OF OWNER’S MATERIALS:
Review the following items with the customer
SERVICE DEPARTMENT
Introduce Service Manager;
provide business cards
Review Service and Parts
Department hours of operation
Explain free Full Circle
Service Inspection
Schedule first maintenance service