tow MAZDA MODEL CX-9 2015 Smart Start Guide (in English)
[x] Cancel search | Manufacturer: MAZDA, Model Year: 2015, Model line: MODEL CX-9, Model: MAZDA MODEL CX-9 2015Pages: 18, PDF Size: 5.42 MB
Page 3 of 18

34
To Program the Driver’s Seat Position and Outside Mirror Angle
1 Park the vehicle.
2 Adjust the seat to the desired position using the slide/tilt and
recline switches.
3 Adjust the outside mirror angles.
4 Push the memory seat SET button followed by one of the programming
buttons (1-3) until a beep is heard. Programming is now complete.
Program the remaining two buttons as desired.
To Program the Driver’s Seat Position and Outside Mirror Angle
with Advanced key/Retractable type key
1 Adjust the seat and outside mirror angle to the desired positions.
2 Switch the ignition off.
3 Push the SET button next to the programming buttons and then the
unlock button on the advanced key/retractable type key you want to
program within about 5 seconds. A beep sound is heard when the
operation is completed.
NOTE:
When the driver's door is unlocked using a programmed advanced key/
retractable type key, the seat and outside mirror angles will move to their programmed
positions if the driver's door is opened within about 40 seconds. A beep sound is
heard after the adjustment to the programmed positions is completed.
To Move the Seat and Outside Mirrors to a Programmed Position
1 Shift the selector lever to the P position.
2 Push the programming button (1-3) that you selected when
programming your seat position.
Seats
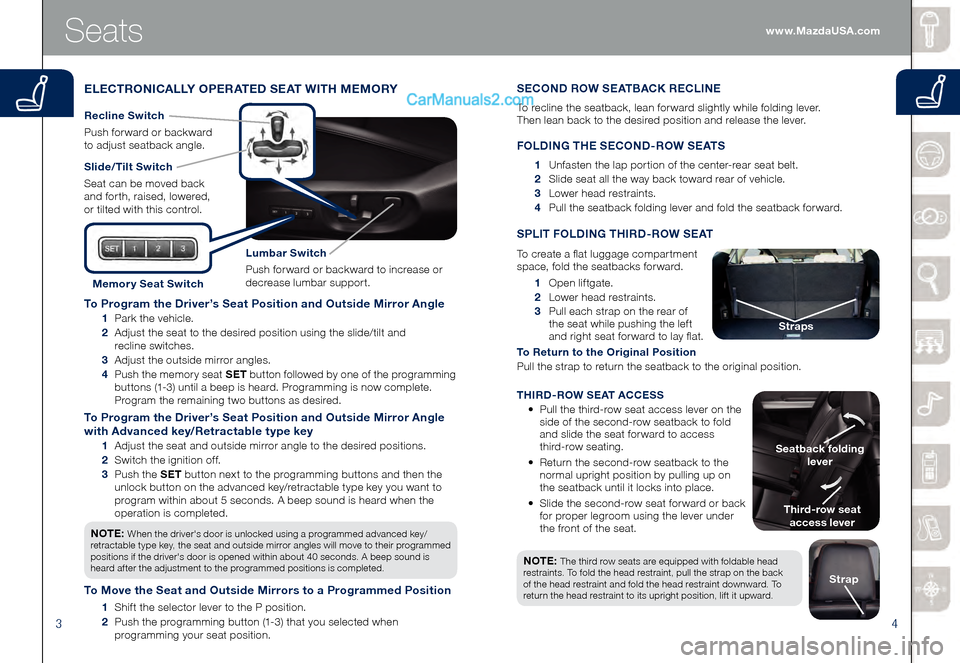
ELECTRONICALLY OPERATED SEAT WITH MEMORY
Slide/Tilt Switch
Seat can be moved back
and forth, raised, lowered,
or tilted with this control.
Lumbar Switch
Push forward or backward to increase or
decrease lumbar support.
Recline Switch
Push forward or backward
to adjust seatback angle.
Memor y Seat Switch 1 Open liftgate.
2 Lower head restraints.
3 Pull each strap on the rear of
the seat while pushing the left
and right seat forward to lay flat.
To Return to the Original Position
Pull the strap to return the seatback to the original position.
SPLIT FOLDING THIRD-ROW SEAT
To create a flat luggage compartment
space, fold the seatbacks forward.
Third-row seat
access lever
Seatback folding
lever
Straps
NOTE: The third row seats are equipped with foldable head
restraints. To fold the head restraint, pull the strap on the back
of the head restraint and fold the head restraint downward. To
return the head restraint to its upright position, lift it upward.
Strap
SECOND ROW SEATBACK RECLINE
To recline the seatback, lean forward slightly while folding lever.
Then lean back to the desired position and release the lever.
FOLDING THE SECOND-ROW SEATS
1 Unfasten the lap portion of the center-rear seat belt.
2 Slide seat all the way back toward rear of vehicle.
3 Lower head restraints.
4 Pull the seatback folding lever and fold the seatback forward.
THIRD-ROW SEAT ACCESS
• Pull the third-row seat access lever on the
side of the second-row seatback to fold
and slide the seat forward to access
third-row seating.
• Return the second-row seatback to the
normal upright position by pulling up on
the seatback until it locks into place.
• Slide the second-row seat forward or back
for proper legroom using the lever under
the front of the seat. www.MazdaUSA.com
Page 6 of 18

910
Lights
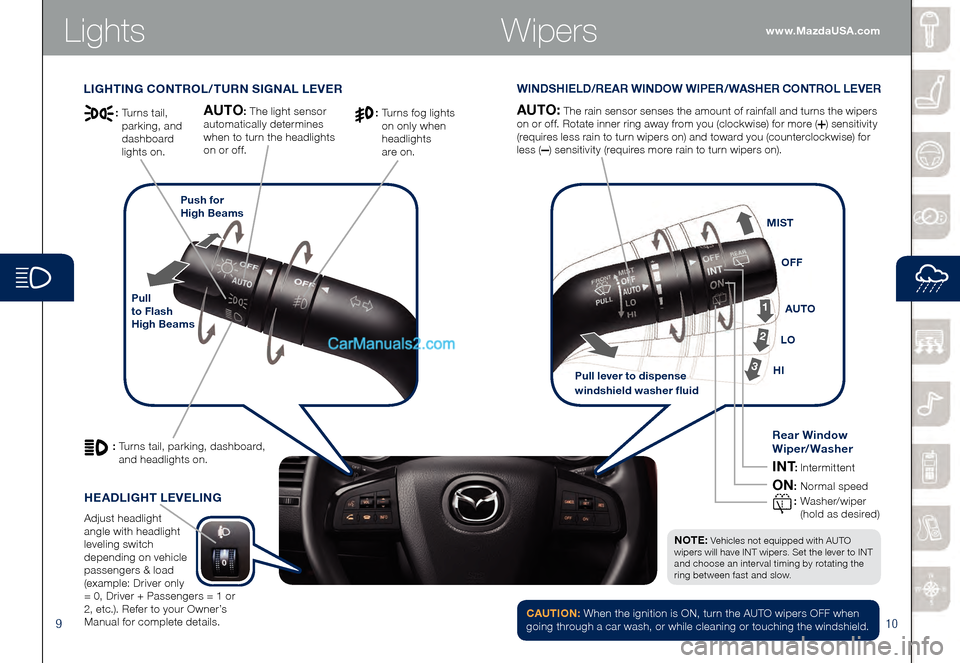
LIGHTING CONTROL/TURN SIGNAL LEVERWINDSHIELD/REAR WINDOW WIPER/WASHER CONTROL LEVER
Pull
to Flash
High BeamsPush for
High Beams
AUTO: The rain sensor senses the amount of rainfall and turns the wipers
on or off. Rotate inner ring away from you (clockwise) for more (
) sensitivity
(requires less rain to turn wipers on) and toward you (counterclockwise) for
less (
) sensitivity (requires more rain to turn wipers on).
AUTO: The light sensor
automatically determines
when to turn the headlights
on or off.
: Turns tail, parking, dashboard,
and headlights on.
: Turns fog lights
on only when
headlights
are on.: Turns tail,
parking, and
dashboard
lights on.
NOTE: Vehicles not e quipped with AUTO
wipers will have INT wipers. Set the lever to INT
and choose an interval timing by rotating the
ring between fast and slow.
HEADLIGHT LEVELING
Adjust headlight
angle with headlight
leveling switch
depending on vehicle
passengers & load
(example: Driver only
= 0, Driver + Passengers = 1 or
2, etc.). Refer to your Owner’s
Manual for complete details.
Pull lever to dispense
windshield washer fluid
1
2
3HI LOAUTO
OFF
MIST
Rear Window
Wiper/Washer
INT: Intermittent
ON: Normal speed
: W ashe r/w ip e r
(hold as desired)
CAUTION: When the ignition is ON, turn the AUTO wipers OFF when
going through a car wash, or while cleaning or touching the windshield.
Wiperswww.MazdaUSA.com
Page 13 of 18

2324
Navigation
6 Enter the street name.
7 Enter the house number, then touch Done.
8 The location is shown on the map. Touch Select to continue or Back
to enter another address.
9 When the new route is shown, touch Done .
For more information about the route, touch Details .
PLANNING A ROUTE USING YOUR VOICE
You can navigate to any of the following places using your voice:
• An address, including home .
• Fav
orites.
• Ci
ties and towns.
• PO
I (Point of Interest) categories. • PO Is for named brands of,
for example, restaurants, gas
stations, car rental and gyms.
• A re
cent destination.
NOTE: POI in a city searches the system in your present location.
To plan a route to an address using your voice, do the following:NOTE:
Planning a route using your voice can be done while driving the vehicle.
1 Touch the voice control button in the Driving view.
2 When you hear the tone, you can say, for example “Drive to
a n a d d r e s s ”.
3 Say the full address (without zip code) for your destination. For
example “123 Main St., Los Angeles, California”. The system does
not recognize zip codes.
NOTE:
For best results, say the full address without pausing between words.
4 Say “Yes” if the address is correct. If shown a list of addresses, say
the list number for the correct address or say “none of these”.
NAVIGATION SYSTEM FEATURES:
• While driving your vehicle, you can enter a destination address
using your voice, but you cannot enter a destination address using
the keyboard.
• While driving your vehicle, the vehicle speed and the maximum
speed limit (for most roads) can be seen on the bottom left tabs of
the Navigation screen.
NOTE:
• Voice guidance can be skipped by pushing the talk button.
• Refer to the Navigation System Owners Manual for additional navigation
system details or visit www.mazdausa.com/navigation
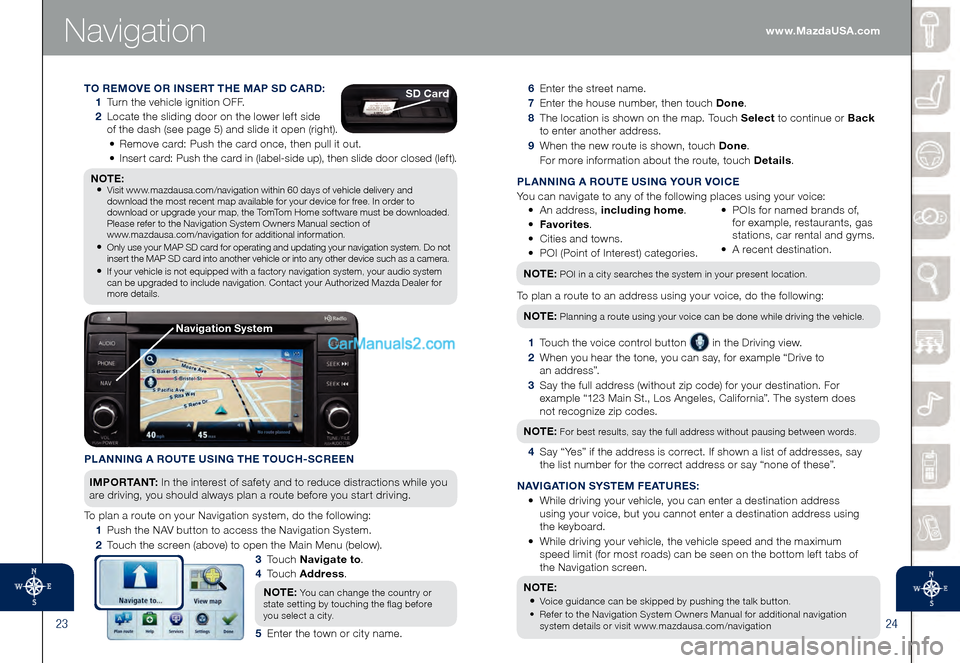
PLANNING A ROUTE USING THE TOUCH-SCREEN
I M P O R TA N T : In the interest of safety and to reduce distractions while you
are driving, you should always plan a route before you start driving.
To plan a route on your Navigation system, do the following:
1 Push the NAV button to access the Navigation System.
2 Touch the screen (above) to open the Main Menu (below).
3 To u c h Navigate to .
4
To u c h Address .
NOTE:
You can change the country or
state setting by touching the flag before
you select a city.
5 Enter the town or city name.
TO REMOVE OR INSERT THE MAP SD CARD:
1 Turn the vehicle ignition OFF.
2 Locate the sliding door on the lower left side
of the dash (see page 5) and slide it open (right).
• Remove card: Push the card once, then pull it out.
• Insert card: Push the card in (label-side up), then slide door closed (left).
NOTE: • Visit www.mazdausa.com/navigation within 60 days of vehicle delivery and
download the most recent map available for your device for free. In order to
download or upgrade your map, the TomTom Home software must be downloaded.
Please refer to the Navigation System Owners Manual section of
www.mazdausa.com/navigation for additional information.
• Only use your MAP SD card for operating and updating your navigation system. Do not insert the MAP SD card into another vehicle or into any other device such as a camera.
• If your vehicle is not equipped with a factory navigation system, your audio system can be upgraded to include navigation. Contact your Authorized Mazda Dealer for
more details.
SD Card
Navigation System
www.MazdaUSA.com