instrument cluster MAZDA MODEL CX-9 2017 (in English) Workshop Manual
[x] Cancel search | Manufacturer: MAZDA, Model Year: 2017, Model line: MODEL CX-9, Model: MAZDA MODEL CX-9 2017Pages: 612
Page 281 of 612

4–133
When Driving
i-ACTIVSENSE
*Some models.
Smart Brake Support (SBS) *
Smart Brake Support (SBS) is a system which alerts the driver of a possible collision using
an indicator and warning sound in the instrument cluster while the vehicle is being driven at
about 15 km/h or faster (10 mph or faster) and the system's radar sensor (front) determines
that your vehicle may hit a vehicle ahead. Furthermore, if the radar sensor (front) determines
that a collision is unavoidable, the automatic brake control is performed to reduce damage in
the event of a collision.
In addition, when the driver depresses the brake pedal, the brakes operate more quickly to
assist the driver.
WARNING
Do not rely completely on the Smart Brake Support (SBS) system and always drive
carefully:
The Smart Brake Support (SBS) is designed to reduce damage in the event of a collision,
not avoid an accident. The ability to detect an obstruction is limited depending on the
obstruction, weather conditions, or traffi c conditions. Therefore, if the accelerator pedal
or brake pedal is mistakenly operated it could result in an accident. Always verify the
safety of the surrounding area and depress the brake pedal or accelerator pedal while
keeping a safer distance from vehicles ahead or on-coming vehicles.
CAUTION
If the vehicle is towed or you are towing something, switch the Smart Brake Support (SBS)
system off to prevent a mistaken operation.
CX-9_8FS7-EA-16K_Edition2.indb 133CX-9_8FS7-EA-16K_Edition2.indb 1332016/12/15 18:34:342016/12/15 18:34:34
Page 287 of 612

4–139
When Driving
i-ACTIVSENSE
*Some models.
Radar Sensor (Front) *
Your vehicle is equipped with a radar sensor (front).
The following systems also use the radar sensor (front).
Distance Recognition Support System (DRSS)
Mazda Radar Cruise Control (MRCC)
Smart Brake Support (SBS)
The radar sensor (front) functions by detecting the radio waves refl ected off a vehicle ahead
or an obstruction sent from the radar sensor.
The radar sensor (front) is mounted behind the front emblem.
Radar sensor (front)
If “Front Radar Sensor Blocked” is displayed in the multi-information display of the
instrument cluster, clean the area around the radar sensor (front).
CX-9_8FS7-EA-16K_Edition2.indb 139CX-9_8FS7-EA-16K_Edition2.indb 1392016/12/15 18:34:362016/12/15 18:34:36
Page 296 of 612

4–14 8
When Driving
Cruise Control
The cruise control will cancel if the
vehicle speed decreases below 21 km/h
(13 mph) when the cruise control is
activated, such as when climbing a
steep grade.
The cruise control may cancel at about
15 km/h (9 mph) below the preset speed,
such as when climbing a long, steep
grade.
The vehicle speed preset using the cruise
control is displayed in the instrument
cluster and the active driving display
(vehicles with active driving display).
Type A Instrument Cluster
Type B Instrument ClusterMulti-information Display
Active Driving Display
To Increase Cruising Speed
Follow either of these procedures.
To increase speed using cruise control
switch
Press the RESUME/
switch and hold it.
Your vehicle will accelerate. Release the
switch at the desired speed.
Press the RESUME/
switch and release
it immediately to adjust the preset speed.
Multiple operations will increase the
preset speed according to the number of
times it is operated.
Increasing speed with a single
RESUME/
switch operation
Instrument cluster display for vehicle
speed indicated in km/h: 1 km/h (0.6 mph)
Instrument cluster display for vehicle
speed indicated in mph: 1 mph (1.6 km/h)
To increase speed using accelerator
pedal
Depress the accelerator pedal to accelerate
to the desired speed. Press the SET/
switch and release it immediately.
NOTE
Accelerate if you want to speed up
temporarily when the cruise control is on.
Greater speed will not interfere with or
change the set speed. Take your foot off the
accelerator to return to the set speed.
CX-9_8FS7-EA-16K_Edition2.indb 148CX-9_8FS7-EA-16K_Edition2.indb 1482016/12/15 18:34:392016/12/15 18:34:39
Page 297 of 612

4–149
When Driving
Cruise Control
To Decrease Cruising Speed
Press the SET/ switch and hold it. The
vehicle will gradually slow.
Release the switch at the desired speed.
Press the SET/
switch and release it
immediately to adjust the preset speed.
Multiple operations will decrease the
preset speed according to the number of
times it is operated.
Decreasing speed with a single SET/
switch operation
Instrument cluster display for vehicle
speed indicated in km/h: 1 km/h (0.6 mph)
Instrument cluster display for vehicle
speed indicated in mph: 1 mph (1.6 km/h)
To Resume Cruising Speed at
More Than 25 km/h (16 mph)
If some other method besides the OFF/
CANCEL switch was used to cancel
cruising speed (such as applying the brake
pedal) and the system is still activated, the
most recent set speed will automatically
resume when the RESUME/
switch is
pressed.
If vehicle speed is below 25 km/h (16
mph), increase the vehicle speed up to 25
km/h (16 mph) or more and press the
RESUME/
switch.
To Temporarily Cancel
To temporarily cancel the system, use one
of these methods:
Slightly depress the brake pedal.
Press the OFF/CANCEL switch.
If the RESUME/ switch is pressed when
the vehicle speed is 25 km/h (16 mph) or
higher, the system reverts to the previously
set speed.
NOTE
If any of the following conditions occur,
the cruise control system is temporarily
canceled.
The parking brake is applied.
The selector lever is in the P or N
position.
When the cruise control system is
temporarily canceled by even one of the
applicable cancel conditions, the speed
cannot be re-set.
The cruise control cannot be cancelled
while driving in manual mode (selector
lever shifted from D to M position).
Therefore, engine braking will not be
applied even if the transaxle is shifted
down to a lower gear. If deceleration is
required, lower the set speed or depress
the brake pedal.
To Deactivate
When a cruising speed has been set
(cruise set indication (green) turns on)
Long-press the OFF/CANCEL switch or
press the OFF/CANCEL switch 2 times.
When a cruising speed has not been set
(cruise main indication (white) turns on)
Press the OFF/CANCEL switch.
CX-9_8FS7-EA-16K_Edition2.indb 149CX-9_8FS7-EA-16K_Edition2.indb 1492016/12/15 18:34:402016/12/15 18:34:40
Page 298 of 612

4–150
When Driving
Tire Pressure Monitoring System
*Some models.
Tire Pressure Monitoring System *
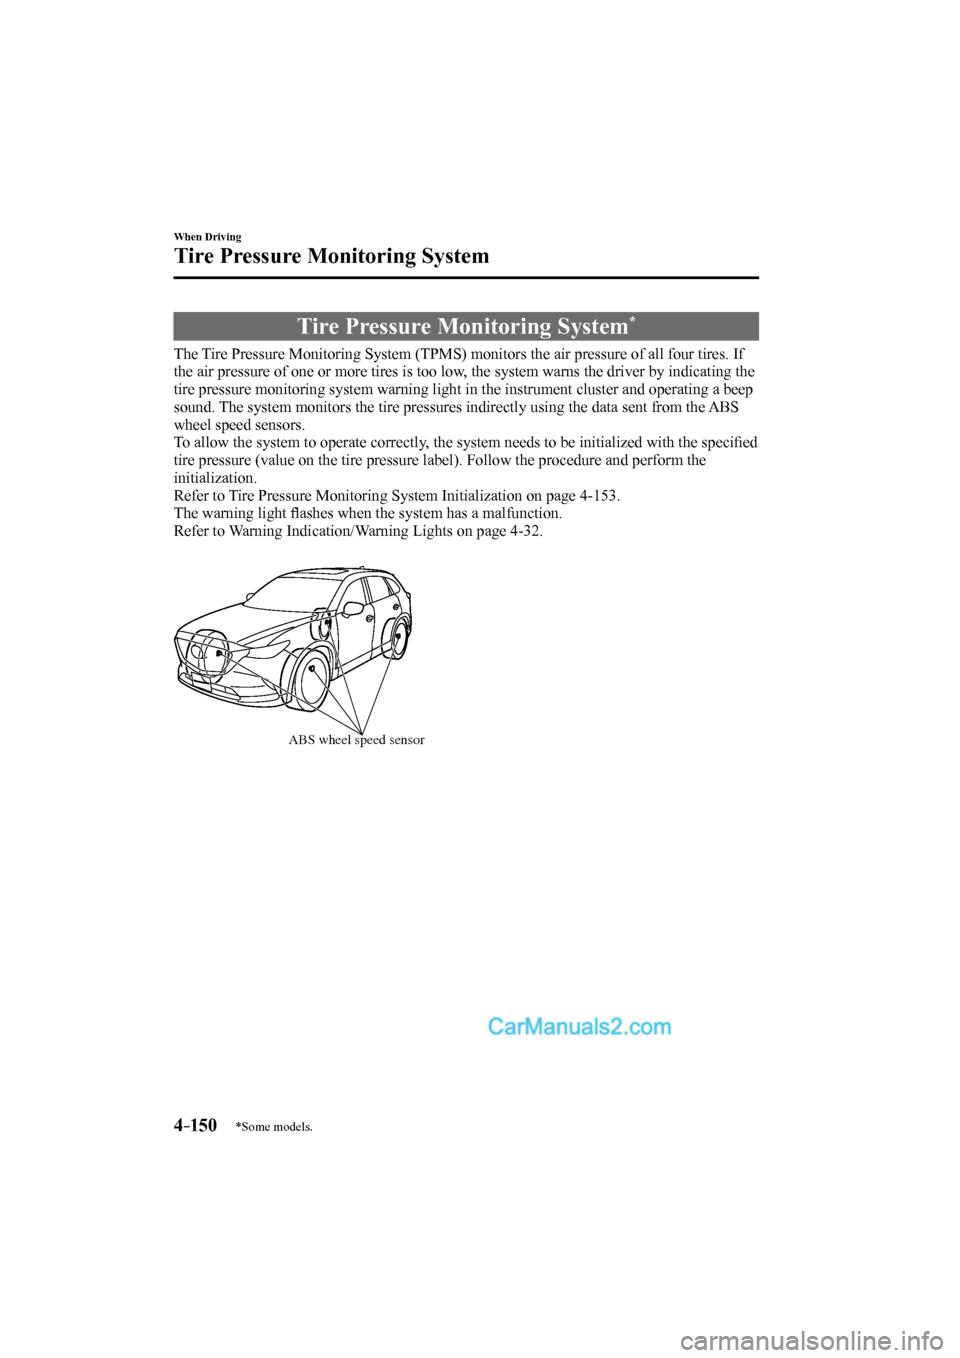
The Tire Pressure Monitoring System (TPMS) monitors the air pressure of all four tires. If
the air pressure of one or more tires is too low, the system warns the driver by indicating the
tire pressure monitoring system warning light in the instrument cluster and operating a beep
sound. The system monitors the tire pressures indirectly using the data sent from the ABS
wheel speed sensors.
To allow the system to operate correctly, the system needs to be initialized with the specifi ed
tire pressure (value on the tire pressure label). Follow the procedure and perform the
initialization.
Refer to Tire Pressure Monitoring System Initialization on page 4-153 .
The warning light fl ashes when the system has a malfunction.
Refer to Warning Indication/Warning Lights on page 4-32 .
ABS wheel speed sensor
CX-9_8FS7-EA-16K_Edition2.indb 150CX-9_8FS7-EA-16K_Edition2.indb 1502016/12/15 18:34:412016/12/15 18:34:41
Page 301 of 612

4–153
When Driving
Tire Pressure Monitoring System
Tire Pressure Monitoring System
Initialization
In the following cases, system
initialization must be performed so that the
system operates normally.
A tire pressure is adjusted.
Tire rotation is performed.
A tire or wheel is replaced.
The battery is replaced or completely
drained.
The tire pressure monitoring system
warning light is illuminated.
Initialization method
1. Park the car in a safe place and fi rmly
apply the parking brake.
2. Let the tires cool, then adjust the tire
pressure of all four (4) tires to the
specifi ed pressure indicated on the tire
pressure label located on the driver's
door frame (door open).
Refer to Tires on page 9-9 .
3. Switch the ignition ON.
4. Press and hold the tire pressure
monitoring system set switch and
verify that the tire pressure monitoring
system warning light in the instrument
cluster fl ashes twice and a beep sound
is heard once.
CAUTION
If the system initialization is performed
without adjusting the tire pressure,
the system cannot detect the normal
tire pressure and it may not illuminate
the tire pressure monitoring system
warning light even if a tire pressure is
low, or it may illuminate the light even
if the pressures are normal.
Adjust the tire pressure on all four
tires and initialize the system when
the warning light is turned on. If the
warning light turns on for a reason
other than a fl at tire, the tire pressure
of all four tires may have decreased
naturally.
The system initialization will not be
performed if the switch is pressed while
the vehicle is being driven.
CX-9_8FS7-EA-16K_Edition2.indb 153CX-9_8FS7-EA-16K_Edition2.indb 1532016/12/15 18:34:422016/12/15 18:34:42
Page 416 of 612

6–4
Maintenance and Care
Scheduled Maintenance
Scheduled Maintenance (U.S.A., Canada, and Puerto
Rico)
Follow Schedule 1 if the vehicle is operated mainly where none of the following conditions
(severe driving conditions)apply.
Repeated short-distance driving
Driving in dusty conditions
Driving with extended use of brakes
Driving in areas where salt or other corrosive materials are used
Driving on rough or muddy roads
Extended periods of idling or low-speed operation
Driving for long periods in cold temperatures or extremely humid climates
Driving in extremely hot conditions
Driving in mountainous conditions continually
If any do apply, follow Schedule 2. (Canada residents follow Schedule 2.)
Vehicles using Engine Oil Flexible Maintenance
Engine Oil Flexible Maintenance is selected by default for U.S.A. and Puerto Rico residents.
If any following conditions do apply, follow Schedule 2 with engine oil fi xed maintenance.
Extended periods of idling or low-speed operation such as police car, taxi or driving
school car
Driving in dusty conditions
The vehicle calculates the remaining oil life based on engine operating conditions. The
vehicle lets you know when an oil change is due by illuminating the wrench indicator light
in the instrument cluster. Change the oil as soon as possible within the next 1000 km (600
mile) or 15 days. Refer page 6-19 for the details.
NOTE
Please ensure that the Flexible Oil Maintenance Setting is reset after each Oil and Filter
replacement.
For maintenance guidelines beyond the miles/months listed, follow the maintenance
intervals provided in the Scheduled Maintenance Tables.
CX-9_8FS7-EA-16K_Edition2.indb 4CX-9_8FS7-EA-16K_Edition2.indb 42016/12/15 18:35:532016/12/15 18:35:53
Page 431 of 612

6–19
Maintenance and Care
Scheduled Maintenance
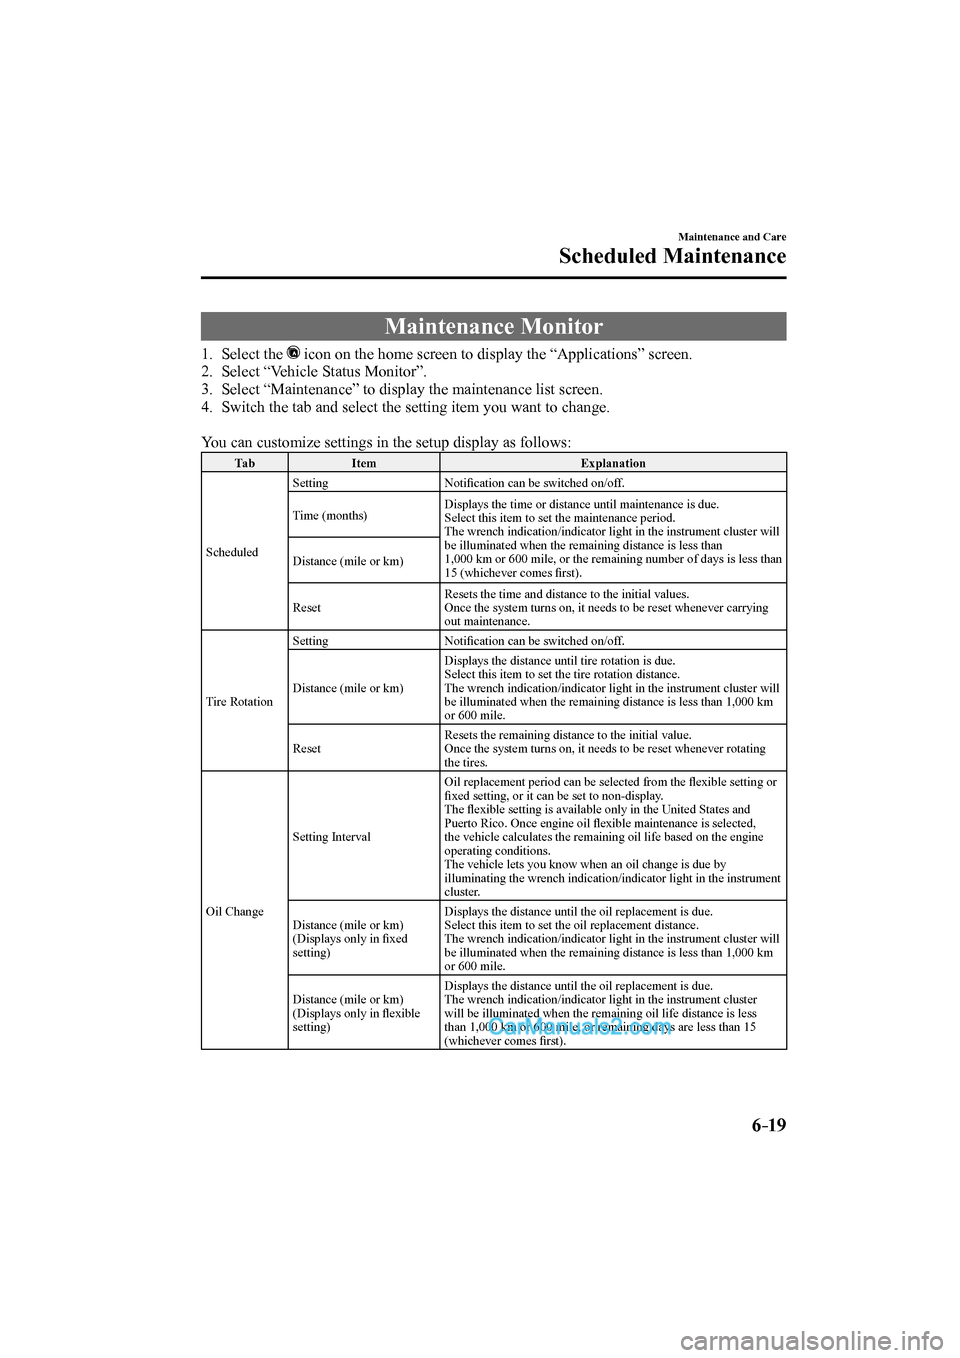
Maintenance Monitor
1. Select the icon on the home screen to display the “Applications” screen.
2. Select “Vehicle Status Monitor”.
3. Select “Maintenance” to display the maintenance list screen.
4. Switch the tab and select the setting item you want to change.
You can customize settings in the setup display as follows:
Tab Item Explanation
Scheduled Setting Notifi cation can be switched on/off.
Time (months) Displays the time or distance until maintenance is due.
Select this item to set the maintenance period.
The wrench indication/indicator light in the instrument cluster will
be illuminated when the remaining distance is less than
1,000 km or 600 mile, or the remaining number of days is less than
15 (whichever comes fi rst). Distance (mile or km)
Reset Resets the time and distance to the initial values.
Once the system turns on, it needs to be reset whenever carrying
out maintenance.
Tire Rotation Setting Notifi cation can be switched on/off.
Distance (mile or km) Displays the distance until tire rotation is due.
Select this item to set the tire rotation distance.
The wrench indication/indicator light in the instrument cluster will
be illuminated when the remaining distance is less than 1,000 km
or 600 mile.
Reset Resets the remaining distance to the initial value.
Once the system turns on, it needs to be reset whenever rotating
the tires.
Oil Change Setting Interval Oil replacement period can be selected from the fl exible setting or
fi xed setting, or it can be set to non-display.
The fl exible setting is available only in the United States and
Puerto Rico. Once engine oil fl exible maintenance is selected,
the vehicle calculates the remaining oil life based on the engine
operating conditions.
The vehicle lets you know when an oil change is due by
illuminating the wrench indication/indicator light in the instrument
cluster.
Distance (mile or km)
(Displays only in fi xed
setting) Displays the distance until the oil replacement is due.
Select this item to set the oil replacement distance.
The wrench indication/indicator light in the instrument cluster will
be illuminated when the remaining distance is less than 1,000 km
or 600 mile.
Distance (mile or km)
(Displays only in fl exible
setting) Displays the distance until the oil replacement is due.
The wrench indication/indicator light in the instrument cluster
will be illuminated when the remaining oil life distance is less
than 1,000 km or 600 mile, or remaining days are less than 15
(whichever comes fi rst).
CX-9_8FS7-EA-16K_Edition2.indb 19CX-9_8FS7-EA-16K_Edition2.indb 192016/12/15 18:35:582016/12/15 18:35:58
Page 453 of 612

6–41
Maintenance and Care
Owner Maintenance
The following conditions indicate that the
battery power is low:
The KEY indicator light (green) fl ashes
in the instrument cluster for about 30
seconds after the engine is turned off
(for vehicles with a type A instrument
cluster (page 4-31 ), messages are
displayed in the instrument cluster).
The system does not operate and
the operation indicator light on the
transmitter does not fl ash when the
buttons are pressed.
The system's operational range is
reduced.
Replacing the battery at an Authorized
Mazda Dealer is recommended to prevent
damage to the key. If replacing the battery
by yourself, follow the instruction.
Replacing the key battery
1. Press the knob and pull out the
auxiliary key.
Knob
2. Twist a tape-wrapped fl athead
screwdriver in the direction of the
arrow and open the cover slightly.
Cover
3. Insert the tape-wrapped fl athead
screwdriver into the gap and slide it in
the direction of the arrow.
Cover
Gap
4. Twist the fl athead screwdriver in the
direction of the arrow and remove the
cover.
Cover
CX-9_8FS7-EA-16K_Edition2.indb 41CX-9_8FS7-EA-16K_Edition2.indb 412016/12/15 18:36:092016/12/15 18:36:09
Page 471 of 612

6–59
Maintenance and Care
Owner Maintenance
*Some models.
DESCRIPTION FUSE
RATING PROTECTED COMPONENT
20 — — —
21 ENGINE.IG1 7.5 A Engine control system
22 C/U IG1 15 A For protection of various circuits
23 H/L LOW L 15 A Headlight low beam (LH)
24 H/L LOW R1 15 A —
25 ENGINE3 15 A Engine control system
26 ENGINE2 15 A Engine control system
27 ENGINE1 15 A Engine control system
28 AT 15 A Transaxle control system
29 H/CLEAN 20 A —
30 A/C 7.5 A Air conditioner
31 AT PUMP 15 A —
32 STOP 10 A Brake lights
33 R.WIPER 15 A Rear window wiper
34 H/L HI 20 A Headlight high beam
35 H/L LOW R2 15 A Headlight low beam (RH)
36 FOG 15 A Fog lights
*
37
7.5 A Engine control system
38 AUDIO2 7.5 A Audio system
39 INTERIOR 10 A Overhead light
40 METER2 15 A —
41 METER1 10 A Instrument cluster
42 SRS1 7.5 A Air bag
43 AUDIO4 10 A Audio system
*
44 AUDIO1 25 A Audio system
45 ABS/DSC S 30 A ABS, Dynamic stability control system
46 — — —
47 ST.HEATER 15 A Heated steering wheel
*
48 TAIL 15 A Parking lights
49 FUEL PUMP2 25 A Fuel system
50 HAZARD 25 A Hazard warning fl ashers, Turn signal lights, Taillights
51 DRL 15 A Daytime running lights
52 R.OUTLET2 15 A Accessory sockets
53 HORN 15 A Horn
54 ROOM 25 A For protection of various circuits
CX-9_8FS7-EA-16K_Edition2.indb 59CX-9_8FS7-EA-16K_Edition2.indb 592016/12/15 18:36:182016/12/15 18:36:18