buttons MAZDA MODEL MX-5 MIATA PRHT 2012 Owners Manual
[x] Cancel search | Manufacturer: MAZDA, Model Year: 2012, Model line: MODEL MX-5 MIATA PRHT, Model: MAZDA MODEL MX-5 MIATA PRHT 2012Pages: 456, PDF Size: 5.68 MB
Page 66 of 456
Black plate (66,1)
Advanced Keysí
The advanced keyless functions (advanced keyless entry and start system) enable the
following operations while the advanced key is being carried (page 3-7).
lLocking/unlocking the doors, and opening the trunk lid, without operating the key.lStarting the engine without operating the key.
Additional functions are available using the buttons on the advanced key.
Refer to Operation Using Advanced Key Functions on page 3-15.
lThe following operations are possible using the transmitter of the keyless entry system
from a distance (Lock/Unlock/Trunk/Panic button):
lLocking/unlocking the doors.lOpening the trunk lid.lOpening the power windowsí.lTurning on the alarm.lLocking/unlocking the doors, opening the trunk lid, or starting the engine using the
auxiliary key.
WARNING
Do not leave the key in your vehicle with children and keep them in a place where
your children will not find or play with them: Leaving children in a vehicle with the key is dangerous. This could result in someone
being badly injured or even killed. Children may find these new kinds of keys to be
an interesting toy to play with and could cause the power windows or other controls
to operate, or even make the vehicle move.
Radio waves from the advanced key may affect medical equipment such as
pacemakers: Before using the advanced key near people who use medical equipment, ask the
medical equipment manufacturer or your physician if radio waves from the
advanced key will affect the equipment.
NOTE
lThe driver must carry the advanced key to ensure the system functions properly.lRefer to Immobilizer System (page 3-64) for information regarding keys and engine starting.l(With theft-deterrent system)
Refer to Theft-Deterrent System (page 3-72) for information regarding keys and the prevention of
vehicle and vehicle contents theft.
3-2
Knowing Your Mazda
íSome models.
Advanced Keyless Entry and Start System
MX-5_8CC1-EA-11F_Edition2 Page66
Monday, July 18 2011 10:7 AM
Form No.8CC1-EA-11F
Page 69 of 456
Black plate (69,1)
qAdvanced Key Maintenance
CAUTION
Ø Make sure the battery is installed
with the correct pole facing
upward. Battery leakage could
occur if it is not installed correctly.
Ø When replacing the battery, be
careful not to touch any of the
internal circuitry and electrical
terminals, bend the electrical
terminals, or get dirt in the
transmitter as the transmitter
could be damaged.
Ø There is the danger of explosion if
the battery is not correctly
replaced.
Ø Replace only with the same type
battery (CR2025 or equivalent).
Ø Dispose of used batteries
according to the following
instructions.
ØInsulate the plus and minus
terminals of the battery using
cellophane or equivalent tape.
ØNever disassemble.
ØNever throw the battery into
fire or water.
ØNever deform or crush.
The following conditions indicate that the
battery power is low:
lThe KEY indicator light (green) flashes
in the instrument cluster for about 30
seconds after the engine is turned off.
lThe system does not operate and the
operation indicator light on the
transmitter does not flash when the
buttons are pressed.
lThe system's operational range is
reduced. Replacing the battery at an Authorized
Mazda Dealer is recommended to prevent
damage to the advanced key. If replacing
the battery by yourself, follow the
instruction below.
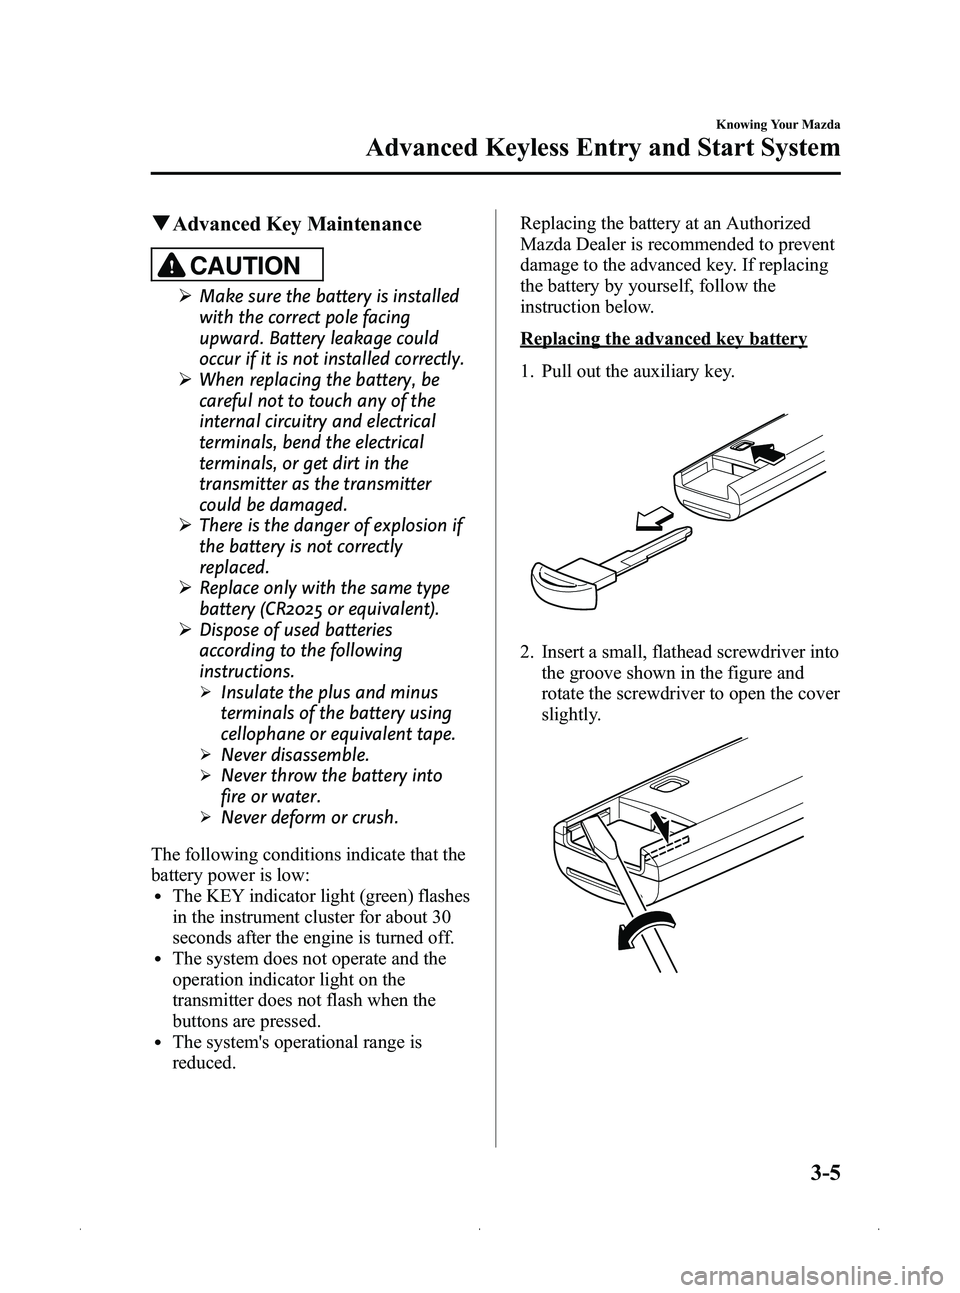
Replacing the advanced key battery
1. Pull out the auxiliary key.
2. Insert a small, flathead screwdriver into
the groove shown in the figure and
rotate the screwdriver to open the cover
slightly.
Knowing Your Mazda
Advanced Keyless Entry and Start System
3-5
MX-5_8CC1-EA-11F_Edition2 Page69
Monday, July 18 2011 10:7 AM
Form No.8CC1-EA-11F
Page 79 of 456
Black plate (79,1)
Operation Using Advanced
Key Functions
qKeyless Entry System
This system uses the more traditional
keyless entry buttons to remotely lock and
unlock the doors and opens the trunk lid,
and opens the power windows.
It can also help you signal for attention.
Press the buttons slowly and carefully.
NOTE
lThe keyless entry system is designed to
operate up to about 2.5 m (8 ft) from the
center of the vehicle, but this may vary due
to local conditions.
lThe system does not operate when the
auxiliary key is in the ignition switch.
lWith the start knob installed in the OFF/
LOCK position, the system is fully
operational. If the ignition is not switched
off or the start knob is pushed in, the system
does not operate.
lBoth doors cannot be locked by pressing
the lock button while either door is open.
The hazard warning lights will also not
flash.
l(With power retractable hardtop)
The trunk lid cannot be operated remotely if
the power retractable hardtop is not fully
opened or fully closed.
lIf the transmitter does not operate when
pressing a button or the operational range
becomes too small, the battery may be
dead. To install a new battery, refer to
Maintenance (page 3-5).
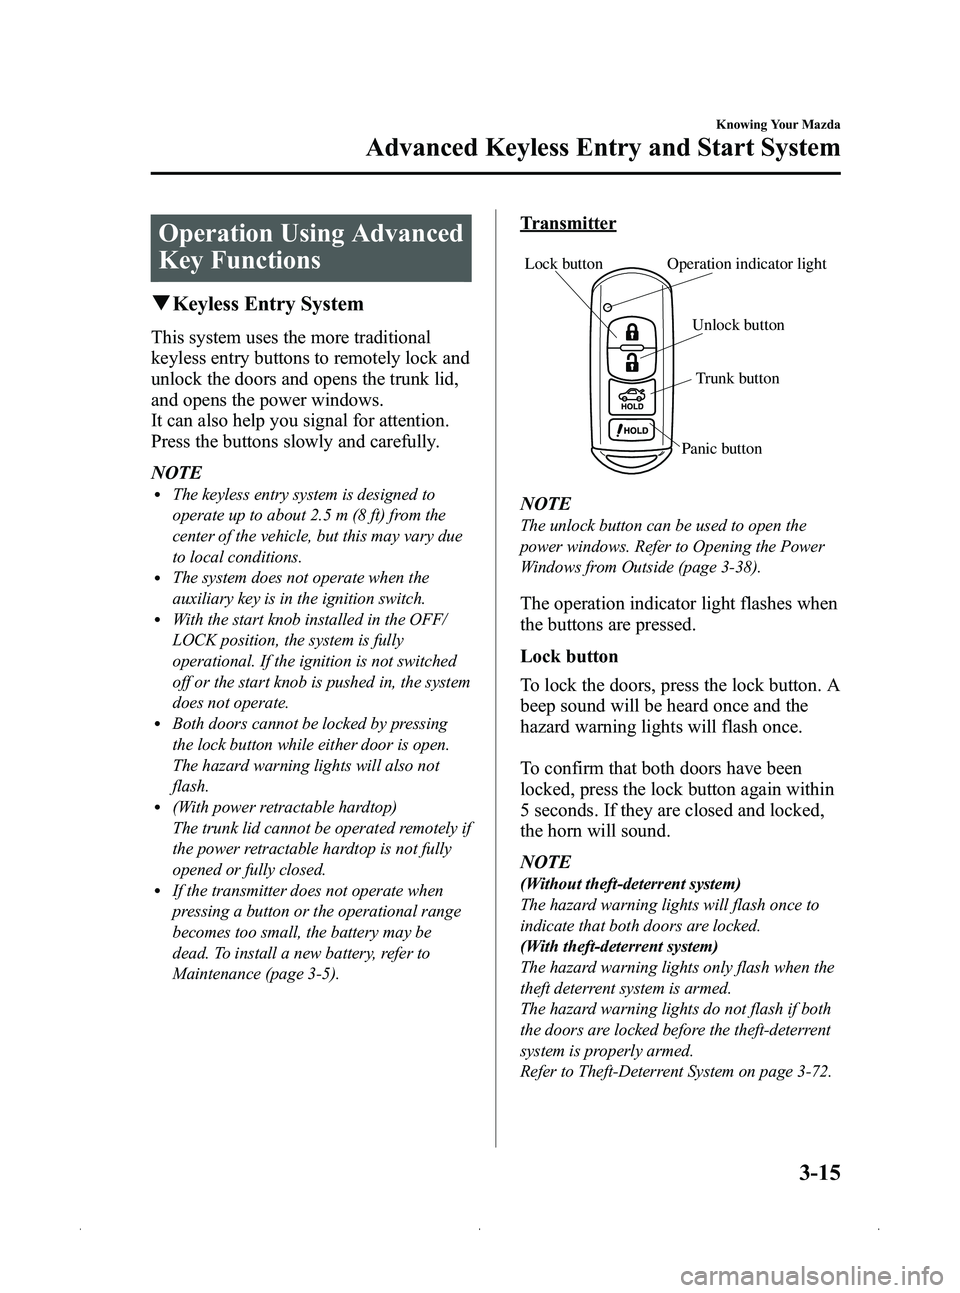
Transmitter
Lock button
Unlock button
Trunk button
Operation indicator light
Panic button
NOTE
The unlock button can be used to open the
power windows. Refer to Opening the Power
Windows from Outside (page 3-38).
The operation indicator light flashes when
the buttons are pressed.
Lock button
To lock the doors, press the lock button. A
beep sound will be heard once and the
hazard warning lights will flash once.
To confirm that both doors have been
locked, press the lock button again within
5 seconds. If they are closed and locked,
the horn will sound.
NOTE
(Without theft-deterrent system)
The hazard warning lights will flash once to
indicate that both doors are locked.
(With theft-deterrent system)
The hazard warning lights only flash when the
theft deterrent system is armed.
The hazard warning lights do not flash if both
the doors are locked before the theft-deterrent
system is properly armed.
Refer to Theft-Deterrent System on page 3-72.
Knowing Your Mazda
Advanced Keyless Entry and Start System
3-15
MX-5_8CC1-EA-11F_Edition2 Page79
Monday, July 18 2011 10:7 AM
Form No.8CC1-EA-11F
Page 88 of 456
Black plate (88,1)
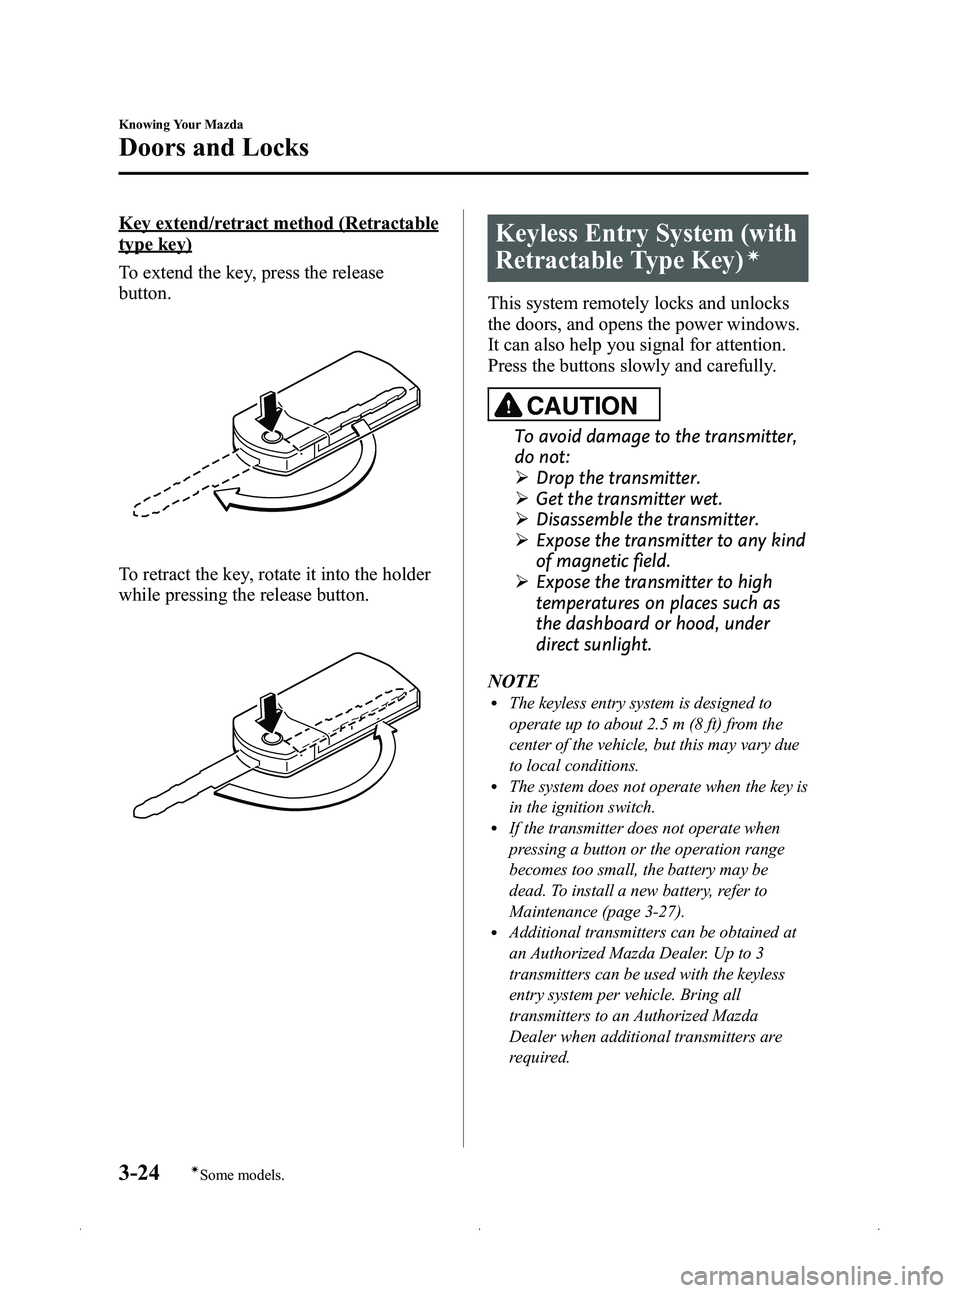
Key extend/retract method (Retractable
type key)
To extend the key, press the release
button.
To retract the key, rotate it into the holder
while pressing the release button.
Keyless Entry System (with
Retractable Type Key)
í
This system remotely locks and unlocks
the doors, and opens the power windows.
It can also help you signal for attention.
Press the buttons slowly and carefully.
CAUTION
To avoid damage to the transmitter,
do not:
ØDrop the transmitter.
Ø Get the transmitter wet.
Ø Disassemble the transmitter.
Ø Expose the transmitter to any kind
of magnetic field.
Ø Expose the transmitter to high
temperatures on places such as
the dashboard or hood, under
direct sunlight.
NOTE
lThe keyless entry system is designed to
operate up to about 2.5 m (8 ft) from the
center of the vehicle, but this may vary due
to local conditions.
lThe system does not operate when the key is
in the ignition switch.
lIf the transmitter does not operate when
pressing a button or the operation range
becomes too small, the battery may be
dead. To install a new battery, refer to
Maintenance (page 3-27).
lAdditional transmitters can be obtained at
an Authorized Mazda Dealer. Up to 3
transmitters can be used with the keyless
entry system per vehicle. Bring all
transmitters to an Authorized Mazda
Dealer when additional transmitters are
required.
3-24
Knowing Your Mazda
íSome models.
Doors and Locks
MX-5_8CC1-EA-11F_Edition2 Page88
Monday, July 18 2011 10:8 AM
Form No.8CC1-EA-11F
Page 89 of 456

Black plate (89,1)
qTransmitter
Lock button
Unlock button
Trunk button Panic button
Operation
indicator light
NOTE
The unlock button can be used to open the
power windows. Refer to Opening the Power
Windows from Outside (page 3-38).
The operation indicator light flashes when
the buttons are pressed.
Lock button
To lock the doors, press the lock button.
To confirm that both doors have been
locked, press the lock button again within
5 seconds. If they are closed and locked,
the horn will sound. NOTE
lDoors can be locked by pressing the lock
button while a door is open. However, the
hazard warning lights will not flash and the
horn will not sound.
l(Without theft-deterrent system)
The hazard warning lights will flash once
to indicate that both doors are locked.
(With theft-deterrent system)
The hazard warning lights only flash when
the theft deterrent system is armed.
The hazard warning lights do not flash if
both the doors are locked before the theft-
deterrent system is properly armed.
Refer to Theft-Deterrent System on page
3-72.
lBoth doors cannot be locked when the key
is in the ignition switch.
lConfirm that both doors are locked visually
or audibly by use of the double click.
Unlock button
To unlock the driver's door, press the
unlock button.
To unlock both doors, press the unlock
button again within 3 seconds.
NOTE
(Without theft-deterrent system)
The hazard warning lights will flash twice to
indicate that both doors are unlocked.
(With theft-deterrent system)
The hazard warning lights only flash when the
theft deterrent system is turned off.
The hazard warning lights do not flash unless
the theft deterrent system has been properly
turned off.
Refer to Theft-Deterrent System on page 3-72.
NOTE
Auto re-lock function
After unlocking with the transmitter, both
doors will automatically lock if one of the
doors is not opened within about 30 seconds.
Knowing Your Mazda
Doors and Locks
3-25
MX-5_8CC1-EA-11F_Edition2 Page89
Monday, July 18 2011 10:8 AM
Form No.8CC1-EA-11F
Page 91 of 456
Black plate (91,1)
qTransmitter Maintenance
If the buttons on the transmitter are
inoperable and the operation indicator
light does not flash, the battery may be
dead.
Replace with a new battery before the
transmitter becomes unusable.
CAUTION
Ø Install the battery with the positive
pole (
) facing down. Battery
leakage could occur if it is not
installed correctly.
Ø When replacing the battery, be
careful not to touch any of the
internal circuitry and electrical
terminals, bend the electrical
terminals, or get dirt in the
transmitter as the transmitter
could be damaged.
Ø There is the danger of explosion if
the battery is not correctly
replaced.
Ø Replace only with the same type
battery (CR1620 or equivalent).
Ø Dispose of used batteries
according to the following
instructions.
ØInsulate the plus and minus
terminals of the battery using
cellophane or equivalent tape.
ØNever disassemble.
ØNever throw the battery into
fire and/or water.
ØNever deform or crush.
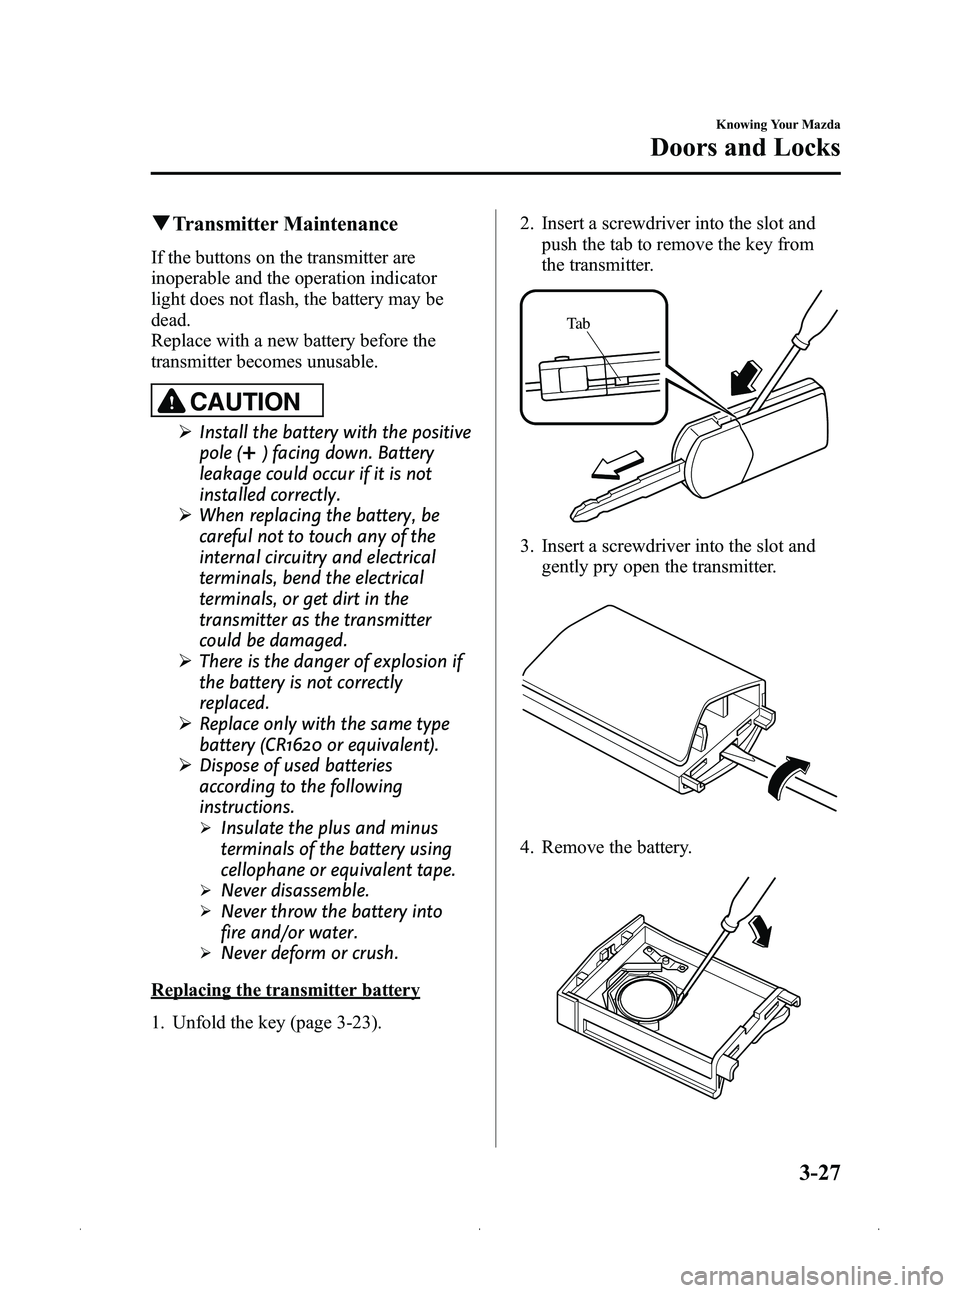
Replacing the transmitter battery
1. Unfold the key (page 3-23). 2. Insert a screwdriver into the slot and
push the tab to remove the key from
the transmitter.
Ta b
3. Insert a screwdriver into the slot andgently pry open the transmitter.
4. Remove the battery.
Knowing Your Mazda
Doors and Locks
3-27
MX-5_8CC1-EA-11F_Edition2 Page91
Monday, July 18 2011 10:8 AM
Form No.8CC1-EA-11F
Page 141 of 456
Black plate (141,1)
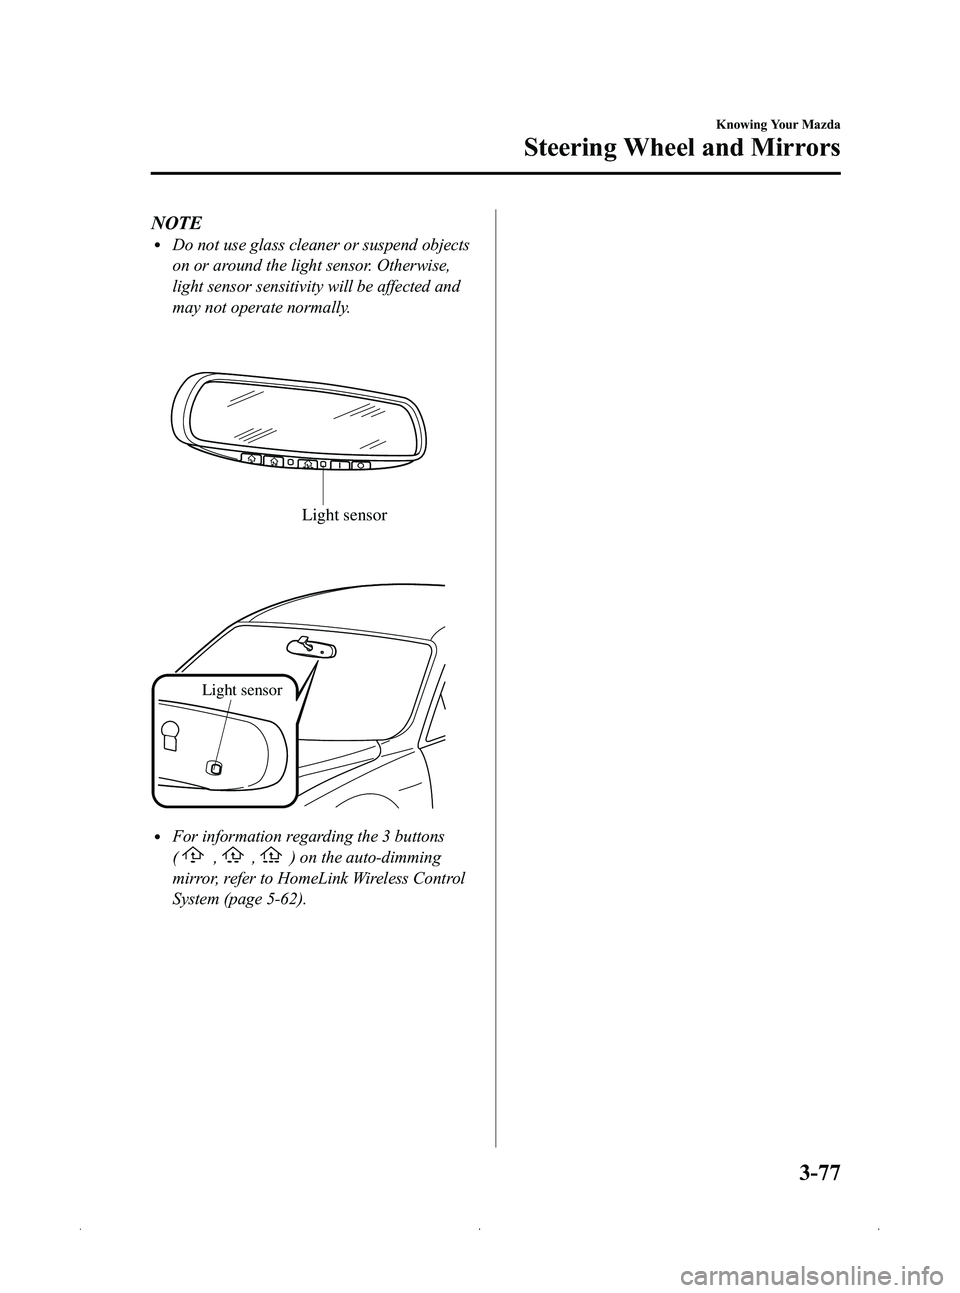
NOTElDo not use glass cleaner or suspend objects
on or around the light sensor. Otherwise,
light sensor sensitivity will be affected and
may not operate normally.
Light sensor
Light sensor
lFor information regarding the 3 buttons
(
,,) on the auto-dimming
mirror, refer to HomeLink Wireless Control
System (page 5-62).
Knowing Your Mazda
Steering Wheel and Mirrors
3-77
MX-5_8CC1-EA-11F_Edition2 Page141
Monday, July 18 2011 10:8 AM
Form No.8CC1-EA-11F
Page 158 of 456
Black plate (158,1)
Ignition Switch
Auxiliary key (with advanced key)
NOTE
When starting the engine using the advanced
key, refer to Starting the Engine (page 3-11).
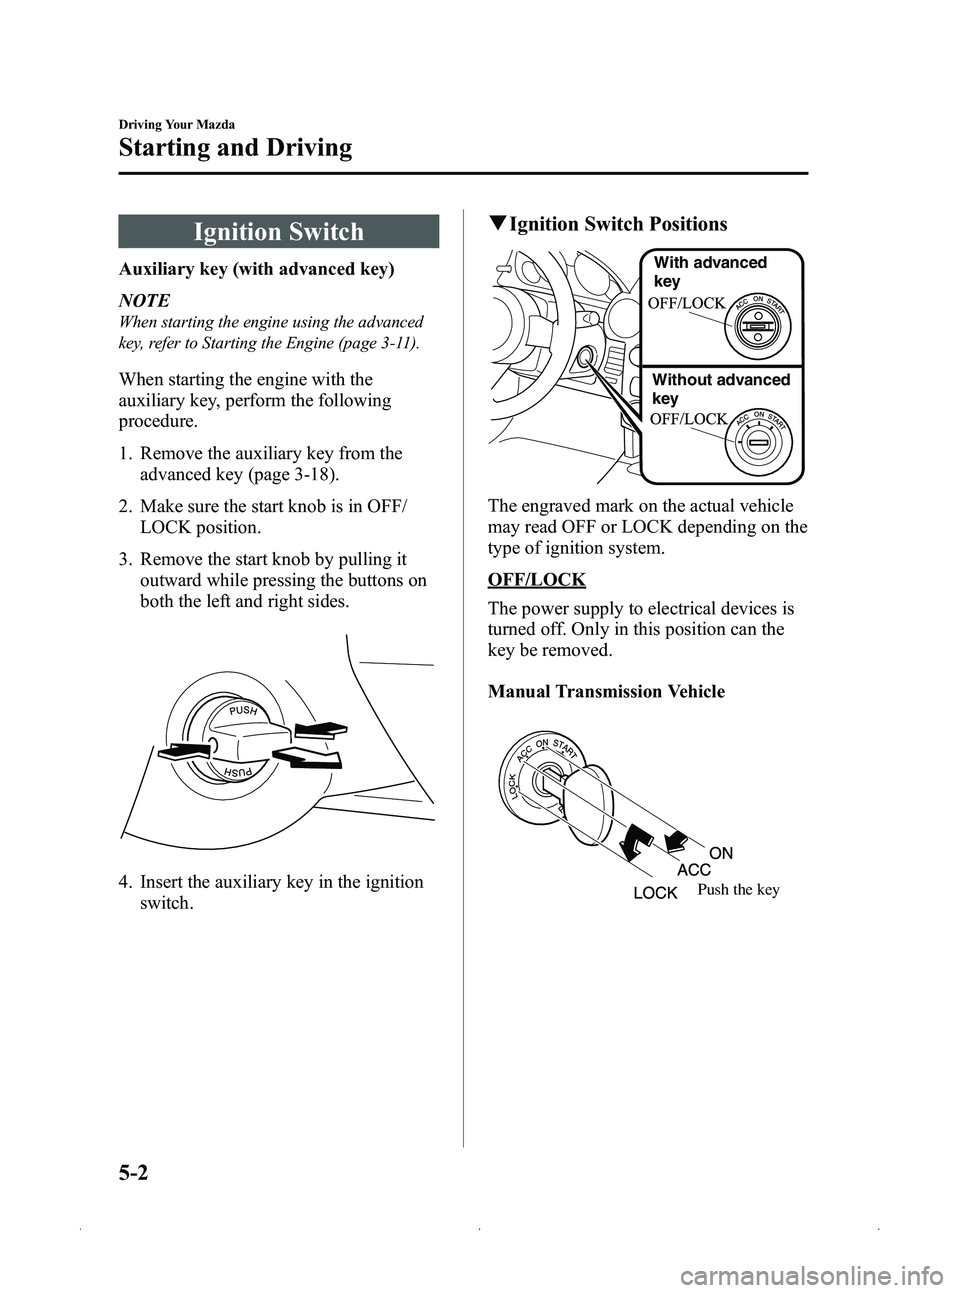
When starting the engine with the
auxiliary key, perform the following
procedure.
1. Remove the auxiliary key from theadvanced key (page 3-18).
2. Make sure the start knob is in OFF/ LOCK position.
3. Remove the start knob by pulling it outward while pressing the buttons on
both the left and right sides.
4. Insert the auxiliary key in the ignitionswitch.
qIgnition Switch Positions
With advanced
key
Without advanced
key
The engraved mark on the actual vehicle
may read OFF or LOCK depending on the
type of ignition system.
OFF/LOCK
The power supply to electrical devices is
turned off. Only in this position can the
key be removed.
Manual Transmission Vehicle
Push the key
5-2
Driving Your Mazda
Starting and Driving
MX-5_8CC1-EA-11F_Edition2 Page158
Monday, July 18 2011 10:8 AM
Form No.8CC1-EA-11F
Page 179 of 456

Black plate (179,1)
qActivation/Deactivation
To activate the system, press the ON/OFF
switch.
The cruise main indicator light
illuminates.
To deactivate the system, press the switch
again.
The cruise main indicator light turns off.
WARNING
Keep the ON/OFF switch off when
cruise control is not in use:
Leaving the ON/OFF switch on when
not using the cruise control is
dangerous as you may hit one of the
other buttons and put the vehicle in
cruise control unexpectedly. This
could result in loss of vehicle control.
qTo Set Speed
1. Activate the cruise control system by
pressing the ON/OFF switch.
2. Accelerate to the desired speed, which must be more than 30 km/h (19 mph). 3. Press down the cruise control SET/-
switch and release it at the desired
speed. Release the accelerator
simultaneously.
Cruise
control
switch
Do not continue to hold the switch. Until
you release it, the speed will continue to
decrease (unless you continue to
accelerate) and you will miss the desired
speed.
NOTE
lOn a steep grade, the vehicle may
momentarily slow down while ascending,
or speed up while descending.
lCruise control will turn off if the vehicle
speed decreases below 30 km/h (19 mph)
when cruise is activated, such as when
climbing a steep grade.
Driving Your Mazda
Starting and Driving
5-23
MX-5_8CC1-EA-11F_Edition2 Page179
Monday, July 18 2011 10:8 AM
Form No.8CC1-EA-11F
Page 219 of 456
Black plate (219,1)
NOTE
FCC ID: NZLOBIHL3
CANADA:4112A-OBIHL3
This device complies with FCC rules part 15.
Operation is subject to the following
conditions:
1- This device may not cause any harmful
interference and
2- This device must accept any interference
that may be received including interference
that may cause undesired operation.
NOTE
The programming will not be erased even if
the battery is disconnected.
qPre-programming the HomeLink
System
NOTE
It is recommended that a new battery be
placed in the hand-held transmitter of the
device being programmed to HomeLink for
quicker training and accurate transmission of
the radio-frequency signal.
lVerify that there is a remote control
transmitter available for the device you
would like to program.
lDisconnect the power to the device.
qProgramming the HomeLink System
CAUTION
When programming a garage door
opener or a gate, disconnect the
power to these devices before
performing programming, as
continuous operation of the devices
could damage the motor. The HomeLink system provides 3 buttons
which can be individually selected and
programmed using the transmitters for
current, on-market devices as follows:
1. Press and hold the two outer
HomeLink buttons (buttons one and
three) ―releasing only when the
indicator light begins to flash (after 20
seconds). Do nothold the buttons for
longer than 30 seconds and do not
repeat step 1 to program a second and/
or third hand-held transmitter to the
remaining two HomeLink buttons.
2. Position the end of your hand-held transmitter 2.5 ―7.5 cm (1 ―3 inches)
away from the HomeLink button you
wish to program while keeping the
indicator light in view.
3. Simultaneously press and hold both the chosen HomeLink and hand-held
transmitter buttons. Do not release the
buttons until step 4 has been
completed.
NOTE
Some gate operators and garage door openers
may require you to replace this Programming
Step 3 with procedures noted in the “Gate
Operator/Canadian Programming ”section.
4. After the HomeLink indicator light
changes from a slow to a rapidly
blinking light, release both the
HomeLink and hand-held transmitter
buttons.
NOTE
If the HomeLink indicator light does not
change to a rapidly blinking light, contact
HomeLink at www.homelink.com or call1-
800-355-3515 for assistance.
Driving Your Mazda
Switches and Controls
5-63
MX-5_8CC1-EA-11F_Edition2 Page219
Monday, July 18 2011 10:8 AM
Form No.8CC1-EA-11F