MAZDA MODEL TRIBUTE 2001 Owners Manual (in English)
Manufacturer: MAZDA, Model Year: 2001, Model line: MODEL TRIBUTE, Model: MAZDA MODEL TRIBUTE 2001Pages: 232, PDF Size: 2.4 MB
Page 131 of 232
Recreational towing
An example of ªrecreational towingº is towing your vehicle behind a
motorhome.
If your vehicle is automatic transmission equipped, with a 4x2
(front-wheel drive only) configured powertrain, ªrecreational towingº is
permitted by trailering the vehicle with its front wheels on a dolly. This
protects the transmission's internal mechanical components from
potential lack of lubrication damage.
If your vehicle is automatic transmission equipped, with a 4x4 (all-wheel
drive) configured powertrain, ªrecreational towingº is permitted only if
the vehicle is trailered with all four (4) wheels off the ground. Otherwise,
no ªrecreational towingº is permitted.
If your vehicle is manual transmission equipped, shifting the transmission
into neutral permits ªflat-towingº (all wheels on the ground) for pulling
behind a motorhome. Your vehicle may be towed up to a speed of
120 km/h (75 mph) but you should always obey local speed limits.
For other towing requirements, refer toWrecker Towingin the
Roadside emergencieschapter.
LUGGAGE RACK
Your vehicle is equipped with a roof rack. The maximum load for the roof
rack is 44 kg (100 lbs), evenly distributed on the crossbars. If it is not
possible to evenly distribute the load, position it in the center or as far
forward on the crossbars as possible. Always use the adjustable tie down
loops to secure the load.
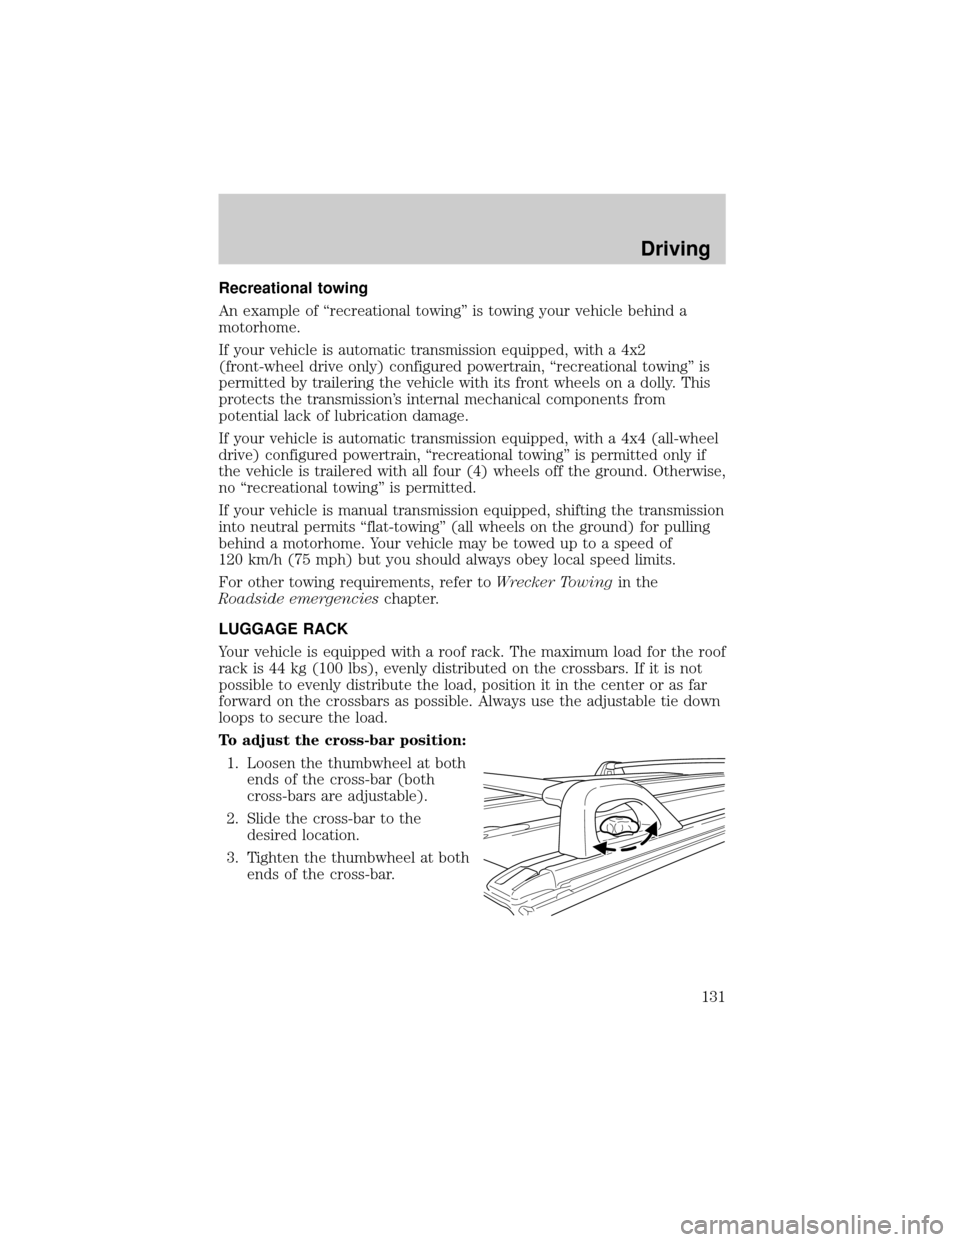
To adjust the cross-bar position:
1. Loosen the thumbwheel at both
ends of the cross-bar (both
cross-bars are adjustable).
2. Slide the cross-bar to the
desired location.
3. Tighten the thumbwheel at both
ends of the cross-bar.
Driving
131
Page 132 of 232
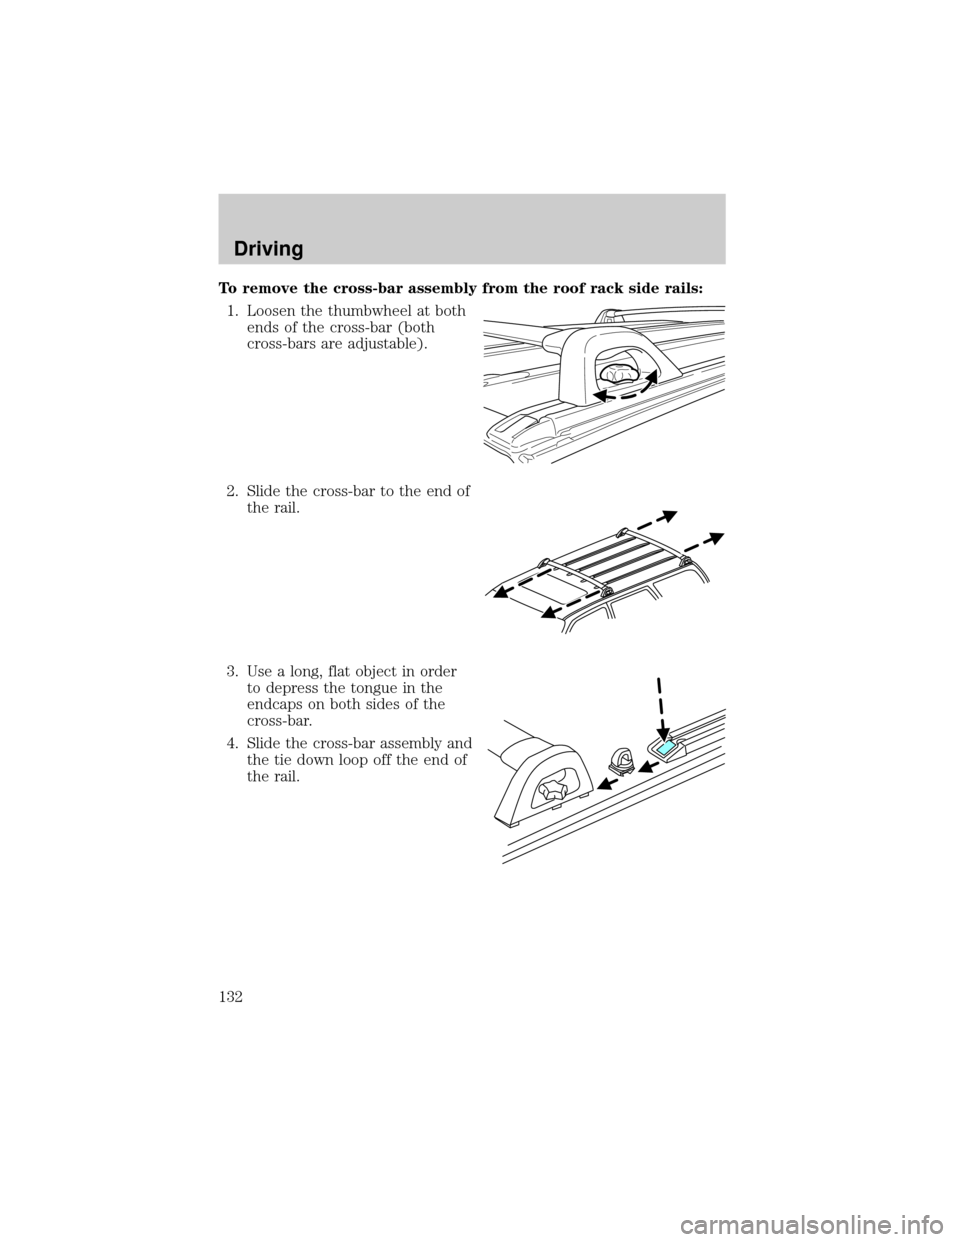
To remove the cross-bar assembly from the roof rack side rails:
1. Loosen the thumbwheel at both
ends of the cross-bar (both
cross-bars are adjustable).
2. Slide the cross-bar to the end of
the rail.
3. Use a long, flat object in order
to depress the tongue in the
endcaps on both sides of the
cross-bar.
4. Slide the cross-bar assembly and
the tie down loop off the end of
the rail.
Driving
132
Page 133 of 232
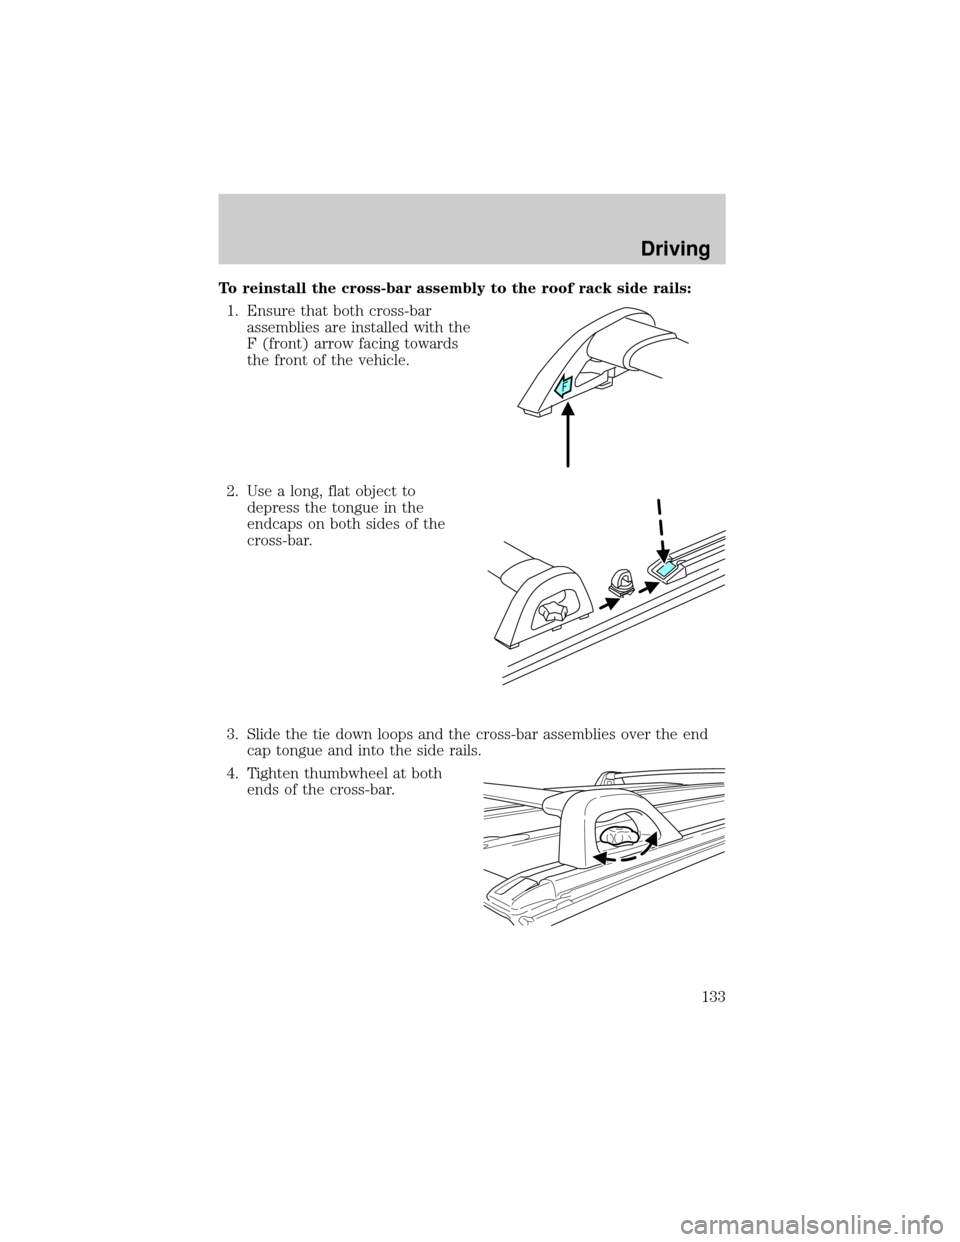
To reinstall the cross-bar assembly to the roof rack side rails:
1. Ensure that both cross-bar
assemblies are installed with the
F (front) arrow facing towards
the front of the vehicle.
2. Use a long, flat object to
depress the tongue in the
endcaps on both sides of the
cross-bar.
3. Slide the tie down loops and the cross-bar assemblies over the end
cap tongue and into the side rails.
4. Tighten thumbwheel at both
ends of the cross-bar.
Driving
133
Page 134 of 232
HAZARD FLASHER CONTROL
Use only in an emergency to warn traffic of vehicle breakdown,
approaching danger, etc. The hazard flashers can be operated when the
ignition is off.
²The hazard lights control is
located on the instrument panel
by the radio.
²Depress hazard lights control to
activate all hazard flashers simultaneously.
²Depress control again to turn the flashers off.
RESETTING THE FUEL PUMP SHUT-OFF SWITCH
FUEL
RESET
The fuel pump shut-off switch is a device intended to stop the electric
fuel pump when your vehicle has been involved in a substantial jolt.
After a collision, if the engine cranks but does not start, the fuel pump
shut-off switch may have been activated.
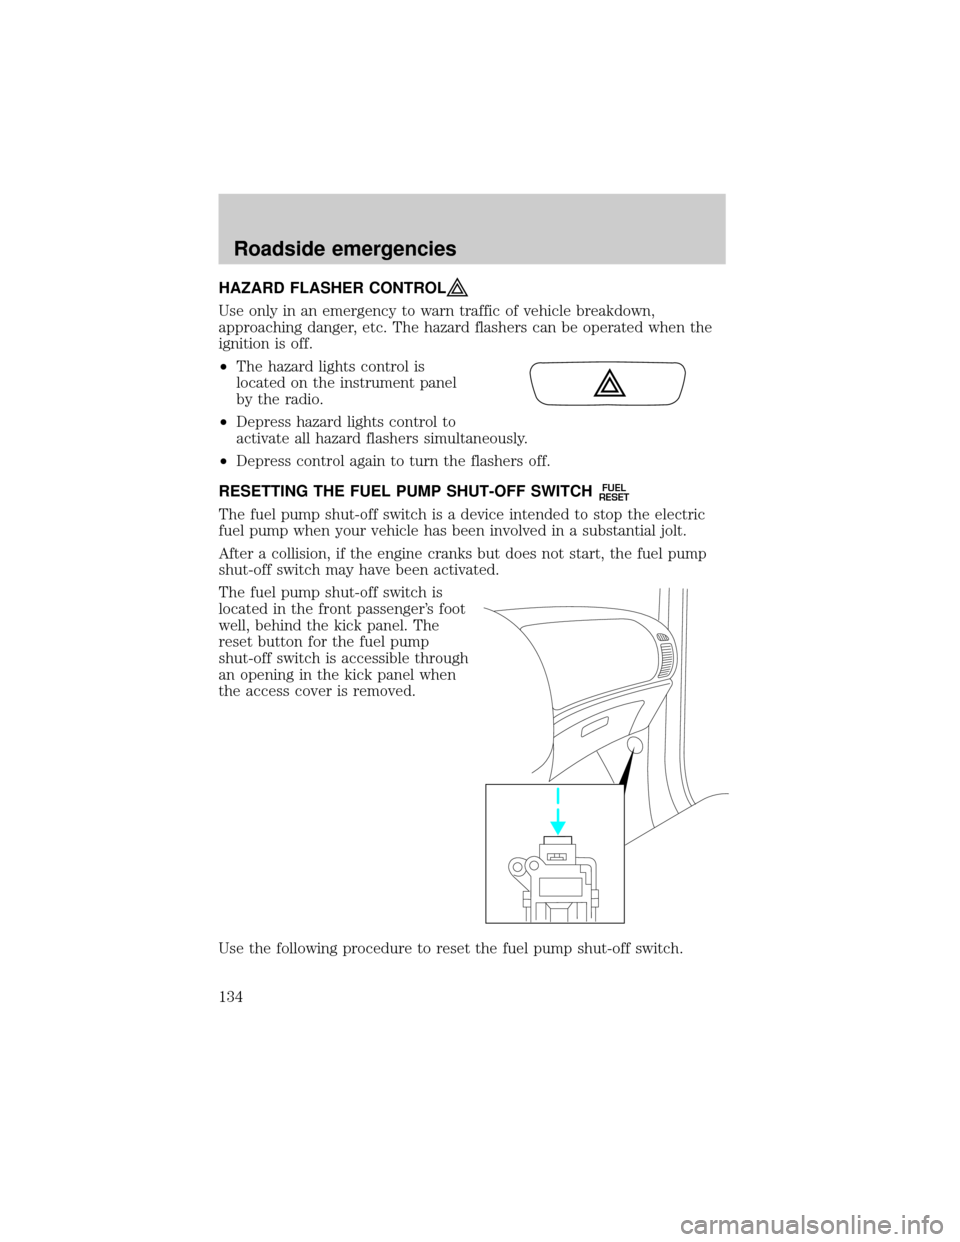
The fuel pump shut-off switch is
located in the front passenger's foot
well, behind the kick panel. The
reset button for the fuel pump
shut-off switch is accessible through
an opening in the kick panel when
the access cover is removed.
Use the following procedure to reset the fuel pump shut-off switch.
Roadside emergencies
134
Page 135 of 232
1. Turn the ignition to the LOCK/OFF position.
2. Check the fuel system for leaks.
3. If no fuel leak is apparent, reset the fuel pump shut-off switch by
pushing in on the reset button.
4. Turn the ignition to the ON position. Pause for a few seconds and
return the key to the LOCK/OFF position.
5. Make a further check for leaks in the fuel system.
FUSES AND RELAYS
Fuses
If electrical components in the
vehicle are not working, a fuse may
have blown. Blown fuses are
identified by a broken wire within
the fuse. Check the appropriate
fuses before replacing any electrical
components.
NOTE:Always replace a fuse with one that has the specified amperage
rating. Using a fuse with a higher amperage rating can cause severe wire
damage and could start a fire.
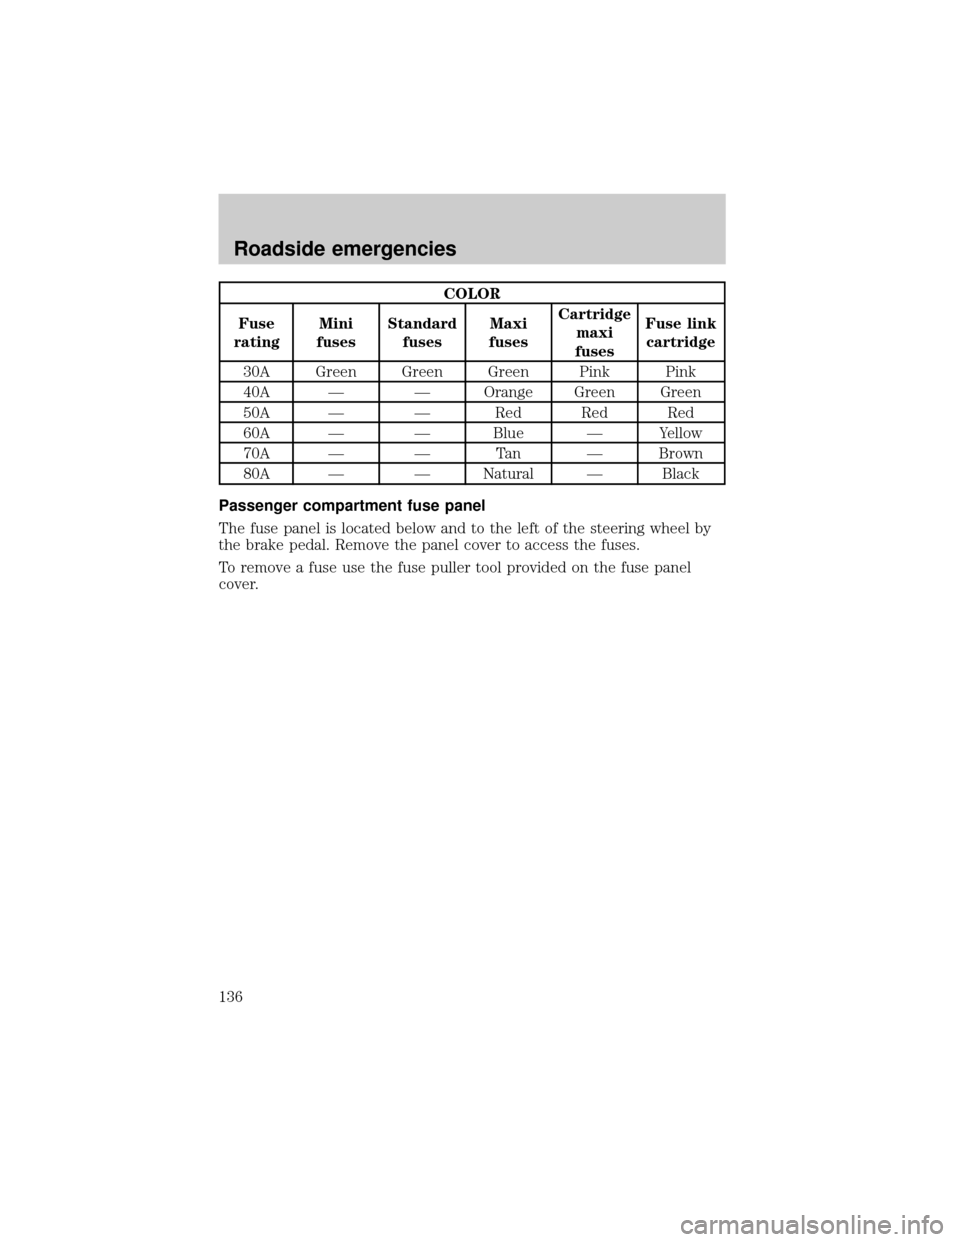
Standard fuse amperage rating and color
COLOR
Fuse
ratingMini
fusesStandard
fusesMaxi
fusesCartridge
maxi
fusesFuse link
cartridge
2A Grey Grey Ð Ð Ð
3A Violet Violet Ð Ð Ð
4A Pink Pink Ð Ð Ð
5A Tan Tan Ð Ð Ð
7.5A Brown Brown Ð Ð Ð
10A Red Red Ð Ð Ð
15A Blue Blue Ð Ð Ð
20A Yellow Yellow Yellow Blue Blue
25A Natural Natural Ð Ð Ð
15
Roadside emergencies
135
Page 136 of 232
COLOR
Fuse
ratingMini
fusesStandard
fusesMaxi
fusesCartridge
maxi
fusesFuse link
cartridge
30A Green Green Green Pink Pink
40A Ð Ð Orange Green Green
50A Ð Ð Red Red Red
60A Ð Ð Blue Ð Yellow
70A Ð Ð Tan Ð Brown
80A Ð Ð Natural Ð Black
Passenger compartment fuse panel
The fuse panel is located below and to the left of the steering wheel by
the brake pedal. Remove the panel cover to access the fuses.
To remove a fuse use the fuse puller tool provided on the fuse panel
cover.
Roadside emergencies
136
Page 137 of 232
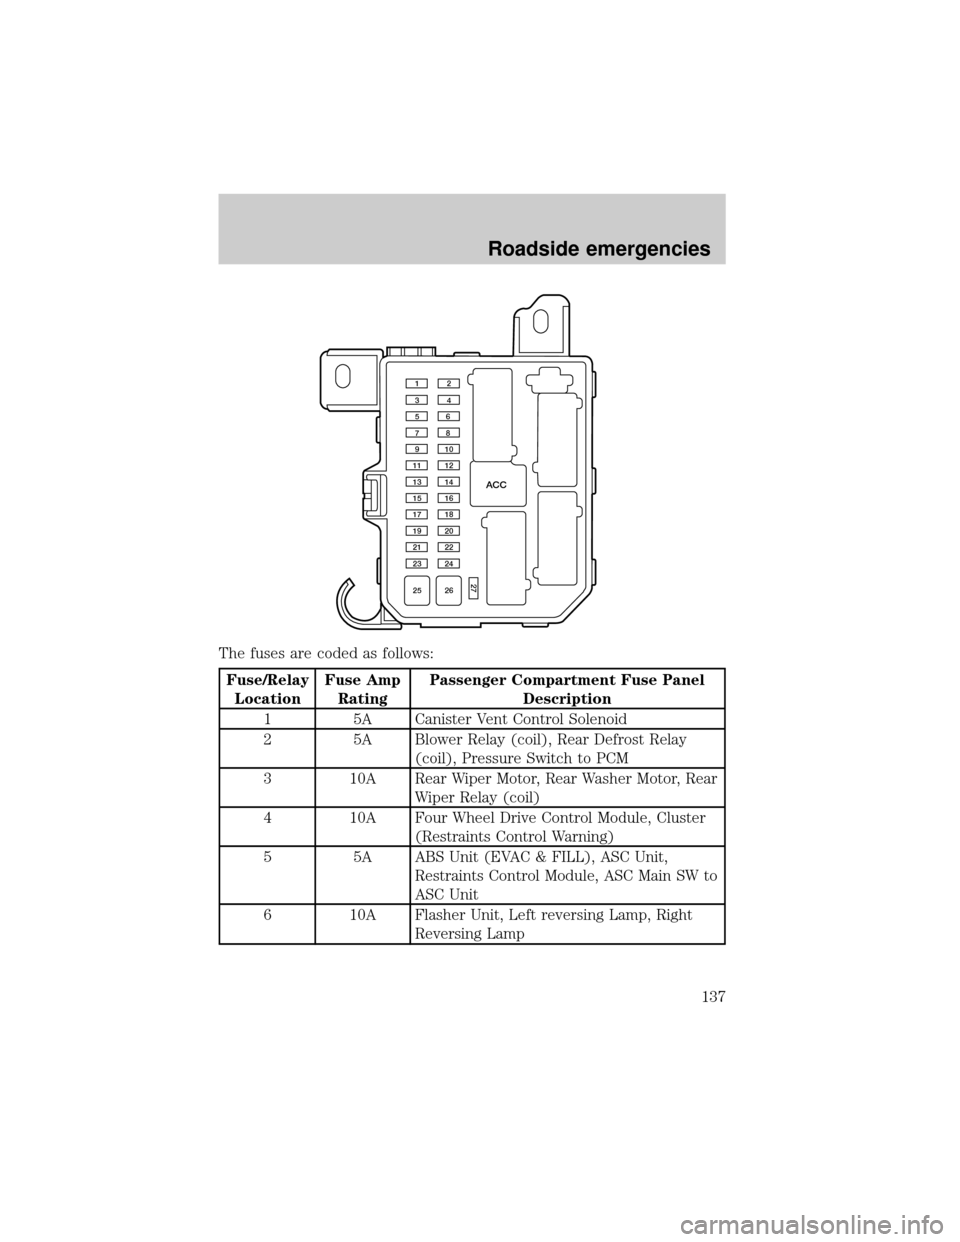
The fuses are coded as follows:
Fuse/Relay
LocationFuse Amp
RatingPassenger Compartment Fuse Panel
Description
1 5A Canister Vent Control Solenoid
2 5A Blower Relay (coil), Rear Defrost Relay
(coil), Pressure Switch to PCM
3 10A Rear Wiper Motor, Rear Washer Motor, Rear
Wiper Relay (coil)
4 10A Four Wheel Drive Control Module, Cluster
(Restraints Control Warning)
5 5A ABS Unit (EVAC & FILL), ASC Unit,
Restraints Control Module, ASC Main SW to
ASC Unit
6 10A Flasher Unit, Left reversing Lamp, Right
Reversing Lamp
ACC
12
34
56
78
910
11 12
13 14
15 16
17 18
19 20
21 22
23 24
25 26
27
Roadside emergencies
137
Page 138 of 232
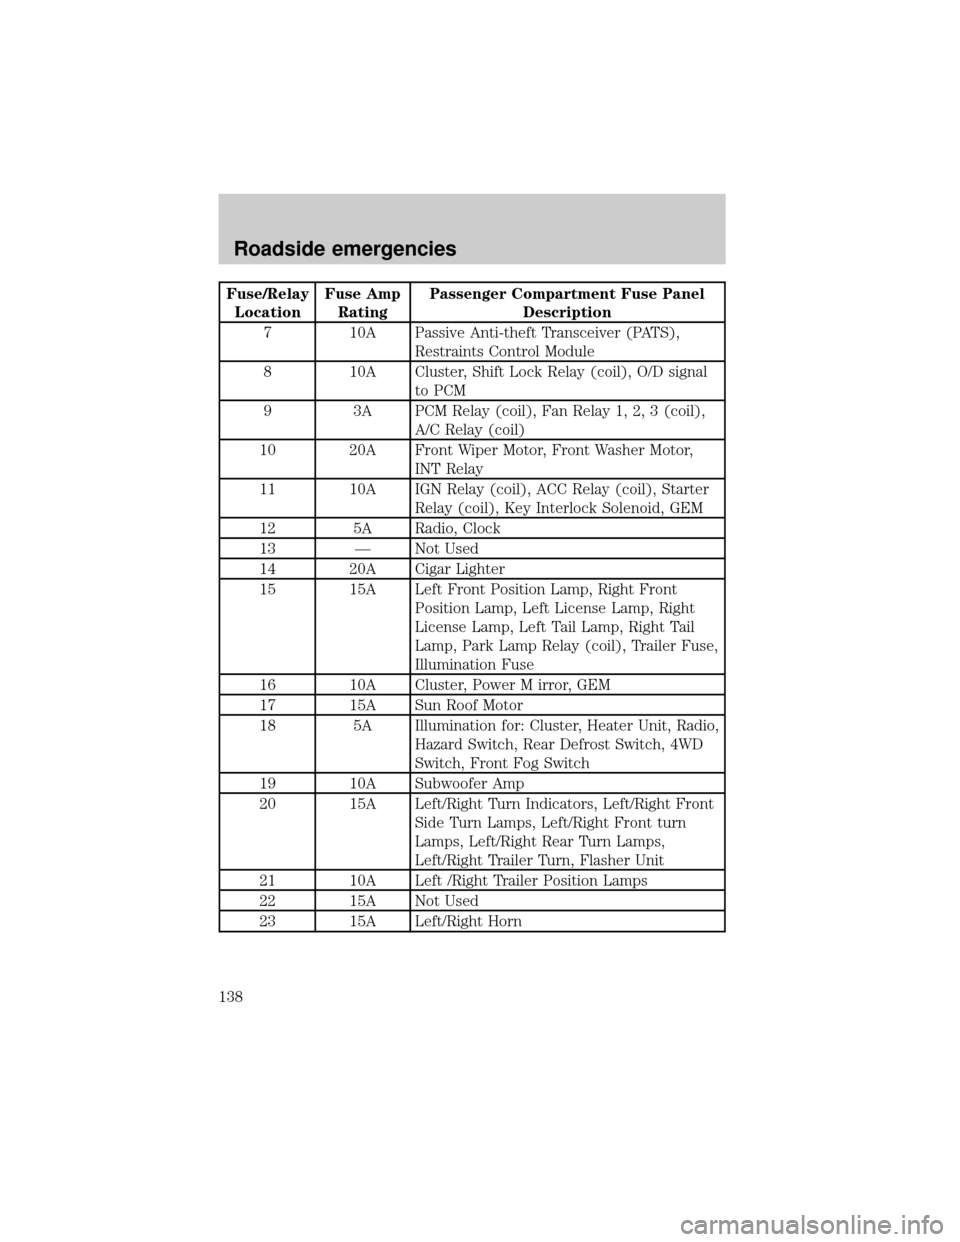
Fuse/Relay
LocationFuse Amp
RatingPassenger Compartment Fuse Panel
Description
7 10A Passive Anti-theft Transceiver (PATS),
Restraints Control Module
8 10A Cluster, Shift Lock Relay (coil), O/D signal
to PCM
9 3A PCM Relay (coil), Fan Relay 1, 2, 3 (coil),
A/C Relay (coil)
10 20A Front Wiper Motor, Front Washer Motor,
INT Relay
11 10A IGN Relay (coil), ACC Relay (coil), Starter
Relay (coil), Key Interlock Solenoid, GEM
12 5A Radio, Clock
13 Ð Not Used
14 20A Cigar Lighter
15 15A Left Front Position Lamp, Right Front
Position Lamp, Left License Lamp, Right
License Lamp, Left Tail Lamp, Right Tail
Lamp, Park Lamp Relay (coil), Trailer Fuse,
Illumination Fuse
16 10A Cluster, Power M irror, GEM
17 15A Sun Roof Motor
18 5A Illumination for: Cluster, Heater Unit, Radio,
Hazard Switch, Rear Defrost Switch, 4WD
Switch, Front Fog Switch
19 10A Subwoofer Amp
20 15A Left/Right Turn Indicators, Left/Right Front
Side Turn Lamps, Left/Right Front turn
Lamps, Left/Right Rear Turn Lamps,
Left/Right Trailer Turn, Flasher Unit
21 10A Left /Right Trailer Position Lamps
22 15A Not Used
23 15A Left/Right Horn
Roadside emergencies
138
Page 139 of 232
Fuse/Relay
LocationFuse Amp
RatingPassenger Compartment Fuse Panel
Description
24 15A Left/Right Stoplamps, Hight Mounted
Stoplamp, Left/Right Trailer Stoplamp, ABS
Unit, ASC Unit (Brake Pedal Position
Switch), PCM, Shift Solenoid
25 30A Power Window Motor - Right Front, Left
Front, Right Rear, Left Rear
26 30A Power Door Lock Motor - Right Front, Left
Front, Right Rear, Left Rear, GEM (Door
Lock Relay Coil), Power Seat
27 10A Audio, Cluster, Interior Lamp, Map Lamp
Cargo Lamp
ACC Ð Accessory Relay
Power distribution box
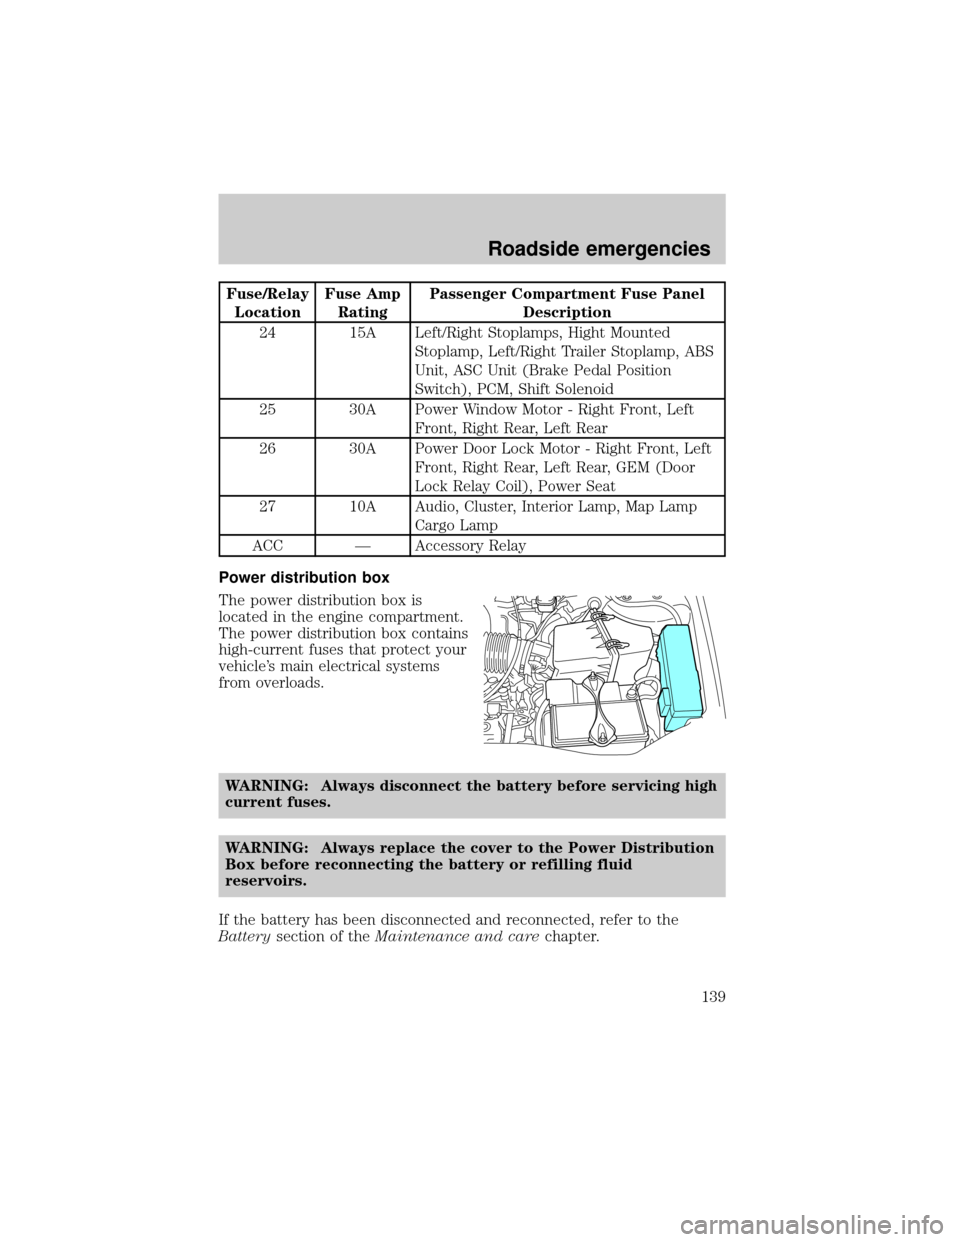
The power distribution box is
located in the engine compartment.
The power distribution box contains
high-current fuses that protect your
vehicle's main electrical systems
from overloads.
WARNING: Always disconnect the battery before servicing high
current fuses.
WARNING: Always replace the cover to the Power Distribution
Box before reconnecting the battery or refilling fluid
reservoirs.
If the battery has been disconnected and reconnected, refer to the
Batterysection of theMaintenance and carechapter.
Roadside emergencies
139
Page 140 of 232
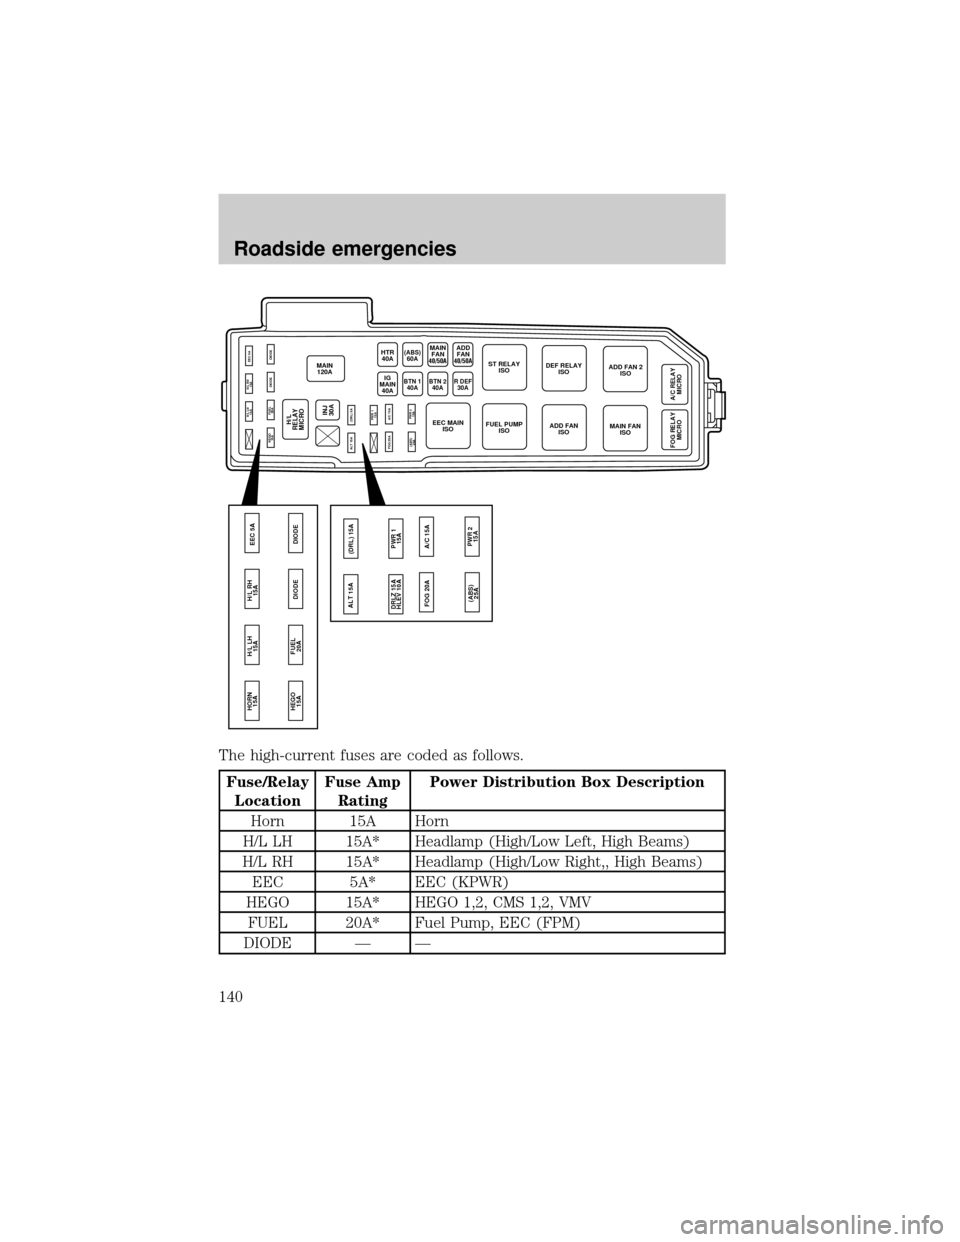
The high-current fuses are coded as follows.
Fuse/Relay
LocationFuse Amp
RatingPower Distribution Box Description
Horn 15A Horn
H/L LH 15A* Headlamp (High/Low Left, High Beams)
H/L RH 15A* Headlamp (High/Low Right,, High Beams)
EEC 5A* EEC (KPWR)
HEGO 15A* HEGO 1,2, CMS 1,2, VMV
FUEL 20A* Fuel Pump, EEC (FPM)
DIODE Ð Ð
MAIN
120A
HEGO
15A
ALT 15A
FOG 20A(DRL) 5A
PWR 1
15A
(ABS)
25APWR 2
15A A/C 15AFUEL
20ADIODE DIODE H/L LH
15AH/L RH
15AEEC 5A
HEGO
15A HORN
15A
FUEL
20ADIODE DIODE H/L LH
15AH/L RH
15AEEC 5A
INJ
30A
HTR
40A
BTN 1
40ABTN 240AR DEF30AIG
MAIN
40A
H/L
RELAY
MICRO
MAIN
FAN(ABS)
60AST RELAY
ISODEF RELAY
ISOADD FAN 2
ISO
A/C RELAY
MICRO FOG RELAY
MICRO
MAIN FAN
ISO ADD FAN
ISO EEC MAIN
ISOFUEL PUMP
ISO
ALT 15A
FOG 20A(DRL) 15A
PWR 1
15A DRLZ 15A
HLEV 10A
(ABS)
25APWR 2
15A A/C 15A
40/50AADD
FAN
40/50A
Roadside emergencies
140