warning light MAZDA MODEL TRIBUTE 2002 (in English) Owner's Manual
[x] Cancel search | Manufacturer: MAZDA, Model Year: 2002, Model line: MODEL TRIBUTE, Model: MAZDA MODEL TRIBUTE 2002Pages: 256, PDF Size: 2.66 MB
Page 135 of 256

squeal or groan noises when the brakes are applied. Such noises are
usually heard during the first few brake applications in the morning;
however, they may be heard at any time while braking and can be
aggravated by environmental conditions such as cold, heat, moisture,
road dust, salt or mud. If a ªmetal-to-metal,º ªcontinuous grindingº or
ªcontinuous squealº sound is present while braking, the brake linings
may be worn-out and should be inspected by an authorized Mazda
dealership.
Four-wheel anti-lock brake system (ABS) (if equipped)
If the vehicle is equipped with an anti-lock braking system (ABS), a
noise from the hydraulic pump motor and pulsation in the pedal may be
observed during ABS braking events. Pedal pulsation coupled with noise
while braking under panic conditions or on loose gravel, bumps, wet or
snowy roads is normal and indicates proper functioning of the vehicle's
anti-lock brake system.
NOTE:The ABS performs a self-check after you start the engine and
begin to drive away.
A brief mechanical noise may be heard during this test. This is normal. If
a malfunction is found, the ABS warning light will come on. If the vehicle
has continuous vibration or shudder in the steering wheel while braking,
the vehicle should be inspected by an authorized Mazda dealership.
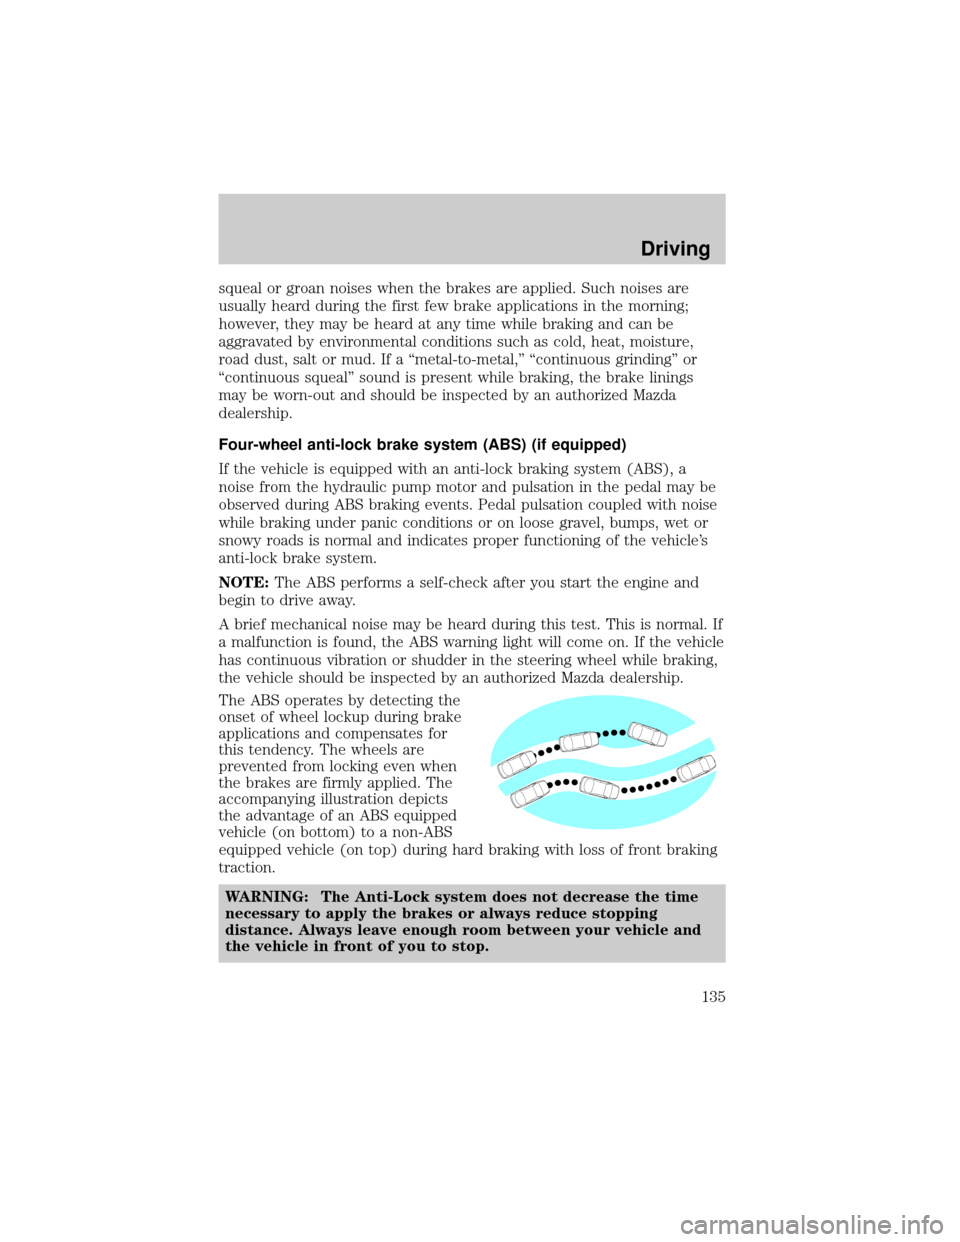
The ABS operates by detecting the
onset of wheel lockup during brake
applications and compensates for
this tendency. The wheels are
prevented from locking even when
the brakes are firmly applied. The
accompanying illustration depicts
the advantage of an ABS equipped
vehicle (on bottom) to a non-ABS
equipped vehicle (on top) during hard braking with loss of front braking
traction.
WARNING: The Anti-Lock system does not decrease the time
necessary to apply the brakes or always reduce stopping
distance. Always leave enough room between your vehicle and
the vehicle in front of you to stop.
Driving
135
Page 136 of 256

ABS warning lampABS(if equipped)
The
ABSwarning lamp in the instrument cluster momentarily illuminates
when the ignition is turned to the ON position. If the light does not
illuminate momentarily at start up, remains on or continues to flash, the
ABS needs to be serviced.
With the ABS light on, the anti-lock
brake system is disabled and normal
braking is still effective unless the
brake warning light also remains
illuminated with parking brake
released. (If your brake warning lamp illuminates, have your vehicle
serviced immediately by an authorized Mazda dealership.)
Using four wheel ABS (if equipped)
²In an emergency or when maximum efficiency from the ABS is
required, apply continuous force on the brake. The ABS will be
activated immediately, thus allowing you to retain full steering control
of your vehicle and, providing there is sufficient space, will enable you
to avoid obstacles and bring the vehicle to a controlled stop.
WARNING: The Anti-Lock system does not decrease the time
necessary to apply the brakes or always reduce stopping
distance. Always leave enough room between your vehicle and
the vehicle in front of you to stop.
NOTE:We recommend that you familiarize yourself with this braking
technique. However, avoid taking any unnecessary risks.
Parking brake
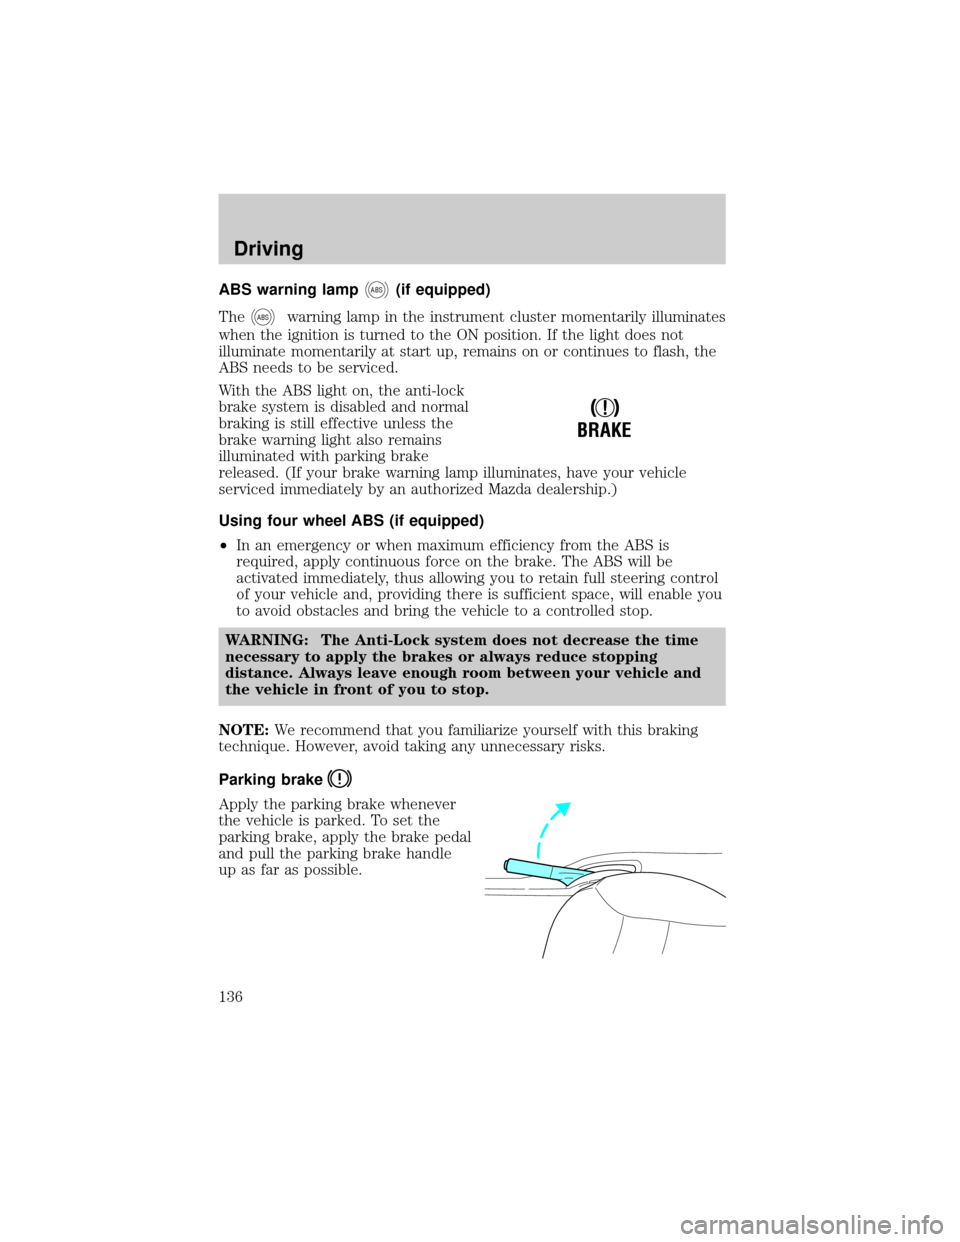
Apply the parking brake whenever
the vehicle is parked. To set the
parking brake, apply the brake pedal
and pull the parking brake handle
up as far as possible.
!
BRAKE
Driving
136
Page 137 of 256

The BRAKE warning lamp in the
instrument cluster illuminates and
remains illuminated (when the
ignition is turned ON) until the
parking brake is released.
WARNING: Always set the parking brake fully and make sure
that the gearshift is securely latched in P (Park) (automatic
transmission) or in 1 (First Gear) (manual transmission).
NOTE:The parking brake is not recommended to stop a moving vehicle.
However, if the normal brakes fail, the parking brake can be used to stop
your vehicle in an emergency. Since the parking brake applies only the
rear brakes, the vehicle's stopping distance will increase greatly and the
handling of your vehicle will be adversely affected.
To release the parking brake, the
brake handle may need to be pulled
up slightly to release pressure
before pushing in the button.
Push the button on the end of
the parking brake handle and
push the handle down as far as
possible. Driving with the
parking brake applied will cause
the brakes to wear out quickly
and reduce fuel economy.
STEERING
Your vehicle is equipped with power steering. Power steering uses energy
from the engine to decrease the driver's effort in steering the vehicle.
To prevent damage to the power steering pump:
²Never hold the steering wheel to the extreme right or the extreme left
for more than a few seconds when the engine is running.
²Do not operate the vehicle with the power steering pump fluid level
below the MIN mark on the reservoir.
If the power steering system breaks down (or if the engine is turned
off), you can steer the vehicle manually, but it takes more effort.
If the steering wanders or pulls, the condition could be caused by any of
the following:
²Underinflated tire(s) on any wheel(s)
!
BRAKE
Driving
137
Page 140 of 256

4. Insert a tool (or screw driver)
into the access hole to override
the brake-shift interlock. Apply
the brake and shift into Neutral
while holding down the override
tab.
If it is necessary to use the above procedure to move the gearshift lever,
it is possible that a fuse has blown or the vehicle's brakelamps are not
operating properly. Refer toFuses and relaysin theRoadside
emergencieschapter.
WARNING: Do not drive your vehicle until you verify that the
brakelamps are working. Failure to check the brakelights and
subsequent use of the brakes may result in a rear-end collision.
If your vehicle gets stuck in mud or snow it may be rocked out by
shifting between forward and reverse gears, stopping between shifts, in a
steady pattern. Press lightly on the accelerator in each gear.
Do not rock the vehicle if the engine is not at normal operating
temperature or damage to the transmission may occur.
Do not rock the vehicle for more than a few minutes or damage
to the transmission and tires may occur or the engine may
overheat.
WARNING: Always set the parking brake fully and make sure
the gearshift is latched in P (Park). Turn the ignition to the
LOCK position and remove the key whenever you leave your
vehicle.
WARNING: If the parking brake is fully released, but the brake
warning lamp remains illuminated, the brakes may not be
working properly. See your authorized Mazda dealership.
Driving
140
Page 149 of 256

²If your vehicle is equipped with this 4x4 system, a spare tire of
a different diameter than the road tires should never be used.
Such a tire could result in damage to driveline components and
make the vehicle difficult to control.
WARNING: Utility and four-wheel drive vehicles are not
designed for cornering at speeds as high as passenger cars any
more than low-slung sports cars are designed to perform
satisfactorily under off-road conditions. Avoid sharp turns or
abrupt maneuvers in these vehicles.
4x4 system indicator lights
The 4x4 mode indicator light illuminates only under the following
conditions. If the indicator light illuminates when driving in the 4x4
AUTO mode, contact your Mazda dealer as soon as possible.
The indicator light illuminates when the 4x4 ON mode is engaged.
Shifting between 4x4 Auto and ON modes
Press the four-wheel drive control to
apply power to both axles. When
you activate the control, the
indicator light will illuminate in the
instrument cluster.
When you press the control again,
4x4 AUTO is activated and, the indicator light will turn off.
Either shift can be done at a stop or while driving at any speed.
Driving off-road with truck and utility vehicles
4x4 vehicles are specially equipped for driving on sand, snow, mud and
rough terrain and have operating characteristics that are somewhat
different from conventional vehicles, both on and off the road.
How your vehicle differs from other vehicles
Truck and utility vehicles can differ from some other vehicles. Your
vehicle may be higher to allow it to travel over rough terrain without
getting hung up or damaging underbody components.
The differences that make your vehicle so versatile also make it handle
differently than an ordinary passenger car.
LOCK
Driving
149
Page 170 of 256

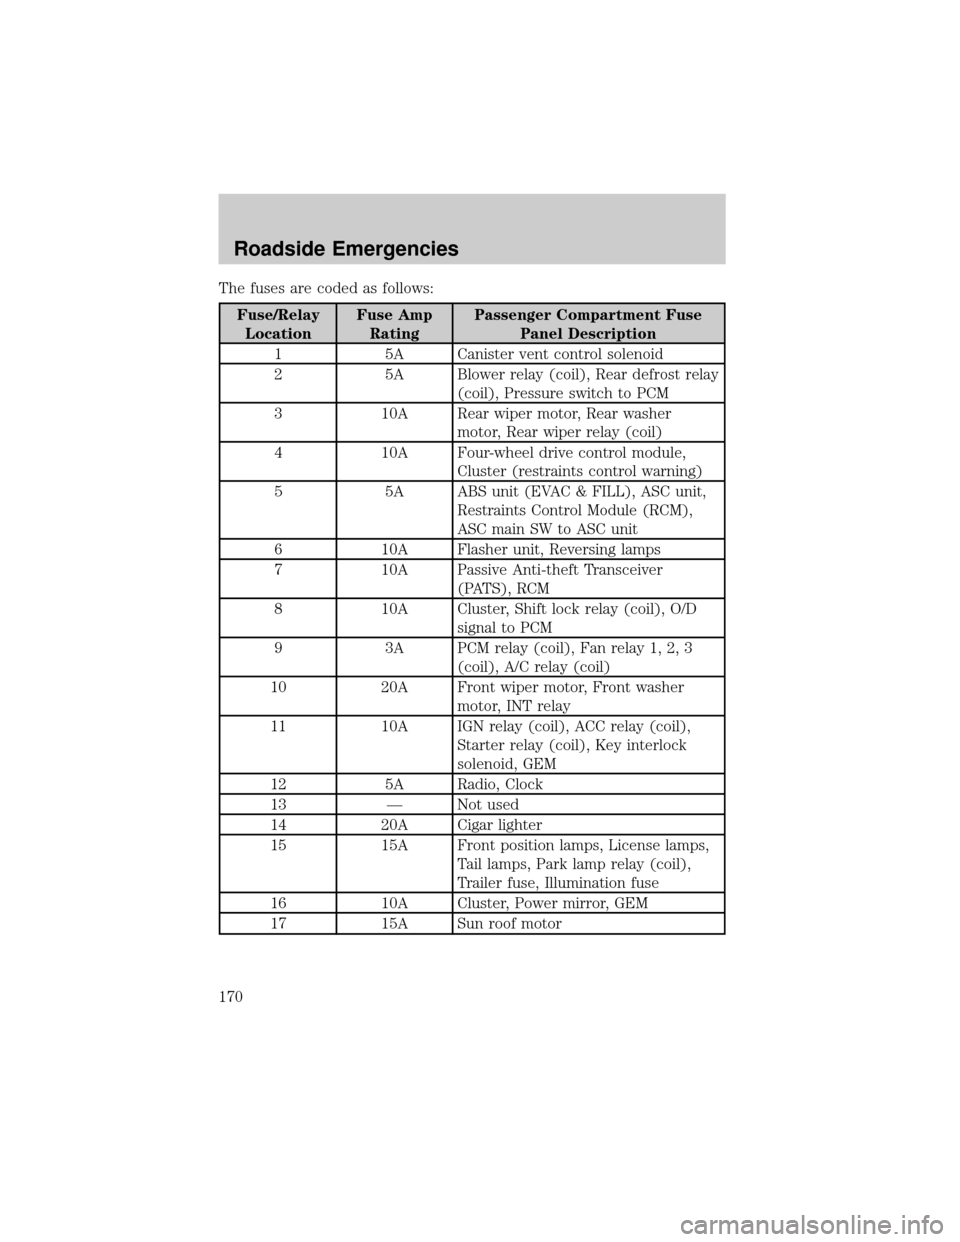
The fuses are coded as follows:
Fuse/Relay
LocationFuse Amp
RatingPassenger Compartment Fuse
Panel Description
1 5A Canister vent control solenoid
2 5A Blower relay (coil), Rear defrost relay
(coil), Pressure switch to PCM
3 10A Rear wiper motor, Rear washer
motor, Rear wiper relay (coil)
4 10A Four-wheel drive control module,
Cluster (restraints control warning)
5 5A ABS unit (EVAC & FILL), ASC unit,
Restraints Control Module (RCM),
ASC main SW to ASC unit
6 10A Flasher unit, Reversing lamps
7 10A Passive Anti-theft Transceiver
(PATS), RCM
8 10A Cluster, Shift lock relay (coil), O/D
signal to PCM
9 3A PCM relay (coil), Fan relay 1, 2, 3
(coil), A/C relay (coil)
10 20A Front wiper motor, Front washer
motor, INT relay
11 10A IGN relay (coil), ACC relay (coil),
Starter relay (coil), Key interlock
solenoid, GEM
12 5A Radio, Clock
13 Ð Not used
14 20A Cigar lighter
15 15A Front position lamps, License lamps,
Tail lamps, Park lamp relay (coil),
Trailer fuse, Illumination fuse
16 10A Cluster, Power mirror, GEM
17 15A Sun roof motor
Roadside Emergencies
170
Page 201 of 256

windshield, rear window or the wiper blades may be the cause. These
may include hot wax treatments used by commercial car washes, tree
sap, or other organic contamination. To clean these items, please follow
these tips:
²The windshield or rear window may be cleaned with a non-abrasive
cleaner such as Ultra Clear Spray Glass Cleaner, available from your
local Mazda dealer.
²Do not use abrasives, as they may cause scratches.
²Do not use fuel, kerosene, or paint thinner to clean any parts.
²Wiper blades can be cleaned with isopropyl (rubbing) alcohol or
windshield washer solution. Be sure to replace wiper blades when they
appear worn or do not function properly.
INSTRUMENT PANEL AND CLUSTER LENS
Clean the instrument panel with a damp cloth, then dry with a dry cloth.
²Avoid cleaners or polish that increase the gloss of the upper portion of
the instrument panel. The dull finish in this area helps protect the
driver from undesirable windshield reflection.
WARNING: Do not use chemical solvents or strong detergents
when cleaning the steering wheel or instrument panel to avoid
contamination of the air bag system.
²Be certain to wash or wipe your hands clean if you have been in
contact with certain products such as insect repellent and suntan
lotion in order to avoid possible damage to the painted surfaces.
WOOD-TONE TRIM
²Clean the area with a damp cloth, then dry by wiping with a dry, soft,
clean cloth.
²Do not use household or glass cleaners as these may damage the
finish.
INTERIOR
For fabric, carpets, cloth seats, safety belts and seats equipped with side
air bags:
²Remove dust and loose dirt with a vacuum cleaner.
²Remove light stains and soil with Extra Strength Upholstery Cleaner,
available at your local Mazda dealer.
Cleaning
201
Page 217 of 256

BATTERY
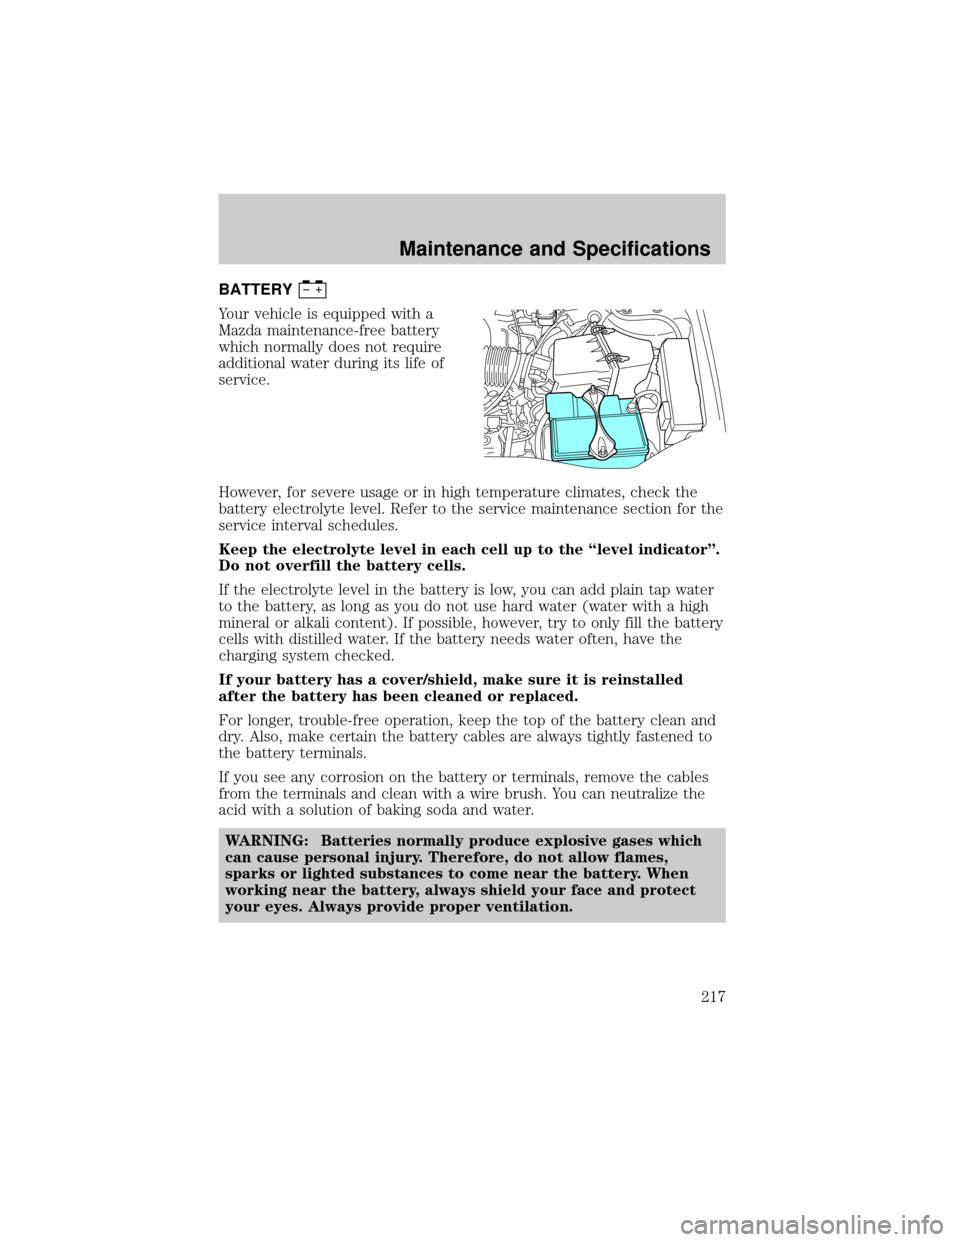
Your vehicle is equipped with a
Mazda maintenance-free battery
which normally does not require
additional water during its life of
service.
However, for severe usage or in high temperature climates, check the
battery electrolyte level. Refer to the service maintenance section for the
service interval schedules.
Keep the electrolyte level in each cell up to the ªlevel indicatorº.
Do not overfill the battery cells.
If the electrolyte level in the battery is low, you can add plain tap water
to the battery, as long as you do not use hard water (water with a high
mineral or alkali content). If possible, however, try to only fill the battery
cells with distilled water. If the battery needs water often, have the
charging system checked.
If your battery has a cover/shield, make sure it is reinstalled
after the battery has been cleaned or replaced.
For longer, trouble-free operation, keep the top of the battery clean and
dry. Also, make certain the battery cables are always tightly fastened to
the battery terminals.
If you see any corrosion on the battery or terminals, remove the cables
from the terminals and clean with a wire brush. You can neutralize the
acid with a solution of baking soda and water.
WARNING: Batteries normally produce explosive gases which
can cause personal injury. Therefore, do not allow flames,
sparks or lighted substances to come near the battery. When
working near the battery, always shield your face and protect
your eyes. Always provide proper ventilation.
Maintenance and Specifications
217
Page 222 of 256

WARNING: To reduce the risk of personal injury, make sure the
engine is cool before unscrewing the coolant pressure relief
cap. The cooling system is under pressure; steam and hot liquid
can come out forcefully when the cap is loosened slightly.
1. Before you begin, turn the engine off and let it cool.
2. When the engine is cool, wrap a thick cloth around the coolant
pressure relief cap on the coolant reservoir (an opaque plastic
bottle). Slowly turn cap counterclockwise (left) until pressure begins
to release.
3. Step back while the pressure releases.
4. When you are sure that all the pressure has been released, use the
cloth to turn it counterclockwise and remove the cap.
5. Fill the coolant reservoir slowly with the proper coolant mixture (see
above), to within the ªcold fill rangeº or the ªcold fullº level on the
reservoir. If you removed the radiator cap in an overflow system, fill
the radiator until the coolant is visible and radiator is almost full.
6. Replace the cap. Turn until tightly installed. (Cap must be tightly
installed to prevent coolant loss.)
After any coolant has been added, run the engine for a few minutes to
mix the coolant. Check the coolant concentration. Make sure the engine
is off and cool before removing the coolant pressure relief cap (see
preceding steps on cap removal). Check the concentration per the
Checking Engine Coolantsection. If the concentration is not 50/50
(protection to ±34ÉF/±36ÉC), drain some coolant and adjust the
concentration. It may take several drains and additions to obtain a 50/50
coolant concentration.
Whenever coolant has been added, the coolant level in the coolant
reservoir should be checked the next few times you drive the vehicle. If
necessary, add enough 50/50 concentration of engine coolant and
distilled water to bring the liquid level to the proper level.
If you have to add more than 1.0 liter (1.0 quart) of engine coolant per
month, have your dealer check the engine cooling system. Your cooling
system may have a leak. Operating an engine with a low level of coolant
can result in engine overheating and possible engine damage).
Maintenance and Specifications
222
Page 226 of 256

WARNING: The flow of fuel through a fuel pump nozzle can
produce static electricity, which can cause a fire if fuel is
pumped into an ungrounded fuel container. Be very careful to
put the container on the ground before adding fuel to it.
Use the following guidelines to avoid static build-up when filling an
ungrounded fuel container:
²Place approved fuel container on the ground.
²DO NOT fill a fuel container while it is in the vehicle (including the
cargo area).
²Keep the fuel pump nozzle in contact with the fuel container while
filling.
²DO NOT use a device that would hold the fuel pump handle in the fill
position.
Choosing the right fuel
²Use only UNLEADED FUEL. The use of leaded fuel is
prohibited by law and could damage your vehicle.
²Do not use fuel containing methanol. It can damage critical fuel
system components.
²Your vehicle was not designed to use fuel or fuel additives with
metallic compounds, including manganese-based compounds
containing MMT.
²Repairs to correct the effects of using a fuel for which your
vehicle was not designed may not be covered by your warranty.
Octane recommendations
Your vehicle is designed to use
ªRegularº unleaded gasoline with
pump (R+M)/2 octane rating of 87.
We do not recommend the use of
gasolines labeled as ªRegularº that
are sold with octane ratings of 86 or lower in high altitude areas.
NOTE:Do not be concerned if your engine sometimes knocks lightly.
However, if it knocks heavily under most driving conditions while you are
using fuel with the recommended octane rating, see your authorized
Mazda dealer to prevent any engine damage.
Fuel quality
NOTE:If you are experiencing starting, rough idle or hesitation
driveability problems during a cold start, try a different brand of
87(R+M)/2 METHOD
Maintenance and Specifications
226