ignition MAZDA MODEL TRIBUTE 2008 Quick Tips (in English)
[x] Cancel search | Manufacturer: MAZDA, Model Year: 2008, Model line: MODEL TRIBUTE, Model: MAZDA MODEL TRIBUTE 2008Pages: 15, PDF Size: 3.69 MB
Page 2 of 15
DRIVER’S VIEW
Always check the Owner’s Manual for more operating information and safety features
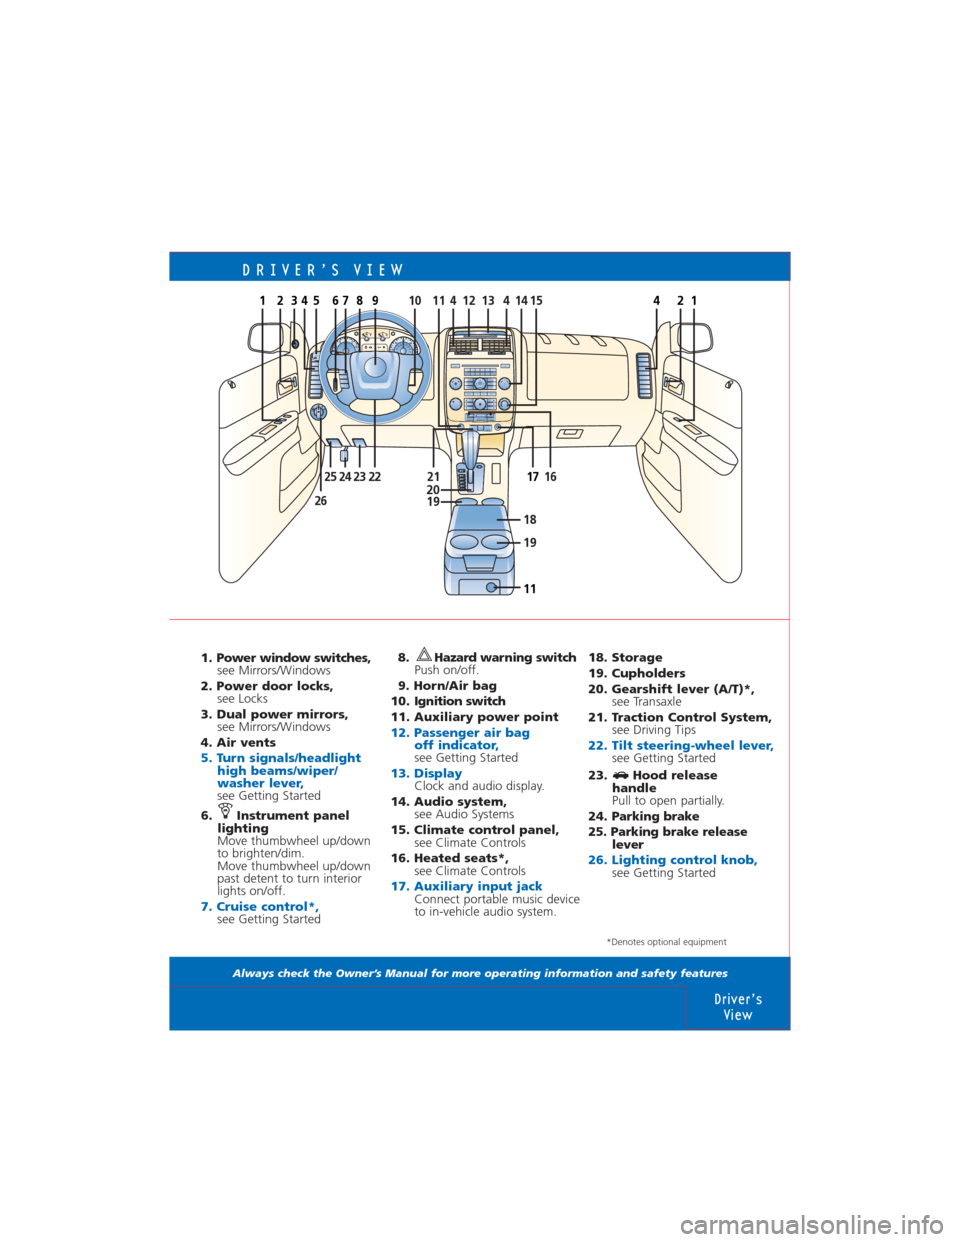
1. Power window switches,
see Mirrors/Windows
2. Power door locks,
see Locks
3. Dual power mirrors,
see Mirrors/Windows
4. Air vents
5. Turn signals/headlight
high beams/wiper/
washer lever,
see Getting Started
6. Instrument panel
lighting
Move thumbwheel up/down
to brighten/dim.
Move thumbwheel up/down
past detent to turn interior
lights on/off.
7. Cruise control*,see Getting Started
8. Hazard warning switch
Push on/off.
9. Horn/Air bag
10. Ignition switch
11. Auxiliary power point
12. Passenger air bag
off indicator,
see Getting Started
13. DisplayClock and audio display.
14. Audio system,
see Audio Systems
15. Climate control panel,
see Climate Controls
16. Heated seats*,
see Climate Controls
17. Auxiliary input jackConnect portable music device
to in-vehicle audio system.
18. Storage
19. Cupholders
20. Gearshift lever (A/T)*,
see Transaxle
21. Traction Control System,
see Driving Tips
22. Tilt steering-wheel lever,see Getting Started
23. Hood release
handle
Pull to open partially.
24. Parking brake
25. Parking brake release
lever
26. Lighting control knob,see Getting Started
Driver’s
View
*Denotes optional equipment
4x1000r/min3
2
1
05EF6
7453.2
2081.4TRIP
A80mph200180 160 140 120 100
80
60
40
20
012 010 0 80 60
40
20
CH
VOLTUNE
OKSCAN
SHUFFLE
CAT/FOLDSEEK/
TRACKSOUND
MENU
TEXT
1
2
3
4
12
73
84
95
06
CLOCK DIRECT
AM/FM CD SAT AUX
LOADEJECT2
1
0
0
2019
11
19 18
313 12 22451144 11 4 14 15
2423 25 16172122
897610
26
Page 3 of 15
GETTING STARTED
Always check the Owner’s Manual for more operating information and safety features
Getting Started
Tribute Quick Tips®are
designed to quickly familiarize
you with some important
features of your Tribute.
The Driver’s View tab is your
index to the Quick Tips
®, locate
the item you would like to
learn more about and then
turn to the listed tab.
This Getting Started section
contains important operating
tips about your Tribute.
Items identified in blue text
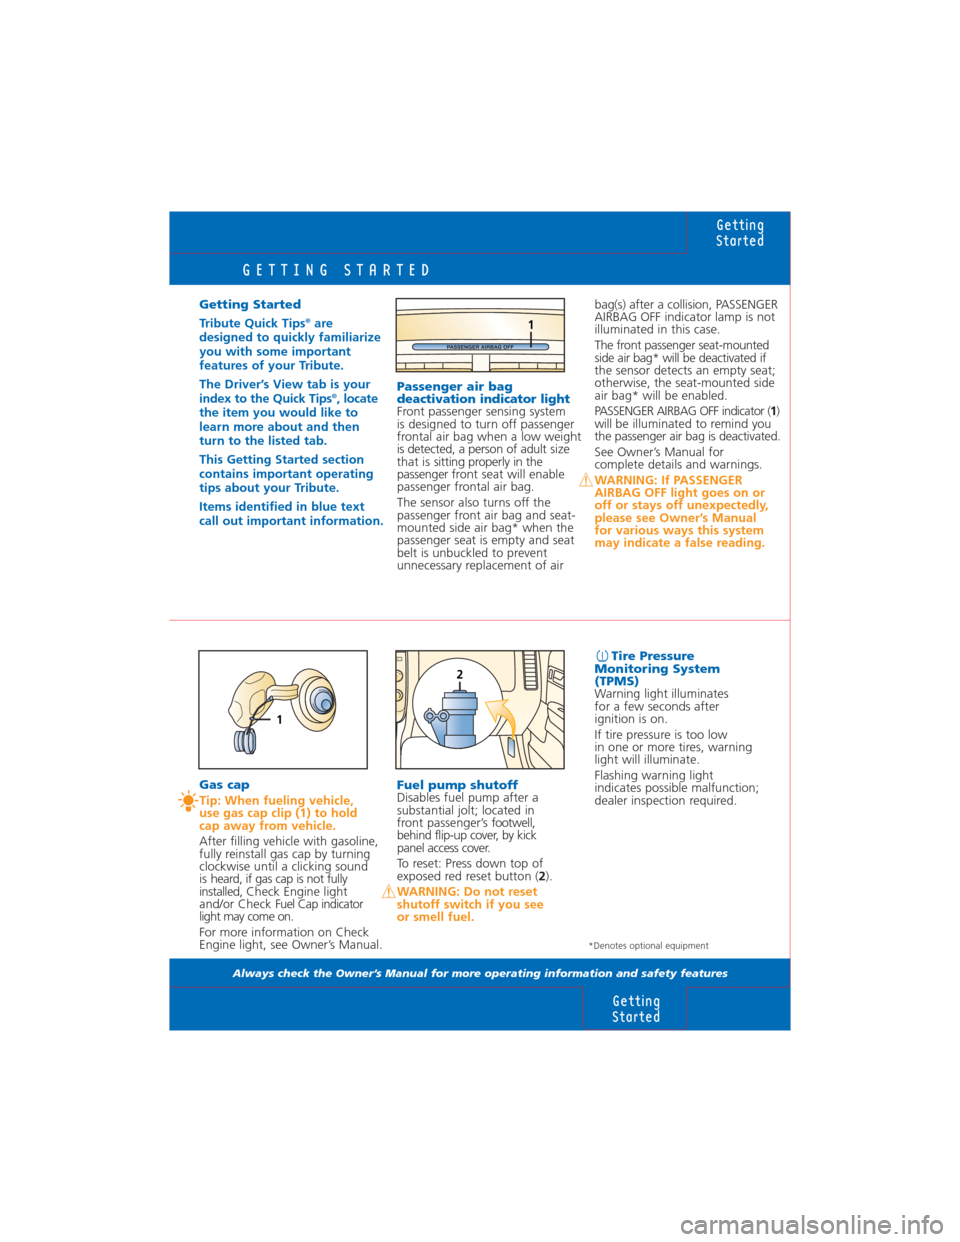
call out important information.Passenger air bag
deactivation indicator lightFront passenger sensing system
is designed to turn off passenger
frontal air bag when a low weight
is detected, a person of adultsize
that is sitting properly in the
passenger front seat will enable
passenger frontal air bag.
The sensor also turns off the
passenger front air bag and seat-
mounted side air bag* when the
passenger seat is empty and seat
belt is unbuckled to prevent
unnecessary replacement of airbag(s) after a collision, PASSENGER
AIRBAG OFF indicator lamp is not
illuminated in this case.
The front passenger seat-mounted
side air bag* will be deactivated if
the sensor detects an empty seat;
otherwise, the seat-mounted side
air bag* will be enabled.
PASSENGER AIRBAG OFF indicator (1)
will be illuminated to remind you
the passenger air bag is deactivated.
See Owner’s Manual for
complete details and warnings.
WARNING: If PASSENGER
AIRBAG OFF light goes on or
off or stays off unexpectedly,
please see Owner’s Manual
for various ways this system
may indicate a false reading.
Gas cap
Tip: When fueling vehicle,
use gas cap clip (1) to hold
cap away from vehicle.
After filling vehicle with gasoline,
fully reinstall gas cap by turning
clockwise until a clicking sound
is heard, if gas cap is not fully
installed, Check Engine light
and/or Check Fuel Cap indicator
light may come on.
For more information on Check
Engine light, see Owner’s Manual.
Fuel pump shutoff Disables fuel pump after a
substantial jolt; located in
front passenger’s footwell,
behind flip-up cover, by kick
panel access cover.
To reset: Press down top of
exposed red reset button (2).
WARNING: Do not reset
shutoff switch if you see
or smell fuel.Tire Pressure
Monitoring System
(TPMS)
Warning light illuminates
for a few seconds after
ignition is on.
If tire pressure is too low
in one or more tires, warning
light will illuminate.
Flashing warning light
indicates possible malfunction;
dealer inspection required.
Getting
Started
Getting
Started
PASSENGER AIRBAG OFF
1
1
TUN E
OKEJECT
2
*Denotes optional equipment
Page 4 of 15
GETTING STARTED
Always check the Owner’s Manual for more operating information and safety features
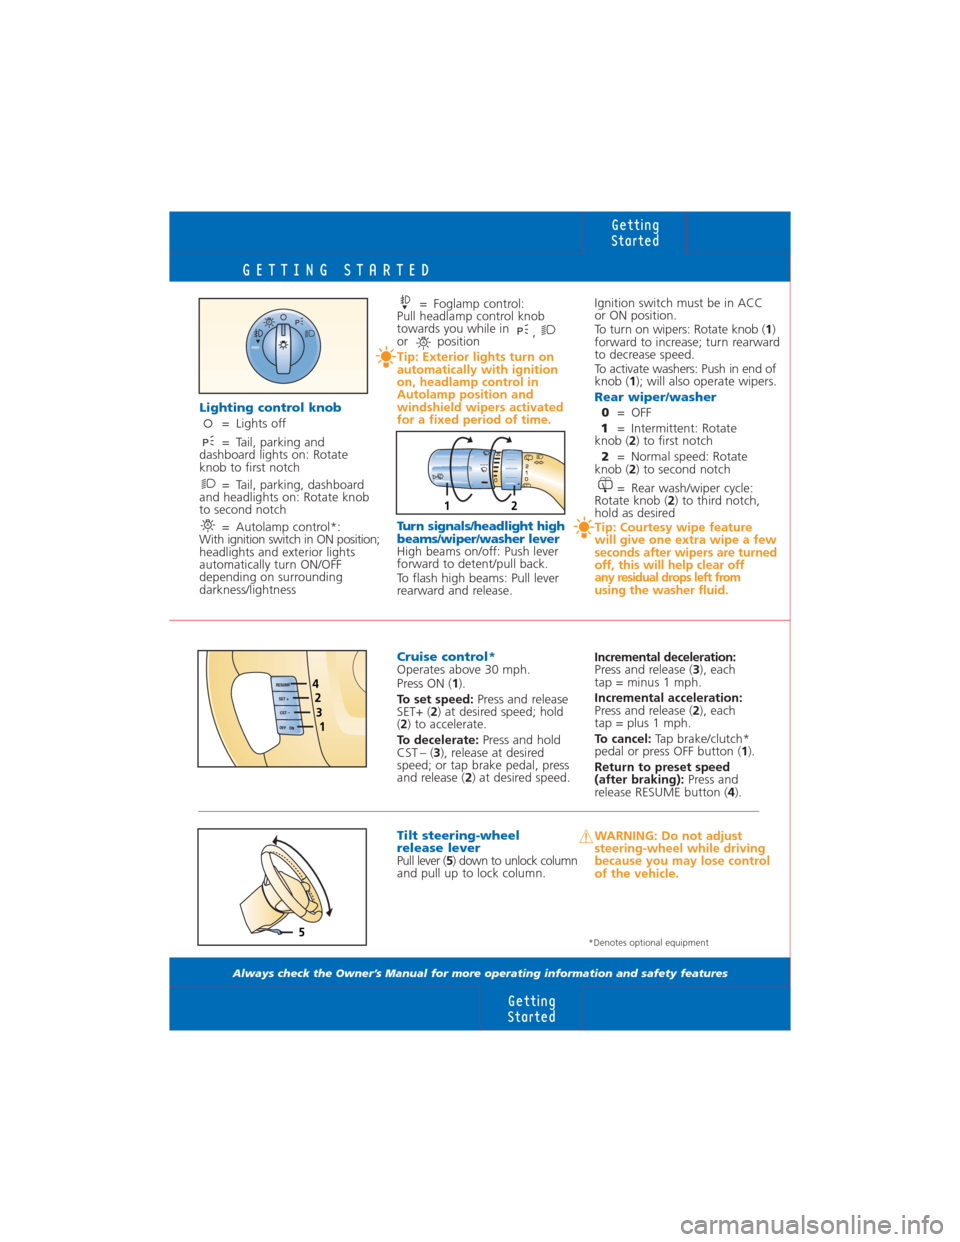
Lighting control knob= Lights off
= Tail, parking and
dashboard lights on: Rotate
knob to first notch
= Tail, parking, dashboard
and headlights on: Rotate knob
to second notch
= Autolamp control*:
With ignition switch in ON position;
headlights and exterior lights
automatically turn ON/OFF
depending on surrounding
darkness/lightness
A
= Foglamp control:
Pull headlamp control knob
towards you while in
,
or position
Tip: Exterior lights turn on
automatically with ignition
on, headlamp control in
Autolamp position and
windshield wipers activated
for a fixed period of time.
Turn signals/headlight high
beams/wiper/washer lever
High beams on/off: Push lever
forward to detent/pull back.
To flash high beams: Pull lever
rearward and release.
A
Ignition switch must be in ACC
or ON position.
To turn on wipers: Rotate knob (
1)
forward to increase; turn rearward
to decrease speed.
To activate washers: Push in end of
knob (1); will also operate wipers.
Rear wiper/washer
0= OFF
1= Intermittent: Rotate
knob (2) to first notch
2= Normal speed: Rotate
knob (2) to second notch
= Rear wash/wiper cycle:
Rotate knob (2) to third notch,
hold as desired
Tip: Courtesy wipe feature
will give one extra wipe a few
seconds after wipers are turned
off, this will help clear off
any residual drops left from
using the washer fluid.
Cruise control*Operates above 30 mph.
Press ON (1).
To set speed:Press and release
SET+ (2) at desired speed; hold
(2) to accelerate.
To decelerate:Press and hold
CST – (3), release at desired
speed; or tap brake pedal, press
and release (2) at desired speed.Incremental deceleration:
Press and release (3), each
tap = minus 1 mph.
Incremental acceleration:
Press and release (2), each
tap = plus 1 mph.
To cancel: Tap brake/clutch*
pedal or press OFF button (1).
Return to preset speed
(after braking):Press and
release RESUME button (4).
Tilt steering-wheel
release lever
Pull lever (5) down to unlock column
and pull up to lock column.
WARNING: Do not adjust
steering-wheel while driving
because you may lose control
of the vehicle.
Getting
Started
Getting
Started
RES
UME
SET
+
C
ST –
O
FF
ON1324
5*Denotes optional equipment
A
2
1
0
0
12
Page 6 of 15
LOCKS
Always check the Owner’s Manual for more operating information and safety features
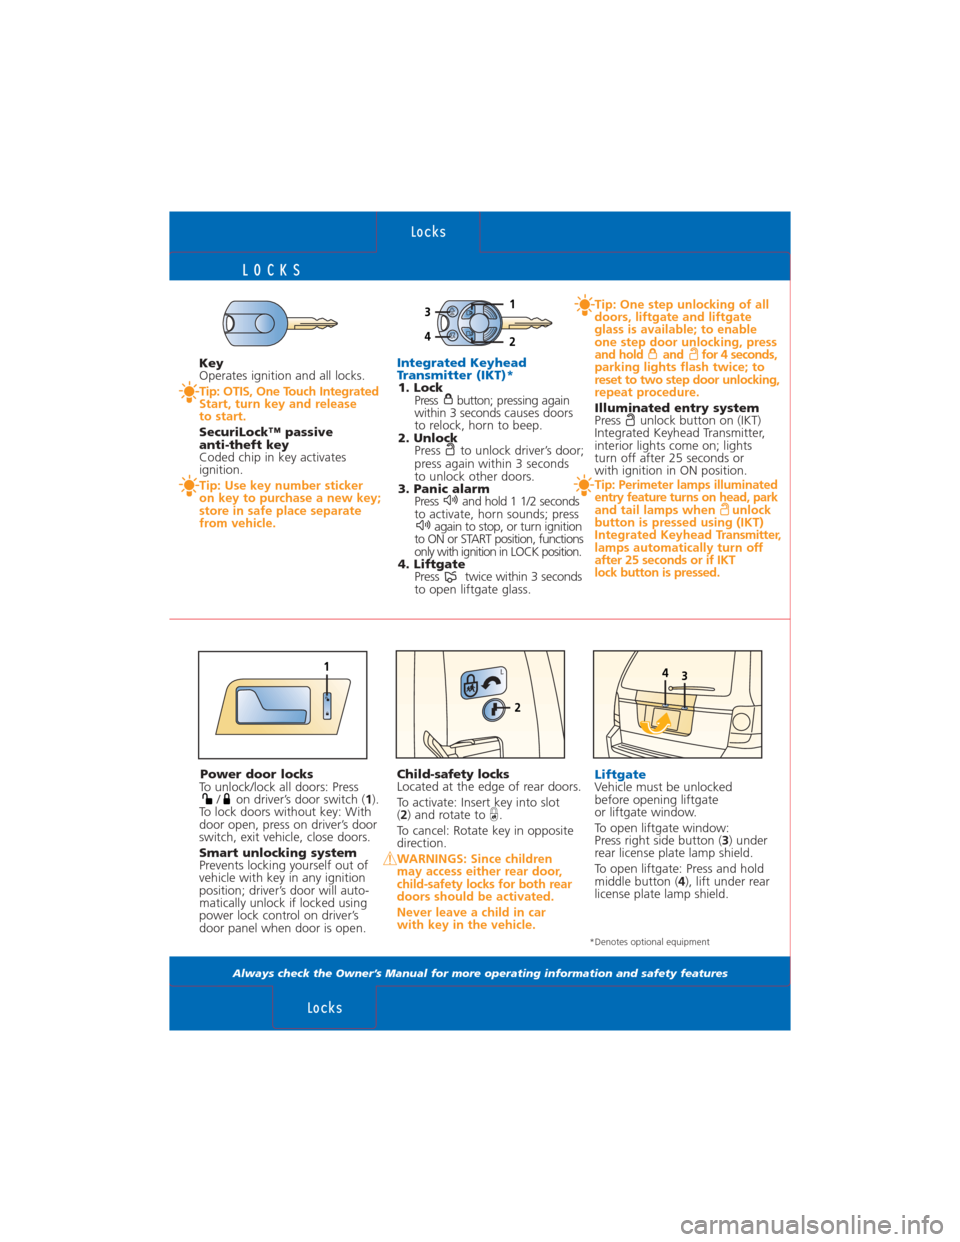
Integrated Keyhead
Transmitter (IKT)*
1. LockPress button; pr essing again
within 3 seconds causes doors
to relock, horn to beep.
2. Unlock Press to unlock driver’s door;
press again within 3 seconds
to unlock other doors.
3. Panic alarm Press and hold 1 1/2 seconds
to activate, horn sounds; press again to stop, or turn ignition
to ON or START position, functions
only with ignition in LOCK position.
4. Liftgate Press twice within 3 seconds
to open liftgate glass.
Tip: One step unlocking of all
doors, liftgate and liftgate
glass is available; to enable
one step door unlocking, press
and hold and for 4 seconds,
parking lights flash twice; to
reset to two step door unlocking,
repeat procedure.
Illuminated entry system
Press unlock button on (IKT)
Integrated Keyhead Transmitter,
interior lights come on; lights
turn off after 25 seconds or
with ignition in ON position.
Tip: Perimeter lamps illuminated
entry feature turns on head, park
and tail lamps when unlock
button is pressed using (IKT)
Integrated Keyhead T ransmitter,
lamps automatically turn off
after 25 seconds or if IKT
lock button is pressed.
LiftgateVehicle must be unlocked
before opening liftgate
or liftgate window.
To open liftgate window:
Press right side button ( 3) under
rear license plate lamp shield.
To open liftgate: Press and hold
middle button ( 4), lift under rear
license plate lamp shield.
Locks
Locks
*Denotes optional equipment
Power door locks
To unlock/lock all doors: Press / on driver’s door switch ( 1).
To lock doors without key: With
door open, press on driver’s door
switch, exit vehicle, close doors.
Smart unlocking system
Prevents locking yourself out of
vehicle with key in any ignition
position; driver’s door will auto-
matically unlock if locked using
power lock control on driver’s
door panel when door is open.
Key
Operates ignition and all locks.
Tip: OTIS, One Touch Integrated
Start, turn key and release
to start.
SecuriLock™ passive
anti-theft key
Coded chip in key activates
ignition.
Tip: Use key number sticker
on key to purchase a new key;
store in safe place separate
from vehicle.
Child- safety locks
Located at the edge of rear doors.
To activate: Insert key into slot
( 2 ) and rotate to .
To cancel: Rotate key in opposite
direction.
WARNINGS: Since children
may access either rear door,
child-safety locks for both rear
doors should be activated.
Never leave a child in car
with key in the vehicle.
1L
2
4
3
2
1
34
Page 7 of 15
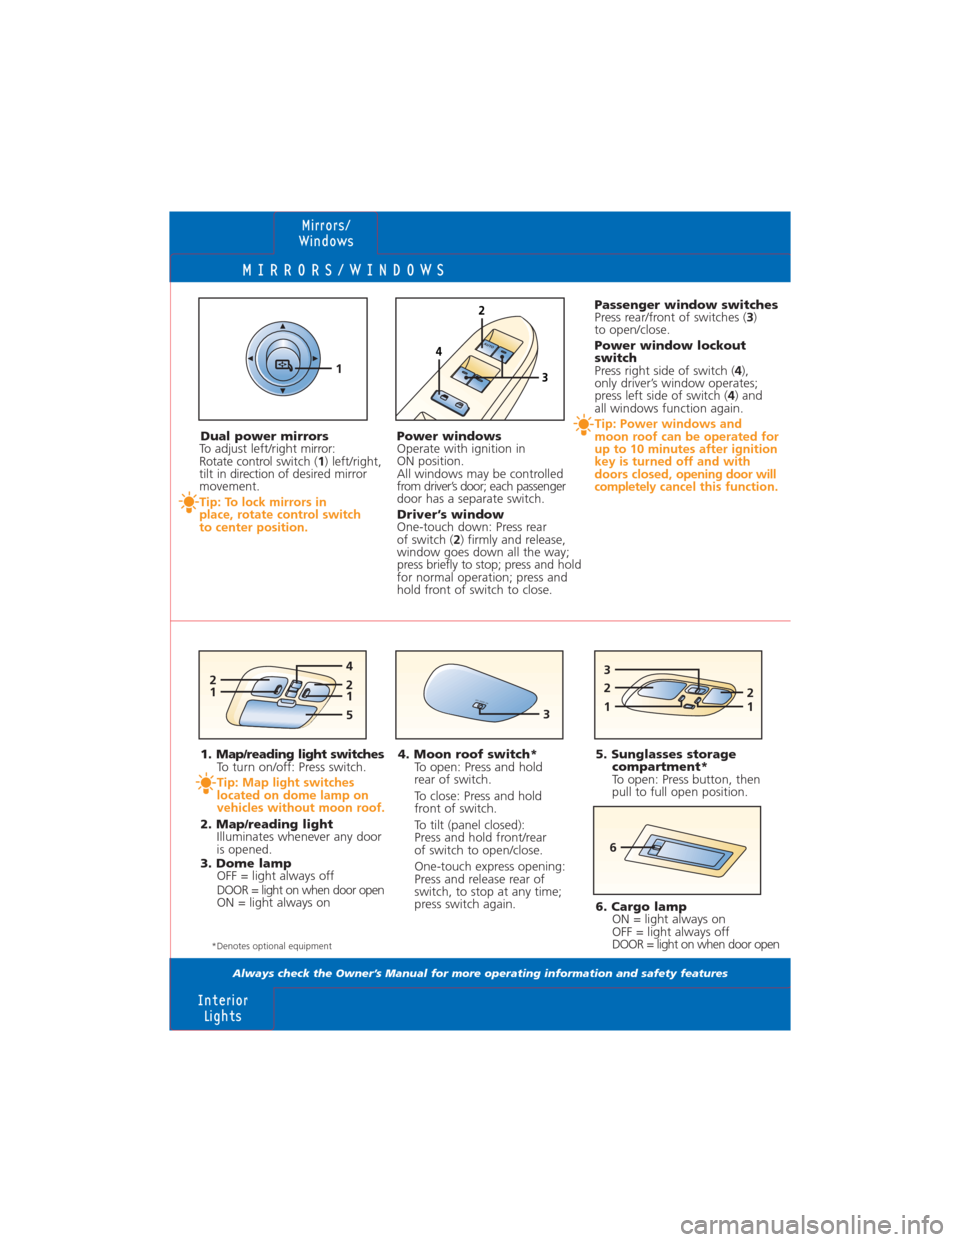
MIRRORS/WINDOWS
Always check the Owner’s Manual for more operating information and safety features
Mirrors/
Windows
Interior
Lights
*Denotes optional equipment
1. Map/reading light switches
To turn on/off: Press switch.
Tip: Map light switches
located on dome lamp on
vehicles without moon roof.
2. Map/reading light
Illuminates whenever any door
is opened.
3. Dome lamp
OFF = light always off
DOOR = light on when door open
ON = light always on4. Moon roof switch*
To open: Press and hold
rear of switch.
To close: Press and hold
front of switch.
To tilt (panel closed):
Press and hold front/rear
of switch to open/close.
One-touch express opening:
Press and release rear of
switch, to stop at any time;
press switch again.5. Sunglasses storage
compartment*
To open: Press button, then
pull to full open position. Dual power mirrors
To adjust left/right mirror:
Rotate controlswitch (1) left/right,
tilt in direction of desired mirror
movement.
Tip: To lock mirrors in
place, rotate control switch
to center position.
Power windows
Operate with ignition in
ON position.
All windows may be controlled
from driver’s door; each passenger
door has a separate switch.
Driver’s window
One-touch down: Press rear
of switch (2) firmly and release,
window goes down all the way;
press briefly to stop; press andhold
for normal operation; press and
hold front of switch to close.Passenger window switches
Press rear/front of switches (3)
to open/close.
Power window lockout
switch
Press right side of switch (4),
only driver’s window operates;
press left side of switch (4) and
all windows function again.Tip: Power windows and
moon roof can be operated for
up to 10 minutes after ignition
key is turned off and with
doors closed, opening door will
completelycancel this function.
1
AUT
O
2
4
3
1 2 4
2
1
512
1 2 3O
FF D
OO
R ON
3
6. Cargo lamp
ON = light always on
OFF = light always off
DOOR = light on when door open
6
Page 12 of 15
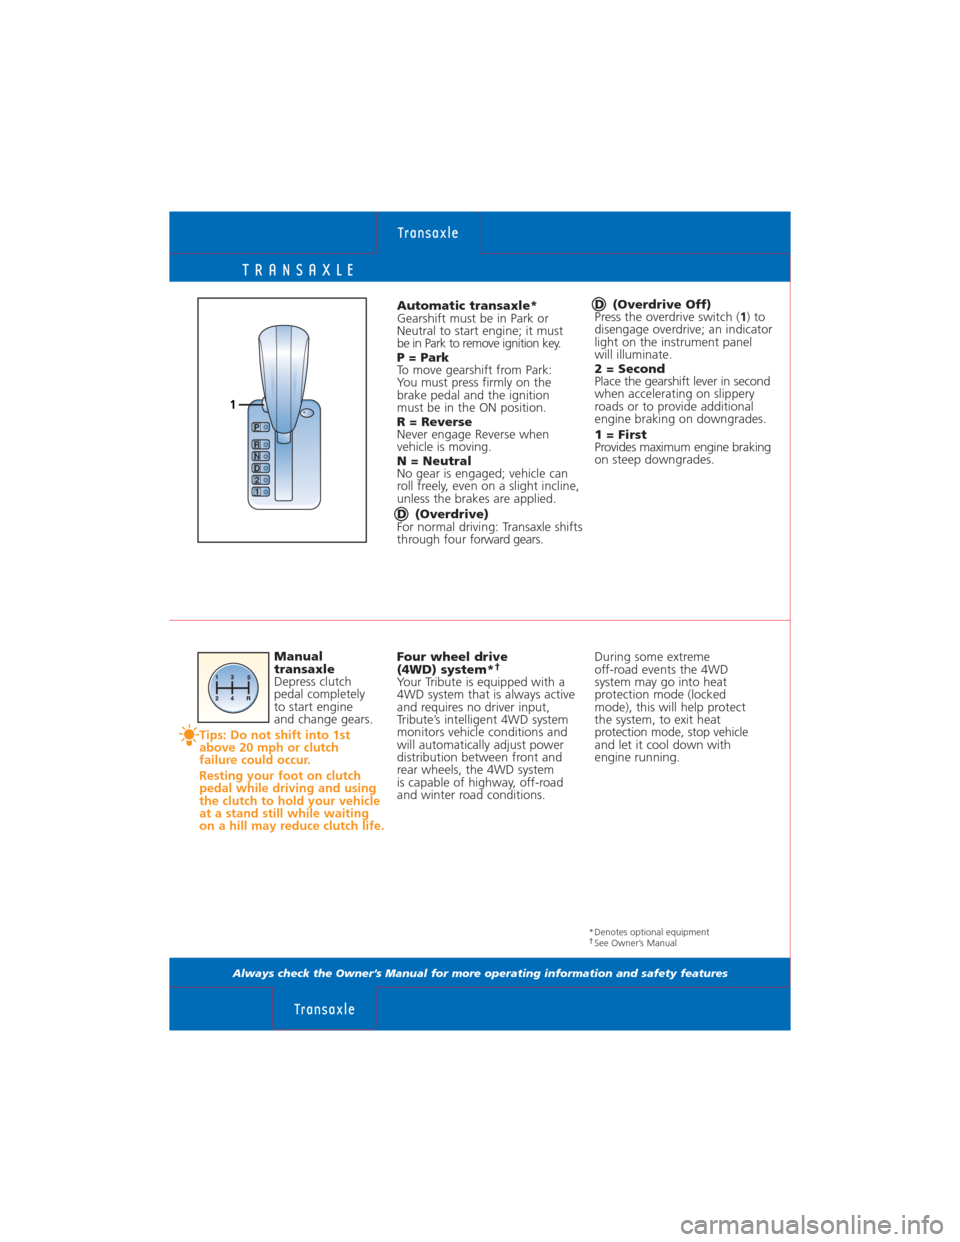
TRANSAXLE
Always check the Owner’s Manual for more operating information and safety features
Automatic transaxle*
Gearshift must be in Park or
Neutral to start engine; it must
be in Park to remove ignition key.
P = Park
To move gearshift from Park:
You must press firmly on the
brake pedal and the ignition
must be in the ON position.
R = Reverse
Never engage Reverse when
vehicle is moving.
N = Neutral
No gear is engaged; vehicle can
roll freely, even on a slight incline,
unless the brakes are applied.
D (Overdrive)
For normal driving: Transaxle shifts
through four forward gears.D (Overdrive Off)
Press the overdrive switch (
1) to
disengage overdrive; an indicator
light on the instrument panel
will illuminate.
2 = Second
Place the gearshift lever in second
when accelerating on slippery
roads or to provide additional
engine braking on downgrades.
1 = First
Provides maximum engine braking
on steep downgrades.
Manual
transaxle
Depress clutch
pedal completely
to start engine
and change gears.
Tips: Do not shift into 1st
above 20 mph or clutch
failure could occur.
Resting your foot on clutch
pedal while driving and using
the clutch to hold your vehicle
at a stand still while waiting
on a hill may reduce clutch life.
Four wheel drive
(4WD) system*†Your Tribute is equipped with a
4WD system that is always active
and requires no driver input,
Tribute’s intelligent 4WD system
monitors vehicle conditions and
will automatically adjust power
distribution between front and
rear wheels, the 4WD system
is capable of highway, off-road
and winter road conditions.
Transaxle
Transaxle
During some extreme
off-road events the 4WD
system may go into heat
protection mode (locked
mode), this will help protect
the system, to exit heat
protection mode, stop vehicle
and let it cool down with
engine running.
1
R
N
D 2
1
P
*Denotes optional equipment†See Owner’s Manual