width MAZDA MX-5 1994 User Guide
[x] Cancel search | Manufacturer: MAZDA, Model Year: 1994, Model line: MX-5, Model: MAZDA MX-5 1994Pages: 1708, PDF Size: 82.34 MB
Page 1111 of 1708

TECHNICAL DATA TD BP DOHC 0.8-1.4 {0.0324.055) 45.0 (1.772) 46.5 11.831) Engine Item Seat contact width mm {in) Valve spring End gap (Measured in cylinder) mm {in) Seat sinking mm {in) Free length mm {in) Minimum length mm {in) Out-of-square mm {in) Camshaft bearing oil clearance mm {in} Ring groove width in piston mm {in) Standard Maximum Piston ring-to-ring groove clearance mm {in) IN EX IN EX IN EX Standard (No.1-No.5) Maximum 46.26 (1.821) 46.26 (1.821) 39.5 {I 56) with a set load of 224--253 N I22.8-25.8 kgf, 50.2-56.7 Ibf) 39.5 (1 56) with a set load of 224-253 N I22.8-25.8 kgf, 50.2-56.7 Ibf) 1.62 (0.0638) max. 1.62 (0.0638) max. Camshaft 0.035-0.081 {0.0014-0..0031) 0.1 5 (0.006) 0.03 {0.001 2) max. 0.07-0.1 9 {0.002~.0074) 0.20 {0.008) Camshaft runout mm {in) TOP Second Cam height mm {in) Camshaft end play mm (in) 0.15-0.30 {0.006-0.011) 0.15-0.30 {0.006--0.011) -- - I Standard Minimum Standard Minimum Standard (No.1-N0.5) IN EX Standard Maximum Oil (rail) Maximum I 1 .O {0.039) 44.094 {I .7360) 43.894 {I .7281) 44.600 11.7559) 44.400 {I .7480) 25.940-25.965 11.021 3-1.0222) Journal diameter mm Iin) Cylinder block 0.20-0.70 {0.00&0.027) TOD Second Oil 1.52-1 535 {0.0594--0.0604) 1.52-1.54 (0.0599--0.0606} 3.02-3.04 f0.11894.1196) Second Maximum 221.5 (8.720) 0.1 5 {0.006) max. 0.20 {0.008) max. 83.00&83.019 i3.2678-3.2684) 83.25683.263 {3.277&3.2780) 83.508-883.51 3 (3.2877-3.2879) 0.01 9 {0.0007} max. Height mm {in) Distortion mm (in) Grinding mm {in} 0.03-0.07 {0.00124.0027) 0.1 5 {0.006) Cylinder bore diameter mm {in] Standard size 0.25 {0.01) oversize 0.50 (0.02) oversize Piston , Cylinder bore taper and out-of-round mm {in) 82.95442.974 i3.2659--3.2666) 83.211-43.21 7 (3.2761-3.2762) 83.461-83.467 (3.2853--3.2860) 0.0324.059 {0.001 3--0.0023) 0.15 (0.006) Piston diameter Measured at 90" to Pin bore axis and 16.5mm i0.65 in) below oil ring groove mm {in) Standard size 0.25 {0.01) oversize 0.50 (0.02) oversize Piston ring Piston-to-cylinder clearance mm (in) Thickness mm {in) Standard Maximum TOP 1.47-1 -49 (0.0579--0.0586} Second 1.47-1.49 {0.0579--0.0586) Gartner Banana
Page 1112 of 1708

TD TECHNICAL DATA item Main journal diameter mm {in) BP DOHC Diameter mm {in) Piston-to-piston pin clearance mm {in) Connecting rod bush-to-piston pin clearance mm (in) Piston pin 19.987-1 9.993 {0.7869-0..7871) -0.00~0.013 {-0.0002-0.0005) 0.01 0-0.027 {0.0004--0.0010} I Main iournal out-of-round - . - . . - -. - size 0.25 {o.oi) undersize 0.50 (0.02) undersize 0.75 I0.03) undersize mm (in) I 0.05 10.0020) max. I Connectir~g rod and connecting rod bearing . L, . -- 2 - 1 Standard 1 Standard I 44.940-44.956 11.7693--1.7699) Minimum Standard ' Minimum Standard 'Minimum Standard Minimum 1 size 1 ~inimum I 44.908 11.76801 I 132.8S132.95 I5.231-5.234) 0.030 (0.001 2) max.1100 (3.94) 20.003--20.0 14 {0.78760.7879) 48.000-48.01 6 {I .8898-1.8903) 21.838-21.890 (0.8598-0.8618) 0.1 104.262 {0.0044-0.0103) 0.30 (0.01 2) Length (Center to center) mm {in) Bending mm (in) Small end bore (Bush inner diameter) mm {in) Big end bore mm {in) Big end width mm {in) 49.904 (1.9647) 49.704--49.708 {I $9569--1.9570) 49.652 {I .9548) 49.454--49.458 {I .947&1.9471) 49.402 (1.9450) 49.204--49.208 (1.9372-1.9373) 49.152 11.9351) Cranks haft Crankshaft runout mm (in) I 0.04 {0.0016) max. Standard 1 Standard I 49.938--49.956 (1.9661-1.9667) Connecting rod side clearance mm {in) . Standard Maximum Crankpin diameter mm (in) - -- s- - 8 undersize 0.50 10.02) undersize 44.1 90-44.206 {I .7398-1.7403) 44.158 {I .7385) 0.05 (0.00201 max. 0.75 {0.03) undersize " Main bearina Standard Minimum Main journal bearing oil clearance mm (in) - L~inimum Standard 'Minimum Crankpin out-of-round mm {in} Crankpin bearing oil clearance mm (in) Standard Maximum 44.658 (1.7582) 44.440-44.456 {I .7496-1,7502) 44.408 (1.74831 0.01 8-0.036 {0.0008--0.0014) 0.1 0 {0.004) Available undersize bearing mm (in) Standard Maximum - 0.25 {0.010), 0.50 {0.020), 0.75 (0.030) 0.020-0.044 {0.0008--0.0017) 0.10 {0.004} Available undersize bearing mm {in) Crankpin bearing 0.25 {0.010), 0.50 {0.020), 0.75 (0.030) Thrust bearing Crankshaft end play mm {in) Standard Maximum 0.080-0.282 (0.0032--0.0111) 0.30 (0.012) 2.500-2.550 {0.0985--0.1003) 2.625-2.675 (0.1 034-0.1 053) 2.750-2.800 {0.108H.1102) 2.875-2.925 {0.1132--0.1151) Bearing width mm {in) nming belt Belt deflection mm {in)/98 N (10 kgf, 22 Ibf) I 9.0-11.5 i0.360.45) ~U Standard size 0.25 (0.01) oversize 0.50 {0.02) oversize 0.75 (0.03) oversize Gartner Banana
Page 1260 of 1708

GENERAL SERVICE INFORMATION VEHICLE DIMENSIONS d Measurement I I Overall height mm (in) I Overall length mm (in) Overall width mm (in) 3,948 (155.4) 1,676 (65.9) WHEEL ALIGNMENT Front wheel alignment (Unloaded*) 2,266 (89.2) 1,410 (55.5) 1,428 (56.2) Wheelbase mm (in) Rear wheel alignment (Unloaded*) Tread Total toe-in Front mrn (in) Rear mm (in) mm (in) degree Camber angle I 0'24' f 30' 3 + 3 (0.12 f 0.12) 0°18' + 18' Maximum steering angle Inner Outer I 37'23' f 2O 32O32' f 2O Caster angle * Fuel tank full; radiator coolant and engine oil at specified levels; and spare tire, jack, and tools in designated positions. 4O4Y f 45' 1 1°20' 3 * 3 (0.12 f 0.12) 0'18' + 18' King pin angle Camber angle Total toe-in -0'43' f 30' mm (in) degree Gartner Banana
Page 1336 of 1708

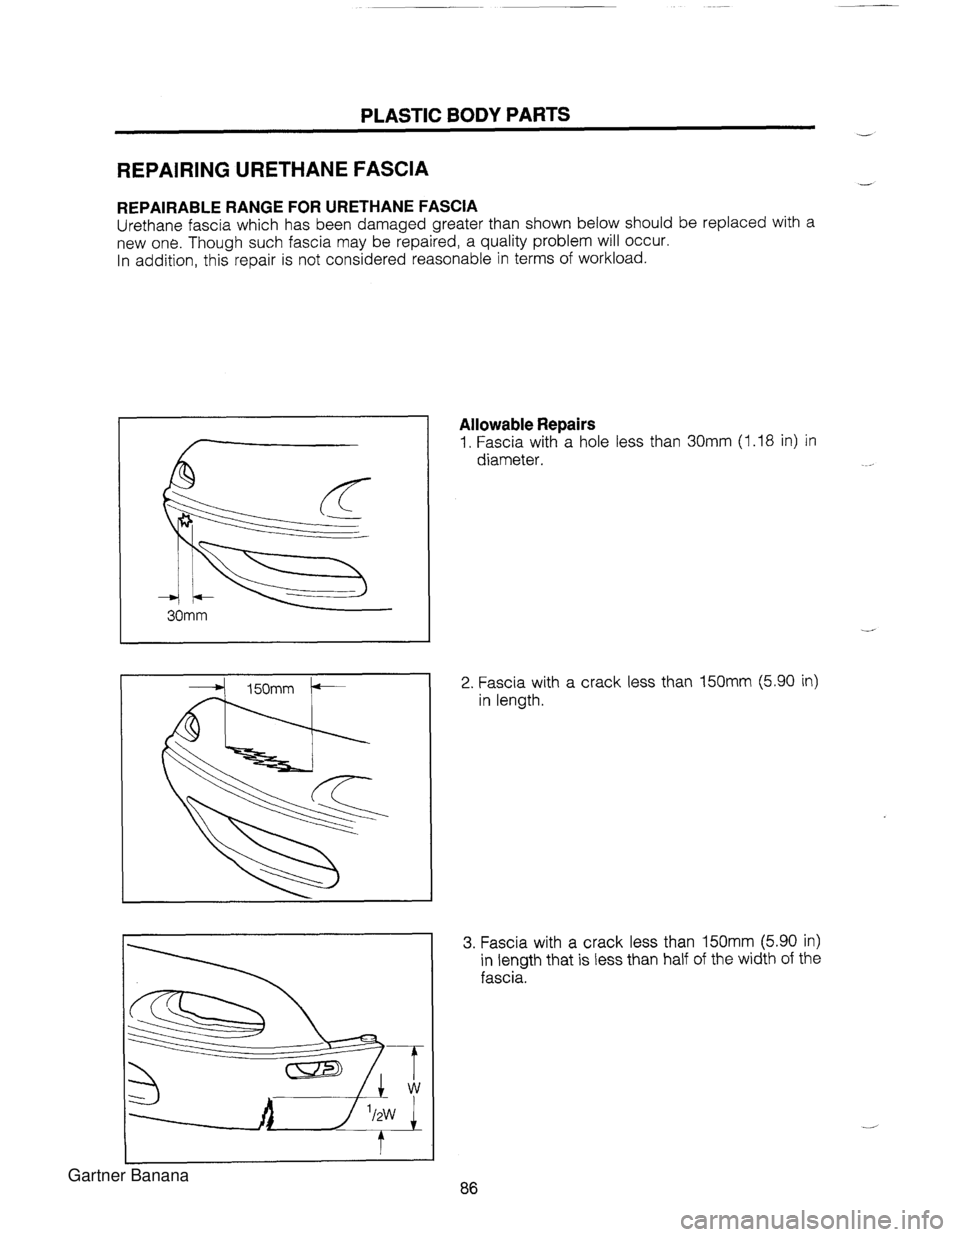
PLASTIC BODY PARTS - REPAIRING URETHANE FASCIA - REPAIRABLE RANGE FOR URETHANE FASCIA Urethane fascia which has been damaged greater than shown below should be replaced with a new one. Though such fascia may be repaired, a quality problem will occur. In addition, this repair is not considered reasonable in terms of workload. Allowable Repairs 1. Fascia with a hole less than 30mm (1.18 in) in diameter. .-- 2. Fascia with a crack less than 150mm (5.90 in) in length. 3. Fascia with a crack less than 150mm (5.90 in) in length that is less than half of the width of the fascia. Gartner Banana
Page 1344 of 1708

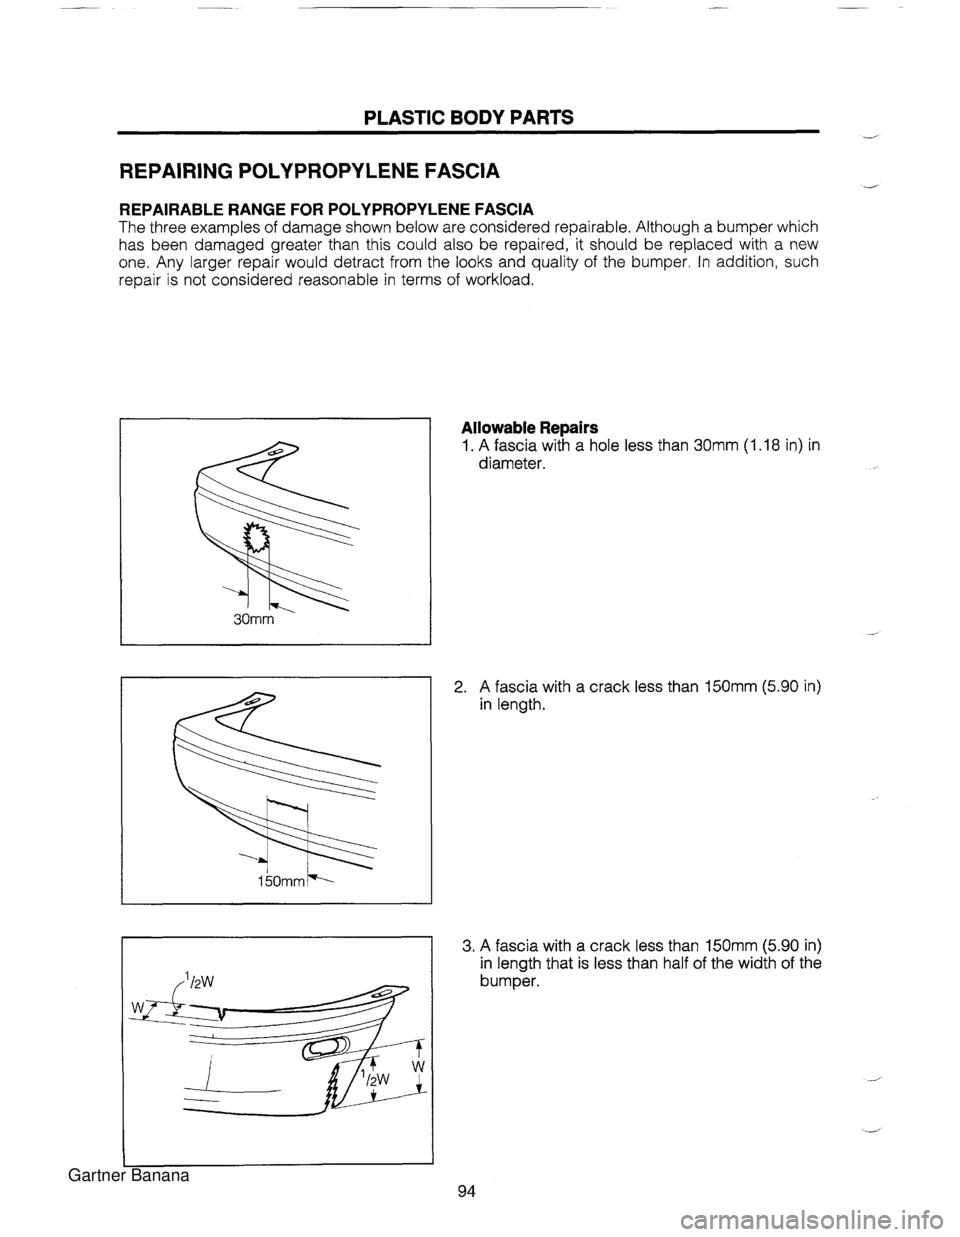
PLASTIC BODY PARTS REPAIRING POLYPROPYLENE FASCIA d REPAIRABLE RANGE FOR POLYPROPYLENE FASCIA The three examples of damage shown below are considered repairable. Although a bumper which has been damaged greater than this could also be repaired, it should be replaced with a new one. Any larger repair would detract from the looks and quality of the bumper. In addition, such repair is not considered reasonable in terms of workload. Allowable Repairs 1. A fascia with a hole less than 30mm (1.18 in) in diameter. 2. A fascia with a crack less than 150mm (5.90 in) in length. 3. A fascia with a crack less than 150mm (5.90 in) in length that is less than half of the width of the bumper. Gartner Banana