check transmission fluid MAZDA MX-5 1994 Workshop Manual
[x] Cancel search | Manufacturer: MAZDA, Model Year: 1994, Model line: MX-5, Model: MAZDA MX-5 1994Pages: 1708, PDF Size: 82.34 MB
Page 23 of 1708

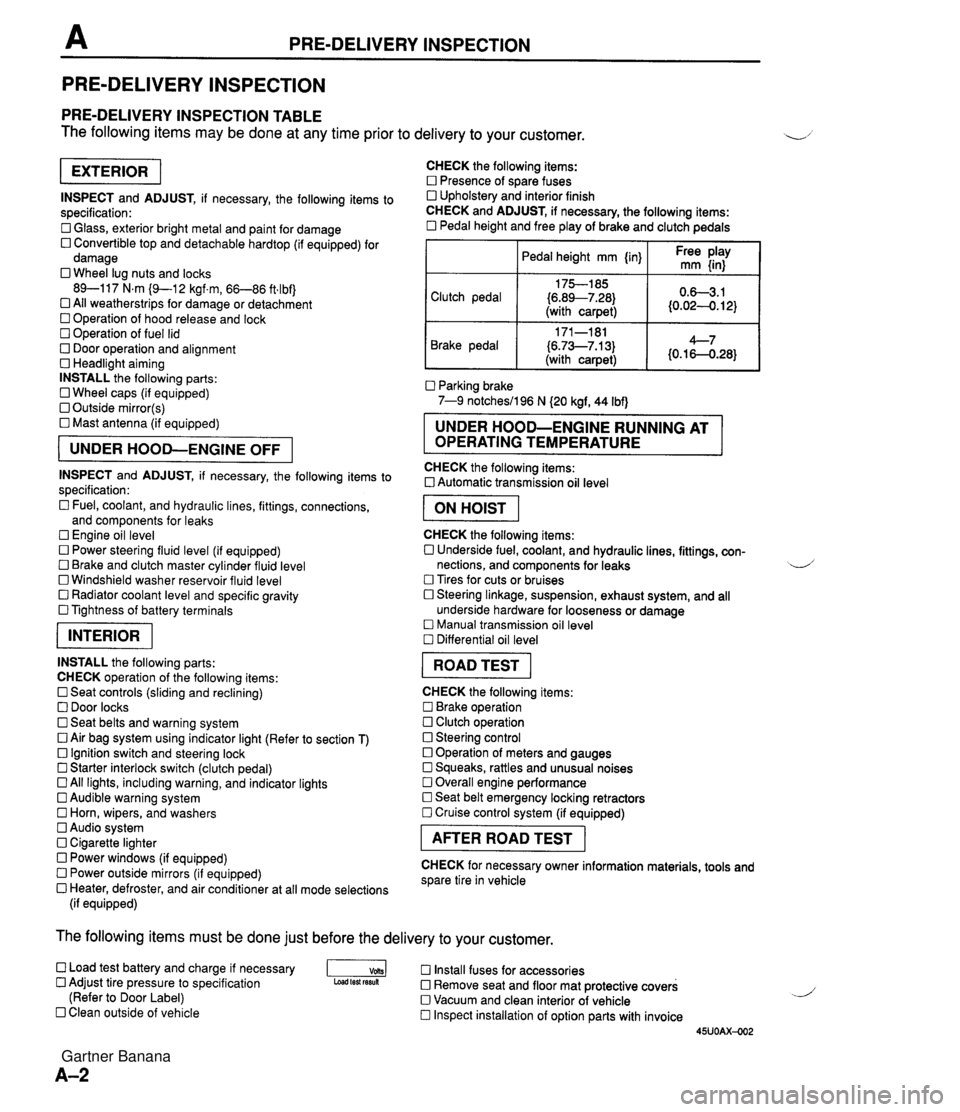
PRE-DELIVERY INSPECTION PRE-DELIVERY INSPECTION PRE-DELIVERY INSPECTION TABLE The following items may be done at any time prior to delivery to your customer. INSPECT and ADJUST, if necessary, the following items to specification: 0 Glass, exterior bright metal and paint for damage 0 Convertible top and detachable hardtop (if equipped) for damage 0 Wheel lug nuts and locks 89-117 N.m (9-1 2 kgf.m, 66-86 ft4bf) 0 All weatherstrips for damage or detachment Operation of hood release and lock Operation of fuel lid 0 Door operation and alignment Headlight aiming INSTALL the following parts: Wheel caps (if equipped) 0 Outside mirror(s) 0 Mast antenna (if equipped) UNDER HOOD-ENGINE OFF INSPECT and ADJUST, if necessary, the following items to specification : Fuel, coolant, and hydraulic lines, fittings, connections, and components for leaks Engine oil level 0 Power steering fluid level (if equipped) Brake and clutch master cylinder fluid level 0 Windshield washer reservoir fluid level 0 Radiator coolant level and specific gravity 0 Tightness of battery terminals pKiq INSTALL the following parts: CHECK operation of the following items: 0 Seat controls (sliding and reclining) 0 Door locks 0 Seat belts and warning system 0 Air bag system using indicator light (Refer to section T) Ignition switch and steering lock 0 Starter interlock switch (clutch pedal) All lights, including warning, and indicator lights 0 Audible warning system 0 Horn, wipers, and washers Audio system 0 Cigarette lighter Power windows (if equipped) 0 Power outside mirrors (if equipped) 0 Heater, defroster, and air conditioner at all mode selections (if equipped) CHECK the following items: Presence of spare fuses 0 Upholstery and interior finish CHECK and ADJUST, if necessary, the following items: 0 Pedal height and free play of brake and clutch pedals I Pedal height mm {in} I Ft: $iy I Clutch pedal {6.89--7.28) (with carpet) Parking brake 7-9 notchesil96 N (20 kgf, 44 Ibf) 0.63.1 (0.024. 12) Brake pedal RUNNING AT OPERATING TEMPERATURE CHECK the following items: 0 Automatic transmission oil level 171-181 (6.73--7.13) (with carpet) I ON HOIST I 4--7 {0.16-0.28} CHECK the following items: 0 Underside fuel, coolant, and hydraulic lines, fittings, con- nections, and components for leaks 4 Tires for cuts or bruises 0 Steering linkage, suspension, exhaust system, and all underside hardware for looseness or damage Manual transmission oil level Differential oil level I ROAD TEST I CHECK the following items: Brake operation Clutch operation 0 Steering control 0 Operation of meters and gauges Squeaks, rattles and unusual noises 0 Overall engine performance Seat belt emergency locking retractors 0 Cruise control system (if equipped) I AFTER ROAD TEST I CHECK for necessary owner information materials, tools and spare tire in vehicle The following items must be done just before the delivery to your customer. 0 Load test battery and charge if necessary -1 Install fuses for accessories Adjust tire pressure to specification Load test fesuk 0 Remove seat and floor mat protective covers (Refer to Door Label) 0 Vacuum and clean interior of vehicle Clean outside of vehicle Inspect installation of option parts with invoice 45UOAX-002 Gartner Banana
Page 437 of 1708

K AUTOMATIC TRANSMISSION FLUID (ATF) Fluid leaks Check for fluid leaks of the transmission as shown below, and repair or replace as necessary. 1. Gaskets, O-ring, and plugs 2. Oil hoses, oil pipes, and connections 3. Oil cooler @ .... O-RING @ .... GASKET 0 .... OIL SEAL 0 .... PLUG @ .... OTHER Gartner Banana
Page 438 of 1708

AUTOMATIC TRANSMISSION FLUID (ATF) K REPLACEMENT 1. On level ground, jack up the vehicle and support it evenly on safety stands. Warning When the transmission and the ATF are hot, they can cause burns to the skin. Allow the transmis- sion and the ATF to cool before doing this proce- dure. 2. Loosen the oil pan installation bolts, and drain the ATF into a container. 3. Remove the oil pan and gasket. 4. Clean the oil pan and the magnet. 5. Install the oil pan along with a new gasket. Tightening torque: 5.9-7.8 N-m (60-80 kgfecm, 53-69 in-lbf) 6. Add approximately 4.0 L (4.2 US qt, 3.5 Imp qt} ATF, and check the ATF level. (Refer to page K-35.) Specified ATF: DexronmII or M-I11 Gartner Banana
Page 451 of 1708

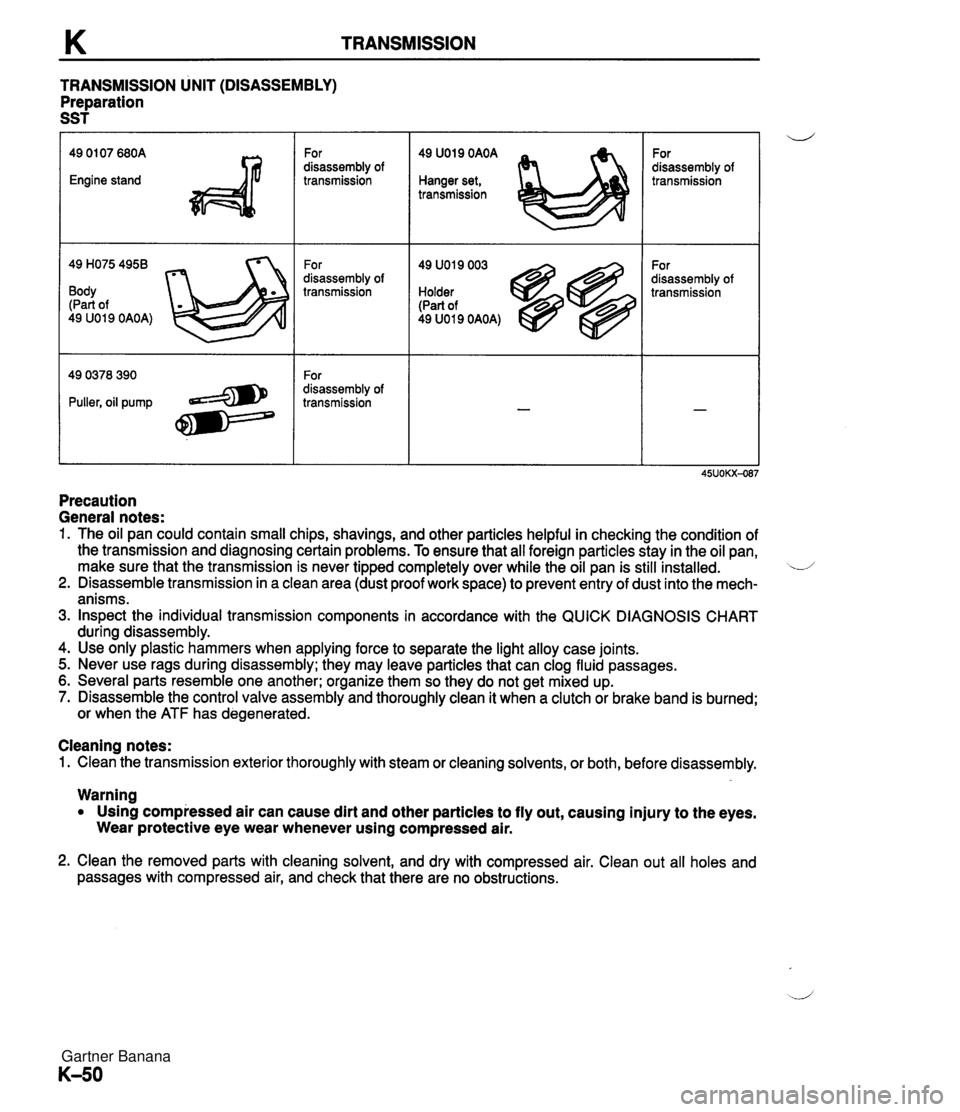
TRANSMISSION TRANSMISSION UNIT (DISASSEMBLY) Preparation SST 49 H075 4958 Body (Part of 49 U019 OAOA) For disassembly of transmission For disassembly of transmission For disassembly of transmission 49 U019 OAOA Hanger set, transmission 49 U019 003 Holder (Part of 49 U019 OAOA) For disassembly of transmission For disassembly of transmission Precaution General notes: 1. The oil pan could contain small chips, shavings, and other particles helpful in checking the condition of the transmission and diagnosing certain problems. To ensure that all foreign particles stay in the oil pan, make sure that the transmission is never tipped completely over while the oil pan is still installed. L/ 2. Disassemble transmission in a clean area (dust proof work space) to prevent entry of dust into the mech- anisms. 3. Inspect the individual transmission components in accordance with the QUICK DIAGNOSIS CHART during disassembly. 4. Use only plastic hammers when applying force to separate the light alloy case joints. 5. Never use rags during disassembly; they may leave particles that can clog fluid passages. 6. Several parts resemble one another; organize them so they do not get mixed up. 7. Disassemble the control valve assembly and thoroughly clean it when a clutch or brake band is burned; or when the ATF has degenerated. Cleaning notes: 1. Clean the transmission exterior thoroughly with steam or cleaning solvents, or both, before disassembly. Warning Using compressed air can cause dirt and other particles to fly out, causing injury to the eyes. Wear protective eye wear whenever using compressed air. 2. Clean the removed parts with cleaning solvent, and dry with compressed air. Clean out all holes and passages with compressed air, and check that there are no obstructions. Gartner Banana
Page 471 of 1708

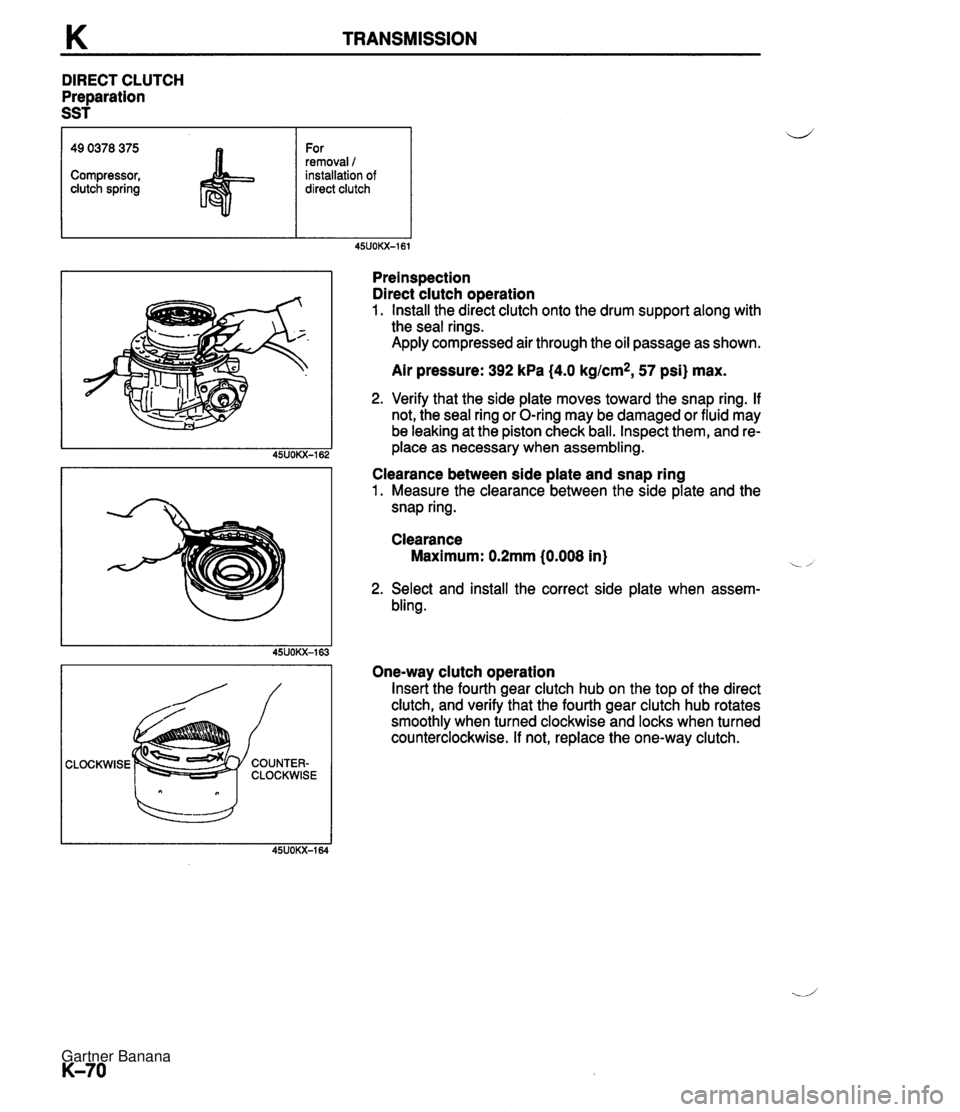
K TRANSMISSION DIRECT CLUTCH Preparation SST CLOCKWISE 49 0378 375 Compressor, clutch spring Preinspection Direct clutch operation 1. Install the direct clutch onto the drum support along with the seal rings. Apply compressed air through the oil passage as shown. For removal 1 installation of direct clutch Air pressure: 392 kPa (4.0 kgtcm*, 57 psi) max. 2. Verify that the side plate moves toward the snap ring. If not, the seal ring or O-ring may be damaged or fluid may be leaking at the piston check ball. Inspect them, and re- place as necessary when assembling. Clearance between side plate and snap ring 1. Measure the clearance between the side plate and the snap ring. Clearance Maximum: 0.2mm (0.008 in) i -, 2. Select and install the correct side plate when assern- bling. One-way clutch operation Insert the fourth gear clutch hub on the top of the direct clutch, and verify that the fourth gear clutch hub rotates smoothly when turned clockwise and locks when turned counterclockwise. If not, replace the one-way clutch. Gartner Banana
Page 487 of 1708

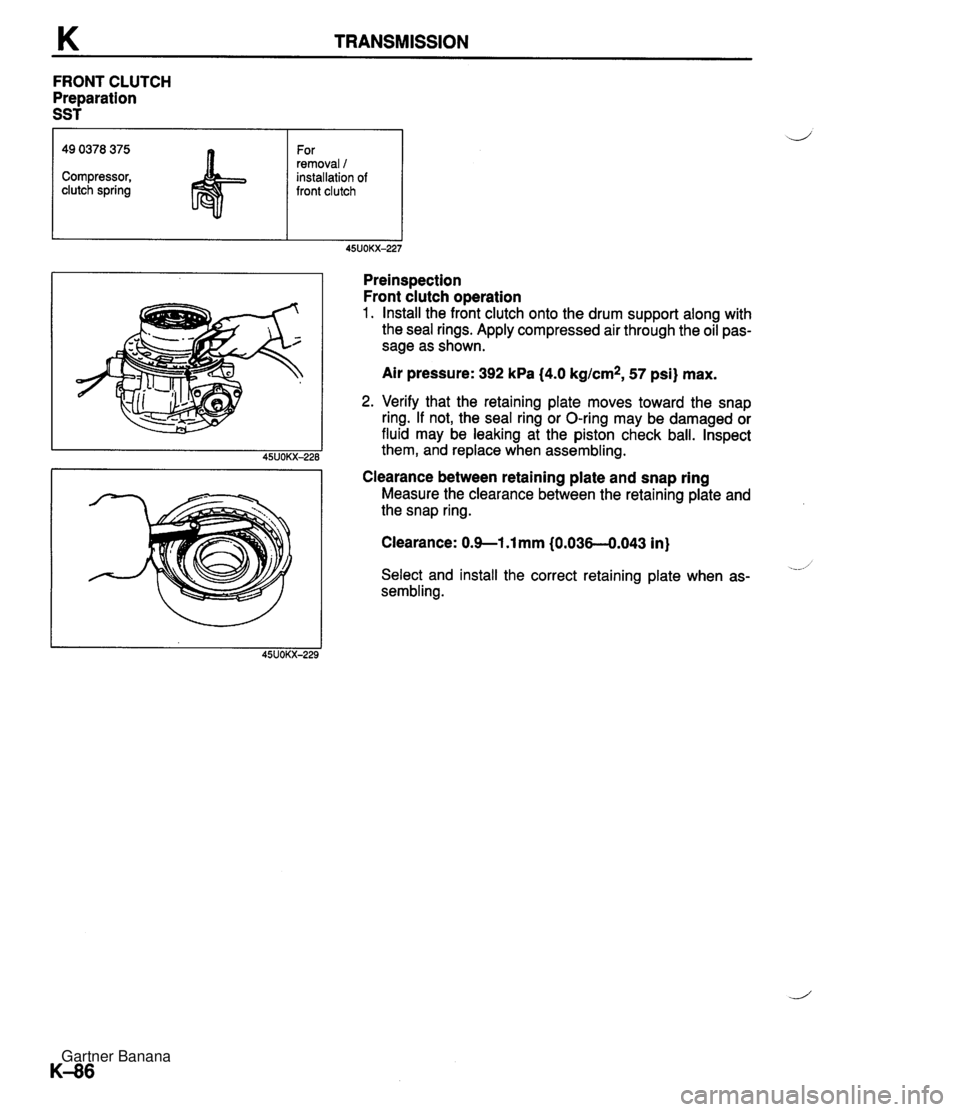
K TRANSMISSION FRONT CLUTCH Preparation SST Preinspection Front clutch operation 1. Install the front clutch onto the drum support along with the seal rings. Apply compressed air through the oil pas- sage as shown. 49 0378 375 Compressor, clutch spring Air pressure: 392 kPa (4.0 kglcm*, 57 psi} max. For removal / installation of front clutch 2. Verify that the retaining plate moves toward the snap ring. If not, the seal ring or O-ring may be damaged or fluid may be leaking at the piston check ball. Inspect them, and replace when assembling. Clearance between retaining plate and snap ring Measure the clearance between the retaining plate and the snap ring. Clearance: 0.9--1 .l mm (0.036-0.043 in} .--- Select and install the correct retaining plate when as- sembling. Gartner Banana
Page 492 of 1708

TRANSMISSION K REARCLUTCH Preparation SST Preinspection Rear clutch operation 1, Install the rear clutch onto the drum support along with the seal rings. Apply compressed air through the oil pas- sage as shown. i/' Air pressure: 392 kPa {4.0 kg/cm2,57 psi} max. 2. Verify that the retaining plate moves toward the snap ring. If not, the seal ring or O-ring may be damaged or fluid may be leaking at the piston check ball. Inspect them, and replace when assembling. 49 0378 375 Compressor, clutch spring Clearance between retaining plate and snap ring Measure the clearance between the retaining plate and the snap ring. For removal / installation of rear clutch Clearance: 0.8-1.0mm (0.0324.039 in) Adjust the clearance by installing the correct retaining plate. Gartner Banana
Page 503 of 1708

K TRANSMISSION LOW AND REVERSE BRAKE Preparation SST Preinspection Low and reverse brake operation 1. Apply compressed air through the oil passage as shown. 49 0378 346 Hex head wrench Air pressure: 392 kPa (4.0 kglcm2, 57 psi) max. For removal I installation of one-way clutch 2. Verify that the retaining plate moves toward the snap ring. If not, the seal ring or O-ring may be damaged or fluid may be leaking at the piston check ball. Inspect them, and replace as necessary when assembling. Clearance between retaining plate and snap ring 1. Measure the clearance between the retaining plate and the snap ring. Clearance: 0.8-1.05mm (0.032--0.041 in) i/ 2. Select and install the correct retaining plate when as- sembling. Gartner Banana
Page 532 of 1708

TRANSMISSION K VACUUM DIAGRAM VACUUM THROTTLE VALVE I On-vehicle Installation 1. Apply ATF to a new O-ring, and install it onto the vacuum diaphragm. 2. Apply ATF to a new O-ring ,and install it into the transmis- sion case. 3. Apply ATF to the vacuum diaphragm rod and vacuum di- aphragm, and install them into the transmission case. Tightening torque: 7.9--10.7 N-m (80-11 0 kgfscm, 70-95.4 inslbf) 4. Connect the vacuum hose. 5. Install the exhaust pipe. (Refer to page K-148.) 6. Add approximately 1.0 L (1.1 US qt, 0.9 Imp qt) ATF, and check the ATF level. (Refer to page K-35.) 7. Warm up the ATF to normal operating temperature (50--80°C, 122-176OF), then check for the following: (1) Fluid leakage (2) Vacuum leakage On-vehicle Adjustment 1. Remove the vacuum diaphragm, vacuum diaphragm rod, and O-rings from the transmission case. (Refer to On-vehicle Removal, page K-130.) 2. Measure dimension N indicated in the figure by using the SST and a scale. 3. Select the proper diaphragm rod from the table. Dimension N Below 25.65mm 11.0099 in) Applicable diaphragm rod 29.0mm {I .14 in) 25.65-26.15mm (1.0099-1.0295 in) 25.90-26.40mm 11.0197-1.0394 in) 4. lnstall the correct vacuum diaphragm rod, O-rings, and vacuum diaphragm. (Refer to On-vehicle Installation, page K-131.) 29.5mm {I .16 in) 29.75mm (1.1 7 in) . - 26.1 5-26.65mm (1.0295-1.0492 in) 26.65-27.1 5mm (1.0492-1.0689 in) 27.1 5mm (1.0689 in) or over 30.Omm {I .18 in) 30.5mm {I .20 in) 31.0mm {I .22 in) Gartner Banana