spark plugs MAZDA MX-5 1994 Workshop Manual
[x] Cancel search | Manufacturer: MAZDA, Model Year: 1994, Model line: MX-5, Model: MAZDA MX-5 1994Pages: 1708, PDF Size: 82.34 MB
Page 32 of 1708

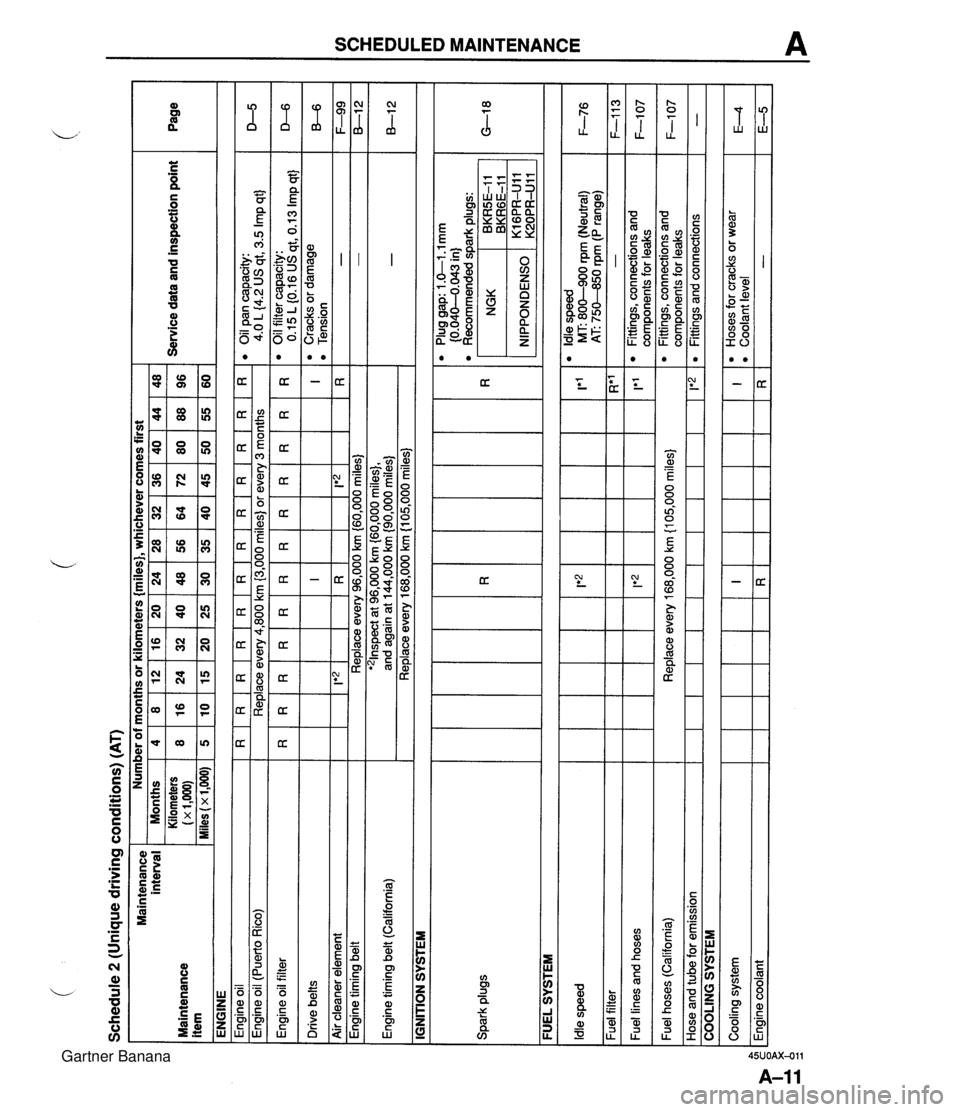
Schedule 2 (Unique driving conditions) (AT) Maintenance interval Maintenance item ENGINE Engine oil I R I R I R I R I R I R I R I R I R I R I R I R Engine oil filter Drive belts Number of months or kilometers {miles}, whichever comes first eoilpancapacity: 4.0 L {4.2 US qt, 3.5 Imp qt} Engine oil (Puerto Rico) I I IGNITION SYSTEM Service data and inspection point Months Kilometers (x 1,m) Miles (x 1,000) D-5 Replace every 4,800 km (3,000 miles) or every 3 months I I I I I I I I - - Engine timing belt (California) Spark plugs Page - - Air cleaner element I I FUEL SYSTEM 4 8 5 I F-99 8-1 2 -. . . '21nspect at 96,000 km {60,000 miles}, and again at 144,000 km {90,000 miles) Replace every 168,000 km (1 05,000 miles) - - R*' - 1'1 l Oilfiltercapacity: 0.15 L (0.16 US qt, 0.13 Imp qt} l Cracks or damage l Tension I R 1 Ie2 1 Engine timing belt ~ --- - - l Plug gap: 1 .&I -1 mm (0.040-4.043 in) l Recommended dark ~luas: 8 16 10 D-6 B-6 Replace every 96,000 km (60,000 miles) Idle speed Fuel filter Fuel lines and hoses NGK , BKRGE-11 BKR5E-I 1 12 24 15 IRI I*2 lt2 l Idle speed MT: 800-900 rpm (Neutral) 1 F-76 AT: 75M0 rpm (P range) 16 32 20 I!*'2 1 20 40 25 24 48 30 - Fittings, connections and com~onents for leaks 36 72 45 F-113 F-1 07 Fuel hoses (California) Hose and tube for emission 28 56 35 Cooling system Engine coolant 32 64 40 COOLING SYSTEM Replace every 168,000 km {I 05,000 miles} 1 1*2 48 96 60 40 80 50 I R 44 88 55 l Fittings, connections and components for leaks Fittings and connections F-1 07 - I R l Hoses for cracks or wear l Coolant level - E4 E-5 Gartner Banana
Page 35 of 1708

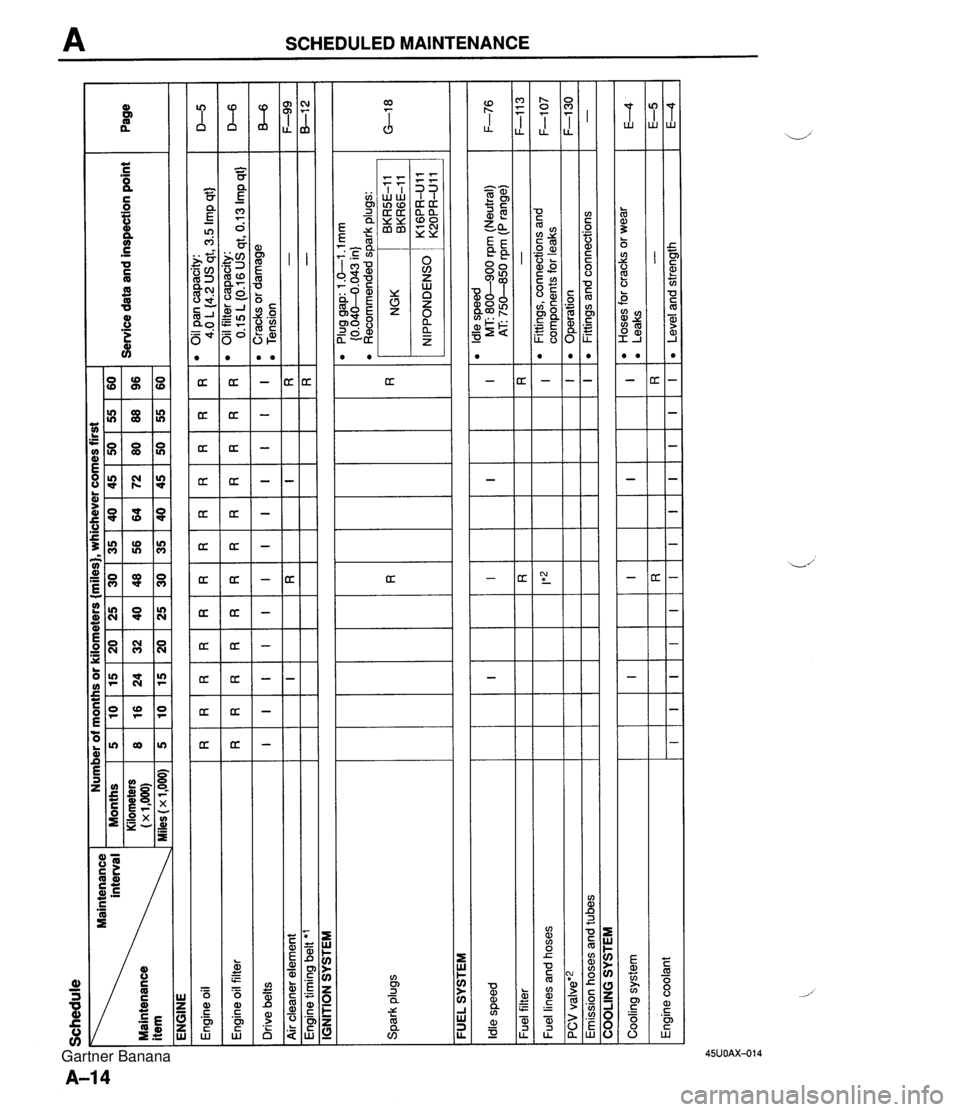
Schedule interval Maintenance ENGINE Number of months or kilometers {miles), whichever comes first I -. Months 5 10 15 20 25 30 35 40 45 50 55 60 Kilometers 8 16 24 32 40 48 56 64 72 80 88 96 - Service data and inspection point 1~1.000~ Page Spark plugs FUEL SYSTEM -- Plug gap: 1 .GI .l mm {0.04M.043 in) l Recommended spark plugs: D-5 D-6 B-6 F-99 8-1 2 IGNITION SYSTEM R I I Engine oil Engine oil filter Drive belts Air cleaner element Engine timing belt 'l R I R I F-76 F-1 1 3 F-107 F-I30 - Idle speed Fuel filter Fuel lines and hoses PCV valve'2 Emission hoses and tubes R I COOLING SYSTEM I Cooling system Engine coolant R I R I I E4 E-5 E4 I R I R I R I R I*z I l Hoses for cracks or wear l Leaks - Level and strength I R RR I R R R I I R I OilPancapacity: 4.0 L (4.2 US qt, 3.5 Imp qt) 0 Oil filter capacity: 0.15L(0.16USqt,0.13Impqt) 'Cracksordamage 0 Tension - - R I I I I I R I l ldle speed MT: 800-900 rpm (Neutral) AT 750-850 rpm (P range) - l Fittings, connections and components for leaks Operation Fittings and connections I I R I I I I I I I I I R I Gartner Banana
Page 45 of 1708

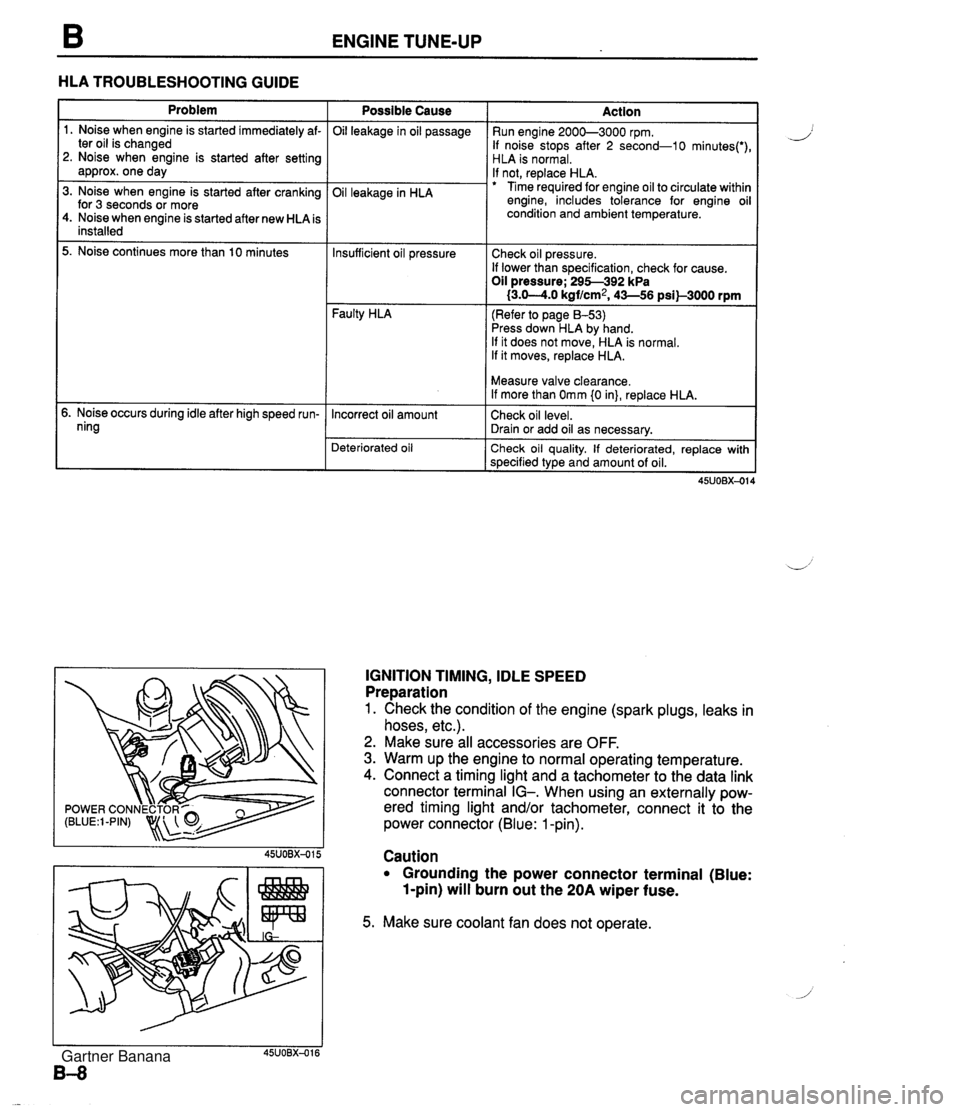
ENGINE TUNE-UP HLA TROUBLESHOOTING GUIDE Problem 1. Noise when engine is started immediately af- ter oil is changed 2. Noise when engine is started after setting approx. one day 3. Noise when engine is started after cranking for 3 seconds or more 4. Noise when engine is started after new HLA is installed 5. Noise continues more than 10 minutes 5. Noise occurs during idle after high speed run- ning Possible Cause Oil leakage in oil passage Oil leakage in HLA Faulty HLA Action Run engine 2000-3000 rpm. If noise stops after 2 second-10 minutes(') HLA is normal. If not, replace HLA. Time required for engine oil to circulate withir engine, includes tolerance for engine oi condition and ambient temperature. Insufficient oil pressure (Refer to page 8-53) Press down HLA by hand. If it does not move, HLA is normal. If it moves, replace HLA. Check oil pressure. If lower than specification, check for cause. Oil pressure; 295-392 kPa I3.0-4.0 kgf/cm2, 43-56 psil-3000 rpm Deteriorated oil Check oil quality. If deteriorated, replace with specified type and amount of oil. Incorrect oil amount IGNITION TIMING, IDLE SPEED Preparation 1. Check the condition of the engine (spark plugs, leaks in hoses, etc.). 2. Make sure all accessories are OFF. 3. Warm up the engine to normal operating temperature. 4. Connect a timing light and a tachometer to the data link connector terminal IG-. When using an externally pow- ered timing light and/or tachometer, connect it to the power connector (Blue: 1 -pin). Measure valve clearance. If more than Omm {0 in}, replace HLA. Check oil level. Drain or add oil as necessary. Caution Grounding the power connector terminal (Blue: 1-pin) will burn out the 20A wiper fuse. 5. Make sure coolant fan does not operate. Gartner Banana
Page 47 of 1708

COMPRESSION COMPRESSION If the engine exhibits low power, poor fuel economy, or poor idle, check the following: 1. Ignition system (Refer to section G.) 2. Compression (Refer to page B-10.) 3. Fuel system (Refer to section F.) INSPECTION 1. Check that the battery is fully charged. Recharge it if necessary. (Refer to section G.) 2. Warm up the engine to the normal operating tempera- ture. 3. Turn the engine OFF. 4. Remove all spark plugs. 5. Disconnect the ignition coil connector. 6. Connect a compression gauge to the No.1 spark plug hole. 7. Fully depress the accelerator pedal and crank the en- gine. 8. Record the maximum gauge reading. 9. Check each cylinder, as above. Compression: 1,255 kPa (1 2.8 kgf/cm2, 182 psi)-300 rpm Minimum: 883 kPa (9.0 kgf/cm2, 128 psiF300 rpm Differential limit between cylinders: 196 kPa (2.0 kgf/cm2, 28 psi} 10. If the compression in one or more cylinders is low, pour a small amount of engine oil into the cylinder and re- check the compression. (1) If the compression increases, the piston, piston rings, or cylinder wall may be worn. (2) If the compression stays low, the valve may be stuck or seated improperly. (3) If the compression in adjacent cylinders stays low, the cylinder head gasket may be defective or the cyl- inder head distorted. 11 . Connect the ignition coil connector. 12. Install the spark plugs. Tightening torque: 15--22 N.m (1.5-2.3 kgf.m, 11-16 ftlbf) Gartner Banana
Page 115 of 1708

ASSEMBLY Dipstick, Dipstick Pipe 1. Apply a small amount of clean engine oil to the new 0- ring. 2. Push the dipstick pipe into the oil pan. u 3. Tighten the dipstick pipe bracket nut. Tightening torque: 7.9-10.7 N.m (80-1 10 kgfem, 70-95.4 in4bf) 4. lnstall the dipstick. Spark Plug lnstall the spark plugs. Tightening torque: 15-22 N.m (1 .%2.3 kgf-m, 11-1 6 ft4bf) Water Outlet Pipe 1. Remove all foreign material from the water outlet pipe mounting surface. 2. lnstall a new gasket and the water outlet pipe. Tightening torque: 19-25 N.m (1.9-2.6 kgf.m, 14--18 ft4bf) Oil Pressure Switch lnstall the oil pressure switch. Tightening torque: 12-17 N.m (1.2-1.8 kgf-m, 9-13 ft4bf) Gartner Banana
Page 167 of 1708

F TROUBLESHOOTING GUIDE INSPECTION Check if battery positive voltage exists at fuel pump connector fuel pump positive terminal with jumper wire connected.(~tep 3 Check for fuel injector operating sound while crank- ing engine Check if battery positive voltage exists at fuel injector connector B terminal wire with ignition switch ON Connect data link connector terminals F/P and GND with jumper wire and check for correct fuel line pres- sure with ignition switch ON page F-110 Fuel Line pressure: 265--314 kPa f2.7-3.2 kgf/crn2, 38-46 psi) Check for correct engine compression Section B Engine compression: 1,255--883 kPa {12.&9.0 kgf/crn2, 182-1 28 psi)-300 rpm Check if spark plugs are OK WEAR AND CARBON BUILDUP BURNS PLUG GAP 1.0-l.lmm DAMAGE AND (0.040-0.043 in) DETERIORATION DAMAGE Try known good PCME and check if condition im- proves page F-144 - Yes - No Yes Yes - No Yes Yes - No - Yes ACTION Check continuity of fuel pump page F-114 Check fuel pump relay page F-117 Go to Step 7 Go to Step 6 Check PCME terminals 2A, 2U, 2V, 2Y and 22 voltages @3F page F-147 Check for open circuit in wiring between main relay and fuel injector page F-7 Go to next step Low pressure Check fuel line pressure while pinching fuel return hose 0 If fuel line pressure quickly increases, check pressure regulator page F-118 0 If fuel line pressure gradually increases, check for clog- ging between fuel pump and pressure regulator If not clogged, check fuel pump maximum pressure page F-115 Go to next step Check engine condition @3F Section B w Worn piston, piston rings or cylinder wall Defective cylinder head gasket w Distorted cylinder head Improper valve seating w Valve sticking in guide Go to next step Repair, clean, or replace Section G Gartner Banana
Page 169 of 1708

TROUBLESHOOTING GUIDE INSPECTION Check if PCME terminal voltages are OK (IC, 1 R, IT, 2D, 20 and 2Q) page F-146 :heck for air leakage of intake air system malfunction page F-100 :heck for EGR system malfunction page F-124 Check if mass airflow sensor US page F-152 Check for correct engine compression Section B Engine compression: 1,255-883 kPa j12.8-9.0 kgf/cm2, 182-128 psil-300 rpm Check if spark plugs are OK WEAR AND CARB/ON BUILDUP BURNS PLUG GAP 1 .O-1 .l mm (0.040-4.043 in) DAMAGE AND DETERIORATION DAMAGE - Yes Yes - No Yes - No Yes - No Yes No - Yes - No - ACTION Go to next step Check for cause (Refer to "Check Point for Each Terminal") page F-148 Repair or replace Go to next step Repair or replace Go to next step Go to next step Repair or replace page F-99 Go to next step Check engine condition Section B Worn piston, piston rings or cylinder wall Defective cylinder head gasket Distorted cylinder head Improper valve seating a Valve sticking in guide Go to next step Repair, clean, or replace @a Section G Try known good PCME and check if condition im- 3rOVeS page F-144 Gartner Banana
Page 173 of 1708

TROUBLESHOOTING GUIDE INSPECTION ACTION Check if PCME terminal voltages are OK (1 R, 1 T, ZD, 20 and 20) us page F-146 Yes Go to next step Check for cause (Refer to "Check Point for Each Termi- nal") Djp paae F-148 Check if strong blue spark is visible at each discon. nected high-tension lead while cranking engine Yes - No Go to next step Check ignition system (Refer to Troubleshooting "Misfire") Section G Check for EGR system malfunction page F-124 Yes - No Repair or replace Go to next step Check for fuel injector operating sound at each in- Yes Go to Step 10 jector at idle No - Yes Go to Step 9 Check if battery positive voltage exists at fuel injec- tor connector B terminal with ignition switch ON Check if fuel injector resistance is OK page F-119 Resistance: 12-1 6R G If OK, check wiring between injector and PCME page F-7 o If not OK, replace injector L@? page F-119 No - Yes Check wiring between main relay and fuel injector page F-7 Go to next step Check for correct engine compression Section B Engine compression: 1,255-883 kPa I12.8-9.0 kgflcm2, 182-1 28 psi)-300 rpm Check engine condition Section B I Worn piston, piston rings or cylinder wall r Defective cylinder head gasket r Distorted cylinder head r Improper valve seating Valve sticking in guide No - Yes :heck if spark plugs PLUG GAP 1 .O-1 .l mm (0.04+0.043 in} DETERIORATION 30 to next step qepair, clean, or replace Section G Try known good PCME and check if condition im- roves @r page F-144 Gartner Banana
Page 176 of 1708
![MAZDA MX-5 1994 Workshop Manual TROUBLESHOOTING GUIDE B ROUGH IDLE - ALWAYS JCRIPTION I Engine vibrates excessively at idle in every condition ROUBLESHOOTING HINTS] AirIFuel mixture too lean Air leakage Fuel injection control malfu MAZDA MX-5 1994 Workshop Manual TROUBLESHOOTING GUIDE B ROUGH IDLE - ALWAYS JCRIPTION I Engine vibrates excessively at idle in every condition ROUBLESHOOTING HINTS] AirIFuel mixture too lean Air leakage Fuel injection control malfu](/img/28/57072/w960_57072-175.png)
TROUBLESHOOTING GUIDE B ROUGH IDLE - ALWAYS JCRIPTION I Engine vibrates excessively at idle in every condition 'ROUBLESHOOTING HINTS] AirIFuel mixture too lean Air leakage Fuel injection control malfunction Low fuel line pressure Q One or more injectors not operating or clogged O One or more spark plugs not sparking @ Injection timing misadjustment O Low engine compression INSPECTION >heck for correct intake manifold vacuum at idle tacuum: More than 450 mmHg f17.7 inHg} VACUUM GAUGE =heck if air cleaner element is clean page F-76 :heck if "00" is displayed on Self-Diagnosis Check- 3r with ignition switch ON page F-79 SELECTSWA SYSTEM SELECT 1 Sheck switches for correct operation with Self- Diagnosis Checker Monitor Lamp and ignition switch ON SELECT SW A page F-95 Sheck if PCME terminal voltages are OK MONITOR . Sheck i (1 R, IT, 2D, 20 and 2Q) page F-146 - Yes Yes - No - Yes Yes - No - Yes ACTION Go to next step Check for air leakage of intake air system components page F-100 Go to next step Replace air cleaner element page F-99 Go to next step Diagnostic Trouble Code No. displayed Check for cause (Refer to specified check sequence) page F-81 "88" flashes Check PCME terminal 1 E voltage page F-136 Specification: Battery positive voltage (Ignition switch ON) e If OK, replace PCME page F-143 Q If not OK, check wiring between PCME and Self-Diagno- sis Checker page F-7 Go to next step Lamp not ONlOFF with specified switch Check for cause (Refer to specified check sequence) page F-96 Lamp always ON Check wiring between PCME terminal 1 D and Self-Diag- nosis Checker as? page F-7 Go to next step Check for cause (Refer to "Check Point for Each Termi- nal") us ~aae F-148 Gartner Banana
Page 182 of 1708

TROUBLESHOOTING GUIDE INSPECTION :heck if spark plugs are OK WEAR AND CARBQN BUILDUP BURNS PLUG GAP 1 .O-1 .l mm DAMAGE AND t0.040--0.043 in) DETERIORATION DAMAGE Try known good PCME and check if condition im- proves as page F-144 Yes ACTION Go to next step Repair, clean, or replace Section G Gartner Banana