check engine light MAZDA MX-5 1997 Factory User Guide
[x] Cancel search | Manufacturer: MAZDA, Model Year: 1997, Model line: MX-5, Model: MAZDA MX-5 1997Pages: 514, PDF Size: 17.89 MB
Page 208 of 514

Remove rear seat cushions. Disconnect fuel pump connector. Start engine and allow to stall. After engine stalls,
attempt to restart engine to ensure no residual pressure exists. Turn ignition off and reconnect fuel pump
connector. When disconnecting fuel hoses, cover connection with shop rag to catch fuel leakage. To avoid
excessive cranking after servicing, prime fuel system before starting engine.
Priming System
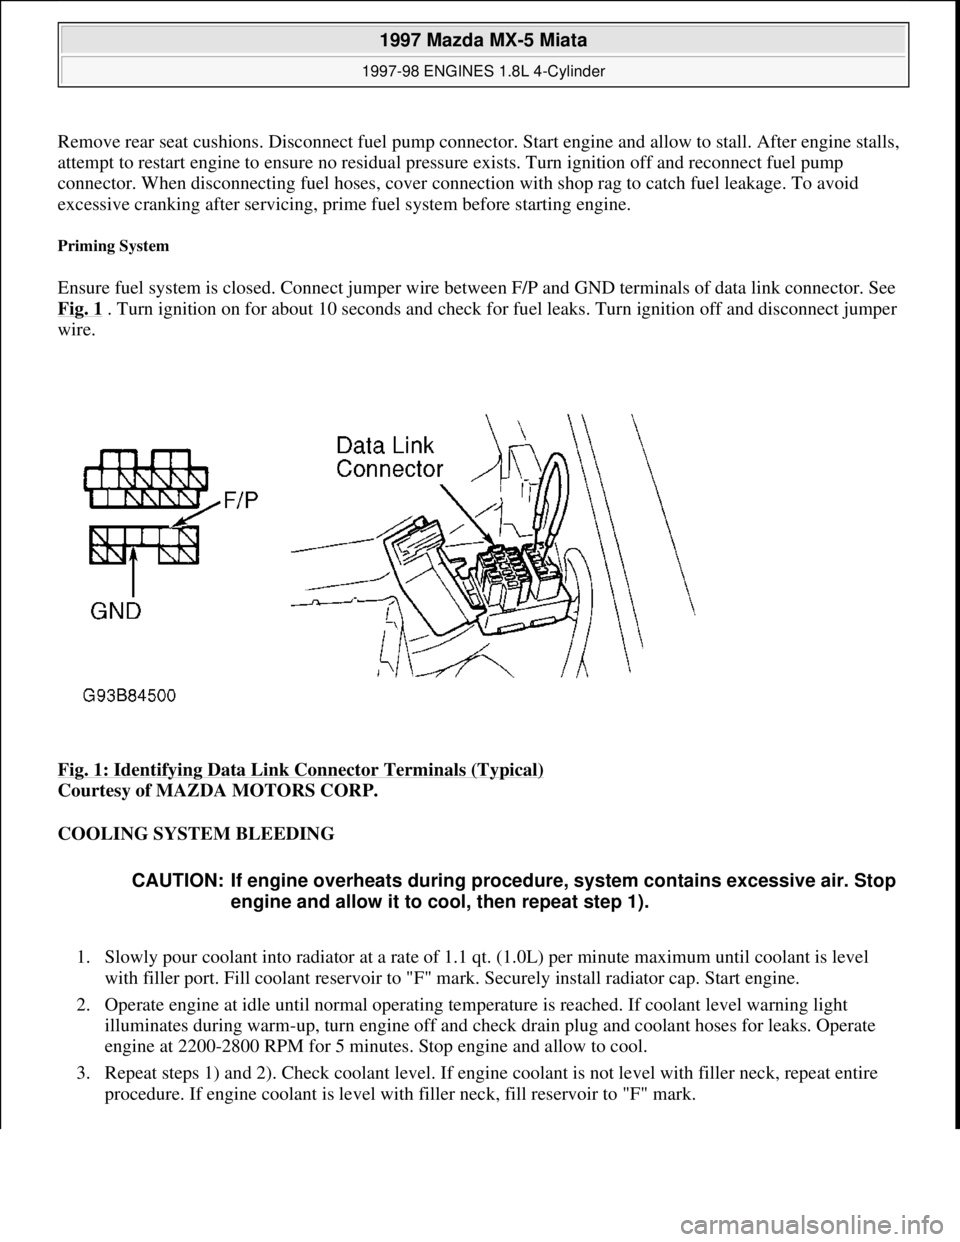
Ensure fuel system is closed. Connect jumper wire between F/P and GND terminals of data link connector. See
Fig. 1
. Turn ignition on for about 10 seconds and check for fuel leaks. Turn ignition off and disconnect jumper
wire.
Fig. 1: Identifying Data Link Connector Terminals (Typical)
Courtesy of MAZDA MOTORS CORP.
COOLING SYSTEM BLEEDING
1. Slowly pour coolant into radiator at a rate of 1.1 qt. (1.0L) per minute maximum until coolant is level
with filler port. Fill coolant reservoir to "F" mark. Securely install radiator cap. Start engine.
2. Operate engine at idle until normal operating temperature is reached. If coolant level warning light
illuminates during warm-up, turn engine off and check drain plug and coolant hoses for leaks. Operate
engine at 2200-2800 RPM for 5 minutes. Stop engine and allow to cool.
3. Repeat steps 1) and 2). Check coolant level. If engine coolant is not level with filler neck, repeat entire
procedure. If engine coolant is level with filler neck, fill reservoir to "F" mark.
CAUTION: If engine overheats during procedure, system contains excessive air. Stop
engine and allow it to cool, then repeat step 1).
1997 Mazda MX-5 Miata
1997-98 ENGINES 1.8L 4-Cylinder
Microsoft
Sunday, July 05, 2009 1:55:15 PMPage 2 © 2005 Mitchell Repair Information Company, LLC.
Page 229 of 514

Courtesy of MAZDA MOTORS CORP.
Removal & Installation (Protege)
1. Disconnect negative battery cable. Remove engine undercovers. Drain engine oil. Remove exhaust header
downpipe and brackets from front exhaust system. Remove oil pan retaining bolts.
2. DO NOT damage sealant contact surfaces. Remove oil pan by prying between oil pan and mounting
surface. On Protege, remove stiffener by prying between stiffener and cylinder block. On all models,
clean all sealant from oil pan, bolts, engine block and both sides of stiffener (Protege).
3. On Protege, apply oil resistant sealant to engine block and stiffener. Install stiffener. On all models, apply
sealant and install oil pan within 5 minutes of applying sealant. To complete installation, reverse removal
procedure. Tighten all bolts to specification. See TORQUE SPECIFICATIONS
. Fill engine with oil to
specification. See ENGINE LUBRICATION SYSTEM
under ENGINE OILING.
OVERHAUL
CYLINDER HEAD
Cylinder Head
Clean carbon and gasket material from all mating surfaces. Using a tap, clean cylinder head threads. Check
cylinder head warpage. If warpage exceeds specification, resurface head, but DO NOT exceed grinding limit.
See CYLINDER HEAD
under ENGINE SPECIFICATIONS. After resurfacing cylinder head, check cylinder
head height. Replace cylinder head if height is less than minimum specification.
Valve Springs
Ensure valve spring free length, out-of-square and compressed length are within specification. See VALVES &
VALVE SPRINGS under ENGINE SPECIFICATIONS. Replace valve spring if necessary.
Valve Stem Oil Seals
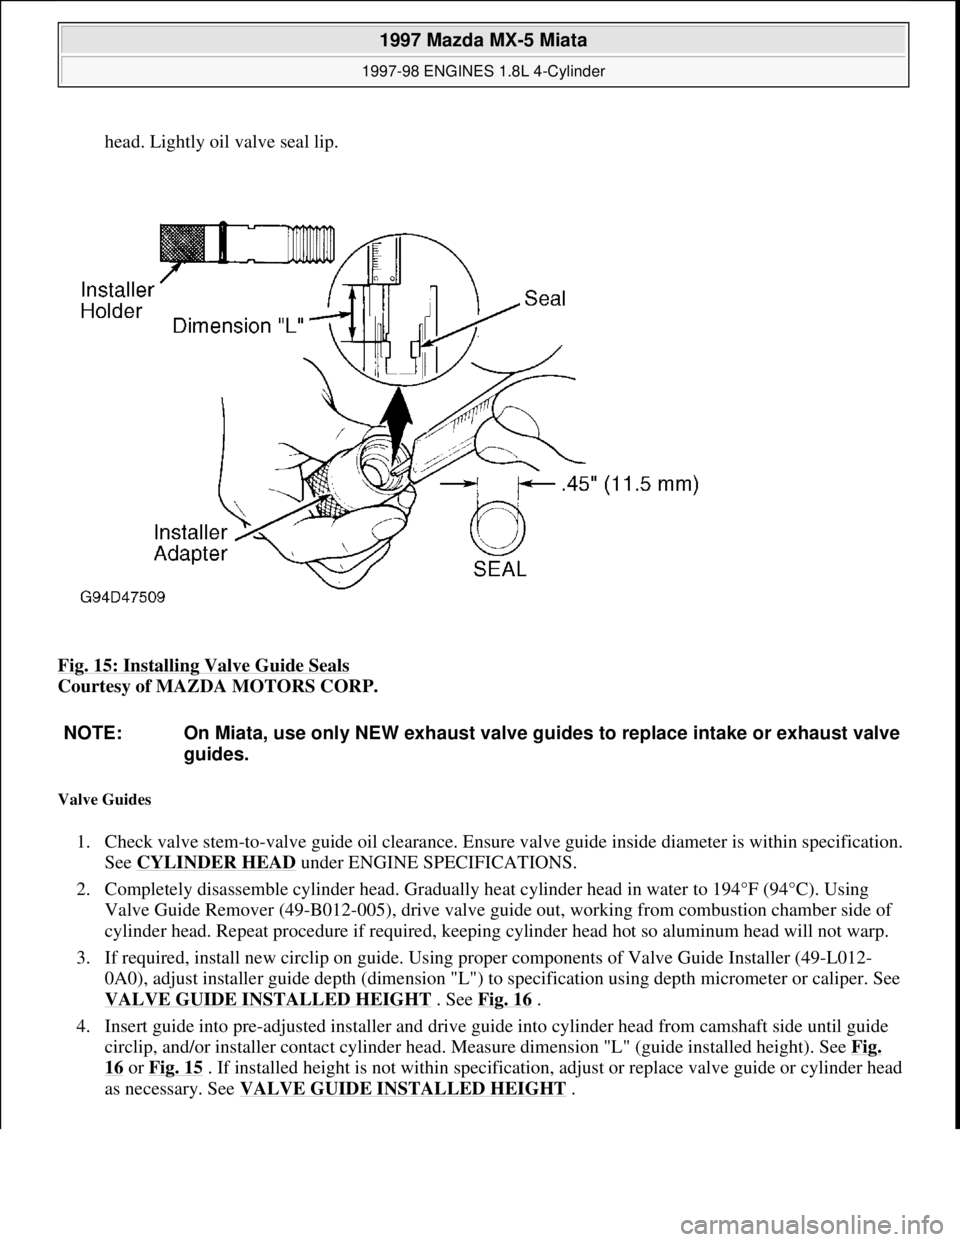
1. On Miata, use Installer Set (49-L012-0A0) to install valve seals. See Fig. 15 . Adjust installer dimension
"L" to seal depth of .720-.744" (18.3-18.9 mm). Using hand pressure ONLY, install seal until it contacts
cylinder head. Lightly oil valve seal lip.
2. On Protege, use Installer Set (49-L012-0A0) to install valve seals. See Fig. 15
. Adjust installer
dimension "L" to seal depth of .783" (19.9 mm). Using hand pressure, install seal until it contacts cylinder CAUTION: If reusing old oil pan bolts, remove old sealant from bolt threads.
Failure to remove old sealant may result in cracked block at bolt
holes.
NOTE: Intake and exhaust valve stem seals are different. Exhaust seals can be
identified by ridges molded into top of seal. Intake seals do not have identifying
ridges. Incorrect installation of valve stem seals will cause premature failure.
1997 Mazda MX-5 Miata
1997-98 ENGINES 1.8L 4-Cylinder
Microsoft
Sunday, July 05, 2009 1:55:15 PMPage 23 © 2005 Mitchell Repair Information Company, LLC.
Page 230 of 514

head. Lightly oil valve seal lip.
Fig. 15: Installing Valve Guide Seals
Courtesy of MAZDA MOTORS CORP.
Valve Guides
1. Check valve stem-to-valve guide oil clearance. Ensure valve guide inside diameter is within specification.
See CYLINDER HEAD
under ENGINE SPECIFICATIONS.
2. Completely disassemble cylinder head. Gradually heat cylinder head in water to 194°F (94°C). Using
Valve Guide Remover (49-B012-005), drive valve guide out, working from combustion chamber side of
cylinder head. Repeat procedure if required, keeping cylinder head hot so aluminum head will not warp.
3. If required, install new circlip on guide. Using proper components of Valve Guide Installer (49-L012-
0A0), adjust installer guide depth (dimension "L") to specification using depth micrometer or caliper. See
VALVE GUIDE INSTALLED HEIGHT
. See Fig. 16 .
4. Insert guide into pre-adjusted installer and drive guide into cylinder head from camshaft side until guide
circlip, and/or installer contact cylinder head. Measure dimension "L" (guide installed height). See Fig.
16 or Fig. 15 . If installed height is not within specification, adjust or replace valve guide or cylinder head
as necessary. See VALVE GUIDE INSTALLED HEIGHT
.
NOTE: On Miata, use only NEW exhaust valve guides to replace intake or exhaust valve
guides.
1997 Mazda MX-5 Miata
1997-98 ENGINES 1.8L 4-Cylinder
Microsoft
Sunday, July 05, 2009 1:55:15 PMPage 24 © 2005 Mitchell Repair Information Company, LLC.
Page 233 of 514

Valves
Check valve face angle, head diameter, margin thickness and stem diameter. Service or replace valves if
measurements are not within specifications. See VALVES & VALVE SPRINGS
under ENGINE
SPECIFICATIONS.
Valve Seat Correction Angles
Measure seat contact width on valve. See VALVE SEAT. If seat width is not within specification or if valve
face does not contact center of valve seat, correct seat using a 70-degree grinding stone. After correcting seat,
lightly finish seat with 45-degree grinding stone.
VALVE TRAIN
Hydraulic Lash Adjusters
1. Remove camshaft cover. Check movement of each Hydraulic Lash Adjuster (HLA) by pushing
downward using hand pressure only. If HLA compresses, replace HLA. To remove HLA, remove
camshafts. See CAMSHAFT
under REMOVAL & INSTALLATION. Mark location of HLA before
removing from bore. Lift HLA from cylinder head.
2. Inspect HLA friction surfaces for wear and damage. Replace HLA if required. Coat HLA with engine oil
and install in original location. Ensure HLA moves smoothly in bore by using small magnet attached to
HLA.
CYLINDER BLOCK ASSEMBLY
Piston & Connecting Rod Assembly
1. Before removing rod cap from crankshaft, measure and record rod side play. See CONNECTING RODS
under ENGINE SPECIFICATIONS. Before removing connecting rods, measure and record connecting
rod bearing oil clearance. See CRANKSHAFT, MAIN & CONNECTING ROD BEARINGS
under
ENGINE SPECIFICATIONS.
2. Before separating piston from connecting rod, mark piston in relation to connecting rod. Check
oscillation movement of piston and rod assembly (hold piston horizontally, lift rod and allow rod to drop
by its own weight). If pin binds in pin bore (rod does not drop), replace piston and/or pin as necessary.
3. To separate components, press piston pin out of piston and rod assembl
y, noting pressure required to
Normal1.772-1.791 (45.00-45.50)
Serviceable1.733-1.772 (45.60-46.50)
NOTE: If hydraulic lash adjusters are persistently noisy, check with manufacturer
for availability of modified adjusters.
NOTE: During disassembly, match mark components for reassembly reference.
1997 Mazda MX-5 Miata
1997-98 ENGINES 1.8L 4-Cylinder
Microsoft
Sunday, July 05, 2009 1:55:15 PMPage 27 © 2005 Mitchell Repair Information Company, LLC.