driver door MERCEDES-BENZ A CLASS 2012 Owners Manual
[x] Cancel search | Manufacturer: MERCEDES-BENZ, Model Year: 2012, Model line: A CLASS, Model: MERCEDES-BENZ A CLASS 2012Pages: 356, PDF Size: 4.96 MB
Page 10 of 356
D
Dashboard see Instrument cluster
Dashboard lighting
see Instrument cluster lighting
Data
see Technical data
Daytime driving lights
Display message ............................ 242
Switching on/off (on-board com-
puter) ............................................. 221
Switching on/off (switch) .............. 105
Dealership
see Qualified specialist workshop
Declarations of conformity ................. 23
Delayed switch-off Exterior lighting (on-board com-
puter) ............................................. 222
Interior lighting .............................. 223
Diagnostics connection ......................23
Diesel .................................................. 341
Digital speedometer .........................212
Dipped-beam headlamps Changing bulbs .............................. 114
Display message ............................ 239
Setting for driving abroad (sym-
metrical) ........................................ 104
Setting for driving on the right/left 221
Switching on/off ........................... 105
DIRECT SELECT lever
see Automatic transmission
Display (cleaning instructions) ........295
Display message ASSYST PLUS ................................ 289
General information ....................... 229
Hiding (on-board computer) ........... 229
Display messages
Calling up (on-board computer) ..... 229
Driving systems ............................. 245
Engine ............................................ 243
Key ................................................ 256
Lights ............................................. 239
Safety systems .............................. 230
Tyres .............................................. 251
Vehicle ........................................... 252
Distance recorder
see Trip meter Distance warning function
Activating/deactivating .................218
Function/notes ................................ 62
Warning lamp ................................. 266
DISTRONIC PLUS
Activation conditions .....................175
Cruise control lever .......................174
Deactivating ................................... 177
Display message ............................ 249
Displays in the multifunction dis-
play ................................................ 175
Driving tips .................................... 178
Function/notes ............................. 174
Important safety notes .................. 173
Selecting ........................................ 175
Setting the specified minimum
distance ......................................... 177
Warning lamp ................................. 266
Door
Automatic locking (on-board com-
puter) ............................................. 223
Automatic locking (switch) ............... 81
Central locking/unlocking (key) ...... 75
Control panel ................................... 37
Display message ............................ 254
Emergency locking ........................... 81
Emergency unlocking .......................81
Important safety notes .................... 79
Opening (from the inside) ................ 80
Drive program
Automatic ...................................... 156
Display ........................................... 153
Display (DIRECT SELECT lever) ...... 152
Manual ........................................... 156
Driver's door
see Door
Driving abroad
Service24h .................................... 290
Symmetrical dipped beam .............104
Driving on flooded roads ..................167
Driving safety system Adaptive Brake Assist ......................64
COLLISION PREVENTION ASSIST .... 62
Distance warning function ...............62
Electronic Brake-force Distribution ..69
ESP ®
(Electronic Stability Pro-
gram) ......................................... 65, 668
Index
Page 11 of 356
ETS/4ETS (Electronic Traction
System) ...........................................
65
Important safety guidelines .............61
Driving safety systems
ABS (Anti-lock Braking System)
.......61
ADAPTIVE BRAKE ............................. 69
Adaptive brake lamps ...................... 65
BAS (Brake Assist System) ..............62
Overview .......................................... 61
Steering assistant STEER CON-
TROL ................................................ 69
Driving system
Active Parking Assist .....................186
Driving systems
ATTENTION ASSIST ........................ 195
Blind Spot Assist ............................ 197
Cruise control ................................ 168
Display message ............................ 245
Distronic Plus ................................ 173
HOLD function ............................... 179
Lane Keeping Assist ...................... 199
Lane package ................................ 197
PARKTRONIC ................................. 182
RACE START (AMG vehicles) ..........181
Reversing camera ..........................191
Speed Limit Assist ......................... 196
SPEEDTRONIC ............................... 171
Driving tips
Aquaplaning ................................... 167
Automatic transmission ................. 154
Brakes ........................................... 166
DISTRONIC PLUS ........................... 178
Downhill gradient ........................... 166
Driving abroad ............................... 104
Driving in winter ............................. 167
Driving on flooded roads ................167
Driving on wet roads ...................... 167
General .......................................... 165
Icy road surfaces ........................... 168
Limited braking efficiency on sal-
ted roads ....................................... 167
New brake pads/linings ................ 167
Running-in tips ............................... 142
Snow chains .................................. 321
Symmetrical dipped beam .............104
Towing a trailer .............................. 201
Wet road surface ........................... 166
DVD audio (on-board computer) ...... 215 E
EASY-VARIO-PLUS system Luggage compartment enlarge-
ment .............................................. 272
EBD (electronic brake force distri-
bution)
Display message
............................ 232
Function/notes ................................ 69
ECO display
Function/notes ............................. 165
On-board computer ....................... 212
ECO start/stop function
Automatic engine start .................. 147
Automatic engine switch-off ..........146
Deactivating/activating ................. 147
General information ....................... 146
Important safety notes .................. 146
Introduction ................................... 145
Electrical fuses
see Fuses
Electronic Stability Program
see ESP ®
(Electronic Stability Program)
Emergency key
Unlocking the driver's door ..............81
Emergency key element
Function/notes ................................ 75
Locking vehicle ................................ 81
Emergency release
Driver's door .................................... 81
Emergency spare wheel
General notes ................................ 332
Important safety notes .................. 332
Removing ....................................... 332
Technical data ............................... 333
Emergency unlocking
Tailgate ............................................ 83
Vehicle ............................................. 81
Engine
Display message ............................ 243
ECO start/stop function ................ 145
Engine number ............................... 338
Jump-starting ................................. 308
Running irregularly ......................... 149
Starting problems .......................... 149
Starting the engine with the key .... 144
Stopping ........................................ 162 Index
9
Page 45 of 356
R
do not lean forwards, e.g. over the cover of
the driver's/front-passenger front airbag,
particularly when the vehicle is in motion.
R do not put your feet on the dashboard.
R only hold the steering wheel on the outside.
This allows the airbag to be fully deployed.
You could be injured if the airbag is
deployed and you are holding the inside of
the steering wheel.
R do not lean on the doors from inside the
vehicle.
R make sure that there are no people, ani-
mals or objects between the vehicle occu-
pants and the area where the airbags are
deployed.
R do not place any objects between the seat
backrest and the door.
R do not hang any hard objects, e.g. coat
hangers, on the grab handles or coat hooks.
R do not attach accessories, e.g. cup holders,
to the doors.
It is not possible to rule out a risk of injury
being caused by an airbag, due to the high
speed at which the airbag must be deployed. G
WARNING
Airbag functionality can only be assured if the
following
parts are not covered and no badges
or stickers are attached to them:
R padded steering wheel boss
R kneebag cover below the steering column
R front-passenger airbag cover
R outer side of front seat bolsters
R side trim next to the rear seat backrest
R roof frame cover between the front A-pillar
and the C-pillar in the rear compartment G
WARNING
When an airbag deploys, a small amount of
powder is released. The powder may cause
short-term breathing difficulties to persons
suffering from asthma or other pulmonary
conditions. In order to prevent potential breathing diffi-
culties, you should leave the vehicle as soon
as it is safe to do so. You can also open the
window
to allow fresh air to enter the vehicle
interior. The powder does not constitute a
health hazard and does not indicate that there
is a fire in the vehicle. G
WARNING
The airbag parts are hot after the airbag has
been deployed. Do not touch them as you
could burn yourself.
Have the airbags replaced at a qualified spe-
cialist workshop. Otherwise, occupants are
not protected by the airbags in the event of
another accident.
Airbag deployment slows down and restricts
the movement of the vehicle occupant.
If the airbags are deployed, you will hear a
bang
and a small amount of powder may also
be released. Only in rare cases will the bang
affect your hearing. The powder that is
released generally does not constitute a
health hazard. The 6 SRS warning lamp
lights up.
The airbag installation locations are identified
by the AIRBAG symbol.
Front airbags !
Do not place heavy objects on the front-
passenger seat. The system may then
detect
that the seat is occupied and if there
is an accident, the restraint systems on the
front-passenger side could be deployed.
Have restraint systems that have been trig-
gered replaced. Occupant safety
43
Safety Z
Page 50 of 356
The belt strap is tightened slightly when:
R
you engage the belt tongue in the belt
buckle
and you then turn the key to position
2 in the ignition lock.
R the key is in position 2 in the ignition lock
and you then engage the belt tongue in the
buckle.
The seat-belt adjustment will apply a certain
tightening force if any slack is detected
between the occupant and the seat belt. Do
not hold on to the seat belt tightly while it is
adjusting. You can switch the seat-belt
adjustment on and off in the on-board com-
puter ( Y page 225).
The seat-belt adjustment is an integral part of
the PRE-SAFE ®
convenience function. More
information about PRE-SAFE ®
can be found
in the "PRE-SAFE ®
(preventative occupant
protection)" section (Y page 45).
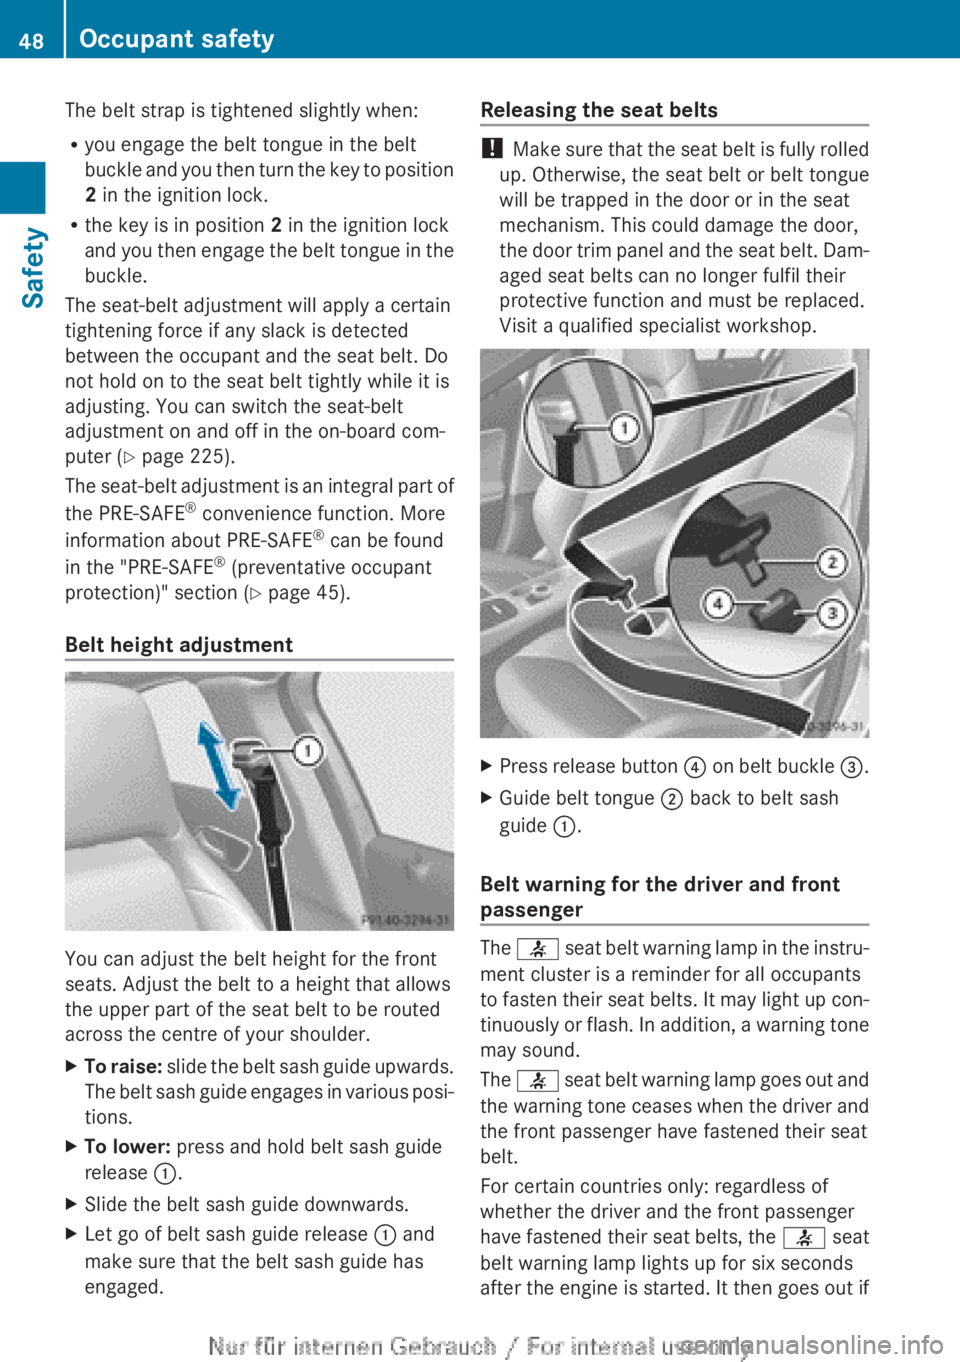
Belt height adjustment You can adjust the belt height for the front
seats. Adjust the belt to a height that allows
the upper part of the seat belt to be routed
across the centre of your shoulder.
X
To raise:
slide the belt sash guide upwards.
The belt sash guide engages in various posi-
tions.
X To lower: press and hold belt sash guide
release :.
X Slide the belt sash guide downwards.
X Let go of belt sash guide release : and
make sure that the belt sash guide has
engaged. Releasing the seat belts !
Make
sure that the seat belt is fully rolled
up. Otherwise, the seat belt or belt tongue
will be trapped in the door or in the seat
mechanism. This could damage the door,
the door trim panel and the seat belt. Dam-
aged seat belts can no longer fulfil their
protective function and must be replaced.
Visit a qualified specialist workshop. X
Press release button ?
on belt buckle =.
X Guide belt tongue ; back to belt sash
guide :.
Belt warning for the driver and front
passenger The
7
seat belt warning lamp in the instru-
ment cluster is a reminder for all occupants
to fasten their seat belts. It may light up con-
tinuously or flash. In addition, a warning tone
may sound.
The 7 seat belt warning lamp goes out and
the warning tone ceases when the driver and
the front passenger have fastened their seat
belt.
For certain countries only: regardless of
whether the driver and the front passenger
have fastened their seat belts, the 7 seat
belt warning lamp lights up for six seconds
after the engine is started. It then goes out if 48
Occupant safety
Safety
Page 63 of 356
opened from inside the vehicle. When the
vehicle is unlocked, the door can be opened
from the outside.
X
To activate: press the child-proof lock
lever up in the direction of arrow :.
X Make sure that the child-proof locks are
working properly.
X To deactivate: press the child-proof lock
lever down in the direction of arrow ;.
Override feature for the rear side win-
dows X
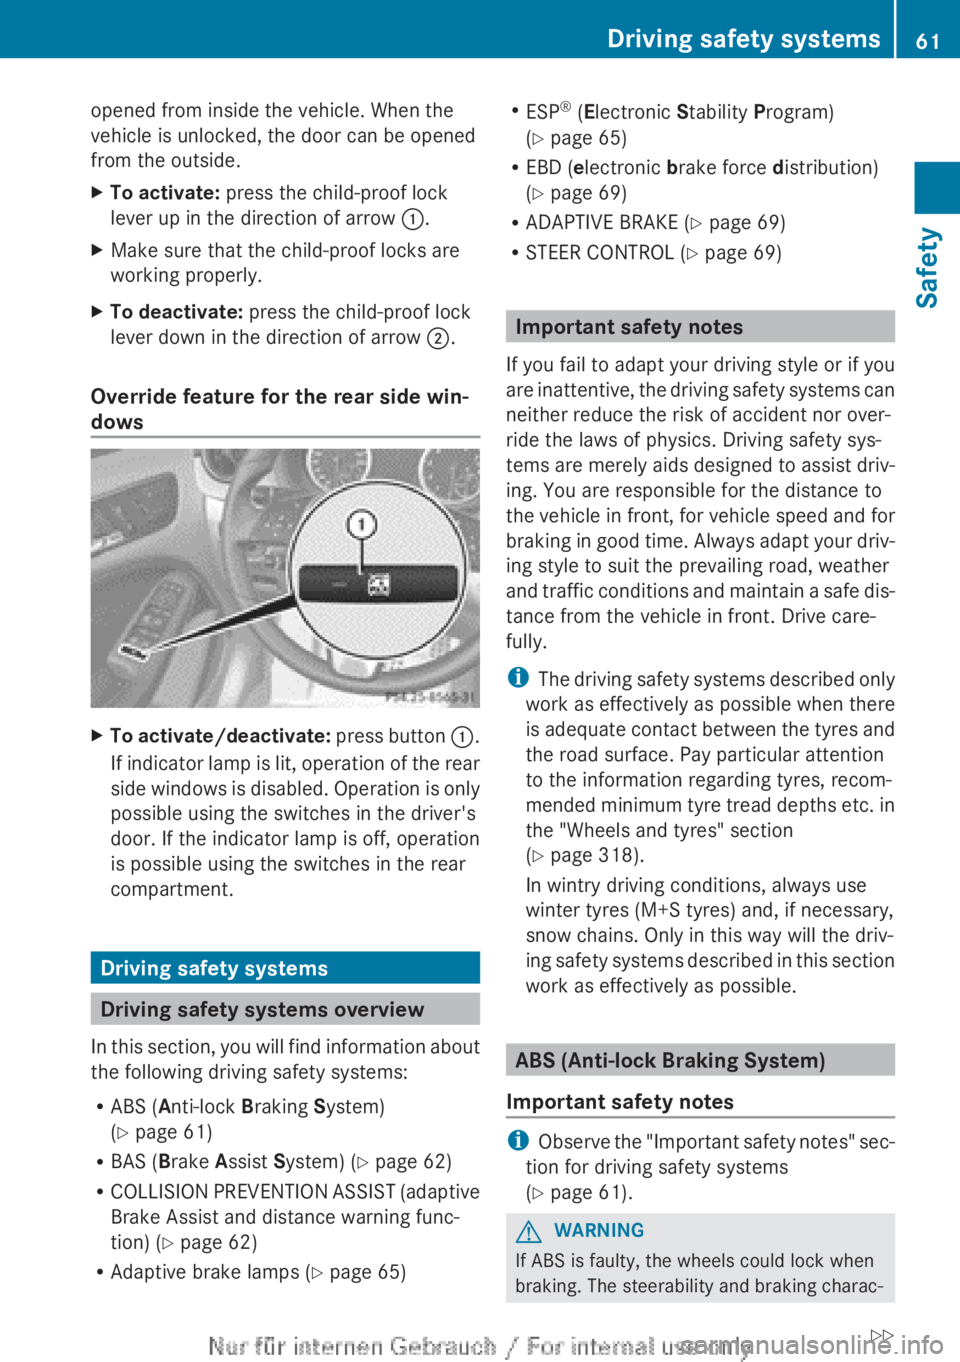
To activate/deactivate: press button :.
If indicator lamp is lit, operation of the rear
side windows is disabled. Operation is only
possible using the switches in the driver's
door. If the indicator lamp is off, operation
is possible using the switches in the rear
compartment. Driving safety systems
Driving safety systems overview
In
this section, you will find information about
the following driving safety systems:
R ABS ( Anti-lock Braking System)
(Y page 61)
R BAS ( Brake Assist System) ( Y page 62)
R COLLISION PREVENTION ASSIST (adaptive
Brake Assist and distance warning func-
tion) (Y page 62)
R Adaptive brake lamps ( Y page 65)R
ESP ®
(Electronic Stability Program)
(Y page 65)
R EBD ( electronic brake force distribution)
(Y page 69)
R ADAPTIVE BRAKE
(Y page 69)
R STEER CONTROL ( Y page 69) Important safety notes
If you fail to adapt your driving style or if you
are
inattentive, the driving safety systems can
neither reduce the risk of accident nor over-
ride the laws of physics. Driving safety sys-
tems are merely aids designed to assist driv-
ing. You are responsible for the distance to
the vehicle in front, for vehicle speed and for
braking in good time. Always adapt your driv-
ing style to suit the prevailing road, weather
and traffic conditions and maintain a safe dis-
tance from the vehicle in front. Drive care-
fully.
i The driving safety systems described only
work as effectively as possible when there
is adequate contact between the tyres and
the road surface. Pay particular attention
to the information regarding tyres, recom-
mended minimum tyre tread depths etc. in
the "Wheels and tyres" section
(Y page 318).
In wintry driving conditions, always use
winter tyres (M+S tyres) and, if necessary,
snow chains. Only in this way will the driv-
ing safety systems described in this section
work as effectively as possible. ABS (Anti-lock Braking System)
Important safety notes i
Observe
the "Important safety notes" sec-
tion for driving safety systems
(Y page 61). G
WARNING
If ABS is faulty, the wheels could lock when
braking. The steerability and braking charac- Driving safety systems
61
Safety
Z
Page 77 of 356
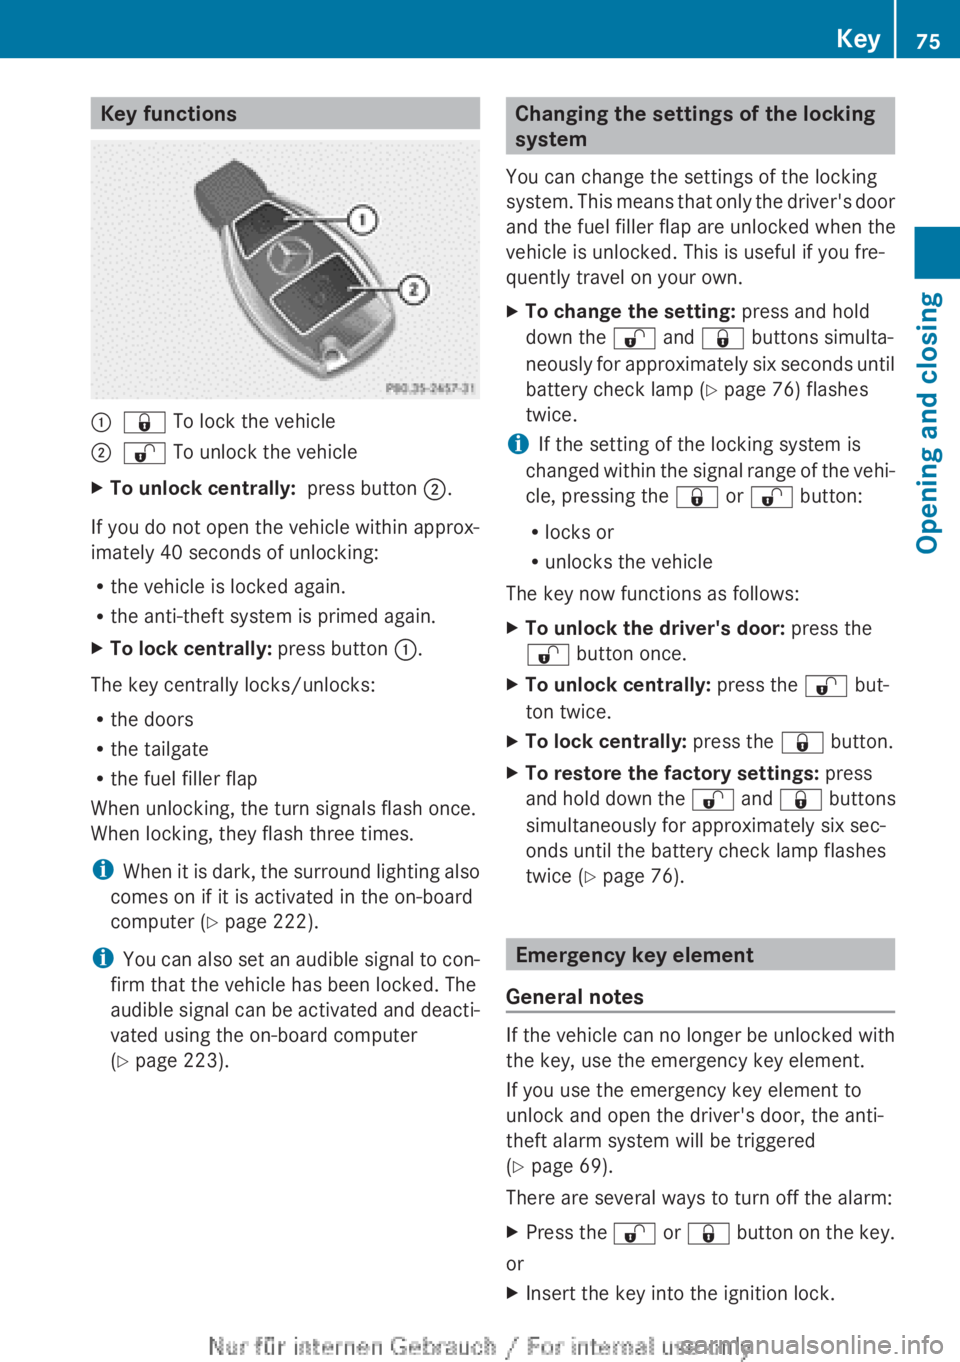
Key functions
:
& To lock the vehicle
; % To unlock the vehicle
X To unlock centrally: press button ;.
If you do not open the vehicle within approx-
imately 40 seconds of unlocking:
R the vehicle is locked again.
R the anti-theft system is primed again.
X To lock centrally: press button :.
The key centrally locks/unlocks:
R the doors
R the tailgate
R the fuel filler flap
When unlocking, the turn signals flash once.
When locking, they flash three times.
i When
it is dark, the surround lighting also
comes on if it is activated in the on-board
computer (Y page 222).
i You can also set an audible signal to con-
firm that the vehicle has been locked. The
audible signal can be activated and deacti-
vated using the on-board computer
(Y page 223). Changing the settings of the locking
system
You can change the settings of the locking
system.
This means that only the driver's door
and the fuel filler flap are unlocked when the
vehicle is unlocked. This is useful if you fre-
quently travel on your own.
X To change the setting: press and hold
down the % and & buttons simulta-
neously
for approximately six seconds until
battery check lamp (Y page 76) flashes
twice.
i If the setting of the locking system is
changed
within the signal range of the vehi-
cle, pressing the & or % button:
R locks or
R unlocks the vehicle
The key now functions as follows:
X To unlock the driver's door: press the
% button once.
X To unlock centrally: press the % but-
ton twice.
X To lock centrally: press the & button.
X To restore the factory settings: press
and
hold down the % and & buttons
simultaneously for approximately six sec-
onds until the battery check lamp flashes
twice (Y page 76). Emergency key element
General notes If the vehicle can no longer be unlocked with
the key, use the emergency key element.
If you use the emergency key element to
unlock and open the driver's door, the anti-
theft alarm system will be triggered
(Y page 69).
There are several ways to turn off the alarm:
X
Press the % or &
button on the key.
or
X Insert the key into the ignition lock. Key
75
Opening and closing Z
Page 80 of 356
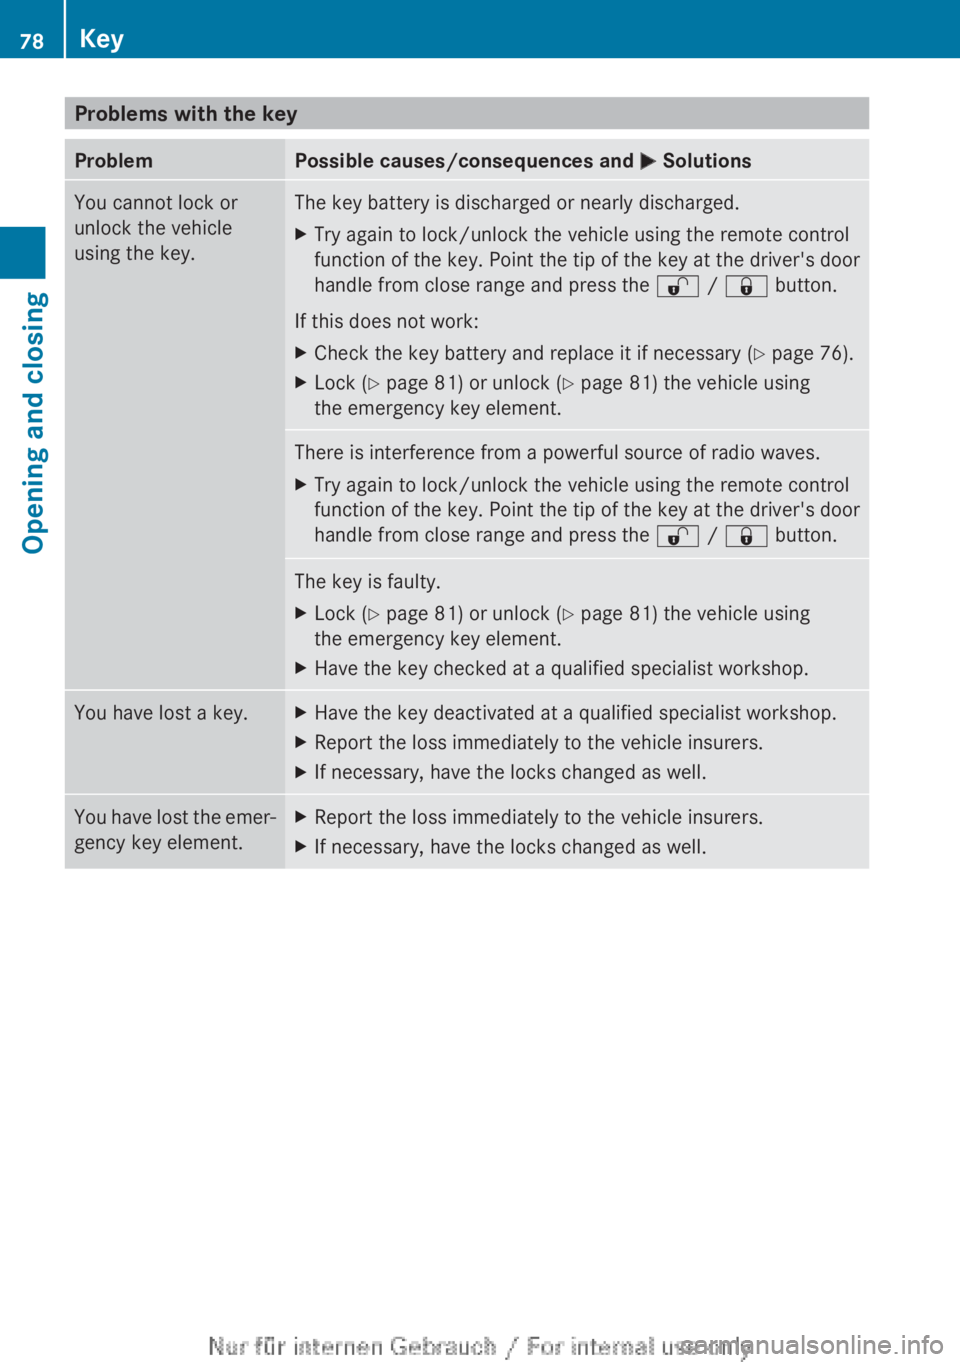
Problems with the key
Problem Possible causes/consequences and
M SolutionsYou cannot lock or
unlock the vehicle
using the key. The key battery is discharged or nearly discharged.
X
Try again to lock/unlock the vehicle using the remote control
function of the key. Point the tip of the key at the driver's door
handle from close range and press the % / & button.
If this does not work:
X Check the key battery and replace it if necessary ( Y page 76).
X Lock ( Y page 81) or unlock ( Y page 81) the vehicle using
the emergency key element. There is interference from a powerful source of radio waves.
X
Try again to lock/unlock the vehicle using the remote control
function of the key. Point the tip of the key at the driver's door
handle from close range and press the % / & button.The key is faulty.
X
Lock ( Y page 81) or unlock ( Y page 81) the vehicle using
the emergency key element.
X Have the key checked at a qualified specialist workshop. You have lost a key. X
Have the key deactivated at a qualified specialist workshop.
X Report the loss immediately to the vehicle insurers.
X If necessary, have the locks changed as well. You have lost the emer-
gency key element. X
Report the loss immediately to the vehicle insurers.
X If necessary, have the locks changed as well.78
KeyOpening and closing
Page 83 of 356
You can only open the rear doors from inside
the vehicle if they are not secured by the
child-proof locks (Y page 60).
If
the vehicle has been locked using the lock-
ing button for the central locking, or has been
locked automatically, and a door is opened
from the inside:
R the vehicle will be fully unlocked if it had
previously been fully unlocked
R only the door which has been opened form
the inside is unlocked if only the driver's
door had been previously unlocked Automatic locking feature
X
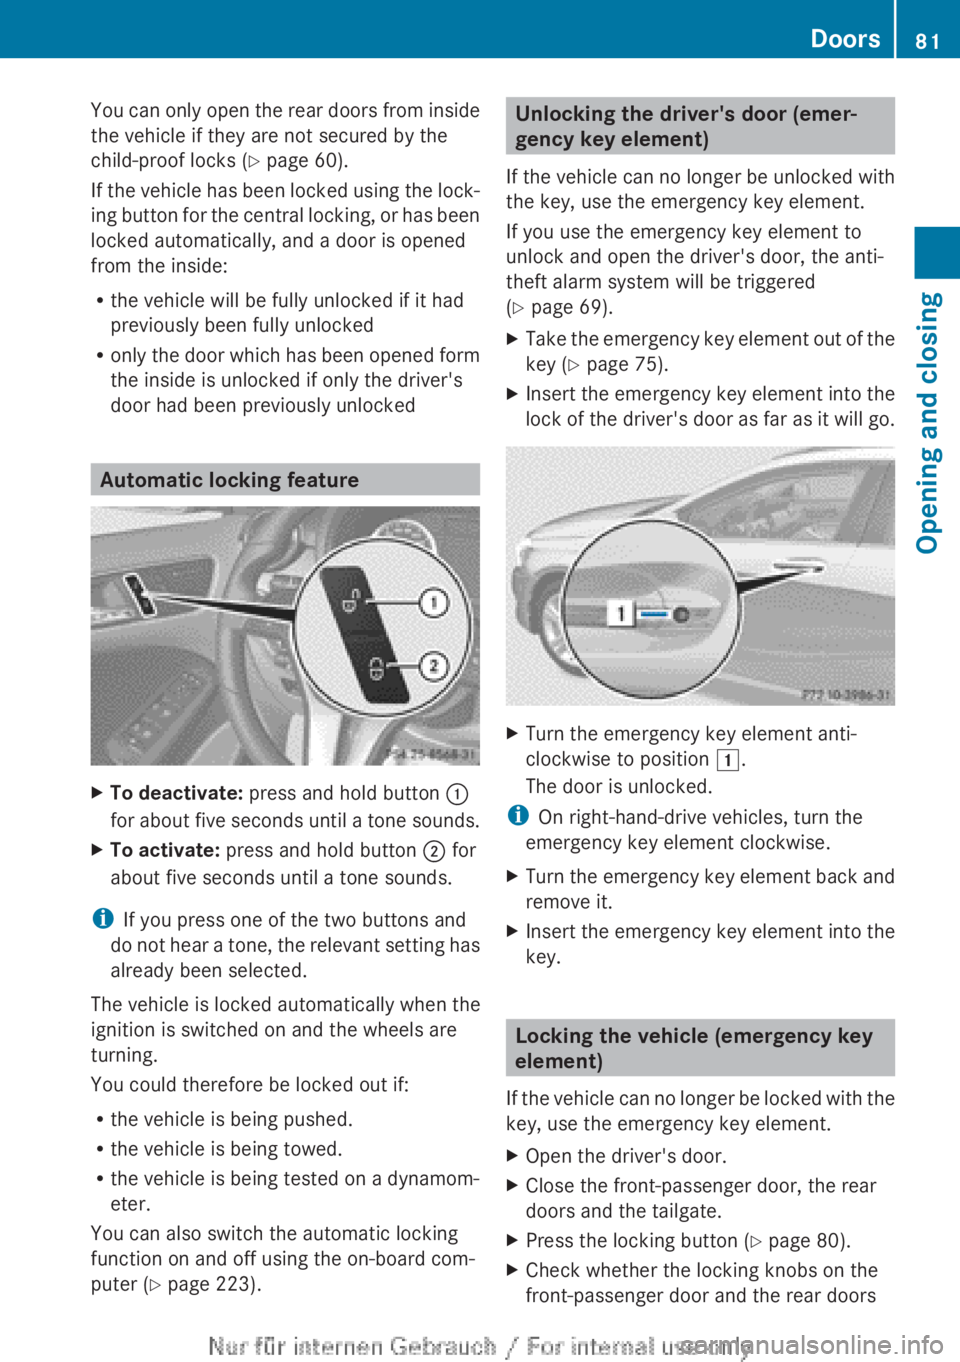
To deactivate: press and hold button :
for
about five seconds until a tone sounds.
X To activate: press and hold button ; for
about five seconds until a tone sounds.
i If you press one of the two buttons and
do
not hear a tone, the relevant setting has
already been selected.
The vehicle is locked automatically when the
ignition is switched on and the wheels are
turning.
You could therefore be locked out if:
R the vehicle is being pushed.
R the vehicle is being towed.
R the vehicle is being tested on a dynamom-
eter.
You can also switch the automatic locking
function on and off using the on-board com-
puter ( Y page 223). Unlocking the driver's door (emer-
gency key element)
If
the vehicle can no longer be unlocked with
the key, use the emergency key element.
If you use the emergency key element to
unlock and open the driver's door, the anti-
theft alarm system will be triggered
(Y page 69).
X Take the emergency key element out of the
key ( Y page 75).
X Insert the emergency key element into the
lock
of the driver's door as far as it will go. X
Turn the emergency key element anti-
clockwise to position 1.
The door is unlocked.
i On right-hand-drive vehicles, turn the
emergency key element clockwise.
X Turn the emergency key element back and
remove it.
X Insert the emergency key element into the
key. Locking the vehicle (emergency key
element)
If
the vehicle can no longer be locked with the
key, use the emergency key element.
X Open the driver's door.
X Close the front-passenger door, the rear
doors and the tailgate.
X Press the locking button (Y page 80).
X Check whether the locking knobs on the
front-passenger door and the rear doors Doors
81
Opening and closing Z
Page 84 of 356
are still visible. Press down the locking
knobs manually, if necessary
(Y page 80).
X Close the driver's door.
X Take the emergency key element out of the
key ( Y page 75).
X Insert the emergency key element into the
lock
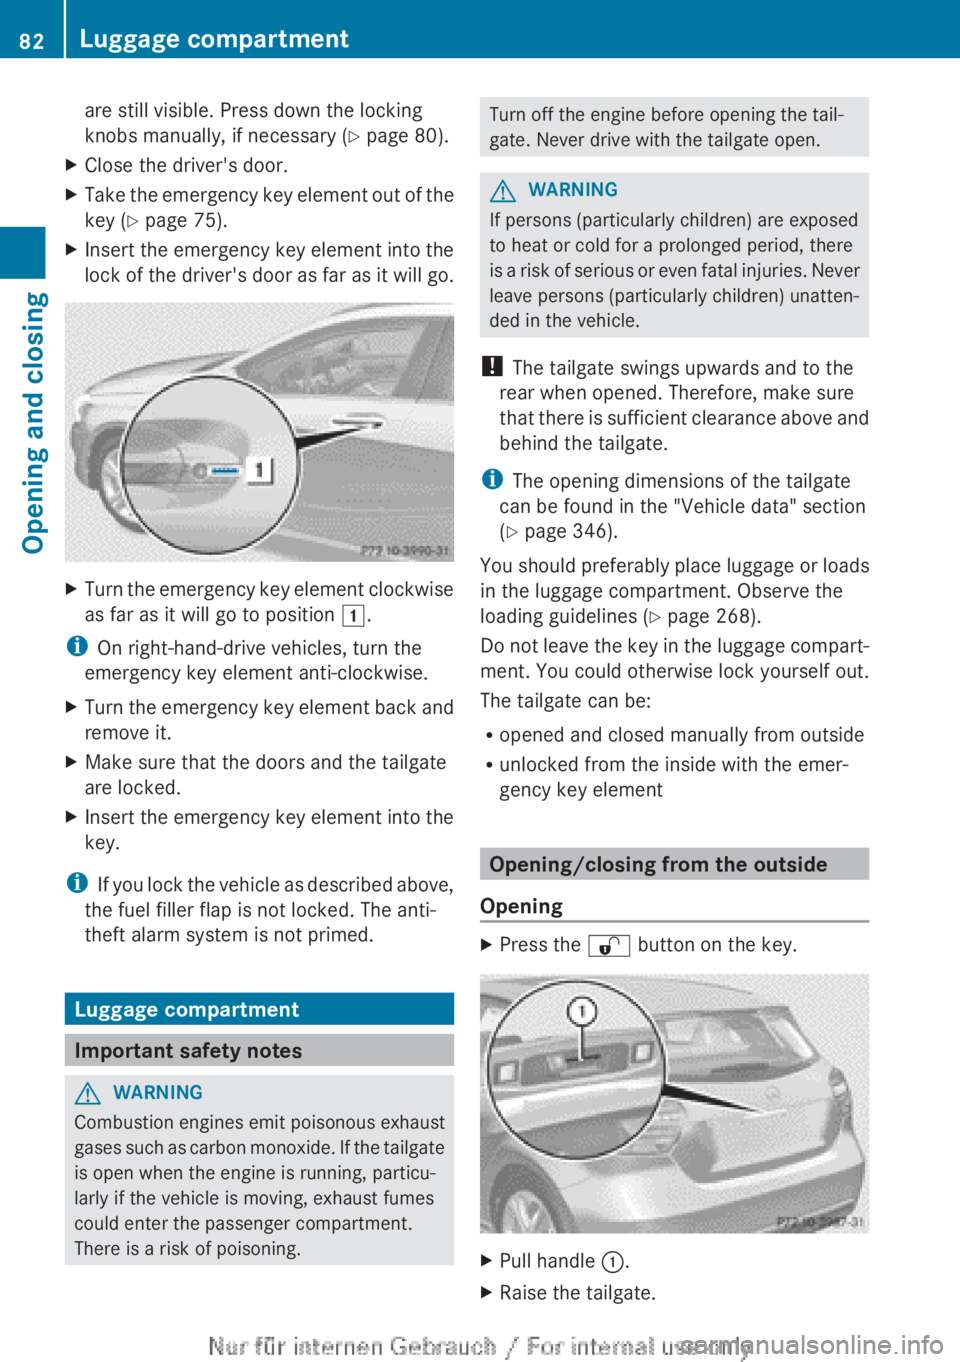
of the driver's door as far as it will go. X
Turn the emergency key element clockwise
as far as it will go to position 1.
i On right-hand-drive vehicles, turn the
emergency key element anti-clockwise.
X Turn the emergency key element back and
remove it.
X Make sure that the doors and the tailgate
are locked.
X Insert the emergency key element into the
key.
i If
you lock the vehicle as described above,
the fuel filler flap is not locked. The anti-
theft alarm system is not primed. Luggage compartment
Important safety notes
G
WARNING
Combustion engines emit poisonous exhaust
gases
such as carbon monoxide. If the tailgate
is open when the engine is running, particu-
larly if the vehicle is moving, exhaust fumes
could enter the passenger compartment.
There is a risk of poisoning. Turn off the engine before opening the tail-
gate. Never drive with the tailgate open.
G
WARNING
If persons (particularly children) are exposed
to heat or cold for a prolonged period, there
is
a risk of serious or even fatal injuries. Never
leave persons (particularly children) unatten-
ded in the vehicle.
! The tailgate swings upwards and to the
rear when opened. Therefore, make sure
that there is sufficient clearance above and
behind the tailgate.
i The opening dimensions of the tailgate
can be found in the "Vehicle data" section
(Y page 346).
You should preferably place luggage or loads
in the luggage compartment. Observe the
loading guidelines ( Y page 268).
Do not leave the key in the luggage compart-
ment. You could otherwise lock yourself out.
The tailgate can be:
R opened and closed manually from outside
R unlocked from the inside with the emer-
gency key element Opening/closing from the outside
Opening X
Press the % button on the key. X
Pull handle :.
X Raise the tailgate.82
Luggage compartment
Opening and closing
Page 86 of 356
Side window reversing feature
The side windows are equipped with an auto-
matic reversing feature. If a solid object
blocks or restricts a side window during the
closing process, the side window opens again
automatically. However, the automatic
reversing feature is only an aid and does not
relieve you of the responsibility to pay atten-
tion when closing a side window. G
WARNING
The reversing function does not react:
R to
soft, light and thin objects, e.g. small fin-
gers
R over the last 4 mm of the closing movement
R during resetting
R when closing the side window again man-
ually immediately after automatic reversing
This means that the reversing function cannot
prevent someone being trapped in these sit-
uations. There is a risk of injury.
When closing make sure that no parts of the
body are in the closing area. If someone
becomes trapped, press the switch to open
the side window again. Opening and closing the side win-
dows
The
switches for all side windows are located
on the driver's door. There is also a switch on
each door for the corresponding side window.
The switches on the driver's door take prec-
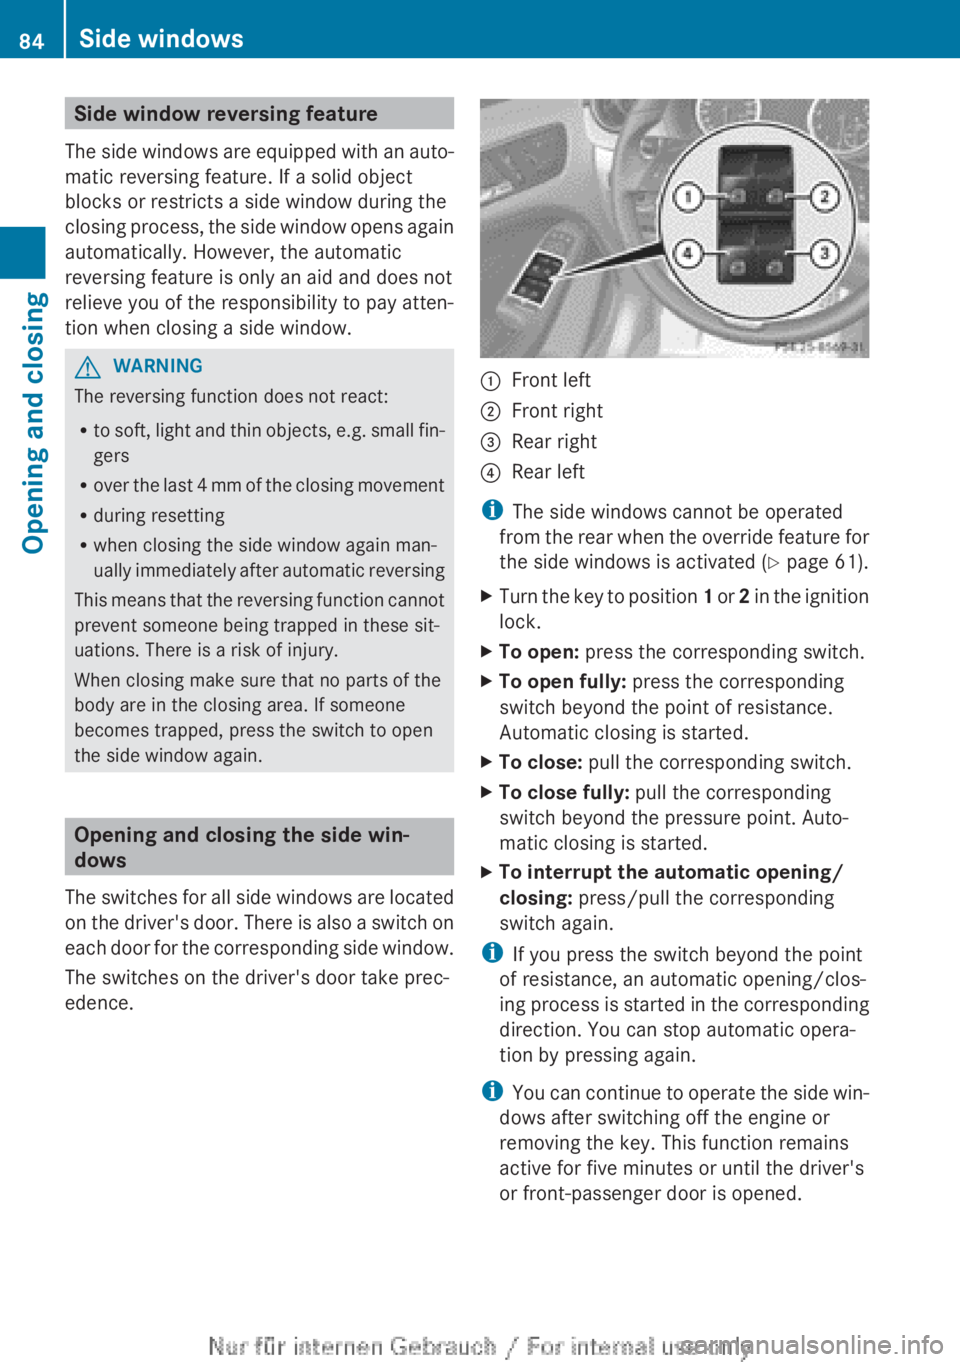
edence. :
Front left
; Front right
= Rear right
? Rear left
i The side windows cannot be operated
from
the rear when the override feature for
the side windows is activated ( Y page 61).
X Turn the key to position 1
or 2 in the ignition
lock.
X To open: press the corresponding switch.
X To open fully: press the corresponding
switch beyond the point of resistance.
Automatic closing is started.
X To close: pull the corresponding switch.
X To close fully: pull the corresponding
switch beyond the pressure point. Auto-
matic closing is started.
X To interrupt the automatic opening/
closing: press/pull the corresponding
switch again.
i If you press the switch beyond the point
of resistance, an automatic opening/clos-
ing
process is started in the corresponding
direction. You can stop automatic opera-
tion by pressing again.
i You can continue to operate the side win-
dows after switching off the engine or
removing the key. This function remains
active for five minutes or until the driver's
or front-passenger door is opened. 84
Side windows
Opening and closing