steering wheel MERCEDES-BENZ A-CLASS HATCHBACK 2008 User Guide
[x] Cancel search | Manufacturer: MERCEDES-BENZ, Model Year: 2008, Model line: A-CLASS HATCHBACK, Model: MERCEDES-BENZ A-CLASS HATCHBACK 2008Pages: 305, PDF Size: 5.43 MB
Page 44 of 305
Occupant safety
41
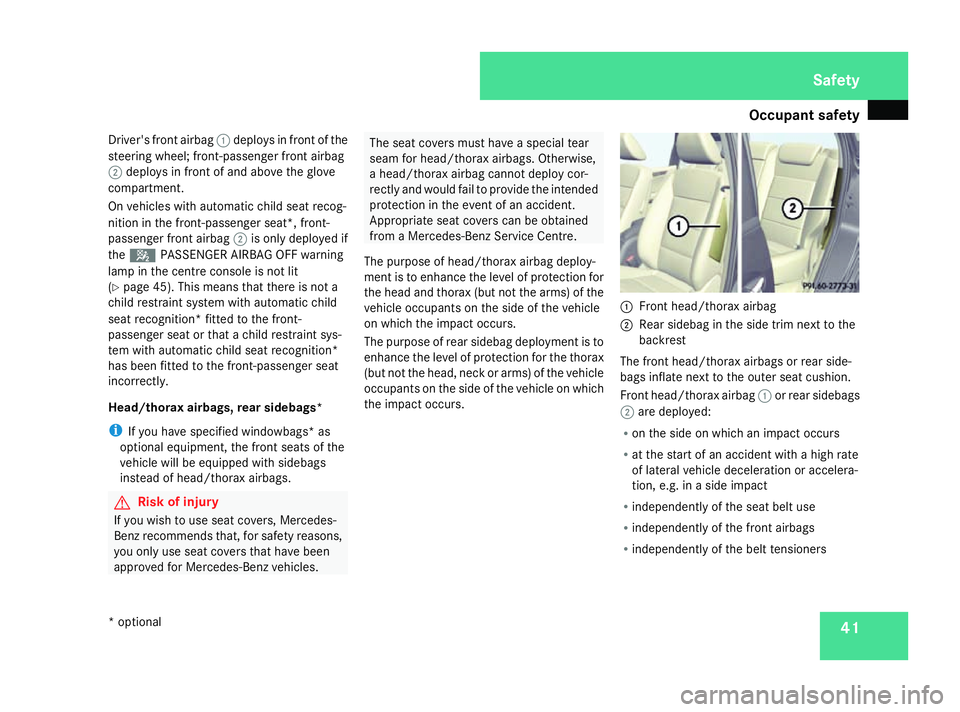
Driver's front airbag
1deploys in front of the
steering wheel; front-passenger front airbag
2 deploys in front of and above the glove
compartment.
On vehicles with automatic child seat recog-
nition in the front-passenger seat*, front-
passenger front airbag 2is only deployed if
the 5 PASSENGER AIRBAG OFF warning
lamp in the centre console is not lit
(Y page 45). This means that there is not a
child restraint system with automatic child
seat recognition* fitted to the front-
passenger seat or that a child restraint sys-
tem with automatic child seat recognition*
has been fitted to the front-passenger seat
incorrectly.
Head/thorax airbags, rear sidebags*
i If you have specified windowbags* as
optional equipment, the front seats of the
vehicle will be equipped with sidebags
instead of head/thorax airbags. G
Risk of injury
If you wish to use seat covers, Mercedes-
Benz recommends that, for safety reasons,
you only use seat covers that have been
approved for Mercedes-Benz vehicles. The seat covers must have a special tear
seam for head/thorax airbags. Otherwise,
a head/thorax airbag cannot deploy cor-
rectly and would fail to provide the intended
protection in the event of an accident.
Appropriate seat covers can be obtained
from a Mercedes-Benz Service Centre.
The purpose of head/thorax airbag deploy-
ment is to enhance the level of protection for
the head and thorax (but not the arms) of the
vehicle occupants on the side of the vehicle
on which the impact occurs.
The purpose of rear sidebag deployment is to
enhance the level of protection for the thorax
(but not the head, neck or arms) of the vehicle
occupants on the side of the vehicle on which
the impact occurs. 1
Front head/thorax airbag
2 Rear sidebag in the side trim next to the
backrest
The front head/thorax airbags or rear side-
bags inflate next to the outer seat cushion.
Front head/thorax airbag 1or rear sidebags
2 are deployed:
R on the side on which an impact occurs
R at the start of an accident with a high rate
of lateral vehicle deceleration or accelera-
tion, e.g. in a side impact
R independently of the seat belt use
R independently of the front airbags
R independently of the belt tensioners Safety
* optional
169_AKB; 2; 4, en-GB
wdomann,
Version: 2.10.6 2008-07-16T08:52:06+02:00 - Seite 41 ZDateiname: 6515_0315_02_buchblock.pdf; preflight
Page 58 of 305
Driving safety sys
tems 55Driving safety systems
Overview of driving safety systems
In this section, you will find information about
the following driving safety systems:
R ABS ( Anti-lock Braking System)
R BAS ( Brake Assist System)
R ESP ®
( Electronic Stability Program)
R Steering assistant STEER CONTROL
i In wintry road conditions, always use win-
ter tyres (M+S tyres) and, where necessary,
snow chains. Only in this way will the driv-
ing safety systems described in this section
work as effectively as possible. G
Risk of accident
The risk of an accident is significantly
increased by driving too fast. This is partic-
ularly the case when cornering as well as
on wet or slippery roads or when driving too
close to the vehicle in front.
The driving safety systems described in this
section can neither reduce this risk nor
override the laws of physics.
For this reason, always adapt your driving
style to suit prevailing road and weather
conditions. Maintain sufficient distance from other road users and objects on the
road.
ABS (Anti-lock Braking System)
ABS regulates brake pressure in such a way
that the wheels do not lock when you brake.
This allows you to continue steering the vehi-
cle when braking.
ABS works from a speed of about 8 km/h
upwards, regardless of road surface condi-
tions. ABS works on slippery surfaces, even
when you only brake gently. G
Risk of accident
Do not depress the brake pedal several
times in quick succession (pumping).
Depress the brake firmly and evenly. Pump-
ing the brake pedal reduces the braking
effect.
Braking If ABS intervenes when braking, you will feel
a pulsing in the brake pedal.
X
If ABS intervenes: continue to depress the
brake pedal with force until the braking sit-
uation is over. X
To make a full brake application:
depress the brake pedal with full force. G
Risk of accident
If ABS is faulty, the wheels could lock when
braking. This limits the steerability of the
vehicle when braking and the braking dis-
tance may increase.
If ABS is deactivated due to a malfunction,
then BAS and ESP are also deactivated.
There is an increased risk of your vehicle
skidding in certain situations.
You should always adapt your driving style
to suit prevailing road and weather condi-
tions. BAS (Brake Assist)
BAS operates in emergency braking situa-
tions. If you depress the brake pedal quickly,
BAS automatically boosts the braking force,
thus shortening the stopping distance.
X Keep the brake pedal firmly depressed until
the emergency braking situation is over.
ABS prevents the wheels from locking.
The brakes will function as usual once you
release the brake pedal. BAS is deactivated. Safety
169_AKB; 2; 4, en-GB
wdomann,
Version: 2.10.6 2008-07-16T08:52:06+02:00 - Seite 55 ZDateiname: 6515_0315_02_buchblock.pdf; preflight
Page 59 of 305

Driving safety sys
tems56 G
Risk of accident
If BAS has malfunctioned, the braking sys-
tem remains available with full brake boost-
ing effect. However, braking force is not
automatically increased in emergency
braking situations and the stopping dis-
tance may increase. Adaptive brake lamps
i Adaptive brake lamps are only available in
certain countries.
If you brake sharply from a speed of more
than 50 km/h or if braking is assisted by BAS,
the brake lamps flash rapidly. In this way,
traffic travelling behind you is warned in an
even more noticeable manner.
If you brake sharply from a speed of more
than 70 km/h to a standstill, the hazard warn-
ing lamps are activated automatically. If the
brakes are applied again, the brake lamps
light up continuously. The hazard warning
lamps switch off automatically if you travel
faster than 10 km/h. You can also switch off
the hazard warning lamps using the hazard
warning switch button ( Ypage 80). ESP
®
(Electronic Stability Program)
ESP ®
monitors driving stability and traction,
i.e. power transmission between tyres and
the road surface.
ESP ®
detects when a wheel spins or the vehi-
cle starts to skid. ESP ®
stabilises the vehicle
by targeted braking of individual wheels and
by limiting engine power. It assists you when
pulling away on wet or slippery roads. ESP ®
also stabilises the vehicle during braking.
When ESP ®
intervenes, the vwarning
lamp flashes in the instrument cluster. G
Risk of accident
If the v warning lamp in the instrument
cluster flashes, proceed as follows:
R only depress the accelerator pedal as far
as necessary when pulling away.
R adapt your driving style to suit the pre-
vailing road and weather conditions.
The vehicle could otherwise go into a skid.
ESP ®
cannot reduce the risk of an accident
if you drive too fast. ESP ®
cannot override
the laws of physics.
! The ignition must be switched off (key in
position 0or 1in the ignition lock), if: R
the parking brake is being tested using a
dynamometer
R the vehicle is being towed with the front
axle raised
Application of the brakes by ESP ®
could
otherwise destroy the brake system on the
front axle.
i Only use wheels with the recommended
tyre sizes. Only then will ESP ®
function
properly. Steering assistant STEER CONTROL
The steering assistant STEER CONTROL helps
you by transmitting a noticeable steering
force to the steering wheel in the direction
required for vehicle stabilisation. This steer-
ing assistance is provided in particular if:
R both right wheels or both left wheels are on
a wet or slippery road surface when you
brake
R the vehicle starts to skid
You have control over the steering at all
times. G
Risk of accident
If there is an ESP ®
malfunction, you will not
receive any steering assistance from the Safety
169_AKB; 2; 4, en-GB
wdomann,
Version: 2.10.6
2008-07-16T08:52:06+02:00 - Seite 56 Dateiname: 6515_0315_02_buchblock.pdf; preflight
Page 62 of 305
59
Opening and closing
...........................60
Key positions ....................................... 62
Seats .................................................... 63
Steering wheel .................................... 70
Mirrors ................................................. 70
Seat belts ............................................. 73
Lights ................................................... 77
Windscreen wipers .............................83
Side windows ...................................... 84Driving and parking
............................87
Transmission ....................................... 92
Instrument cluster ..............................97
On-board computer .............................98
Driving systems ................................ 115
Air conditioning ................................. 129
Roof .................................................... 142
Loading and stowing ........................144
Features ............................................. 162 Controls
169_AKB; 2; 4, en-GB
wdomann,
Version: 2.10.6 2008-07-16T08:52:06+02:00 - Seite 59Dateiname: 6515_0315_02_buchblock.pdf; preflight
Page 73 of 305

Mirrors
70 Steering wheel
G
Risk of accident
Only adjust the steering wheel when the
vehicle is stationary and do not pull away
until the steering wheel adjustment mech-
anism is locked in position. You might oth-
erwise drive without the steering wheel
adjustment mechanism being locked in
position. As a result you could be distracted
from road and traffic conditions by an unex-
pected movement of the steering wheel
and thereby cause an accident.
However, the steerability of the vehicle is
not affected.
When you adjust the steering wheel, make
sure that:
R the steering wheel can be reached with
your arms slightly bent
R you can move your legs freely
R you can see all the displays in the instru-
ment cluster clearly 1
Release lever
2 Height adjustment
3 Fore-and-aft adjustment
X Pull handle 1out completely.
The steering column is unlocked.
X Adjust the steering wheel to the desired
position.
X Push handle 1in completely until you hear
it engage.
The steering wheel is locked in position. Mirrors
Rear-view mirror
X Adjust the rear-view mirror by hand so you
have a good overview of the traffic condi-
tions.
Rear-view mirror (manual anti-dazzle) 1
Anti-dazzle switch
X Anti-dazzle mode: flick anti-dazzle switch
1 forwards or back.
Rear-view mirror (automatic anti-daz-
zle*) The rear-view mirror automatically goes into
anti-dazzle mode if the ignition is switched onControls
169_AKB; 2; 4, en-GB
wdomann,
Version: 2.10.6 2008-07-16T08:52:06+02:00 - Seite 70Dateiname: 6515_0315_02_buchblock.pdf; preflight
Page 79 of 305
Seat belts
76 Rear seat belt status indicator
The rear-compartment seat belt status indi-
cator tells you if the rear passengers have
fastened their seat belts. The status indicator
for the rear rear-compartment also tells you
how many of the belt tongues are inserted
into the seat belt buckles.
The rear-compartment seat belt status indi-
cator appears in the multi-function display for
around 30 seconds if:
R you set off and have reached a speed of
approx. 10 km/h
R the rear passengers fasten or unfasten
their seat belts while driving
R someone gets in or out of the vehicle
You can also cancel the messages immedi-
ately (Y page 202).
The following messages appear in the multi-
function display:
R < No rear seat belt engaged
R < 1 rear seat belt engaged
R < 2 rear seat belts engaged
R < 3 rear seat belts engaged i
The status indicator for the rear-compart-
ment seat belts is only available for certain
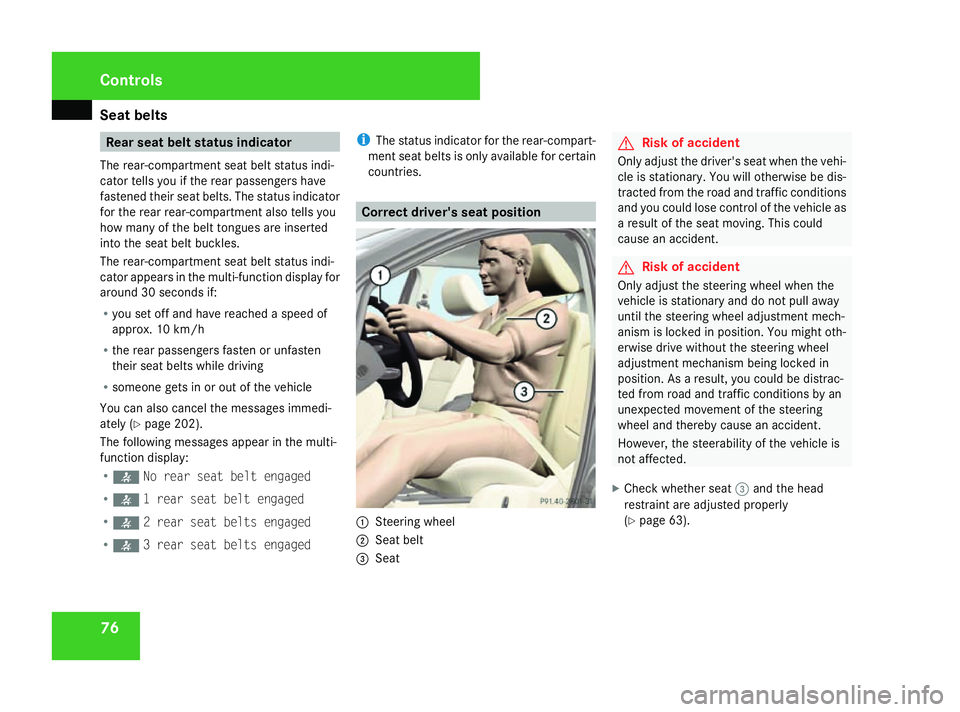
countries. Correct driver's seat position
1
Steering wheel
2 Seat belt
3 Seat G
Risk of accident
Only adjust the driver's seat when the vehi-
cle is stationary. You will otherwise be dis-
tracted from the road and traffic conditions
and you could lose control of the vehicle as
a result of the seat moving. This could
cause an accident. G
Risk of accident
Only adjust the steering wheel when the
vehicle is stationary and do not pull away
until the steering wheel adjustment mech-
anism is locked in position. You might oth-
erwise drive without the steering wheel
adjustment mechanism being locked in
position. As a result, you could be distrac-
ted from road and traffic conditions by an
unexpected movement of the steering
wheel and thereby cause an accident.
However, the steerability of the vehicle is
not affected.
X Check whether seat 3and the head
restraint are adjusted properly
(Y page 63). Controls
169_AKB; 2; 4, en-GB
wdomann,
Version: 2.10.6
2008-07-16T08:52:06+02:00 - Seite 76 Dateiname: 6515_0315_02_buchblock.pdf; preflight
Page 80 of 305
Lights
77
Make sure that:
R
you are as far away from the driver's front
airbag as possible
R you are sitting in a normal upright posi-
tion
R you can fasten the seat belt properly
R you have moved the backrest to an
almost vertical position
R you have set the seat angle so that your
thighs are gently supported
R you can depress the pedals properly
R you have adjusted the head restraint so
that the back of your head is supported
at eye level by the central area of the
head restraint
X Check whether steering wheel 1is adjus-
ted properly (Y page 70).
Make sure that:
R you can hold the steering wheel with your
arms slightly bent
R you can move your legs freely
R you can see all the displays in the instru-
ment cluster clearly
X Check whether you have fastened seat belt
2 properly (Y page 73). It should:
R
fit snugly across your body
R be routed across the middle of your
shoulder
R routed in your pelvic area across the hip
joints Lights
Light switch
For safety reasons, Mercedes-Benz recom-
mends that you drive with the lights switched
on even during the daytime. In some coun-
tries, daytime operation of headlamps varies
due to legal and voluntary requirements. In
these countries, the constant headlamp
mode is automatically switched on when the
engine is started.
i If you drive in countries in which traffic
drives on the opposite side of the road to
the country where the vehicle is registered,
oncoming traffic may be dazzled by the
asymmetrical dipped-beam headlamps.
Have the headlamps changed to symmet-
rical dipped beam when driving in these
countries. You can obtain information
about this from any Mercedes-Benz Service
Centre. Controls
169_AKB; 2; 4, en-GB
wdomann,
Version: 2.10.6 2008-07-16T08:52:06+02:00 - Seite 77 ZDateiname: 6515_0315_02_buchblock.pdf; preflight
Page 84 of 305

Lights
81Position Load
2
Driver's seat, front passenger
seat and rear seats occupied,
luggage compartment laden
3
Not required
X
Turn headlamp range control 1to the
position which corresponds to the load in
your vehicle. Headlamp cleaning system*
The headlamps are cleaned automatically if
the "Wipe with windscreen washer fluid" func-
tion is operated five times while the lights are
on and the engine is running. When you
switch off the ignition, the automatic head-
lamp cleaning system is reset and counting is
resumed from 0. Cornering light function* (bi-xenon
headlamps*)
Specially designed headlamps light up the
area into which you are driving when turning
corners.
If you are driving at speeds below 40 km/h,
the cornering light function is activated either
by the turn signals or when the steering wheel
is turned. If you are driving at speeds above
40 km/h the cornering light function is deac-
tivated.
Activating X
Start the engine.
X Switch on the dipped-beam headlamps.
X Switch off the foglamps*.
X Switch on the turn signal.
The cornering lamp on the same side as the
turn signal comes on, even if you turn the
steering wheel in the opposite direction
after indicating.
or
X Turn the steering wheel in the desired
direction.
When in a forwards gear: the cornering
lamp on the inside of the bend comes on. When in reverse gear: the cornering lamp
on the outside of the bend comes on.
Deactivating X
Turn the steering wheel back to the straight
ahead position.
The turn signal goes off. The cornering lamp
may remain lit for a short time.
or
X Switch off the turn signal.
The cornering lamp may remain lit for a
short time.
The cornering light will go out after a maxi-
mum of three minutes. Controls
* optional
169_AKB; 2; 4, en-GB
wdomann,
Version: 2.10.6 2008-07-16T08:52:06+02:00 - Seite 81 ZDateiname: 6515_0315_02_buchblock.pdf; preflight
Page 101 of 305
On-board computer
98 Resetting the trip meter
X Select the Standard display menu
(Y page 103).
X Press and hold the reset button on the left-
hand side of the instrument cluster until the
trip meter is reset. Rev counter
The red band in the rev counter indicates the
engine's overrevving range. The fuel supply is
interrupted to protect the engine when the
red band is reached.
! Do not drive in the overrevving range.
Doing so will damage the engine. H
Environmental note
Avoid driving at high engine speeds, as this
increases your vehicle's consumption
unnecessarily and pollutes the environ-
ment through increased emissions. Clock
On vehicles without an audio system or with
Audio 5*/Audio 20*, you can set the time
using the on-board computer (Y page 109). Outside temperature display
G
Risk of accident
The road surface may be icy, especially in
wooded areas or on bridges, even if tem-
peratures are just above freezing point. The
vehicle could skid if you fail to adapt your
driving style. You should therefore always
adapt your driving style and speed to suit
the weather conditions.
Changes in the outside temperature are dis-
played after a short delay. On-board computer
Points to remember
The on-board computer is activated as soon
as you turn the key to position 1in the ignition
lock. You can use the on-board computer to
call up information relating to your vehicle
and to make and adjust settings. G
Risk of accident
Only use the on-board computer when road
and traffic conditions permit. You would
otherwise be distracted and unable to con-
centrate properly on driving, and could
cause an accident. Multi-function steering wheel
You can control the multi-function display and
the settings in the on-board computer using
the buttons on the multi-function steering
wheel. Controls
* optional
169_AKB; 2; 4, en-GB
wdomann,
Version: 2.10.6
2008-07-16T08:52:06+02:00 - Seite 98 Dateiname: 6515_0315_02_buchblock.pdf; preflight
Page 127 of 305
Driving sys
tems 124
Use Active parking assist for parking spaces
R that are parallel to the direction of travel.
R that are on straight roads, not bends.
R that are on the same level as the road, i.e.
not on the pavement, for example;
Parking tips:
R On narrow roads, drive as close to the park-
ing space as possible.
R Parking spaces which are littered, over-
grown or partially occupied by trailer tow-
bars might not be identified properly.
R Snowfall or heavy rain may lead to a parking
space being measured inaccurately.
R Pay attention to the Parktronic warning
messages during the parking procedure
(Y page 121).
R You can intervene in the steering procedure
to correct it at any time. Active parking
assist will then be cancelled.
R When transporting a load which protrudes
from your vehicle you should not use Active
parking assist.
R Never use active parking assist when snow
chains or an emergency spare wheel* are
fitted. R
Make sure that the tyre pressures are
always correct. This has a direct influence
on the parking characteristics of the vehi-
cle.
R The way your vehicle is positioned in the
parking space after parking is dependent
on various factors. These include the posi-
tion and shape of the vehicles parked in
front and behind it as well as the condition
of the location. In some cases, Active park-
ing assist may guide you too far into a park-
ing space, or not far enough into it. In some
cases it may also lead you across or onto
the kerb. If necessary, you should abort the
parking procedure with Active parking
assist.
R You can also engage forward gear prema-
turely. The vehicle redirects and does not
drive as far into the parking space Should
a gear be changed too early to achieve a
sensible parking position, the parking pro-
cedure will be aborted.
! When unavoidable, you should drive over
obstacles such as kerbs slowly and not at
a sharp angle. Otherwise you may damage
the wheel rims or tyres. Detecting parking spaces Active parking assist is switched on automat-
ically when driving forwards. The system is
operational at speeds of up to approximately
35 km/h. While in operation, the system inde-
pendently locates and measures parking
spaces on both sides of the vehicle. When
driving at speeds below 35 km/h, you will see
the parking symbol as a status indicator in the
instrument cluster. Active parking assist only
displays parking spaces on the front-
passenger side as standard. Parking spaces
on the driver's side are displayed as soon as
the turn signal on the driver's side is activa-
ted. If you wish to park in a space on the driv-
er's side, the indicator on the driver's side
must remain on. This must remain switched
on until you acknowledge the use of Active
parking assist by pressing the
jbutton on
the multi-function steering wheel.
When a parking space has been detected, an
arrow towards the right or the left also
appears. Controls
* optional
169_AKB; 2; 4, en-GB
wdomann,
Version: 2.10.6
2008-07-16T08:52:06+02:00 - Seite 124 Dateiname: 6515_0315_02_buchblock.pdf; preflight