MERCEDES-BENZ A-CLASS HATCHBACK 2008 Owners Manual
Manufacturer: MERCEDES-BENZ, Model Year: 2008, Model line: A-CLASS HATCHBACK, Model: MERCEDES-BENZ A-CLASS HATCHBACK 2008Pages: 305, PDF Size: 5.43 MB
Page 241 of 305
Troubleshooting
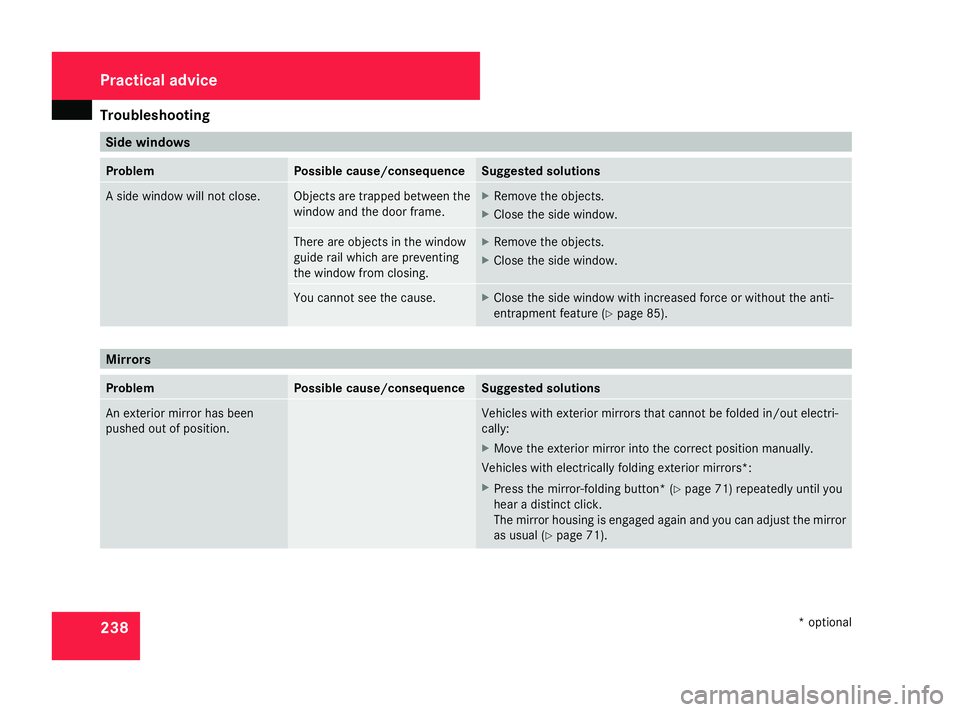
238 Side windows
Problem Possible cause/consequence Suggested solutions
A side window will not close. Objects are trapped between the
window and the door frame. X
Remove the objects.
X Close the side window. There are objects in the window
guide rail which are preventing
the window from closing. X
Remove the objects.
X Close the side window. You cannot see the cause. X
Close the side window with increased force or without the anti-
entrapment feature ( Ypage 85). Mirrors
Problem Possible cause/consequence Suggested solutions
An exterior mirror has been
pushed out of position. Vehicles with exterior mirrors that cannot be folded in/out electri-
call
y:
X Move the exterior mirror into the correct position manually.
Vehicles with electrically folding exterior mirrors *:
X Press the mirror-folding button* (Y page 71) repeatedly until you
hear a distinct click.
The mirror housing is engaged again and you can adjust the mirror
as usual (Y page 71). Practical advice
* optional
169_AKB; 2; 4, en-GB
wdomann,
Version: 2.10.6
2008-07-16T08:52:06+02:00 - Seite 238 Dateiname: 6515_0315_02_buchblock.pdf; preflight
Page 242 of 305
Troubleshooting
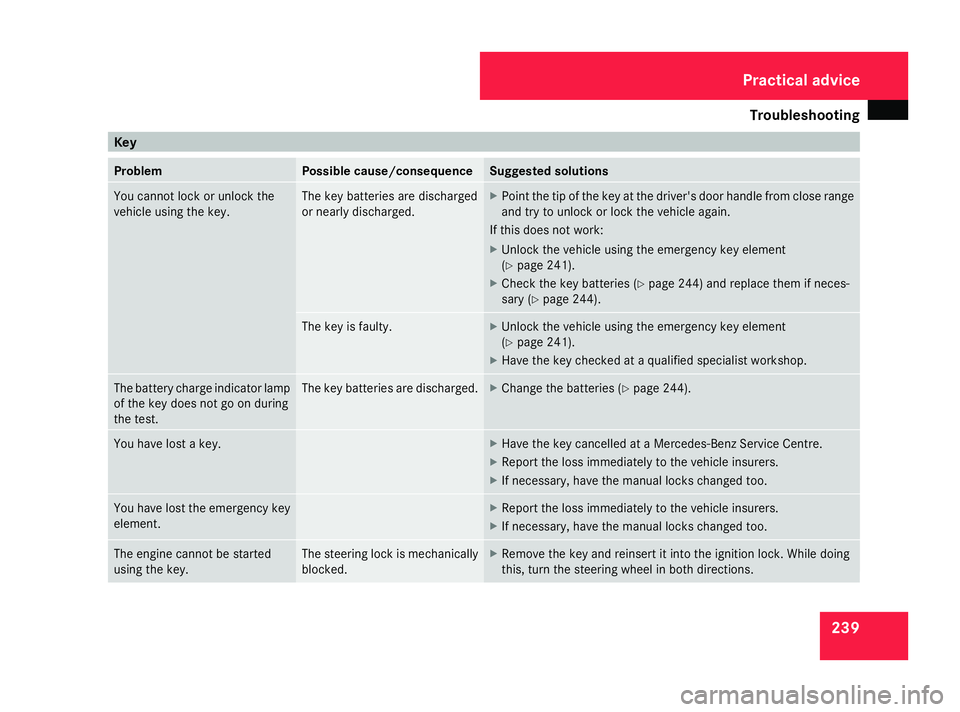
239Key
Problem Possible cause/consequence Suggested solutions
You cannot lock or unlock the
vehicle using the key. The key batteries are discharged
or nearl
y discharged. X
Point the tip of the key at the driver's door handle from close range
and try to unlock or lock the vehicle again.
If this does not work:
X Unlock the vehicle using the emergency key element
(Y page 241).
X Check the key batteries (Y page 244) and replace them if neces-
sary ( Ypage 244). The key is faulty. X
Unlock the vehicle using the emergency key element
(Y page 241).
X Have the key checked at a qualified specialist workshop. The battery charge indicator lamp
of the key does not go on during
the test. The key batteries are discharged. X
Change the batteries ( Ypage 244). You have lost a key. X
Have the key cancelled at a Mercedes-Benz Service Centre.
X Report the loss immediately to the vehicle insurers.
X If necessary, have the manual locks changed too. You have lost the emergency key
element. X
Report the loss immediately to the vehicle insurers.
X If necessary, have the manual locks changed too. The engine cannot be started
using the key. The steering lock is mechanically
blocked. X
Remove the key and reinsert it into the ignition lock. While doing
this, turn the steering wheel in both directions. Practical advice
169_AKB; 2; 4, en-GB
wdomann
,V ersion: 2.10.6
2008-07-16T08:52:06+02:00 - Seite 239 ZDateiname: 6515_0315_02_buchblock.pdf; preflight
Page 243 of 305
Troubleshooting
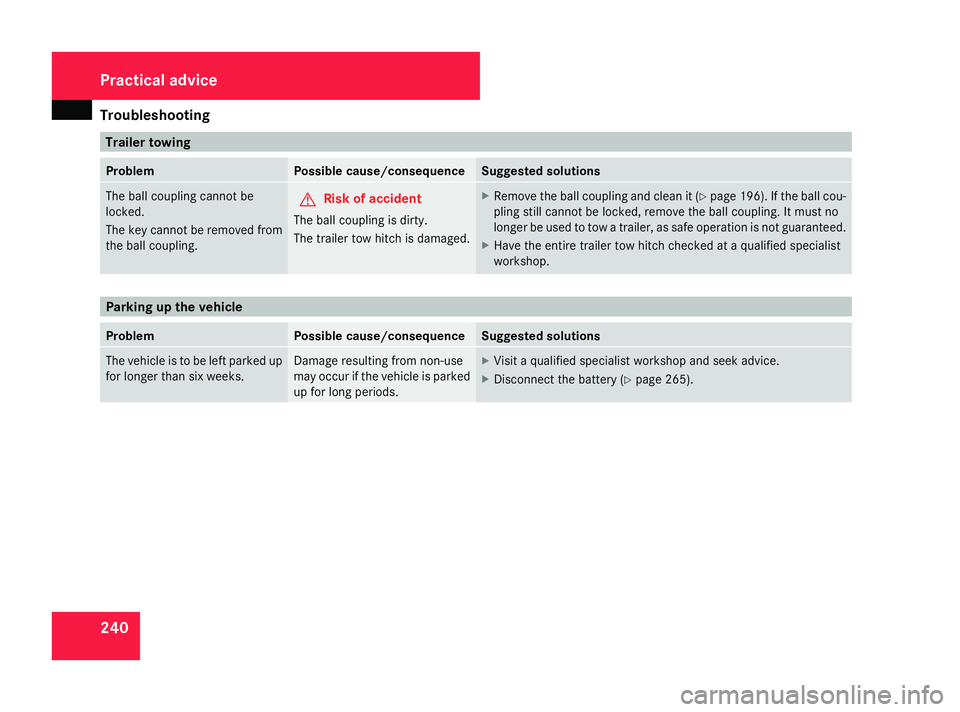
240 Trailer towing
Problem Possible cause/consequence Suggested solutions
The ball coupling cannot be
locked.
The key cannot be removed from
the ball coupling.
G
Risk of accident
The ball coupling is dirty.
The trailer tow hitch is damaged. X
Remove the ball coupling and clean it (Y page 196). Ifthe ball cou-
pling still cannot be locked, remove the ball coupling. It must no
longer be used to tow a trailer, as safe operation is not guaranteed.
X Have the entire trailer tow hitch checked at a qualified specialist
workshop. Parking up the vehicle
Problem Possible cause/consequence Suggested solutions
The vehicle is to be left parked up
for longer than six weeks. Damage resulting from non-use
may occur if the vehicle is parked
up for long periods. X
Visit a qualified specialist workshop and seek advice.
X Disconnect the battery ( Ypage 265). Practical advice
169_AKB; 2; 4, en-GB
wdomann,
Version: 2.10.6
2008-07-16T08:52:06+02:00 - Seite 240 Dateiname: 6515_0315_02_buchblock.pdf; preflight
Page 244 of 305
Locking/unlocking in an emergency
241Locking/unlocking in an emergency
Emergency key
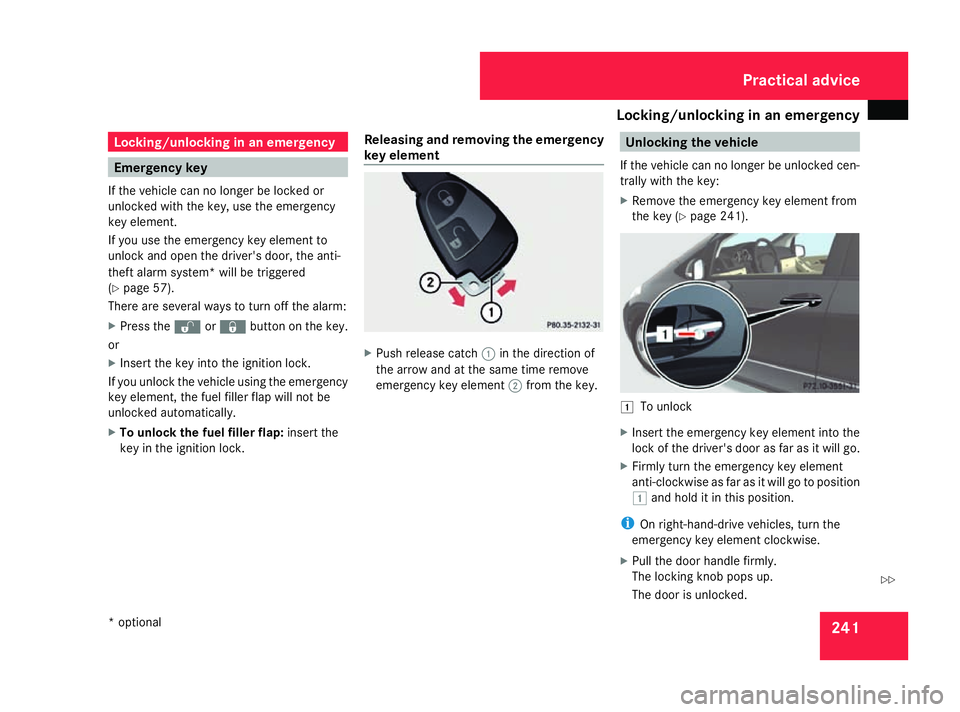
If the vehicle can no longer be locked or
unlocked with the key, use the emergency
key element.
If you use the emergency key element to
unlock and open the driver's door, the anti-
theft alarm system* will be triggered
(Y page 57).
There are several ways to turn off the alarm:
X Press the korj button on the key.
or
X Insert the key into the ignition lock.
If you unlock the vehicle using the emergency
key element, the fuel filler flap will not be
unlocked automatically.
X To unlock the fuel filler flap: insert the
key in the ignition lock. Releasing and removing the emergency
key element X
Push release catch 1in the direction of
the arrow and at the same time remove
emergency key element 2from the key. Unlocking the vehicle
If the vehicle can no longer be unlocked cen-
trally with the key:
X Remove the emergency key element from
the key (Y page 241). $
To unlock
X Insert the emergency key element into the
lock of the driver's door as far as it will go.
X Firmly turn the emergency key element
anti-clockwise as far as it will go to position
$ and hold it in this position.
i On right-hand-drive vehicles, turn the
emergency key element clockwise.
X Pull the door handle firmly.
The locking knob pops up.
The door is unlocked. Practical advice
* optional
169_AKB; 2; 4, en-GB
wdomann, Version: 2.10.6 2008-07-16T08:52:06+02:00 - Seite 241 ZDateiname: 6515_0315_02_buchblock.pdf; preflight
Page 245 of 305
Locking/unlocking in an emergency
242
X
Turn the emergency key element back and
remove it.
X Pull the door handle again. Locking the vehicle
If the vehicle can no longer be locked cen-
trally with the key:
5-door X
Close the front-passenger door, the rear
door on the front-passenger side and the
tailgate.
X Open the driver’s door and the rear door on
the driver’s side.
X Press the locking button on the driver’s
door (Y page 61).
The locking knobs in the front-passenger
door and in the rear doors drop down.
X Press the locking knobs in the front-
passenger and rear doors down manually,
if necessary.
X Close the driver's door from the outside.
X Press down the locking knob in the driver's
door by reaching through the open rear
door. i
Make sure that you have the key with you
and have not left it in the vehicle.
X Close the rear door on the driver’s side.
The vehicle is locked.
3-door X
Close the front-passenger door.
X Open the driver's door and the tailgate.
X Press the locking button on the driver’s
door (Y page 61).
The locking knob in the front-passenger
door moves down.
X Press down the locking knob manually, if
necessary.
X Close the driver's door from the outside.
X Press down the locking knob in the driver's
door by reaching through the open tailgate.
i Make sure that you have the key with you
and have not left it in the vehicle.
X Close the tailgate.
The vehicle is locked. Emergency fuel filler flap release
G
Risk of injury
The corners of the vehicle walls may be
sharp-edged. You could injure yourself
while carrying out an emergency release of
the fuel filler flap. Avoid contact with the
edges of the vehicle walls.
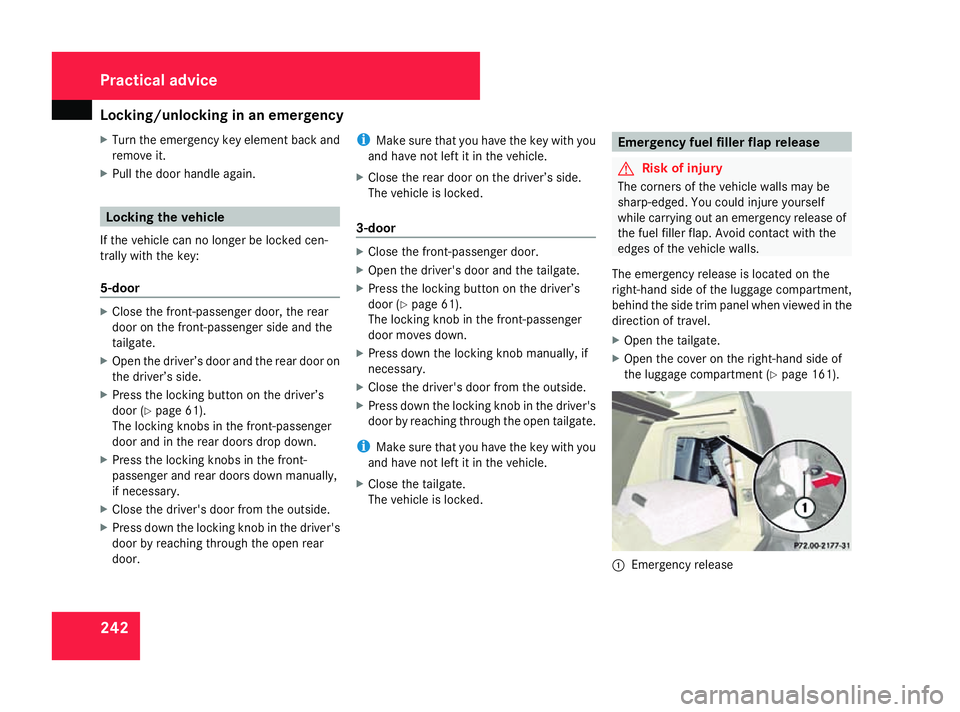
The emergency release is located on the
right-hand side of the luggage compartment,
behind the side trim panel when viewed in the
direction of travel.
X Open the tailgate.
X Open the cover on the right-hand side of
the luggage compartment (Y page 161). 1
Emergency release Practical advice
169_AKB; 2; 4, en-GB
wdomann,
Version: 2.10.6 2008-07-16T08:52:06+02:00 - Seite 242Dateiname: 6515_0315_02_buchblock.pdf; preflight
Page 246 of 305
Locking/unlocking in an emergency
243
X
Pull emergency release 1in the direction
of the arrow.
The fuel filler flap is unlocked.
X Open the fuel filler flap. Releasing the parking lock manually
on vehicles with AUTOTRONIC*
In the event of an electrical fault, it is possible
to release the selector lever lock manually to
move it out of position P, e.g. if you wish to
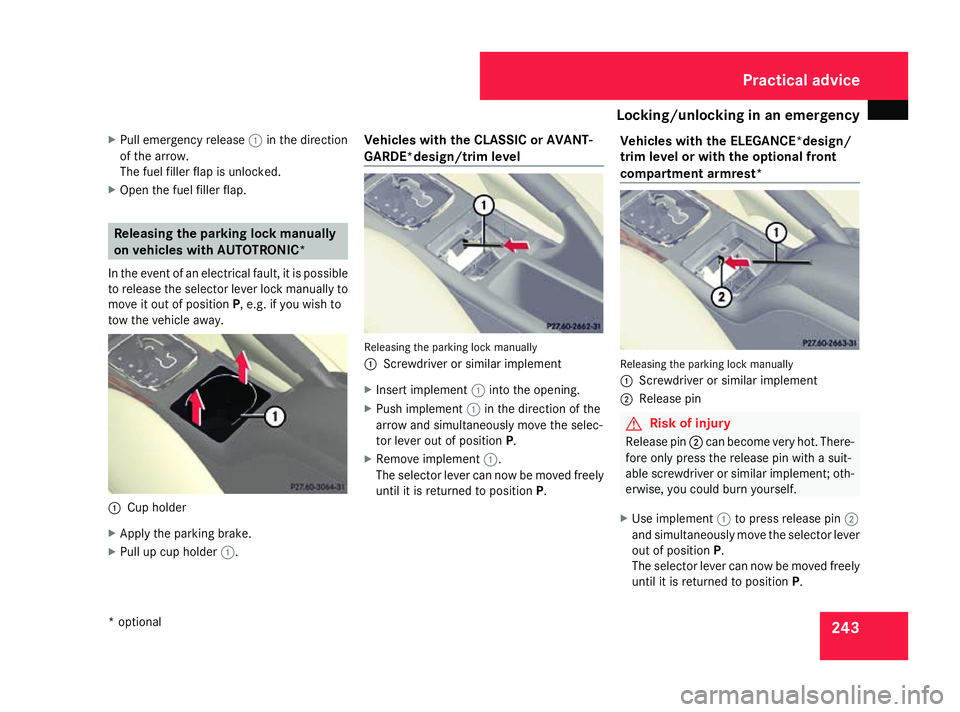
tow the vehicle away. 1
Cup holder
X Apply the parking brake.
X Pull up cup holder 1. Vehicles with the CLASSIC or AVANT-
GARDE*design/trim level
Releasing the parking lock manually
1
Screwdriver or similar implement
X Insert implement 1into the opening.
X Push implement 1in the direction of the
arrow and simultaneously move the selec-
tor lever out of position P.
X Remove implement 1.
The selector lever can now be moved freely
until it is returned to position P.Vehicles with the ELEGANCE*design/
trim level or with the optional front
compartment armrest* Releasing the parking lock manually
1
Screwdriver or similar implement
2 Release pin G
Risk of injury
Release pin 2can become very hot. There-
fore only press the release pin with a suit-
able screwdriver or similar implement; oth-
erwise, you could burn yourself.
X Use implement 1to press release pin 2
and simultaneously move the selector lever
out of position P.
The selector lever can now be moved freely
until it is returned to position P. Practical advice
* optional
169_AKB; 2; 4, en-GB
wdomann,
Version: 2.10.6 2008-07-16T08:52:06+02:00 - Seite 243 ZDateiname: 6515_0315_02_buchblock.pdf; preflight
Page 247 of 305
Changing the batteries
244 Changing the batteries
Notes
It is advisable to have the batteries replaced
at a qualified specialist workshop, e.g. at a
Mercedes-Benz Service Centre. G
Risk of poisoning
Batteries contain toxic and caustic sub-
stances. For this reason, keep batteries
away from children.
If a battery is swallowed, consult a doctor
immediately. H
Environmental note
Do not dispose of batteries with the house-
hold rubbish, as they contain highly toxic
substances.
Take discharged batteries to a qualified
specialist workshop, e.g. a Mercedes-Benz
Service Centre, or to a special collection
point for old batteries. Key
Checking the batteries X
Press the jork button.
The batteries are in order if the battery
charge indicator lamp lights up briefly.
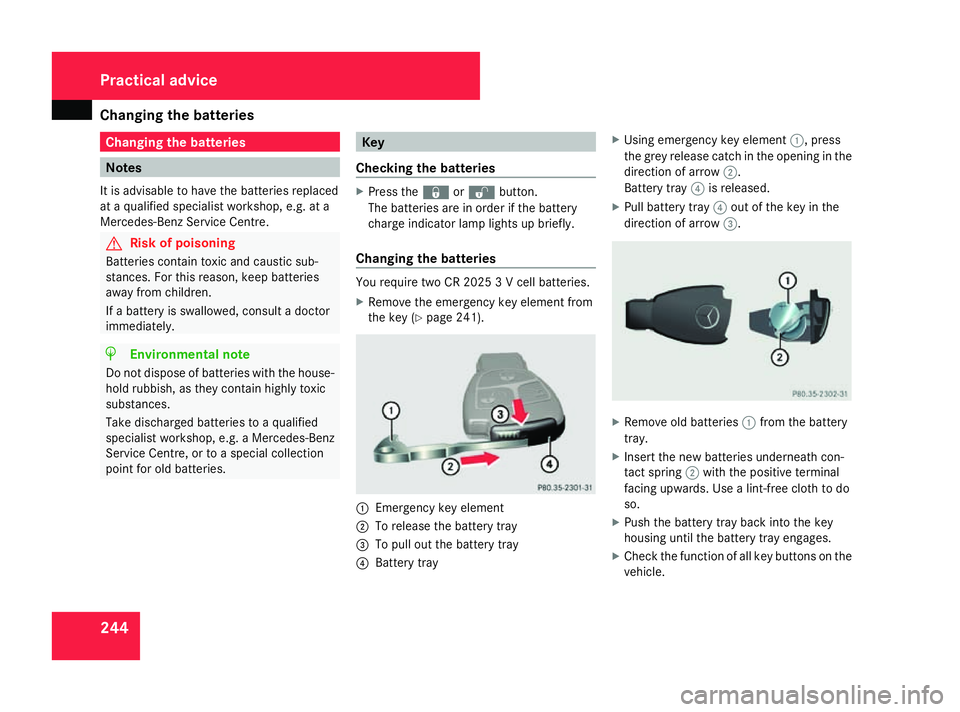
Changing the batteries You require two CR 2025 3 V cell batteries.
X
Remove the emergency key element from
the key (Y page 241). 1
Emergency key element
2 To release the battery tray
3 To pull out the battery tray
4 Battery tray X
Using emergency key element 1, press
the grey release catch in the opening in the
direction of arrow 2.
Battery tray 4is released.
X Pull battery tray 4out of the key in the
direction of arrow 3. X
Remove old batteries 1from the battery
tray.
X Insert the new batteries underneath con-
tact spring 2with the positive terminal
facing upwards. Use a lint-free cloth to do
so.
X Push the battery tray back into the key
housing until the battery tray engages.
X Check the function of all key buttons on the
vehicle. Practical advice
169_AKB; 2; 4, en-GB
wdomann
,V ersion: 2.10.6
2008-07-16T08:52:06+02:00 - Seite 244 Dateiname: 6515_0315_02_buchblock.pdf; preflight
Page 248 of 305
Changing the bulbs
245Changing the bulbs
Notes on changing bulbs
Bulbs and lamps are an important aspect of
vehicle safety. You must therefore make sure
that these function correctly at all times. G
Risk of injury
Bulbs and lamps can be very hot. You
should therefore allow them to cool down
before you change them. Otherwise, you
could be burned if you touch them.
Keep bulbs out of the reach of children.
Otherwise, they could damage them, for
example, and injure themselves.
Never use a bulb which has been dropped.
Such a bulb may explode and injure you.
H7 bulbs are pressurised and could explode
when you change them, particularly if they
are very hot. You should therefore wear eye
protection and gloves when you are chang-
ing them. G
Risk of injury
Xenon bulbs carry a high voltage. You could
get an electric shock and be seriously or
even fatally injured if you touch the electric contacts on xenon bulbs. Therefore, never
remove the cover from xenon bulbs.
Do not change xenon bulbs yourself, but
have them replaced at a qualified specialist
workshop which has the necessary special-
ist knowledge and tools to carry out the
work required.
Mercedes-Benz recommends that you use
a Mercedes-Benz Service Centre for this
purpose. In particular, work relevant to
safety or on safety-related systems must be
carried out at a qualified specialist work-
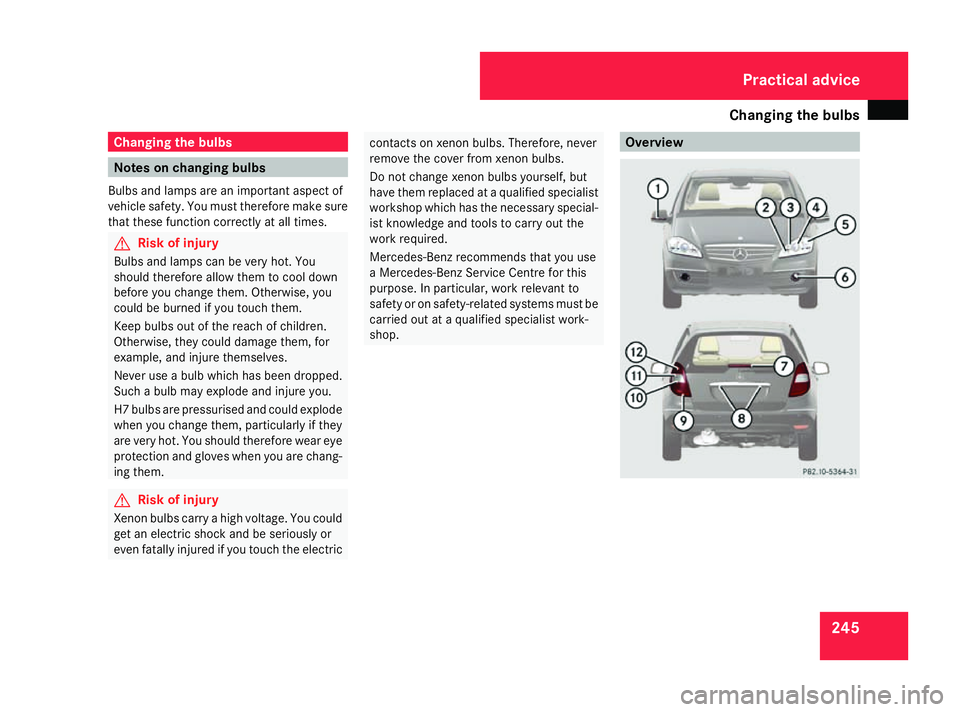
shop. Overview Practical advice
169_AKB; 2; 4, en-GB
wdomann
, Version: 2.10.6 2008-07-16T08:52:06+02:00 - Seite 245 ZDateiname: 6515_0315_02_buchblock.pdf; preflight
Page 249 of 305

Changing the bulbs
246
Front bulbs Bulb Type
1
Additional turn
signal lamp
LEDs
29 2
Parking lamp/
side lamp W 5 W
3
Main-beam
headlamps
30
/
cornering
light* 31 H7 55 W
4
Dipped-beam
headlamps
H7 55 W
30
or
D1S 35 W* 32 5
Turn signal lamp PY 21 W
6
Front foglamps* H11 55 W
33 Rear bulbs
Bulb Type
7
Third brake
lamp
LED
29 8
Licence plate
lamp C 5 W
9
Rear foglamp P 21 W
Tail lamp P 4 W
a
Turn signal lamp PY 21 W
b
Reversing lamp P 21 W
c
Brake lamp P 21 W
Before changing bulbs
You can replace the following bulbs:
R
Dipped-beam headlamps (halogen head-
lamps)
R Main-beam headlamps (halogen head-
lamps) R
Side lamp/parking lamp (halogen head-
lamps)
R Cornering light* (vehicles with bi-xenon
headlamps*)
R Front turn signal lamp
R Brake lamp
R Reversing lamp
R Rear foglamp/tail lamp
R Turn signal lamp (rear)
R Licence plate lamp
Observe the following points:
R Use only the bulb types specified here.
R To prevent a short-circuit, switch off the
lights before changing a bulb.
R Only hold bulbs with a clean, lint-free cloth.
R Do not work with wet or greasy fingers.
R If the new bulb still does not light up, con-
sult a qualified specialist workshop, e.g. a
Mercedes-Benz Service Centre.
29 LEDs must not be replaced, as they are designed to have an unlimited service life.
30 Vehicles with halogen headlamps.
31 Vehicles with bi-xenon headlamps*
32 Vehicles with xenon headlamps*: always have these bulbs changed at a qualified specialist workshop, e.g. a Mercedes-Benz Service Centre.
33 These bulbs must be replaced at a qualified specialist workshop, e.g. a Mercedes-Benz Service Centre. Practical advice
* optional
169_AKB; 2; 4, en-GB
wdomann
,V ersion: 2.10.6
2008-07-16T08:52:06+02:00 - Seite 246 Dateiname: 6515_0315_02_buchblock.pdf; preflight
Page 250 of 305

Changing the bulbs
247
i
Due to the location of the bulbs in the
front headlamps, it is best to have these
changed at a qualified specialist workshop,
e.g. a Mercedes-Benz Service Centre.
i Have the headlamp setting checked reg-
ularly at a qualified specialist workshop,
e.g. a Mercedes-Benz Service Centre. Changing the front bulbs
Opening/closing the cover in the front
wheel arch X
To open: turn the front wheels inwards.
X Unscrew retaining screw 1.
X Fold the cover down. X
To close: fold the cover upwards.
X Screw in retaining screw 1.
Removing/fitting the washer fluid res-
ervoir You must remove the washer fluid reservoir
from the engine compartment before you can
replace the bulbs in the front left-hand head-
lamp. X
To remove: turn retaining screw 1anti-
clockwise.
X Remove washer fluid reservoir 2from
bracket 3.
X Put washer fluid reservoir 2to one side
and leave the lines and hoses connected.
Make sure that no washer fluid escapes. X
To fit: guide the lower retaining lug into the
rubber grommet on the longitudinal mem-
ber and fit washer fluid reservoir 2into
bracket 3.
X Turn retaining screw 1clockwise.
Replacing the bulbs in the dipped-beam
headlamp (halogen headlamps) X
Switch off the lights.
X Open the cover in the front wheel arch
(Y page 247).
X Open the bonnet.
X Left-hand headlamps: remove the washer
fluid reservoir (Y page 247).
X Press retaining lug :down and remove
housing cover 2.
X Pull connector =from bulb holder 4. Practical advice
169_AKB; 2; 4, en-GB
wdomann
,V ersion: 2.10.6
2008-07-16T08:52:06+02:00 - Seite 247 ZDateiname: 6515_0315_02_buchblock.pdf; preflight