weight MERCEDES-BENZ A-CLASS HATCHBACK 2015 User Guide
[x] Cancel search | Manufacturer: MERCEDES-BENZ, Model Year: 2015, Model line: A-CLASS HATCHBACK, Model: MERCEDES-BENZ A-CLASS HATCHBACK 2015Pages: 417, PDF Size: 11.91 MB
Page 70 of 417
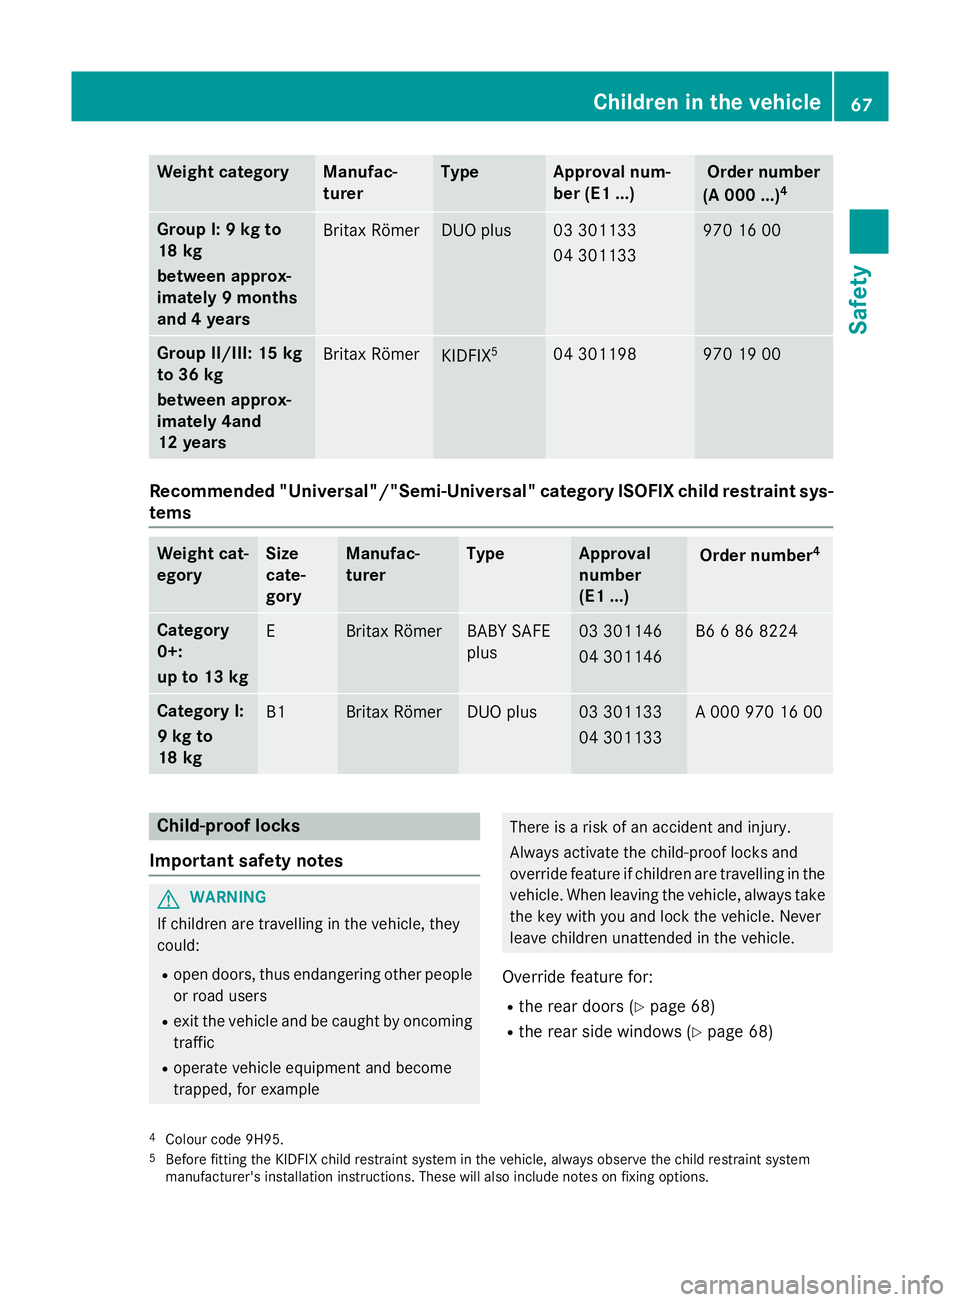
Weight category Manufac-
turer Type Approval num-
ber (E1 ...) Order number
(A 000 ...) 4 Group I: 9 kg to
18 kg
between approx-
imately 9 months
and 4 years
Britax Römer DUO plus 03 301133
04 301133 970 16 00
Group II/III: 15 kg
to 36 kg
between approx-
imately 4and
12 years
Britax Römer
KIDFIX
5 04 301198 970 19 00
Recommended "Universal"/"Semi-Universal" category ISOFIX child restraint sys-
tems Weight cat-
egory Size
cate-
gory Manufac-
turer Type Approval
number
(E1 ...)
Order number
4 Category
0+:
up to 13 kg
E Britax Römer BABY SAFE
plus 03 301146
04 301146 B6 6 86 8224
Category I:
9 kg to
18 kg
B1 Britax Römer DUO plus 03 301133
04 301133 A 000 970 16 00
Child-proof locks
Important safety notes G
WARNING
If children are travelling in the vehicle, they
could:
R open doors, thus endangering other people
or road users
R exit the vehicle and be caught by oncoming
traffic
R operate vehicle equipment and become
trapped, for example There is a risk of an accident and injury.
Always activate the child-proof locks and
override feature if children are travelling in the
vehicle. When leaving the vehicle, always take the key with you and lock the vehicle. Never
leave children unattended in the vehicle.
Override feature for:
R the rear doors (Y page 68)
R the rear side windows (Y page 68)
4 Colour code 9H95.
5 Before fitting the KIDFIX child restraint system in the vehicle, always observe the child restraint system
manufacturer's installation instructions. These will also include notes on fixing options. Children in the vehicle
67Safety Z
Page 233 of 417
road users. There is a risk of an accident and
injury.
Never exceed the maximum permissible load
when using a carrier.
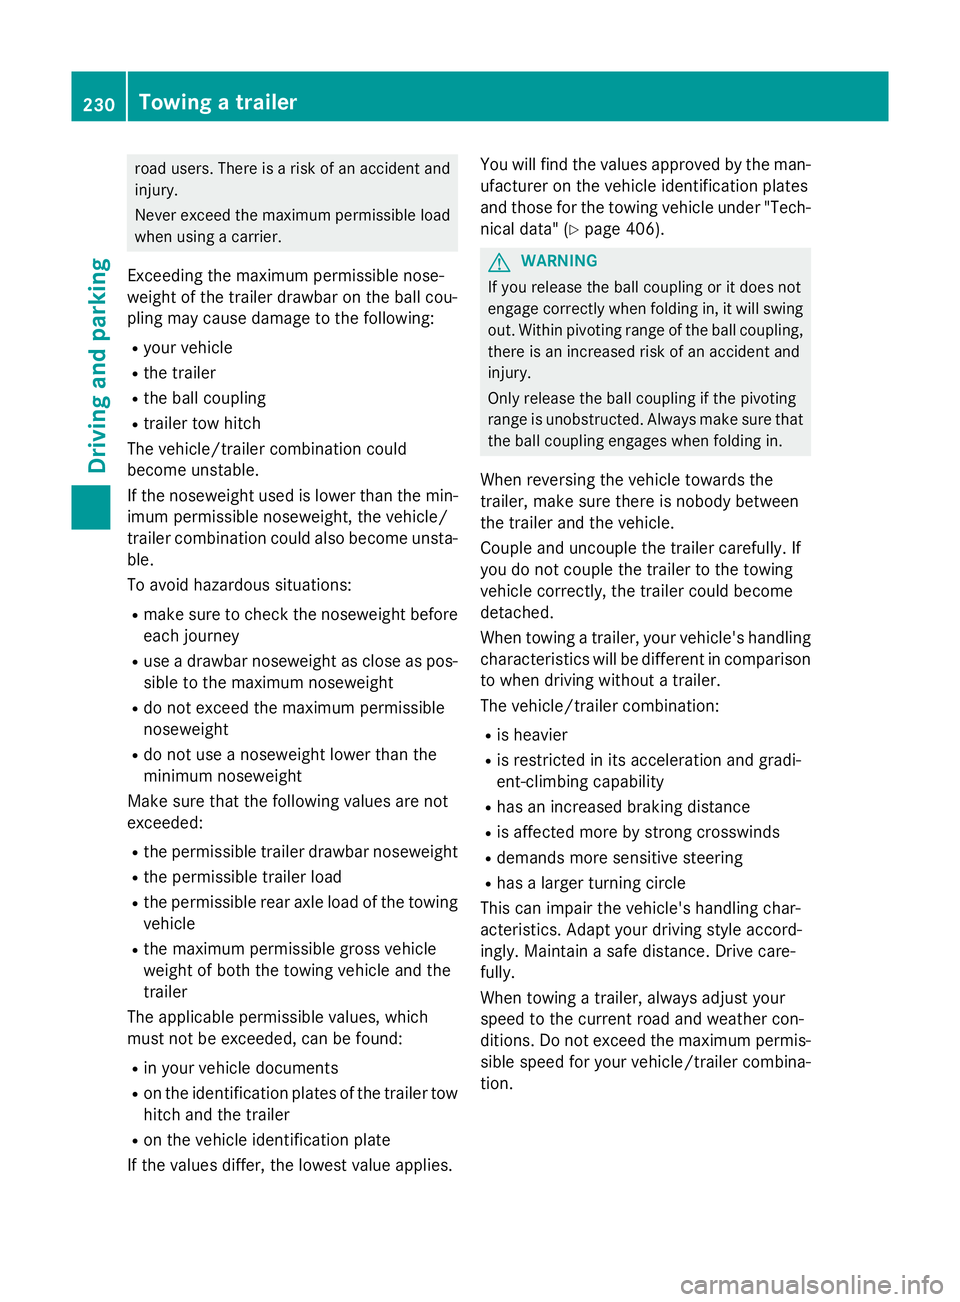
Exceeding the maximum permissible nose-
weight of the trailer drawbar on the ball cou-
pling may cause damage to the following:
R your vehicle
R the trailer
R the ball coupling
R trailer tow hitch
The vehicle/trailer combination could
become unstable.
If the noseweight used is lower than the min- imum permissible noseweight, the vehicle/
trailer combination could also become unsta-
ble.
To avoid hazardous situations:
R make sure to check the noseweight before
each journey
R use a drawbar noseweight as close as pos-
sible to the maximum noseweight
R do not exceed the maximum permissible
noseweight
R do not use a noseweight lower than the
minimum noseweight
Make sure that the following values are not
exceeded:
R the permissible trailer drawbar noseweight
R the permissible trailer load
R the permissible rear axle load of the towing
vehicle
R the maximum permissible gross vehicle
weight of both the towing vehicle and the
trailer
The applicable permissible values, which
must not be exceeded, can be found:
R in your vehicle documents
R on the identification plates of the trailer tow
hitch and the trailer
R on the vehicle identification plate
If the values differ, the lowest value applies. You will find the values approved by the man-
ufacturer on the vehicle identification plates
and those for the towing vehicle under "Tech- nical data" (Y page 406). G
WARNING
If you release the ball coupling or it does not
engage correctly when folding in, it will swing out. Within pivoting range of the ball coupling,
there is an increased risk of an accident and
injury.
Only release the ball coupling if the pivoting
range is unobstructed. Always make sure that the ball coupling engages when folding in.
When reversing the vehicle towards the
trailer, make sure there is nobody between
the trailer and the vehicle.
Couple and uncouple the trailer carefully. If
you do not couple the trailer to the towing
vehicle correctly, the trailer could become
detached.
When towing a trailer, your vehicle's handling
characteristics will be different in comparison to when driving without a trailer.
The vehicle/trailer combination:
R is heavier
R is restricted in its acceleration and gradi-
ent-climbing capability
R has an increased braking distance
R is affected more by strong crosswinds
R demands more sensitive steering
R has a larger turning circle
This can impair the vehicle's handling char-
acteristics. Adapt your driving style accord-
ingly. Maintain a safe distance. Drive care-
fully.
When towing a trailer, always adjust your
speed to the current road and weather con-
ditions. Do not exceed the maximum permis-
sible speed for your vehicle/trailer combina-
tion. 230
Towing a trailerDriving and parking
Page 272 of 417
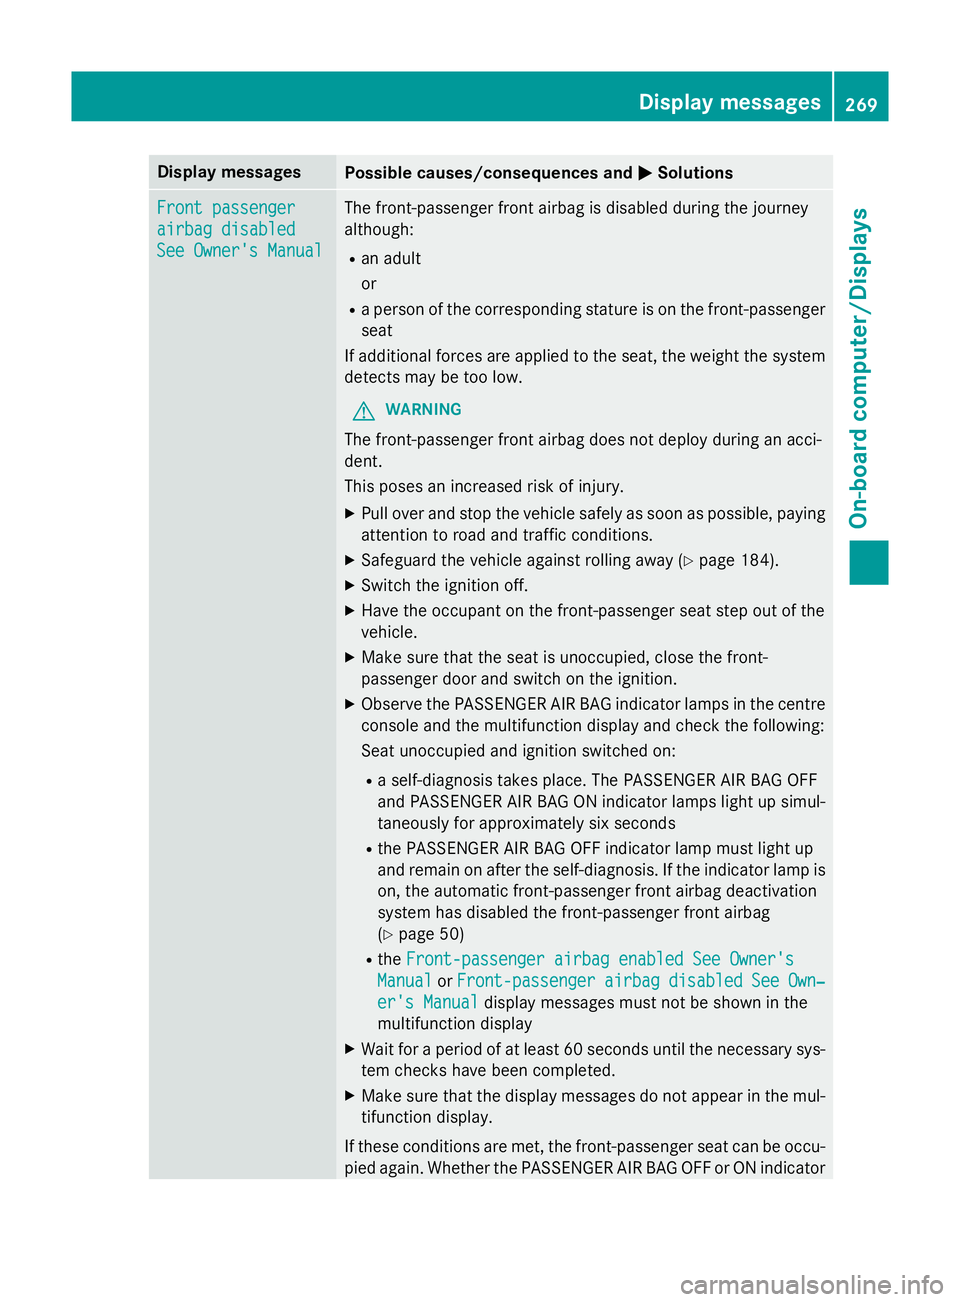
Display messages
Possible causes/consequences and
M
MSolutions Front passenger
Front passenger
airbag disabled airbag disabled
See Owner's Manual See Owner's Manual The front-passenger front airbag is disabled during the journey
although:
R an adult
or
R a person of the corresponding stature is on the front-passenger
seat
If additional forces are applied to the seat, the weight the system detects may be too low.
G WARNING
The front-passenger front airbag does not deploy during an acci-
dent.
This poses an increased risk of injury. X Pull over and stop the vehicle safely as soon as possible, paying
attention to road and traffic conditions.
X Safeguard the vehicle against rolling away (Y page 184).
X Switch the ignition off.
X Have the occupant on the front-passenger seat step out of the
vehicle.
X Make sure that the seat is unoccupied, close the front-
passenger door and switch on the ignition.
X Observe the PASSENGER AIR BAG indicator lamps in the centre
console and the multifunction display and check the following:
Seat unoccupied and ignition switched on:
R a self-diagnosis takes place. The PASSENGER AIR BAG OFF
and PASSENGER AIR BAG ON indicator lamps light up simul-
taneously for approximately six seconds
R the PASSENGER AIR BAG OFF indicator lamp must light up
and remain on after the self-diagnosis. If the indicator lamp is on, the automatic front-passenger front airbag deactivation
system has disabled the front-passenger front airbag
(Y page 50)
R the Front-passenger airbag enabled See Owner's
Front-passenger airbag enabled See Owner's
Manual Manual orFront-passenger
Front-passenger airbag
airbagdisabled
disabled See
See Own‐
Own‐
er's Manual
er's Manual display messages must not be shown in the
multifunction display
X Wait for a period of at least 60 seconds until the necessary sys-
tem checks have been completed.
X Make sure that the display messages do not appear in the mul-
tifunction display.
If these conditions are met, the front-passenger seat can be occu- pied again. Whether the PASSENGER AIR BAG OFF or ON indicator Display
messages
269On-board computer/Displays Z
Page 273 of 417
Display messages
Possible causes/consequences and
M
MSolutions lamp remains lit or goes out depends on how the automatic front-
passenger front airbag deactivation system classifies the occu-
pant.
If the conditions are not met, the system is not operating correctly.
X Consult a qualified specialist workshop immediately.
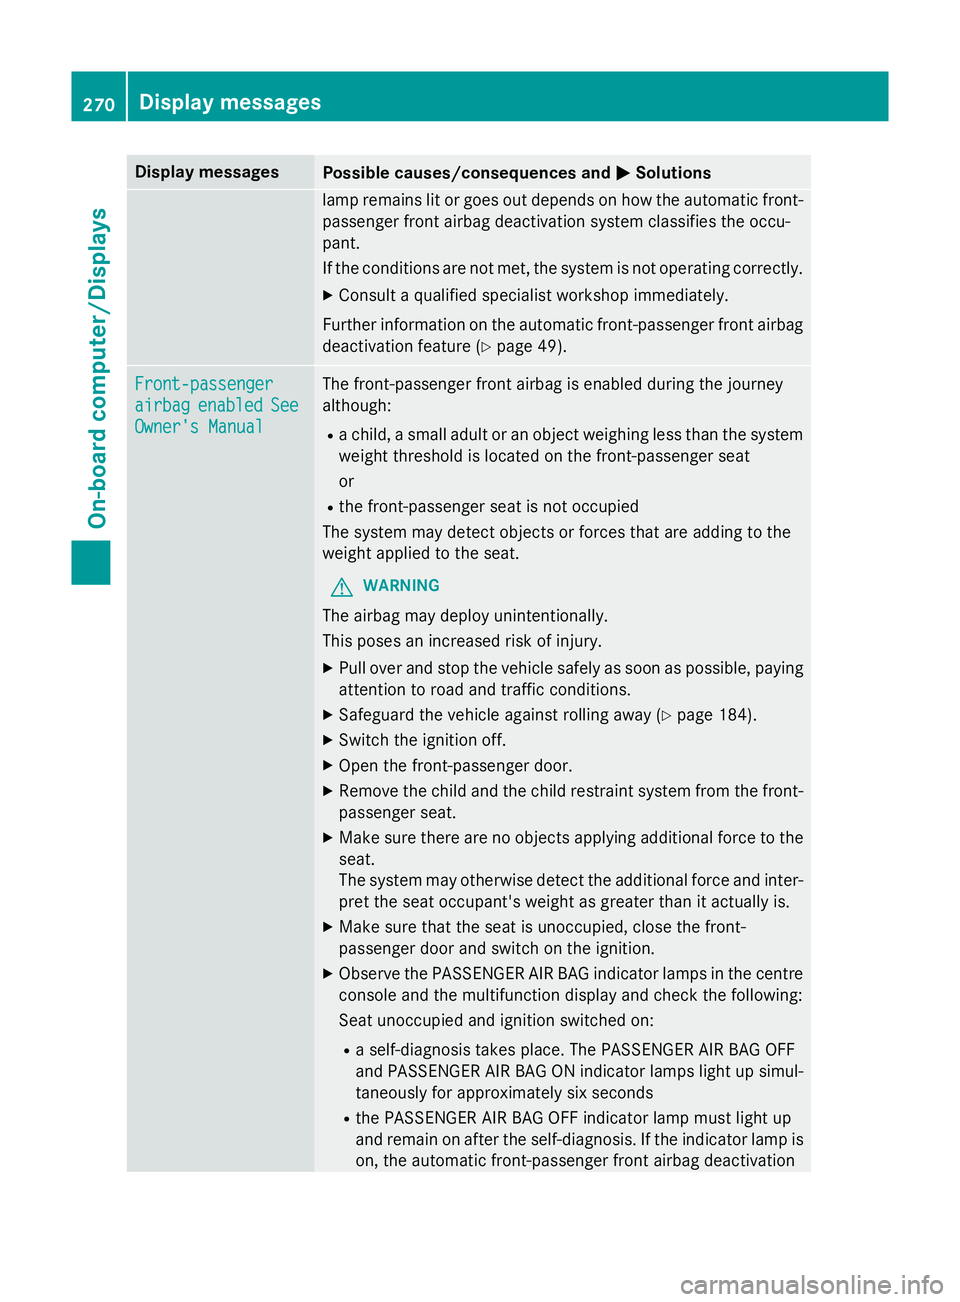
Further information on the automatic front-passenger front airbag deactivation feature (Y page 49).Front-passenger Front-passenger
airbag airbag
enabled
enabled See
See
Owner's Manual
Owner's Manual The front-passenger front airbag is enabled during the journey
although:
R a child, a small adult or an object weighing less than the system
weight threshold is located on the front-passenger seat
or
R the front-passenger seat is not occupied
The system may detect objects or forces that are adding to the
weight applied to the seat.
G WARNING
The airbag may deploy unintentionally.
This poses an increased risk of injury. X Pull over and stop the vehicle safely as soon as possible, paying
attention to road and traffic conditions.
X Safeguard the vehicle against rolling away (Y page 184).
X Switch the ignition off.
X Open the front-passenger door.
X Remove the child and the child restraint system from the front-
passenger seat.
X Make sure there are no objects applying additional force to the
seat.
The system may otherwise detect the additional force and inter-
pret the seat occupant's weight as greater than it actually is.
X Make sure that the seat is unoccupied, close the front-
passenger door and switch on the ignition.
X Observe the PASSENGER AIR BAG indicator lamps in the centre
console and the multifunction display and check the following:
Seat unoccupied and ignition switched on:
R a self-diagnosis takes place. The PASSENGER AIR BAG OFF
and PASSENGER AIR BAG ON indicator lamps light up simul-
taneously for approximately six seconds
R the PASSENGER AIR BAG OFF indicator lamp must light up
and remain on after the self-diagnosis. If the indicator lamp is
on, the automatic front-passenger front airbag deactivation 270
Display
messagesOn-board computer/Displays
Page 309 of 417
Useful information
i This Owner's Manual describes all mod-
els, series and optional equipment for your
vehicle that were available at the time of
going to press. National variations are pos- sible. Note that your vehicle may not be
equipped with all of the functions descri-
bed. This is also the case for systems and
functions relevant to safety.
i Read the information on qualified special-
ist workshops: (Y page 24). Loading guidelines
G
WARNING
If objects, luggage or loads are not secured or not secured sufficiently, they could slip, tip
over or be flung around and thereby hit vehicle
occupants. There is a risk of injury, especially when braking or abruptly changing directions.
Always store objects so that they cannot be
flung around. Secure objects, luggage or
loads against slipping or tipping before the
journey. G
WARNING
Combustion engines emit poisonous exhaust
gases such as carbon monoxide. If the tailgate is open when the engine is running, particu-
larly if the vehicle is moving, exhaust fumes
could enter the passenger compartment.
There is a risk of poisoning.
Turn off the engine before opening the tail-
gate. Never drive with the tailgate open. G
WARNING
The exhaust tail pipe and tail pipe trim can
become very hot. If you come into contact
with these parts of the vehicle, you could burn
yourself. There is a risk of injury.
Always be particularly careful around the
exhaust tail pipe and the tail pipe trim. Allow
these components to cool down before touch-
ing them. The handling characteristics of a laden vehi-
cle are dependent on the distribution of the
load within the vehicle. For this reason, you
should observe the following notes when
transporting a load:
R never exceed the maximum permissible
gross vehicle weight or the permissible axle
loads for the vehicle (including occupants).
R the luggage compartment is the preferred
place to carry objects.
R position heavy loads as far forwards as pos-
sible and as low down in the load compart-ment as possible.
R the load must not protrude above the upper
edge of the seat backrests.
R always place the load against the rear or
front seat backrests. Make sure that the
seat backrests are securely locked into
place.
R always place the load behind unoccupied
seats if possible.
R use the lashing eyelets and the luggage
nets to transport loads and luggage.
R only use lashing eyelets and fastening com-
ponents that are suitable for the weight and size of the load.
R the maximum load capacity of the stowage
well under the luggage compartment floor
is 25 kg.
R secure the load with sufficiently strong and
wear-resistant lashing material. pad sharp
edges for protection.
! Do not position the load on one part of the
folding luggage compartment floor only.
The maximum load capacity of the folding
luggage compartment floor is 100 kg.
Spread the weight evenly to avoid damag-
ing the luggage compartment floor. Place a
solid board under the load if necessary.
Please note that the load on the luggage
compartment floor will be increased when
the load is lashed down. 306
Loading guidelinesStowing and features
Page 317 of 417
thrown around and hit vehicle occupants.
There is a risk of injury, particularly in the
event of sudden braking or a sudden change
in direction.
R Always stow objects so that they cannot be
thrown around in such situations.
R Always make sure that objects do not pro-
trude from stowage spaces, parcel nets or
stowage nets.
R Close the lockable stowage spaces before
starting a journey.
R Stow and secure objects that are heavy,
hard, pointed, sharp-edged, fragile or too
large in the luggage compartment.
! Only use the cup holders for containers of
the right size and which have lids. The
drinks could otherwise spill.
Observe the loading guidelines (Y page 306).
The stowage compartments in the doors pro- vide space for bottles:
R front: capacity up to 1.0 l
R rear: capacity up to 0.5 l
Cup holders in the front centre console All vehicles (except vehicles with Audio 5)
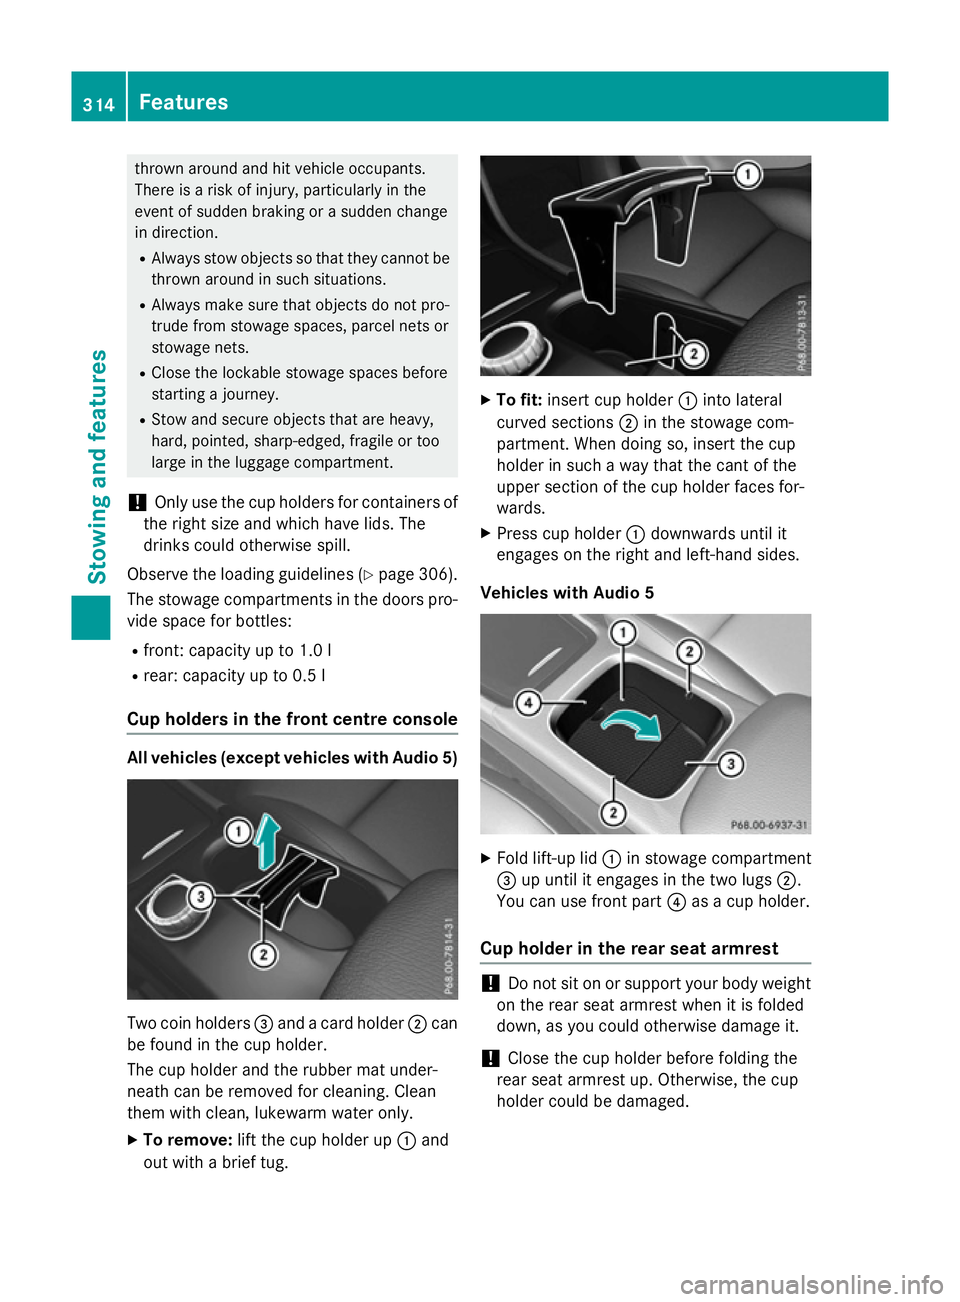
Two coin holders
=and a card holder ;can
be found in the cup holder.
The cup holder and the rubber mat under-
neath can be removed for cleaning. Clean
them with clean, lukewarm water only.
X To remove: lift the cup holder up :and
out with a brief tug. X
To fit: insert cup holder :into lateral
curved sections ;in the stowage com-
partment. When doing so, insert the cup
holder in such a way that the cant of the
upper section of the cup holder faces for-
wards.
X Press cup holder :downwards until it
engages on the right and left-hand sides.
Vehicles with Audio 5 X
Fold lift-up lid :in stowage compartment
= up until it engages in the two lugs ;.
You can use front part ?as a cup holder.
Cup holder in the rear seat armrest !
Do not sit on or support your body weight
on the rear seat armrest when it is folded
down, as you could otherwise damage it.
! Close the cup holder before folding the
rear seat armrest up. Otherwise, the cup
holder could be damaged. 314
FeaturesSto
wing an d features
Page 353 of 417
X
Start the engine of the donor vehicle and run it at idling speed.
X Connect negative terminal ?of donor battery Bto earth point Aof your vehicle using the
jump lead, connecting the jump lead to donor battery Bfirst.
X If the battery is fully discharged, leave the battery that is being used to jump-start connected
for a few minutes before attempting to start. This charges the empty battery a little.
X Start the engine.
X Before disconnecting the jump leads, let the engines run for several minutes.
X First, remove the jump leads from earth point Aand negative terminal ?, then from pos-
itive clamp ;and positive terminal =. Begin each time at the contacts on your own vehicle
first.
X Close cover :of positive clamp ;after removing the jump leads.
X Close the bonnet.
X Have the battery checked at a qualified specialist workshop.
i Jump-starting is not considered to be a normal operating condition.
i Jump-starting cables and further information regarding jump starting can be obtained at
any qualified specialist workshop. Towing away and tow-starting
Important safety notes
G
WARNING
Safety relevant functions are restricted or no
longer available if:
R the engine is not running
R the brake system or power steering is mal-
functioning
R there is a malfunction in the voltage supply
or the vehicle's electrical system
When your vehicle is towed away or towed
started, you may require considerably more
effort to steer and brake. There is a risk of an
accident.
In such cases use a rigid towing bar. Before
being towed away or tow started, make sure
the steering moves freely. G
WARNING
If the steering wheel lock is engaged, the vehi- cle can no longer be steered. There is a risk of
an accident.
Always switch on the ignition when towing
with a tow rope or a towing bar. G
WARNING
When towing or tow-starting another vehicle
and its weight is greater than the permissible gross weight of your vehicle, the:
R towing eye may be torn off
R car/trailer combination may swerve or
even overturn
There is a risk of an accident.
When towing or tow-starting another vehicle,
its weight should not be greater than the per- missible gross weight of your vehicle.
Details on the permissible gross vehicle
weight of your vehicle can be found on the
vehicle identification plate (Y page 396).
! When COLLISION PREVENTION ASSIST
PLUS, DISTRONIC PLUS or the HOLD func- tion is activated, the vehicle brakes auto-
matically in certain situations. To avoid
damage to the vehicle, deactivate these
systems in the following or similar situa-
tions:
R when towing away
R in a car wash 350
Towing away and tow-startingBreakdown assistance
Page 399 of 417
Identification plates
Vehicle identification plate with vehi-
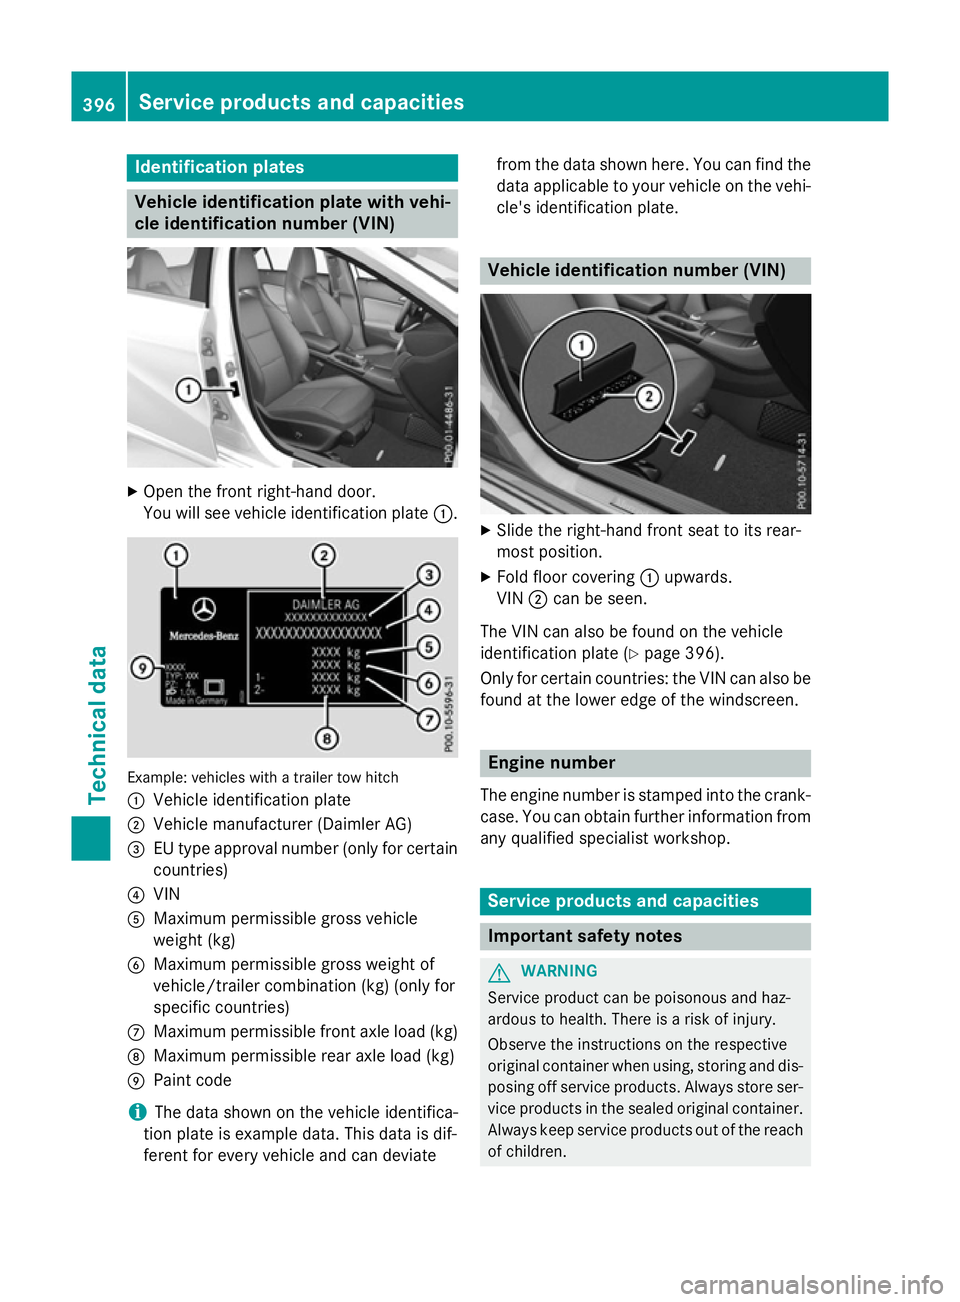
cle identification number (VIN) X
Open the front right-hand door.
You will see vehicle identification plate :.Example: vehicles with a trailer tow hitch
: Vehicle identification plate
; Vehicle manufacturer (Daimler AG)
= EU type approval number (only for certain
countries)
? VIN
A Maximum permissible gross vehicle
weight (kg)
B Maximum permissible gross weight of
vehicle/trailer combination (kg) (only for
specific countries)
C Maximum permissible front axle load (kg)
D Maximum permissible rear axle load (kg)
E Paint code
i The data shown on the vehicle identifica-
tion plate is example data. This data is dif-
ferent for every vehicle and can deviate from the data shown here. You can find the
data applicable to your vehicle on the vehi- cle's identification plate. Vehicle identification number (VIN)
X
Slide the right-hand front seat to its rear-
most position.
X Fold floor covering :upwards.
VIN ;can be seen.
The VIN can also be found on the vehicle
identification plate (Y page 396).
Only for certain countries: the VIN can also be
found at the lower edge of the windscreen. Engine number
The engine number is stamped into the crank-
case. You can obtain further information from any qualified specialist workshop. Service products and capacities
Important safety notes
G
WARNING
Service product can be poisonous and haz-
ardous to health. There is a risk of injury.
Observe the instructions on the respective
original container when using, storing and dis- posing off service products. Always store ser-
vice products in the sealed original container. Always keep service products out of the reach
of children. 396
Service products and capacitiesTechnical data
Page 407 of 417
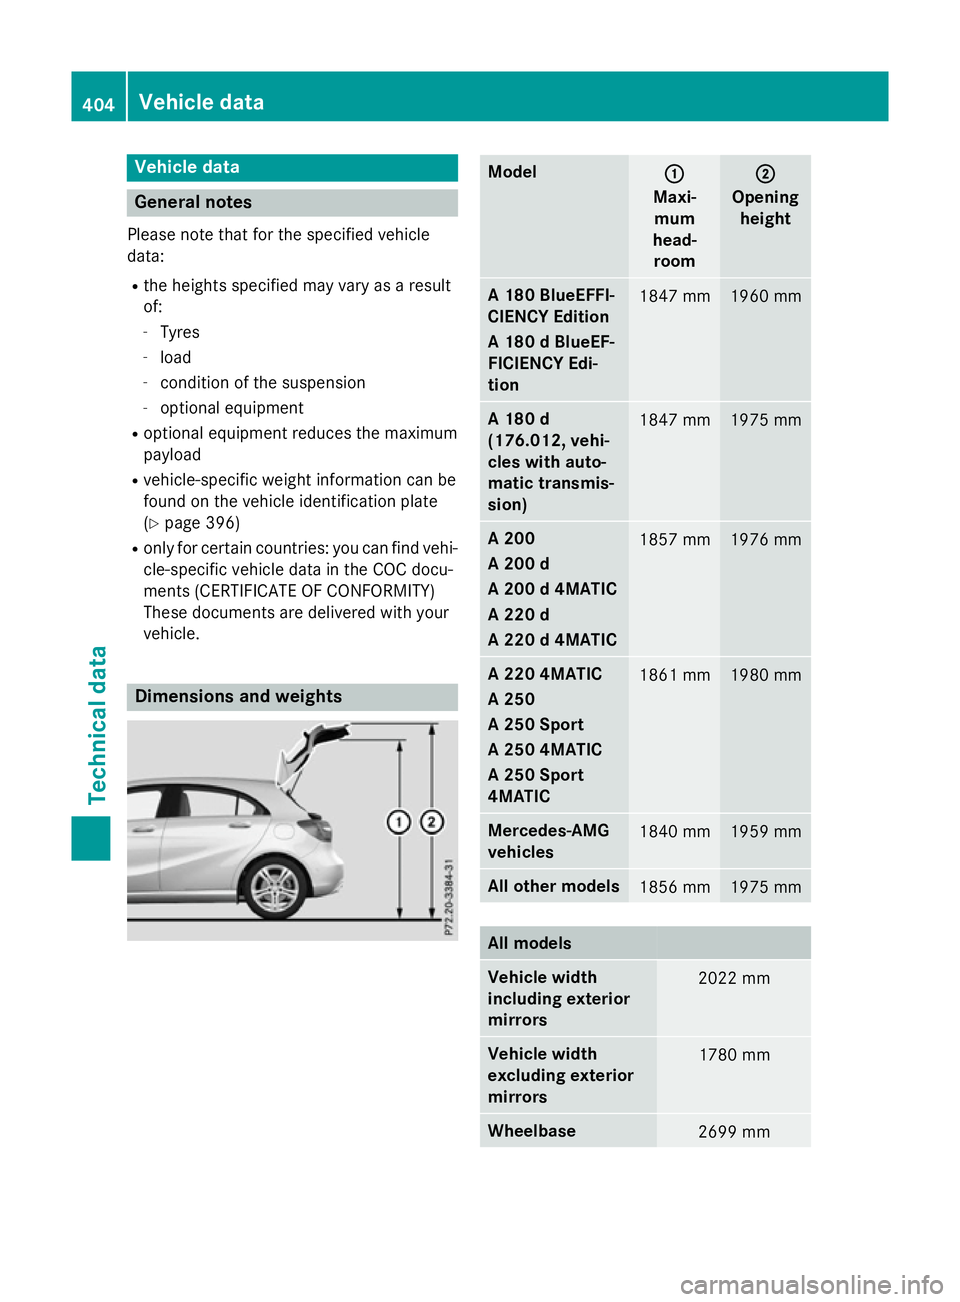
Vehicle data
General notes
Please note that for the specified vehicle
data:
R the heights specified may vary as a result
of:
- Tyres
- load
- condition of the suspension
- optional equipment
R optional equipment reduces the maximum
payload
R vehicle-specific weight information can be
found on the vehicle identification plate
(Y page 396)
R only for certain countries: you can find vehi-
cle-specific vehicle data in the COC docu-
ments (CERTIFICATE OF CONFORMITY)
These documents are delivered with your
vehicle. Dimensions and weights Model
: :
Maxi- mum
head- room ;
;
Opening height A 180 BlueEFFI-
CIENCY Edition
A 180 d BlueEF-
FICIENCY Edi-
tion
1847 mm 1960 mm
A 180 d
(176.012, vehi-
cles with auto-
matic transmis-
sion)
1847 mm 1975 mm
A 200
A 200 d
A 200 d 4MATIC
A 220 d
A 220 d 4MATIC
1857 mm 1976 mm
A 220 4MATIC
A 250
A 250 Sport
A 250 4MATIC
A 250 Sport
4MATIC
1861 mm 1980 mm
Mercedes-AMG
vehicles
1840 mm 1959 mm
All other models
1856 mm 1975 mm
All models
Vehicle width
including exterior
mirrors
2022 mm
Vehicle width
excluding exterior
mirrors
1780 mm
Wheelbase
2699 mm404
Vehicle dataTechnical data
Page 411 of 417
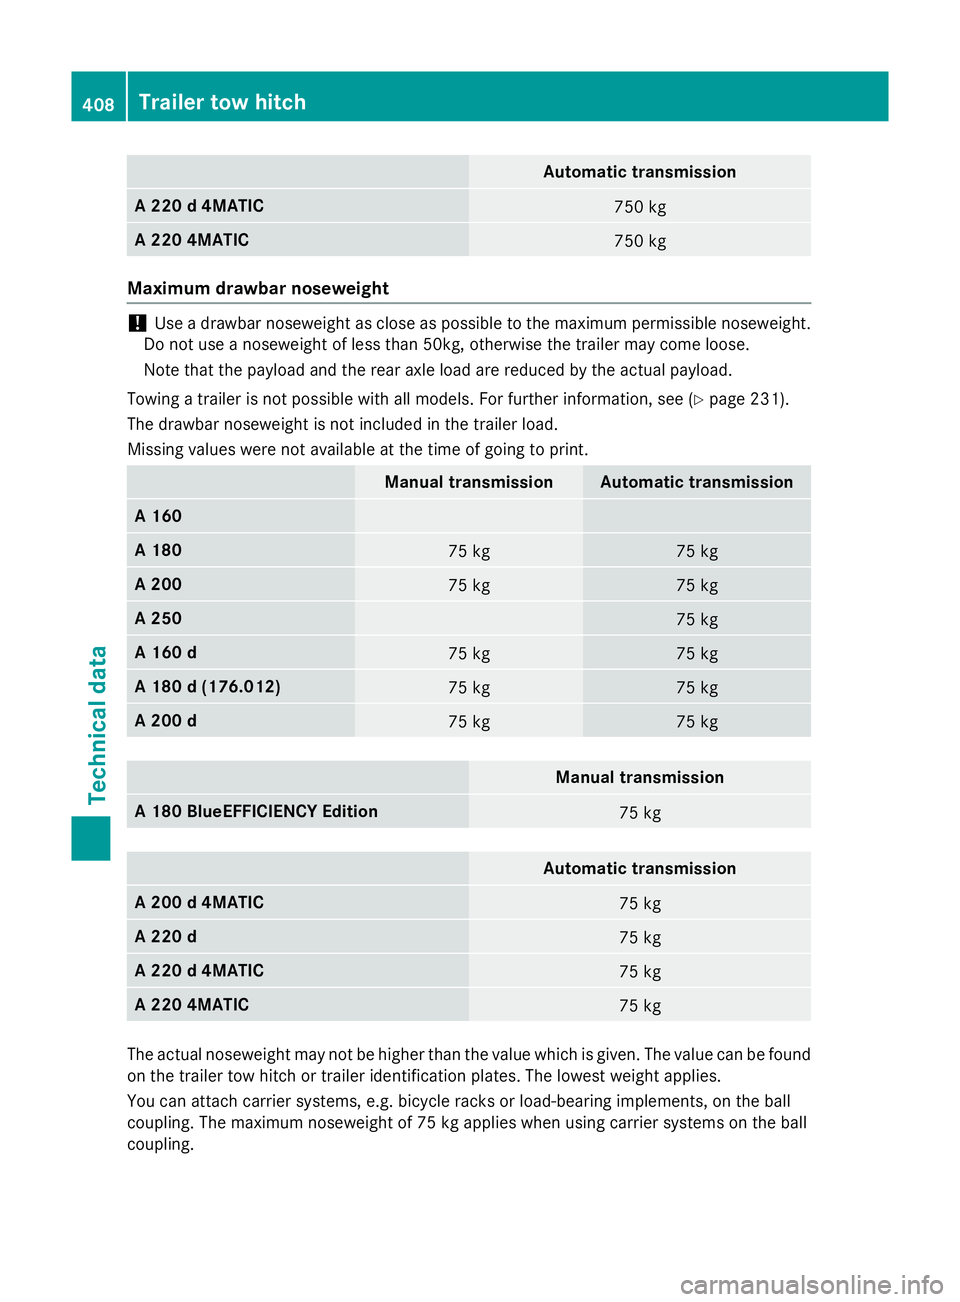
Automatic transmission
A 220 d 4MATIC
750 kg
A 220 4MATIC
750 kg
Maximum drawbar noseweight
!
Use a drawbar noseweight as close as possible to the maximum permissible noseweight.
Do not use a noseweight of less than 50kg, otherwise the trailer may come loose.
Note that the payload and the rear axle load are reduced by the actual payload.
Towing a trailer is not possible with all models. For further information, see (Y page 231).
The drawbar noseweight is not included in the trailer load.
Missing values were not available at the time of going to print. Manual transmission Automatic transmission
A 160
A 180
75 kg 75 kg
A 200
75 kg 75 kg
A 250
75 kg
A 160 d
75 kg 75 kg
A 180 d (176.012)
75 kg 75 kg
A 200 d
75 kg 75 kg
Manual transmission
A 180 BlueEFFICIENCY Edition
75 kg
Automatic transmission
A 200 d 4MATIC
75 kg
A 220 d
75 kg
A 220 d 4MATIC
75 kg
A 220 4MATIC
75 kg
The actual noseweight may not be higher than the value which is given. The value can be found
on the trailer tow hitch or trailer identification plates. The lowest weight applies.
You can attach carrier systems, e.g. bicycle racks or load-bearing implements, on the ball
coupling. The maximum noseweight of 75 kg applies when using carrier systems on the ball
coupling. 408
Trailer tow hitchTechnical data