sensor MERCEDES-BENZ A-CLASS HATCHBACK 2015 Owner's Manual
[x] Cancel search | Manufacturer: MERCEDES-BENZ, Model Year: 2015, Model line: A-CLASS HATCHBACK, Model: MERCEDES-BENZ A-CLASS HATCHBACK 2015Pages: 417, PDF Size: 11.91 MB
Page 99 of 417
i
Notes on the automatic reversing feature
for:
R the side windows (Y page 94)
R the panorama sliding sunroof
(Y page 99)
R the roller sunblind (Y page 101)
Using the key X
Vehicles with Exclusive Package or
AMG Exclusive Package but without
KEYLESS-GO and the KEYLESS-GO start
function: for the following operations,
point the tip of the key at the door handle
on the driver's door. The key must be close
to the driver's door handle.
i Vehicles with KEYLESS-GO or the KEY-
LESS-GO start function: the key must be
in close proximity to the vehicle.
X Press and hold the &button until the
side windows and the panorama sliding
sunroof are fully closed.
X Make sure that all the side windows and the
panorama sliding sunroof are closed.
On vehicles with a panorama sliding sunroof: X Press and hold the &button again until
the roller sunblind of the panorama sliding
sunroof closes.
X To interrupt convenience closing:
release the &button.
Using KEYLESS-GO The driver's door and the door at which the
handle is used must both be closed. The key
must be outside the vehicle. The gap between
the key and the corresponding door handle
should not be greater than 1 m. X
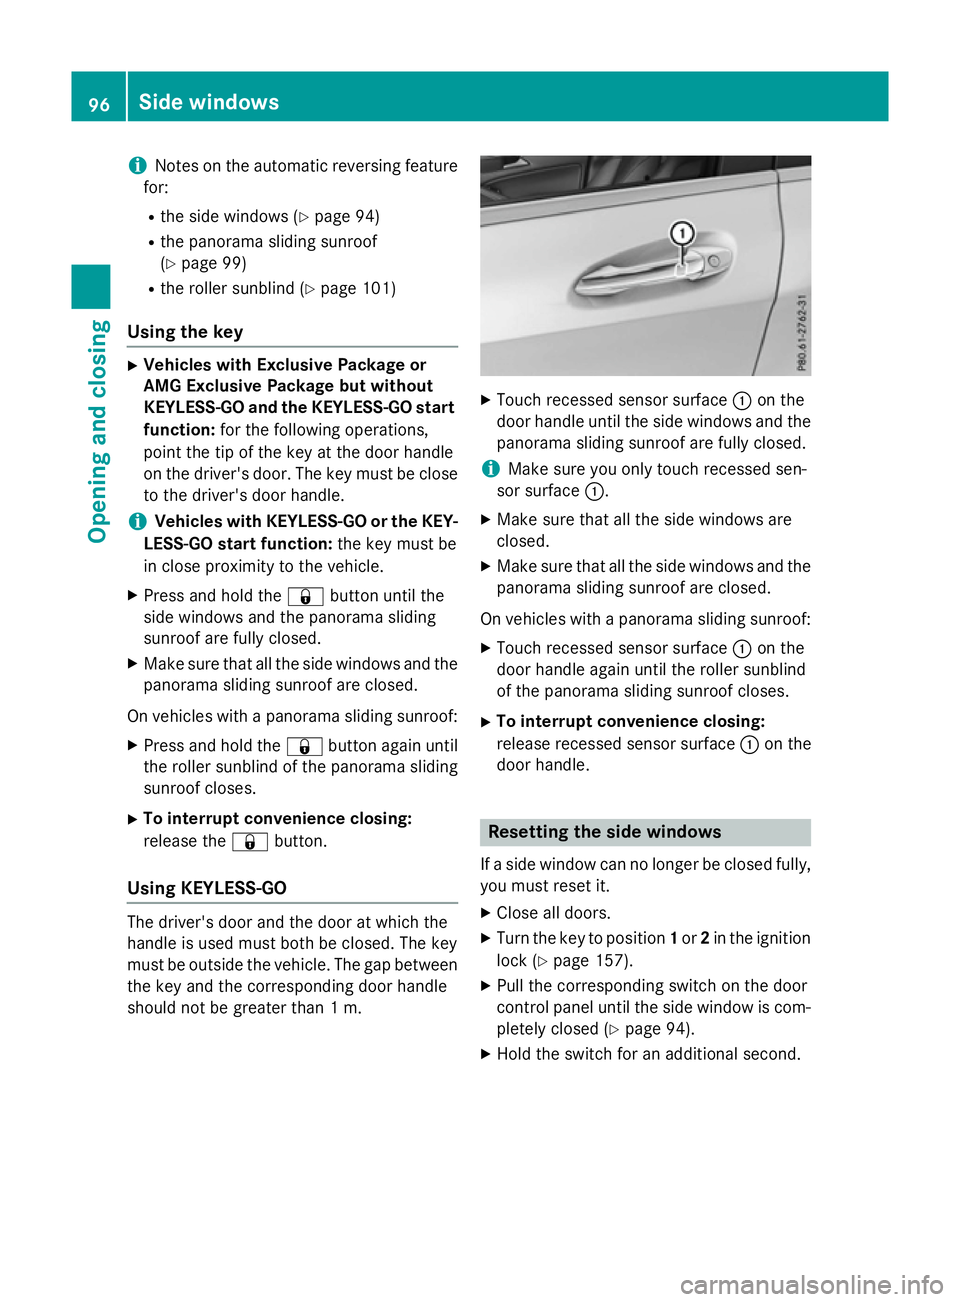
Touch recessed sensor surface :on the
door handle until the side windows and the panorama sliding sunroof are fully closed.
i Make sure you only touch recessed sen-
sor surface :.
X Make sure that all the side windows are
closed.
X Make sure that all the side windows and the
panorama sliding sunroof are closed.
On vehicles with a panorama sliding sunroof: X Touch recessed sensor surface :on the
door handle again until the roller sunblind
of the panorama sliding sunroof closes.
X To interrupt convenience closing:
release recessed sensor surface :on the
door handle. Resetting the side windows
If a side window can no longer be closed fully, you must reset it.
X Close all doors.
X Turn the key to position 1or 2in the ignition
lock (Y page 157).
X Pull the corresponding switch on the door
control panel until the side window is com-
pletely closed (Y page 94).
X Hold the switch for an additional second. 96
Side windowsOpening and closing
Page 103 of 417
After opening the sliding sunroof, the roller
sunblind automatically closes slightly. This
reduces drafts in the vehicle interior.
If the sliding sunroof is raised at the rear, it
automatically lowers slightly at higher
speeds. The noise level in the vehicle interior is reduced as a result.
At low speeds it raises again automatically.
You can also temporarily deactivate auto-
matic lowering. To do so, press the 3
switch. The sliding sunroof raises again auto- matically.
You can continue to operate the sliding sun-
roof after switching off the engine or remov-
ing the key. This function remains active for
five minutes or until you open a front door.
The sliding sunroof cannot be opened if a roof
carrier is fitted. In order to allow ventilation of
the vehicle interior, you can raise the sliding
sunroof.
If contact is made with a roof carrier approved
by Mercedes-Benz, the sliding sunroof lowers
slightly but remains raised at the rear.
Rain-closing feature when the engine is
switched off The rain-closing feature is only available for
vehicles with a rain sensor.
When the key is in position 0in the ignition
lock or is removed, the panorama sliding sun- roof closes automatically:
R if it starts to rain
R at extreme outside temperatures
R after six hours
R if there is a malfunction in the power supply
The panorama sliding sunroof remains raised
at the rear in order to allow ventilation of the vehicle interior.
If the panorama sliding sunroof is obstructed
when being closed by the rain-closing feature, it opens again slightly. The rain-closing fea-
ture is then deactivated. The panorama sliding sunroof does not close
if:
R it is raised at the rear.
R it is blocked.
R no rain is falling on the area of the wind-
screen being monitored by the rain sensor.
If, for example, the vehicle is under a bridge
or in a carport, the field of the sensor may
be covered.
Rain-closing feature when driving The raised panorama sliding sunroof auto-
matically lowers when driving if it starts to
rain. The sliding sunroof is lowered depending
on:
R the road speed and
R the intensity of the rain
You can manually cancel the automatic clos-
ing procedure. Press or pull the 3switch
in any direction.
To raise the panorama sliding sunroof again,
press the 3button in direction :. The
rain-closing feature remains activated. Operating the roller sunblind of the
panorama sliding sunroof
Important safety notes G
WARNING
Parts of the body could become trapped
between the roller sunblind and frame or slid- ing sunroof during automatic opening or clos-
ing. There is a risk of injury.
When opening or closing, make sure that no
body parts are in the sweep of the roller sun- blind.
If someone is trapped:
R release the switch immediately or
R press the switch in any direction during the
automatic opening/closing process
The opening/closing process is stopped. 100
Panorama sliding sunroofOpening and closing
Page 118 of 417
R
if electrolyte is swallowed, immediately
rinse out your mouth thoroughly. Do not
induce vomiting.
R if electrolyte comes into contact with skin
or eyes or is swallowed, seek medical atten-
tion immediately.
R immediately change out of clothing that has
been in contact with electrolyte.
R if an allergic reaction occurs, seek medical
attention immediately.
The "Automatic anti-dazzle mirrors" function
is only available if the vehicle is equipped with
the "Mirror package".
The rear-view mirror and the exterior mirror
on the driver's side automatically go into anti- dazzle mode if:
R the ignition is switched on and
R incident light from headlamps strikes the
sensor in the rear-view mirror
The mirrors do not go into anti-dazzle mode if reverse gear is engaged or if the interior light-
ing is switched on. Parking position of the exterior mirror
on the front-passenger side
General notes The "Parking position for the exterior mirror
on the front-passenger side" function is only
available if the vehicle is equipped with the
"Memory package".
Setting and storing the parking position You can set the front-passenger side exterior
mirror so that you can see the rear wheel on
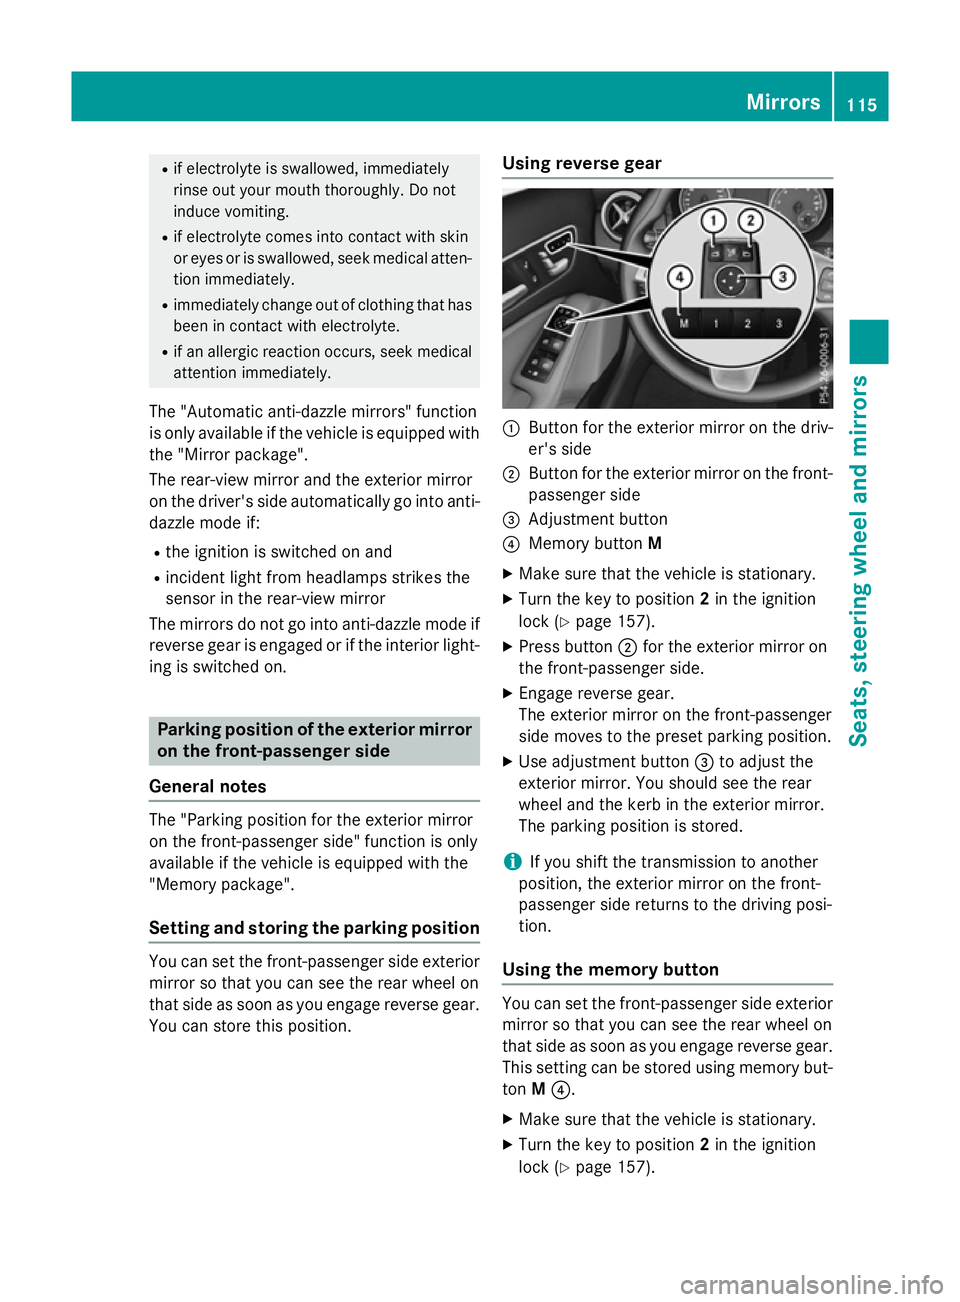
that side as soon as you engage reverse gear. You can store this position. Using reverse gear :
Button for the exterior mirror on the driv-
er's side
; Button for the exterior mirror on the front-
passenger side
= Adjustment button
? Memory button M
X Make sure that the vehicle is stationary.
X Turn the key to position 2in the ignition
lock (Y page 157).
X Press button ;for the exterior mirror on
the front-passenger side.
X Engage reverse gear.
The exterior mirror on the front-passenger
side moves to the preset parking position.
X Use adjustment button =to adjust the
exterior mirror. You should see the rear
wheel and the kerb in the exterior mirror.
The parking position is stored.
i If you shift the transmission to another
position, the exterior mirror on the front-
passenger side returns to the driving posi-
tion.
Using the memory button You can set the front-passenger side exterior
mirror so that you can see the rear wheel on
that side as soon as you engage reverse gear.
This setting can be stored using memory but-
ton M?.
X Make sure that the vehicle is stationary.
X Turn the key to position 2in the ignition
lock (Y page 157). Mirrors
115Seats, steering wheel and mirrors Z
Page 123 of 417
Useful information
i This Owner's Manual describes all mod-
els, series and optional equipment for your
vehicle that were available at the time of
going to press. National variations are pos- sible. Note that your vehicle may not be
equipped with all of the functions descri-
bed. This is also the case for systems and
functions relevant to safety.
i Read the information on qualified special-
ist workshops: (Y page 24). Exterior lighting
General notes
For reasons of safety, Mercedes-Benz recom- mends that you drive with the lights switched
on even during the daytime. In some coun-
tries, operation of the headlamps varies due
to legal requirements and self-imposed obli-
gations. Driving abroad
Symmetrical dipped-beam headlamps It is not necessary to switch your headlamps
to symmetrical dipped beam when driving in
countries where vehicles are driven on the
opposite side of the road to the country in
which the vehicle is registered. Legal require- ments are fulfilled without switching the
headlamps to symmetrical dipped beam. Setting the exterior lighting
Setting options Exterior lighting can be set using the:
R light switch
R combination switch (Y page 122)
R headlamp range adjustment (only vehicles
with halogen headlamps) (Y page 122)
R on-board computer (Y page 251)Light switch Operation
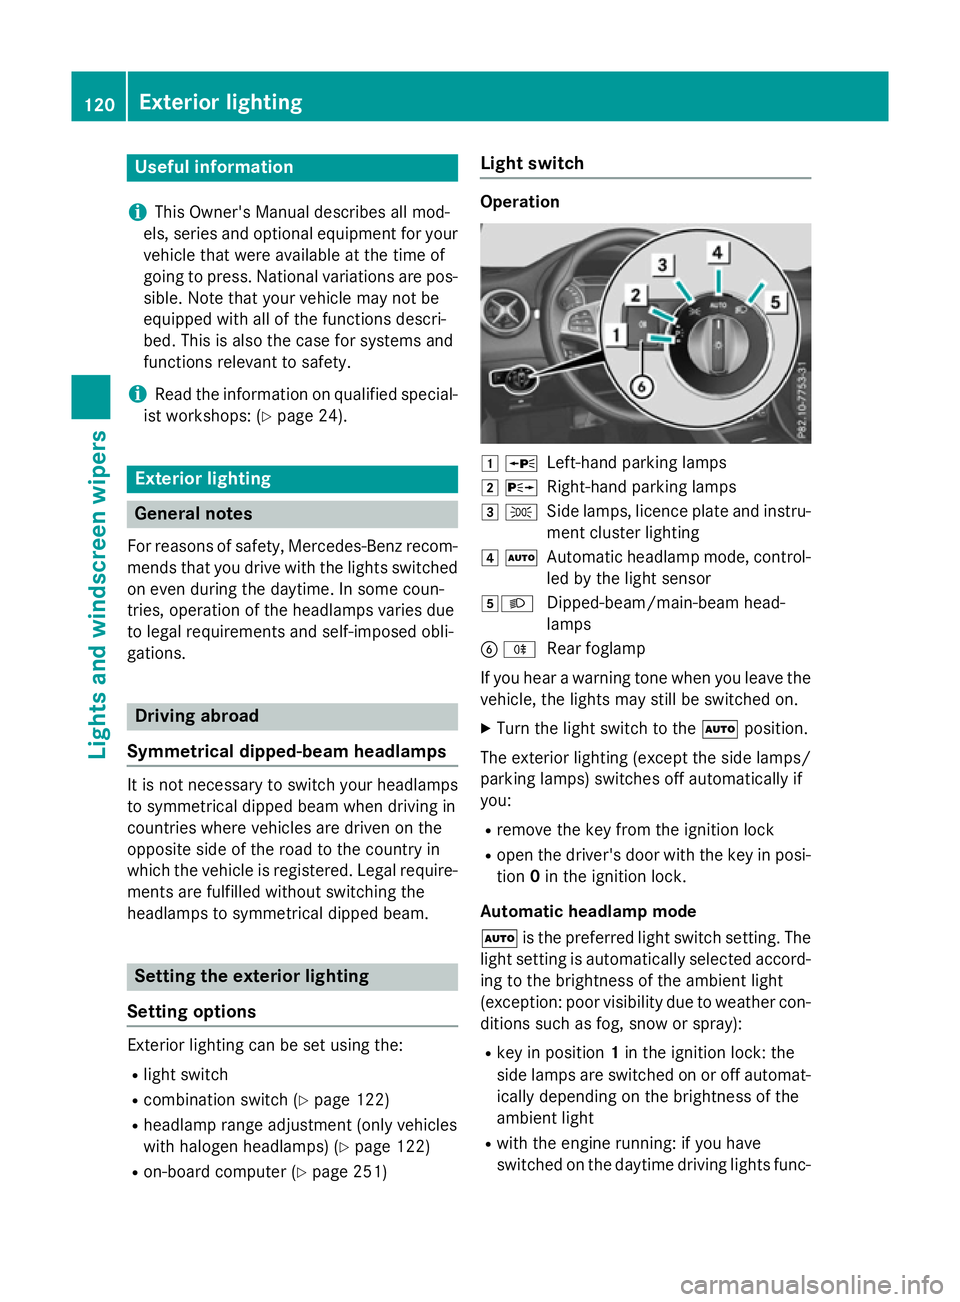
1
W
Left-hand parking lamps
2 X
Right-hand parking lamps
3 T
Side lamps, licence plate and instru-
ment cluster lighting
4 Ã
Automatic headlamp mode, control-
led by the light sensor
5L Dipped-beam/main-beam head-
lamps
B R
Rear foglamp
If you hear a warning tone when you leave the
vehicle, the lights may still be switched on.
X Turn the light switch to the Ãposition.
The exterior lighting (except the side lamps/
parking lamps) switches off automatically if
you: R remove the key from the ignition lock
R open the driver's door with the key in posi-
tion 0in the ignition lock.
Automatic headlamp mode
à is the preferred light switch setting. The
light setting is automatically selected accord- ing to the brightness of the ambient light
(exception: poor visibility due to weather con-
ditions such as fog, snow or spray):
R key in position 1in the ignition lock: the
side lamps are switched on or off automat- ically depending on the brightness of the
ambient light
R with the engine running: if you have
switched on the daytime driving lights func- 120
Exterior lightingLights and windscreen wipers
Page 124 of 417
tion in the on-board computer, the daytime
driving lights or the side lamps and dipped- beam headlamps are switched on or off
automatically depending on the brightness of the ambient light
X To switch on the automatic headlamps:
turn the light switch to the Ãposition. G
WARNING
When the light switch is set to Ã, the
dipped-beam headlamps may not be switched on automatically if there is fog, snow or othercauses of poor visibility due to the weather
conditions such as spray. There is a risk of an
accident.
In such situations, turn the light switch to
L.
The automatic headlamp feature is only an
aid. The driver is responsible for the vehicle
lighting at all times.
The daytime driving lights improve the detect- ability of your vehicle during the day. To do
this, the daytime driving lights function must
be switched on via the on-board computer
(Y page 251).
When the side lamps and dipped-beam head- lamps are switched on, the green T(side
lamps) and L(dipped-beam headlamps)
indicator lamps in the instrument cluster light
up.
Dipped-beam headlamps
When the ignition is switched on and the light switch is in the Lposition, the side lamps
and dipped-beam headlamps are switched on even if the light sensor does not sense dark
ambient light conditions. This is advanta-
geous when there is fog or rain.
X To switch on the dipped beam head-
lamps: turn the key to position 2in the
ignition lock or start the engine.
X Turn the light switch to L.
The green Lindicator lamp in the instru-
ment cluster lights up. Rear foglamp
The rear foglamp improves the visibility of
your vehicle in heavy fog for the following
traffic. Please observe the country-specific
laws on the use of rear foglamps.
X To switch on the rear foglamp: turn the
key to position 2in the ignition lock or start
the engine.
X Turn the light switch to LorÃ.
X Press the Rbutton.
The yellow Rindicator lamp in the
instrument cluster lights up.
X To switch off the rear foglamp: press the
R button.
The yellow Rindicator lamp in the
instrument cluster goes out.
Side lamps
! If the battery has been excessively dis-
charged, the side lamps or parking lamps
are automatically switched off to enable
the next engine start. Always park your
vehicle safely and sufficiently lit according
to legal standards. Avoid the continuous
use of the Tside lamps for several
hours. If possible, switch on the Xright
or the Wleft parking lamp.
X To switch on: turn the light switch to T.
The green Tindicator lamp in the instru-
ment cluster lights up.
Parking lamps
Switching on the parking lamps ensures that
the corresponding side of the vehicle is illu-
minated.
X To switch on the parking lamps: the key
should not be in the ignition lock or it
should be in position 0.
X Turn the light switch to W(left-hand side
of the vehicle) or X(right-hand side of
the vehicle). Exterior lighting
121Lights andwindscreen wipers Z
Page 126 of 417
Vehicles with Adaptive Highbeam Assist:
when Adaptive Highbeam Assist is active, it
controls activation and deactivation of the
main-beam headlamps (Y page 123).
Headlamp flasher X
To switch on: turn the key in the ignition
lock to position 1or 2, or start the engine.
X Pull the combination switch in the direction
of arrow =. Hazard warning lamps
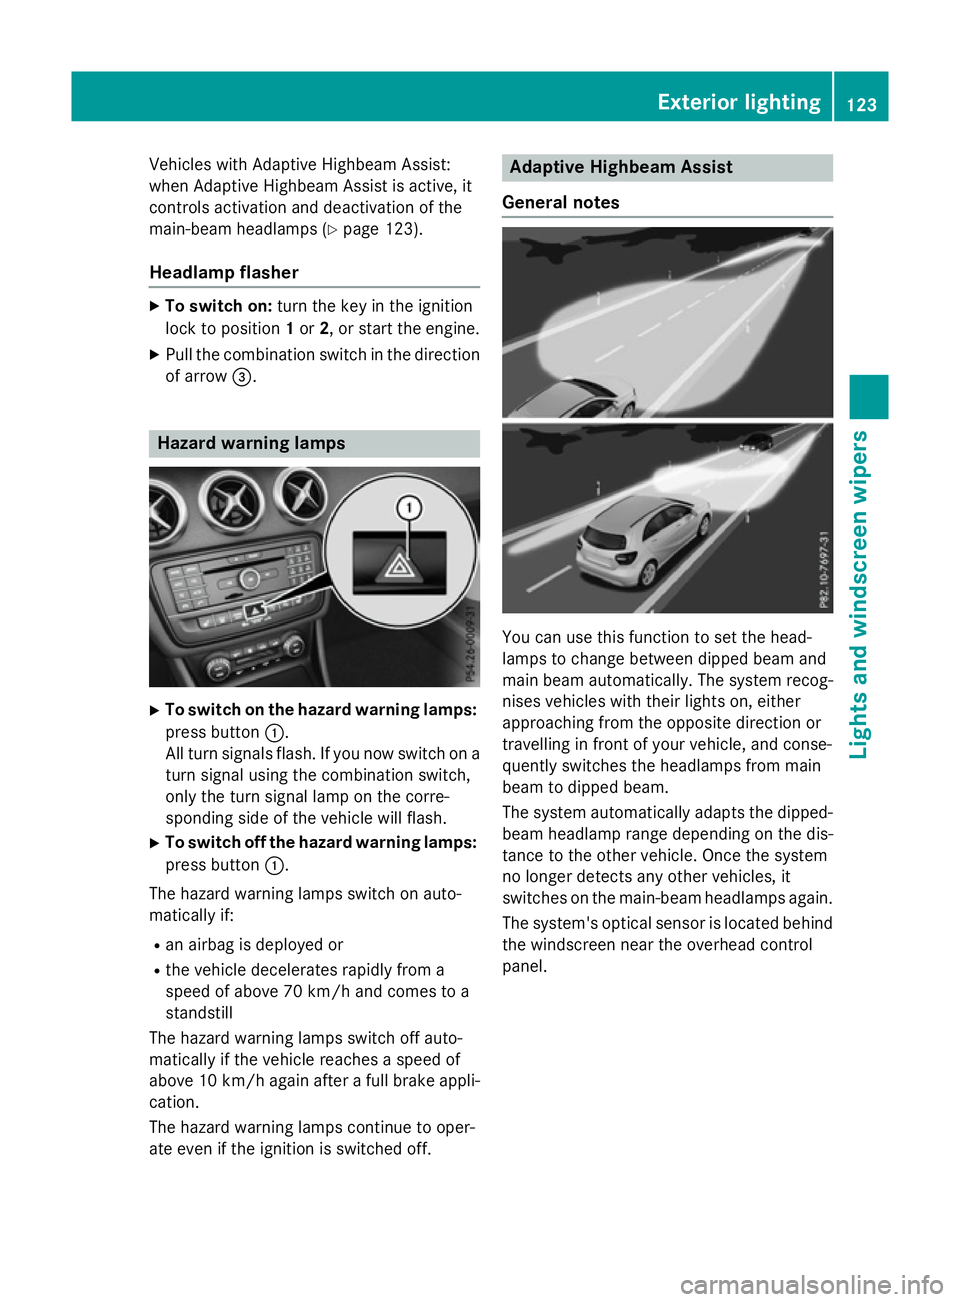
X
To switch on the hazard warning lamps:
press button :.
All turn signals flash. If you now switch on a turn signal using the combination switch,
only the turn signal lamp on the corre-
sponding side of the vehicle will flash.
X To switch off the hazard warning lamps:
press button :.
The hazard warning lamps switch on auto-
matically if:
R an airbag is deployed or
R the vehicle decelerates rapidly from a
speed of above 70 km/h and comes to a
standstill
The hazard warning lamps switch off auto-
matically if the vehicle reaches a speed of
above 10 km/h again after a full brake appli- cation.
The hazard warning lamps continue to oper-
ate even if the ignition is switched off. Adaptive Highbeam Assist
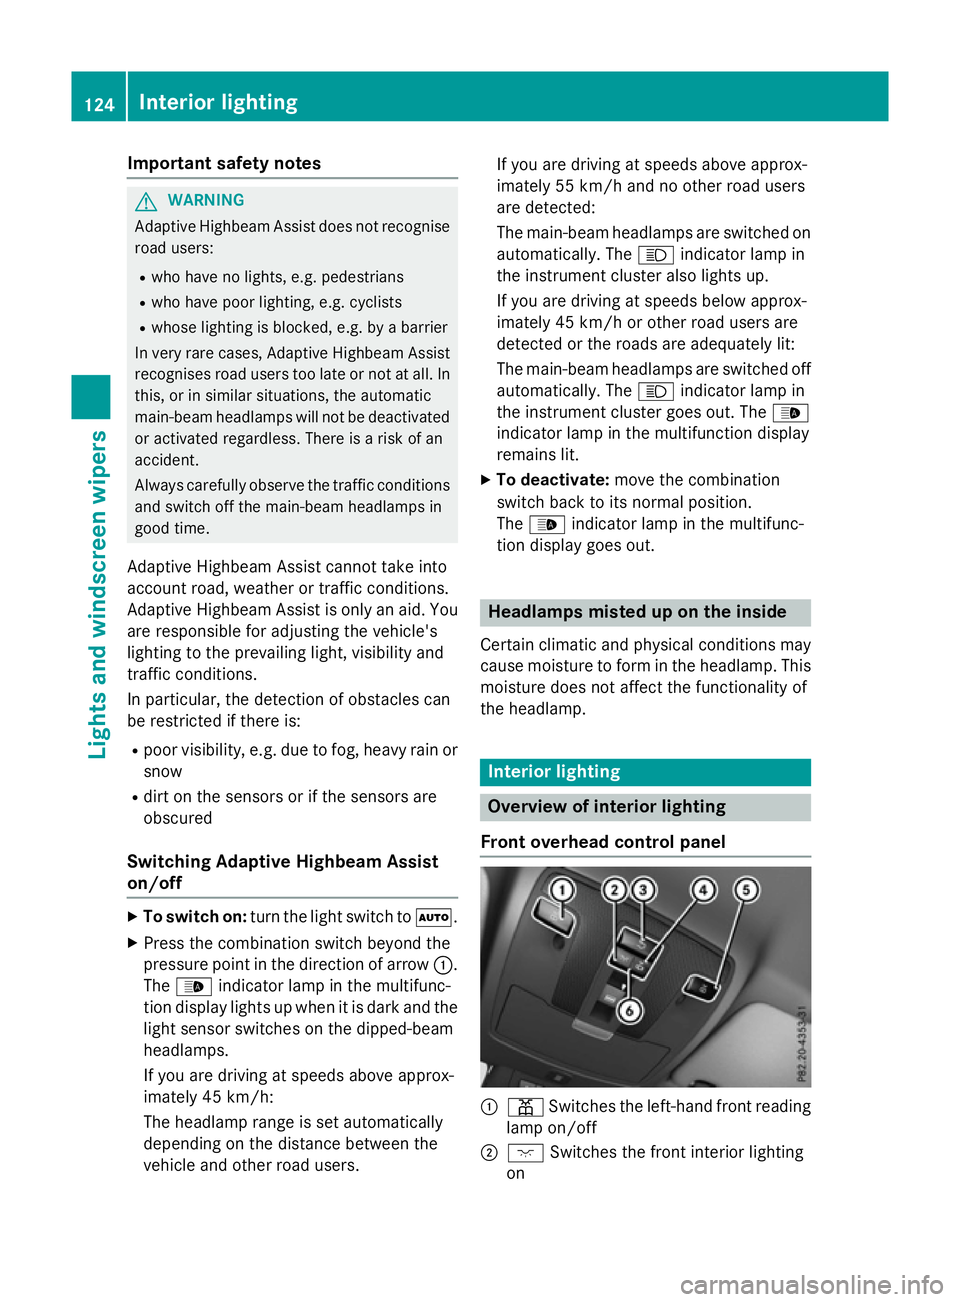
General notes You can use this function to set the head-
lamps to change between dipped beam and
main beam automatically. The system recog-
nises vehicles with their lights on, either
approaching from the opposite direction or
travelling in front of your vehicle, and conse-
quently switches the headlamps from main
beam to dipped beam.
The system automatically adapts the dipped- beam headlamp range depending on the dis-
tance to the other vehicle. Once the system
no longer detects any other vehicles, it
switches on the main-beam headlamps again.
The system's optical sensor is located behind
the windscreen near the overhead control
panel. Exterior lighting
123Lights and windscreen wipers Z
Page 127 of 417
Important safety notes
G
WARNING
Adaptive Highbeam Assist does not recognise road users:
R who have no lights, e.g. pedestrians
R who have poor lighting, e.g. cyclists
R whose lighting is blocked, e.g. by a barrier
In very rare cases, Adaptive Highbeam Assist
recognises road users too late or not at all. In
this, or in similar situations, the automatic
main-beam headlamps will not be deactivated
or activated regardless. There is a risk of an
accident.
Always carefully observe the traffic conditions and switch off the main-beam headlamps in
good time.
Adaptive Highbeam Assist cannot take into
account road, weather or traffic conditions.
Adaptive Highbeam Assist is only an aid. You
are responsible for adjusting the vehicle's
lighting to the prevailing light, visibility and
traffic conditions.
In particular, the detection of obstacles can
be restricted if there is:
R poor visibility, e.g. due to fog, heavy rain or
snow
R dirt on the sensors or if the sensors are
obscured
Switching Adaptive Highbeam Assist
on/off X
To switch on: turn the light switch to Ã.
X Press the combination switch beyond the
pressure point in the direction of arrow :.
The _ indicator lamp in the multifunc-
tion display lights up when it is dark and the
light sensor switches on the dipped-beam
headlamps.
If you are driving at speeds above approx-
imately 45 km/h:
The headlamp range is set automatically
depending on the distance between the
vehicle and other road users. If you are driving at speeds above approx-
imately 55 km/h and no other road users
are detected:
The main-beam headlamps are switched on
automatically. The Kindicator lamp in
the instrument cluster also lights up.
If you are driving at speeds below approx-
imately 45 km/h or other road users are
detected or the roads are adequately lit:
The main-beam headlamps are switched off
automatically. The Kindicator lamp in
the instrument cluster goes out. The _
indicator lamp in the multifunction display
remains lit.
X To deactivate: move the combination
switch back to its normal position.
The _ indicator lamp in the multifunc-
tion display goes out. Headlamps misted up on the inside
Certain climatic and physical conditions may
cause moisture to form in the headlamp. This
moisture does not affect the functionality of
the headlamp. Interior lighting
Overview of interior lighting
Front overhead control panel :
p Switches the left-hand front reading
lamp on/off
; c Switches the front interior lighting
on 124
Interior lightingLights and windscreen wipers
Page 132 of 417
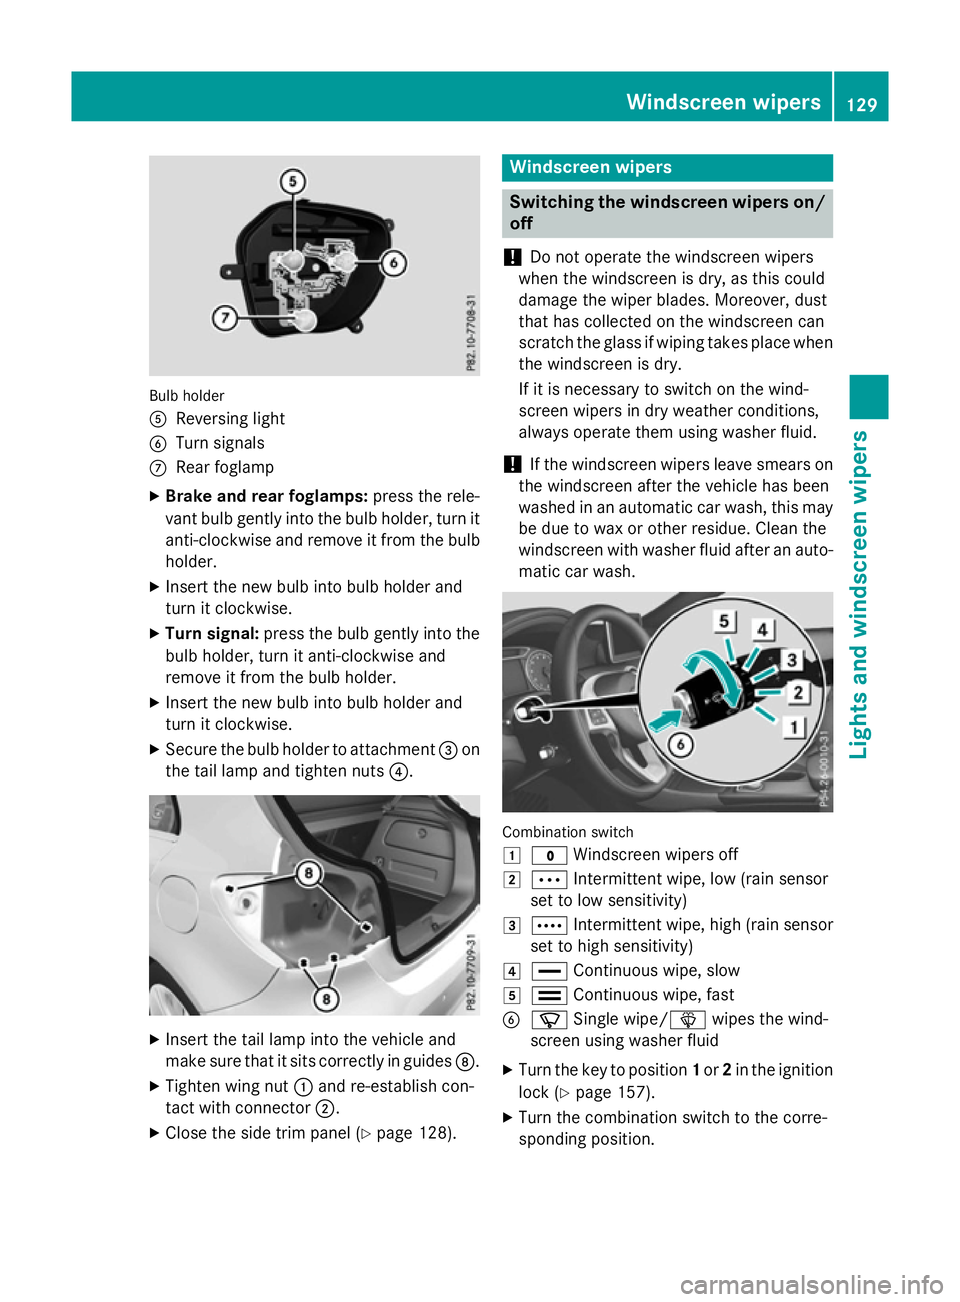
Bulb holder
A
Reversing light
B Turn signals
C Rear foglamp
X Brake and rear foglamps: press the rele-
vant bulb gently into the bulb holder, turn it
anti-clockwise and remove it from the bulb holder.
X Insert the new bulb into bulb holder and
turn it clockwise.
X Turn signal: press the bulb gently into the
bulb holder, turn it anti-clockwise and
remove it from the bulb holder.
X Insert the new bulb into bulb holder and
turn it clockwise.
X Secure the bulb holder to attachment =on
the tail lamp and tighten nuts ?.X
Insert the tail lamp into the vehicle and
make sure that it sits correctly in guides D.
X Tighten wing nut :and re-establish con-
tact with connector ;.
X Close the side trim panel (Y page 128). Windscreen wipers
Switching the windscreen wipers on/
off
! Do not operate the windscreen wipers
when the windscreen is dry, as this could
damage the wiper blades. Moreover, dust
that has collected on the windscreen can
scratch the glass if wiping takes place when the windscreen is dry.
If it is necessary to switch on the wind-
screen wipers in dry weather conditions,
always operate them using washer fluid.
! If the windscreen wipers leave smears on
the windscreen after the vehicle has been
washed in an automatic car wash, this may
be due to wax or other residue. Clean the
windscreen with washer fluid after an auto- matic car wash. Combination switch
1
$ Windscreen wipers off
2 Ä Intermittent wipe, low (rain sensor
set to low sensitivity)
3 Å Intermittent wipe, high (rain sensor
set to high sensitivity)
4 ° Continuous wipe, slow
5 ¯ Continuous wipe, fast
B í Single wipe/î wipes the wind-
screen using washer fluid
X Turn the key to position 1or 2in the ignition
lock (Y page 157).
X Turn the combination switch to the corre-
sponding position. Windscreen wipers
129Lights and windscreen wipers Z
Page 133 of 417
!
Vehicles with a rain sensor: if the wind-
screen becomes dirty in dry weather con-
ditions, the windscreen wipers may be acti- vated inadvertently. This could damage the
windscreen wiper blades or scratch the
windscreen.
For this reason, you should always switch
off the windscreen wipers in dry weather.
Vehicles with a rain sensor: in the Äor
Å position, the appropriate wiping fre-
quency is automatically set according to the
intensity of the rain. In the Åposition, the
rain sensor is more sensitive than in the Ä
position, causing the windscreen wiper to
wipe more frequently.
If the wiper blades are worn, the windscreen
will no longer be wiped properly. This could
mean you are unable to observe the traffic
conditions. Switching the rear window wiper on/
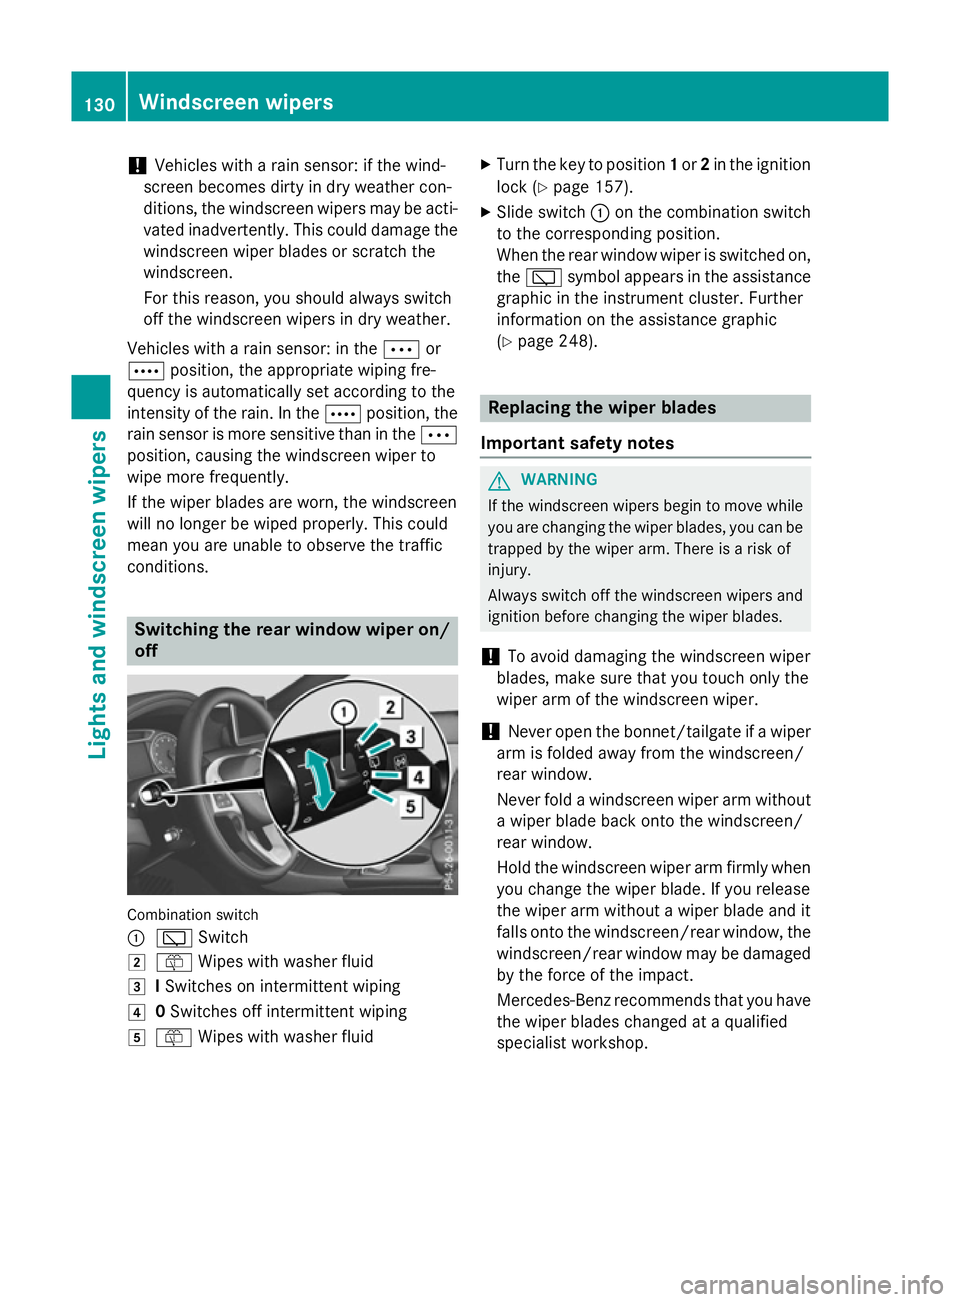
off Combination switch
:
è Switch
2 ô Wipes with washer fluid
3 ISwitches on intermittent wiping
4 0Switches off intermittent wiping
5 ô Wipes with washer fluid X
Turn the key to position 1or 2in the ignition
lock (Y page 157).
X Slide switch :on the combination switch
to the corresponding position.
When the rear window wiper is switched on,
the è symbol appears in the assistance
graphic in the instrument cluster. Further
information on the assistance graphic
(Y page 248). Replacing the wiper blades
Important safety notes G
WARNING
If the windscreen wipers begin to move while
you are changing the wiper blades, you can be trapped by the wiper arm. There is a risk of
injury.
Always switch off the windscreen wipers and
ignition before changing the wiper blades.
! To avoid damaging the windscreen wiper
blades, make sure that you touch only the
wiper arm of the windscreen wiper.
! Never open the bonnet/tailgate if a wiper
arm is folded away from the windscreen/
rear window.
Never fold a windscreen wiper arm without a wiper blade back onto the windscreen/
rear window.
Hold the windscreen wiper arm firmly when
you change the wiper blade. If you release
the wiper arm without a wiper blade and it
falls onto the windscreen/rear window, the windscreen/rear window may be damaged
by the force of the impact.
Mercedes-Benz recommends that you have
the wiper blades changed at a qualified
specialist workshop. 130
Windscreen wipersLights and windscreen wipers
Page 159 of 417
Useful information
i This Owner's Manual describes all mod-
els, series and optional equipment for your
vehicle that were available at the time of
going to press. National variations are pos- sible. Note that your vehicle may not be
equipped with all of the functions descri-
bed. This is also the case for systems and
functions relevant to safety.
i Read the information on qualified special-
ist workshops: (Y page 24). Running-in notes
Important safety notes
In certain driving and driving safety systems,
the sensors adjust automatically while a cer-
tain distance is being driven after the vehicle has been delivered or after repairs. Full sys-
tem effectiveness is not reached until the end
of this teach-in process.
Brake pads/linings and discs that are either
new or have been replaced only achieve opti- mum braking effect after several hundred kil-
ometres of driving. Compensate for the
reduced braking effect by applying greater
force to the brake pedal. The first 1500 km
If you treat the engine with sufficient care
from the very start, you will be rewarded with excellent performance for the remainder of
the engine's life.
R Drive at varying vehicle speeds and engine
speeds for the first 1500 km.
R Avoid overstraining the vehicle during this
period, e.g. driving at full throttle.
R Change gear in good time, before the rev
counter needle is Ôof the way to the red
area of the rev counter. R
Do not shift down a gear manually in order
to brake.
R Vehicles with automatic transmission:
try to avoid depressing the accelerator
pedal beyond the point of resistance (kick- down).
After 1500 km, you may gradually bring the
vehicle up to full road and engine speeds.
Additional notes on running in Mercedes-
AMG vehicles:
R for the first 1,500 km do not drive at speeds
above 140 km/h.
R only allow the engine to reach a maximum
engine speed of 4,500 rpm briefly.
You should also observe these notes on run-
ning-in if the engine or parts of the drive train on your vehicle have been replaced.
Always observe the maximum permissible
speed. Driving
Important safety notes
G
WARNING
Objects in the driver's footwell may restrict
the clearance around the pedals or block a
depressed pedal. This jeopardises the oper-
ating and road safety of the vehicle. There is a risk of an accident.
Stow all objects securely in the vehicle so that
they do not get into the driver's footwell.
Always fit the floormats securely and as pre-
scribed in order to ensure that there is always sufficient room for the pedals. Do not use
loose floormats and do not place several floor-mats on top of one another. G
WARNING
Unsuitable footwear can hinder correct usage of the pedals, e.g.:
R shoes with thick soles
R shoes with high heels
R slippers 156
DrivingDriving and parking