MERCEDES-BENZ AMG GT R-ROADSTER 2018 Owners Manual
Manufacturer: MERCEDES-BENZ, Model Year: 2018, Model line: AMG GT R-ROADSTER, Model: MERCEDES-BENZ AMG GT R-ROADSTER 2018Pages: 473, PDF Size: 8.3 MB
Page 211 of 473
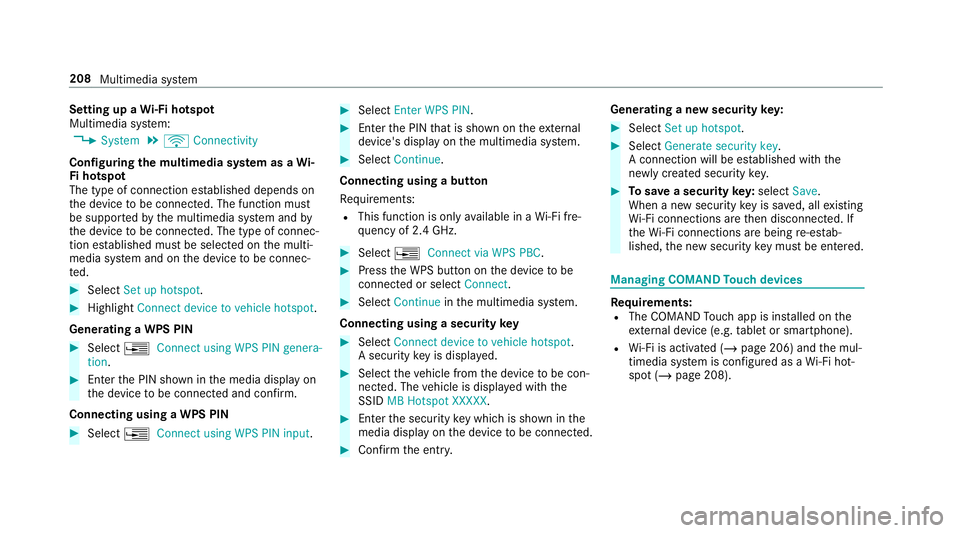
Setting up a
Wi-Fi hotspot
Multimedia sy stem:
4 System 5
ö Connectivity
Configuring the multimedia sy stem as a Wi-
Fi hotspot
The type of connection es tablished depends on
th e device tobe connec ted. The function must
be suppor tedby the multimedia sy stem and by
th e device tobe connec ted. The type of connec‐
tion es tablished must be selected on the multi‐
media sy stem and on the device tobe connec‐
te d. #
Select Set up hotspot. #
Highlight Connect device to vehicle hotspot.
Generating a WPS PIN #
Select ¥Connect using WPS PIN genera-
tion . #
Ente rth e PIN shown in the media display on
th e device tobe connec ted and con firm.
Connecting using a WPS PIN #
Select ¥Connect using WPS PIN input. #
Select Enter WPS PIN. #
Enterth e PIN that is shown on theex tern al
device's display on the multimedia sy stem. #
Select Continue.
Connecting using a button
Re quirements:
R This function is only available in a Wi-Fi fre‐
qu ency of 2.4 GHz. #
Select ¥Connect via WPS PBC. #
Press the WPS button on the device tobe
connec ted or select Connect. #
Select Continue inthe multimedia sy stem.
Connecting using a security key #
Select Connect device to vehicle hotspot .
A secu rity key is displa yed. #
Select theve hicle from the device tobe con‐
nec ted. The vehicle is displa yed with the
SSID MB Hotspot XXXXX . #
Enter the security key which is shown in the
media display on the device tobe connec ted. #
Confirm the entry. Genera
ting a new security key: #
Select Set up hotspot . #
Select Generate security key .
A connection will be es tablished with the
newly crea ted security key. #
Tosave a security key:select Save.
When a new security key is sa ved, all existing
Wi -Fi connections are then disconnected. If
th eWi -Fi connections are being re-es tab‐
lished, the new security key must be en tere d. Managing COMAND
Touch devices Re
quirements:
R The COMAND Touch app is ins talled on the
ex tern al device (e.g. tablet or smartphone).
R Wi-Fi is acti vated (/ page 206) and the mul‐
timedia sy stem is confi gured as a Wi-Fi hot‐
spot (/ page 208). 208
Multimedia sy stem
Page 212 of 473
Multimedia sy
stem:
4 System 5
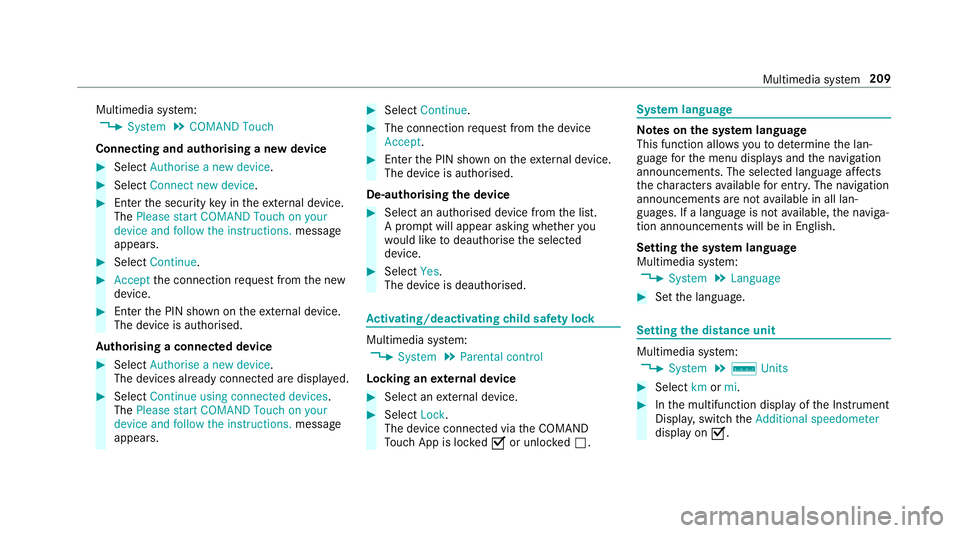
COMAND Touch
Connecting and authorising a new device #
Select Authorise a new device. #
Select Connect new device. #
Ente rth e security key in theex tern al device.
The Please start COMAND Touch on your
device and follow the instructions. message
appears. #
Select Continue. #
Accept the connection requ est from the new
device. #
Ente rth e PIN shown on theex tern al device.
The device is authorised.
Au thorising a connected device #
Select Authorise a new device.
The devices already connec ted are displa yed. #
Select Continue using connected devices.
The Please start COMAND Touch on your
device and follow the instructions. message
appears. #
Select Continue. #
The connection requ est from the device
Accept. #
Ente rth e PIN shown on theex tern al device.
The device is authorised.
De-authorising the device #
Select an authorised device from the list.
A prom ptwill appear asking whe ther you
wo uld like todeauthorise the selected
device. #
Select Yes.
The device is deauthorised. Ac
tivating/deactivating child saf ety lock Multimedia sy
stem:
4 System 5
Parental control
Locking an extern al device #
Select an extern al device. #
Select Lock.
The device connec ted via theCO MAND
To uch App is loc kedO or unloc kedª. Sy
stem language Note
s onthe sy stem language
This function allo wsyouto determ ine the lan‐
guage forth e menu displa ysand the navigation
announcements. The selected language af fects
th ech aracters available for entr y.The navigation
announcements are not available in all lan‐
guages. If a language is not available, the naviga‐
tion announcements will be in Engl ish.
Setting the sy stem language
Multimedia sy stem:
4 System 5
Language #
Set the language. Setting
the distance unit Multimedia sy
stem:
4 System 5
% Units #
Select kmormi. #
Inthe multifunction display of the Instrument
Displa y,switch theAdditional speedometer
display on O. Multimedia sy
stem 209
Page 213 of 473
Data import and
export Data import/export function
The
following functions are possible:
R Trans ferring data from one sy stem or vehicle
to ano ther sy stem or vehicle.
R Creating a bac kup copy of your personal data
and loading it again.
R Protecting your personal data against un wan‐
te dex port with PIN pr otection.
% Please no tethat the NTFS file sy stem is not
suppor ted. The FAT32 file sy stem is recom‐
mended.
Importing/exporting data
* NO
TELoss of da tadue topremature
re mo val #
Do not remo vethe data storage
medium when data is being expor ted.
Mercedes-Benz is not liable for any loss of
data. Re
quirements:
R The vehicle is stationar y.
R The ignition is switched on or theve hicle has
been star ted.
R The SD card is inser ted (/ page 280) or the
USB device is connecte d (/page 283).
Multimedia sy stem:
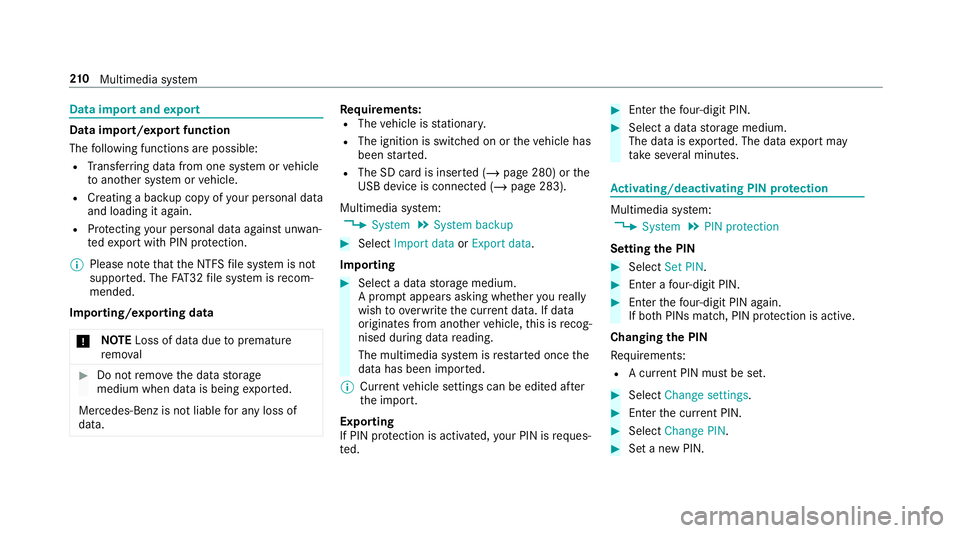
4 System 5
System backup #
Select Import data orExport data.
Importing #
Select a data storage medium.
A prom ptappears asking whe ther youre ally
wish to overwrite the cur rent da ta. If da ta
originates from ano ther vehicle, this is recog‐
nised du ring da tareading.
The multimedia sy stem is restar ted once the
data has been impor ted.
% Current vehicle settings can be edited af ter
th e import.
Exporting
If PIN pr otection is activated, your PIN is reques‐
te d. #
Ente rth efo ur-digit PIN. #
Select a data storage medium.
The data is expor ted. The data export may
ta ke several minutes. Ac
tivating/deactivating PIN pr otection Multimedia sy
stem:
4 System 5
PIN protection
Setting the PIN #
Select Set PIN. #
Enter a four-digit PIN. #
Enterth efo ur-digit PIN again.
If bo thPINs match, PIN pr otection is active.
Changing the PIN
Re quirements:
R A cur rent PIN mu stbe set. #
Select Change settings. #
Ente rth e cur rent PIN. #
Select Change PIN . #
Set a new PIN. 210
Multimedia sy stem
Page 214 of 473
Ac
tivating PIN pr otection for data export #
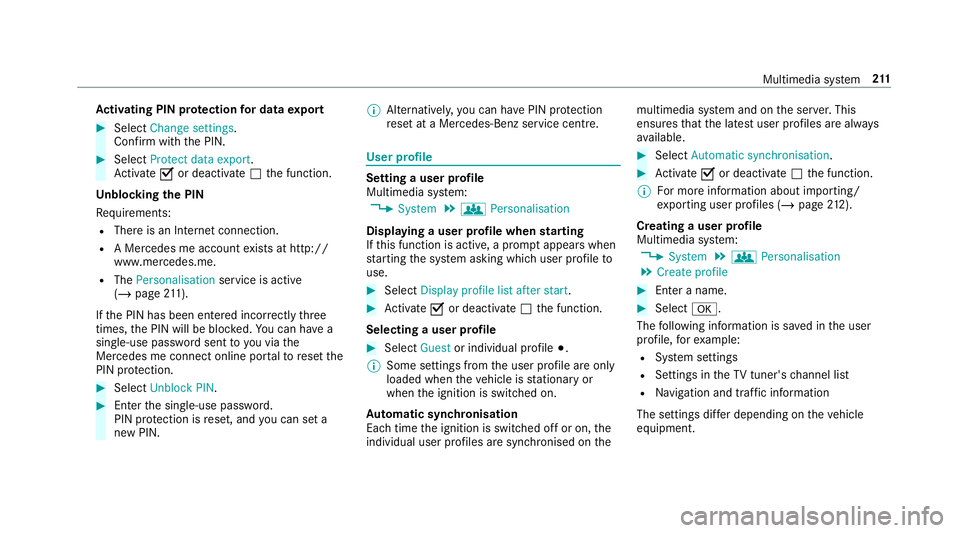
Select Change settings .
Confirm wi th the PIN. #
Select Protect data export.
Ac tivate Oor deacti vate ª the function.
Un blocking the PIN
Re quirements:
R There is an Internet connection.
R A Mercedes me account exists at http://
www.me rcedes.me.
R The Personalisation service is active
(/ page 211).
If th e PIN has been entered incor rectly three
times, the PIN will be bloc ked. You can ha ve a
single-use password sent to you via the
Mercedes me connect online por talto reset the
PIN pr otection. #
Select Unblock PIN. #
Ente rth e single-use password.
PIN pr otection is reset, and you can set a
new PIN. %
Alternativel y,yo u can ha vePIN pr otection
re set at a Mercedes-Benz service centre. User profile
Setting a user profile
Multimedia sy
stem:
4 System 5
g Personalisation
Displaying a user profile when starting
If th is function is active, a prom ptappears when
st arting the sy stem asking which user profile to
use. #
Select Display profile list after start . #
Activate Oor deacti vate ª the function.
Selecting a user profile #
Select Guestor individual profile #.
% Some settings from the user profile are only
loaded when theve hicle is stationary or
when the ignition is switched on.
Au tomatic syn chronisation
Each time the ignition is switched off or on, the
individual user profiles are synchronised on themultimedia sy
stem and on the ser ver.This
ensures that the latest user profiles are alw ays
av ailable. #
Select Automatic synchronisation. #
Activate Oor deacti vate ª the function.
% For more information about importing/
ex porting user profiles (/ page212).
Crea ting a user profile
Multimedia sy stem:
4 System 5
g Personalisation
5 Create profile #
Ente r a name. #
Select a.
The following information is sa ved in the user
profile, forex ample:
R System settings
R Settings in theTV tuner's channel list
R Navigation and traf fic information
The settings di ffer depending on theve hicle
equipment. Multimedia sy
stem 211
Page 215 of 473
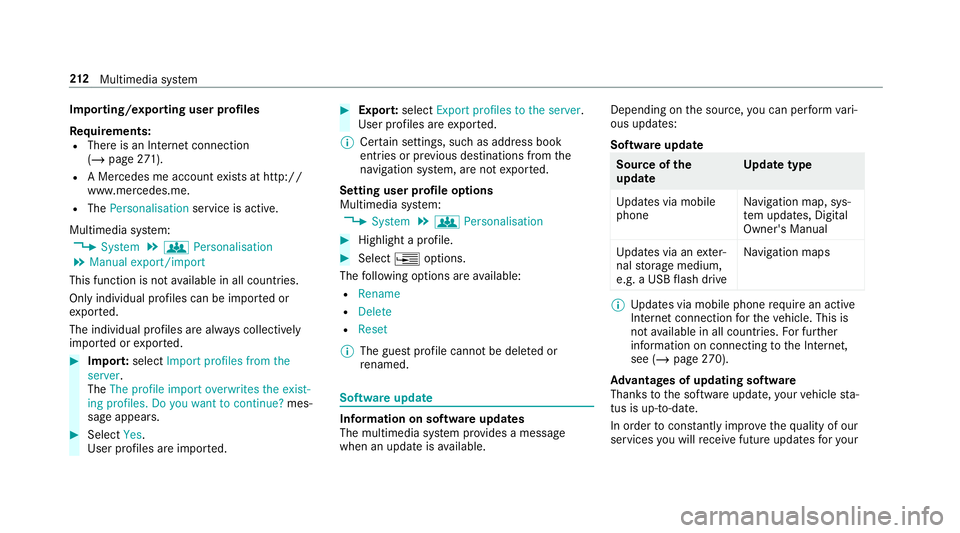
Importing/exporting user profiles
Re
quirements:
R There is an Internet connection
(/ page 271).
R A Mercedes me account exists at http://
www.me rcedes.me.
R The Personalisation service is active.
Multimedia sy stem:
4 System 5
g Personalisation
5 Manual export/import
This function is not available in all countries.
On ly individu al profiles can be impor ted or
ex por ted.
The individual profiles are alw ays collectively
impor ted or expor ted. #
Impor t:select Import profiles from the
server.
The The profile import overwrites the exist-
ing profiles. Do you want to continue? mes‐
sage appears. #
Select Yes.
User profiles are impor ted. #
Expor t:select Export profiles to the server.
User profiles are expor ted.
% Certain settings, such as address book
ent ries or pr evious destinations from the
navigation sy stem, are not expor ted.
Setting user profile options
Multimedia sy stem:
4 System 5
g Personalisation #
Highlight a profile. #
Select ¥options.
The following options are available:
R Rename
R Delete
R Reset
% The guest profile cannot be dele ted or
re named. So
ftwa reupdate Information on software updates
The multimedia sy
stem pr ovides a message
when an update is available. Depending on
the source, you can per form vari‐
ous updates:
Software update Source of
the
update Up
date type
Up dates via mobile
phone Na
vigation map, sys‐
te m updates, Digital
Owner's Manual
Up dates via an exter‐
nal storage medium,
e.g. a USB flash drive Na
vigation maps %
Updates via mobile phone requ ire an active
Internet connection forth eve hicle. This is
not available in all countries. For fur ther
information on connecting tothe Internet,
see (/ page270).
Ad vantages of updating software
Thanks tothe software update, your vehicle sta‐
tus is up-to-date.
In order tocons tantly impr ovethequ ality of our
services you will recei vefuture updates foryo ur 212
Multimedia sy stem
Page 216 of 473
multimedia sy
stem, the Mercedes me connect
services and your vehicle's communication mod‐
ule. These will con veniently be sent to you via
th e mobile phone connection in your vehicle
and, as an option, ins talled automaticall y.Yo u
can moni torth est atus of your updates on the
Mercedes me por tal and find information about
po tential inno vations.
Yo ur advantages at a glance:
R con veniently recei vesoftware update s via
th e mobile phone network
R impr ovesth equ ality and availability of
Mercedes me connect services
R keeps your multimedia sy stem and communi‐
cation module up-to-date
Fu rther information about software updates can
be found at http://me.mercedes-benz.com
Pe rforming a software upda te
Requ irements:
R There is an Internet connection
(/ page 270). R
For automatic updates: your vehicle has a
permanently installed communication mod‐
ule.
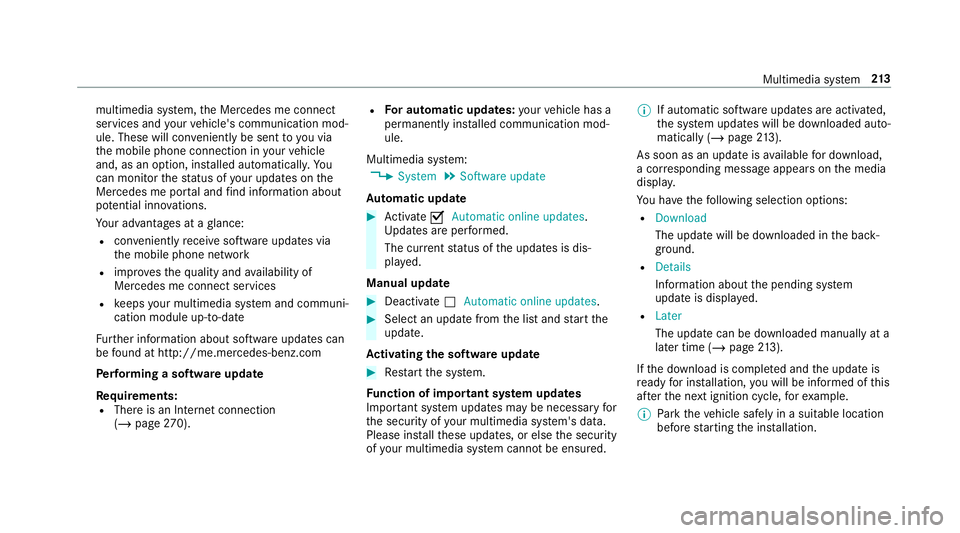
Multimedia sy stem:
4 System 5
Software update
Au tomatic update #
Activate OAutomatic online updates.
Up dates are per form ed.
The cur rent status of the updates is dis‐
pla yed.
Manual update #
Deactivate ªAutomatic online updates. #
Select an update from the list and start the
update.
Ac tivating the so ftwa reupdate #
Restart the sy stem.
Fu nction of important sy stem upda tes
Impor tant sy stem updates may be necessary for
th e security of your multimedia sy stem's data.
Please ins tallth ese updates, or else the security
of your multimedia sy stem cann otbe ensured. %
If automatic software updates are activated,
th e sy stem updates will be downloaded auto‐
matically (/ page213).
As soon as an update is available for download,
a cor responding message appears onthe media
displa y.
Yo u ha vethefo llowing selection options:
R Download
The update will be downloaded in the back‐
ground.
R Details
Information about the pending sy stem
update is displa yed.
R Later
The update can be downloaded manually at a
later time (/ page213).
If th e download is comple ted and the update is
re ady for ins tallation, you will be informed of this
af te rth e next ignition cycle, forex ample.
% Park theve hicle safely in a suitable location
before starting the ins tallation. Multimedia sy
stem 213
Page 217 of 473
Re
quirements forth e ins tallation:
R The ignition is switched on.
R The engine is not running.
R Notes and warnings ha vebeen read and
accep ted.
R The parking brake is applied.
If all requirements are met, the update will be
ins talled. The multimedia sy stem cann otbe
operated while the update is being ins talled and
ve hicle functions are restricted.
If er rors should occur during the ins tallation, the
multimedia sy stem automatically attem ptsto
re store the pr evious version. If restoration of the
pr ev ious version is not possible, a symbol
appears on the cent reconsole displ ay. Please
consult a qualified specialist workshop to
re solve the problem. Re
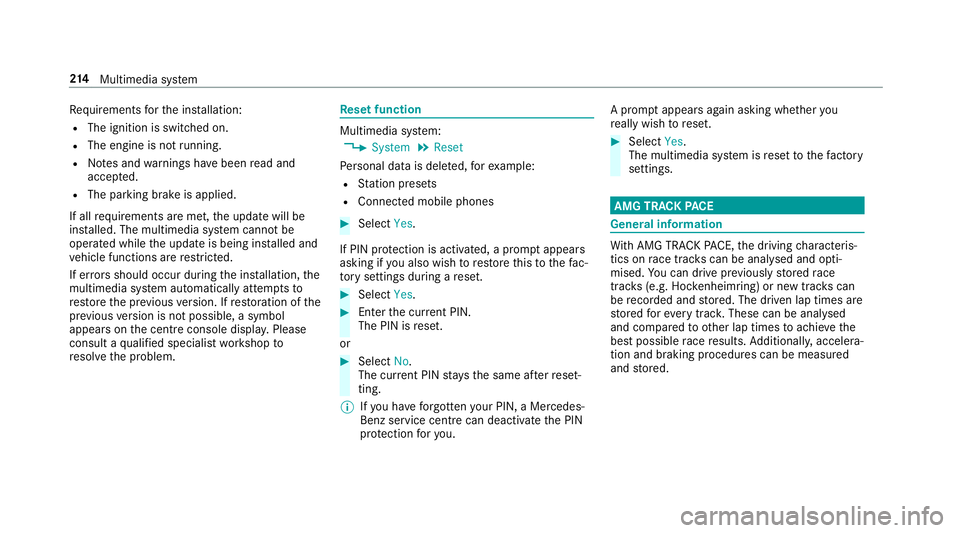
set function Multimedia sy
stem:
4 System 5
Reset
Pe rsonal data is dele ted, forex ample:
R Station presets
R Connec ted mobile phones #
Select Yes.
If PIN pr otection is activated, a prom ptappears
asking if you also wish torestore this to thefa c‐
to ry settings during a reset. #
Select Yes. #
Enter the cur rent PIN.
The PIN is reset.
or #
Select No.
The cur rent PIN stay sth e same af terre set‐
ting.
% Ifyo u ha veforg ottenyo ur PIN, a Mercedes-
Benz service centre can deactivate the PIN
pr otection foryo u. A prom
ptappears again asking whe ther you
re ally wish toreset. #
Select Yes.
The multimedia sy stem is reset tothefa ctory
settings. AMG TRA
CKPACE General information
Wi
th AMG TR ACKPA CE, the driving characteris‐
tics on race trac kscan be ana lysed and opti‐
mised. You can drive pr eviously stored race
trac ks(e.g. Hoc kenheimring) or new trac kscan
be recorded and stored. The driven lap times are
st ored forev ery tra ck. These can be ana lysed
and compared to other lap times toachie vethe
best possible race results. Additionall y,accelera‐
tion and braking procedures can be measured
and stored. 214
Multimedia sy stem
Page 218 of 473
Setting
Track Race Multimedia sy
stem:
4 vehicle 5
TRACK PACE 5
Track Race
Re cording a track #
Select New track. #
Atthe desired starting point, select Start.
The track recording starts at this point. Dur‐
ing track recording, sectors can be set to
de term ine inter vals. #
Tofinish track recording, select Stopor cross
th est arting line again. #
Enterth ewe ather and the track name.
Sear ching bytrack name #
Select All tracks . #
Select ªSearch . #
Enter the tra ckname.
Tr ac ks with the sear ched name are dis‐
pla yed.
Measuring the time on the track #
Select Timekeeping.
An ove rview of near bytrac ksappears. The dis
tance and di rection tothest arting
line of the track is displa yed. #
Select the desired trac k.
If yo u ha vealready driven on this trac k,you
can select a driven time as a refere nce time.
Ti mekeeping begins auto maticallywhen the
st arting line has been crossed.
% When Zoomis selec ted, the tra ckdisplay
can be switched from 2D to3D.
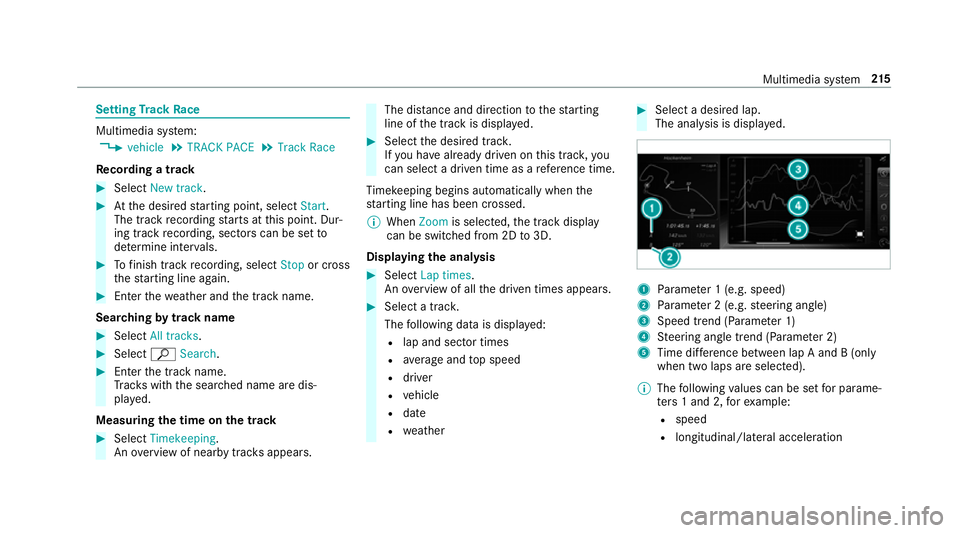
Displaying the ana lysis #
Select Lap times.
An ove rview of all the driven times appears. #
Select a tra ck.
The following data is displa yed:
R lap and sector times
R average and top speed
R driver
R vehicle
R date
R weather #
Select a desired lap.
The anal ysis is displa yed. 1
Parame ter 1 (e.g. speed)
2 Parame ter 2 (e.g. steering angle)
3 Speed trend (Parame ter 1)
4 Steering angle trend (Parame ter 2)
5 Time dif fere nce between lap A and B (only
when two laps are selected).
% The following values can be set for parame‐
te rs 1 and 2, forex ample:
R speed
R longitudinal/lateral acceleration Multimedia sy
stem 215
Page 219 of 473
R
steering angle
R engine speed
R engine oil/tyre temp erature
Based on the analysis you can check and opti‐
mise driving characteristics for any position on
th e trac k.
Exporting trac ksorraces (USB) #
Select All tracks.
An ove rview of all stored trac ksand races
appea rs. #
Highlight desired trac ksorraces. #
Select ÜOptions. #
Select Export.
The selected trac ksorraces can be expor ted
to a USB storage device connected tothe
ve hicle.
Editing trac ksand recordings #
Select All tracks. #
Highlight the desired trac k.#
Select Üoptions. #
Select Rename orDelete. or #
Select a trac k. #
Highlight the desired recording. #
Select Üoptions. #
Select Weather orDelete. Setting Drag
Race Multimedia sy
stem:
4 Vehicle 5
TRACK PACE 5
Drag Race
Measuring acceleration #
Select Acceleration.
Measurement begins when theve hicle accel‐
erates. Measurement is incremental, in steps
of 50 km/h up toa maximum of 300 km/h
or up tothe set maximum speed.
Measurement can be stopped early by
selecting Stoporby stopping theve hicle.
Quar ter-mile race #
Select Quarter Mile.
The time measurement runs until a mile has
been tr avelled or a pr eviously set dis tance (e.g. 1/4 mile, 1/3 mile or 1/2 mile) has
been
reached.
% The possible values for setting the end dis‐
ta nce are de term ined bythe sy stem and
cann otbe freely chosen.
Measurement can be stopped early byselecting
Stop orby stopping theve hicle.
Manual start for accele ration and quarter-
mile race #
Select Acceleration orQuarter Mile . #
Select Manual start .
Three red traf fic lights appear one af terthe
ot her. The reaction time measurement starts
when they change togreen at the same time.
The reaction time is displa yed as soon as you
drive off. If you drive off too ear ly,th e mes‐
sage Jump start. will appear and acceleration
or quarter mile measu rement will be cancel‐
led.
Measuring braking #
Select Braking . 216
Multimedia sy stem
Page 220 of 473
#
Select Start Record .
Measu rement is incremental, in steps of
50 km/h toast andstill. If the braking proce‐
dure is star ted e.g. at a speed of 160 km/h,
measurement starts as soon as 150 km/h
has been reached.
St oring and calling up measurement values
When a measurement has been comple ted or
cancelled, the measured time can be stored. #
After a measu rement, select Save measure-
ment? .
The stored measurements can be displa yed via
th eHistory menu item.
Editing measu rements #
Select History . #
Highlight the desired measurement. #
Select Üoptions. #
Select Weather orDelete.
% The measurements can be displa yedby cate‐
gor y,e.g. acceleration measurements, by
applying a filter. Calling up
thete lemetry display Multimedia sy
stem:
4 Vehicle 5
TRACK PACE 5
Telemetry
The telemetry display sho wscurrent vehicle data
as a digital value and as a diagram. Uptofour
parame ters can be selected that are tobe
shown in the displa y.
Fo rex ample:
R engine speed
R wheel angle
R speed
R steering angle #
Set the desired parame ters. #
Set the time.
The set parame ters are evaluated in the dia‐
gram forth e time set.
% The time can range from a minimum of
30 seconds toa maximum of 20 minutes. Configuring AMG TR
ACKPA CE Re
quirements:
To use the TRACK PACE app:
R the TRA CKPACE app is ins talled on the
mobile end device.
R the mobile end device is connected tothe
multimedia sy stem via Wi-Fi.
Multimedia sy stem:
4 Vehicle 5
TRACK PACE 5
Options
Setting driver profiles #
Select Driver Profile. #
Create a new driver profile.
or #
Select an existing driver profile.
The driver profile is activated.
% Trac ks, laps and times driven are assigned to
th e active driver profile while driving. For an
ex act evaluation of your driving style, you
should alw ays drive with an active driver pro‐
fi le. Multimedia sy
stem 217