turn signal MERCEDES-BENZ AMG GT ROADSTER 2016 Owners Manual
[x] Cancel search | Manufacturer: MERCEDES-BENZ, Model Year: 2016, Model line: AMG GT ROADSTER, Model: MERCEDES-BENZ AMG GT ROADSTER 2016Pages: 289, PDF Size: 5.97 MB
Page 9 of 289
Brake force distribution
see EBD (electronic brake force
distribution)
Brake lamps
Adaptive ........................................... 57
Brakes
ABS .................................................. 54
Adaptive Brake Assist ...................... 56
AMG high-performance and
ceramic brakes .............................. 124
BAS .................................................. 54
Brake fluid (notes) ......................... 279
Display message ............................ 172
Driving tips .................................... 123
Hill start assist ............................... 104
Important safety notes .................. 123
Parking brake ................................ 121
Warning lamp ................................. 196
Breakdown
Where will I find...? ........................ 244
see Flat tyre
see Towing away
Buttons on the steering column ...... 156C
Calling up a fault see Display messages
Calling up the climate control bar
Multimedia system ........................ 209
Calling up the climate control
menu
Multimedia system ........................ 209
Car
see Vehicle
Car wash (care) ................................. 238
Care
Automatic car wash ....................... 238
Carpets .......................................... 243
Display ........................................... 242
Exhaust pipe .................................. 242
Exterior lighting ............................. 241
Gear or selector lever .................... 243
High-pressure cleaner .................... 239
Interior ........................................... 242
Matt paintwork .............................. 240
Note s............................................. 238
Paint .............................................. 239 Plastic trim .................................... 242
Reversing camera .......................... 241
Roof lining ...................................... 243
Seat belt ........................................ 243
Seat cove r..................................... 243
Sensors ......................................... 241
Steering wheel ............................... 243
Trim pieces .................................... 243
Washing by hand ........................... 239
Wheels ........................................... 240
Windows ........................................ 240
Wiper blades .................................. 241
Wooden trim .................................. 243
CD
See also Digital Owner's Manua l... 205
CD player (on-board computer) ........ 161
Central locking
Locking/unlocking (key) .................. 64
Centre console
Overview .......................................... 31
Changing the media source ............. 161
Charge retention
Socket ........................................... 122
Charge-air pressure (on-board
computer) .......................................... 167
Child
Restraint system .............................. 49
Child seat
Forward-facing restraint system ...... 51
On the front-passenger sea t............ 50
Rearward-facing restraint system .... 51
Recommendations ........................... 52
Suitable positions ............................ 51
Children in the vehicle
Important safety notes .................... 49
Cigarette lighter ................................ 222
Cleaning
Mirror turn signal ........................... 241
Climate control
Controlling automaticall y................. 97
Convenience opening/closing
(air-recirculation mode) ................... 99
Cooling with air dehumidification ..... 96
Cooling with air dehumidification
(multimedia system) ...................... 209
Demisting the windows .................... 98
Demisting the windscreen ............... 98
ECO start/stop function .................. 96 6
Index
Page 14 of 289
Opening ......................................... 118
Problem (malfunction) ...................1
19
Fuel level
Calling up the range (on-board
computer) ...................................... 158
Gauge .............................................. 29
Fuel tank
Capacity ........................................ 278
Problem (malfunction) ................... 119
Fuses
Allocation chart ............................ .260
Before changing ............................ .259
Fuse box in the front-passenger
footwell .......................................... 259
Fuse box in the luggage compart-
ment .............................................. 260
Important safety notes .................. 259 G
G-Meter (on-board computer) .......... 167
Garage door opener
Clearing the memory ..................... 227
Frequencies ................................... 228
General notes ................................ 225
Important safety notes .................. 226
Opening/closing the garage door .. 227
Problems when programming ....... .227
Programming (button in the rear-
view mirror) ................................... 226
Synchronising the rolling code ....... 226
Gear indicator (on-board com-
puter) ................................................. .167
Gearshift paddles
see Steering wheel gearshift paddles
Gearshift program
SETUP (on-board computer) .......... 168
Genuine Mercedes-Benz parts ........... 22
Glove compartment .......................... 218
Google™ Local Search
See also Digital Owner's Manual ... 205 H
Handwriting recognition Switching text reader function
on/off ............................................ 207
Touchpad ....................................... 207 Hazard warning lamps
........................ 90
Head restraints
Adjusting ......................................... 80
Headlamp
Cleaning system (notes) ................ 280
Headlamp flasher ................................ 89
Headlamps
Misting up ........................................ 91
see Automatic headlamp mode
Heating
see Climate control
High-pressure cleaners .................... 239
Hill start assist .................................. 104
HOLD function
Activating ....................................... 138
Deactivating ................................... 138
Display message ............................ 187
Function/notes ............................ .138
Home address
See also Digital Owner's Manual ... 205
Horn ...................................................... 27 I
Ignition lock see Key positions
Immobiliser .......................................... 60
Indicator and warning lamp
Restraint system ............................ 199
Indicator and warning lamps
COLLISION PREVENTION ASSIST
PLUS .............................................. 202
Coolant .......................................... 200
Engine diagnostics ......................... 200
SPORT handling mode ................... 199
Indicator lamps
Display message ............................ 182
see Warning and indicator lamps
Indicators
see Turn signals
Instrument cluster
Overview .......................................... 29
Warning and indicator lamps ........... 29
Instrument cluster lighting .............. 165
Interior lighting
Automatic control system ................ 91
General notes .................................. 91
Overview .......................................... 91 Index
11
Page 15 of 289
Reading lamp ..................................
.91
Setting brightness for display/
switches (on-board computer) ....... 165
Interior motion sensor
Deactivating ..................................... 62
Function ........................................... 61
Priming ............................................ 61
Switching off .................................... 62
iPod ®
See also Digital Owner's Manua l... 205 J
Jack Declaration of conformity ................ 24
Storage location ............................ 246
Using ............................................. 269
Jump starting (engine) ...................... 253K
Key Changing the battery ....................... 66
Checking the battery ....................... 66
Convenience closing feature ............ 75
Convenience opening feature .......... 75
Display message ............................ 194
Door central locking/unlocking ....... 64
Emergency key element ................... 65
Important safety notes .................... 63
KEYLESS-GO start function .............. 65
Loss ................................................. 67
Modifying the programming ............. 65
Overview .......................................... 63
Positions (ignition lock) ................. 103
Problem (malfunction) ..................... 67
Starting the engine ........................ 104
Key positions
Key ................................................ 103
Start/Stop button .......................... 102
KEYLESS-GO
Convenience closing ........................ 75
Deactivation ..................................... 64
Locking ............................................ 64
Start function ................................... 65
Unlocking ......................................... 64
KEYLESS-GO start function
Start/Stop button .......................... 102 Kickdown
Driving tips .................................... 112
Kneebag ............................................... 40 L
Lamps see Warning and indicator lamps
Lane Keeping Assist
Activating/deactivating (on-
board computer) ............................ 165
Display message ............................ 186
Function/information .................... 153
Lane package ..................................... 151
Lap time (RACETIMER) ...................... 168
Licence plate lamp (display mes-
sage) ................................................... 182
Light sensor (display message) ....... 182
Lighting
see Lights
Lights
Automatic headlamp mod e.............. 88
Dipped-beam headlamp s................. 89
Driving abroad ................................. 88
Hazard warning lamps ..................... 90
Headlamp flashe r............................. 89
Light switch ..................................... 88
Main-beam headlamp s..................... 89
Misted up headlamp s....................... 91
Parking lamps .................................. 89
Rear foglamp ................................... 89
Setting brightness for display/
switches (on-board computer) ....... 165
Setting exterior lighting ................... 88
Side lamps ....................................... 89
Turn signals ..................................... 89
see Interior lighting
LIM indicator lamp
Cruise control ................................ 126
DISTRONIC PLUS ........................... 131
Variable SPEEDTRONIC ................. 128
Limiting the speed
see SPEEDTRONIC
Loading guidelines ............................ 217
Locking (doors)
Automatic ........................................ 70
Emergency locking ........................... 70 12
Index
Page 16 of 289
From inside (central locking but-
ton) .................................................. 70
see KEYLESS-GO
Locking centrally
see Central locking
Luggage compartment
Unlocking with KEYLESS-G O............ 72
Luggage compartment cover
Important safety notes .................. 218 M
M button ............................................. 113
M+S tyres ........................................... 263
Main-beam headlamps
Display message ............................ 182
Switching on/of f.............................. 89
Manual mode ..................................... 115
Matt finish (cleaning instructions) .. 240
MB Contact
Display message ............................ 177
Media Interface
see Digital Owner's Manual
Memory card (audio) ......................... 161
Memory function
Seats, steering wheel, exterior
mirrors ............................................. 86
Mercedes-Benz emergency call
system
Switch in the overhead control
panel .............................................. 223
Mercedes-Benz Intelligent Drive
DISTRONIC PLUS ........................... 130
Mercedes-Benz Service Centre
see Qualified specialist workshop
Message memory (on-board com-
puter) .................................................. 171
Messages
see Display messages
see Warning and indicator lamps
Mirror turn signal
Cleaning ......................................... 241
Mirrors
see Exterior mirrors
see Rear-view mirror
see Vanity mirror Mobile phone
Connecting (Bluetooth ®
inter-
face) .............................................. 211
Connecting another mobile
phone ............................................ 212
Connecting the telephone module
with Bluetooth ®
(SAP profile) ......... 214
Frequencies ................................... 275
Installation ..................................... 275
Menu (on-board computer) ............ 162
Notes/placing in the bracket ......... 223
Transmission output (maximum) .... 275
Modifying the programming (key) ..... 65
MP3
Operating ....................................... 161
See also Digital Owner's Manua l... 205
Multifunction display
Function/note s............................. 157
Multifunction steering wheel
Operating the on-board compute r..1 56
Overview .......................................... 30
Multimedia system
Switching on and off ..................... .206
Music files
See also Digital Owner's Manual ... 205 N
Navigation Menu (on-board computer) ............ 159
See also Digital Owner's Manual ... 205
Notes on running in a new vehicle .. 101 O
Occupant safety Airbags ............................................ 38
Automatic front-passenger front
airbag deactivatio n .......................... 41
Automatic measures after an acci-
dent ................................................. 48
Children in the vehicle ..................... 49
Important safety notes .................... 34
PASSENGER AIRBAG indicator
lamp ................................................. 35
Pets in the vehicle ........................... 53
PRE-SAFE ®
(anticipatory occu-
pant protection) ............................... 48 Index
13
Page 22 of 289
Trim pieces (cleaning instruc-
tions)
.................................................. 243
Trip computer (on-board com-
puter) .................................................. 158
Trip meter
Calling up ....................................... 157
Resetting (on-board computer) ...... 158
Turn signals
Switching on/off .............................. 89
Two-way radio
Frequencies ................................... 275
Installation ..................................... 275
Transmission output (maximum) .... 275
Type identification plate
see Vehicle identification plate
Tyre changing tool kit ....................... 246
Tyre inflation compressor
see TIREFIT kit
Tyre pressure
Calling up (on-board computer) ..... 265
Display message ............................ 189
Not reached (TIREFIT) .................... 249
Reached (TIREFIT) .......................... 249
Recommended ............................... 264
Tyre pressure monitor
Checking the tyre pressure elec-
tronically ........................................ 266
Function/note s............................. 265
General notes ................................ 265
Important safety notes .................. 266
Restarting ...................................... 267
Warning lamp ................................. 203
Warning message .......................... 267
Tyres
Changing a whee l.......................... 267
Checking ........................................ 262
Direction of rotation ...................... 268
Display message ............................ 189
Important safety notes .................. 261
Information on driving .................... 261
Replacing ....................................... 267
Service life ..................................... 262
Storing ........................................... 268
Summer tyres in winter ................. 263
Tyre size (data ).............................. 272
Tyre tread ...................................... 262
Wheel and tyre combinations ........ 272
see Flat tyre U
Unlocking Emergency unlocking ....................... 70
From inside the vehicle (central
unlocking button) ............................. 70
USB devices
Connecting to the Media Inter-
face ............................................... 216 V
Vanity mirror (in sun visor) .............. 221
Vehicle
Correct use ...................................... 25
Data acquisition ............................... 26
Display message ............................ 190
Electronics ..................................... 275
Equipment ....................................... 23
Implied warranty .............................. 25
Individual settings .......................... 164
Leaving parked up ......................... 122
Locking (in an emergency) ............... 70
Locking (key) ................................... 64
Lowering ........................................ 272
Operating safety .............................. 23
Parking .......................................... 119
Pulling away ................................... 104
Raising ........................................... 269
Registration ..................................... 25
Securing from rolling away ............ 268
Towing away .................................. 256
Transporting .................................. 258
Unlocking (in an emergency) ........... 70
Unlocking (key) ................................ 64
Vehicle data ................................... 281
Vehicle data
Boot load (maximum) ..................... 281
Vehicle dimensions ........................... 281
Vehicle emergency locking ................ 70
Vehicle identification number
see VIN
Vehicle identification plate .............. 276
Vehicle tool kit .................................. 246
Video
Operating the DVD ......................... 162
See also Digital Owner's Manua l... 205 Index
19
Page 32 of 289
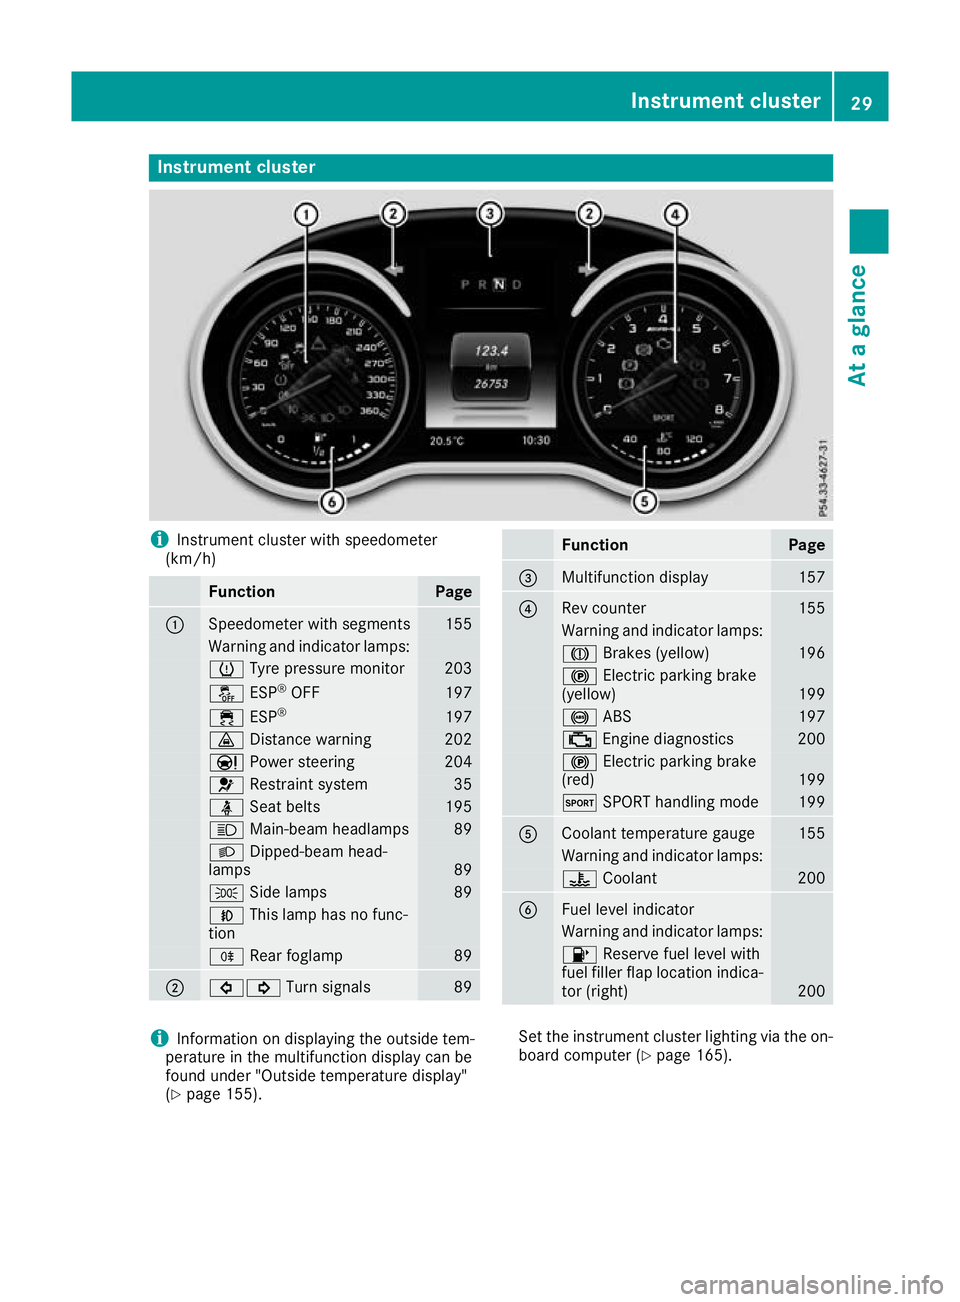
Instrument cluster
i
Instrument cluster with speedometer
(km/h) Function Page
:
Speedometer with segments 155
Warning and indicator lamps:
h
Tyre pressure monitor 203
å
ESP®
OFF 197
÷
ESP® 197
·
Distance warning 202
Ð
Power steering 204
6
Restraint system 35
ü
Seat belts 195
K
Main-beam headlamps 89
L
Dipped-beam head-
lamps 89
T
Side lamps 89
N
This lamp has no func-
tion R
Rear foglamp 89
;
#!
Turn signals 89 Function Page
=
Multifunction display 157
?
Rev counter 155
Warning and indicator lamps:
J
Brakes (yellow) 196
!
Electric parking brake
(yellow) 199
!
ABS 197
;
Engine diagnostics 200
!
Electric parking brake
(red) 199
M
SPORT handling mode 199
A
Coolant temperature gauge 155
Warning and indicator lamps:
?
Coolant 200
B
Fuel level indicator
Warning and indicator lamps:
8
Reserve fuel level with
fuel filler flap location indica-
tor (right) 200
i
Information on displaying the outside tem-
perature in the multifunction display can be
found under "Outside temperature display"
(Y page 155). Set the instrument cluster lighting via the on-
board computer (Y page 165). Instrument cluster
29At a glance
Page 67 of 289
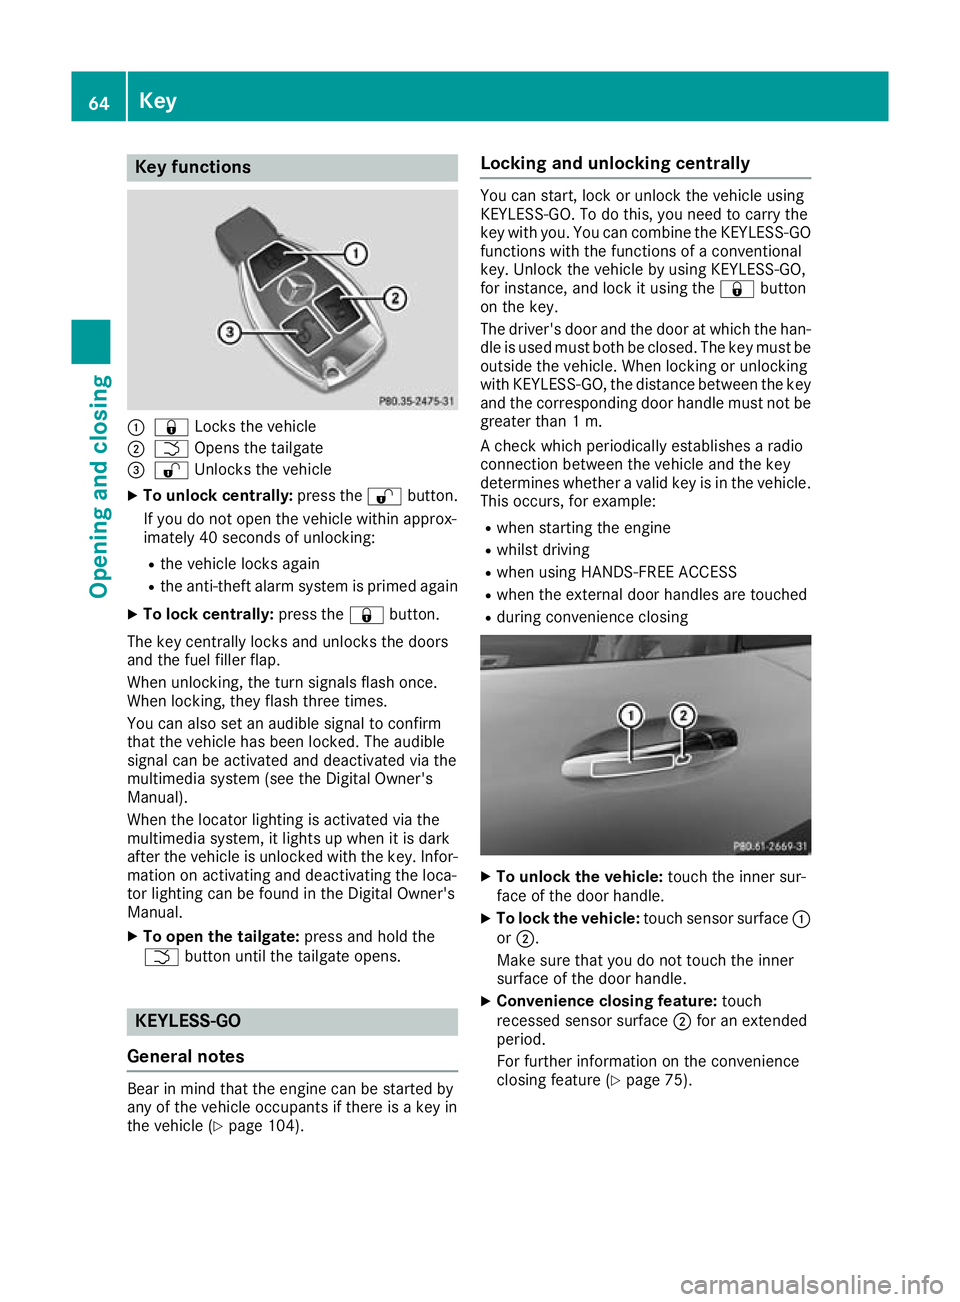
Key functions
:
& Locks the vehicle
; F Opens the tailgate
= % Unlocks the vehicle
X To unlock centrally: press the%button.
If you do not open the vehicle within approx-
imately 40 seconds of unlocking:
R the vehicle locks again
R the anti-theft alarm system is primed again
X To lock centrally: press the&button.
The key centrally locks and unlocks the doors
and the fuel filler flap.
When unlocking, the turn signals flash once.
When locking, they flash three times.
You can also set an audible signal to confirm
that the vehicle has been locked. The audible
signal can be activated and deactivated via the
multimedia system (see the Digital Owner's
Manual).
When the locator lighting is activated via the
multimedia system, it lights up when it is dark
after the vehicle is unlocked with the key. Infor- mation on activating and deactivating the loca-
tor lighting can be found in the Digital Owner's
Manual.
X To open the tailgate: press and hold the
F button until the tailgate opens. KEYLESS-GO
General notes Bear in mind that the engine can be started by
any of the vehicle occupants if there is a key in
the vehicle (Y page 104). Locking and unlocking centrally You can start, lock or unlock the vehicle using
KEYLESS-GO. To do this, you need to carry the
key with you. You can combine the KEYLESS-GO functions with the functions of a conventional
key. Unlock the vehicle by using KEYLESS-GO,
for instance, and lock it using the &button
on the key.
The driver's door and the door at which the han- dle is used must both be closed. The key must be
outside the vehicle. When locking or unlocking
with KEYLESS-GO, the distance between the key and the corresponding door handle must not be greater than 1 m.
A check which periodically establishes a radio
connection between the vehicle and the key
determines whether a valid key is in the vehicle.
This occurs, for example:
R when starting the engine
R whilst driving
R when using HANDS-FREE ACCESS
R when the external door handles are touched
R during convenience closing X
To unlock the vehicle: touch the inner sur-
face of the door handle.
X To lock the vehicle: touch sensor surface :
or ;.
Make sure that you do not touch the inner
surface of the door handle.
X Convenience closing feature: touch
recessed sensor surface ;for an extended
period.
For further information on the convenience
closing feature (Y page 75).64
KeyOpening and closing
Page 92 of 289
Dipped-beam headlamps
G
WARNING
When the light switch is set to Ã, the
dipped-beam headlamps may not be switched on automatically if there is fog, snow or othercauses of poor visibility due to the weather
conditions such as spray. There is a risk of an
accident.
In such situations, turn the light switch to
L.
When the ignition is switched on and the light
switch is in the Lposition, the side lamps
and dipped-beam headlamps are switched on
even if the light sensor does not sense dark
ambient light conditions. This is advantageous
when there is fog or rain.
X To switch on the dipped-beam headlamps:
select key position 2with the Start/Stop but-
ton or start the engine.
X Turn the light switch to the Lposition.
The green Lindicator lamp on the instru-
ment cluster lights up.
Rear fog lamp
The rear fog lamp improves the visibility of your vehicle for the traffic behind in the event of
heavy fog. Please observe the country-specific
laws on the use of rear foglamps.
X To switch on the rear foglamp: select key
position 2with the Start/Stop button or start
the engine.
X Turn the light switch to the LorÃ
position.
X Press the Rbutton.
The yellow Rindicator lamp in the instru-
ment cluster lights up.
X To switch off the rear foglamp:press the
R button.
The yellow Rindicator lamp in the instru-
ment cluster goes out.
Side lamps ! When the battery is discharged heavily, the
side lamps or parking lamps are automatically
switched off to facilitate an engine start.
Always park your vehicle safely and in a well lit area, in accordance with the relevant legal
stipulations. Avoid using the Tside lamps
for periods lasting several hours. Where pos- sible, switch on the right
Xor left W
parking lamp.
X To switch on: turn the light switch to the
T position.
The green Tindicator lamp in the instru-
ment cluster lights up.
Parking lamps
Switching on the parking lamps ensures that the
corresponding side of the vehicle is illuminated.
X To switch on the parking lamps: switch off
the engine with the Start/Stop button.
X Turn the light switch to the W(left-hand
side of the vehicle) or X(right-hand side of
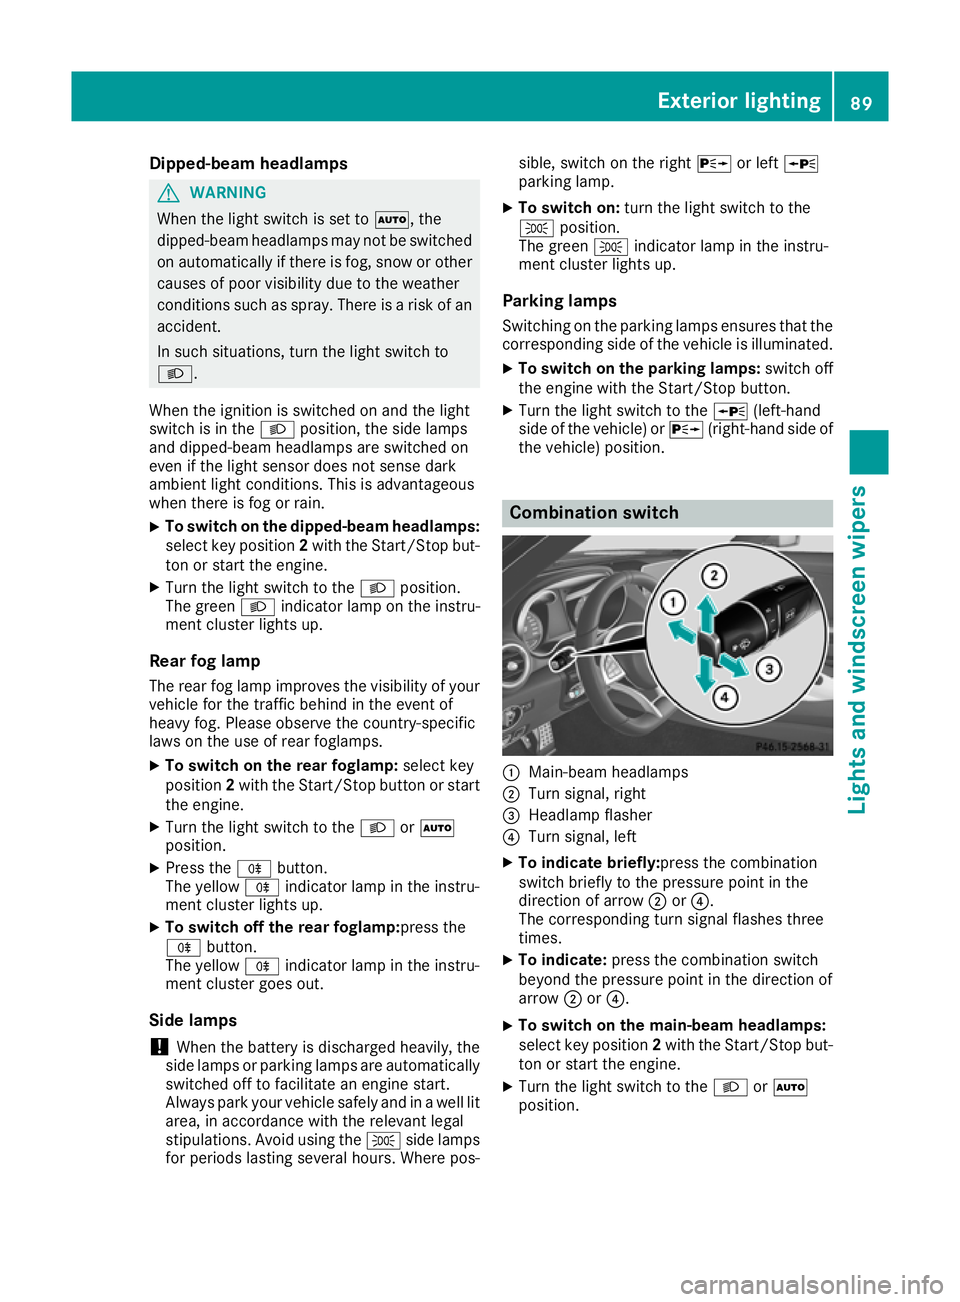
the vehicle) position. Combination switch
:
Main-beam headlamps
; Turn signal, right
= Headlamp flasher
? Turn signal, left
X To indicate briefly: press the combination
switch briefly to the pressure point in the
direction of arrow ;or?.
The corresponding turn signal flashes three
times.
X To indicate: press the combination switch
beyond the pressure point in the direction of
arrow ;or?.
X To switch on the main-beam headlamps:
select key position 2with the Start/Stop but-
ton or start the engine.
X Turn the light switch to the LorÃ
position. Exterior lighting
89Lights and windscreen wipers Z
Page 93 of 289
X
Press the combination switch beyond the
pressure point in the direction of arrow :.
In the Ãposition, the main-beam head-
lamps are only switched on when it is dark and the engine is running.
The K indicator lamp in the instrument
cluster lights up when the main-beam head-
lamps are switched on.
X To switch off the main-beam headlamps:
move the combination switch back to its nor-
mal position.
The K indicator lamp in the instrument
cluster goes out.
Vehicles with Adaptive Highbeam Assist: when
Adaptive Highbeam Assist is active, it controls
switching on/off of the main-beam headlamps
(Y page 90).
X To flash the headlamps: pull the combina-
tion switch in the direction of arrow =.Hazard warning lamps
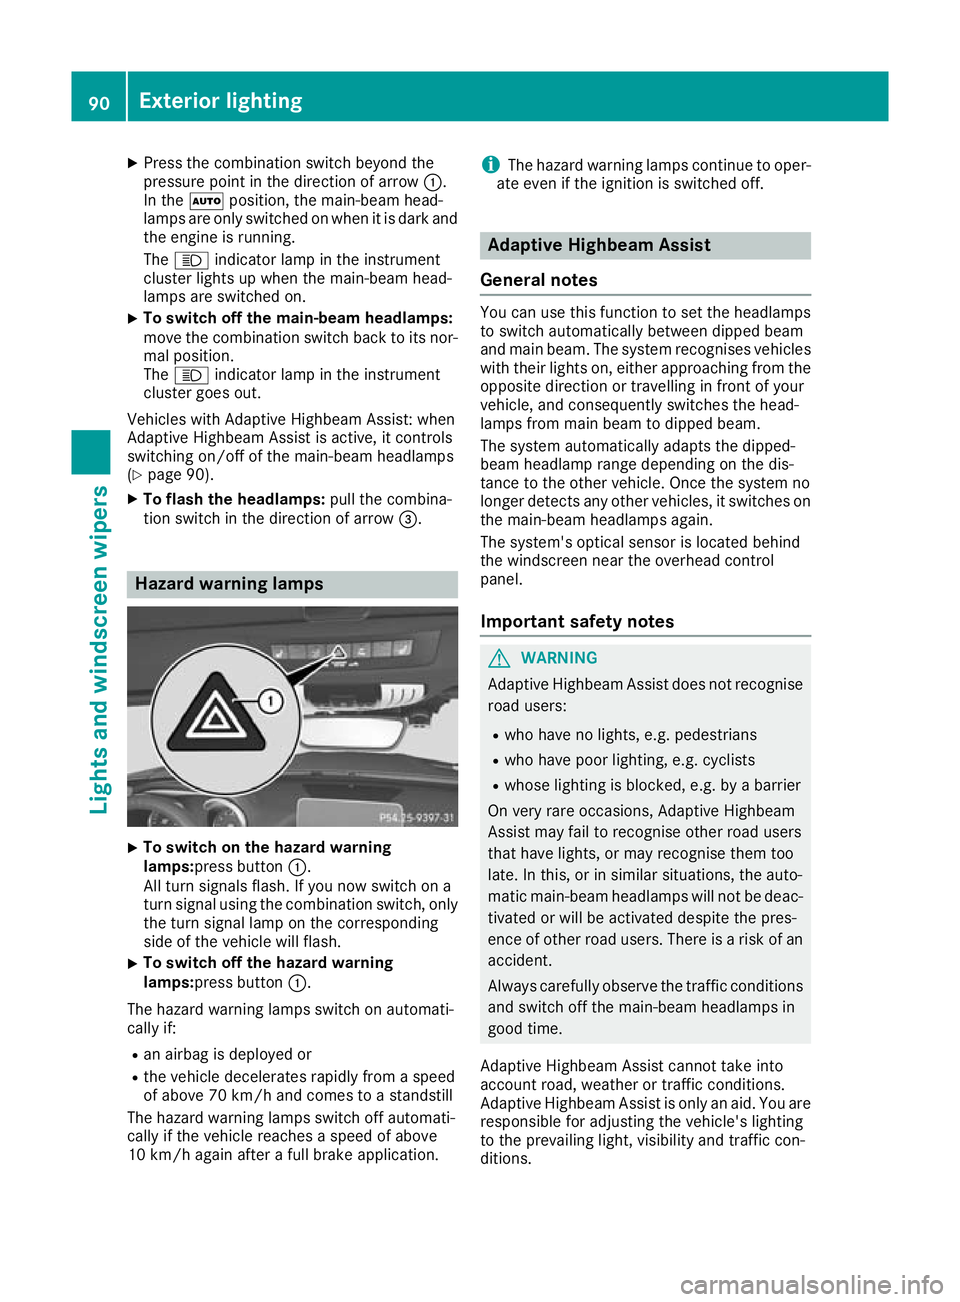
X
To switch on the hazard warning
lamps:press button
:.
All turn signals flash. If you now switch on a
turn signal using the combination switch, only the turn signal lamp on the corresponding
side of the vehicle will flash.
X To switch off the hazard warning
lamps:press button
:.
The hazard warning lamps switch on automati-
cally if:
R an airbag is deployed or
R the vehicle decelerates rapidly from a speed
of above 70 km/h and comes to a standstill
The hazard warning lamps switch off automati-
cally if the vehicle reaches a speed of above
10 km/h again after a full brake application. i
The hazard warning lamps continue to oper-
ate even if the ignition is switched off. Adaptive Highbeam Assist
General notes You can use this function to set the headlamps
to switch automatically between dipped beam
and main beam. The system recognises vehicles
with their lights on, either approaching from the opposite direction or travelling in front of your
vehicle, and consequently switches the head-
lamps from main beam to dipped beam.
The system automatically adapts the dipped-
beam headlamp range depending on the dis-
tance to the other vehicle. Once the system no
longer detects any other vehicles, it switches on the main-beam headlamps again.
The system's optical sensor is located behind
the windscreen near the overhead control
panel.
Important safety notes G
WARNING
Adaptive Highbeam Assist does not recognise road users:
R who have no lights, e.g. pedestrians
R who have poor lighting, e.g. cyclists
R whose lighting is blocked, e.g. by a barrier
On very rare occasions, Adaptive Highbeam
Assist may fail to recognise other road users
that have lights, or may recognise them too
late. In this, or in similar situations, the auto-
matic main-beam headlamps will not be deac-
tivated or will be activated despite the pres-
ence of other road users. There is a risk of an accident.
Always carefully observe the traffic conditions and switch off the main-beam headlamps in
good time.
Adaptive Highbeam Assist cannot take into
account road, weather or traffic conditions.
Adaptive Highbeam Assist is only an aid. You are
responsible for adjusting the vehicle's lighting
to the prevailing light, visibility and traffic con-
ditions. 90
Exterior lightingLights and windscreen wipers
Page 136 of 289
accelerates or brakes. If you do not know
what the stored speed is, the vehicle may
accelerate or brake unexpectedly. There is a
risk of an accident.
Take the traffic conditions into account
before calling up the stored speed. If you do
not know what the stored speed is, store the
desired speed again. X
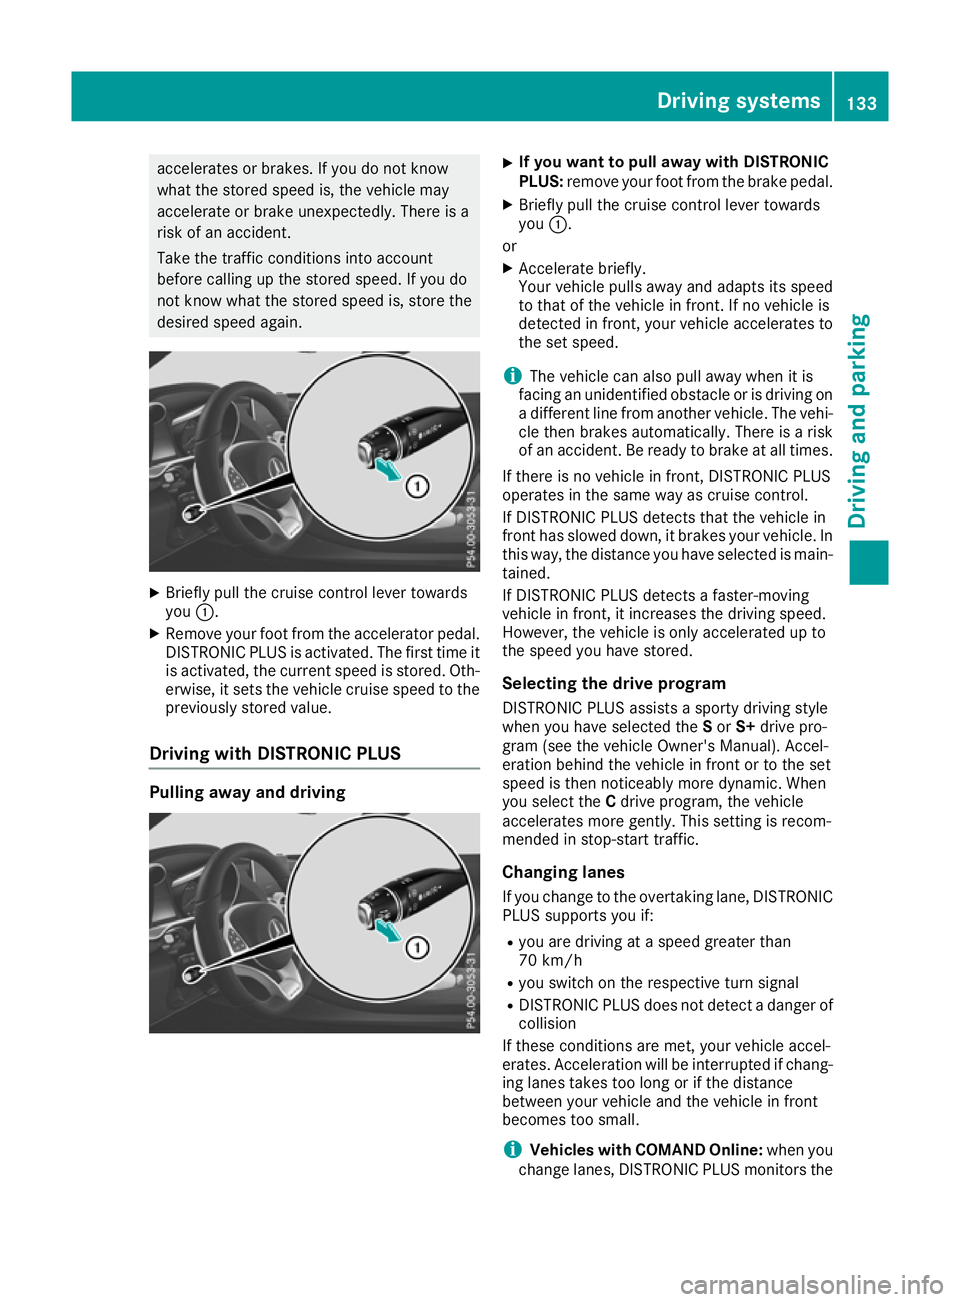
Briefly pull the cruise control lever towards
you :.
X Remove your foot from the accelerator pedal.
DISTRONIC PLUS is activated. The first time it
is activated, the current speed is stored. Oth-
erwise, it sets the vehicle cruise speed to the
previously stored value.
Driving with DISTRONIC PLUS Pulling away and driving X
If you want to pull away with DISTRONIC
PLUS:
remove your foot from the brake pedal.
X Briefly pull the cruise control lever towards
you :.
or X Accelerate briefly.
Your vehicle pulls away and adapts its speed
to that of the vehicle in front. If no vehicle is
detected in front, your vehicle accelerates to
the set speed.
i The vehicle can also pull away when it is
facing an unidentified obstacle or is driving on
a different line from another vehicle. The vehi-
cle then brakes automatically. There is a risk
of an accident. Be ready to brake at all times.
If there is no vehicle in front, DISTRONIC PLUS
operates in the same way as cruise control.
If DISTRONIC PLUS detects that the vehicle in
front has slowed down, it brakes your vehicle. In
this way, the distance you have selected is main-
tained.
If DISTRONIC PLUS detects a faster-moving
vehicle in front, it increases the driving speed.
However, the vehicle is only accelerated up to
the speed you have stored.
Selecting the drive program
DISTRONIC PLUS assists a sporty driving style
when you have selected the Sor S+ drive pro-
gram (see the vehicle Owner's Manual). Accel-
eration behind the vehicle in front or to the set
speed is then noticeably more dynamic. When
you select the Cdrive program, the vehicle
accelerates more gently. This setting is recom-
mended in stop-start traffic.
Changing lanes
If you change to the overtaking lane, DISTRONIC
PLUS supports you if:
R you are driving at a speed greater than
70 km/h
R you switch on the respective turn signal
R DISTRONIC PLUS does not detect a danger of
collision
If these conditions are met, your vehicle accel-
erates. Acceleration will be interrupted if chang- ing lanes takes too long or if the distance
between your vehicle and the vehicle in front
becomes too small.
i Vehicles with COMAND Online:
when you
change lanes, DISTRONIC PLUS monitors the Driving systems
133Driving and parking Z