MERCEDES-BENZ AMG GT ROADSTER 2018 Manual Online
Manufacturer: MERCEDES-BENZ, Model Year: 2018, Model line: AMG GT ROADSTER, Model: MERCEDES-BENZ AMG GT ROADSTER 2018Pages: 294, PDF Size: 4.8 MB
Page 81 of 294
If the side window opens again slightly:
XImmediately pull the corresponding switch on
the door control panel until the side window is
completely closed (
Ypage 77).
XHold the switch for an additional second.
XIf the respective side window remains closed
after the button is released, then it has been
set correctly. If this is not the case, repeat the
steps above.
Problems with the side windows
GWARNING
If you close a side window again immediately after it has been blocked or reset, the side window
closes with increased or maximum force. The reversing feature is then not active. Parts of the
body could be trapped in the closing area in the process. This poses an increased risk of injury or
even fatal injury.
Make sure that no parts of the body are in the closing area. To stop the closing process, release
the switch or push the switch again to reopen the side window.
ProblemPossible causes/consequences and MSolutions
A side window cannot be
closed because it is
blocked by objects, e.g.
leaves in the window
guide.XRemove the objects.
XClose the side window.
A side window cannot be
closed and you cannot
see the cause.If a side window is obstructed during closing and reopens again
slightly:
XImmediately after the window blocks, pull the corresponding switch
again until the side window has closed.
The side window is closed with increased force.
If a side window is obstructed again during closing and reopens again slightly:
XImmediately after the window blocks, pull the corresponding switchagain until the side window has closed.
The side window is closed without the automatic reversing feature.
The side windows cannot
be opened or closed with
convenience opening.The SmartKey battery is discharged or nearly discharged.
XCheck the SmartKey battery (Ypage 69) and replace it if necessary
(Ypage 69).
If a side window will still not open or close due to a malfunction, consult a qualified specialist
workshop.
Side windows79
Opening and closing
Z
Page 82 of 294
Soft top (Roadster)
Important safety notes
GWARNING
If you do not fully open/close the soft top, the
soft-top hydraulics depressurize after a short
time. This causes the soft top to lower unex-
pectedly and may cause you or others to be
trapped. There is a risk of injury.
Always open or close the soft top completely.
!Never sit on the soft top or store heavy
objects on it. You will otherwise damage the
vehicle soft top and soft-top covers.
!When opening and closing the soft top,
make sure that:
Rthere is sufficient clearance above it, as the
soft top swings upwards
Rthere are no objects on the soft top or the
soft-top covers to the side
Rthe fabric is not dirty, wet or frozen
Rthe outside temperature is above -10 †
You could otherwise damage the soft top as
well as other parts of the vehicle.
Take the height of the vehicle into account when
opening and closing the soft top (
Ypage 291).
Make sure that the soft top is dry and clean
before opening or closing it. Otherwise, water or
dirt could enter the vehicle interior or trunk.
You can open or close the soft top:
Rwhen the vehicle is stationary or
Rwhen you do not exceed a speed of 31 mph
(50 km/h) (max. 37 mph (60 km/h), to avoid
interrupting the closing process while slightly
exceeding this speed)
If there is a strong head wind, it may not be pos-
sible to close the soft top fully. In order to close
the soft top fully, reduce your speed or stop the
vehicle in accordance with the traffic condi-
tions.
For safety reasons, Mercedes-Benz recom-
mends that you only open or close the soft top
when the vehicle is stationary.
If the soft top does not open or close fully, the
soft-top hydraulics are depressurized and the
soft top is lowered:
Rafter approximately 7 minutes when the igni-
tion is switched on
Rafter about
20 seconds if the ignition is switched off
Opening/closing with the soft top
switch
Important safety notes
GWARNING
When opening or closing the soft top, there is a risk that parts of the body could become
trapped by moving parts such as the roof
mechanism, the trunk lid, or the side win-
dows. There is a risk of injury.
When opening or closing the roof, make sure
that no parts of the body are in the vicinity of
moving parts. Release the switch if somebody
becomes trapped.
GWARNING
If the vehicle speed exceeds 35 mph
(60 km/h), the soft top stops during the open- ing or closing process. This impairs your view
to the rear. There is a risk of an accident.
Reduce your speed to below 35 mph
(60 km/h) or stop the vehicle in accordance
with the traffic conditions. Press or pull the
soft-top switch again in order to open or close
the soft top fully.
Opening and closing
XSelect SmartKey position 2with the Start/
Stop button (Ypage 110).
XWhen the vehicle is stationary, depress the
brake pedal and keep it depressed.
80Soft top (Roadster)
Opening and closing
Page 83 of 294
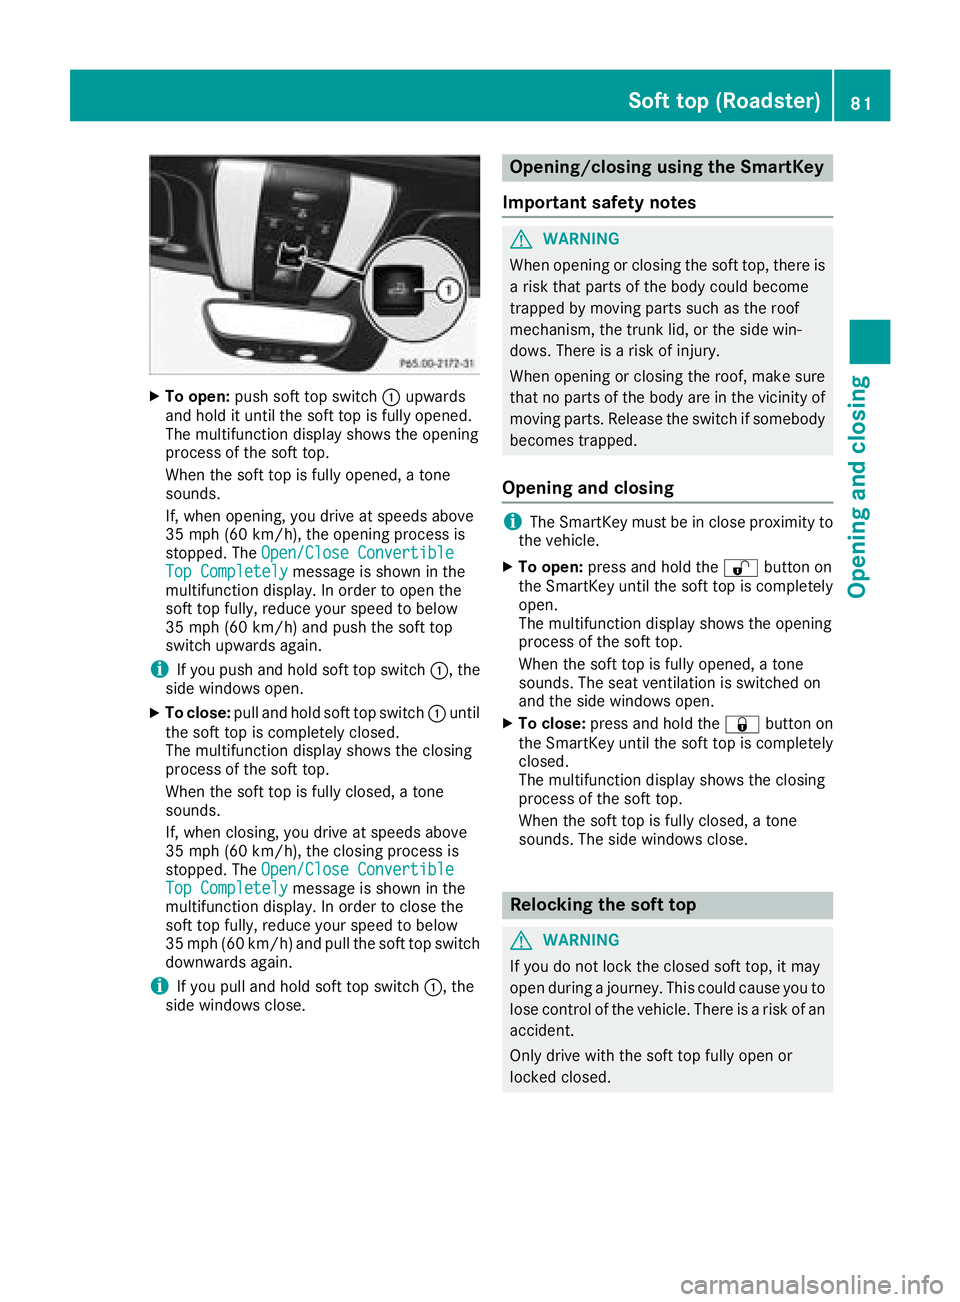
XTo open:push soft top switch :upwards
and hold it until the soft top is fully opened.
The multifunction display shows the opening
process of the soft top.
When the soft top is fully opened, a tone
sounds.
If, when opening, you drive at speeds above
35 mph (60 km/h), the opening process is
stopped. The Open/Close Convertible
Top Completelymessage is shown in the
multifunction display. In order to open the
soft top fully, reduce your speed to below
35 mph (60 km/h) and push the soft top
switch upwards again.
iIf you push and hold soft top switch :, the
side windows open.
XTo close: pull and hold soft top switch :until
the soft top is completely closed.
The multifunction display shows the closing
process of the soft top.
When the soft top is fully closed, a tone
sounds.
If, when closing, you drive at speeds above
35 mph (60 km/h), the closing process is
stopped. The Open/Close Convertible
Top Completelymessage is shown in the
multifunction display. In order to close the
soft top fully, reduce your speed to below
35 mph (60 km/h) and pull the soft top switch
downwards again.
iIf you pull and hold soft top switch :, the
side windows close.
Opening/closing using the SmartKey
Important safety notes
GWARNING
When opening or closing the soft top, there is a risk that parts of the body could become
trapped by moving parts such as the roof
mechanism, the trunk lid, or the side win-
dows. There is a risk of injury.
When opening or closing the roof, make sure
that no parts of the body are in the vicinity of
moving parts. Release the switch if somebody
becomes trapped.
Opening and closing
iThe SmartKey must be in close proximity to
the vehicle.
XTo open: press and hold the %button on
the SmartKey until the soft top is completely
open.
The multifunction display shows the opening
process of the soft top.
When the soft top is fully opened, a tone
sounds. The seat ventilation is switched on
and the side windows open.
XTo close: press and hold the &button on
the SmartKey until the soft top is completely
closed.
The multifunction display shows the closing
process of the soft top.
When the soft top is fully closed, a tone
sounds. The side windows close.
Relocking the soft top
GWARNING
If you do not lock the closed soft top, it may
open during a journey. This could cause you to lose control of the vehicle. There is a risk of an
accident.
Only drive with the soft top fully open or
locked closed.
Soft top (Roadster)81
Opening and closing
Z
Page 84 of 294
The soft top is not locked if:
RtheOpen/Close Convertible Top Com‐pletelymessage is shown in the multifunc-
tion display
Ryou hear a warning tone for up to ten seconds
when pulling away or while driving
Lock the soft top again if it is not locked fully:
XPull over and stop the vehicle safely as soon
as possible, paying attention to road and traf-
fic conditions.
XSelect SmartKey position 2with the Start/
Stop button (Ypage 110).
XPress the soft top switch (Ypage 80).
Installing/removing the draft stop
Important safety notes
GWARNING
If the wind screen is incorrectly installed, it
could detach itself during a journey and
endanger other road users. There is a risk of
an accident and injury.
Install the wind screen as described. Do not
place any objects on top of the installed wind
screen.
!Install or remove the wind screen only when
the soft top is open. You could otherwise
damage the wind screen or the vehicle inte-
rior.
!Mercedes-Benz recommends that you only
use wind screens which have been tested and
approved for Mercedes-Benz vehicles. This
helps to prevent damage to the vehicle.
Installing/removing
The wind screen protects against wind when
driving with the soft top open. It is secured
between the roll bars.
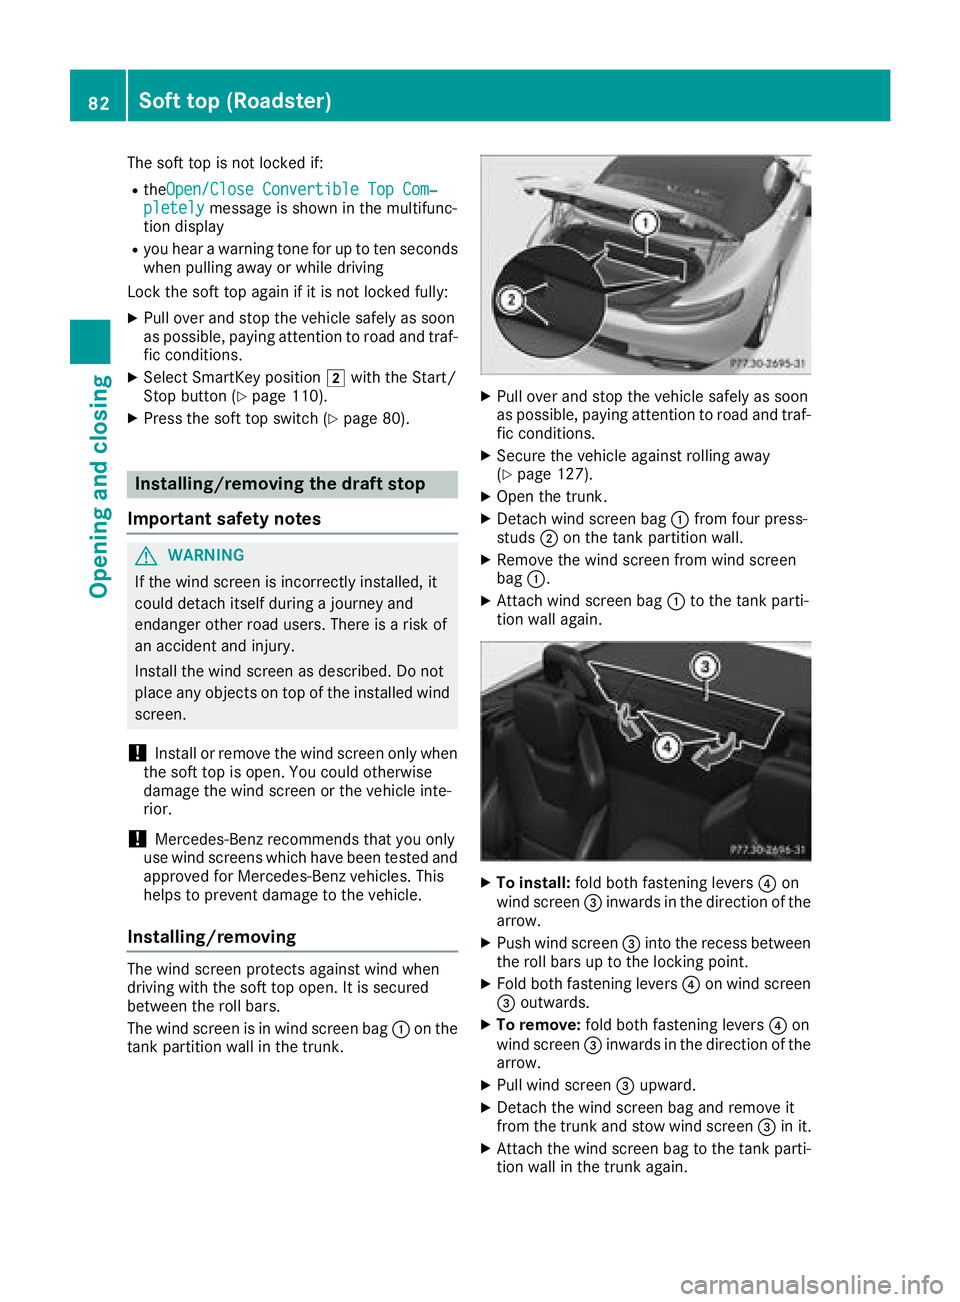
The wind screen is in wind screen bag :on the
tank partition wall in the trunk.
XPull over and stop the vehicle safely as soon
as possible, paying attention to road and traf-
fic conditions.
XSecure the vehicle against rolling away
(Ypage 127).
XOpen the trunk.
XDetach wind screen bag :from four press-
studs ;on the tank partition wall.
XRemove the wind screen from wind screen
bag :.
XAttach wind screen bag :to the tank parti-
tion wall again.
XTo install: fold both fastening levers ?on
wind screen =inwards in the direction of the
arrow.
XPush wind screen =into the recess between
the roll bars up to the locking point.
XFold both fastening levers ?on wind screen
= outwards.
XTo remove: fold both fastening levers ?on
wind screen =inwards in the direction of the
arrow.
XPull wind screen =upward.
XDetach the wind screen bag and remove it
from the trunk and stow wind screen =in it.
XAttach the wind screen bag to the tank parti-
tion wall in the trunk again.
82Soft top (Roadster)
Opening and closing
Page 85 of 294
Problems with the soft top
ProblemPossible causes/consequences andMSolutions
The soft top will not open
or close.The ignition is not switched on.
XSelect SmartKey position2with the Start/Stop button.
The brake pedal has not been depressed with the vehicle stationary.
XDepress the brake pedal.
The soft-top mechanism or control system is defective.
XVisit a qualified specialist workshop.
The soft top has been opened and closed several times in a row. The
soft-top drive has been deactivated automatically for safety reasons.
You can open and close the soft top again after approximately ten
minutes.
XSwitch off the ignition and turn it back on.
XOpen or close the soft top again.
Soft top (Roadster)83
Opening and closing
Z
Page 86 of 294
Correct driver's seat position
GWARNING
You could lose control of your vehicle if you do the following while driving:
Radjust the driver's seat, head restraint,
steering wheel or mirrors
Rfasten the seat belt
There is a risk of an accident.
Adjust the driver's seat, head restraint, steer-
ing wheel and mirror and fasten your seat belt before starting the engine.
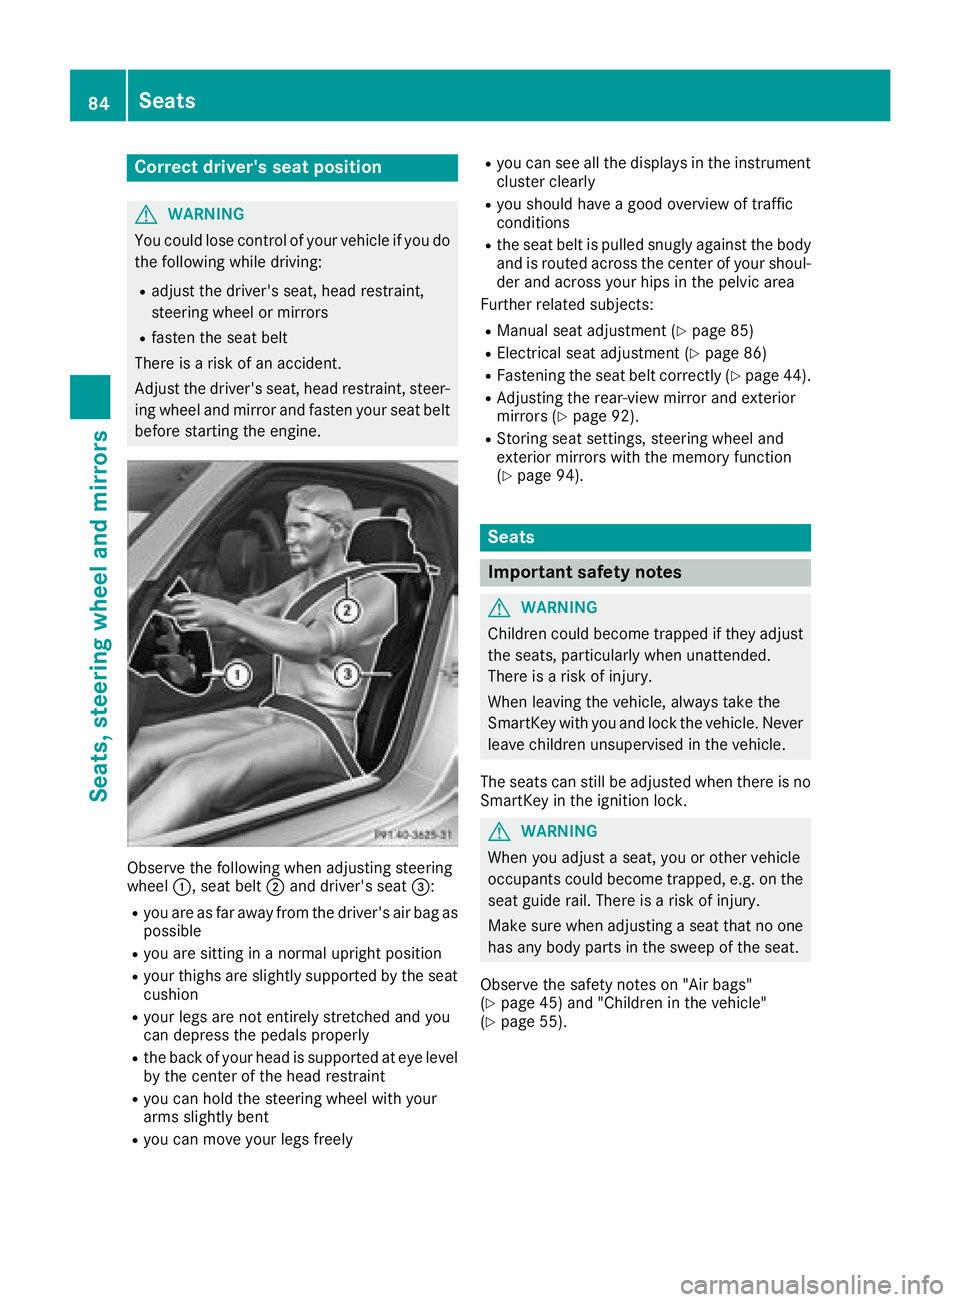
Observe the following when adjusting steering
wheel :, seat belt ;and driver's seat =:
Ryou are as far away from the driver's air bag as
possible
Ryou are sitting in a normal upright position
Ryour thighs are slightly supported by the seat
cushion
Ryour legs are not entirely stretched and you
can depress the pedals properly
Rthe back of your head is supported at eye level
by the center of the head restraint
Ryou can hold the steering wheel with your
arms slightly bent
Ryou can move your legs freely
Ryou can see all the displays in the instrument
cluster clearly
Ryou should have a good overview of traffic
conditions
Rthe seat belt is pulled snugly against the body and is routed across the center of your shoul-
der and across your hips in the pelvic area
Further related subjects:
RManual seat adjustment (Ypage 85)
RElectrical seat adjustment (Ypage 86)
RFastening the seat belt correctly (Ypage 44).
RAdjusting the rear-view mirror and exterior
mirrors (Ypage 92).
RStoring seat settings, steering wheel and
exterior mirrors with the memory function
(
Ypage 94).
Seats
Important safety notes
GWARNING
Children could become trapped if they adjust
the seats, particularly when unattended.
There is a risk of injury.
When leaving the vehicle, always take the
SmartKey with you and lock the vehicle. Never
leave children unsupervised in the vehicle.
The seats can still be adjusted when there is no
SmartKey in the ignition lock.
GWARNING
When you adjust a seat, you or other vehicle
occupants could become trapped, e.g. on the seat guide rail. There is a risk of injury.
Make sure when adjusting a seat that no one
has any body parts in the sweep of the seat.
Observe the safety notes on "Air bags"
(
Ypage 45) and "Children in the vehicle"
(Ypage 55).
84Seats
Seats, steering wheel and mirrors
Page 87 of 294
GWARNING
You could lose control of your vehicle if you do the following while driving:
Radjust the driver's seat, head restraint,
steering wheel or mirrors
Rfasten the seat belt
There is a risk of an accident.
Adjust the driver's seat, head restraint, steer-
ing wheel and mirror and fasten your seat belt before starting the engine.
For safety reasons, seat fore-and-aft adjustment
on electrically adjustable seats is only possible
for a maximum of two seconds when the vehicle
is in motion. The seat fore-and-aft adjustment
can then no longer be set.
GWARNING
If you adjust the seat height carelessly, you or
other vehicle occupants could be trapped and
thereby injured. Children in particular could
accidentally press the electrical seat adjust-
ment buttons and become trapped. There is a
risk of injury.
While moving the seats, make sure that your
hands or other body parts do not get under the
lever assembly of the seat adjustment sys-
tem.
GWARNING
If head restraints are not adjusted correctly,
they cannot provide protection as intended.
There is an increased risk of injury in the head
and neck area, e.g. in the event of an accident or when braking.
Before driving off, make sure for every vehicle
occupant that the center of the head restraint
supports the back of the head at about eye
level.
Using the fore-and-aft adjustment, adjust the
head restraint so that it is as close as possible to
your head.
GWARNING
The seat belt does not offer the intended level of protection if you have not moved the back-
rest to an almost vertical position. When brak-
ing or in the event of an accident, you could
slide underneath the seat belt and sustain
abdomen or neck injuries, for example. This
poses an increased risk of injury or even fatalinjury.
Adjust the seat properly before beginning
your journey. Always ensure that the backrest
is in an almost vertical position and that the
shoulder section of your seat belt is routed
across the center of your shoulder.
!To prevent damage to the seats and the seat
heating, observe the following notes:
RDo not spill liquids onto the seats. Dry the
seats as soon as possible if liquid does get
spilled on the seats.
RIf the seat covers are damp or wet, do not
switch on the seat heating. Also, do not use
the seat heating to dry the seats.
RClean the seat covers as recommended;
see keyword "Care".
RDo not transport heavy loads on the seats.
Do not place pointed objects on the seat
cushions such as knives, nails or tools.
Where possible, use the seats only for car-
rying passengers.
RWhen operating the seat heating, do not
cover the seats with insulating materials,
e.g. blankets, coats, bags, protective cov-
ers, child seats or booster seats.
!Make sure that there are no objects in the
footwell under or behind the seats when mov-
ing the seats back. There is a risk that the
seats and/or the objects could be damaged.
Adjusting the seats manually
General notes
The manually adjustable seat is only available in
Canada.
Seats85
Seats, steering wheel and mirrors
Z
Page 88 of 294
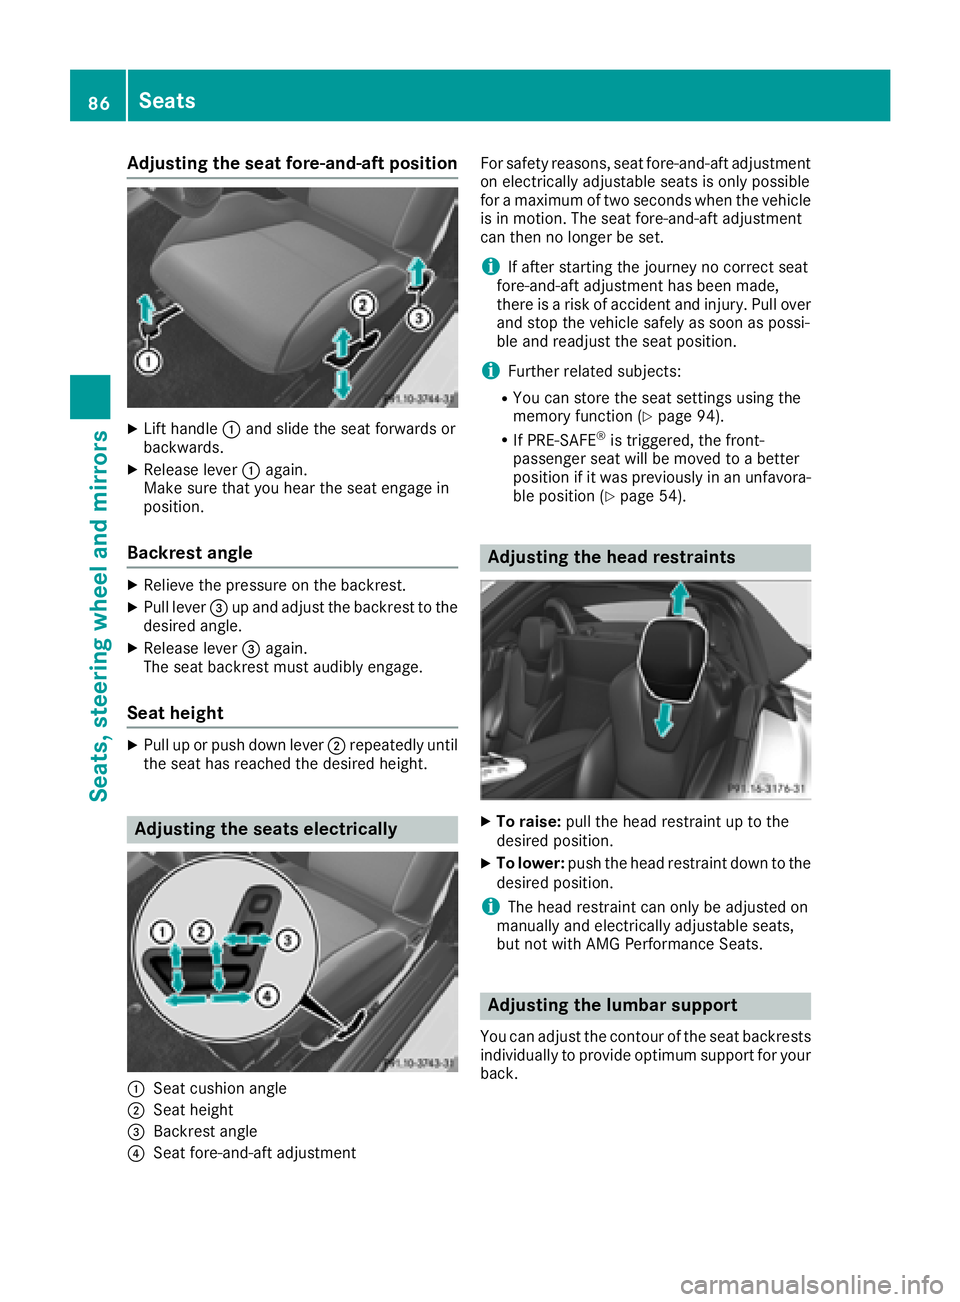
Adjusting the seat fore-and-aft position
XLifthandle :and slid eth eseat forward sor
backwards .
XReleaselever :again .
Mak esur ethat you hear th eseat engage in
position .
Backrest angle
XRelieveth epressur eon th ebackrest .
XPull lever =up and adjust th ebackrest to th e
desired angle.
XReleas elever =again .
The seat backrest mus taudibly engage .
Seat height
XPull up or push down lever ;repeatedly until
th eseat has reached th edesired height .
Adjusting the seats electri cally
:Seat cushion angle
;Seat height
=Backrest angle
?Seat fore-and-aftadjustmen t Fo
rsafet yreasons, seat fore-and-af tadjustmen t
on electrically adjustable seat sis only possibl e
for amaximum of two seconds when th evehicl e
is in motion .The seat fore-and-af tadjustmen t
can then no longer be set .
iIf after starting thejourney no correc tseat
fore-and-af tadjustmen thas been made ,
there is aris kof acciden tand injury. Pull ove r
and stop th evehicl esafely as soo nas possi-
ble and readjus tth eseat position .
iFurther relate dsubjects :
RYou can store th eseat setting susin gth e
memory function (Ypage 94).
RIf PRE-SAFE®is triggered ,th efront-
passenger seat will be moved to abette r
position if it was previously in an unfavora-
ble position (
Ypage 54).
Adjusting the head restraints
XTo raise:pull thehead restrain tup to th e
desired position .
XTo lower:push th ehead restrain tdown to th e
desired position .
iThe head restrain tcan only be adjusted on
manually and electrically adjustable seats,
but no twit hAM GPerformance Seats .
Adjusting the lumbar support
You can adjust thecontour of th eseat backrest s
individually to provid eoptimum support for your
back.
86Seats
Seats, steering wheel and mirrors
Page 89 of 294
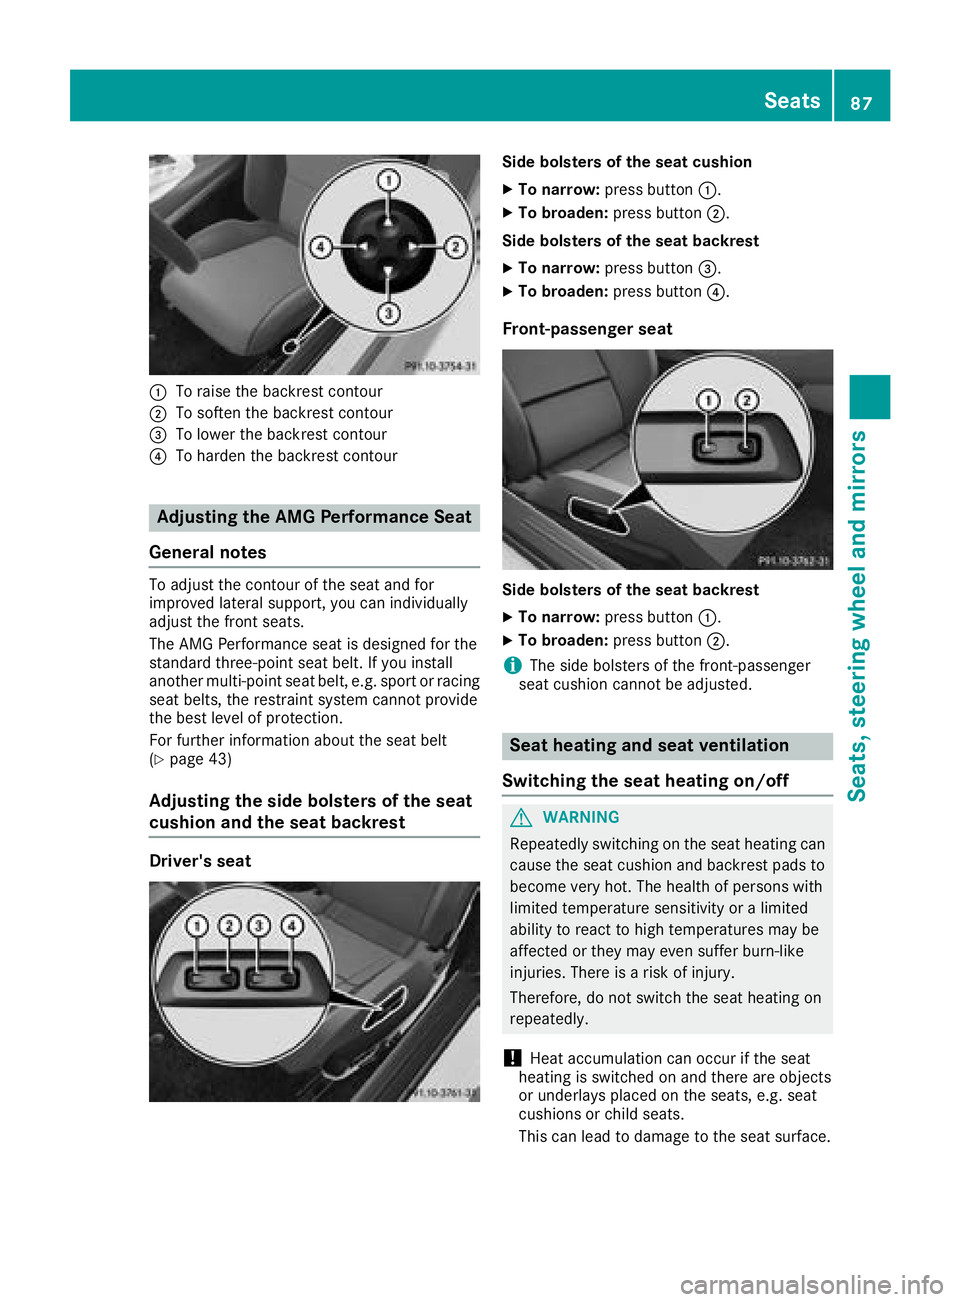
:To raise the backrest contour
;To soften the backrest contour
=To lower the backrest contour
?To harden the backrest contour
Adjusting the AMG Performance Seat
General notes
To adjust the contour of the seat and for
improved lateral support, you can individually
adjust the front seats.
The AMG Performance seat is designed for the
standard three-point seat belt. If you install
another multi-point seat belt, e.g. sport or racing
seat belts, the restraint system cannot provide
the best level of protection.
For further information about the seat belt
(
Ypage 43)
Adjusting the side bolsters of the seat
cushion and the seat backrest
Driver's seat
Side bolsters of the seat cushion
XTo narrow: press button :.
XTo broaden: press button;.
Side bolsters of the seat backrest
XTo narrow: press button =.
XTo broaden: press button?.
Front-passenger seat
Side bolsters of the seat backrest
XTo narrow:press button :.
XTo broaden: press button;.
iThe side bolsters of the front-passenger
seat cushion cannot be adjusted.
Seat heating and seat ventilation
Switching the seat heating on/off
GWARNING
Repeatedly switching on the seat heating can
cause the seat cushion and backrest pads to
become very hot. The health of persons with
limited temperature sensitivity or a limited
ability to react to high temperatures may be
affected or they may even suffer burn-like
injuries. There is a risk of injury.
Therefore, do not switch the seat heating on
repeatedly.
!Heat accumulation can occur if the seat
heating is switched on and there are objects
or underlays placed on the seats, e.g. seat
cushions or child seats.
This can lead to damage to the seat surface.
Seats87
Seats, steering wheel and mirrors
Z
Page 90 of 294
Make sure that no objects or underlays are
placed on the seats when the seat heating is
switched on.
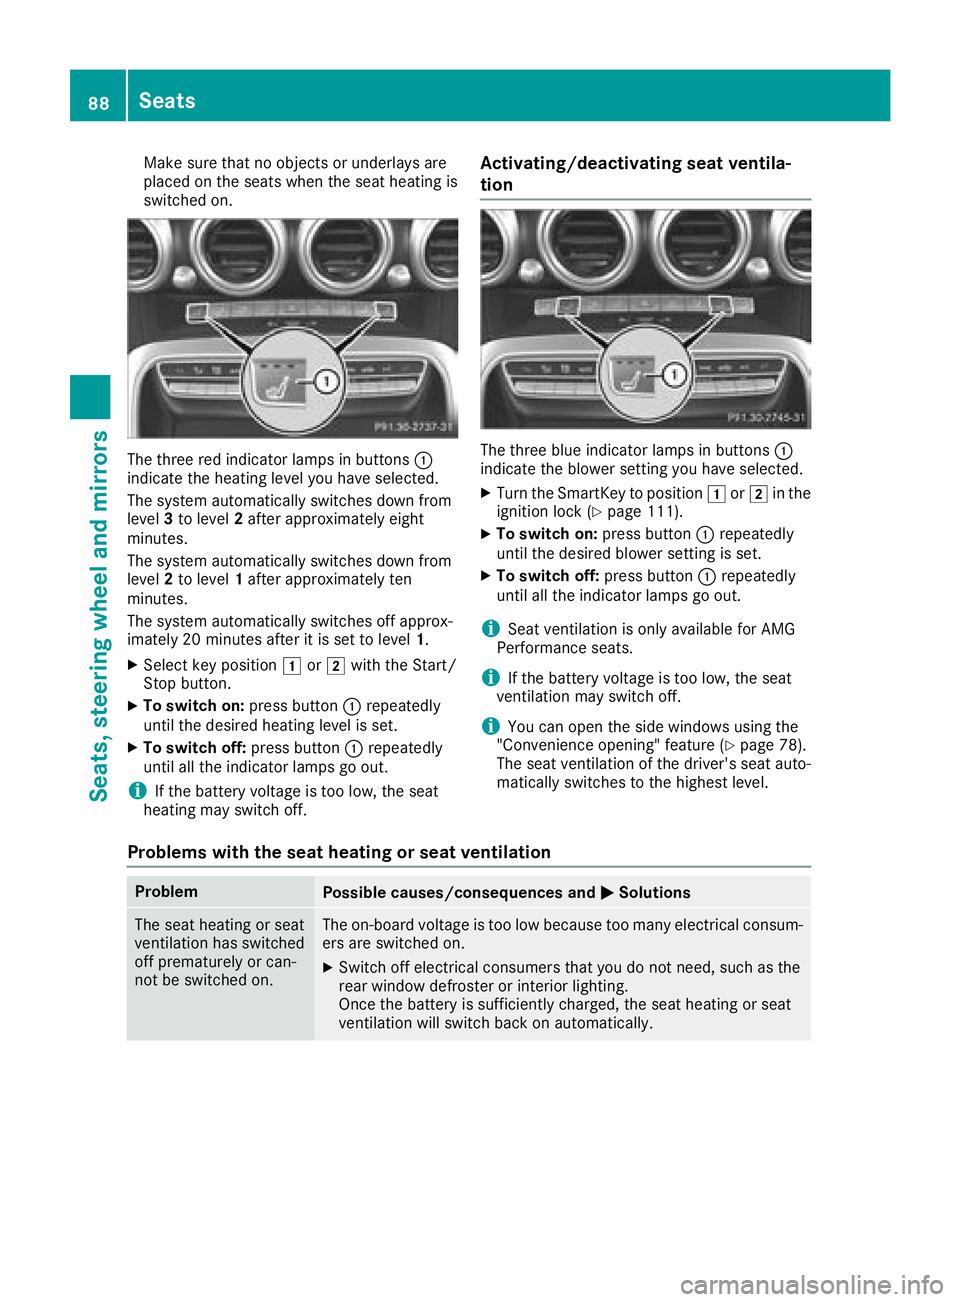
The three red indicator lamps in buttons:
indicate the heating level you have selected.
The system automatically switches down from
level 3to level 2after approximately eight
minutes.
The system automatically switches down from
level 2to level 1after approximately ten
minutes.
The system automatically switches off approx-
imately 20 minutes after it is set to level 1.
XSelect key position1or2 with the Start/
Stop button.
XTo switch on: press button:repeatedly
until the desired heating level is set.
XTo switch off: press button:repeatedly
until all the indicator lamps go out.
iIf the battery voltage is too low, the seat
heating may switch off.
Activating/deactivating seat ventila-
tion
The three blue indicator lamps in buttons :
indicate the blower setting you have selected.
XTurn the SmartKey to position 1or2 in the
ignition lock (Ypage 111).
XTo switch on: press button:repeatedly
until the desired blower setting is set.
XTo switch off: press button:repeatedly
until all the indicator lamps go out.
iSeat ventilation is only available for AMG
Performance seats.
iIf the battery voltage is too low, the seat
ventilation may switch off.
iYou can open the side windows using the
"Convenience opening" feature (Ypage 78).
The seat ventilation of the driver's seat auto-
matically switches to the highest level.
Problems with the seat heating or seat ventilation
ProblemPossible causes/consequences and MSolutions
The seat heating or seat
ventilation has switched
off prematurely or can-
not be switched on.The on-board voltage is too low because too many electrical consum-
ers are switched on.
XSwitch off electrical consumers that you do not need, such as the
rear window defroster or interior lighting.
Once the battery is sufficiently charged, the seat heating or seat
ventilation will switch back on automatically.
88Seats
Seats, steering wheel and mirrors