buttons MERCEDES-BENZ AMG GT ROADSTER 2019 Owner's Manual
[x] Cancel search | Manufacturer: MERCEDES-BENZ, Model Year: 2019, Model line: AMG GT ROADSTER, Model: MERCEDES-BENZ AMG GT ROADSTER 2019Pages: 298, PDF Size: 7.9 MB
Page 8 of 298
B
Back button ....................................... 210
BAS (Brake Assist System) ................. 59
Basic settings
see Settings
Battery (SmartKey)
Checking .......................................... 69
Important safety notes .................... 68
Replacing ......................................... 69
Battery (vehicle)
Charging ........................................ 255
Display message ............................ 188
Important safety notes .................. 254
Jump starting ................................. 256
Replacing ....................................... 256
Belt
see Seat belts
Belt warning ......................................... 44
Blind Spot Assist
Activating/deactivating (on-
board computer) ............................ 168
Display message ............................ 190
Notes/function .............................. 155
Blower
see Climate control
Bluetooth ®
Searching for a mobile phone ........ 216
see also Digital Operator's Man-
ual .................................................. 209
Brake Assist System
see BAS (Brake Assist System)
Brake assistance
see BAS (Brake Assist System)
Brake fluid
Display message ............................ 180
Notes ............................................. 291
Brake force distribution
see EBD (electronic brake force
distribution)
Brakes
ABS .................................................. 58
AMG high-performance and
ceramic brakes .............................. 133
BAS .................................................. 59
Brake fluid (notes) ......................... 291
Braking assistance appropriate to
the situation ..................................... 61 Display message ............................ 175
EBD .................................................. 64
Hill start assist ............................... 112
Important safety notes .................. 132
Maintenance .................................. 133
Parking brake ................................ 129
Riding tips ...................................... 132
Warning lamp ................................. 200
Braking assistance appropriate to
the situation
Function/note s................................ 61
Breakdown assistance
Where will I find...? ........................ 249
see Flat tire
see Towing away
Buttons on the steering wheel ......... 160 C
Cabriolet Soft top ............................................ 80
California
Important notice for retail cus-
tomers and lessees .......................... 25
Calling up a malfunction
see Display messages
Calling up the climate control bar
Multimedia system ........................ 213
Calling up the climate control
menu
Multimedia system ........................ 213
Car
see Vehicle
Care
Car wash ........................................ 242
Carpets .......................................... 248
Display ........................................... 247
Exhaust pipe .................................. 247
Exterior lights ................................ 246
Gear or selector lever .................... 247
General notes ................................ 241
Interior ........................................... 247
Matte finish ................................... 244
Paint .............................................. 243
Plastic trim .................................... 247
Power washe r................................ 243
Rear view camera .......................... 246
Roof lining ...................................... 248 6
Index
Page 20 of 298
Sockets
General notes ................................ 222
Trunk ............................................. 222
Soft top
Cleaning ......................................... 245
Important safety notes .................... 80
Opening/closing (SmartKey) ........... 81
Opening/closing (with soft-top
switch) ............................................. 80
Problem (malfunction) ..................... 83
Relocking ......................................... 81
Wind screen .....................................82
Soft-top switch .................................... 80
Sound
Switching on/off ........................... 210
Special seat belt retractor .................. 56
Specialist workshop ............................28
Speed, controlling
see Cruise control
Speedometer
Activating/deactivating the addi-
tional speedometer ........................ 170
Digital ............................................ 162
Segments ...................................... 159
Selecting the display unit ............... 169
SPORT handling mode
Activating/deactivating ...................62
Warning lamp ................................. 203
Sports exhaust system
see AMG sports exhaust system
Standing lamps
Display message ............................1 86
Switching on/off .............................. 97
Start/Stop button
General notes ................................ 110
Key positions ................................. 110
Starting the engine ........................ 112
Start/stop function
see ECO start/stop function
Starting (engine) ................................ 111
Steering
Display message ............................ 197
Warning lamps ............................... 208
Steering wheel
Adjusting (electrically) ..................... 90
Button overview ............................... 35
Buttons (on-board computer) ......... 160 Calling up a stored setting (mem-
ory function) ...................................
.95
Cleaning ........................................ .247
EASY ENTRY/EXIT feature .............. .90
Important safety notes .................... 90
Paddle shifters ............................... 121
Storing settings (memory func-
tion) .................................................94
Steering wheel paddle shifters ........ 121
Stopwatch (RACETIMER) ...................172
Stowage areas ................................... 218
Stowage compartments
Armrest (front) ............................... 219
Armrest (under) ............................ .219
Cup holders ................................... 220
Glove box ....................................... 219
Important safety information ......... 218
Stowage net ................................... 219
see Stowage areas
Stowage net ....................................... 219
Summer opening
see Side windows
Summer tires
In winter ........................................ 265
Sun visor ............................................ 220
Suspension setting
AMG adaptive sport suspension
system .......................................... .147
Suspension tuning
SETUP (on-board computer,
Mercedes-AMG vehicles) .............. .171
Switching air-recirculation mode
on/off ................................................. 107
Switching on media mode
Via the device lis t.......................... 217 T
Tachometer ........................................ 159
Tail lamps
Display message ............................ 186
see Lights
Tank
see Fuel tank
Tank content
Fuel gauge ....................................... 34
Technical data
Capacities ...................................... 289 18
Index
Page 39 of 298
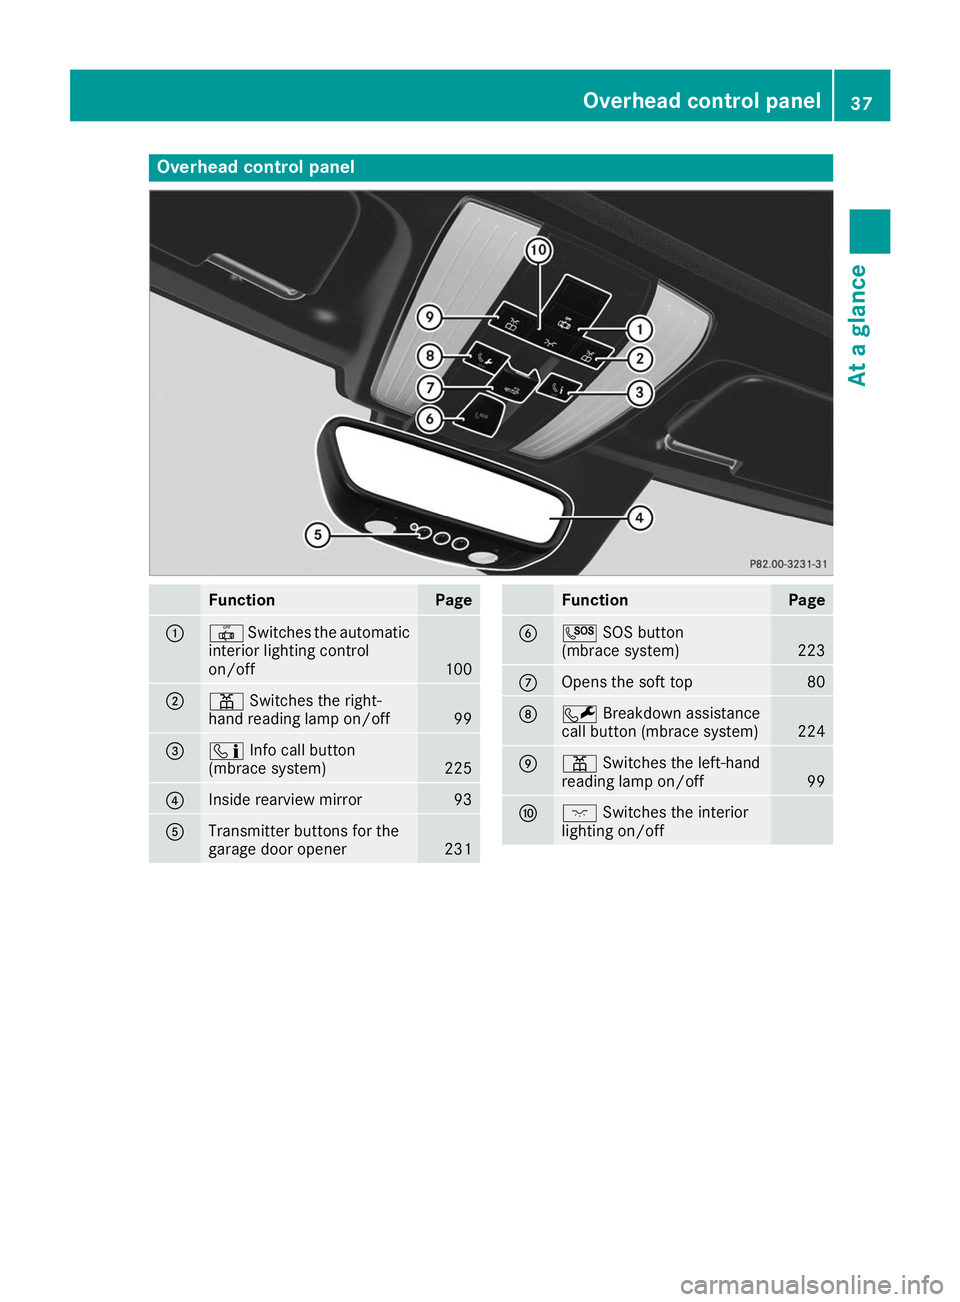
Overhead control panel
Function Page
0043
0033
Switches the automatic
interior lighting control
on/off 100
0044
003D
Switches the right-
hand reading lamp on/off 99
0087
00D9
Info call button
(mbrace system) 225
0085
Inside rearview mirror 93
0083
Transmitter buttons for the
garage door opener 231 Function Page
0084
0053
SOS button
(mbrace system) 223
006B
Opens the soft top 80
006C
0052
Breakdown assistance
call button (mbrace system) 224
006D
003D
Switches the left-hand
reading lamp on/off 99
006E
004A
Switches the interior
lighting on/off Overhead control panel
37At a glance
Page 60 of 298
Pets in the vehicle
G
WARNING
If you leave animals unsupervised or unse-
cured in the vehicle, they may press buttons
or switches, for instance.
In this way, animals may:
R activate vehicle equipment and become
trapped, for example
R switch systems on or off and thereby
endanger other road users
Furthermore, unsecured animals may be flung
around inside the vehicle in the event of an
accident or abrupt steering or braking maneu- ver, and thereby injure vehicle occupants.
There is a risk of accident and injury.
Never leave animals unattended in the vehi-
cle.
Always secure animals properly when driving,
for instance with a suitable pet carrier. Driving safety systems
Overview of driving safety systems
In this section, you will find information about
the following driving safety systems: R ABS ( Anti-lock BrakingSystem)
(Y page 58)
R BAS ( Brake Assist System) (Y page 59)
R Active Brake Assist (Y page 59)
R ESP ®
(Electronic StabilityProgram)
(Y page 62)
R EBD ( Electronic Brake force Distribution)
(Y page 64)
R ADAPTIVE BRAKE (Y page 64)Important safety notes
If you fail to adapt your driving style or if you are
inattentive, the driving safety systems can nei-
ther reduce the risk of an accident nor override the laws of physics. Driving safety systems are
merely aids designed to assist driving. You are
responsible for maintaining the distance to the
vehicle in front, for vehicle speed, for braking in good time, and for staying in lane. Always adapt
your driving style to suit the prevailing road and
weather conditions and maintain a safe distance from the vehicle in front. Drive carefully.
The driving safety systems described only work
as effectively as possible when there is ade-
quate contact between the tires and the road
surface. Please pay special attention to the
notes on tires, recommended minimum tire
tread depths, etc. (Y page 263).
In wintry driving conditions, always use winter
tires (M+S tires) and if necessary, snow chains.
Only in this way will the driving safety systems
described in this section work as effectively as
possible. ABS (Anti-lock Braking System)
General information ABS regulates brake pressure in such a way that
the wheels do not lock when you brake. This
allows you to continue steering the vehicle when braking.
The 0025 ABS warning lamp in the instrument
cluster lights up when the ignition is switched
on. It goes out when the engine is running.
ABS works from a speed of about 5 mph
(8 km/h), regardless of road-surface conditions.
ABS works on slippery surfaces, even when you only brake gently.
Important safety notes i
Observe the "Important safety notes" sec-
tion (Y page 58). G
WARNING
If ABS is faulty, the wheels could lock when
braking. The steerability and braking charac-
teristics may be severely impaired. Addition-
ally, further driving safety systems are deac-
tivated. There is an increased danger of skid- ding and accidents.
Drive on carefully. Have ABS checked imme-
diately at a qualified specialist workshop.
When ABS is malfunctioning, other systems,
including driving safety systems, will also
become inoperative. Observe the information
on the ABS warning lamp (Y page 201) and dis-58
Driving safety systemsSafety
Page 70 of 298
Changing the settings of the locking
system
You can change the settings of the locking sys-
tem. This means that only the driver's door, the
glove box and the fuel filler flap are unlocked
when the vehicle is unlocked. This is useful if you
frequently travel on your own.
X To change the setting: press and hold down
the 0036 and0037 buttons simultaneously
for approximately six seconds until the indi-
cator lamp flashes twice (Y page 69).
If the setting of the locking system is changed
within the signal range of the vehicle, pressing
the 0037 or0036 button:
R locks or
R unlocks the vehicle
The SmartKey now functions as follows:
X To unlock: press the0036button once.
X To unlock centrally: press the0036button
twice.
X To lock: press the 0037button.
The KEYLESS-GO functions can be changed as
follows:
X To unlock the driver's door: touch the inner
surface of the door handle on the driver's
door.
X To unlock centrally: touch the inner surface
of the front-passenger door handle.
X To lock centrally: touch the outer sensor
surface on one of the door handles.
Restoring factory settings:
X Press the 0036and0037 buttons simultane-
ously for approximately six seconds until the
indicator lamp flashes twice (Y page 69).Mechanical key
General notes If the vehicle can no longer be locked or
unlocked with the SmartKey or KEYLESS-GO,
use the mechanical key.
If you use the mechanical key to unlock and
open the driver's door, the anti-theft alarm sys- tem will be triggered. Switch off the alarm
(Y page 64). If you unlock the vehicle using the mechanical
key, the fuel filler flap will not be unlocked auto-
matically.
X To unlock the fuel filler flap: insert the
SmartKey into the ignition lock.
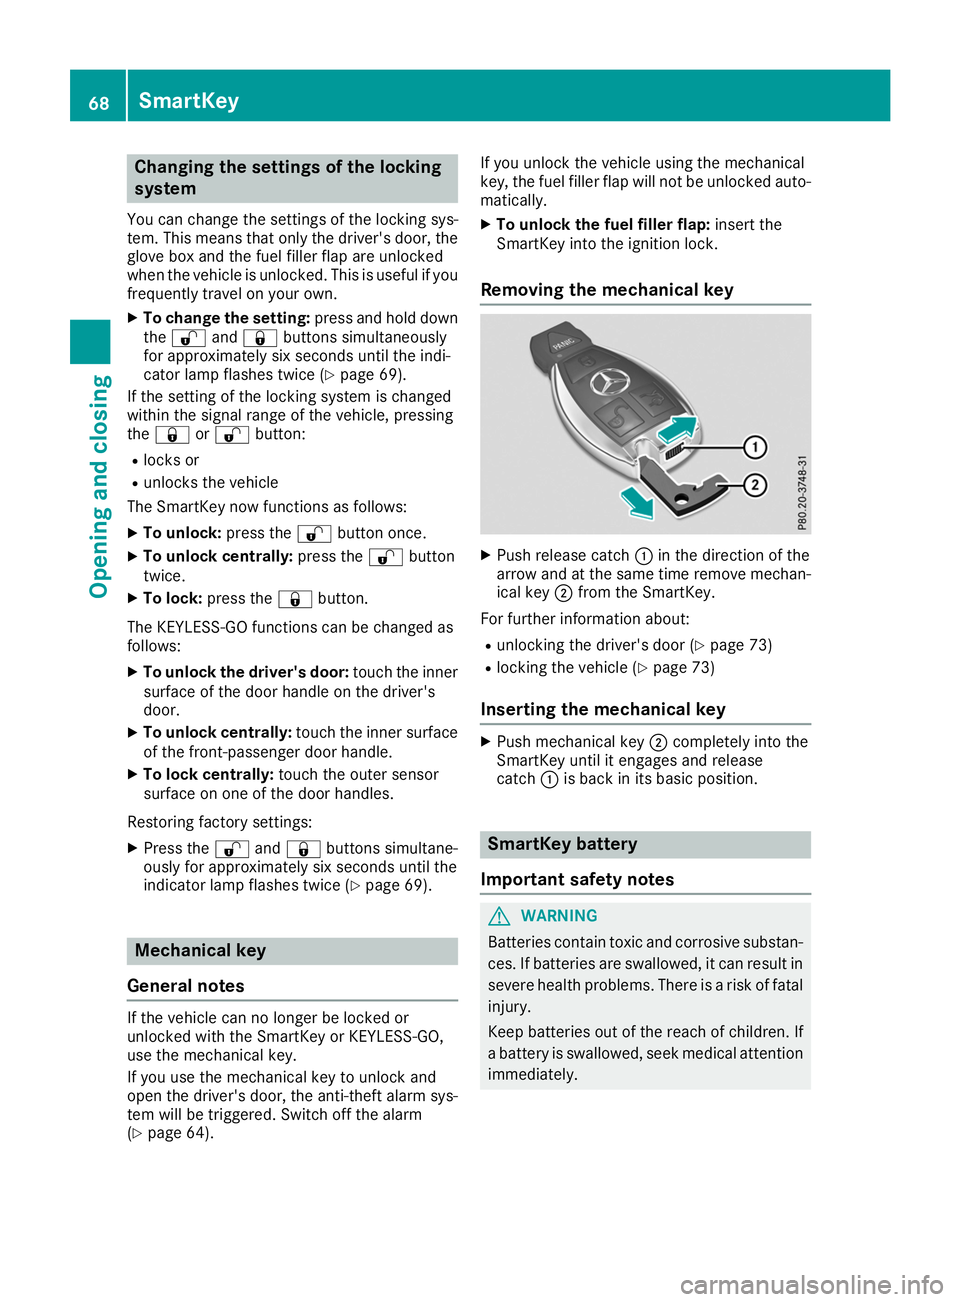
Removing the mechanical key X
Push release catch 0043in the direction of the
arrow and at the same time remove mechan- ical key 0044from the SmartKey.
For further information about:
R unlocking the driver's door (Y page 73)
R locking the vehicle (Y page 73)
Inserting the mechanical key X
Push mechanical key 0044completely into the
SmartKey until it engages and release
catch 0043is back in its basic position. SmartKey battery
Important safety notes G
WARNING
Batteries contain toxic and corrosive substan- ces. If batteries are swallowed, it can result in
severe health problems. There is a risk of fatal injury.
Keep batteries out of the reach of children. If
a battery is swallowed, seek medical attention immediately. 68
SmartKeyOpening and closing
Page 72 of 298
X
Insert the front tabs of battery compartment
cover 0043into the housing first and then press
to close it. X
Insert mechanical key 0044into the SmartKey
(Y page 68).
X Check the function of all SmartKey buttons on
the vehicle. Problems with the SmartKey
Problem
Possible causes/consequences and
0050
0050Solutions You can no longer lock or
unlock the vehicle using
the SmartKey. The SmartKey battery is discharged or nearly discharged.
X Check the SmartKey battery (Y page 69) and replace it if necessary
(Y page 69).
If this does not work: X Unlock (Y page 73) or lock (Y page 73) the vehicle using the
mechanical key. There is interference from a powerful source of radio waves.
X Unlock (Y page 73) or lock (Y page 73) the vehicle using the
mechanical key. The SmartKey is faulty.
X Unlock (Y page 73) or lock (Y page 73) the vehicle using the
mechanical key.
X Have the SmartKey checked at a qualified specialist workshop. You can no longer lock or
unlock the vehicle using
KEYLESS-GO. KEYLESS-GO was deactivated.
X Reactivate KEYLESS-GO (Y page 67). The SmartKey battery is discharged or nearly discharged.
X Check the SmartKey battery (Y page 69) and replace it if necessary
(Y page 69).
If this does not work: X Unlock (Y page 73) or lock (Y page 73) the vehicle using the
mechanical key. There is interference from a powerful source of radio waves.
X Unlock (Y page 73) or lock (Y page 73) the vehicle using the
mechanical key. 70
SmartKeyOpening and closing
Page 74 of 298
Doors
Important safety notes
G
WARNING
If children are left unsupervised in the vehicle, they could:
R open the doors, thus endangering other
people or road users.
R get out and disrupt traffic.
R operate the vehicle's equipment.
Additionally, children could set the vehicle in
motion if, for example, they:
R release the parking brake.
R shifting the automatic transmission out of
park position P
R Start the engine.
There is a risk of an accident and injury.
When leaving the vehicle, always take the
SmartKey with you and lock the vehicle. Never
leave children or animals unattended in the
vehicle. Always keep the SmartKey out of
reach of children.
When a door is opened, the side window on that
side opens slightly. When the door is closed, the side window closes again.
! The side windows will not open/close if the
battery is discharged or if the side windows
have iced up. It will then not be possible to
close the door. Do not attempt to force the
door closed. You could otherwise damage the door or the side window. Unlocking and opening doors from
the inside
You can open a door from inside the vehicle
even if it has been locked. If the vehicle has been
locked with the SmartKey or with KEYLESS-GO,
opening a door from the inside will trigger the
anti-theft alarm system. Switch off the alarm
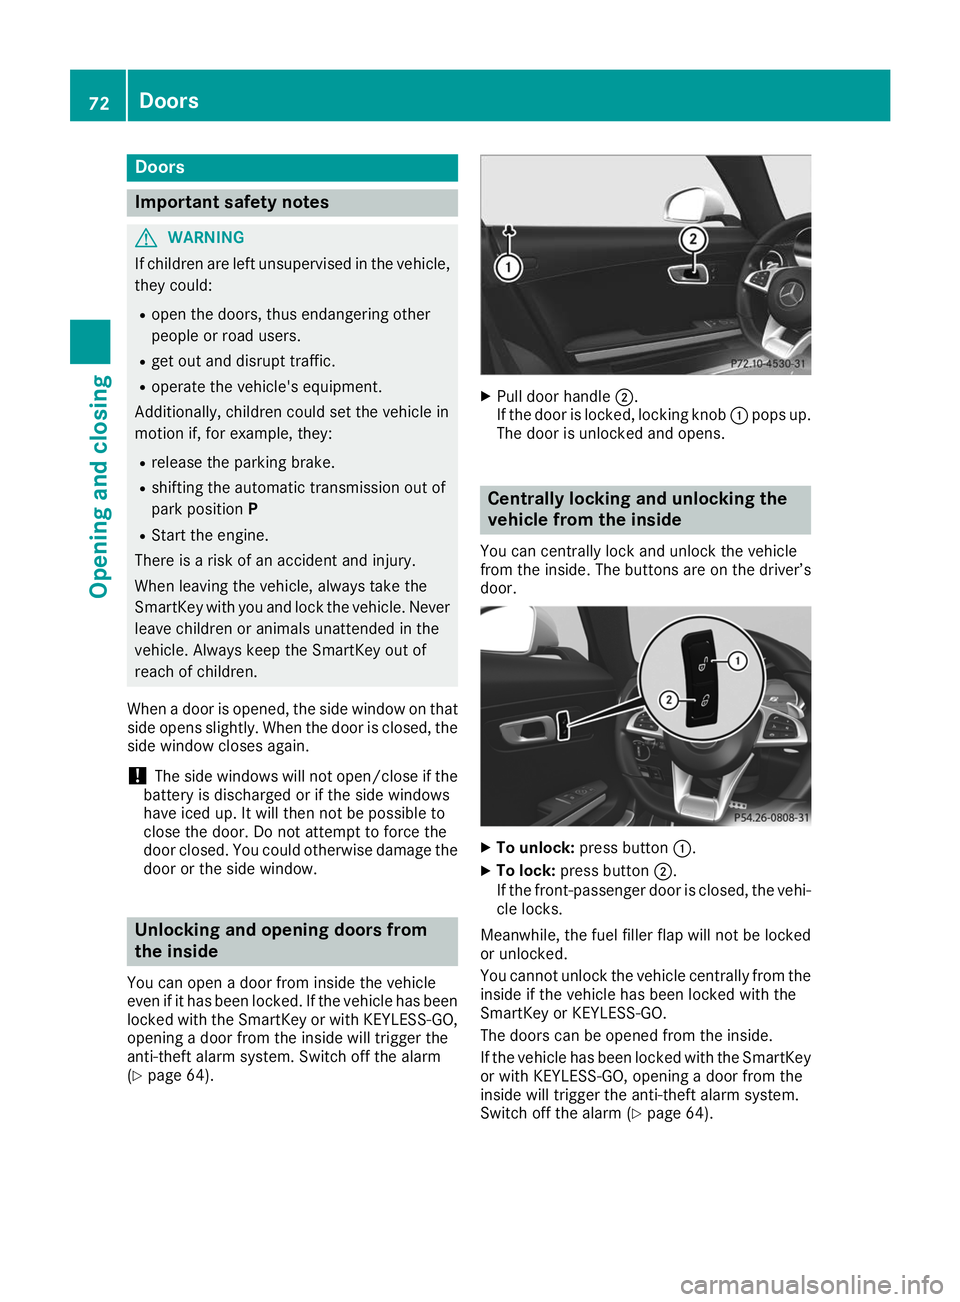
(Y page 64). X
Pull door handle 0044.
If the door is locked, locking knob 0043pops up.
The door is unlocked and opens. Centrally locking and unlocking the
vehicle from the inside
You can centrally lock and unlock the vehicle
from the inside. The buttons are on the driver’s
door. X
To unlock: press button 0043.
X To lock: press button 0044.
If the front-passenger door is closed, the vehi-
cle locks.
Meanwhile, the fuel filler flap will not be locked
or unlocked.
You cannot unlock the vehicle centrally from the
inside if the vehicle has been locked with the
SmartKey or KEYLESS-GO.
The doors can be opened from the inside.
If the vehicle has been locked with the SmartKey
or with KEYLESS-GO, opening a door from the
inside will trigger the anti-theft alarm system.
Switch off the alarm (Y page 64).72
DoorsOpening and closing
Page 75 of 298
If a locked door is opened from the inside, the
previous unlock status of the vehicle will be
taken into consideration if:
R the vehicle was locked using the locking but-
ton for the central locking, or
R locked automatically
The vehicle will be fully unlocked if it had previ-
ously been fully unlocked. If only the driver's
door had been previously unlocked, only the
door which has been opened from the inside is
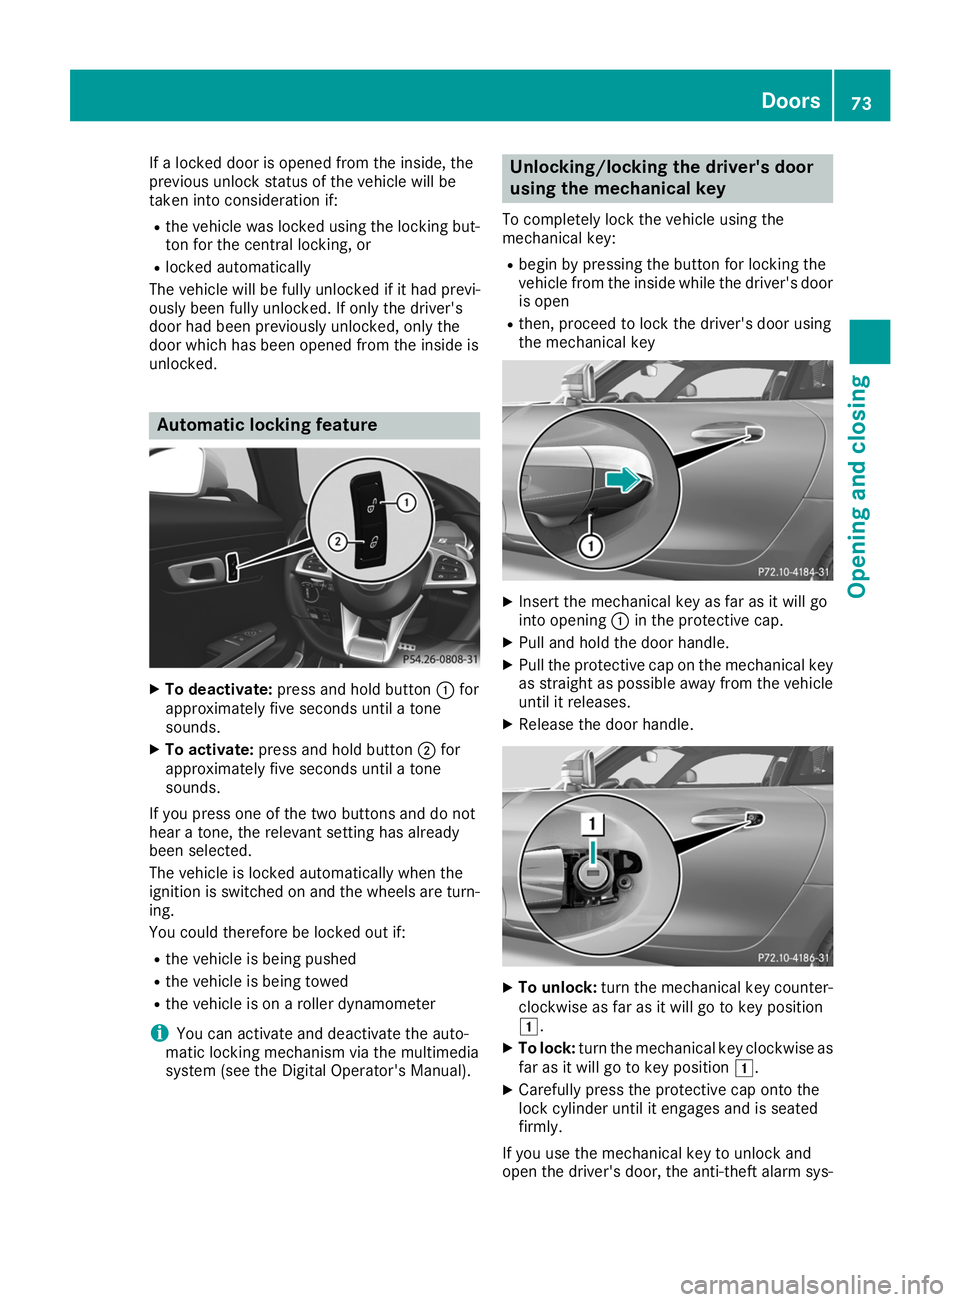
unlocked. Automatic locking feature
X
To deactivate: press and hold button 0043for
approximately five seconds until a tone
sounds.
X To activate: press and hold button 0044for
approximately five seconds until a tone
sounds.
If you press one of the two buttons and do not
hear a tone, the relevant setting has already
been selected.
The vehicle is locked automatically when the
ignition is switched on and the wheels are turn-
ing.
You could therefore be locked out if:
R the vehicle is being pushed
R the vehicle is being towed
R the vehicle is on a roller dynamometer
i You can activate and deactivate the auto-
matic locking mechanism via the multimedia
system (see the Digital Operator's Manual). Unlocking/locking the driver's door
using the mechanical key
To completely lock the vehicle using the
mechanical key: R begin by pressing the button for locking the
vehicle from the inside while the driver's door
is open
R then, proceed to lock the driver's door using
the mechanical key X
Insert the mechanical key as far as it will go
into opening 0043in the protective cap.
X Pull and hold the door handle.
X Pull the protective cap on the mechanical key
as straight as possible away from the vehicleuntil it releases.
X Release the door handle. X
To unlock: turn the mechanical key counter-
clockwise as far as it will go to key position
0047.
X To lock: turn the mechanical key clockwise as
far as it will go to key position 0047.
X Carefully press the protective cap onto the
lock cylinder until it engages and is seated
firmly.
If you use the mechanical key to unlock and
open the driver's door, the anti-theft alarm sys- Doors
73Opening and closing Z
Page 87 of 298
G
WARNING
You could lose control of your vehicle if you do the following while driving:
R adjust the driver's seat, head restraint,
steering wheel or mirrors
R fasten the seat belt
There is a risk of an accident.
Adjust the driver's seat, head restraint, steer-
ing wheel and mirror and fasten your seat belt before starting the engine.
For safety reasons, seat fore-and-aft adjustment on electrically adjustable seats is only possible
for a maximum of two seconds when the vehicleis in motion. The seat fore-and-aft adjustment
can then no longer be set. G
WARNING
If you adjust the seat height carelessly, you or other vehicle occupants could be trapped andthereby injured. Children in particular could
accidentally press the electrical seat adjust-
ment buttons and become trapped. There is a
risk of injury.
While moving the seats, make sure that your
hands or other body parts do not get under the
lever assembly of the seat adjustment sys-
tem. G
WARNING
If head restraints are not adjusted correctly,
they cannot provide protection as intended.
There is an increased risk of injury in the head
and neck area, e.g. in the event of an accident or when braking.
Before driving off, make sure for every vehicle
occupant that the center of the head restraint supports the back of the head at about eye
level.
Using the fore-and-aft adjustment, adjust the
head restraint so that it is as close as possible to your head. G
WARNING
The seat belt does not offer the intended level of protection if you have not moved the back-
rest to an almost vertical position. When brak- ing or in the event of an accident, you could
slide underneath the seat belt and sustain
abdomen or neck injuries, for example. This
poses an increased risk of injury or even fatal
injury.
Adjust the seat properly before beginning
your journey. Always ensure that the backrestis in an almost vertical position and that the
shoulder section of your seat belt is routed
across the center of your shoulder.
! To prevent damage to the seats and the seat
heating, observe the following notes:
R Do not spill liquids onto the seats. Dry the
seats as soon as possible if liquid does get
spilled on the seats.
R If the seat covers are damp or wet, do not
switch on the seat heating. Also, do not use
the seat heating to dry the seats.
R Clean the seat covers as recommended;
see keyword "Care".
R Do not transport heavy loads on the seats.
Do not place pointed objects on the seat
cushions such as knives, nails or tools.
Where possible, use the seats only for car-
rying passengers.
R When operating the seat heating, do not
cover the seats with insulating materials,
e.g. blankets, coats, bags, protective cov-
ers, child seats or booster seats.
! Make sure that there are no objects in the
footwell under or behind the seats when mov- ing the seats back. There is a risk that the
seats and/or the objects could be damaged. Adjusting the seats manually
General notes The manually adjustable seat is only available in
Canada. Seats
85Seats, steering wheel and mirrors Z
Page 90 of 298
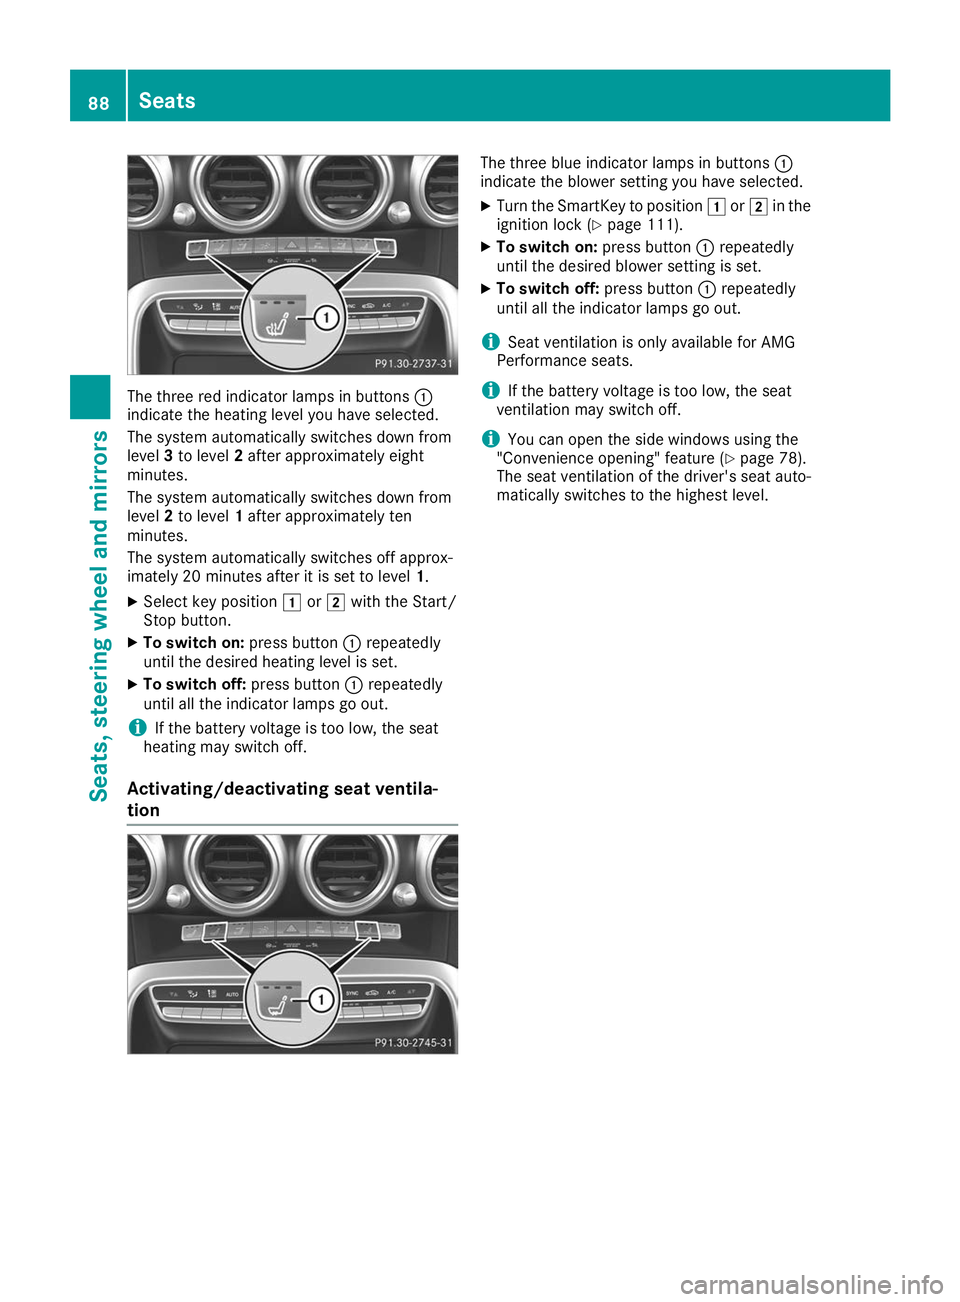
The three red indicator lamps in buttons
0043
indicate the heating level you have selected.
The system automatically switches down from
level 3to level 2after approximately eight
minutes.
The system automatically switches down from
level 2to level 1after approximately ten
minutes.
The system automatically switches off approx-
imately 20 minutes after it is set to level 1.
X Select key position 0047or0048 with the Start/
Stop button.
X To switch on: press button0043repeatedly
until the desired heating level is set.
X To switch off: press button0043repeatedly
until all the indicator lamps go out.
i If the battery voltage is too low, the seat
heating may switch off.
Activating/deactivating seat ventila-
tion The three blue indicator lamps in buttons
0043
indicate the blower setting you have selected.
X Turn the SmartKey to position 0047or0048 in the
ignition lock (Y page 111).
X To switch on: press button0043repeatedly
until the desired blower setting is set.
X To switch off: press button0043repeatedly
until all the indicator lamps go out.
i Seat ventilation is only available for AMG
Performance seats.
i If the battery voltage is too low, the seat
ventilation may switch off.
i You can open the side windows using the
"Convenience opening" feature (Y page 78).
The seat ventilation of the driver's seat auto-
matically switches to the highest level. 88
SeatsSeats, steering wheel and mirrors