tow MERCEDES-BENZ B-Class 2017 W246 Owner's Guide
[x] Cancel search | Manufacturer: MERCEDES-BENZ, Model Year: 2017, Model line: B-Class, Model: MERCEDES-BENZ B-Class 2017 W246Pages: 290, PDF Size: 19.81 MB
Page 127 of 290
cable is connected or during the charging
process.
Removing the charging cable !
Before driving away, you must ensure that,
for your own safety and to avoid damage, the charging cable has been removed from the
vehicle socket. Otherwise, you cannot shift
the transmission out of position P.
When the charge level display reaches 100%,
the battery is fully charged (Y page 153).When the battery is charged:
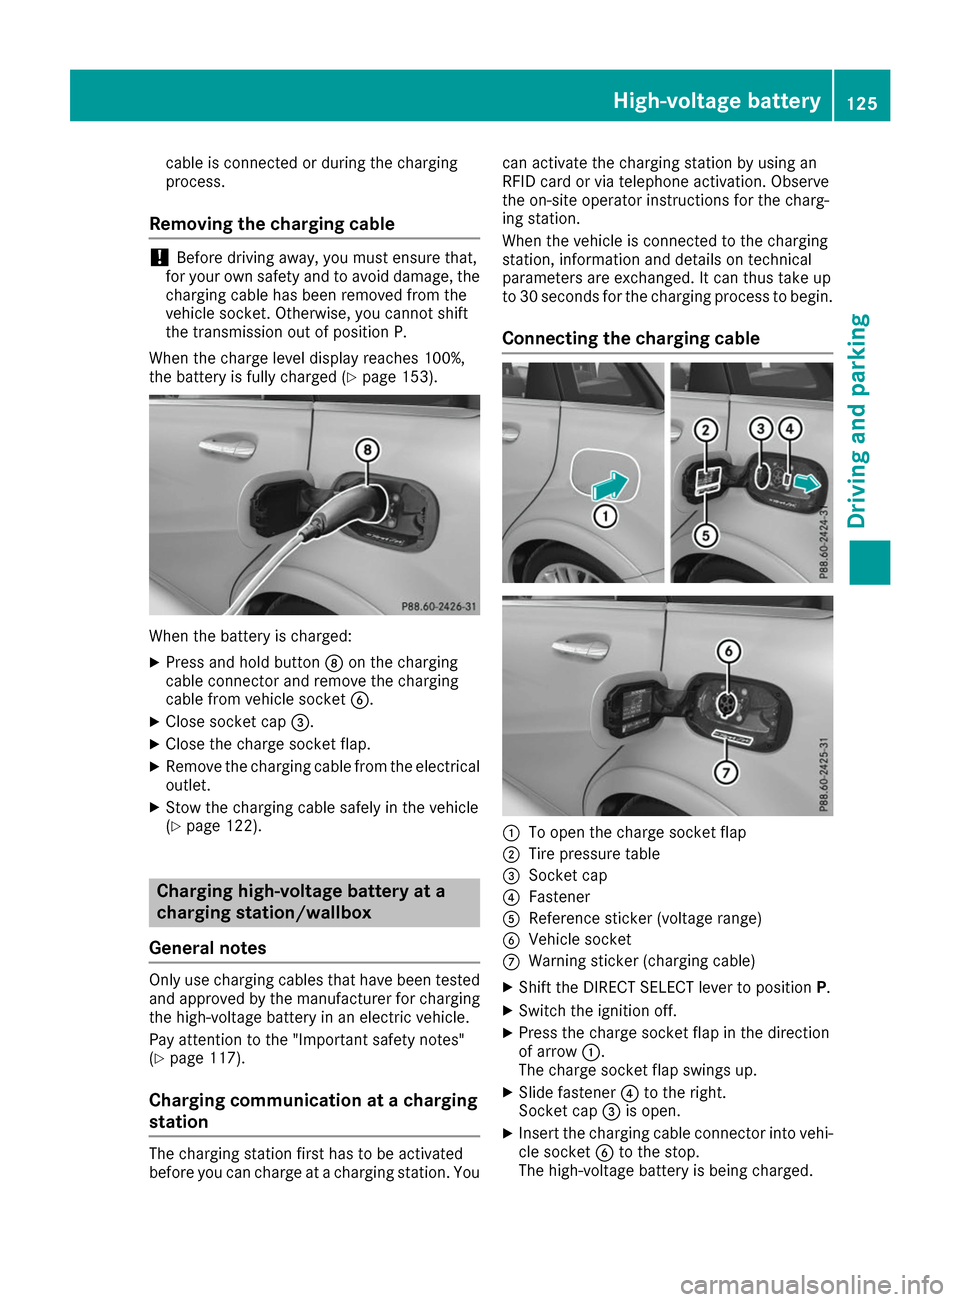
X Press and hold button 006Con the charging
cable connector and remove the charging
cable from vehicle socket 0084.
X Close socket cap 0087.
X Close the charge socket flap.
X Remove the charging cable from the electrical
outlet.
X Stow the charging cable safely in the vehicle
(Y page 122). Charging high-voltage battery at a
charging station/wallbox
General notes Only use charging cables that have been tested
and approved by the manufacturer for charging
the high-voltage battery in an electric vehicle.
Pay attention to the "Important safety notes"
(Y page 117).
Charging communication at a charging
station The charging station first has to be activated
before you can charge at a charging station. You can activate the charging station by using an
RFID card or via telephone activation. Observe
the on-site operator instructions for the charg-
ing station.
When the vehicle is connected to the charging
station, information and details on technical
parameters are exchanged. It can thus take up
to 30 seconds for the charging process to begin.
Connecting the charging cable 0043
To open the charge socket flap
0044 Tire pressure table
0087 Socket cap
0085 Fastener
0083 Reference sticker (voltage range)
0084 Vehicle socket
006B Warning sticker (charging cable)
X Shift the DIRECT SELECT lever to position P.
X Switch the ignition off.
X Press the charge socket flap in the direction
of arrow 0043.
The charge socket flap swings up.
X Slide fastener 0085to the right.
Socket cap 0087is open.
X Insert the charging cable connector into vehi-
cle socket 0084to the stop.
The high-voltage battery is being charged. High-voltage battery
125Driving and parking Z
Page 131 of 290
G
WARNING
If you leave children unsupervised in the vehi- cle, they could set it in motion by, for example:
R release the parking brake.
R shift the transmission out of park position
P.
R start the vehicle's drive system.
They could also operate the vehicle's equip-
ment. There is a risk of an accident and injury.
When leaving the vehicle, always take the
SmartKey with you and lock the vehicle. Never leave children unsupervised in the vehicle.
! While the vehicle is rolling, do not shift the
transmission directly from Dto R, from Rto D
or directly to P.
Do not open the driver's door while the vehi-
cle is in motion. Otherwise, at low speeds in
transmission position Dor R, park position P
is engaged automatically and the electrical
parking brake is applied.
The transmission could be damaged.
! Always secure the vehicle correctly against
rolling away. Otherwise, the vehicle or its driv-
etrain could be damaged.
To ensure that the vehicle is secured against
rolling away unintentionally:
R the electric parking brake must be applied.
R the transmission must be in position P.
R the SmartKey in the ignition lock must be
turned to position 0and removed from the
ignition lock.
R on uphill or downhill gradients, the front
wheels must be turned towards the curb. Switching off the drive system
G
WARNING
If you switch off the ignition while driving,
safety-relevant functions are only available
with limitations, or not at all. This can affect
the power steering and the brake boosting
effect, for example. You will require consider- ably more effort to steer and brake. There is a
risk of an accident.
Do not switch off the ignition while driving. X
Shift the DIRECT SELECT lever to position P.
X With the SmartKey: turn the SmartKey to
position 0in the ignition lock and remove it.
The immobilizer is activated.
X With the Start/Stop button: press the
Start/Stop button (Y page 109).
The drive system and all the indicator lamps in
the instrument cluster go out.
When the driver's door is closed, this corre-
sponds to SmartKey position 1. When the
driver's door is open, this corresponds to
SmartKey position 0: "Key removed".
If you switch the engine off with the transmis-
sion in position Ror D, the transmission auto-
matically shifts to N.
With the SmartKey: if you then open the driv-
er's door or the front-passenger door or remove
the SmartKey from the ignition, the transmis-
sion automatically shifts to P.
With the Start/Stop button: if you then open
the driver's door or the front-passenger door,
the transmission automatically shifts to P.
If you want the transmission to remain in neutral N, e.g. when having the vehicle cleaned in an
automatic car wash with a towing system:
X Vehicles with the Start-Stop button:
remove the Start-Stop button from the igni-
tion lock.
X Insert the SmartKey into the ignition lock.
X All vehicles: switch the ignition on.
X Depress the brake pedal and keep it
depressed.
X Shift to neutral N.
X Release the brake pedal.
X Release the electric parking brake.
X Switch off the ignition and leave the SmartKey
in the ignition lock. Parking
129Driving and parking Z
Page 136 of 290
Wet roads
If you have driven for a long time in heavy rain
without braking, there may be a delayed reac-
tion from the brakes when braking for the first
time. This may also occur after the vehicle has
been washed or driven through deep water.
You have to depress the brake pedal more
firmly. Maintain a greater distance from the
vehicle in front.
After driving on a wet road or having the vehicle
washed, brake firmly while paying attention to
the traffic conditions. This will warm up the
brake discs, thereby drying them more quickly
and protecting them against corrosion.
Limited braking performance on salt-
treated roads If you drive on salted roads, a layer of salt resi-
due may form on the brake discs and brake
pads. This can result in a significantly longer
braking distance.
R In order to prevent any salt build-up, apply the
brakes occasionally while paying attention to
the traffic conditions.
R Carefully depress the brake pedal and the
beginning and end of a journey.
R Maintain a greater distance to the vehicle
ahead.
Servicing the brakes !
The brake fluid level may be too low, if:
R if the red brake warning lamp lights up in
the instrument cluster and
R you hear a warning tone while the engine is
running
Observe additional warning messages in the
multifunction display.
The brake fluid level may be too low due to
brake pad wear or leaking brake lines.
Have the brake system checked immediately.
Consult a qualified specialist workshop to
arrange this.
! A function or performance test should only
be carried out on a 2-axle dynamometer. If
you wish to operate the vehicle on such a
dynamometer, please consult a qualified spe- cialist workshop in advance. You could oth-
erwise damage the drive train or the brake
system. !
As the ESP ®
system operates automatically,
the engine and the ignition must be switched
off (the SmartKey must be in position 0or 1in
the ignition lock) if:
R the electric parking brake is tested on a
brake dynamometer (for a maximum of
ten seconds)
R the vehicle is towed with the front axle
raised.
Braking triggered automatically by ESP ®
may
seriously damage the brake system.
All checks and maintenance work on the brake
system must be carried out at a qualified spe-
cialist workshop.
Have brake pads installed and brake fluid
replaced at a qualified specialist workshop.
If the brake system has only been subject to
moderate loads, you should test the functional- ity of your brakes at regular intervals.
You can find a description of Brake Assist (BAS)
on (Y page 59).
Mercedes-Benz recommends that you only have brake pads/linings installed on your vehicle
which have been approved for Mercedes-Benz
vehicles or which correspond to an equivalent
quality standard. Brake pads/linings which havenot been approved for Mercedes-Benz vehicles
or which are not of an equivalent quality could
affect your vehicle's operating safety.
Mercedes-Benz recommends that you only use
brake fluid that has been specially approved for
your vehicle by Mercedes-Benz, or which corre- sponds to an equivalent quality standard. Brakefluid which has not been approved for
Mercedes-Benz vehicles or which is not of an
equivalent quality could affect your vehicle's
operating safety.
Checking brake lining thickness You can measure the break pad/lining thick-
ness using a test gage. Color-coding (green or
red) on the test gage allows you to determine
whether the brake pad/lining thickness is still
sufficient. The test gage is in the vehicle docu-
ment wallet in the glove box. 134
Driving tipsDriving and parking
Page 139 of 290
Activation conditions
To activate cruise control, all of the following
activation conditions must be fulfilled:
R the electric parking brake must be released.
R ESP ®
must be active, but not intervening.
R the transmission must be in position D.
Storing, maintaining and calling up a
speed Storing and maintaining the current
speed
You can store the current speed if you are driv-
ing faster than 20 mph (30 km/h).
X Accelerate the vehicle to the desired speed.
X Briefly press the cruise control lever up 0043or
down 0044.
X Remove your foot from the accelerator pedal.
Cruise control is activated. The vehicle auto-
matically maintains the stored speed.
i Cruise control may be unable to maintain
the stored speed on uphill gradients. The
stored speed is resumed when the gradient
evens out. Cruise control maintains the
stored speed on downhill gradients by auto-
matically applying the brakes.
Storing the current speed or calling up the
last stored speed G
WARNING
If you call up the stored speed and it differs
from the current speed, the vehicle acceler-
ates or decelerates. If you do not know the
stored speed, the vehicle could accelerate or brake unexpectedly. There is a risk of an acci-
dent.
Pay attention to the road and traffic condi-
tions before calling up the stored speed. If you do not know the stored speed, store the
desired speed again.
X Briefly pull the cruise control lever towards
you 0085.
X Remove your foot from the accelerator pedal.
The first time cruise control is activated, it
stores the current speed or regulates the
speed of the vehicle to the previously stored
speed. Setting a speed Keep in mind that it may take a brief moment
until the vehicle has accelerated or braked to
the speed set.
X To adjust the set speed in10 km/hincre-
ments:briefly press cruise control lever
0043up
beyond the pressure point for a higher speed, or down 0044for a lower speed.
or X Keep the cruise control lever pressed beyond
the point of resistance until the desired speed is set. Press cruise control lever up 0043for a
higher speed or down 0044for a lower speed.
X To adjust the set speed in1 km/hincre-
ments:briefly press cruise control lever up
0043
to the pressure point for a higher speed or
down 0044for a lower speed.
or
X Keep the cruise control lever pressed to the
point of resistance until the desired speed is
set. Press cruise control lever up 0043for a
higher speed or down 0044for a lower speed.
i Cruise control is not deactivated if you
depress the accelerator pedal. For example, if
you accelerate briefly to overtake, cruise con-
trol adjusts the vehicle's speed to the last
speed stored after you have finished overtak-
ing.
Deactivating cruise control There are several ways to deactivate cruise con-
trol:
X Briefly press the cruise control lever forwards
0087.
or X Brake.
Cruise control is automatically deactivated if: R the vehicle is secured with the electric park-
ing brake
R you are driving at less than 20 mph (30 km/h)
R ESP ®
intervenes or you deactivate ESP ®
R you shift the transmission to position Nwhile
driving
If cruise control is deactivated, you will hear a
warning tone. You will see the Cruise Con‐
Cruise Con‐
trol Off trol Off message in the multifunction display
for approximately five seconds. Driving systems
137Driving and parking Z
Page 140 of 290
i
When you switch off the engine, the last
speed stored is cleared. HOLD function
General notes The HOLD function can assist the driver in the
following situations:
R when pulling away, especially on steep slopes
R when maneuvering on steep slopes
R when waiting in traffic
The vehicle is kept stationary without the driver
having to depress the brake pedal.
The braking effect is canceled and the HOLD
function deactivated when you depress the
accelerator pedal to pull away.
Important safety notes G
WARNING
When leaving the vehicle, it can still roll away despite being braked by the HOLD function if:
R there is a malfunction in the system or in
the voltage supply.
R the HOLD function has been deactivated by
pressing the accelerator pedal or the brake
pedal, e.g. by a vehicle occupant.
R the electrical system in the engine com-
partment, the battery or the fuses have
been tampered with.
R the battery is disconnected
There is a risk of an accident.
If you wish to exit the vehicle, always turn off the HOLD function and secure the vehicle
against rolling away.
! If the HOLD function is activated, the vehicle
brakes automatically in certain situations.
To prevent damage to the vehicle, deactivate
the HOLD function in the following or other
similar situations:
R when towing the vehicle
R in the car wash
Deactivating the HOLD function (Y page 138).Activation conditions You can activate the HOLD function if:
R the vehicle is stationary
R the engine is running or if it has been auto-
matically switched off by the ECO start/stop
function
R the driver's door is closed or your seat belt is
fastened
R the electric parking brake is released
R the transmission position D,Ror Nis engaged
Activating the HOLD function X
Make sure that the activation conditions are
met.
X Depress the brake pedal.
X Quickly depress the brake pedal further
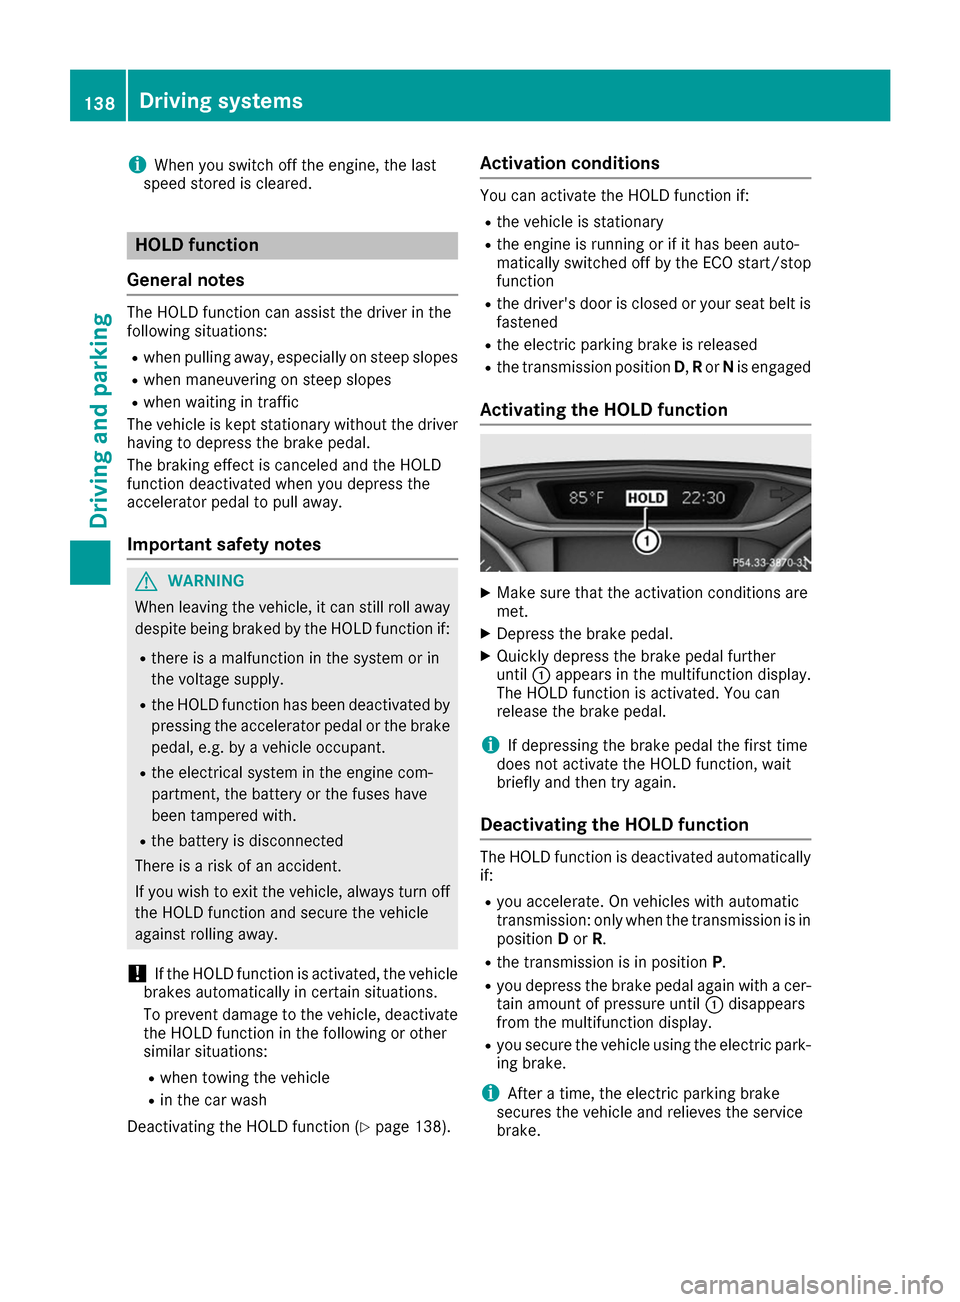
until 0043appears in the multifunction display.
The HOLD function is activated. You can
release the brake pedal.
i If depressing the brake pedal the first time
does not activate the HOLD function, wait
briefly and then try again.
Deactivating the HOLD function The HOLD function is deactivated automatically
if:
R you accelerate. On vehicles with automatic
transmission: only when the transmission is in
position Dor R.
R the transmission is in position P.
R you depress the brake pedal again with a cer-
tain amount of pressure until 0043disappears
from the multifunction display.
R you secure the vehicle using the electric park-
ing brake.
i After a time, the electric parking brake
secures the vehicle and relieves the service
brake. 138
Driving systemsDriving and parking
Page 145 of 290
R
the range of movement is too small
R the parking space is bordered by an obstacle
which is not clearly defined such as a tree or a
trailer 0043
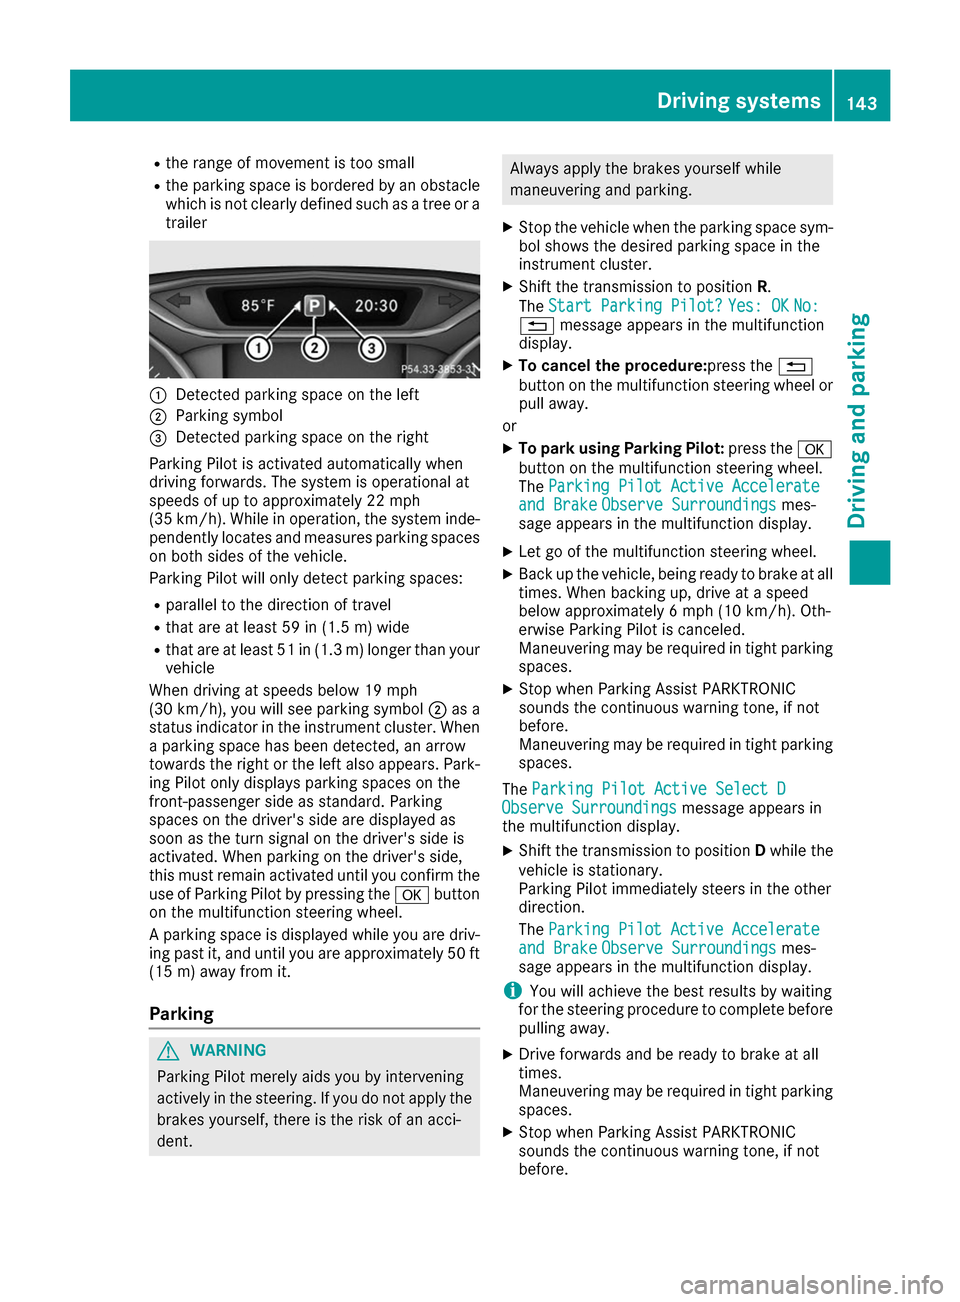
Detected parking space on the left
0044 Parking symbol
0087 Detected parking space on the right
Parking Pilot is activated automatically when
driving forwards. The system is operational at
speeds of up to approximately 22 mph
(35 km/h). While in operation, the system inde- pendently locates and measures parking spaces on both sides of the vehicle.
Parking Pilot will only detect parking spaces:
R parallel to the direction of travel
R that are at least 59 in (1.5 m) wide
R that are at least 51 in (1.3 m) longer than your
vehicle
When driving at speeds below 19 mph
(30 km/h), you will see parking symbol 0044as a
status indicator in the instrument cluster. When
a parking space has been detected, an arrow
towards the right or the left also appears. Park- ing Pilot only displays parking spaces on the
front-passenger side as standard. Parking
spaces on the driver's side are displayed as
soon as the turn signal on the driver's side is
activated. When parking on the driver's side,
this must remain activated until you confirm the
use of Parking Pilot by pressing the 0076button
on the multifunction steering wheel.
A parking space is displayed while you are driv- ing past it, and until you are approximately 50 ft
(15 m) away from it.
Pa rking G
WARNING
Parking Pilot merely aids you by intervening
actively in the steering. If you do not apply the brakes yourself, there is the risk of an acci-
dent. Always apply the brakes yourself while
maneuvering and parking.
X Stop the vehicle when the parking space sym-
bol shows the desired parking space in the
instrument cluster.
X Shift the transmission to position R.
The Start Parking Pilot?
Start Parking Pilot? Yes: OK Yes: OKNo:
No:
0038 message appears in the multifunction
display.
X To cancel the procedure:press the 0038
button on the multifunction steering wheel or pull away.
or
X To park using Parking Pilot: press the0076
button on the multifunction steering wheel.
The Parking Pilot Active Accelerate Parking Pilot Active Accelerate
and Brake
and Brake Observe Surroundings
Observe Surroundings mes-
sage appears in the multifunction display.
X Let go of the multifunction steering wheel.
X Back up the vehicle, being ready to brake at all
times. When backing up, drive at a speed
below approximately 6 mph (10 km/h). Oth-
erwise Parking Pilot is canceled.
Maneuvering may be required in tight parking
spaces.
X Stop when Parking Assist PARKTRONIC
sounds the continuous warning tone, if not
before.
Maneuvering may be required in tight parking
spaces.
The Parking Pilot Active Select D
Parking Pilot Active Select D
Observe Surroundings Observe Surroundings message appears in
the multifunction display.
X Shift the transmission to position Dwhile the
vehicle is stationary.
Parking Pilot immediately steers in the other
direction.
The Parking Pilot Active Accelerate
Parking Pilot Active Accelerate
and Brake and Brake Observe Surroundings
Observe Surroundings mes-
sage appears in the multifunction display.
i You will achieve the best results by waiting
for the steering procedure to complete before
pulling away.
X Drive forwards and be ready to brake at all
times.
Maneuvering may be required in tight parking
spaces.
X Stop when Parking Assist PARKTRONIC
sounds the continuous warning tone, if not
before. Driving systems
143Driving and parking Z
Page 148 of 290
Activating/deactivating the rear view
camera X
To activate: make sure that the SmartKey is
in position 2in the ignition lock.
X Make sure that the Activation by R gear
Activation by R gear
function is selected in the multimedia system; see the Digital Operator's Manual.
X Engage reverse gear.
The area behind the vehicle is shown with
guide lines in the multimedia system display.
The image from the rear view camera is avail-
able throughout the maneuvering process.
To deactivate: the rear view camera deacti-
vates if you shift the transmission to Por after
driving forwards a short distance.
Messages in the multimedia system dis- play The rear view camera may show a distorted view
of obstacles, show them incorrectly or not at all.The rear view camera does not show objects in
the following positions:
R very close to the rear bumper
R under the rear bumper
R in the area immediately above the tailgate
handle
! Objects not at ground level may appear to
be further away than they actually are, e.g.:
R the bumper of a parked vehicle
R the drawbar of a trailer
R the ball coupling of a trailer tow hitch
R the rear section of an HGV
R a slanted post
Use the guidelines only for orientation.
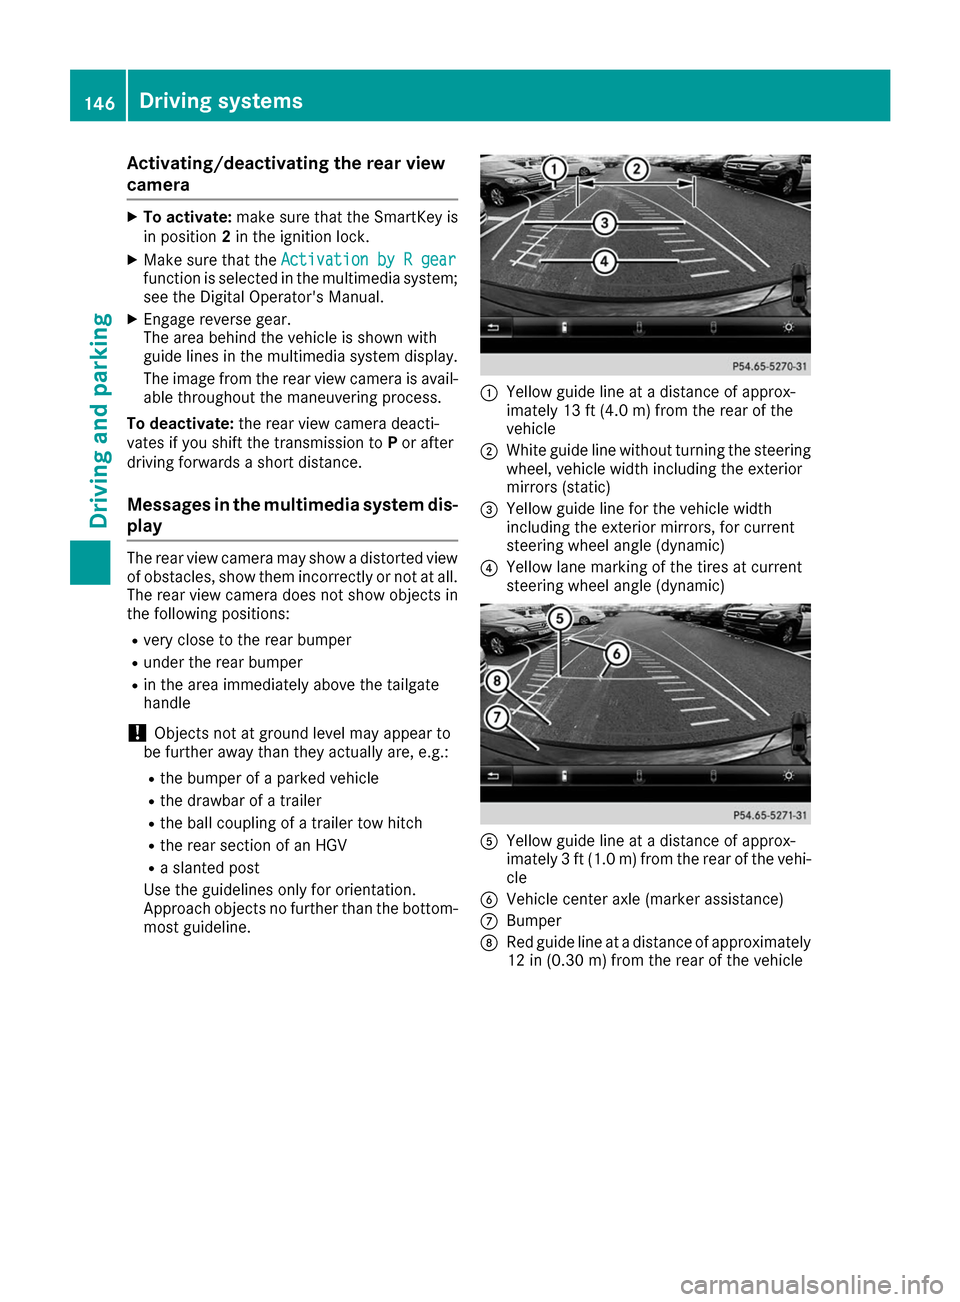
Approach objects no further than the bottom- most guideline. 0043
Yellow guide line at a distance of approx-
imately 13 ft (4.0 m) from the rear of the
vehicle
0044 White guide line without turning the steering
wheel, vehicle width including the exterior
mirrors (static)
0087 Yellow guide line for the vehicle width
including the exterior mirrors, for current
steering wheel angle (dynamic)
0085 Yellow lane marking of the tires at current
steering wheel angle (dynamic) 0083
Yellow guide line at a distance of approx-
imately 3 ft (1.0 m) from the rear of the vehi-
cle
0084 Vehicle center axle (marker assistance)
006B Bumper
006C Red guide line at a distance of approximately
12 in (0.30 m) from the rear of the vehicle 146
Driving systemsDriving an
d parking
Page 161 of 290
Route guidance active
No change of direction announced
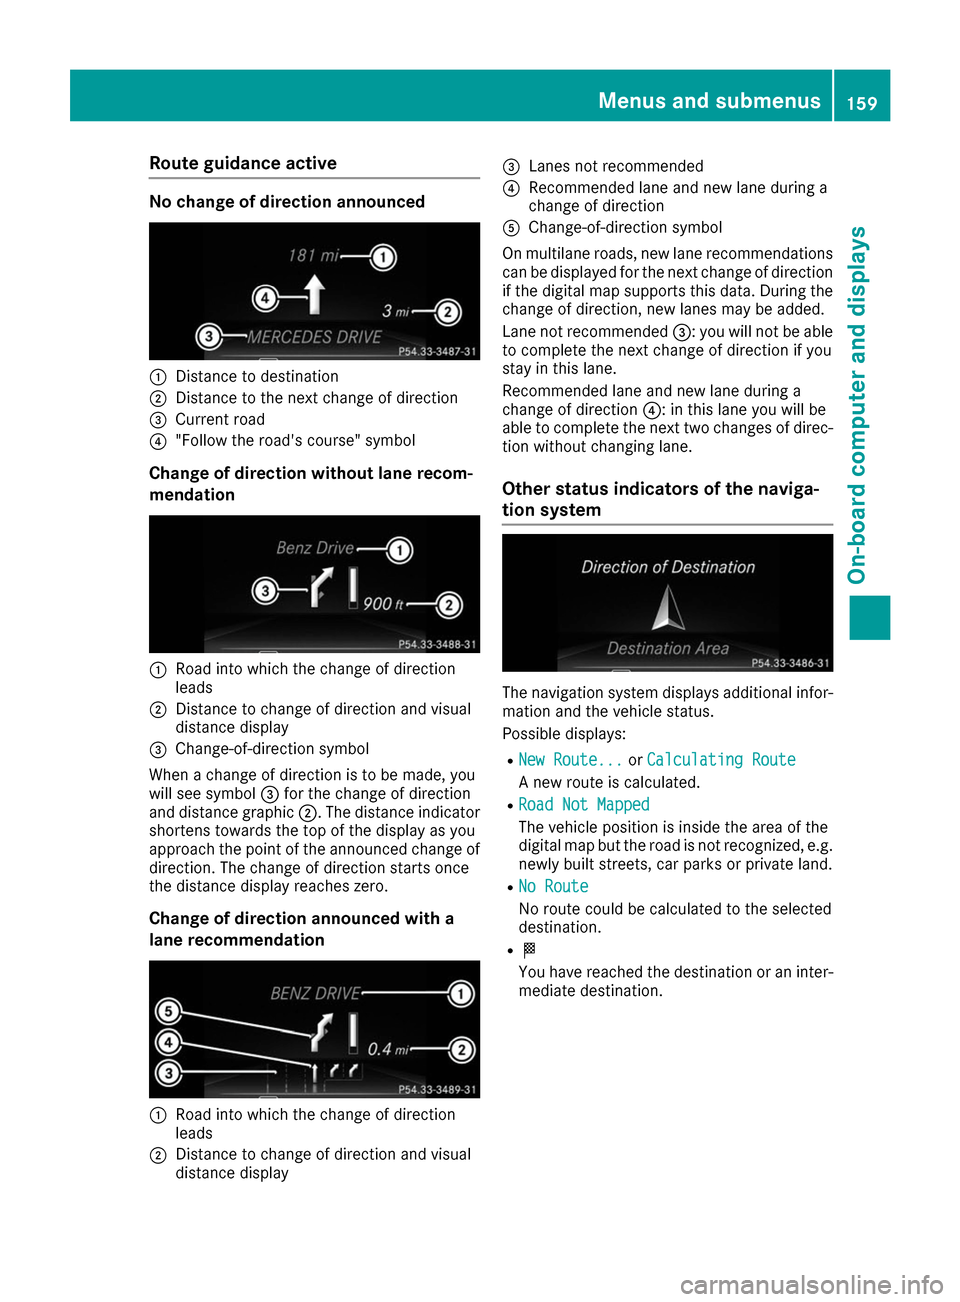
0043
Distance to destination
0044 Distance to the next change of direction
0087 Current road
0085 "Follow the road's course" symbol
Change of direction without lane recom-
mendation 0043
Road into which the change of direction
leads
0044 Distance to change of direction and visual
distance display
0087 Change-of-direction symbol
When a change of direction is to be made, you
will see symbol 0087for the change of direction
and distance graphic 0044. The distance indicator
shortens towards the top of the display as you
approach the point of the announced change of
direction. The change of direction starts once
the distance display reaches zero.
Change of direction announced with a
lane recommendation 0043
Road into which the change of direction
leads
0044 Distance to change of direction and visual
distance display 0087
Lanes not recommended
0085 Recommended lane and new lane during a
change of direction
0083 Change-of-direction symbol
On multilane roads, new lane recommendations can be displayed for the next change of direction
if the digital map supports this data. During the
change of direction, new lanes may be added.
Lane not recommended 0087: you will not be able
to complete the next change of direction if you
stay in this lane.
Recommended lane and new lane during a
change of direction 0085: in this lane you will be
able to complete the next two changes of direc-
tion without changing lane.
Other status indicators of the naviga-
tion system The navigation system displays additional infor-
mation and the vehicle status.
Possible displays:
R New Route...
New Route... orCalculating Route Calculating Route
A new route is calculated.
R Road Not Mapped
Road Not Mapped
The vehicle position is inside the area of the
digital map but the road is not recognized, e.g.
newly built streets, car parks or private land.
R No Route No Route
No route could be calculated to the selected
destination.
R 004B
You have reached the destination or an inter-
mediate destination. Menus and submenus
159On-board computer and displays Z
Page 174 of 290
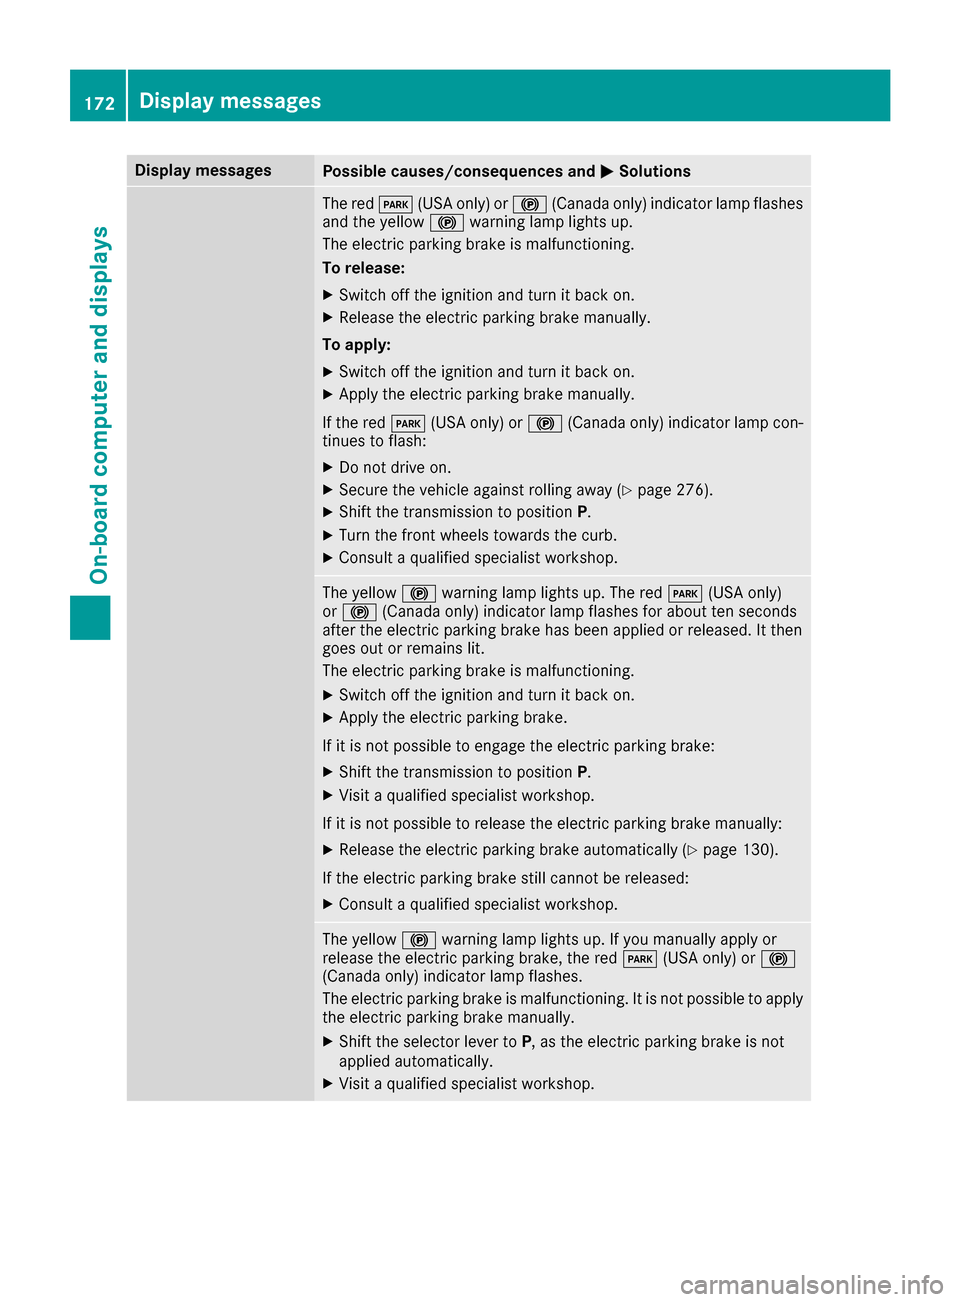
Display messages
Possible causes/consequences and
0050
0050Solutions The red
0049(USA only) or 0024(Canada only) indicator lamp flashes
and the yellow 0024warning lamp lights up.
The electric parking brake is malfunctioning.
To release:
X Switch off the ignition and turn it back on.
X Release the electric parking brake manually.
To apply: X Switch off the ignition and turn it back on.
X Apply the electric parking brake manually.
If the red 0049(USA only) or 0024(Canada only) indicator lamp con-
tinues to flash:
X Do not drive on.
X Secure the vehicle against rolling away (Y page 276).
X Shift the transmission to position P.
X Turn the front wheels towards the curb.
X Consult a qualified specialist workshop. The yellow
0024warning lamp lights up. The red 0049(USA only)
or 0024 (Canada only) indicator lamp flashes for about ten seconds
after the electric parking brake has been applied or released. It then
goes out or remains lit.
The electric parking brake is malfunctioning.
X Switch off the ignition and turn it back on.
X Apply the electric parking brake.
If it is not possible to engage the electric parking brake:
X Shift the transmission to position P.
X Visit a qualified specialist workshop.
If it is not possible to release the electric parking brake manually: X Release the electric parking brake automatically (Y page 130).
If the electric parking brake still cannot be released:
X Consult a qualified specialist workshop. The yellow
0024warning lamp lights up. If you manually apply or
release the electric parking brake, the red 0049(USA only) or 0024
(Canada only) indicator lamp flashes.
The electric parking brake is malfunctioning. It is not possible to apply
the electric parking brake manually.
X Shift the selector lever to P, as the electric parking brake is not
applied automatically.
X Visit a qualified specialist workshop. 172
Display
messagesOn-board computer and displays
Page 183 of 290
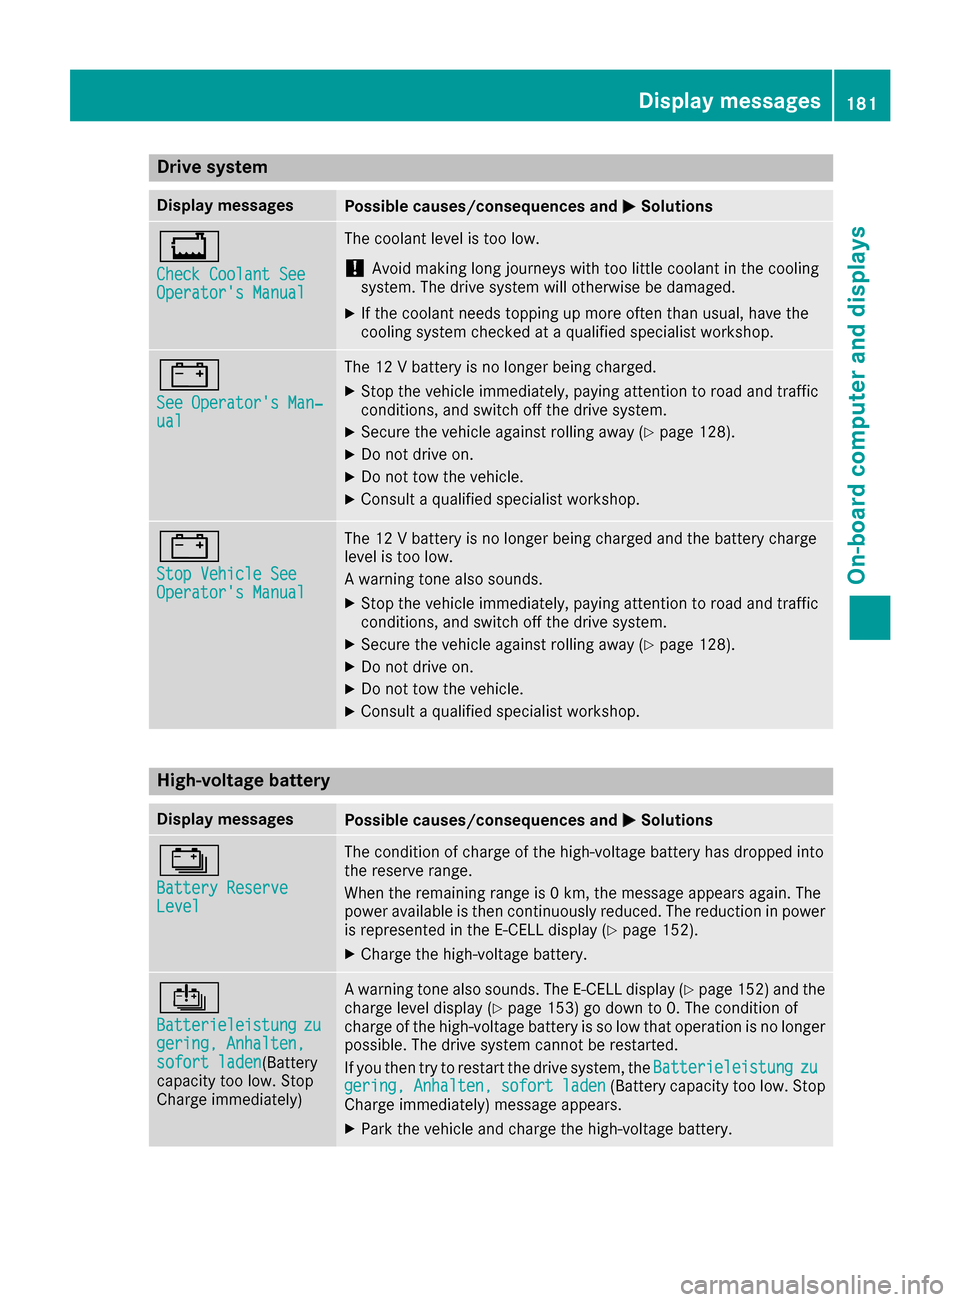
Drive system
Display messages
Possible causes/consequences and
0050
0050Solutions 00BD
Check Coolant See Check Coolant See
Operator's Manual Operator's Manual The coolant level is too low.
! Avoid making long journeys with too little coolant in the cooling
system. The drive system will otherwise be damaged.
X If the coolant needs topping up more often than usual, have the
cooling system checked at a qualified specialist workshop. 003D
See Operator's Man‐ See Operator's Man‐
ual ual The 12 V battery is no longer being charged.
X Stop the vehicle immediately, paying attention to road and traffic
conditions, and switch off the drive system.
X Secure the vehicle against rolling away (Y page 128).
X Do not drive on.
X Do not tow the vehicle.
X Consult a qualified specialist workshop. 003D
Stop Vehicle See Stop Vehicle See
Operator's Manual Operator's Manual The 12 V battery is no longer being charged and the battery charge
level is too low.
A warning tone also sounds.
X Stop the vehicle immediately, paying attention to road and traffic
conditions, and switch off the drive system.
X Secure the vehicle against rolling away (Y page 128).
X Do not drive on.
X Do not tow the vehicle.
X Consult a qualified specialist workshop. High-voltage battery
Display messages
Possible causes/consequences and
0050 0050Solutions 00D9
Battery Reserve Battery Reserve
Level Level The condition of charge of the high-voltage battery has dropped into
the reserve range.
When the remaining range is 0 km, the message appears again. The
power available is then continuously reduced. The reduction in power
is represented in the E-CELL display (Y page 152).
X Charge the high-voltage battery. 00D7
Batterieleistung Batterieleistung
zu
zu
gering, Anhalten,
gering, Anhalten,
sofort laden sofort laden(Battery
capacity too low. Stop
Charge immediately) A warning tone also sounds. The E
‑CELL display (Ypage 152) and the
charge level display (Y page 153) go down to 0. The condition of
charge of the high-voltage battery is so low that operation is no longer
possible. The drive system cannot be restarted.
If you then try to restart the drive system, the Batterieleistung
Batterieleistung zu zu
gering,
gering, Anhalten,
Anhalten, sofort
sofortladen
laden(Battery capacity too low. Stop
Charge immediately) message appears.
X Park the vehicle and charge the high-voltage battery. Display
messages
181On-board computer and displays Z