MERCEDES-BENZ B-Class ELECTRIC 2015 W246 Owner's Manual
Manufacturer: MERCEDES-BENZ, Model Year: 2015, Model line: B-Class ELECTRIC, Model: MERCEDES-BENZ B-Class ELECTRIC 2015 W246Pages: 338, PDF Size: 6.61 MB
Page 241 of 338

Useful information
............................240
Loading guidelines ............................240
Stowage areas ................................... 240
Features ............................................. 249 239Stowage and features
Page 242 of 338
Useful information
i This Operator's Manual describes all
models and all standard and optional equip- ment of your vehicle available at the time of
publication of the Operator's Manual.
Country-specific differences are possible.
Please note that your vehicle may not be
equipped with all features described. This
also applies to safety-related systems and
functions.
i Read the information on qualified special-
ist workshops (Y page 25). Loading guidelines
G
WARNING
If objects, luggage or loads are not secured or not secured sufficiently, they could slip, tip
over or be flung around and thereby hit vehicle
occupants. There is a risk of injury, particu-
larly in the event of sudden braking or a sud-
den change in direction.
Always store objects so that they cannot be
flung around. Secure objects, luggage or
loads against slipping or tipping before the
journey.
The handling characteristics of a laden vehi-
cle are dependent on the distribution of the
load within the vehicle. For this reason, you
should observe the following notes when
transporting a load:
R Never exceed the maximum permissible
gross vehicle mass or the gross axle weight rating for the vehicle (including occupants).
The values are specified on the vehicle
identification plate on the B-pillar of the
driver's door.
R The cargo compartment is the preferred
place to carry objects.
R Position heavy loads as far forwards as pos-
sible and as low down in the cargo com-
partment as possible. R
The load must not protrude above the
upper edge of the seat backrests.
R Always place the load against the rear or
front seat backrests. Make sure that the
seat backrests are securely locked into
place.
R Always place the load behind unoccupied
seats if possible.
R Use the cargo tie-down rings and the parcel
nets to transport loads and luggage.
R Use cargo tie-down rings and fastening
materials appropriate for the weight and
size of the load.
R Hook in the cargo net when loading.
R The maximum load capacity of the stowage
well under the cargo compartment floor is
55 lbs (25 kg).
R Secure the load with sufficiently strong and
wear-resistant tie-downs. Pad sharp edges
for protection.
! Do not position the load on one part of the
folding cargo compartment floor only. The
maximum load capacity of the folding cargo
compartment floor is 220 lbs (100 kg). Dis-
tribute the weight evenly to avoid damaging
the cargo compartment floor. Place a solid board under the load if necessary. Please
note that the load on the cargo compart-
ment floor will be increased when the load
is lashed down. Stowage areas
Stowage spaces
Important safety notes G
WARNING
If objects in the passenger compartment are
stowed incorrectly, they can slide or be
thrown around and hit vehicle occupants.
There is a risk of injury, particularly in the
event of sudden braking or a sudden change
in direction. 240
Stowage areasStowage and features
Page 243 of 338
R
Always stow objects so that they cannot be
thrown around in such situations.
R Always make sure that objects do not pro-
trude from stowage spaces, parcel nets or
stowage nets.
R Close the lockable stowage spaces while
driving.
R Stow and secure objects that are heavy,
hard, pointy, sharp-edged, fragile or too
large in the cargo compartment.
Observe the loading guidelines (Y page 240).
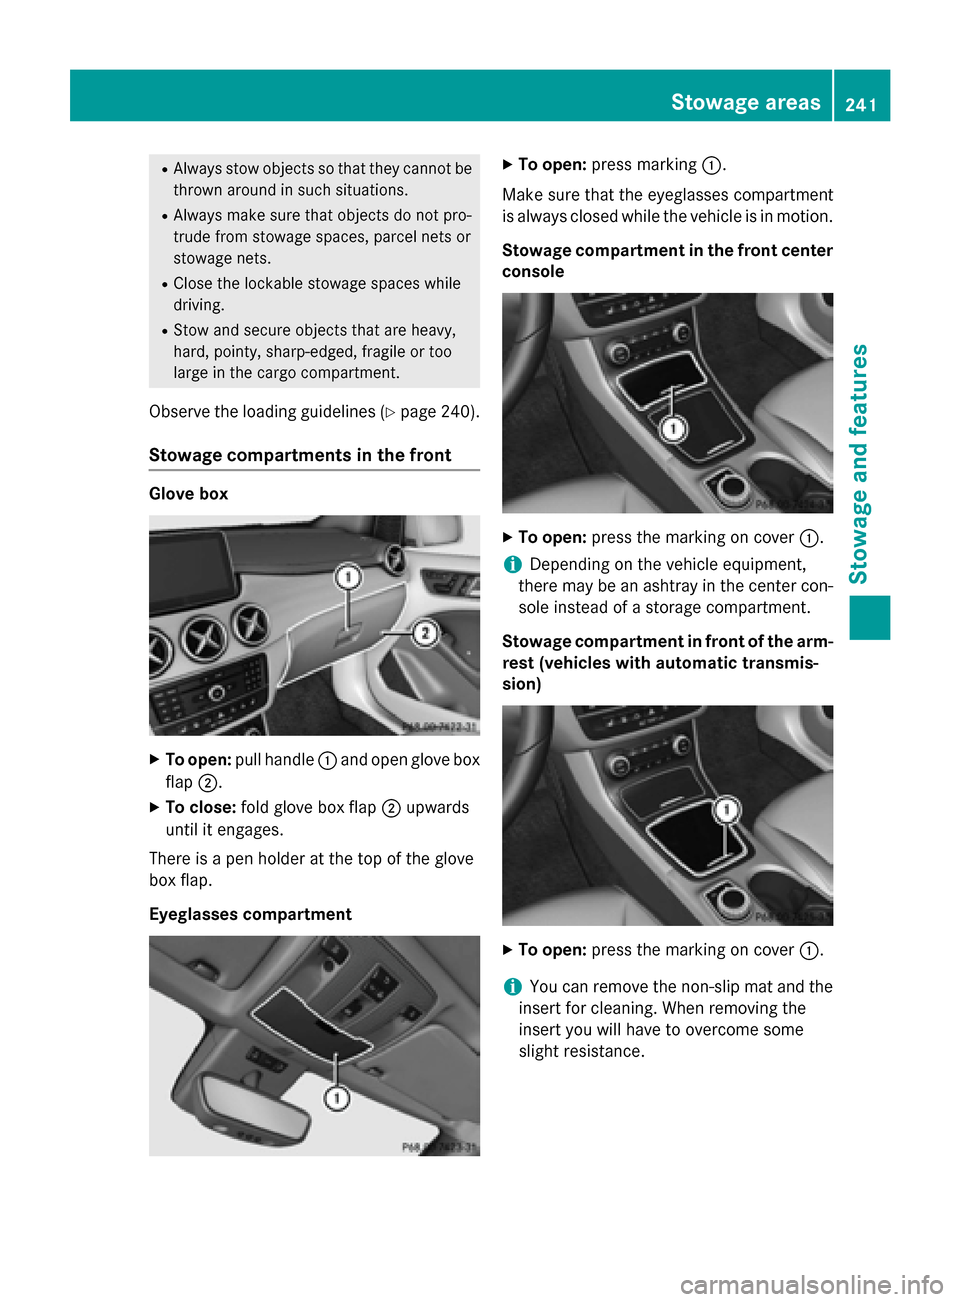
Stowage compartments in the front Glove box
X
To open: pull handle :and open glove box
flap ;.
X To close: fold glove box flap ;upwards
until it engages.
There is a pen holder at the top of the glove
box flap.
Eyeglasses compartment X
To open: press marking :.
Make sure that the eyeglasses compartment
is always closed while the vehicle is in motion.
Stowage compartment in the front centerconsole X
To open: press the marking on cover :.
i Depending on the vehicle equipment,
there may be an ashtray in the center con-
sole instead of a storage compartment.
Stowage compartment in front of the arm-
rest (vehicles with automatic transmis-
sion) X
To open: press the marking on cover :.
i You can remove the non-slip mat and the
insert for cleaning. When removing the
insert you will have to overcome some
slight resistance. Stowage areas
241Stowage an d features Z
Page 244 of 338
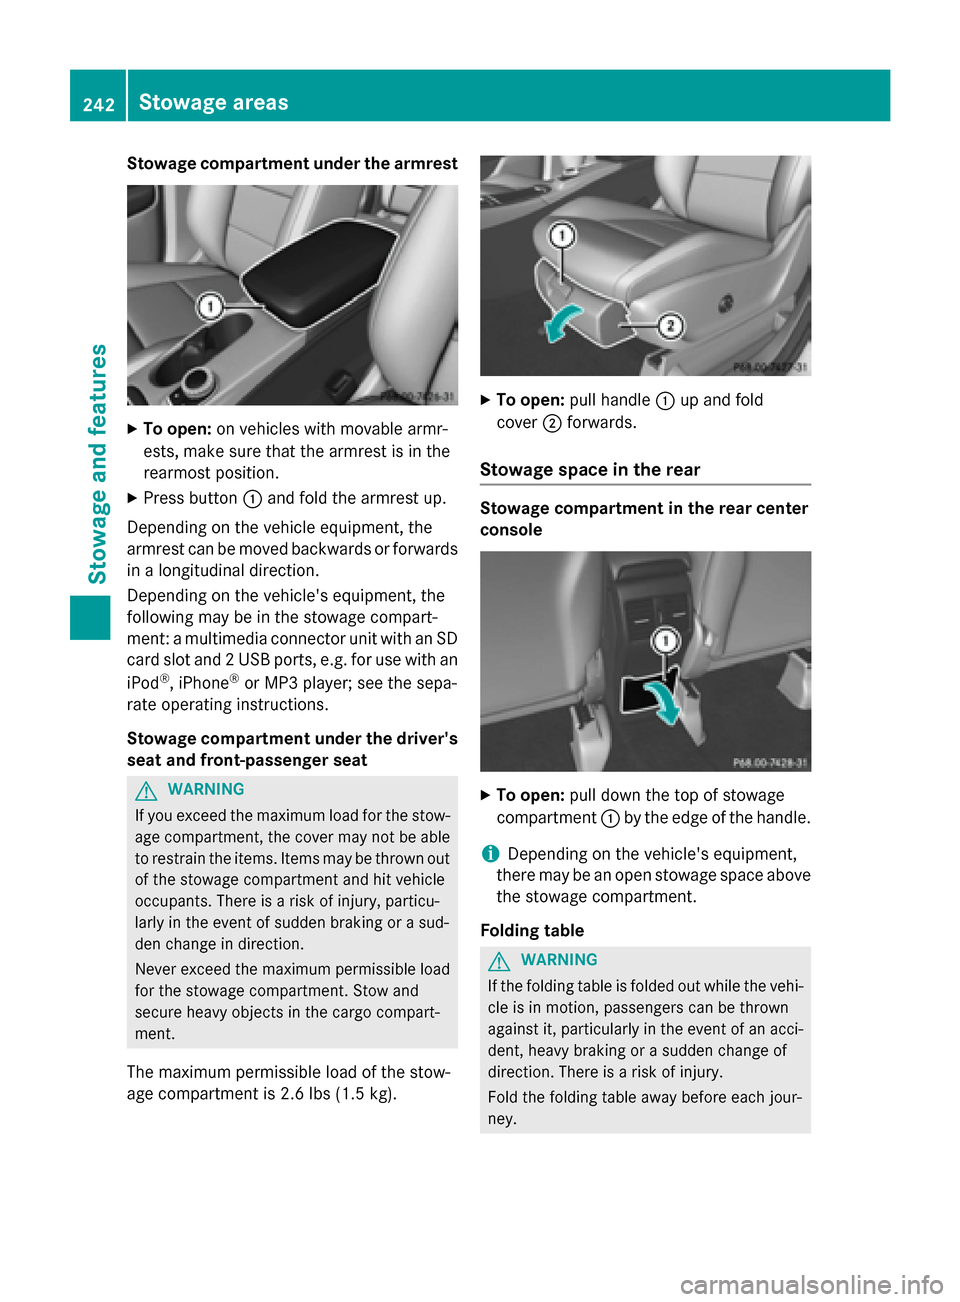
Stowage compartment under the armrest
X
To open: on vehicles with movable armr-
ests, make sure that the armrest is in the
rearmost position.
X Press button :and fold the armrest up.
Depending on the vehicle equipment, the
armrest can be moved backwards or forwards
in a longitudinal direction.
Depending on the vehicle's equipment, the
following may be in the stowage compart-
ment: a multimedia connector unit with an SD
card slot and 2 USB ports, e.g. for use with an
iPod ®
, iPhone ®
or MP3 player; see the sepa-
rate operating instructions.
Stowage compartment under the driver's seat and front-passenger seat G
WARNING
If you exceed the maximum load for the stow- age compartment, the cover may not be ableto restrain the items. Items may be thrown out
of the stowage compartment and hit vehicle
occupants. There is a risk of injury, particu-
larly in the event of sudden braking or a sud-
den change in direction.
Never exceed the maximum permissible load
for the stowage compartment. Stow and
secure heavy objects in the cargo compart-
ment.
The maximum permissible load of the stow-
age compartment is 2.6 lbs (1.5 kg). X
To open: pull handle :up and fold
cover ;forwards.
Stowage space in the rear Stowage compartment in the rear center
console
X
To open: pull down the top of stowage
compartment :by the edge of the handle.
i Depending on the vehicle's equipment,
there may be an open stowage space above the stowage compartment.
Folding table G
WARNING
If the folding table is folded out while the vehi- cle is in motion, passengers can be thrown
against it, particularly in the event of an acci- dent, heavy braking or a sudden change of
direction. There is a risk of injury.
Fold the folding table away before each jour-
ney. 242
Stowage areasStowage and features
Page 245 of 338
!
Do not load the folding table with more
than the maximum permissible load of
4.4 lbs (2 kg). X
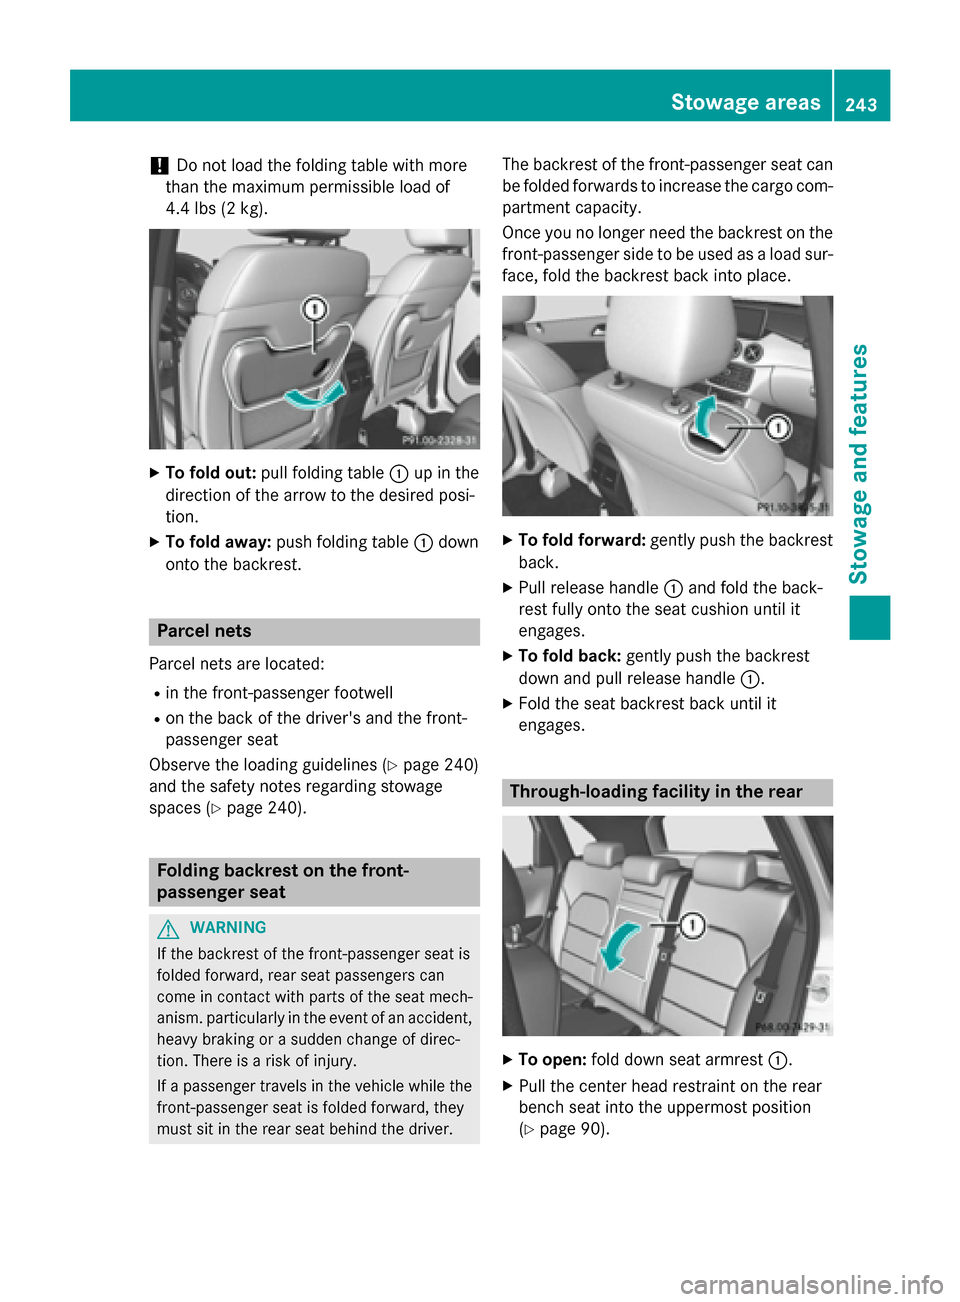
To fold out: pull folding table :up in the
direction of the arrow to the desired posi-
tion.
X To fold away: push folding table :down
onto the backrest. Parcel nets
Parcel nets are located:
R in the front-passenger footwell
R on the back of the driver's and the front-
passenger seat
Observe the loading guidelines (Y page 240)
and the safety notes regarding stowage
spaces (Y page 240). Folding backrest on the front-
passenger seat G
WARNING
If the backrest of the front-passenger seat is
folded forward, rear seat passengers can
come in contact with parts of the seat mech-
anism. particularly in the event of an accident, heavy braking or a sudden change of direc-
tion. There is a risk of injury.
If a passenger travels in the vehicle while the
front-passenger seat is folded forward, they
must sit in the rear seat behind the driver. The backrest of the front-passenger seat can
be folded forwards to increase the cargo com-
partment capacity.
Once you no longer need the backrest on the
front-passenger side to be used as a load sur- face, fold the backrest back into place. X
To fold forward: gently push the backrest
back.
X Pull release handle :and fold the back-
rest fully onto the seat cushion until it
engages.
X To fold back: gently push the backrest
down and pull release handle :.
X Fold the seat backrest back until it
engages. Through-loading facility in the rear
X
To open: fold down seat armrest :.
X Pull the center head restraint on the rear
bench seat into the uppermost position
(Y page 90). Stowage areas
243Stowage and features Z
Page 246 of 338
X
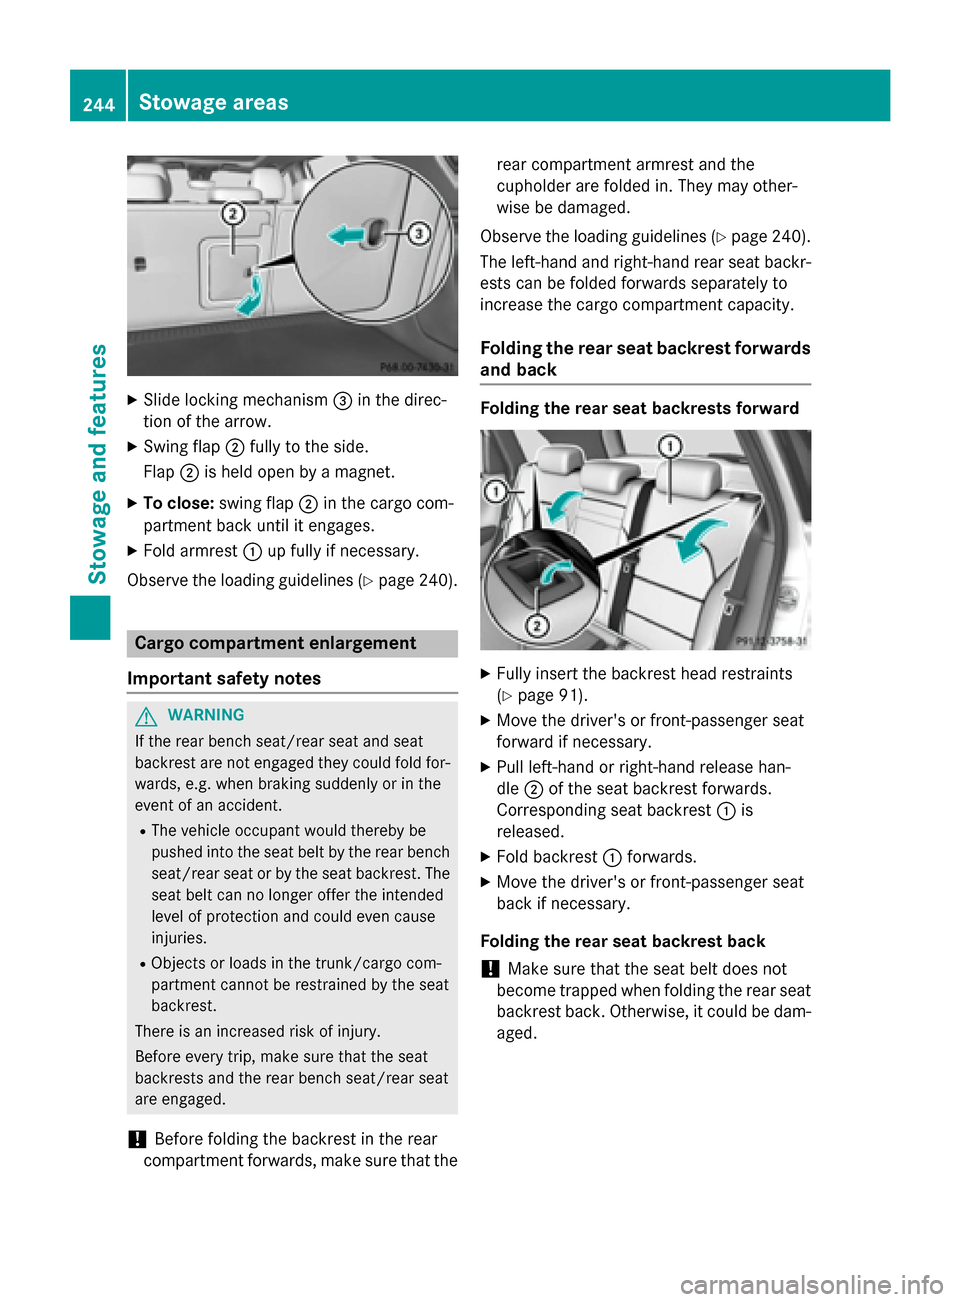
Slide locking mechanism =in the direc-
tion of the arrow.
X Swing flap ;fully to the side.
Flap ;is held open by a magnet.
X To close: swing flap ;in the cargo com-
partment back until it engages.
X Fold armrest :up fully if necessary.
Observe the loading guidelines (Y page 240).Cargo compartment enlargement
Important safety notes G
WARNING
If the rear bench seat/rear seat and seat
backrest are not engaged they could fold for- wards, e.g. when braking suddenly or in the
event of an accident.
R The vehicle occupant would thereby be
pushed into the seat belt by the rear bench
seat/rear seat or by the seat backrest. The
seat belt can no longer offer the intended
level of protection and could even cause
injuries.
R Objects or loads in the trunk/cargo com-
partment cannot be restrained by the seat
backrest.
There is an increased risk of injury.
Before every trip, make sure that the seat
backrests and the rear bench seat/rear seat
are engaged.
! Before folding the backrest in the rear
compartment forwards, make sure that the rear compartment armrest and the
cupholder are folded in. They may other-
wise be damaged.
Observe the loading guidelines (Y page 240).
The left-hand and right-hand rear seat backr- ests can be folded forwards separately to
increase the cargo compartment capacity.
Folding the rear seat backrest forwards
and back Folding the rear seat backrests forward
X
Fully insert the backrest head restraints
(Y page 91).
X Move the driver's or front-passenger seat
forward if necessary.
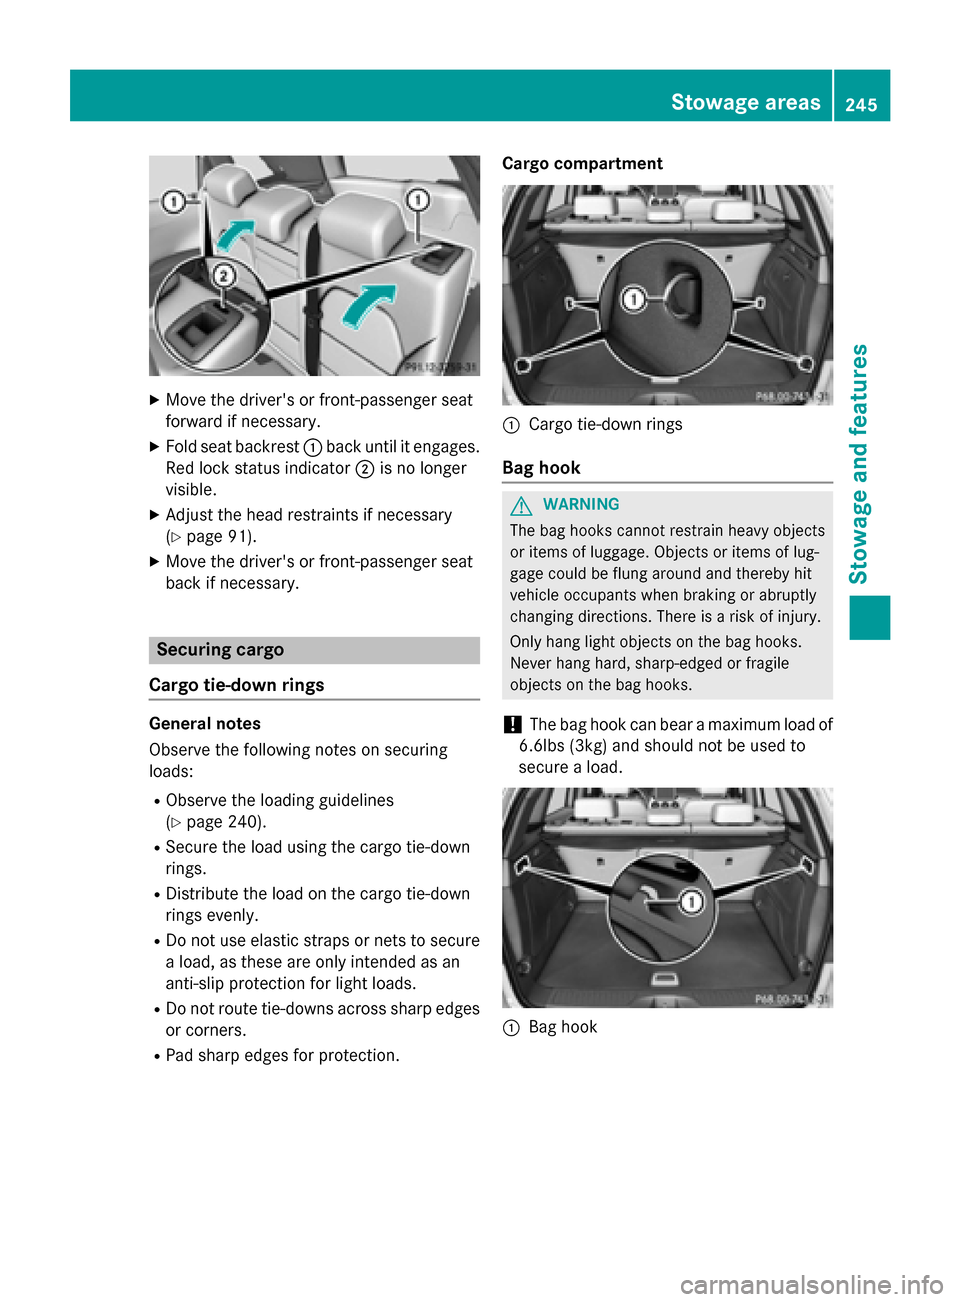
X Pull left-hand or right-hand release han-
dle ;of the seat backrest forwards.
Corresponding seat backrest :is
released.
X Fold backrest :forwards.
X Move the driver's or front-passenger seat
back if necessary.
Folding the rear seat backrest back ! Make sure that the seat belt does not
become trapped when folding the rear seat backrest back. Otherwise, it could be dam-
aged. 244
Stowage areasStowage and features
Page 247 of 338
X
Move the driver's or front-passenger seat
forward if necessary.
X Fold seat backrest :back until it engages.
Red lock status indicator ;is no longer
visible.
X Adjust the head restraints if necessary
(Y page 91).
X Move the driver's or front-passenger seat
back if necessary. Securing cargo
Cargo tie-down rings General notes
Observe the following notes on securing
loads:
R Observe the loading guidelines
(Y page 240).
R Secure the load using the cargo tie-down
rings.
R Distribute the load on the cargo tie-down
rings evenly.
R Do not use elastic straps or nets to secure
a load, as these are only intended as an
anti-slip protection for light loads.
R Do not route tie-downs across sharp edges
or corners.
R Pad sharp edges for protection. Cargo compartment
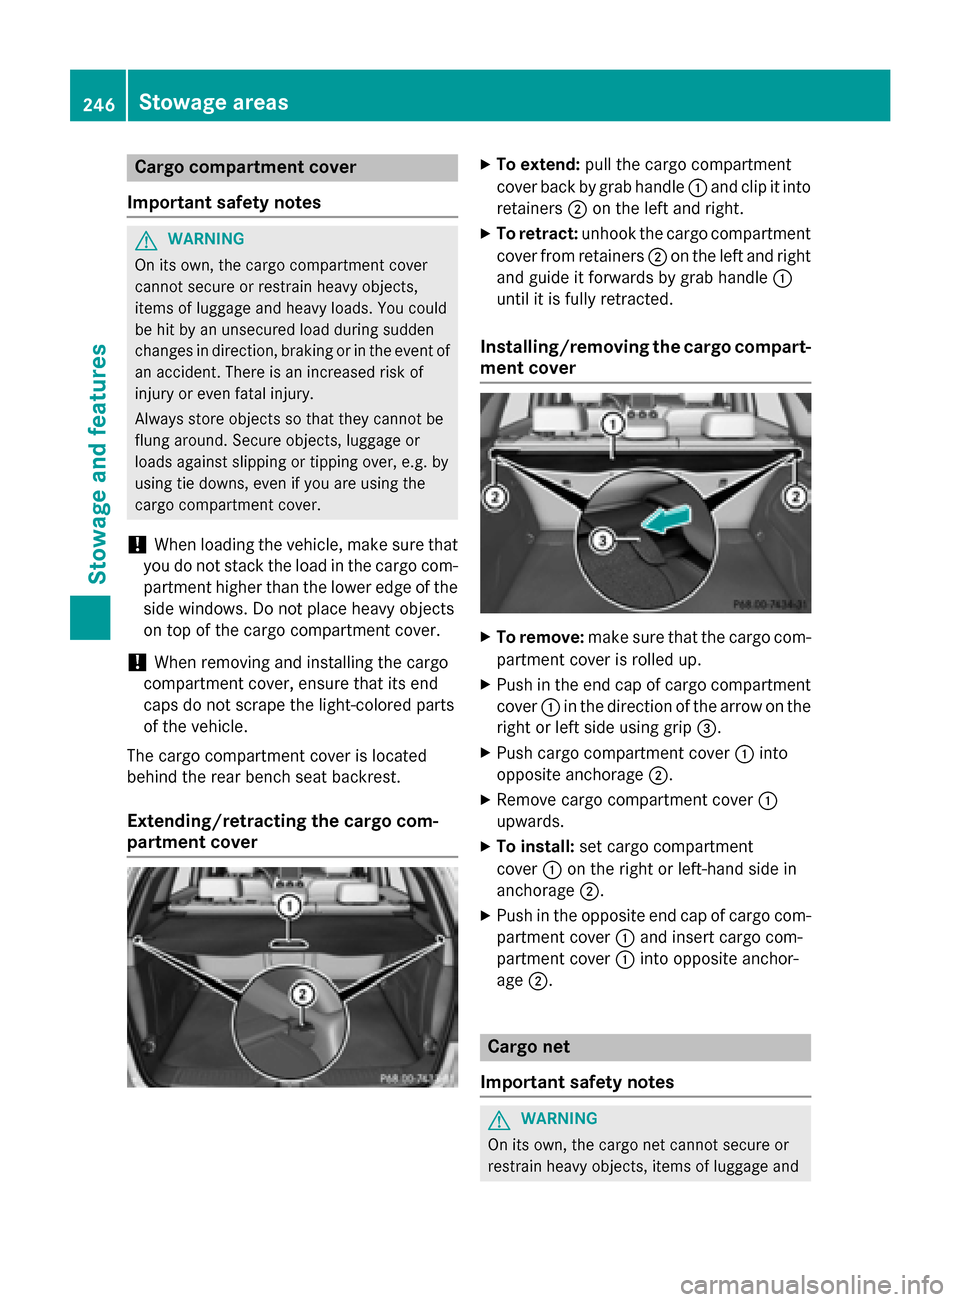
:
Cargo tie-down rings
Bag hook G
WARNING
The bag hooks cannot restrain heavy objects
or items of luggage. Objects or items of lug-
gage could be flung around and thereby hit
vehicle occupants when braking or abruptly
changing directions. There is a risk of injury.
Only hang light objects on the bag hooks.
Never hang hard, sharp-edged or fragile
objects on the bag hooks.
! The bag hook can bear a maximum load of
6.6lbs (3kg) and should not be used to
secure a load. :
Bag hook Stowage areas
245Stowage and features Z
Page 248 of 338
Cargo compartment cover
Important safety notes G
WARNING
On its own, the cargo compartment cover
cannot secure or restrain heavy objects,
items of luggage and heavy loads. You could
be hit by an unsecured load during sudden
changes in direction, braking or in the event of an accident. There is an increased risk of
injury or even fatal injury.
Always store objects so that they cannot be
flung around. Secure objects, luggage or
loads against slipping or tipping over, e.g. by
using tie downs, even if you are using the
cargo compartment cover.
! When loading the vehicle, make sure that
you do not stack the load in the cargo com-
partment higher than the lower edge of the side windows. Do not place heavy objects
on top of the cargo compartment cover.
! When removing and installing the cargo
compartment cover, ensure that its end
caps do not scrape the light-colored parts
of the vehicle.
The cargo compartment cover is located
behind the rear bench seat backrest.
Extending/retracting the cargo com-
partment cover X
To extend: pull the cargo compartment
cover back by grab handle :and clip it into
retainers ;on the left and right.
X To retract: unhook the cargo compartment
cover from retainers ;on the left and right
and guide it forwards by grab handle :
until it is fully retracted.
Installing/removing the cargo compart-
ment cover X
To remove: make sure that the cargo com-
partment cover is rolled up.
X Push in the end cap of cargo compartment
cover :in the direction of the arrow on the
right or left side using grip =.
X Push cargo compartment cover :into
opposite anchorage ;.
X Remove cargo compartment cover :
upwards.
X To install: set cargo compartment
cover :on the right or left-hand side in
anchorage ;.
X Push in the opposite end cap of cargo com-
partment cover :and insert cargo com-
partment cover :into opposite anchor-
age ;. Cargo net
Important safety notes G
WARNING
On its own, the cargo net cannot secure or
restrain heavy objects, items of luggage and 246
Stowage areasStowage and features
Page 249 of 338
heavy loads. You could be hit by an unsecured
load during sudden changes in direction,
braking or in the event of an accident. There isan increased risk of injury or even fatal injury.
Always store objects so that they cannot be
flung around. Secure objects, luggage or
loads against slipping or tipping over, e.g. by
using tie downs, even if you are using the
cargo net.
It is important to use a cargo net if you load
the vehicle with small objects above the seat backrests. For safety reasons, always use a
cargo net when transporting loads.
Damaged cargo nets can no longer fulfill their
protective function and must be replaced.
Visit a qualified specialist workshop.
Attaching and tightening the cargo net You have two options for hooking in the cargo
net:
R with cargo compartment enlargement: the
brackets are behind the B‑pillar and the
cargo tie-down rings to tension the net are
on the sides of the rear-compartment foot-
well.
R without cargo compartment enlargement:
the brackets are behind the C-pillar and the
cargo tie-down rings to tension the net are
in the cargo compartment (Y page 245).
The cargo net is located in the stowage space under the cargo compartment floor
(Y page 247).
X Open both Velcro fasteners and remove the
cargo net.
X Unroll and unfold the cargo net.
The joints on the upper and lower guide rod
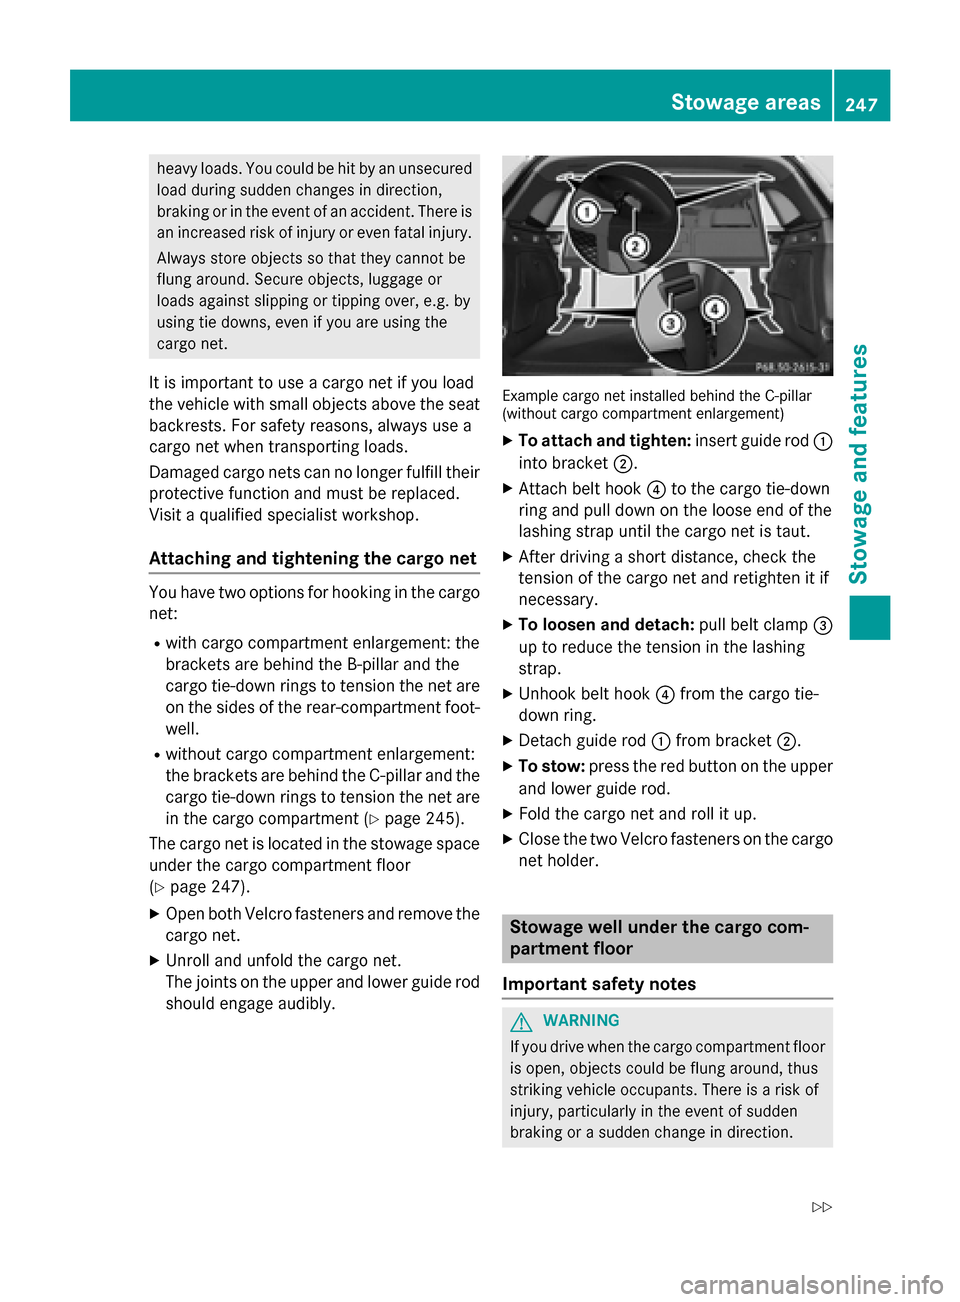
should engage audibly. Example cargo net installed behind the C-pillar
(without cargo compartment enlargement)
X To attach and tighten: insert guide rod:
into bracket ;.
X Attach belt hook ?to the cargo tie-down
ring and pull down on the loose end of the
lashing strap until the cargo net is taut.
X After driving a short distance, check the
tension of the cargo net and retighten it if
necessary.
X To loosen and detach: pull belt clamp=
up to reduce the tension in the lashing
strap.
X Unhook belt hook ?from the cargo tie-
down ring.
X Detach guide rod :from bracket ;.
X To stow: press the red button on the upper
and lower guide rod.
X Fold the cargo net and roll it up.
X Close the two Velcro fasteners on the cargo
net holder. Stowage well under the cargo com-
partment floor
Important safety notes G
WARNING
If you drive when the cargo compartment floor is open, objects could be flung around, thus
striking vehicle occupants. There is a risk of
injury, particularly in the event of sudden
braking or a sudden change in direction. Stowage areas
247Stowage and features
Z
Page 250 of 338
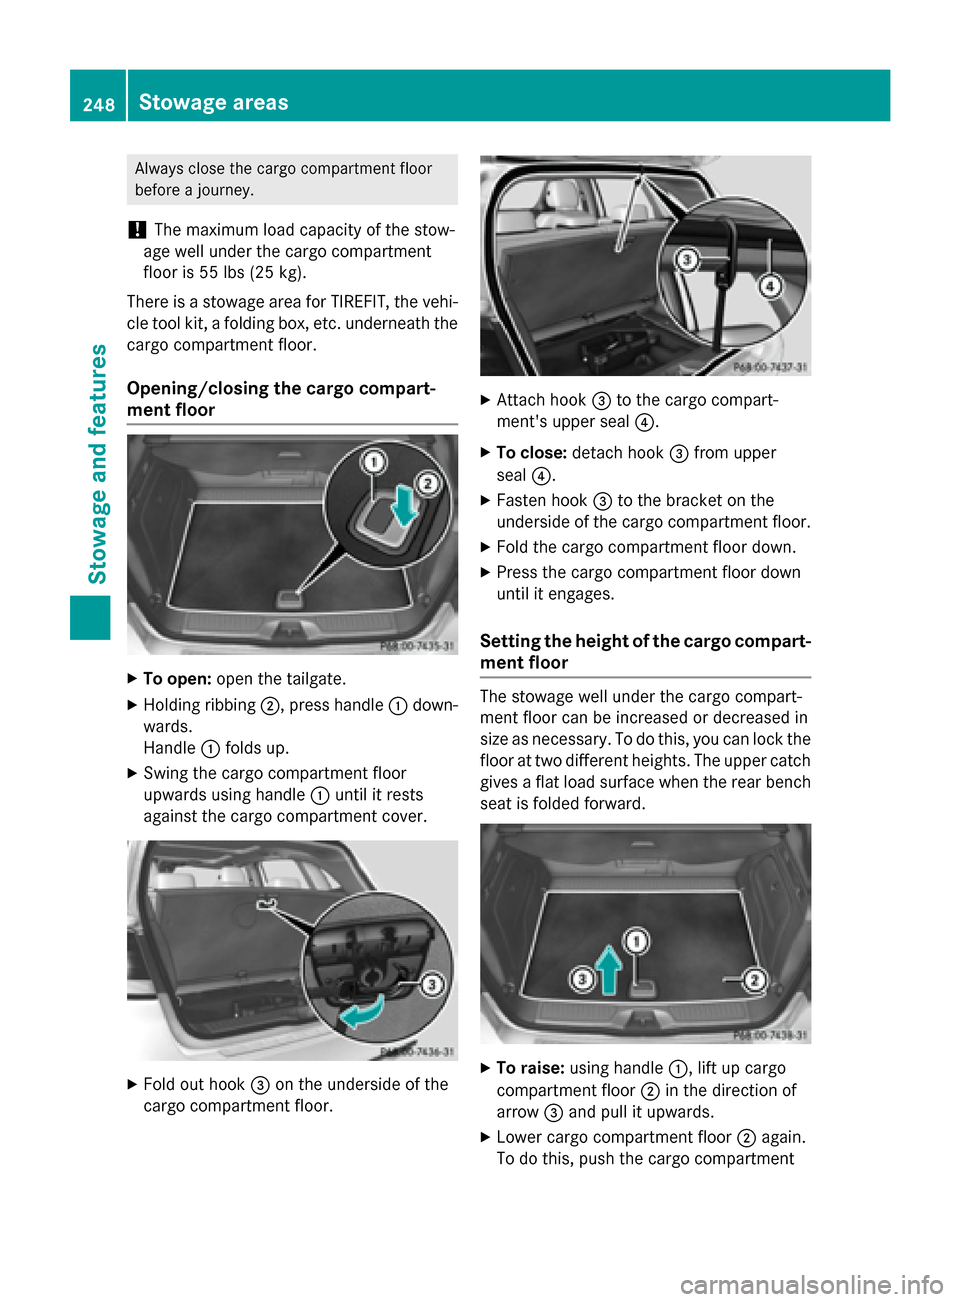
Always close the cargo compartment floor
before a journey.
! The maximum load capacity of the stow-
age well under the cargo compartment
floor is 55 lbs (25 kg).
There is a stowage area for TIREFIT, the vehi-
cle tool kit, a folding box, etc. underneath the
cargo compartment floor.
Opening/closing the cargo compart-
ment floor X
To open: open the tailgate.
X Holding ribbing ;, press handle :down-
wards.
Handle :folds up.
X Swing the cargo compartment floor
upwards using handle :until it rests
against the cargo compartment cover. X
Fold out hook =on the underside of the
cargo compartment floor. X
Attach hook =to the cargo compart-
ment's upper seal ?.
X To close: detach hook =from upper
seal ?.
X Fasten hook =to the bracket on the
underside of the cargo compartment floor.
X Fold the cargo compartment floor down.
X Press the cargo compartment floor down
until it engages.
Setting the height of the cargo compart- ment floor The stowage well under the cargo compart-
ment floor can be increased or decreased in
size as necessary. To do this, you can lock the
floor at two different heights. The upper catch gives a flat load surface when the rear benchseat is folded forward. X
To raise: using handle :, lift up cargo
compartment floor ;in the direction of
arrow =and pull it upwards.
X Lower cargo compartment floor ;again.
To do this, push the cargo compartment 248
Stowage areasSto
wage an d features