display MERCEDES-BENZ B-CLASS HATCHBACK 2008 Workshop Manual
[x] Cancel search | Manufacturer: MERCEDES-BENZ, Model Year: 2008, Model line: B-CLASS HATCHBACK, Model: MERCEDES-BENZ B-CLASS HATCHBACK 2008Pages: 305, PDF Size: 5.1 MB
Page 155 of 305
Loading and stowing
152
i
When the ignition is switched on, a mes-
sage is displayed for the corresponding
rear seats in the upper multi-function dis-
play. If, for example, both connectors are
removed, the message:
X Stow connector 1in connector holder
2 in the vehicle floor.
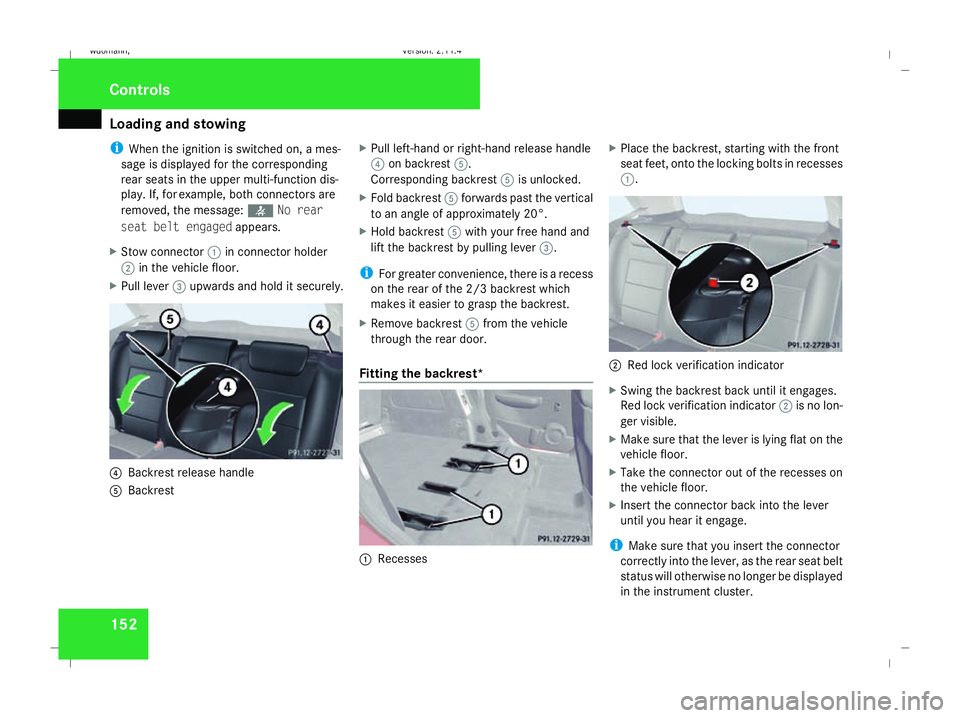
X Pull lever 3upwards and hold it securely. 4
Backrest release handle
5 Backrest X
Pull left-hand or right-hand release handle
4 on backrest 5.
Corresponding backrest 5is unlocked.
X Fold backrest 5forwards past the vertical
to an angle of approximately 20°.
X Hold backrest 5with your free hand and
lift the backrest by pulling lever 3.
i For greater convenience, there is a recess
on the rear of the 2/3 backrest which
makes it easier to grasp the backrest.
X Remove backrest 5from the vehicle
through the rear door.
Fitting the backrest* 1
Recesses X
Place the backrest, starting with the front
seat feet, onto the locking bolts in recesses
1. 2
Red lock verification indicator
X Swing the backrest back until it engages.
Red lock verification indicator 2is no lon-
ger visible.
X Make sure that the lever is lying flat on the
vehicle floor.
X Take the connector out of the recesses on
the vehicle floor.
X Insert the connector back into the lever
until you hear it engage.
i Make sure that you insert the connector
correctly into the lever, as the rear seat belt
status will otherwise no longer be displayed
in the instrument cluster. Controls
245_AKB; 2; 7, en-GB
wdomann,
Version: 2.11.4
2008-10-17T11:22:31+02:00 - Seite 152 Dateiname: 6515_1640_02_buchblock.pdf; preflight
Page 176 of 305
Engine compartment
173
operating temperature (i.e. if you only star-
ted the engine briefly)
Using the on-board computer*
i Only possible on vehicles with a diesel
engine. A dipstick is used to check petrol
engines (Y page 174).
X Make sure that the key is in position
2(Y page 62) in the ignition lock.
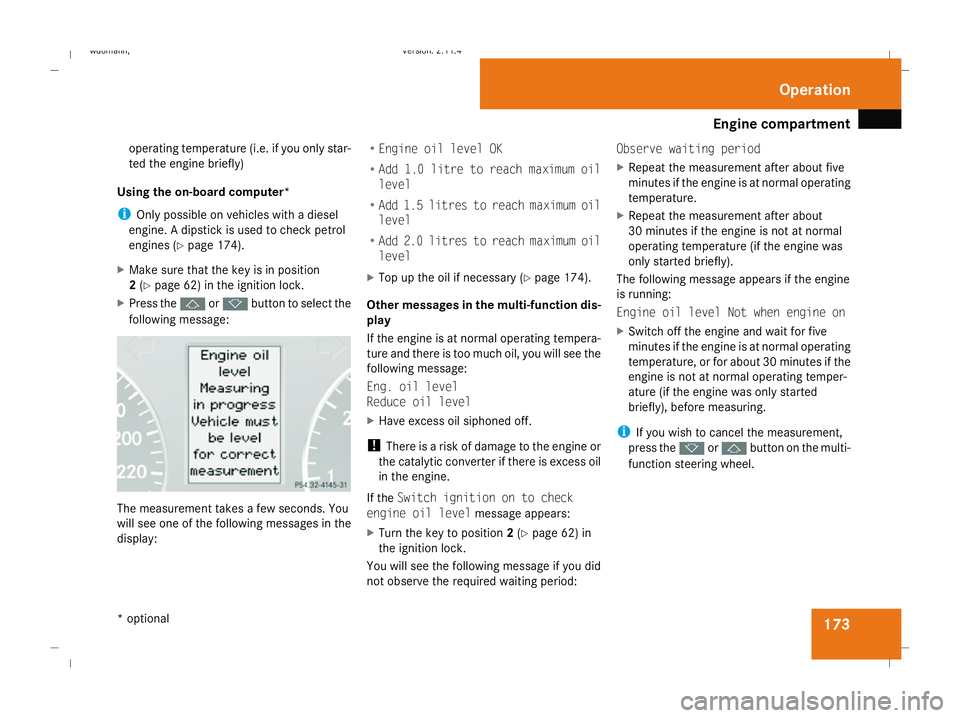
X Press the jork button to select the
following message: The measurement takes a few seconds. You
will see one of the following messages in the
display: R
Engine oil level OK
R Add 1.0 litre to reach maximum oil
level
R Add 1.5 litres to reach maximum oil
level
R Add 2.0 litres to reach maximum oil
level
X Top up the oil if necessary ( Ypage 174).
Other messages in the multi-function dis-
play
If the engine is at normal operating tempera-
ture and there is too much oil, you will see the
following message:
Eng. oil level
Reduce oil level
X Have excess oil siphoned off.
! There is a risk of damage to the engine or
the catalytic converter if there is excess oil
in the engine.
If the Switch ignition on to check
engine oil level message appears:
X Turn the key to position 2(Y page 62) in
the ignition lock.
You will see the following message if you did
not observe the required waiting period: Observe waiting period
X
Repeat the measurement after about five
minutes if the engine is at normal operating
temperature.
X Repeat the measurement after about
30 minutes if the engine is not at normal
operating temperature (if the engine was
only started briefly).
The following message appears if the engine
is running:
Engine oil level Not when engine on
X Switch off the engine and wait for five
minutes if the engine is at normal operating
temperature, or for about 30 minutes if the
engine is not at normal operating temper-
ature (if the engine was only started
briefly), before measuring.
i If you wish to cancel the measurement,
press the korj button on the multi-
function steering wheel. Operation
* optional
245_AKB; 2; 7, en-GB
wdomann,
Version: 2.11.4 2008-10-17T11:22:31+02:00 - Seite 173 ZDateiname: 6515_1640_02_buchblock.pdf; preflight
Page 178 of 305
Engine compartment
175H
Environmental note
When topping up the oil, take care not to
spill any. Oil must not be allowed to escape
into the soil or waterways. You would oth-
erwise be damaging the environment.
For further information on engine oil
(Y page 295). Coolant
G
Risk of injury
The cooling system is pressurised. There-
fore, only unscrew the cap once the engine
has cooled down. The coolant temperature
gauge must display less than 70 °C. You
could otherwise be scalded by escaping hot
coolant.
Coolant consists of water and antifreeze/cor-
rosion inhibitor. Only check the coolant level
when the vehicle is on a level surface and the
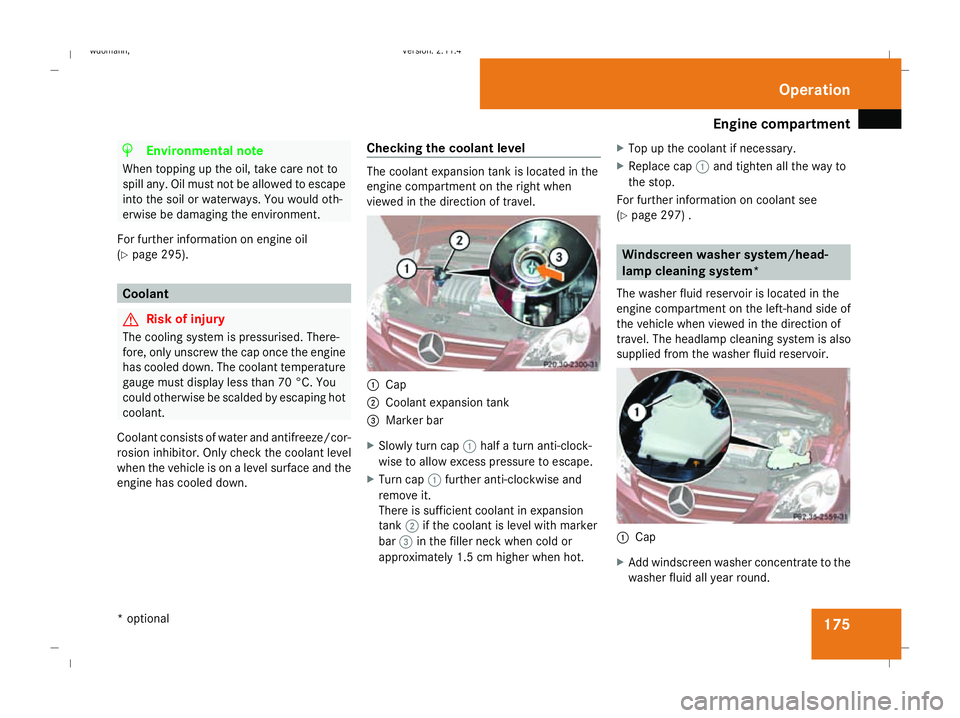
engine has cooled down. Checking the coolant level The coolant expansion tank is located in the
engine compartment on the right when
viewed in the direction of travel.
1
Cap
2 Coolant expansion tank
3 Marker bar
X Slowly turn cap 1half a turn anti-clock-
wise to allow excess pressure to escape.
X Turn cap 1further anti-clockwise and
remove it.
There is sufficient coolant in expansion
tank 2if the coolant is level with marker
bar 3in the filler neck when cold or
approximately 1.5 cm higher when hot. X
Top up the coolant if necessary.
X Replace cap 1and tighten all the way to
the stop.
For further information on coolant see
(Y page 297) . Windscreen washer system/head-
lamp cleaning system*
The washer fluid reservoir is located in the
engine compartment on the left-hand side of
the vehicle when viewed in the direction of
travel. The headlamp cleaning system is also
supplied from the washer fluid reservoir. 1
Cap
X Add windscreen washer concentrate to the
washer fluid all year round. Operation
* optional
245_AKB; 2; 7, en-GB
wdomann
,V ersion: 2.11.4
2008-10-17T11:22:31+02:00 - Seite 175 ZDateiname: 6515_1640_02_buchblock.pdf; preflight
Page 183 of 305
Tyres and wheels
180 fully. Do not make any sudden steering
movements when doing so.
The function of the tyre pressure loss warning
system is limited or delayed if:
R snow chains are fitted to your vehicle's
tyres.
R road conditions are wintry.
R you are driving on sand or gravel.
R you adopt a very sporty driving style (cor-
nering at high speeds or driving with high
rates of acceleration).
R you are towing a very heavy or large trailer.
R you are driving with a heavy load (in the
vehicle or on the roof).
Restarting the tyre pressure loss warn-
ing system Restart the tyre pressure loss warning system
if you have:
R changed the tyre pressure
R changed the wheels or tyres
R fitted new wheels or tyres
X Before restarting, consult the table of tyre
pressures on the inside of the fuel filler flap
to ensure that the tyre pressure in all four tyres is set correctly for the operating con-
ditions concerned.
X Also observe the notes in the section on
tyre pressures (Y page 178). G
Risk of accident
The tyre pressure loss warning system can
only give reliable warnings if you have set
the correct tyre pressure.
If an incorrect tyre pressure is set, these
incorrect values will be monitored.
A tyre with insufficient pressure results in
vehicle instability when driving, thus
increasing the risk of an accident.
X Make sure that the key is in position
2(Y page 62) in the ignition lock.
You will see the following message on the
standard screen of the multi-function dis-
play (Y page 99)
X Press korj to select the tyre pres-
sure function:
Run Flat Indicator active
Menu: R-Button
X Press the reset button on the left of the
instrument cluster.
The following message appears in the
multi-function display: Restart Run Flat Indicat.? Yes Can-
cel
If you wish to confirm the restart:
X Press the æbutton.
The following message appears in the
multi-function display:
Run Flat Indicator restarted
After a teach-in period, the tyre pressure
loss warning system will monitor the set
tyre pressures of all four tyres.
If you wish to cancel the restart:
X Press the çbutton.
or
X Wait until the message
Restart Run Flat Indicator?
Yes Cancel disappears.
The tyre pressure values stored at the last
restart will continue to be monitored. Operation
245_AKB; 2; 7, en-GB
wdomann,
Version: 2.11.4 2008-10-17T11:22:31+02:00 - Seite 180Dateiname: 6515_1640_02_buchblock.pdf; preflight
Page 194 of 305
Service
191
specialist workshop, e.g. a Mercedes-Benz
Service Centre.
X To switch the switched power supply on
or off: turn the key in the ignition lock to
position 2or 0, respectively. Trailer with 7-pin connector
If your trailer has a 7-pin connector, you can
connect it to the 13-pin socket on the ball
coupling using an adapter or, if necessary, an
adapter cable. Both of these can be obtained
at a qualified specialist workshop, e.g. at a
Mercedes-Benz Service Centre.
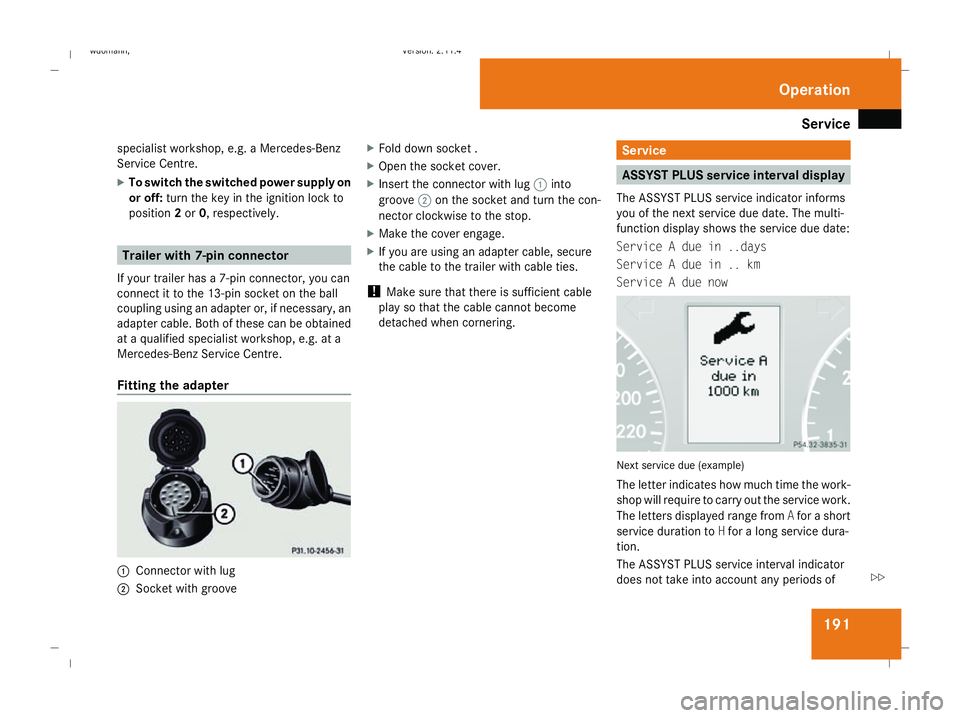
Fitting the adapter 1
Connector with lug
2 Socket with groove X
Fold down socket .
X Open the socket cover.
X Insert the connector with lug 1into
groove 2on the socket and turn the con-
nector clockwise to the stop.
X Make the cover engage.
X If you are using an adapter cable, secure
the cable to the trailer with cable ties.
! Make sure that there is sufficient cable
play so that the cable cannot become
detached when cornering. Service
ASSYST PLUS service interval display
The ASSYST PLUS service indicator informs
you of the next service due date. The multi-
function display shows the service due date:
Service A due in ..days
Service A due in .. km
Service A due now Next service due (example)
The letter indicates how much time the work-
shop will require to carry out the service work.
The letters displayed range from
Afor a short
service duration to Hfor a long service dura-
tion.
The ASSYST PLUS service interval indicator
does not take into account any periods of Operation
245_AKB; 2; 7, en-GB
wdomann,
Version: 2.11.4
2008-10-17T11:22:31+02:00 - Seite 191 ZDateiname: 6515_1640_02_buchblock.pdf; preflight
Page 195 of 305
Care
192
time during which the battery is disconnec-
ted.
Maintaining the time-dependent service
schedule:
X Note down the service due date displayed
before disconnecting the battery.
or
X Subtract the battery disconnection periods
from the service date shown on the display
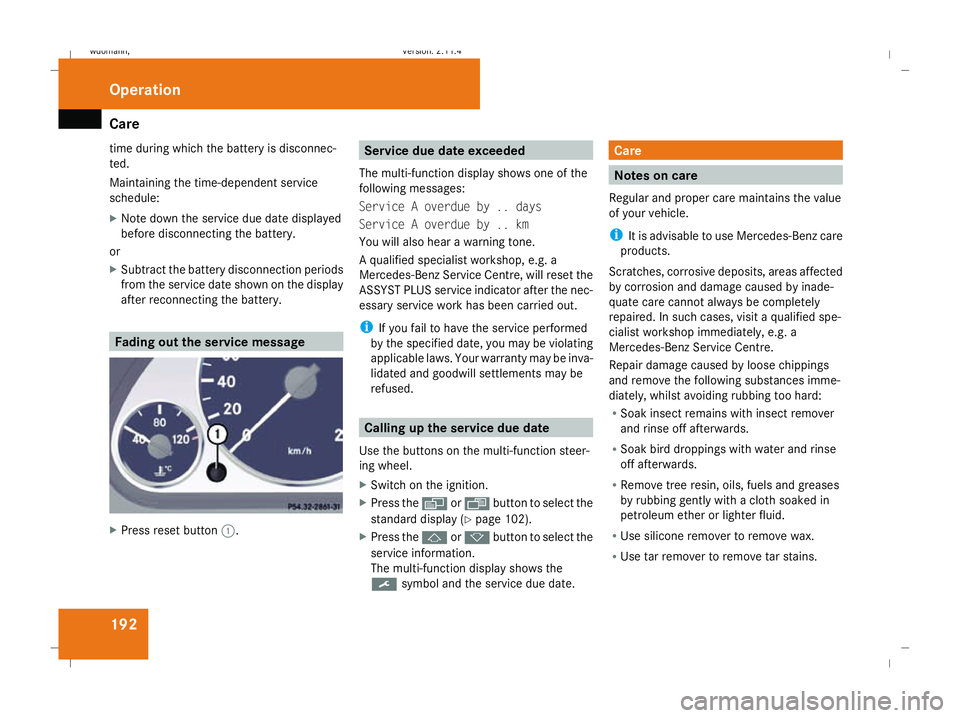
after reconnecting the battery. Fading out the service message
X
Press reset button 1. Service due date exceeded
The multi-function display shows one of the
following messages:
Service A overdue by .. days
Service A overdue by .. km
You will also hear a warning tone.
A qualified specialist workshop, e.g. a
Mercedes-Benz Service Centre, will reset the
ASSYST PLUS service indicator after the nec-
essary service work has been carried out.
i If you fail to have the service performed
by the specified date, you may be violating
applicable laws. Your warranty may be inva-
lidated and goodwill settlements may be
refused. Calling up the service due date
Use the buttons on the multi-function steer-
ing wheel.
X Switch on the ignition.
X Press the èorÿ button to select the
standard display (Y page 102).
X Press the jork button to select the
service information.
The multi-function display shows the
9 symbol and the service due date. Care
Notes on care
Regular and proper care maintains the value
of your vehicle.
i It is advisable to use Mercedes-Benz care
products.
Scratches, corrosive deposits, areas affected
by corrosion and damage caused by inade-
quate care cannot always be completely
repaired. In such cases, visit a qualified spe-
cialist workshop immediately, e.g. a
Mercedes-Benz Service Centre.
Repair damage caused by loose chippings
and remove the following substances imme-
diately, whilst avoiding rubbing too hard:
R Soak insect remains with insect remover
and rinse off afterwards.
R Soak bird droppings with water and rinse
off afterwards.
R Remove tree resin, oils, fuels and greases
by rubbing gently with a cloth soaked in
petroleum ether or lighter fluid.
R Use silicone remover to remove wax.
R Use tar remover to remove tar stains. Operation
245_AKB; 2; 7, en-GB
wdomann,
Version: 2.11.4 2008-10-17T11:22:31+02:00 - Seite 192Dateiname: 6515_1640_02_buchblock.pdf; preflight
Page 202 of 305
199
Where will I find...?
...........................200
Display messages ............................. 202
Troubleshooting ................................ 222
Locking/unlocking in an emer-
gency ................................................. 241
Changing the batteries .....................243
Changing bulbs ................................. 244
Replacing the wiper blades ..............250
Flat tyre ............................................. 252
Battery ............................................... 263
Jump-starting .................................... 266
Towing and tow-starting ..................267
Fuses .................................................. 270 Practical advice
245_AKB; 2; 7, en-GB
wdomann
, Version: 2.11.4 2008-10-17T11:22:31+02:00 - Seite 199Dateiname: 6515_1640_02_buchblock.pdf; preflight
Page 205 of 305
Display
messages 202 Spare
wheel*/"Minispare" emer-
gency spare wheel*
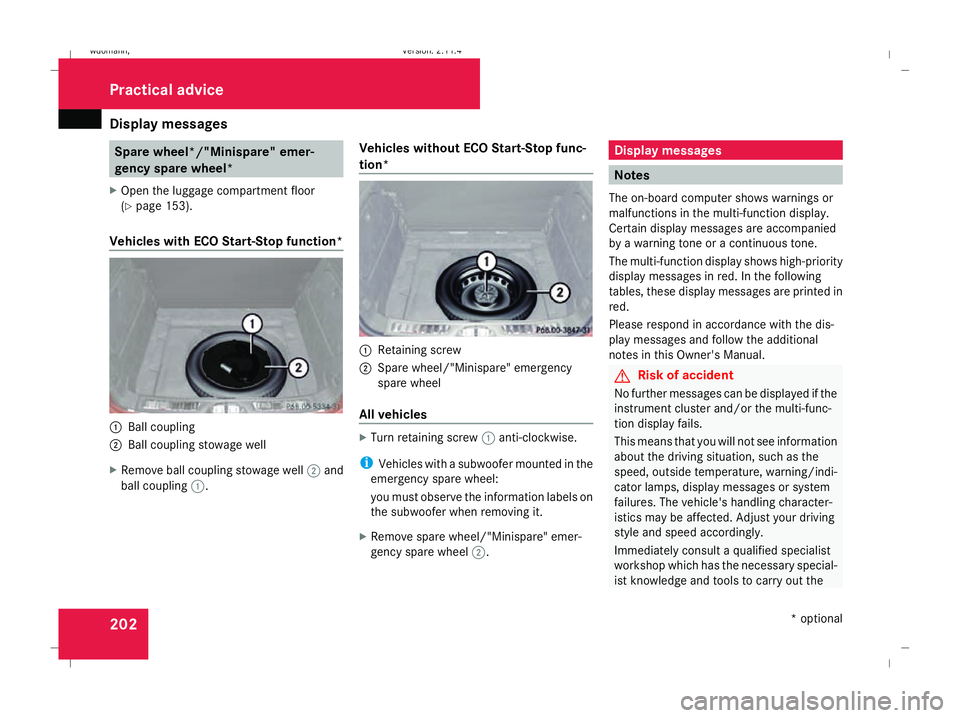
X Open the luggage compartment floor
(Y page 153).
Vehicles with ECO Start-Stop function* 1
Ball coupling
2 Ball coupling stowage well
X Remove ball coupling stowage well 2and
ball coupling 1. Vehicles without ECO Start-Stop func-
tion* 1
Retaining screw
2 Spare wheel/"Minispare" emergency
spare wheel
All vehicles X
Turn retaining screw 1anti-clockwise.
i Vehicles with a subwoofer mounted in the
emergency spare wheel:
you must observe the information labels on
the subwoofer when removing it.
X Remove spare wheel/"Minispare" emer-
gency spare wheel 2. Display messages
Notes
The on-board computer shows warnings or
malfunctions in the multi-function display.
Certain display messages are accompanied
by a warning tone or a continuous tone.
The multi-function display shows high-priority
display messages in red. In the following
tables, these display messages are printed in
red.
Please respond in accordance with the dis-
play messages and follow the additional
notes in this Owner's Manual. G
Risk of accident
No further messages can be displayed if the
instrument cluster and/or the multi-func-
tion display fails.
This means that you will not see information
about the driving situation, such as the
speed, outside temperature, warning/indi-
cator lamps, display messages or system
failures. The vehicle's handling character-
istics may be affected. Adjust your driving
style and speed accordingly.
Immediately consult a qualified specialist
workshop which has the necessary special-
ist knowledge and tools to carry out the Practical advice
* optional
245_AKB; 2; 7, en-GB
wdomann,
Version: 2.11.4 2008-10-17T11:22:31+02:00 - Seite 202Dateiname: 6515_1640_02_buchblock.pdf; preflight
Page 206 of 305
Display
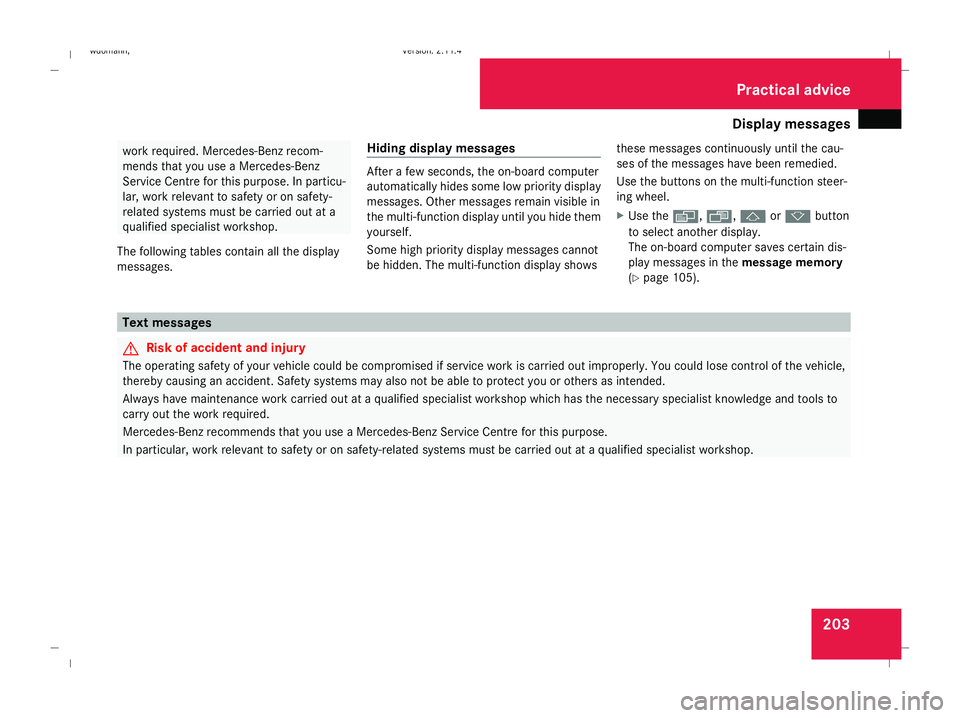
messages 203work required. Mercedes-Benz recom-
mends that you use a Mercedes-Benz
Service Centre for this purpose. In particu-
lar, work relevant to safety or on safety-
related systems must be carried out at a
qualified specialist workshop.
The following tables contain all the display
messages. Hiding display messages After a few seconds, the on-board computer
automatically hides some low priority display
messages. Other messages remain visible in
the multi-function display until you hide them
yourself.
Some high priority display messages cannot
be hidden. The multi-function display shows these messages continuously until the cau-
ses of the messages have been remedied.
Use the buttons on the multi-function steer-
ing wheel.
X Use the è,·,jork button
to select another display.
The on-board computer saves certain dis-
play messages in the message memory
(Y page 105). Text messages
G
Risk of accident and injury
The operating safety of your vehicle could be compromised if service work is carried out improperly. You could lose control of the vehicle,
thereby causing an accident. Safety systems may also not be able to protect you or others as intended.
Always have maintenance work carried out at a qualified specialist workshop which has the necessary specialist knowledge and tools to
carry out the work required.
Mercedes-Benz recommends that you use a Mercedes-Benz Service Centre for this purpose.
In particular, work relevant to safety or on safety-related systems must be carried out at a qualified specialist workshop. Practical advi
ce
245_AKB; 2; 7, en-GB
wdomann,
Version: 2.11.4
2008-10-17T11:22:31+02:00 - Seite 203 ZDateiname: 6515_1640_02_buchblock.pdf; preflight
Page 207 of 305
Display
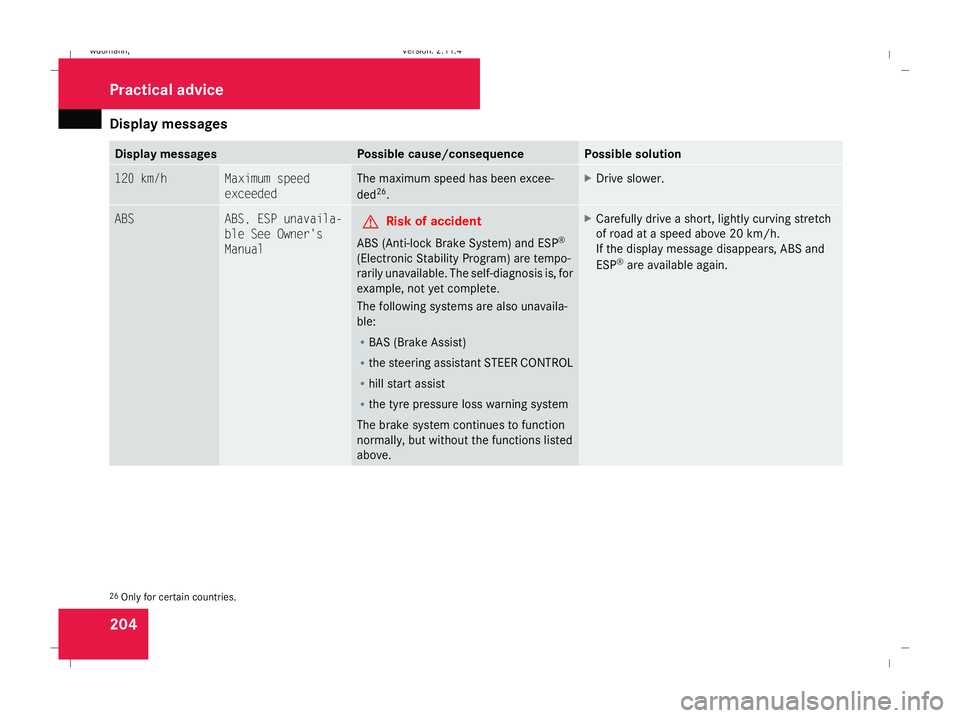
messages 204 Display messages Possible cause/consequence Possible solution
120 km/h Maximum speed
exceeded The maximum speed has been excee-
ded
26
. X
Drive slower. ABS ABS, ESP unavaila-
ble See Owner's
Manual
G
Risk of accident
ABS (Anti-lock Brake System) and ESP ®
(Electronic Stability Program) are tempo-
rarily unavailable. The self-diagnosis is, for
example, not yet complete.
The following systems are also unavaila-
ble:
R BAS (Brake Assist)
R the steering assistant STEER CONTROL
R hill start assist
R the tyre pressure loss warning system
The brake system continues to function
normally, but without the functions listed
above. X
Carefully drive a short, lightly curving stretch
of road at a speed above 20 km/h.
If the display message disappears, ABS and
ESP ®
are available again. 26
Only for certain countries. Practical advi
ce
245_AKB; 2; 7, en-GB
wdomann,
Version: 2.11.4 2008-10-17T11:22:31+02:00 - Seite 204Dateiname: 6515_1640_02_buchblock.pdf; preflight