sensor MERCEDES-BENZ B-CLASS HATCHBACK 2011 User Guide
[x] Cancel search | Manufacturer: MERCEDES-BENZ, Model Year: 2011, Model line: B-CLASS HATCHBACK, Model: MERCEDES-BENZ B-CLASS HATCHBACK 2011Pages: 329, PDF Size: 7.91 MB
Page 67 of 329

In such cases, the distance warning signal
may:
R
give an unnecessary warning
R not give a warning
There is a risk of an accident. Always pay par-
ticula rattention to the traffi csituation and be
ready to brake, especially if the distance
warning signal alerts you. G
WARNING
The distance warning signal does not react:
R to people or animals
R to oncoming vehicles
R to crossing traffic
R when cornering
Thus, the distance warning signal cannot pro-
vide a warning in all critical situations .There
is a risk of an accident. Always pay careful
attention to the traffic situation and be ready
to brake.
X To activate/deactivate: activate or deac-
tivate the distance warning signal in the on-
board computer (Y page 199).
When the distance warning signal is activa-
ted, the multifunction display shows the
Ä symbol as long as the HOLD function is
not activated (Y page 162). On vehicles with
Active Parking Assist, the Äsymbol is dis-
played when position Pis engaged or you are
driving faster than 35 km/h.
The distance warning signal can help you to
minimise the risk of a front-end collision with
a vehicle ahead or reduce the effects of such
a collision. If the distance warning signal
detects that there is a risk of a collision, you
will be warned visually and acoustically .The
distance warning signal cannot prevent a col-
lision without your intervention.
The distance warning signal will issue a warn-
ing at speeds of around 30 km/h or more if:
R the distance to the vehicle in front is too
short for the speed you are driving at for
several seconds. The ·distance warn- ing lamp then lights up in the instrument
cluster.
R you are rapidly approaching the vehicle in
front. An intermittent warning tone will
then sound and the ·distance warning
lamp will light up in the instrumentc luster.
X Brake immediately in order to increase the
distance from the vehicle in front.
or
X Take evasive action provided it is safe to do
so.
For the distance warnin gsignal to assist you
when driving, the function must be activated
in the on-board computer (Y page 199) and
be operational.
Due to the nature of the system, particularly
complicated driving conditions may cause the
system to display an unnecessary warning.
With the help of the radar sensor system, the
distance warning signal can detect obstacles
that are in the path of your vehicle for an
extended period of time.
At speeds up to approximately 70 km/h, the
distance warning signal may also detect sta-
tionary obstacles, for example, stopped or
parked vehicles.
If you approach an obstacle and the distance
warning signal detects a risk of a collision, the
system will initially alert you both visually and
acoustically.
In particular, the detection of obstacles can
be impaired if there is:
R dirt on the sensors or anything else cover-
ing the sensors
R snow or heavy rain
R interference by other radar sources
R the possibility of strong radar reflections,
for example, in multi-storey car parks
R a narrow vehicle travelling in front, e.g. a
motorbike
R a vehicle travelling in front on a different
line
Following damage to the front end of the vehi-
cle, have the configuration and operation of 64
Driving safety systemsSafety
Page 68 of 329
the rada
rsensor checked at a qualified spe-
cialist workshop. This also applies to colli-
sions at slow speeds where there is no visible
damage to the fron tofthe vehicle.
i Observe the "Important safety notes" sec-
tion (Y page 62).
BAS PLUS (Brake Assist System Plus) G
WARNING
BAS PLUS cannot always clearly identify
objects and complex traffic situations. BAS
PLUS cannot intervene in these cases.
There is a risk of an accident. Always pay
careful attention to the traffic situation and be
ready to brake. G
WARNING
BAS PLUS does not react:
R to people or animals
R to oncoming vehicles
R to crossing traffic
R to stationary obstacles
R when cornering
As a result, BAS PLUS may not intervene in
critical situations. There is a risk of an acci-
dent. Always pay careful attention to the traf-
fic situation and be ready to brake.
BAS PLUS assists you in braking during haz-
ardous situations at speeds above 30 km/h
and uses the radar sensor system to evaluate
the traffic situation.
With the help of the radar sensor system, BAS
PLUS can detect obstacles that are in the
path of your vehicle for an extended period of
time.
Should you approach an obstacle and BAS
PLUS has detected a risk of collision, BAS
PLUS calculates the braking force necessary
to avoid a rear-end collision. Should you apply
the brakes forcefully, BAS PLUS will automat-
ically increase the braking force to a level
suitable for the traffic conditions. X
Keep the brake pedal depressed until the
emergency braking situation is over.
ABS prevents the wheels from locking.
The brakes will work normally again if:
R you release the brake pedal.
R there is no longer any danger of a rear-end
collision.
R no obstacle is detected in front of your
vehicle.
BAS PLUS is then deactivated.
Vehicles with PRE-SAFE ®
:if BAS PLUS
requires particularly high brake pressure, pre-
ventative passenger protection measures
(PRE-SAFE ®
) are deployed simultaneously.
Up to vehicle speeds of around 250 km/h,
BAS PLUS is capable of reacting to moving
objects that have already been recognised as
such at least once over the period of obser-
vation. BAS PLUS does not react to stationary
obstacles.
If BAS PLUS is not available due to a malfunc-
tion in the radar sensor system, the brake
system remains available with full brake
boosting effect and BAS.
In particular, the detection of obstacles can
be impaired if there is:
R dirt on the sensors or anything else cover-
ing the sensors
R snow or heavy rain
R interference by other radar sources
R the possibility of strong radar reflections,
for example, in multi-storey car parks
R a narrow vehicle travelling in front, e.g. a
motorbike
R a vehicle travelling in front on a different
line
Following damage to the front end of the vehi-
cle, have the configuration and operation of
the radar sensor checked at a qualified spe-
cialist workshop. This also applies to colli-
sions at slow speeds where there is no visible
damage to the front of the vehicle.
i Observe the "Important safety notes" sec-
tion (Y page 62). Driving safety systems
65Safety Z
Page 72 of 329
Tow-away protection
An audible and visual alar mis triggered if your
vehicle's angle of inclination is altered while
tow-away protection is primed. This occurs if
the vehicle is jacked up on one side, for exam-
ple.
To activate:
X Lock the vehicle with the key.
Tow-away protection is primed after
approximately 30 seconds.
To deactivate:
X Unlock the vehicle with the key.
Tow-away protection is switched off auto-
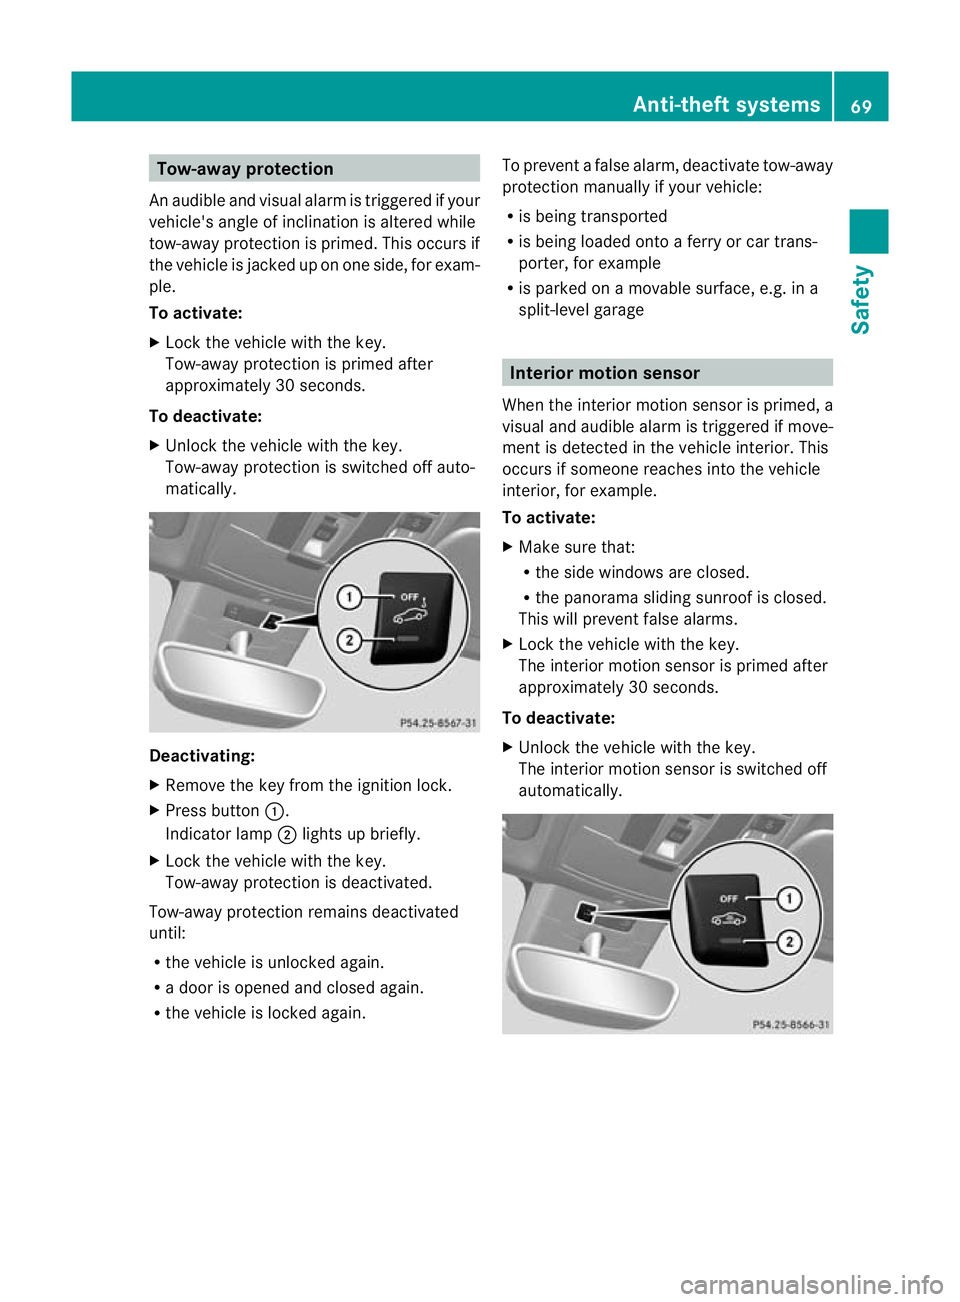
matically. Deactivating:
X
Remove the key from the ignition lock.
X Press button :.
Indicator lamp ;lights up briefly.
X Lock the vehicle with the key.
Tow-away protection is deactivated.
Tow-away protection remains deactivated
until:
R the vehicle is unlocked again.
R a door is opened and closed again.
R the vehicle is locked again. To prevent a false alarm, deactivate tow-away
protection manually if your vehicle:
R
is being transported
R is being loaded onto a ferry or car trans-
porter, for example
R is parked on a movable surface, e.g. in a
split-level garage Interior motion sensor
When the interior motion sensor is primed, a
visual and audible alarm is triggered if move-
ment is detected in the vehicle interior. This
occurs if someone reaches into the vehicle
interior, for example.
To activate:
X Make sure that:
R
the side windows are closed.
R the panorama sliding sunroof is closed.
This will prevent false alarms.
X Lock the vehicle with the key.
The interior motion sensor is primed after
approximately 30 seconds.
To deactivate:
X Unlock the vehicle with the key.
The interior motion sensor is switched off
automatically. Anti-theft systems
69Safety Z
Page 73 of 329
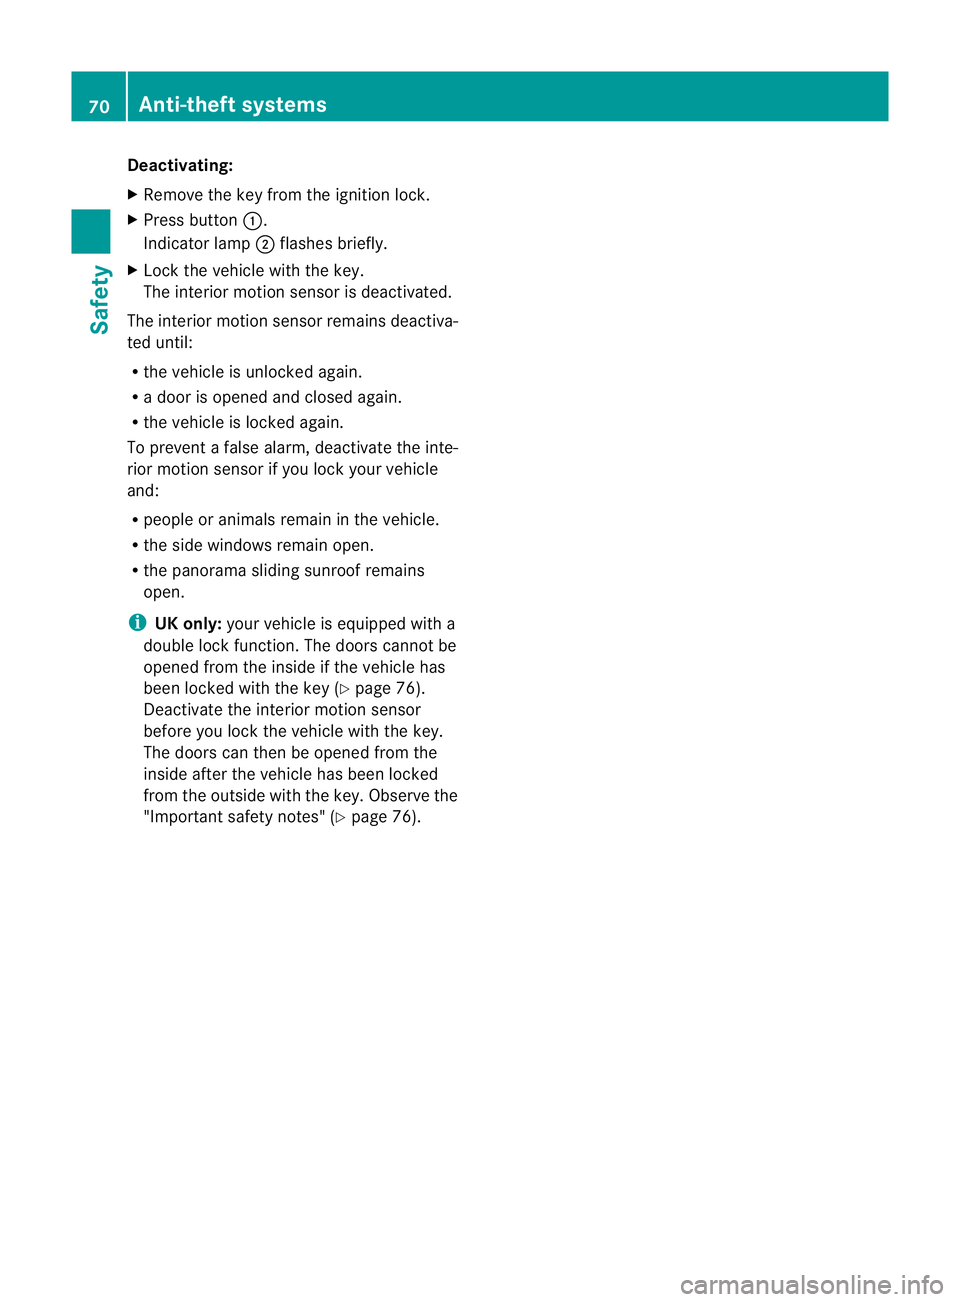
Deactivating:
X
Remove the key from the ignition lock.
X Press button :.
Indicato rlamp ;flashes briefly.
X Loc kthe vehicle with the key.
The interior motion sensor is deactivated.
The interior motion sensor remains deactiva-
ted until:
R the vehicle is unlocked again.
R a door is opened and closed again.
R the vehicle is locked again.
To prevent a false alarm, deactivate the inte-
rior motion sensor if you lock your vehicle
and:
R people or animals remain in the vehicle.
R the side windows remain open.
R the panorama sliding sunroof remains
open.
i UK only: your vehicle is equipped with a
double lock function. The doors cannot be
opened from the inside if the vehicle has
been locked with the key (Y page 76).
Deactivate the interior motion sensor
before you lock the vehicle with the key.
The doors can then be opened from the
inside after the vehicle has been locked
from the outside with the key. Observe the
"Important safety notes" (Y page 76).70
Anti-theft systemsSafety
Page 79 of 329
Doors
Important safety notes
G
WARNING
Only for the United Kingdom: if the vehicle
has bee nlocked with the key, the double lock
function is activated as standard. It is then not
possible to open the doors from inside the
vehicle.
Therefore, do not leave any people behind in
the vehicle, particularly children, elderly peo-
ple or people in need of special assistance if
the vehicle has been locked with the key. As
a result, they may not be able to free them-
selves in the event of an emergency. As a
result, they could be seriously or even fatally
injured by prolonged exposure to extremely
high or low temperatures, for example. In this
case, rescuing people from outside the vehi-
cle is difficult.
Deactivate the interior motion sensor before
you lock the vehicle with the key. The doors
can then be opened from the inside after the
vehicle has been locked from the outside with
the key. G
WARNING
If children are left unsupervised in the vehicle,
they could:
R open a door from inside the vehicle at any
time, even if it has been locked
R start the vehicle using akey which has been
left in the vehicle
R release the parking brake
They could thereby endanger themselves and
others. Never leave children unsupervised in
the vehicle. Always take the key with you
when leaving the vehicle, even if you are only
leaving it for a short time. Unlocking and opening the doors
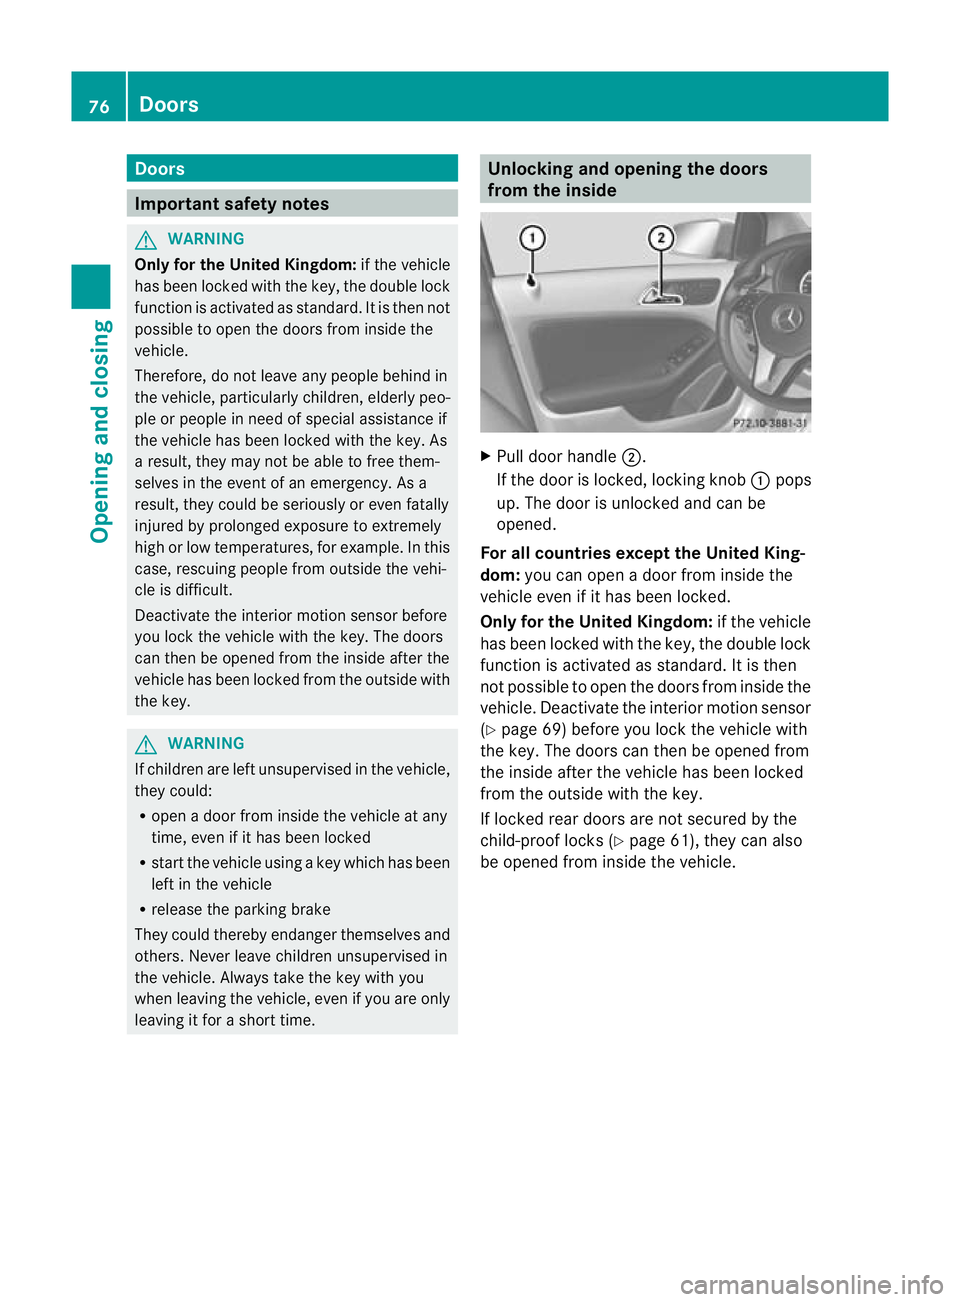
from the inside
X
Pull door handle ;.
If the door is locked, locking knob :pops
up. The door is unlocked and can be
opened.
For all countries except the United King-
dom: you can open a door from inside the
vehicle even if it has been locked.
Only for the United Kingdom: if the vehicle
has been locked with the key, the double lock
function is activated as standard. It is then
not possible to open the doors from inside the
vehicle. Deactivate the interior motion sensor
(Y page 69) before you lock the vehicle with
the key. The doors can then be opened from
the inside after the vehicle has been locked
from the outside with the key.
If locked rear doors are not secured by the
child-proof locks (Y page 61), they can also
be opened from inside the vehicle. 76
DoorsOpening and closing
Page 86 of 329
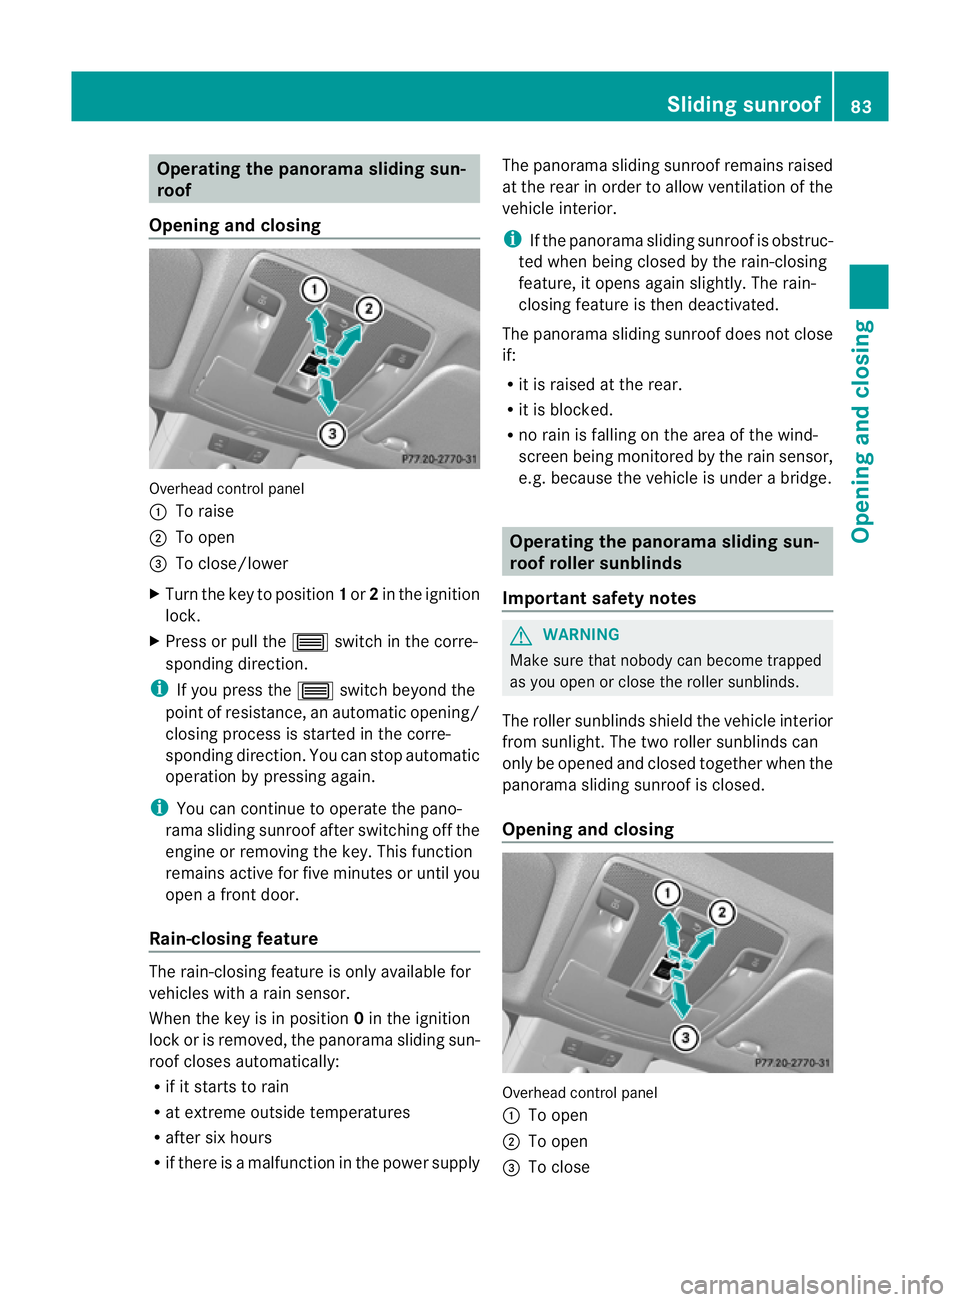
Operating the panorama sliding sun-
roof
Opening and closing Overhead control panel
:
To raise
; To open
= To close/lower
X Turn the key to position 1or 2in the ignition
lock.
X Press or pull the 3switch in the corre-
sponding direction.
i If you press the 3switch beyond the
point of resistance, an automatic opening/
closing process is started in the corre-
sponding direction. You can stop automatic
operation by pressing again.
i You can continue to operate the pano-
rama sliding sunroof after switching off the
engine or removing the key. This function
remains active for five minutes or until you
open a front door.
Rain-closing feature The rain-closing feature is only available for
vehicles with a rain sensor.
When the key is in position 0in the ignition
lock or is removed, the panorama sliding sun-
roof closes automatically:
R if it starts to rain
R at extreme outside temperatures
R after six hours
R if there is a malfunction in the power supply The panorama sliding sunroof remains raised
at the rear in order to allow ventilation of the
vehicle interior.
i If the panorama sliding sunroof is obstruc-
ted when being closed by the rain-closing
feature, it opens again slightly. The rain-
closing feature is then deactivated.
The panorama sliding sunroof does not close
if:
R it is raised at the rear.
R it is blocked.
R no rain is falling on the area of the wind-
screen being monitored by the rain sensor,
e.g. because the vehicle is under a bridge. Operating the panorama sliding sun-
roof roller sunblinds
Important safety notes G
WARNING
Make sure that nobody can become trapped
as you open or close the roller sunblinds.
The roller sunblinds shield the vehicle interior
from sunlight. The two roller sunblinds can
only be opened and closed together when the
panorama sliding sunroof is closed.
Opening and closing Overhead control panel
:
To open
; To open
= To close Sliding sunroof
83Opening and closing Z
Page 96 of 329
Automatic anti-dazzle mirrors
G
WARNING
If inciden tlight fro mheadlamps is prevented
from striking the sensor in the rear-view mir-
ror, for instance, by luggage piled too high in
the vehicle, the mirror's automatic anti-dazzle
function will not operate.
Incident light could then blind you. This may
distract you from the traffic conditions and,
as a result, you may cause an accident.
The rear-view mirror and the exterior mirror
on the driver's side automatically go into anti-
dazzle mode if the ignition is switched on and
inciden tlight fro mheadlamps strikes the sen-
sor in the rear-view mirror.
The mirrors do not go into anti-dazzle mode if
reverse gear is engaged or if the interior light-
ing is switched on. Parking position for the exterior mir-
ror on the front-passenger side
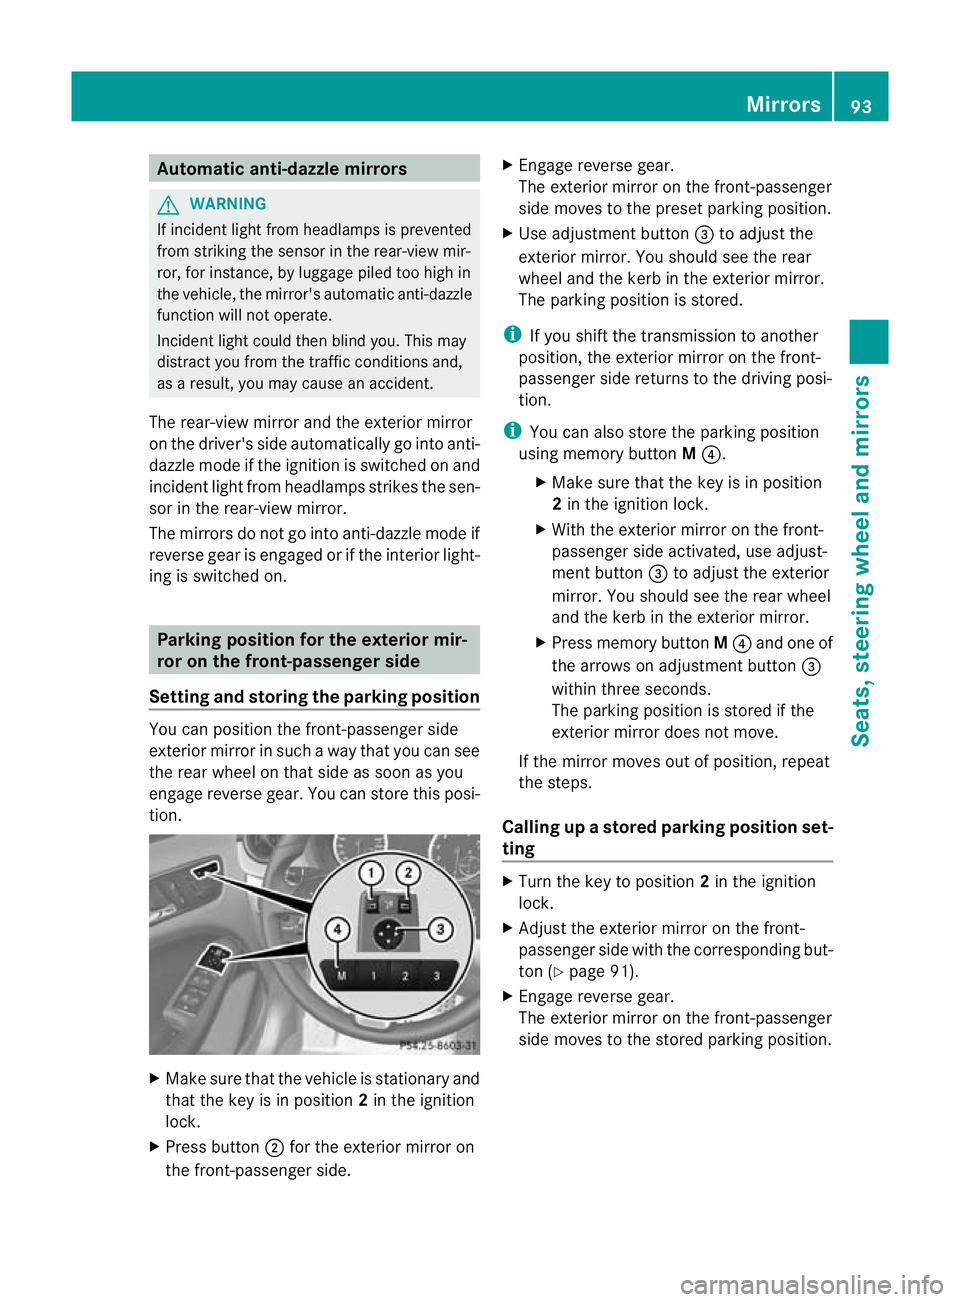
Setting and storing the parking position You can position the front-passenger side
exterior mirror in such a way that you can see
the rear wheel on that side as soon as you
engage reverse gear. You can store this posi-
tion. X
Make sure that the vehicle is stationary and
that the key is in position 2in the ignition
lock.
X Press button ;for the exterior mirror on
the front-passenger side. X
Engage reverse gear.
The exterior mirror on the front-passenger
side moves to the preset parking position.
X Use adjustment button =to adjust the
exterior mirror .You should see the rear
wheel and the kerb in the exterior mirror.
The parking position is stored.
i If you shift the transmission to another
position, the exterior mirror on the front-
passenger side returns to the driving posi-
tion.
i You can also store the parking position
using memory button M?.
X Make sure that the key is in position
2in the ignition lock.
X With the exterior mirror on the front-
passenger side activated, use adjust-
ment button =to adjust the exterior
mirror. You should see the rear wheel
and the kerb in the exterior mirror.
X Press memory button M? and one of
the arrows on adjustment button =
within three seconds.
The parking position is stored if the
exterior mirror does not move.
If the mirror moves out of position, repeat
the steps.
Calling up astore dparking position set-
ting X
Tur nthe key to position 2in the ignition
lock.
X Adjust the exterior mirror on the front-
passenger side with the corresponding but-
ton (Y page 91).
X Engage reverse gear.
The exterior mirror on the front-passenger
side moves to the stored parking position. Mirrors
93Seats, steering wheel and mirrors Z
Page 104 of 329
the illumination of the edge of the carriage-
way.
Active: if you are driving at speeds below
70 km/h and yo uswitch on the rear foglamp
Not active: if you are driving at speeds above
10 0k m/h or if you switch off the rear foglamp
following activation Adaptive Highbeam Assist
G
WARNING
Adaptive Highbeam Assist is only an aid
designed to assist driving. The driver is
responsible for adjusting the vehicle's lighting
to the prevailing light, visio nand traffic con-
ditions.
The system may be impaired or deactivated:
R if there is poor visibility, e.g .due to snow,
rain, fog or spray
R if the area of the windscree naround the
optical sensor is dirty, misted up or covered
up, e.g. by a sticker
The system may not recognise the following
road users:
R road users that have no lighting, e.g. pedes-
trians
R road users that have poor lighting, e.g.
cyclists
R road users whose lighting is not clearly visi-
ble, e.g. road users behind a crash barrier
R on rare occasions: road users that have
lights that may be recognised too late or not
at all
The automatic main-beam headlamps will not
be deactivated, or they may be activated
despite road users travelling in front of or
approaching the vehicle.
Thus, you could cause an accident and injure
yourself and others. Always observe traffic
conditions and, if necessary, dip the lights
manually.
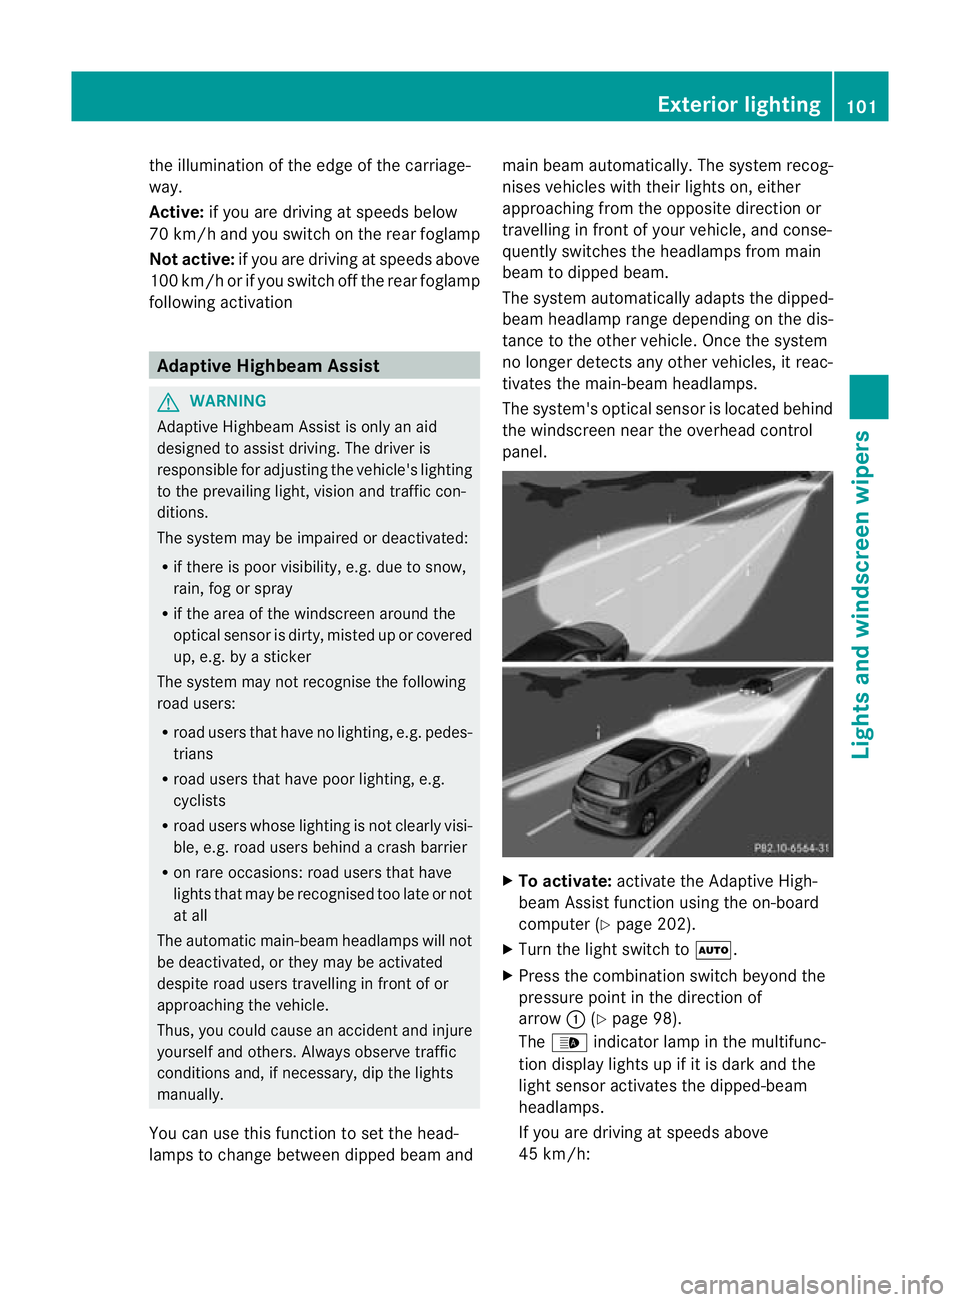
You can use this function to set the head-
lamps to change between dipped beama ndmain beam automatically. The system recog-
nises vehicles with thei
rlights on, either
approaching fro mthe opposite direction or
travelling in front of your vehicle, and conse-
quently switches the headlamps from main
beam to dipped beam.
The system automatically adapts the dipped-
beam headlamp range depending on the dis-
tance to the other vehicle. Once the system
no longer detects any other vehicles, it reac-
tivates the main-beam headlamps.
The system's optical sensor is located behind
the windscreen near the overhead control
panel. X
To activate: activate the Adaptive High-
beam Assist function using the on-board
computer (Y page 202).
X Turn the light switch to Ã.
X Press the combination switch beyond the
pressure point in the direction of
arrow :(Ypage 98).
The _ indicator lamp in the multifunc-
tion display lights up if it is dark and the
light sensor activates the dipped-beam
headlamps.
If you are driving at speeds above
45 km/h: Exterior lighting
101Lights and windscreen wipers Z
Page 111 of 329
X
Lightly press the corresponding bulb into
the holder, turn it anti-clockwise and
remove it from the bulb holder.
X Insert the corresponding new bulb into the
bulb holdera nd turnitclockwise.
X Attach the bulb holder and press firmly.
The retaining lugs on the bulb holder
engage audibly.
X Close the side trim panel (Y page 107).
Licence plate lighting X
Switch off the lights.
X Open the tailgate.
X Apply a screwdriver to lamp lens :from
the outside.
X Leve rout lamp lens :and remove it.
X Replace the bulb.
X Inser tlamp lens :into the licence plate
lamp and press it in until it engages. Windscreen wipers
Switching the windscreen wipers on/
off
G
WARNING
The windscree nwill not longer be wiped prop-
erly if the wiper blades are worn .This could
prevent you from observing the traffic condi-
tions, thereby causing an accident. Replace
the wiper blades twice a year, ideally in spring
and autumn. !
Do not operate the windscreen wipers
when the windscreen is dry, as this could
damage the wiper blades. Moreover, dust
that has collected on the windscreen can
scratch the glass if wiping takes place when
the windscreen is dry.
If it is necessary to switch on the wind-
screen wipers in dry weather conditions,
always operate them using washer fluid.
! If the windscreen wipers leave smears on
the windscreen after the vehicle has been
washed in an automatic car wash, this may
be due to wax or other residue. Cleant he
windscreen with washer fluid after an auto-
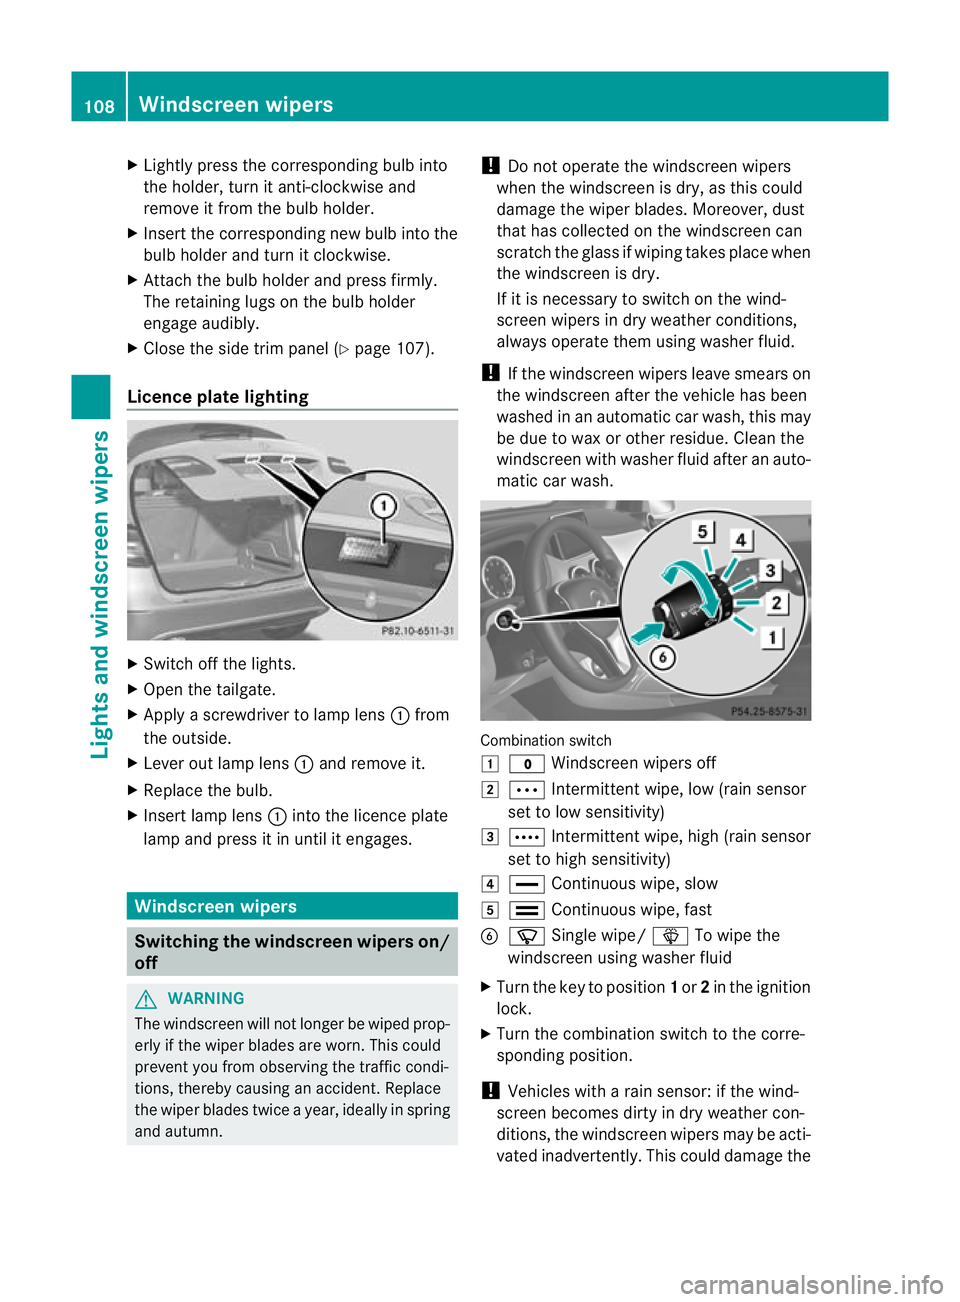
matic car wash. Combination switch
1
$ Windscreen wipers off
2 Ä Intermittent wipe, low (rain sensor
set to low sensitivity)
3 Å Intermittent wipe, high (rain sensor
set to high sensitivity)
4 ° Continuous wipe, slow
5 ¯ Continuous wipe, fast
B í Single wipe/ îTo wipe the
windscreen using washer fluid
X Turn the key to position 1or 2in the ignition
lock.
X Turn the combination switch to the corre-
sponding position.
! Vehicles with a rain sensor: if the wind-
screen becomes dirty in dry weather con-
ditions, the windscreen wipers may be acti-
vated inadvertently. This could damage the 108
Windscreen wipersLights and windscreen wipers
Page 112 of 329
windscreen wiper blades or scratch the
windscreen.
For this reason, you should always switch
off the windscreen wipers in dry weather.
Vehicles with arain sensor: in theÄor
Å position, the appropriate wiping fre-
quency is automatically set according to the
intensity of the rain. In the Åposition, the
rai ns ensor is more sensitive than in
the Ä position, causing the windscreen
wipers to wipe more frequently. Switching the rear window wiper on/
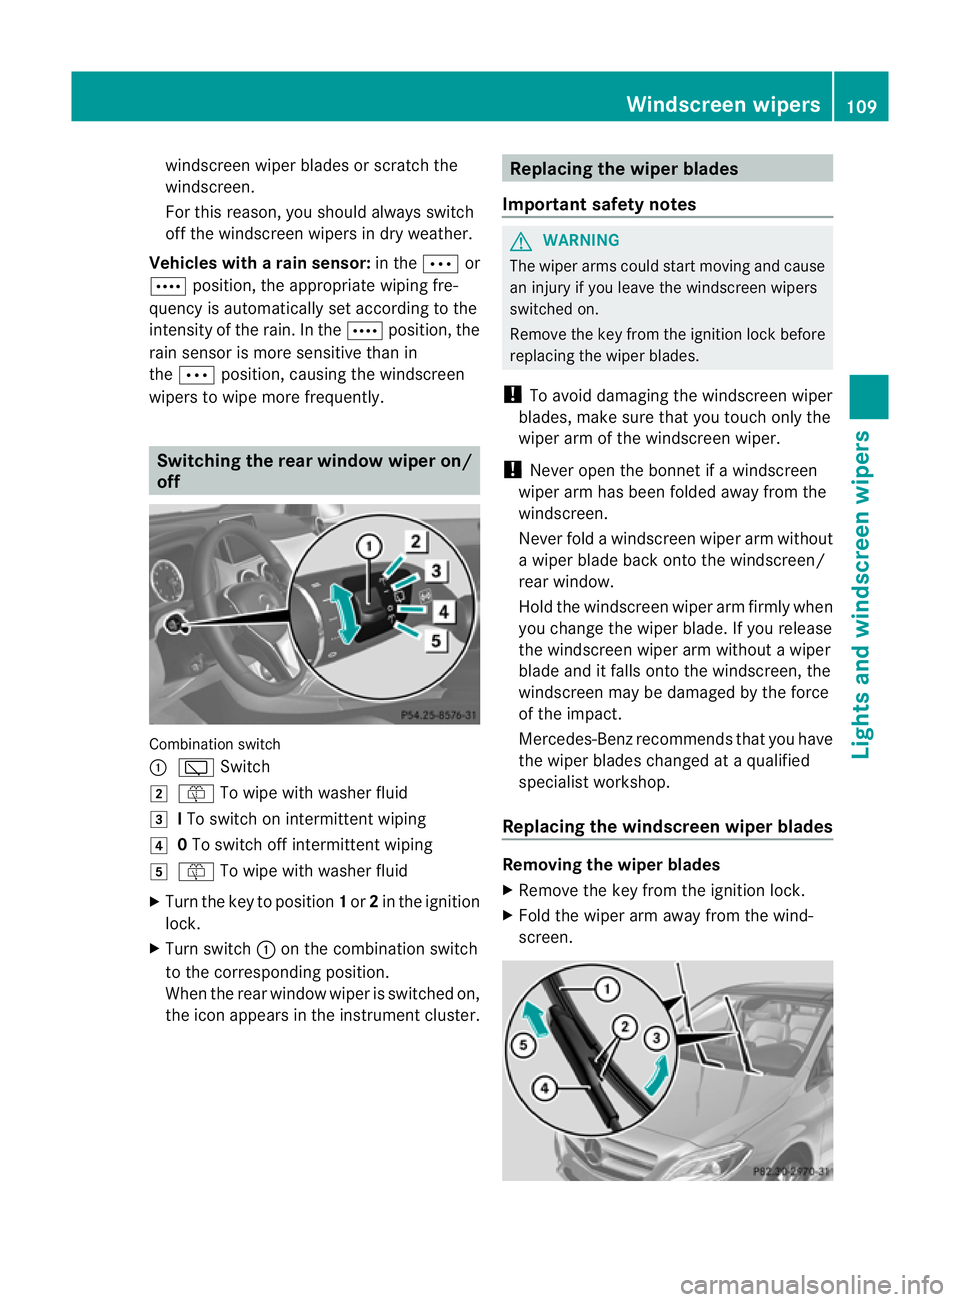
off
Combination switch
:
è Switch
2 ô To wipe with washer fluid
3 ITo switch on intermittent wiping
4 0To switch off intermittent wiping
5 ô To wipe with washer fluid
X Turn the key to position 1or 2in the ignition
lock.
X Turn switch :on the combination switch
to the corresponding position.
When the rear window wiper is switched on,
the icon appears in the instrument cluster. Replacing the wiper blades
Important safety notes G
WARNING
The wiper arms could start moving and cause
an injury if you leave the windscreen wipers
switched on.
Remove the key from the ignition lock before
replacing the wiper blades.
! To avoid damaging the windscreen wiper
blades, make sure that you touch only the
wiper arm of the windscreen wiper.
! Never open the bonnet if a windscreen
wiper arm has been folded away from the
windscreen.
Never fold a windscreen wiper arm without
a wiper blade back onto the windscreen/
rear window.
Hold the windscreen wiper arm firmly when
you change the wiper blade. If you release
the windscreen wiper arm without a wiper
blade and it falls onto the windscreen, the
windscreen may be damaged by the force
of the impact.
Mercedes-Benzr ecommends that you have
the wiper blades changed at aqualified
specialist workshop.
Replacing the windscreen wiper blades Removing the wiper blades
X
Remove the key from the ignition lock.
X Fold the wiper arm away from the wind-
screen. Windscreen wipers
109Lights and windscreen wipers Z