MERCEDES-BENZ B-CLASS HATCHBACK 2011 Owners Manual
Manufacturer: MERCEDES-BENZ, Model Year: 2011, Model line: B-CLASS HATCHBACK, Model: MERCEDES-BENZ B-CLASS HATCHBACK 2011Pages: 329, PDF Size: 7.91 MB
Page 301 of 329
Changing
awheel Flat tyre
You can find information on wha tto do in the
event of flat tyre in the "Flat tyre" section
(Y page 276). Instructions for driving with
MOExtended tyres in the event of a flat tyre
are also provided there. Interchanging the wheels
G
WARNING
Interchanging the front and rear wheels may
severely impair the driving characteristics if
the wheels or tyres have different dimensions.
The wheel brakes or suspension components
may also be damaged. There is a risk of acci-
dent.
Interchange front and rear wheels only if the
wheels and tyres are of the same dimensions.
Interchanging the front and rear wheels of
differing dimensions can render the general
operating permit invalid.
Always pay attention to the instructions and
safety warnings in the "Fitting a wheel" sec-
tion (Y page 298).
The wear patterns on the front and rear tyres
differ, depending on the operating conditions.
Interchange the wheels before a clear wear
pattern has formed on the tyres. Front tyres
typically wear more on the shoulders and the
rear tyres in the centre.
On vehicles that have the same size front and
rear wheels, you can interchange the wheels
every 5,000km to 10,000 km depending on
the degree of tyre wear. Maintain the direc-
tion of tyre rotation.
Clean the contact surfaces of the wheel and
the brake disc thoroughly every time a wheel
is interchanged. Check the tyre pressure and,
if necessary, restart the tyre pressure loss
warning system. Direction of rotation
Tyres with a specified direction of rotation
have additional benefits, e.g. if there is a risk
of aquaplaning. You will only gain these ben-
efits if the correct direction of rotation is
observed.
An arrow on the sidewall of the tyre indicates
its correct direction of rotation. Storing wheels
Store wheels that are not being used in a cool,
dry and preferably dark place. Protec tthe
tyres against oil, grease, petrol and diesel. Cleaning the wheels
G
WARNING
Do not use high-pressure cleaners with circu-
lar-jet nozzles (dirt grinders) to clean your
vehicle, in particular the tyres. You could oth-
erwise damage the tyres and cause an acci-
dent. Fitting
awheel
Preparing the vehicle X
Park the vehicle on firm, non-slippery and
level ground.
X Apply the electric parking brake manually
(Y page 145).
X Bring the front wheels into the straight-
ahead position.
X Vehicles with manual transmission:
engage first or reverse gear.
X Vehicles with automatic transmission:
move the DIRECT SELECT lever to P.
X Switch off the engine.
X Remove the key from the ignition lock.
X If a trailer is coupled to the vehicle, uncou-
ple it.
X If included in the vehicle equipment, take
the tyre-change tool kit out of the vehicle. 298
Changing
awheelWheels and tyres
Page 302 of 329
X
Secure the vehicle to prevent it from rolling
away.
i Apart from some country-specific var-
iants, vehicles are not equipped with tyre-
changing tools. For more information on
which tools are required to perfor mawheel
change on your vehicle, consult a
Mercedes-Benz Service Centre.
Required tyre-changing tools could be, for
example:
R jack
R wheel chock
R wheel wrench
Securing the vehicle to prevent it from
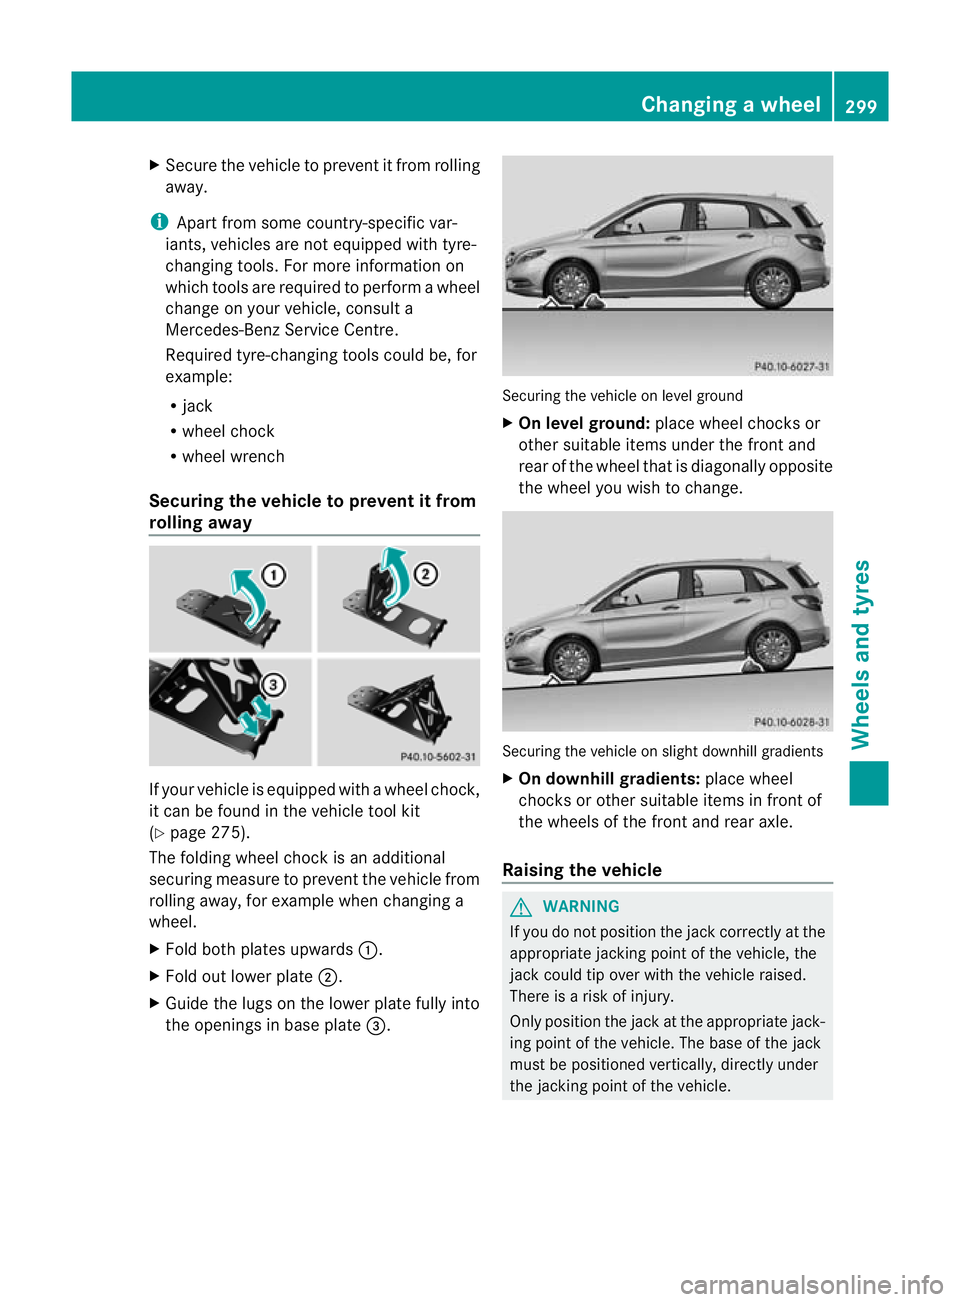
rolling away If your vehicle is equipped with a wheel chock,
it can be found in th evehicle tool kit
(Y page 275).
The folding wheel choc kis an additional
securing measure to prevent the vehicle from
rolling away, for example when changing a
wheel.
X Fold both plates upwards :.
X Fold out lower plate ;.
X Guide the lugs on the lower plate fully into
the openings in base plate =. Securing the vehicle on level ground
X
On level ground: place wheel chocks or
other suitable items under the front and
rear of the wheel that is diagonally opposite
the wheel you wish to change. Securing the vehicle on slight downhill gradients
X
On downhill gradients: place wheel
chocks or other suitable items in front of
the wheels of the front and rear axle.
Raising the vehicle G
WARNING
If you do not position the jack correctly at the
appropriate jacking point of the vehicle, the
jack could tip over with the vehicle raised.
There is a risk of injury.
Only position the jack at the appropriate jack-
ing point of the vehicle. The base of the jack
must be positioned vertically, directly under
the jacking point of the vehicle. Changing
awheel
299Wheels and tyres Z
Page 303 of 329
The following must be observed when raising
the vehicle:
R
to raise the vehicle, only use the vehicle-
specific jack that has been tested and
approved by Mercedes-Benz.Ifu sed incor-
rectly, the jack could tip over with the vehi-
cle raised.
R the jack is designed only to raise and hold
the vehicle for a short time while a wheel
is being changed. It is not suited for per-
forming maintenance work under the vehi-
cle.
R avoid changing the wheel on uphill and
downhill slopes.
R before raising the vehicle, secure it from
rolling away by applying the parking brake
and inserting wheel chocks. Never disen-
gage the parking brake while the vehicle is
raised.
R the jack must be placed on a firm, flat and
non-slip surface. On a loose surface, a
large, load-bearing underlay must be used.
On a slippery surface, a non-slip underlay
must be used, e.g. rubber mats.
R do not use wooden blocks or similar
objects as a jack underlay.O therwise, the
jack will not be able to achieve its load-
bearing capacity due to the restricted
height.
R make sure tha tthe distance between the
underside of the tyres and the ground does
not exceed 3 cm.
R never place your hands and feet under the
raised vehicle.
R never lie under the raised vehicle.
R never start the engine when the vehicle is
raised.
R never open or close a door or the tailgate
when the vehicle is raised.
R make sure that no persons are present in
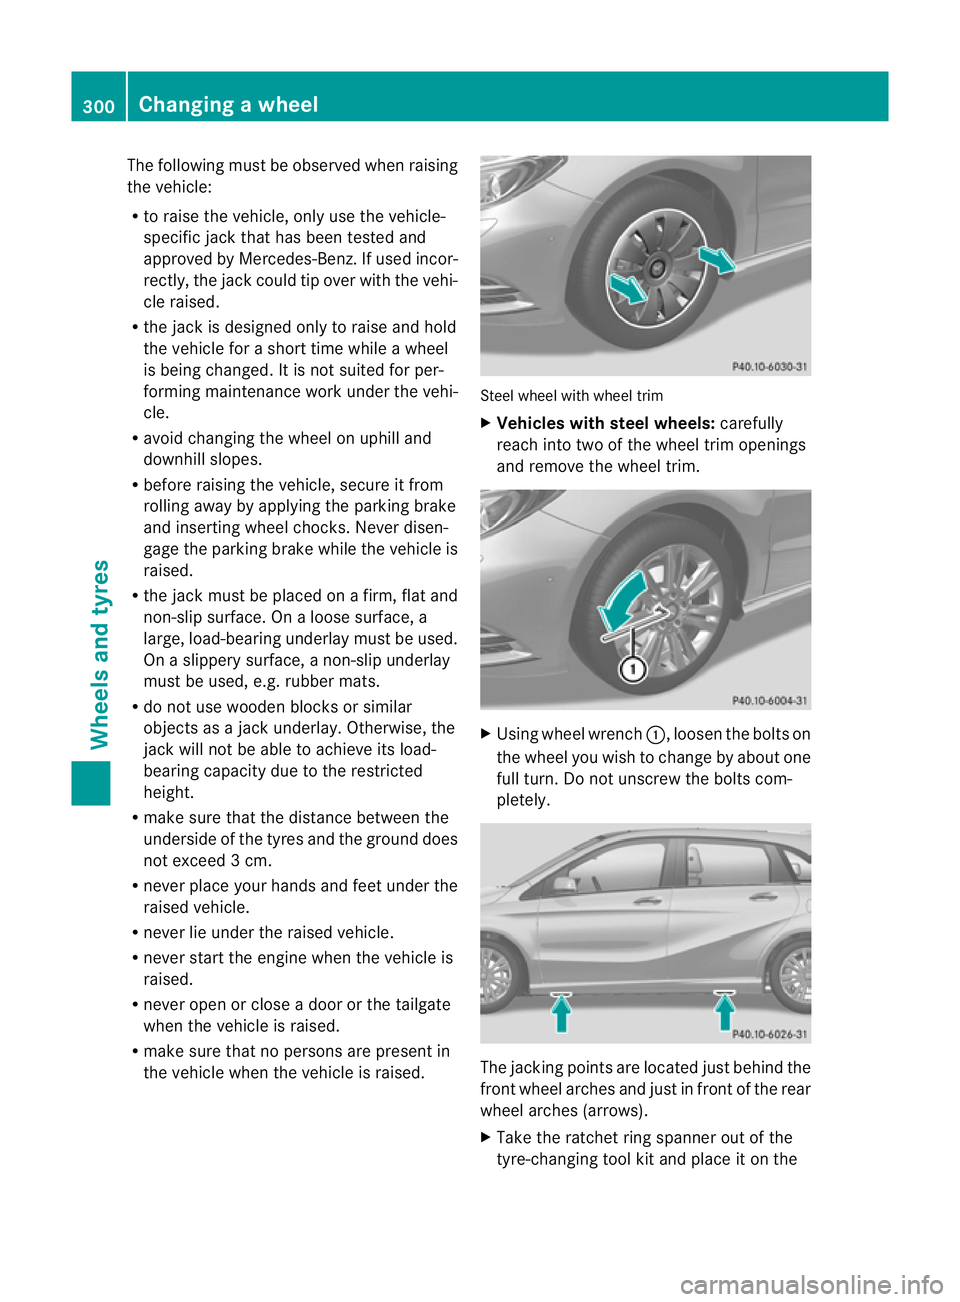
the vehicle when the vehicle is raised. Steel wheel with wheel trim
X Vehicles with steel wheels: carefully
reach into two of the wheel trim openings
and remove the wheel trim. X
Using wheel wrench :, loosen the bolts on
the wheel you wish to change by about one
full turn. Do not unscrew the bolts com-
pletely. The jacking points are located just behind the
front wheel arches and just in front of the rear
wheel arches (arrows).
X Take the ratchet ring spanner out of the
tyre-changing tool kit and place it on the 300
Changing
awheelWheels and tyres
Page 304 of 329
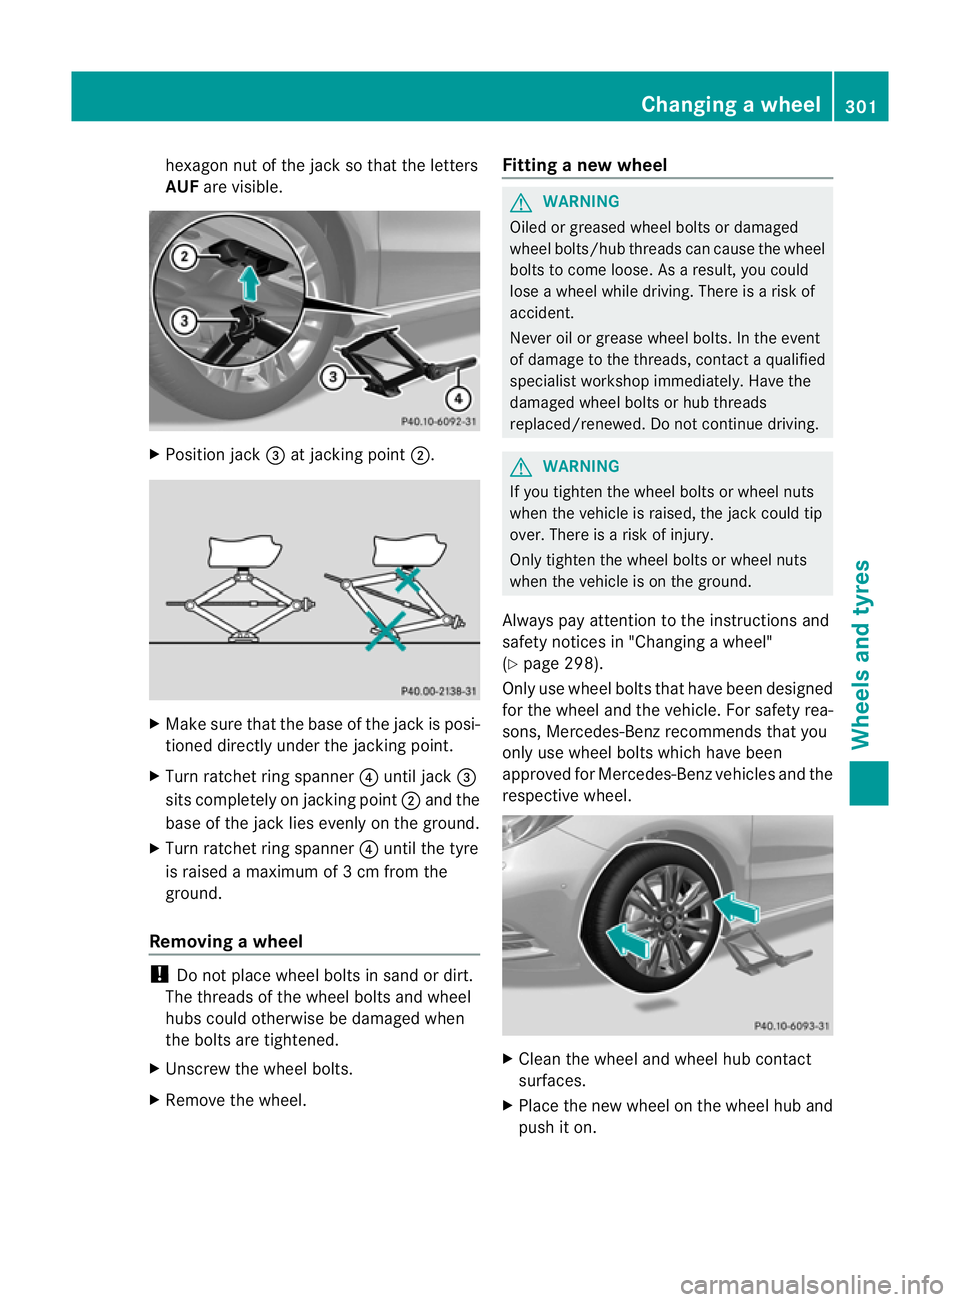
hexagon nut of the jack so that the letters
AUF are visible. X
Position jack =at jacking point ;. X
Make sure that the base of the jack is posi-
tioned directly under the jacking point.
X Turn ratchet ring spanner ?until jack =
sits completely on jacking point ;and the
base of the jack lies evenly on the ground.
X Turn ratchet ring spanner ?until the tyre
is raised a maximum of 3 cm from the
ground.
Removing awheel !
Do not place wheel bolts in sand or dirt.
The threads of the wheel bolts and wheel
hubs could otherwise be damaged when
the bolts are tightened.
X Unscrew the wheel bolts.
X Remove the wheel. Fitting
anew wheel G
WARNING
Oiled or greased wheel bolts or damaged
wheel bolts/hub threads can cause the wheel
bolts to come loose .As a result, you could
lose a wheel while driving. There is a risk of
accident.
Never oil or grease wheel bolts. In the event
of damage to the threads, contact a qualified
specialist workshop immediately.H ave the
damaged wheel bolts or hub threads
replaced/renewed. Do no tcontinue driving. G
WARNING
If you tighten the wheel bolts or wheel nuts
when the vehicle is raised, the jack could tip
over. There is a risk of injury.
Only tighten the wheel bolts or wheel nuts
when the vehicle is on the ground.
Always pay attention to the instructions and
safety notices in "Changing a wheel"
(Y page 298).
Only use wheel bolts that have been designed
for the wheel and the vehicle. For safety rea-
sons, Mercedes-Benz recommends that you
only use wheel bolts which have been
approved for Mercedes-Benz vehicles and the
respective wheel. X
Clean the wheel and wheel hub contact
surfaces.
X Place the new wheel on the wheel hub and
push it on. Changing
awheel
301Wheels and tyres Z
Page 305 of 329
X
Tighten the wheel bolts until they are fin-
ger-tight.
Lowering the vehicle X
Place the ratchet ring spanner onto the
hexagon nut of the jack so that the letters
AB are visible.
X Turn the ratchet ring spanner until the vehi-
cle is once again standing firmly on the
ground.
X Place the jack to one side. G
WARNING
The wheels could work loose if the wheel nuts
and bolts are not tightened to the specified
tightening torque. There is a risk of accident.
Have the tightening torque immediately
checked at a qualified specialist workshop
after a wheel is changed.
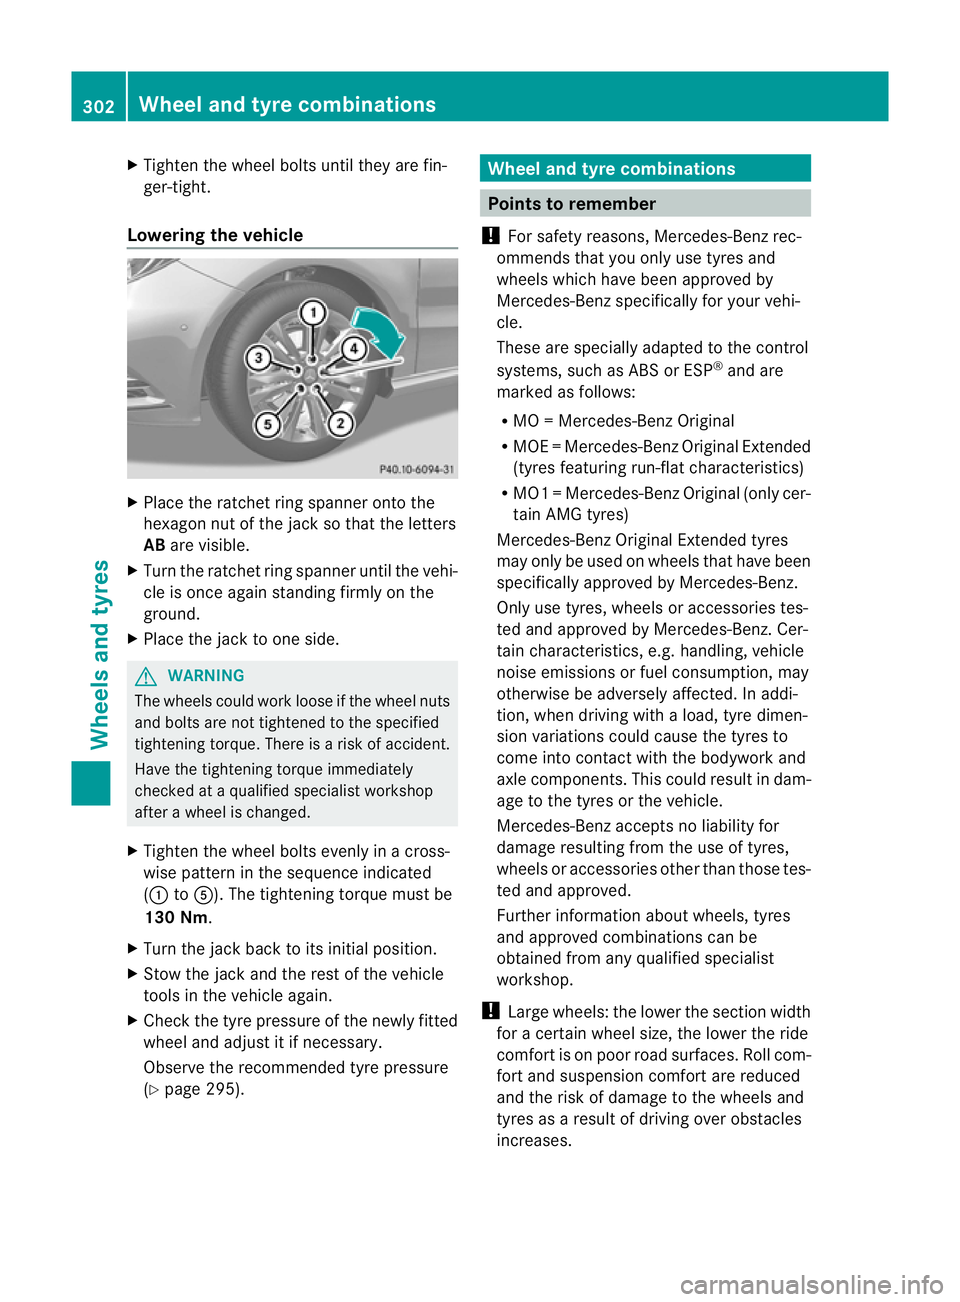
X Tighten the wheel bolts evenly in a cross-
wise pattern in the sequence indicated
(: toA). The tightening torque must be
130 Nm.
X Turn the jack back to its initial position.
X Stow the jack and the rest of the vehicle
tools in the vehicle again.
X Check the tyre pressure of the newly fitted
wheel and adjust it if necessary.
Observe the recommended tyre pressure
(Y page 295). Wheel and tyre combinations
Points to remember
! For safety reasons, Mercedes-Benz rec-
ommends that you only use tyres and
wheels which have been approved by
Mercedes-Benz specifically for your vehi-
cle.
These are specially adapted to the control
systems, such as ABS or ESP ®
and are
marked as follows:
R MO =Mercedes-BenzO riginal
R MOE =Mercedes-BenzO riginal Extended
(tyres featuring run-flat characteristics)
R MO1 =Mercedes-BenzO riginal (only cer-
tain AMG tyres)
Mercedes-Benz Original Extended tyres
may only be used on wheels that have been
specifically approved by Mercedes-Benz.
Only use tyres, wheels or accessories tes-
ted and approved by Mercedes-Benz. Cer-
tain characteristics, e.g. handling, vehicle
noise emissions or fuel consumption, may
otherwise be adversely affected. In addi-
tion, when driving with aload, tyre dimen-
sion variations could cause the tyres to
come into contact with the bodywork and
axle components.T his could result in dam-
age to the tyres or the vehicle.
Mercedes-Ben zaccepts no liability for
damage resulting from the use of tyres,
wheels or accessories othe rthan those tes-
ted and approved.
Further information about wheels, tyres
and approved combinations can be
obtained from any qualified specialist
workshop.
! Large wheels: the lower the section width
for a certain wheel size, the lower the ride
comfort is on poor road surfaces. Roll com-
fort and suspension comfort are reduced
and the risk of damage to the wheels and
tyres as a result of driving over obstacles
increases. 302
Wheel and tyre combinationsWheels and tyres
Page 306 of 329
i
You will find a table of tyre pressures on
the inside of your vehicle's fuel filler flap.
For further information on tyre pressure,
see (Y page 295). Check tyre pressures
regularly, and only when the tyres are cold.
i Notes on the vehicle equipmen t–always
fit the vehicle:
R with tyres of the same size on a given axle
(left/right)
R with the same type of tyres at a given
time (summer tyres, winter tyres,
MOExtended tyres)
i Vehicles with MOExtended tyres are not
equipped with a TIREFIT kit at the factory.
It is therefore recommended that you addi-
tionally equip your vehicle with a TIREFIT kit
if you fit tyres that do not feature run-flat
characteristics, e.g. winter tyres. A TIREFIT
kit can be obtained fro maqualified spe-
cialist workshop.
i Overview of abbreviations used in the fol-
lowing tyre tables:
R BA: both axles
R FA: front axle
R RA: rear axle
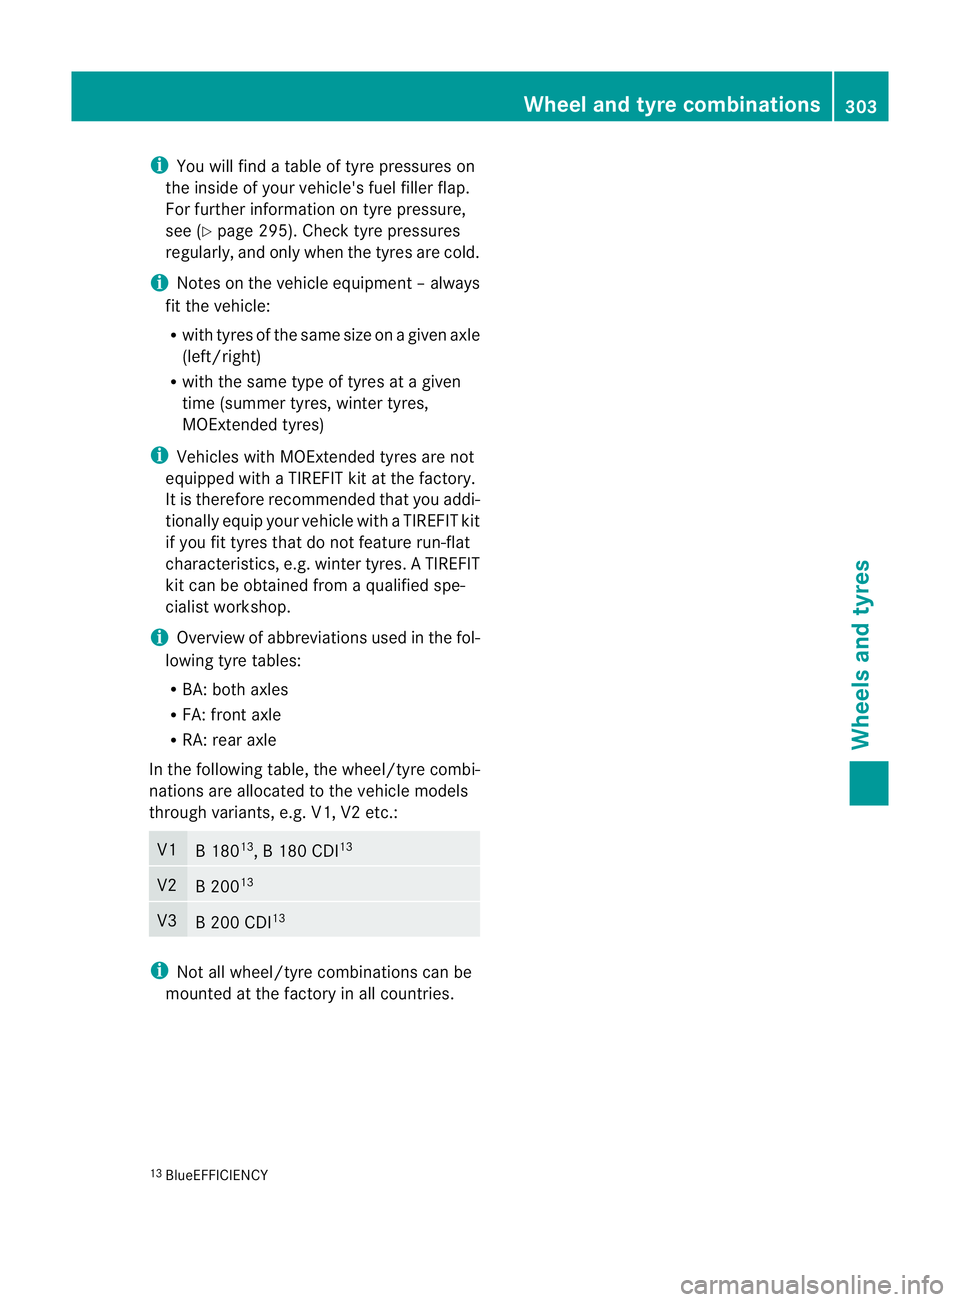
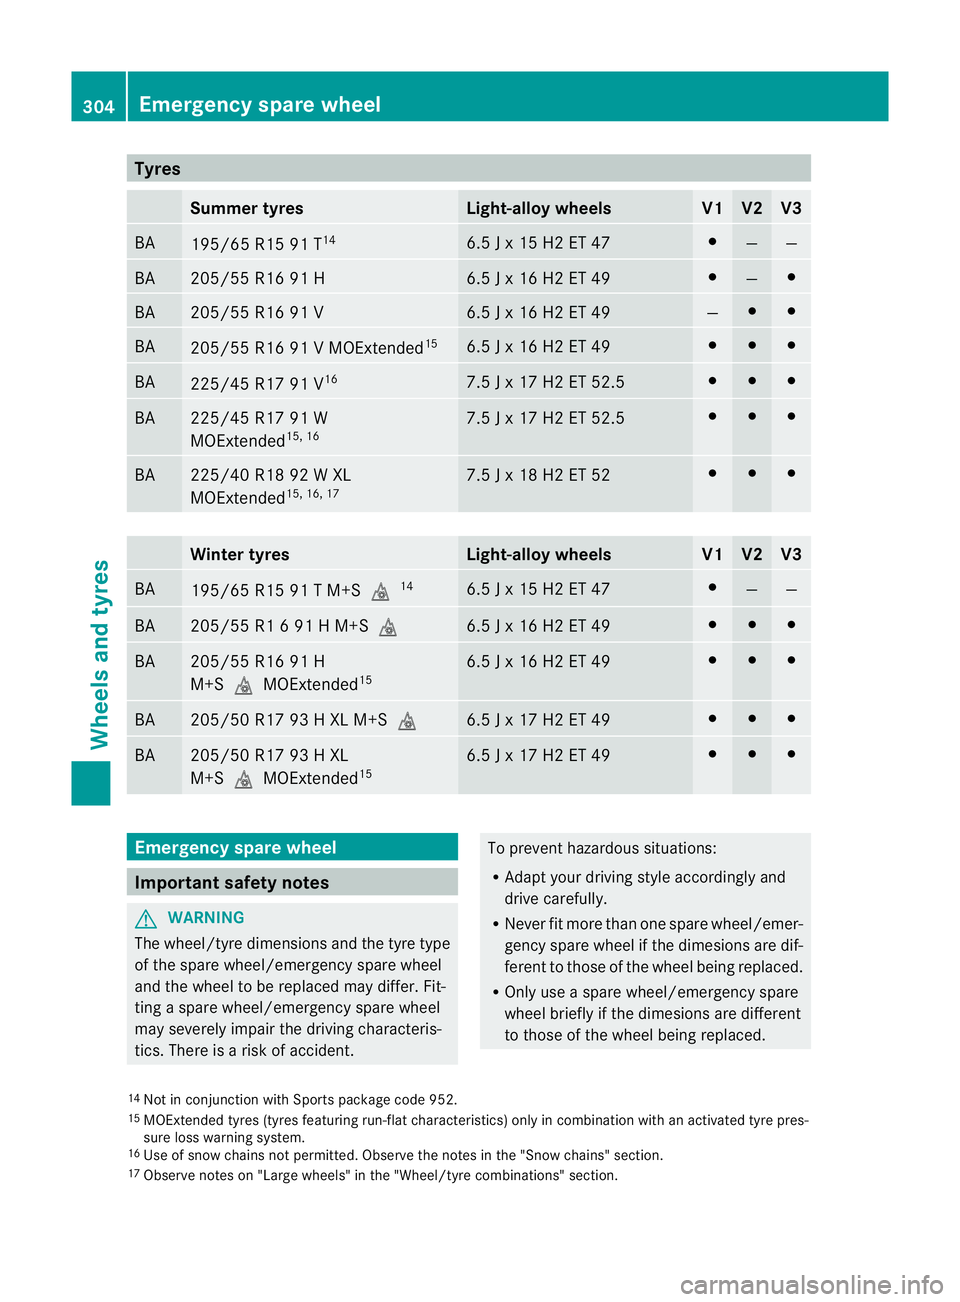
In the following table, the wheel/tyre combi-
nations are allocated to the vehicle models
through variants, e.g. V1, V2 etc.: V1
B 180
13
, B 180 CDI 13 V2
B 200
13 V3
B 200 CDI
13 i
Not all wheel/tyre combinations can be
mounted at the factory in all countries.
13 BlueEFFICIENCY Wheel and tyre combinations
303Wheels and tyres Z
Page 307 of 329
Tyres
Summer tyres Light-alloy wheels V1 V2 V3
BA
195/6
5 R15 91 T 14 6.5 J
x 15 H2 ET 47 #
— —
BA 205/55 R16 91 H 6.5 J x 16 H2 ET 49 #
— #
BA 205/55 R16 91 V 6.5 J x 16 H2 ET 49 — # #
BA
205/55 R16 91 V MOExtended
15 6.5 J x 16 H2 ET 49 # # #
BA
225/45 R17 91 V
16 7.5 J x 17 H2 ET 52.5 # # #
BA 225/45 R17 91 W
MOExtended
15, 16 7.5 J x 17 H2 ET 52.5 # # #
BA 225/40 R18 92 W XL
MOExtended
15, 16, 17 7.5 J x 18 H2 ET 52 # # #
Winter tyres Light-alloy wheels V1 V2 V3
BA
195/65 R15 91 T M+S
i14 6.5 J x 15 H2 ET 47 #
— —
BA 205/55 R1 6 91 H M+S
i 6.5 J x 16 H2 ET 49 # # #
BA 205/55 R16 91 H
M+S
iMOExtended 15 6.5 J x 16 H2 ET 49 # # #
BA 205/50 R17 93 H XL M+S
i 6.5 J x 17 H2 ET 49 # # #
BA 205/50 R17 93 H XL
M+S
iMOExtended 15 6.5 J x 17 H2 ET 49 # # #
Emergenc
yspare wheel Important safety notes
G
WARNING
The wheel/tyre dimensions and the tyre type
of the spare wheel/emergency spare wheel
and the wheel to be replaced may differ .Fit-
ting a spare wheel/emergency spare wheel
may severely impair the driving characteris-
tics. There is a risk of accident. To prevent hazardous situations:
R
Adapt your driving style accordingly and
drive carefully.
R Never fit more than one spare wheel/emer-
gency spare wheel if the dimesions are dif-
ferent to those of the wheel being replaced.
R Only use a spare wheel/emergency spare
wheel briefly if the dimesions are different
to those of the wheel being replaced.
14 Not in conjunction with Sports package code 952.
15 MOExtended tyres (tyres featuring run-flat characteristics) only in combination with an activated tyre pres-
sure loss warning system.
16 Use of snow chains not permitted. Observe the notes in the "Snow chains" section.
17 Observe notes on "Large wheels" in the "Wheel/tyre combinations" section. 304
Emergency spare wheelWheels and tyres
Page 308 of 329
R
Do not switch off ESP ®
.
R Have the spare wheel/emergency spare
wheel in question replaced at the nearest
qualified specialis tworkshop. Make sure
that the wheel/tyre dimensions and tyre
type are correct.
When using an emergency spare wheel or
spare wheel of a different size, you must not
exceed the maximum speed of 80 km/h.
Snow chains must not be fitted to emergency
spare wheels. Points to remember
You should regularly check the pressure of
the emergency spare wheel, particularly prior
to long trips, and correc tthe pressure as nec-
essary (Y page 295). The value on the wheel
or as given in the "Technical data" section
(Y page 302) is valid.
i When you are driving with the emergency
spare wheel fitted, the tyre pressure loss
warning system cannot function reliably.
Only restart the tyre pressure loss warning
system when the defective wheel has been
replaced with a new wheel.
An emergency spare wheel may also be fitted
against the direction of rotation. Observe the
time restriction on use as well as the speed
limitation specified on the emergency spare
wheel.
Replace the tyres after six years at the latest,
regardless of wear. This also applies to the
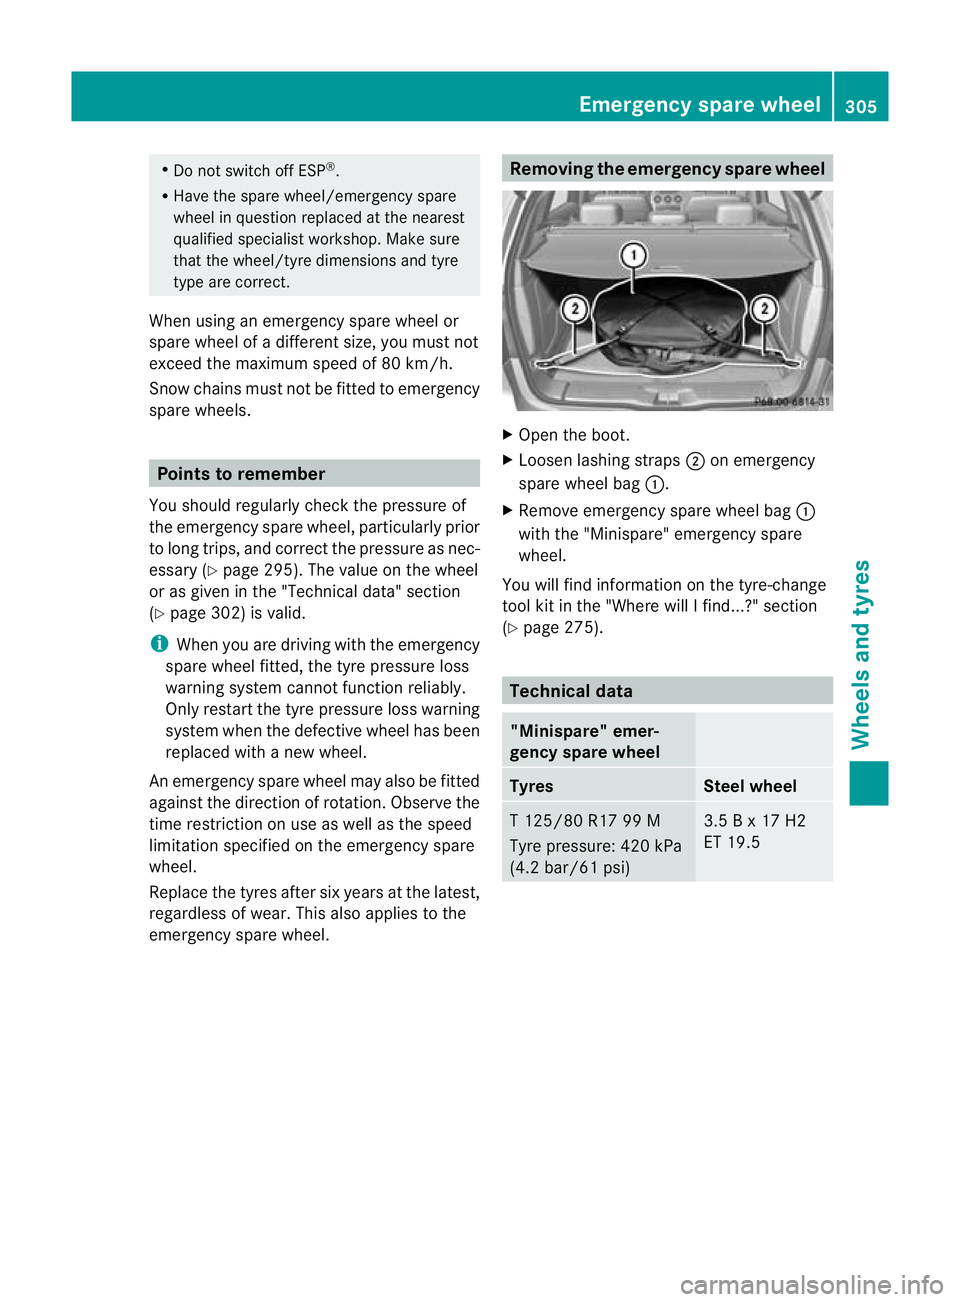
emergency spare wheel. Removing the emergency spare wheel
X
Open the boot.
X Loosen lashing straps ;on emergency
spare wheel bag :.
X Remove emergency spare wheel bag :
with the "Minispare" emergency spare
wheel.
You will find information on the tyre-change
tool kit in the "Where will Ifind...?" section
(Y page 275). Technical data
"Minispare" emer-
gency spare wheel
Tyres Steel wheel
T 125/80 R17 99 M
Tyre pressure: 420 kPa
(4.2 bar/61 psi) 3.5 B x 17 H2
ET 19.5Emergency spare wheel
305Wheels and tyres Z
Page 309 of 329

306
Page 310 of 329
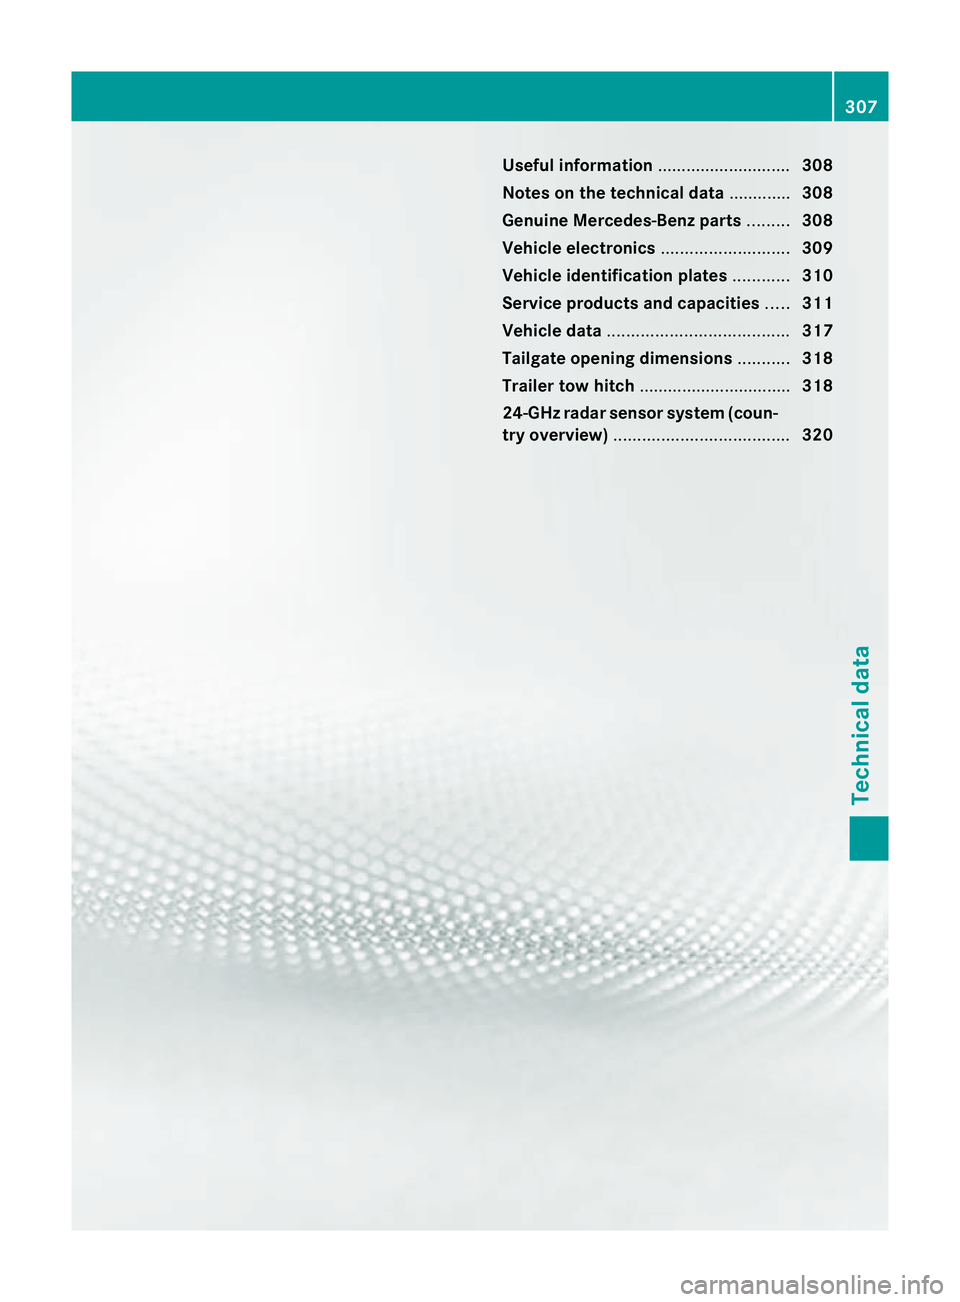
Useful information
............................308
Notes on the technical data .............308
Genuine Mercedes-Benz parts .........308
Vehicle electronics ...........................309
Vehicle identification plates ............310
Service products and capacities .....311
Vehicle data ...................................... 317
Tailgate opening dimensions ...........318
Trailer tow hitch ................................ 318
24-GHz radar sensor system (coun-
tryo verview) ..................................... 320 307Technical data