engine MERCEDES-BENZ B-CLASS HATCHBACK 2011 Manual PDF
[x] Cancel search | Manufacturer: MERCEDES-BENZ, Model Year: 2011, Model line: B-CLASS HATCHBACK, Model: MERCEDES-BENZ B-CLASS HATCHBACK 2011Pages: 329, PDF Size: 7.91 MB
Page 186 of 329
permissible maximum speed for vehicle/
trailer combinations is above 100 km/h.
When towing a trailer, your vehicle's handling
characteristics will be differen tincomparison
to when driving without a trailer and it will
consume more fuel.
Change into a lower gear in good time on long
and steep downhill gradients. Vehicles with
automatic transmission: in order to do so, you
will need to have switched to manual drive
program Min advance (Y page 139).
i This also applies if you have activated
cruise control, SPEEDTRONIC or DIS-
TRONIC PLUS.
This will use the braking effect of the engine,
so less braking will be required to prevent the
vehicle from gaining speed. This relieves the
load on the brake system and prevents the
brakes from overheating and wearing too
quickly. If you need additional braking,
depress the brake pedal repeatedly rather
than continuously.
i Vehicles with automatic transmis-
sion: if the accelerator pedal is depressed
briefly on downhill gradients while manual
drive program Mis temporarily activated,
the automatic transmission may switch
back to the last active automatic drive pro-
gram Eor S.T he automatic transmission
may shift to a higher gear. This can reduce
the engine's braking effect.
Driving tips If the trailer swings from side to side:
X
Do not accelerate.
X Do not counter-steer.
X Brake if necessary. R
Maintain a greater distance from the vehi-
cle in front than when driving without a
trailer.
R Avoid braking abruptly. If possible, brake
gently at first to allow the trailer to run on.
Then, increase the braking force rapidly.
R The values given for gradient-climbing
capabilities from a standstill refer to sea
level. When driving in mountainous areas,
note that the power output of the engine,
and consequently the vehicle's gradient-
climbing capability, decrease with increas-
ing altitude. Folding out the ball coupling
G
WARNING
Make sure that the ball coupling is engaged,
either in its folded-out or folded-in position,
and that the indicator lamp is off.
Do not turn the release wheel when a trailer
is coupled up. Otherwise, the trailer might
detach.
Before you can tow a trailer with your vehicle,
you must fold out the ball coupling.
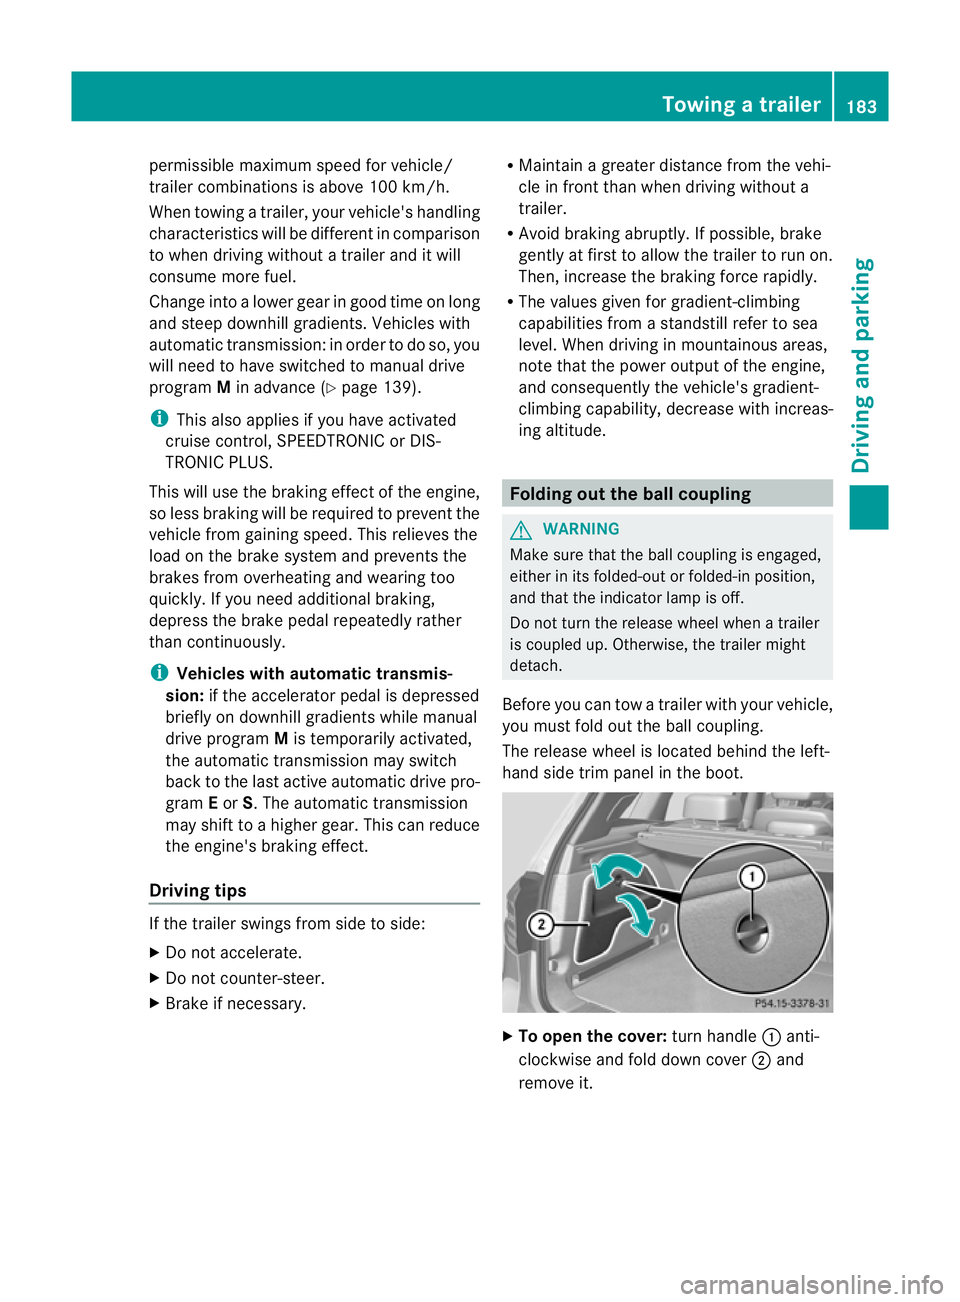
The release wheel is located behind the left-
hand side trim panel in the boot. X
To open the cover: turn handle:anti-
clockwise and fold down cover ;and
remove it. Towing
atrailer
183Driving an d parking Z
Page 191 of 329
Useful information
i This Owner's Manual describes all models
and all standard and optional equipment
available to your vehicle at the time of pub-
lication of the Owner's Manual. Country-
specific deviations are possible. Please
note that your vehicle may not be equipped
with all features described. This also
applies to safety-relevan tsystems and
functions.
i Please read the information on qualified
specialist workshops (Y page 22).Important safety notes
G
WARNING
Only use the on-board computer when road
and traffic conditions permit .You would oth-
erwise be distracted and unable to concen-
trate properly on driving, and could cause an
accident. G
WARNING
No messages will be displayed if either the
instrument cluster or the multifunction dis-
play is inoperative.
As a result, you will not be able to see infor-
mation about your driving conditions, such as
speed, outside temperature, warning and indi-
cator lamps, display messages or system fail-
ures. Driving characteristics may be impaired.
Adjust your driving style and vehicle speed
accordingly.
Contact a qualified specialist workshop
immediately. G
WARNING
The on-board computer only records and dis-
plays malfunctions and warnings from certain
systems. For this reason, you should always
make sure that your vehicle is safe to use. You
could otherwise cause an accident by driving
an unsafe vehicle. G
WARNING
The operating safety of your vehicle could be
affected if maintenance work is carried out
incorrectly. You could lose control of the vehi-
cle and cause an accident .The safety systems
may also no longer be able to protect you or
others as they are designed to do.
Always have maintenance work carried out at
a qualified specialist workshop.
You will find an illustration of the instrument
cluster in the "At a glance" section
(Y page 28). Displays and operation
Coolant temperature gauge
The coolant temperature gauge is in the
instrumentc lusteront he right-hand side.
The reading may rise up to 120 †undernor-
mal driving conditions if the coolant has been
filled correctly.
At high outside temperatures and when driv-
ing uphill, the coolant temperature may rise
to the end of the scale. Rev counter
! Do not drive in the overrevving range.
Doing so will damage the engine.
The red band in the rev counter indicates the
engine's overrevving range.
The fuel supply is interrupted to protec tthe
engine when the red band is reached. Outside temperature display
G
WARNING
At temperatures just above freezing point, the
street may be icy, especially in wooded areas
or on bridges. If you do not adapt your driving
style to the conditions, the vehicle could skid.
For this reason, adapt your driving style and
speed to the weather conditions. 188
Displays and operationOn-board computer and displays
Page 202 of 329
The vehicle may otherwise begin to skid.
If you drive too fast, ESP ®
cannot reduce the
risk of an accident. ESP ®
cannot override the
laws of physics. G
WARNING
If the å warning lamp in the instrument
cluster lights up when the engine is running,
ESP ®
is deactivated or is unavailable due to a
malfunction. The risk that your vehicle may
start to skid then increases in certain situa-
tions.
Always adapt your driving style to the prevail-
ing road and weather conditions.
For further information about ESP ®
, see
(Y page 66).
X Start the engine.
X Press =or; on the steering wheel
to select the Assist. menu.
X Press 9or: to select ESP .
X Press the abutton.
X To deactivate: pressaagain.
The å warning lamp in the instrument
cluster comes on.
X To activate: pressaagain.
The å warning lamp in the instrument
cluster goes out.
Activating/deactivating the distance
warning signal X
Press the =or; button on the steer-
ing wheel to select the Assist. menu.
X Press 9or: to select Dist. warn‐
ing .
X Press the abutton.
The curren tselection is displayed.
X To activate/deactivate: pressa
again.
When the distance warning signal is activa-
ted, the multifunction display shows the
Ä symbol if the HOLD function is not acti-
vated (Y page 162). Vehicles with Active Parking Assist:
if
PARKTRONIC is activated and you are driving
at a speed under 35 km/h, the jActive
Parking Assist symbol is shown instead of the
Ä symbol ( Ypage 166).
For further information on the distance warn-
ing signal, see (Y page 63).
Activating/deactivating ATTENTION
ASSIST X
Press the =or; button on the steer-
ing wheel to select the Assist. menu.
X Press the 9or: button to select
Attention Asst. X
Press a.
The curren tselection is displayed.
X To activate/deactivate: pressa
again.
When ATTENTION ASSIST( Ypage 175) is
activated, the Àsymbol appears in the
multifunction display when the ignition is on.
Activating/deactivating Blind Spot
Assist X
Press the =or; button on the steer-
ing wheel to select the Assist. menu.
X Press the 9or: button to select
Blind Spot Asst. .
X Press a.
The curren tselection is displayed.
X To activate/deactivate: pressa
again.
For further information about Blind Spot
Assist, see (Y page 177).
Activating/deactivating Lane Keeping
Assist X
Press the =or; button on the steer-
ing wheel to select the Assist. menu.
X Press the 9or: button to select
Lane Keep. Asst. Menus and submenus
199On-board computer and displays Z
Page 204 of 329
![MERCEDES-BENZ B-CLASS HATCHBACK 2011 Manual PDF X
Press the abutton to confirm.
X Press the :or9 button to select the
Dig. speedo [mph] function.
You will see the selected setting: on or
off .
X Press the abutton to save the setting.
i Speed is dis MERCEDES-BENZ B-CLASS HATCHBACK 2011 Manual PDF X
Press the abutton to confirm.
X Press the :or9 button to select the
Dig. speedo [mph] function.
You will see the selected setting: on or
off .
X Press the abutton to save the setting.
i Speed is dis](/img/4/55448/w960_55448-203.png)
X
Press the abutton to confirm.
X Press the :or9 button to select the
Dig. speedo [mph] function.
You will see the selected setting: on or
off .
X Press the abutton to save the setting.
i Speed is displayed in mph.
i Vehicles for the United Kingdom: this
function is not available.
The Dig. speedo [mph] function allows you
to choose whether the status area in the mul-
tifunction display always shows the speed in
mph instead of the outside temperature.
Selecting the permanent display function
You can determine whether the multifunction
display permanently shows your speed or the
outside temperature.
X Press the =or; button on the steer-
ing wheel to select the Settings menu.
X Press the :or9 button to select the
Inst. cluster submenu.
X Press the abutton to confirm.
X Press the :or9 button to select the
Permanent display: function.
You will see the selected setting: outsidetemperature or
Dig. speedom [mph] .
X Press the abutton to save the setting.
i Speed is displayed in mph.
i Vehicles for the United Kingdom: this
function is not available.
Lights Switching the daytime driving lights on/
off
X Switch off the engine.
X Press the =or; button on the steer-
ing wheel to select the Settings menu.
X Press the :or9 button to select the
Light submenu.
X Press the abutton to confirm. X
Press the :or9 button to select the
Daytime driving lights: function.
You will see the selected setting: on or
off .
X Press the abutton to save the setting.
Further information on daytime driving lights
(Y page 97).
Switching the Intelligent Light System
on/off
X Press the =or; button on the steer-
ing wheel to select the Settings menu.
X Press the :or9 button to select the
Light submenu.
X Press the abutton to confirm.
X Press the :or9 button to select the
Intell. Light System: function.
You will see the selected setting: on or
off .
X Press the abutton to save the setting.
When you activate the Intell. Light Sys‐
tem: function, you activat
ethe following:
R motorway mode
R active light function
R cornering light function
R extended range foglamps
If you set the dipped-beamh eadlamps for
driving on the right/left (Y page 201), the
multifunction display shows the Intell. Light System: System inoperative
Inactive for left-side traffic or
Intell. Light System: System inoper‐
ative Inactive for right-side traf‐
fic display message instead of the
Intell. Light System: function in the
Light sub-
menu.
Setting the dipped-beam headlamps for
driving on the left/right
X Press the =or; button on the steer-
ing wheel to select the Settings menu.
X Press the :or9 button to select the
Light submenu.
X Press the abutton to confirm. Menus and submenus
201On-board computer and displays Z
Page 205 of 329
X
Press :or9 to select the Dipped headl. Setting for: function.
You will see the selected setting: Right-side traffic or
Left-side traffic .
X Press the abutton to save the setting.
When you change the setting, conversion
does not take place until the next time the
vehicle is stationary.
This function is only available on vehicles with
the Intelligent Light System.
You can use this function to switch between
symmetrical and asymmetrical dipped beam
(Y page 96).
If you set the dipped-beam headlamps for
driving on the right/left, then motorway
mode and the extended range foglamps are
not available.
You can also have the dipped-beam head-
lamps set for driving on the right/left at a
qualified specialist workshop, e.g. a
Mercedes-Benz Service Centre.
Switching Adaptive Highbeam Assist on/
off
X Press the =or; button on the steer-
ing wheel to select the Settings menu.
X Press the :or9 button to select the
Light submenu.
X Press the abutton to confirm.
X Press the :or9 button to select the
Adaptive Main-beam Assist: function.
You will see the selected setting: Activa‐ted or
Deactivated .
X Press the abutton to save the setting.
Activating/deactivating the surround
lighting and exterior lighting delayed
switch-off
If you have activated the Surround light‐ing: function and the light switch is set to
Ã, the following functions are activated
when it is dark:
R Surround lighting: the exterior lighting
remains lit for 40 seconds after unlocking
with the key. If you start the engine, the surround lighting is switched off and auto-
matic headlamp mode is activated
(Y
page 97).
R Exterior lighting delayed switch-off: the
exterior lighting remains lit for 60seconds
after the engine is switched off. If you close
all the doors and the tailgate, the exterior
lighting goes off after 15 seconds.
X Press the =or; button on the steer-
ing wheel to select the Settings menu.
X Press the :or9 button to select the
Light submenu.
X Press the abutton to confirm.
X Press the :or9 button to select the
Surround lighting: function.
You will see the selected setting: on or
off .
X Press the abutton to save the setting.
Deactivating delayed switch-off of the exte-
rior lighting temporarily:
X Before leaving the vehicle, turn the key to
position 0in the ignition lock.
X Turn the key to position 2in the ignition
lock.
The exterior lighting delayed switch-off is
deactivated.
Delayed switch-off of the exterior lighting is
reactivated the next time you start the
engine.
i Depending on your vehicle's equipment,
when the surround lighting and delayed
switch-off exterior lighting are on, the fol-
lowing light up:
R side lamps
R foglamps
R dipped-beam headlamps
R daytime driving lights
R surround lighting in the exterior mirrors
Activating/deactivating the interior light-
ing delayed switch-off
If you activate the Interior lighting delay sw. off: function, the interior light-202
Menus and submenusOn-board computer and displays
Page 214 of 329
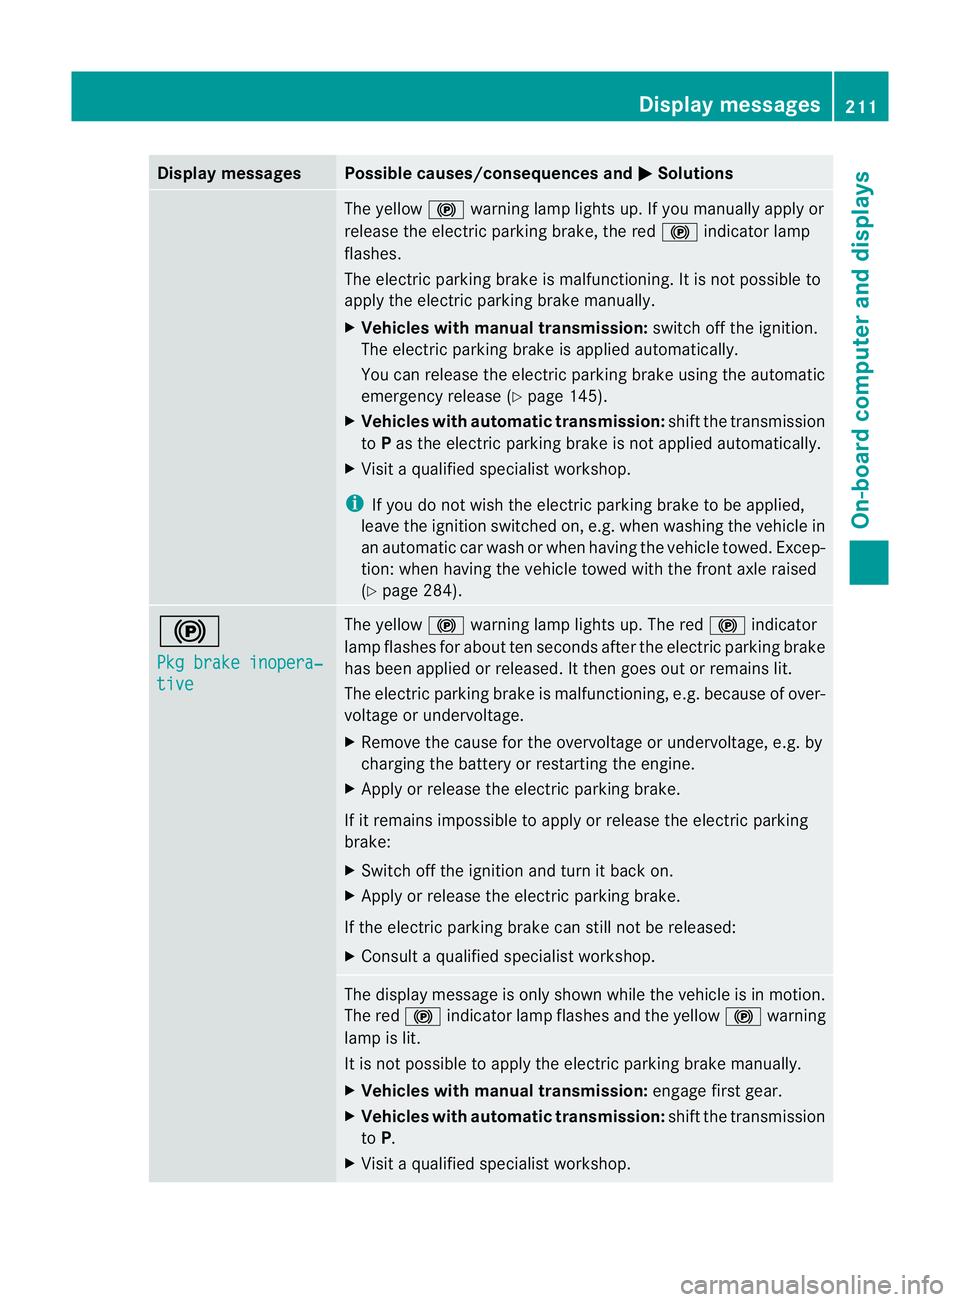
Display messages Possible causes/consequences and
M Solutions
The yellow
!warning lamp lights up. If you manually apply or
release the electric parkin gbrake, the red !indicator lamp
flashes.
The electric parking brake is malfunctioning. It is not possible to
apply the electric parking brake manually.
X Vehicles with manual transmission: switch off the ignition.
The electric parking brake is applied automatically.
You can release the electric parking brake using the automatic
emergency release (Y page 145).
X Vehicles with automatic transmission: shift the transmission
to Pas the electric parking brake is not applied automatically.
X Visi taqualified specialist workshop.
i If you do not wish the electric parking brake to be applied,
leave the ignition switched on, e.g. when washing the vehicle in
an automatic car wash or when having the vehicle towed. Excep-
tion :when having the vehicle towed with the front axle raised
(Y page 284). !
Pkg brake inopera‐
tive The yellow
!warning lamp lights up. The red !indicator
lamp flashes for about ten seconds after the electric parking brake
has been applied or released. It then goes out or remains lit.
The electric parking brake is malfunctioning, e.g. because of over-
voltage or undervoltage.
X Remove the cause for the overvoltage or undervoltage, e.g. by
charging the battery or restarting the engine.
X Apply or release the electric parking brake.
If it remains impossible to apply or release the electric parking
brake:
X Switch off the ignition and turn it back on.
X Apply or release the electric parking brake.
If the electric parking brake can still not be released:
X Consult a qualified specialist workshop. The display message is only shown while the vehicle is in motion.
The red
!indicator lamp flashes and the yellow !warning
lamp is lit.
It is not possible to apply the electric parking brake manually.
X Vehicles with manual transmission: engage first gear.
X Vehicles with automatic transmission: shift the transmission
to P.
X Visit a qualified specialist workshop. Display messages
211On-board computer and displays Z
Page 216 of 329

Display messages Possible causes/consequences and
M Solutions
PRE-SAFE
Functions cur‐
rently limited See
Owner's Manual BA
SP LUS is temporarily inoperative. Possible causes:
R the radars ensor system cover in the radiator grille is dirty.
R function is impaired due to heavy rain or snow.
R the sensors in the bumpers are dirty.
R the radar sensor system is temporarily inoperative, e.g. due to
electromagnetic radiation emitted by nearby TV or radio sta-
tions or other sources of electromagnetic radiation.
R the system is outside the operating temperature range.
R the on-board voltage is too low.
If the display message does not disappear:
X Pull over and stop the vehicle safely as soon as possible, paying
attention to road and traffic conditions.
X Engage the electric parking brake.
X Clean the radar sensor system cover in the radiator grille
(Y page 270).
X Clean the bumpers (Y page 270).
X Restart the engine.
If the system detects that the sensors are fully operational, the
display message disappears.
BASP LUS is operational again. PRE-SAFE
Functions limited
See Owner's Manual BAS PLUS is faulty. The distance warning signal may also have
failed.
X
Visit a qualified specialist workshop. ü If the symbol appears in the multifunction display,
aseat belt
tongue has been inserted into a rear seat belt buckle.
For further information on the status indicator for the rear seat
belts, (Y page 46). ý If the symbol appears in the multifunction display,
aseat belt
tongue has not been inserted in a rear seat belt buckle.
G WARNING
If you do not wear the seat belt correctly, or it is not properly
engaged in the buckle, it no longer offers the intended level of
protection in the event of an accident.
There is an increased risk of injury.
X If necessary, ask the occupants in the rear to fasten their seat
belts.
For further information on the status indicator for the rear seat
belts, (Y page 46). Display messages
213On-board computer and displays Z
Page 222 of 329
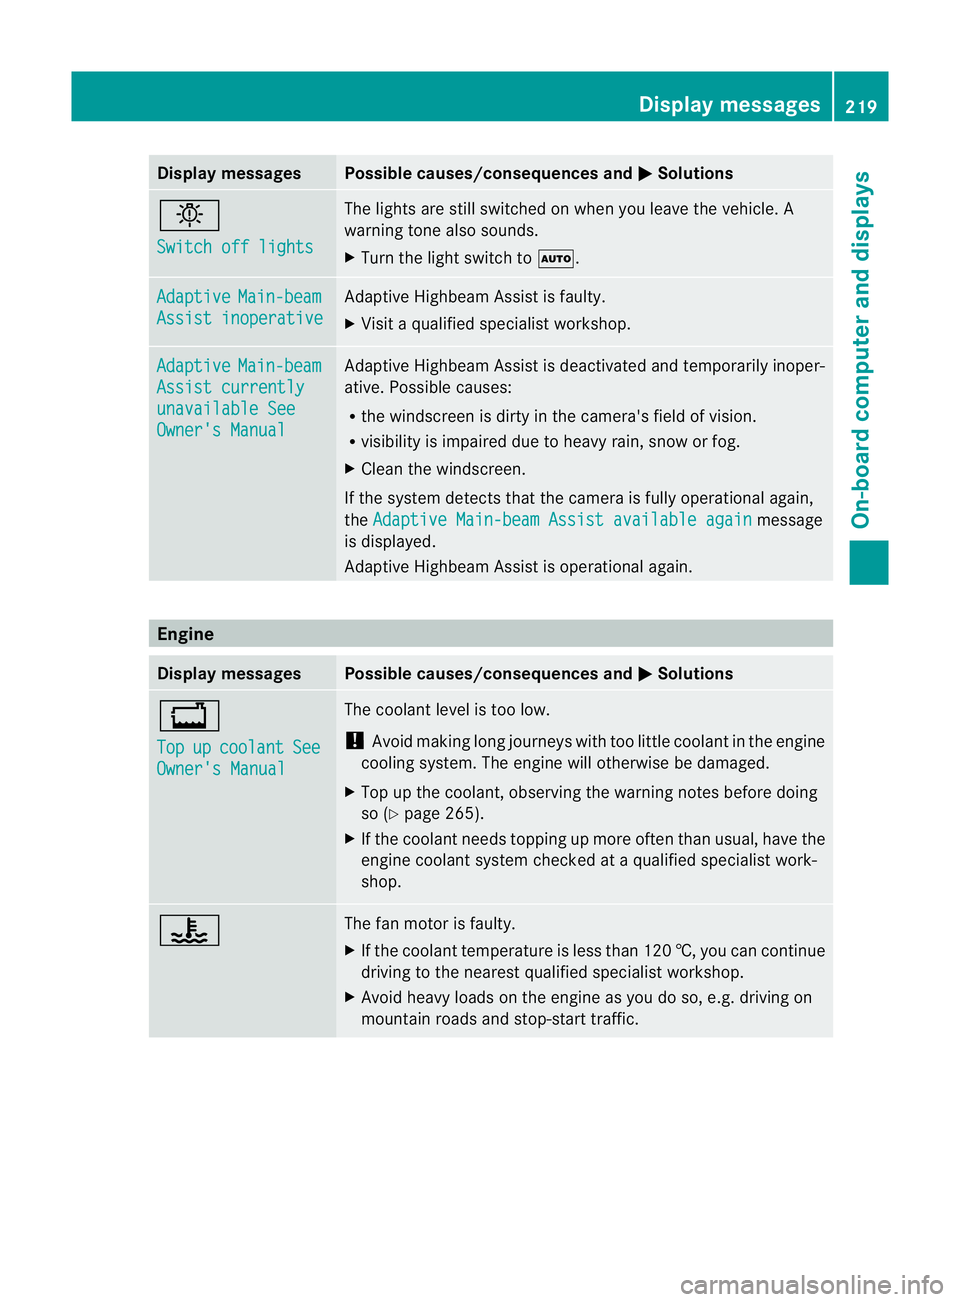
Display messages Possible causes/consequences and
M Solutions
b
Switch off lights The lights are still switched on when you leave the vehicle. A
warning tone also sounds.
X Tur nthe light switch to Ã. Adaptive Main-beam
Assist inoperative Adaptive Highbeam Assist is faulty.
X
Visit a qualified specialist workshop. Adaptive Main-beam
Assist currently
unavailable See
Owner's Manual Adaptive Highbeam Assist is deactivated and temporarily inoper-
ative. Possible causes:
R
the windscreen is dirty in the camera's field of vision.
R visibility is impaired due to heavy rain, snow or fog.
X Cleant he windscreen.
If the system detects that the camera is fully operational again,
the Adaptive Main-beam Assist available again message
is displayed.
Adaptive Highbeam Assist is operational again. Engine
Display messages Possible causes/consequences and
M Solutions
+
Top
up coolant See
Owner's Manual The coolant level is too low.
!
Avoid making long journeys with too little coolant in the engine
cooling system. The engine will otherwise be damaged.
X Top up the coolant, observing the warning notes before doing
so (Y page 265).
X If the coolant needs topping up more often than usual, have the
engine coolant system checked at a qualified specialist work-
shop. ? The fan motor is faulty.
X
If the coolant temperature is less than 120 †, you can continue
driving to the nearest qualified specialist workshop.
X Avoid heavy loads on the engine as you do so, e.g. driving on
mountain roads and stop-start traffic. Display messages
219On-board computer and displays Z
Page 223 of 329

Display messages Possible causes/consequences and
M Solutions
?
Coolant Stop vehi‐
cle Switch engine
off The coolan
tis too hot.
Aw arning tone also sounds.
G WARNING
Do no tdrive when youre ngine is overheated. Thi scan cause some
fluids which may have leaked into the engine compartmen tto
catch fire.
Stea mfrom the overheated engine can also cause serious burns
which can occur just by opening the bonnet.
There is a risk of injury.
X Stop the vehicle immediately, paying attention to road and traf-
fic conditions, and switch off the engine.
X Engage the electric parking brake.
X Leave the vehicle and keep a safe distance from the vehicle until
the engine has cooled down.
X Make sure that the air supply to the engine radiator is not
blocked, e.g. by frozen slush.
X Do not start the engine again until the display message goes out
and the coolant temperature is under 120 †. The engine may
otherwise be damaged.
X Pay attention to the coolant temperature display.
X If the temperature increases again, visit a qualified specialist
workshop immediately.
The reading may rise up to 120 †undernormal driving conditions
if the coolant has been filled correctly. # The battery is not being charged.
Possible causes:
R
faulty alternator
R torn poly-V-belt
R a malfunction in the electronics
X Stop the vehicle immediately, paying attention to road and traf-
fic conditions, and switch off the engine.
X Open the bonnet.
X Check whether the poly-V-belt is torn.
If the poly-V-belt is torn:
! Do not continue driving. The engine could otherwise overheat.
X Consult a qualified specialist workshop.
If the poly-V-belt is OK:
X Visit a qualified specialist workshop immediately. 220
Display messagesOn-board computer and displays
Page 224 of 329
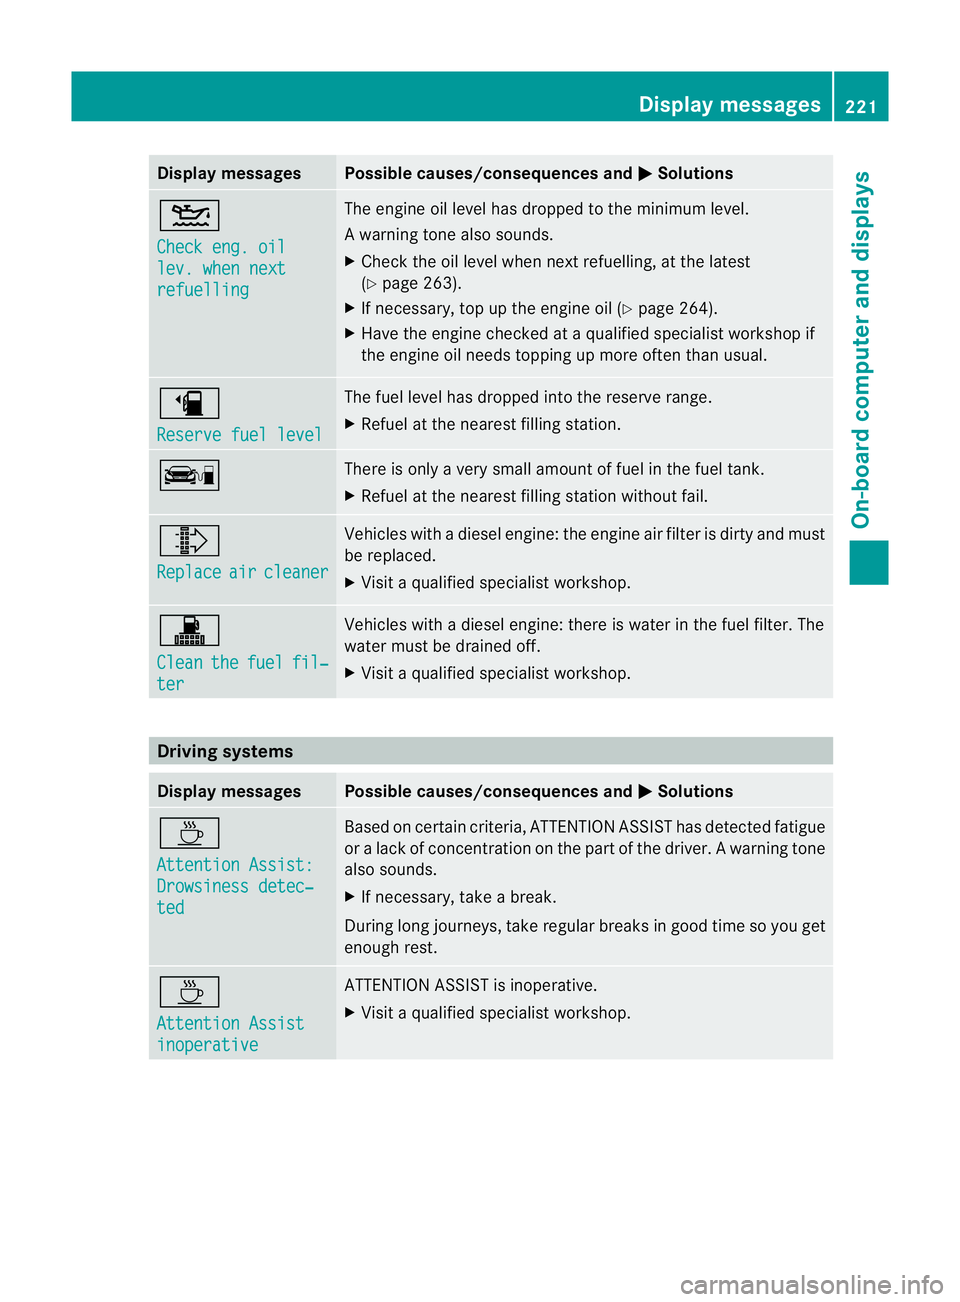
Display messages Possible causes/consequences and
M Solutions
4
Check eng. oil
lev. when next
refuelling The engine oil level has dropped to the minimum level.
Aw
arning tone also sounds.
X Chec kthe oil level when next refuelling, at the latest
(Y page 263).
X If necessary, top up the engine oil (Y page 264).
X Have the engine checked at a qualified specialist workshop if
the engine oil needs topping up more often than usual. æ
Reserve fuel level The fuel level has dropped into the reserve range.
X
Refuel at the nearest filling station. ç There is only a very small amount of fuel in the fuel tank.
X
Refuel at the nearest filling station without fail. ¸
Replace
air cleaner Vehicles with a diesel engine: the engine air filter is dirty and must
be replaced.
X
Visit a qualified specialist workshop. !
Clean
the fuel fil‐
ter Vehicles with a diesel engine: there is water in the fuel filter. The
water must be drained off.
X
Visit a qualified specialist workshop. Driving systems
Display messages Possible causes/consequences and
M Solutions
À
Attention Assist:
Drowsiness detec‐
ted Based on certain criteria, ATTENTION ASSIST has detected fatigue
or
alack of concentration on th epart of th edriver. A warning tone
also sounds.
X If necessary, take a break.
During long journeys, take regular breaks in good time so you get
enough rest. À
Attention Assist
inoperative ATTENTION ASSIST is inoperative.
X Visi taqualified specialist workshop. Display messages
221On-board computer and displays Z