fog light MERCEDES-BENZ B-CLASS HATCHBACK 2011 Owners Manual
[x] Cancel search | Manufacturer: MERCEDES-BENZ, Model Year: 2011, Model line: B-CLASS HATCHBACK, Model: MERCEDES-BENZ B-CLASS HATCHBACK 2011Pages: 329, PDF Size: 7.91 MB
Page 13 of 329
ETS
.................................................. 66
Function/notes ................................ 66
Important safety guidelines .............66
Trailer stabilisatio n.......................... 67
Warning lamp ................................. 235
ETS (Electronic Traction System) ....... 66
Exhaus tpipe (cleaning instruc-
tions) .................................................. 271
Exterior lighting see Lights
Exterior mirrors
Adjusting ......................................... 91
Anti-dazzle mode (automatic) ..........93
Folding in/ou t(automatically) .........92
Folding in/ou t(electrically) .............92
Folding in whe nlocking (on-board
computer) ...................................... 204
Out of position (troubleshooting) .....92
Parking position ............................... 93
Resetting ......................................... 92
Storing settings (memory func-
tion) ................................................. 94F
Faul tmessage
see Display messages
Filler cap
see Fuel filler flap
Fire extinguisher ............................... 275
First-aid kit ......................................... 274
Fitting awheel
Removing awheel .......................... 301
Fitting wheels
Fitting awheel ............................... 301
Lowering the vehicle ......................302
Preparing the vehicle .....................298
Raising the vehicle .........................299
Securing the vehicle against roll-
ing away ........................................ 299
Flat tyre
MOExtended tyres .........................276
Preparing the vehicle .....................276
TIREFIT kit ...................................... 277
Floormat ............................................ .260
Foglamps Extended range .............................. 100
Switching on/off .............................. 97 Folding table
...................................... 246
Frequencies Mobile phone ................................. 309
Two-way radio ................................ 309
Front foglamps
Display message ............................ 217
Front-passenger seat
Folding the backres tforward/
back ............................................... 247
Front windscreen
see Windscreen
Fuel
Additives ........................................ 312
Consumption statistics ..................193
Displaying the current consump-
tion ................................................ 193
Displaying the range ......................193
Fuel gauge ....................................... 28
Grade (petrol) ................................ 312
Important safety notes ..................312
Notes about consumption .............314
Problem (malfunction) ...................143
Quality (diesel )............................... 313
Refuelling ...................................... .141
Tank content/reserve fuel .............312
Fuel filler flap Opening/closing .......142
Fuel filte r(white display message) .221
Fuel level Calling up the range (on-board
computer) ...................................... 193
Gauge .............................................. 28
Fuel reserve
see Fuel
Fuel tank
Capacity ........................................ 312
Problem (malfunction) ...................143
Fuse allocation chart (vehicle tool
kit) ...................................................... 275
Fuses Before changing ............................. 288
Fuse allocation chart .....................289
Fuse box in the engine compart-
ment .............................................. 288
Fuse box in the front-passenger
footwell .......................................... 289
Important safety notes ..................28710
Index
Page 15 of 329
Emergency key element ................... 73
Important safety note s.................... 72
Loss ................................................. 75
Modifying the programming .............73
Positions (ignition lock) .................127
Problem (malfunction) .....................75
Starting the engine ........................127
Keyp ositions (ignition lock) ............127
Kickdown Driving tips .................................... 137
Manual drive program ....................140
Kneebag ............................................... 42L
Lamps see Warning and indicator lamps
Lane Keeping Assist
Activating/deactivating .................199
Display message ............................ 223
Function/informatio n.................... 180
Lane package ..................................... 177
Lashing eyelets ................................. 251
Licence plate lamp (display mes-
sage) ................................................... 217
Licence plate lighting Changing bulbs .............................. 108
Lighting
see Lights
Lights
Activating/deactivating the Intel-
ligent Ligh tSystem ........................ 201
Activating/deactivating the inte-
rior lighting delayed switch-off .......202
Active light function .......................100
Automatic headlamp mode ..............97
Cornering light function .................100
Dipped-bea mheadlamps ................. 97
Display message ............................ 215
Driving abroad ................................. 96
Foglamps ......................................... 97
Foglamps (extended range) ...........100
Hazard warning lamps .....................99
Headlamp flasher ............................. 99
Headlamp range .............................. 98
Ligh tswitc h..................................... 96
Main-beam headlamps ..................... 99
Motorway mode ............................. 100Parking lamps
.................................. 96
Rea rfoglamp ................................... 98
Switching Adaptive Highbeam
Assist on/off ................................. 202
Switching the daytime driving
lights on/off (on-board computer) .201
Switching the daytime driving
lights on/off (switch) .......................97
Switching the exterio rlighting
delayed switch-off on/off (on-
board computer )............................ 202
Switching the surround lighting
on/off (on-board computer) ..........202
Turn signals ..................................... 98
see Changing bulbs
see Interior lighting
Light sensor (display message) .......218
LIM indicator lamp Cruise control ................................ 149
DISTRONI CPLUS ........................... 155
Variabl eSPEEDTRONIC .................152
Limiting the speed
see SPEEDTRONIC
Loading guidelines ............................244
Locking see Centra llocking
Locking (doors)
Automatic ........................................ 77
Emergency locking ........................... 78
From inside (central locking but-
ton) .................................................. 77
Locking centrally
see Centra llocking
Locking verification signal (on-
board computer) ............................... 203
Luggage compartment cover ...........251
Luggage compartment enlarge-
ment ................................................... 248
Important safety notes ..................248
Notes on use ................................. 250
Luggage compartment floor
Adjusting the height ....................... 254
opening/closing ............................ 253
stowage well, unde r....................... 253
Luggage net ....................................... 247
Lumbar support Adjusting the 4-way lumba rsup-
por t.................................................. 9012
Index
Page 17 of 329
P
Paint code .......................................... 310
Paintwork (cleaning instructions) ...268
Panorama sliding sunroof Important safety information ...........82
Opening/closing .............................. 83
Opening/closing the roller sun-
blind ................................................. 83
Problem (malfunction) .....................84
Rain closing feature .........................83
Resetting ......................................... 84
Parking ............................................... 144
Important safety notes ..................144
Parking brake ................................ 145
Position of exterior mirror, front-
passenger side ................................. 93
Reversing camera ..........................170
see PARKTRONIC
Parking aid
Active Parking Assist .....................166
see Exterior mirrors
see PARKTRONIC
Parking brake
Display message ............................ 208
Electric parking brake ....................145
Parking lamps
Changing bulbs .............................. 106
Display message ............................ 217
Switching on/off .............................. 96
Parking lamps (changing bulbs) ......106
PARKTRONIC Deactivating/activating .................165
Driving system ............................... 163
Function/notes ............................. 163
Important safety notes ..................163
Problem (fault) ............................... 166
Sensor range ................................. 164
Trailer towing ................................. 165
Warning displa y............................. 164
PASSENGE RAIRBAG OFF warning
lamp ...................................................... 49
Petrol .................................................. 312
Plastic trim (cleaning instructions) .271
Power windows see Side windows PRE-SAFE
®
(preventive occupant
safety system) Display message ............................ 212
Operation ........................................ .43
Program selector button ..................137
Pulling away Automatic transmission .................128
Manual transmission ..................... .128
Trailer ............................................ 128 Q
Qualifie dspecialis tworkshop ...........22 R
Radar sensor system Activating/deactivating .................203
Country overview ........................... 320
Display message ............................ 222
Radio
Selecting astation ......................... 195
see separate operating instructions
Rain closing feature (panorama
sliding sunroof) ................................... 83
Reading lamp ..................................... 102
Rear compartment Setting the airv ents...................... 123
Rear-compartment seat belt sta-
tus indicator ........................................ 46
Rear foglamp Display message ............................ 217
Switching on/off .............................. 98
Rear lamps
Changing bulbs .............................. 107
see Lights
Rear seat
Adjusting the angle of the backr-
ests ................................................ 250
Folding the backrest forwards/
back (vehicles without the EASY-
VARIO-PLUS system) .....................248
Folding the backres tforwards/
back (vehicles with the EASY-
VARIO-PLUS system) .....................249
Fore-and-aft adjustment ................25014
Index
Page 99 of 329
Useful information
i This Owner's Manual describes all models
and all standard and optional equipment
available to your vehicle at the time of pub-
lication of the Owner's Manual. Country-
specific deviations are possible. Please
note that your vehicle may not be equipped
with all features described. This also
applies to safety-relevan tsystems and
functions.
i Please read the information on qualified
specialist workshops (Y page 22).Exterior lighting
Important safety notes
Fo rreasons of safety, Mercedes-Benzr ecom-
mends that you drive with the lights switched
on even during the daytime. In some coun-
tries, operation of the headlamps varies due
to legal requirements and self-imposed obli-
gations. Notes on driving abroad
To convert to symmetrical dipped beam
when driving abroad: switch the headlamps
to symmetrical dipped beam in countries in
which traffic drives on the opposite side of the
road to the country where the vehicle is reg-
istered. This prevents glare to oncoming traf-
fic. When using symmetrical lights, the edge
of the carriageway is not lit as widely and as
far ahead as normal.
Convert the headlamps as close to the border
as possible before driving in these countries
(Y page 201).
Convert to asymmetrical dipped beam
after returning: convert the headlamps back
to asymmetrical dipped beam as soon as pos-
sible after crossing the border when returning
(Y page 201). If the headlamps are converted to symmetri-
cal dipped beam, the "motorway mode" and
"extended range foglamps" functions (Intelli-
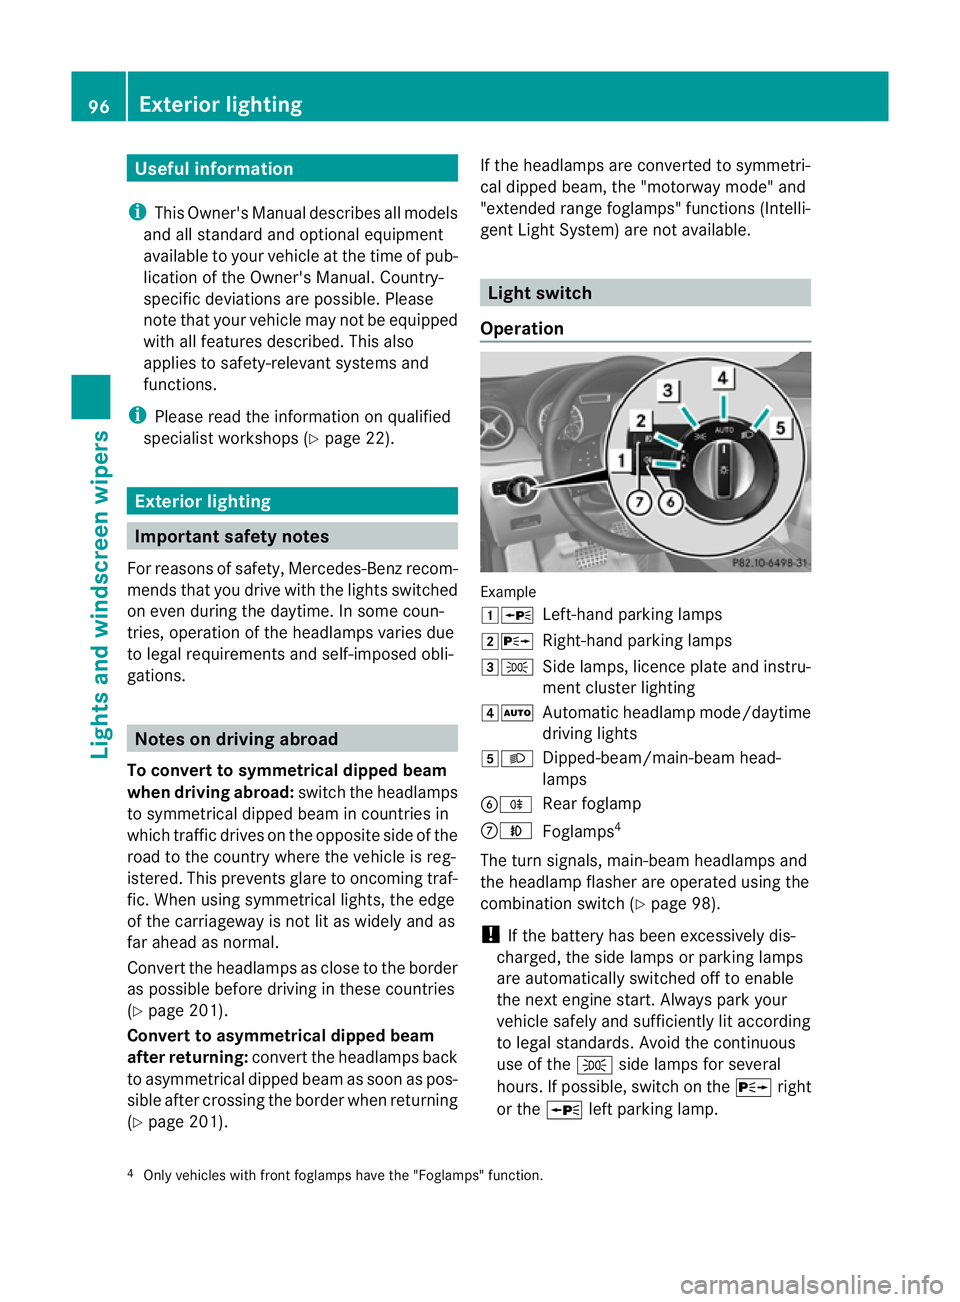
gent Light System) are not available. Light switch
Operation Example
1W
Left-hand parking lamps
2X Right-hand parking lamps
3T Side lamps, licence plate and instru-
ment cluster lighting
4Ã Automatic headlamp mode/daytime
driving lights
5L Dipped-beam/main-beam head-
lamps
BR Rear foglamp
CN Foglamps 4
The turn signals, main-beam headlamps and
the headlamp flasher are operated using the
combination switch (Y page 98).
! If the battery has been excessively dis-
charged, the side lamps or parking lamps
are automatically switched off to enable
the nexte ngine start. Always park your
vehicle safely and sufficiently li taccording
to legal standards. Avoid the continuous
use of the Tside lamps for several
hours. If possible, switch on the Xright
or the Wleft parking lamp.
4 Only vehicles with front foglamps have the "Foglamps "function. 96
Exterior lightingLights and windscreen wipers
Page 100 of 329
The exterior lighting (except the side lamps/
parking lamps) switches off automatically if
you:
R remove the key from the ignition lock
R open the driver's door with the key in posi-
tion 0
If you hear a warning tone when you leave the
vehicle, the lights may still be switched on.
X Turn the light switch to Ã.
Dipped-beam headlamps X
To switch on the dipped-beam head-
lamps: turn the key in the ignition lock to
position 2or start the engine.
X Turn the light switch to L.
The L indicator lamp in the instrument
cluster lights up.
Daytime driving lights You can activate or deactivate the daytime
driving lights function using the on-board
computer (Y page 201).
X Daytime driving lights: activate the day-
time driving lights function using the on-
board computer.
X Turn the light switch to Ã.
When the engine is on: depending on the
ambient light conditions, the daytime driv-
ing lights or the parking and dipped-beam
headlamps are switched on.
When the dipped-beam headlamps are
switched on, the Lindicator lamp in the
instrument cluster lights up.
Automatic headlamp mode G
WARNING
If the light switch is set to Ã, the dipped-
beam headlamps will not come on automati-
cally if it is foggy. This could endanger you and
others. Therefore, turn the light switch to
L in fog. The automatic headlamp feature is only an
aid. The driver is responsible for the vehicle's
lighting at all times.
X To switch on automatic headlamp
mode: turn the light switch to Ã.
Key in position 1in the ignition lock: the
side lamps are switched on or off automat-
ically depending on the brightness of the
ambient light.
With the engine running: depending on the
brightness of the ambient light, the daytime
driving lights 5
or the dipped-beam head-
lamps are switched on or off automatically.
When the dipped-beam headlamps are
switched on, the Lindicator lamp in the
instrument cluster lights up.
Front foglamps and rear foglamp Foglamps
Only vehicles with frontf
oglamps have the
"Foglamps" function. G
WARNING
If you suspect that driving conditions will be
foggy, turn the light switch to Lbefore you
start your journey. Your vehicle may other-
wise not be visible and you could endanger
yourself and others.
X To switch on the foglamps: turn the key
in the ignition lock to position 2or start the
engine.
X Turn the light switch to T,Lor
Ã.
X Press the Nbutton.
The green Nindicator lamp in the instru-
ment cluster lights up.
X To switch off the front foglamps: press
the N button.
The green Nindicator lamp in the instru-
ment cluster goes out.
5 Only if daytime driving lights have been activated via the on-board computer. Exterior lighting
97Lights and windscreen wipers Z
Page 101 of 329
Rear foglamp
X To switch on the rear foglamp: turn the
key in the ignition lock to position 2or start
the engine.
X Turn the light switch to LorÃ.
X Press the Rbutton.
The yellow Rindicator lamp in the
instrument cluster lights up.
X To switch off the rear foglamp: press the
R button.
The yellow Rindicator lamp in the
instrument cluster goes out.
Vehicles with front foglamps: when the light
switch is in the Tposition, the rea rfog-
lamp can only be switched on if the foglamps
(without dipped-beam headlamps) are
switched on.
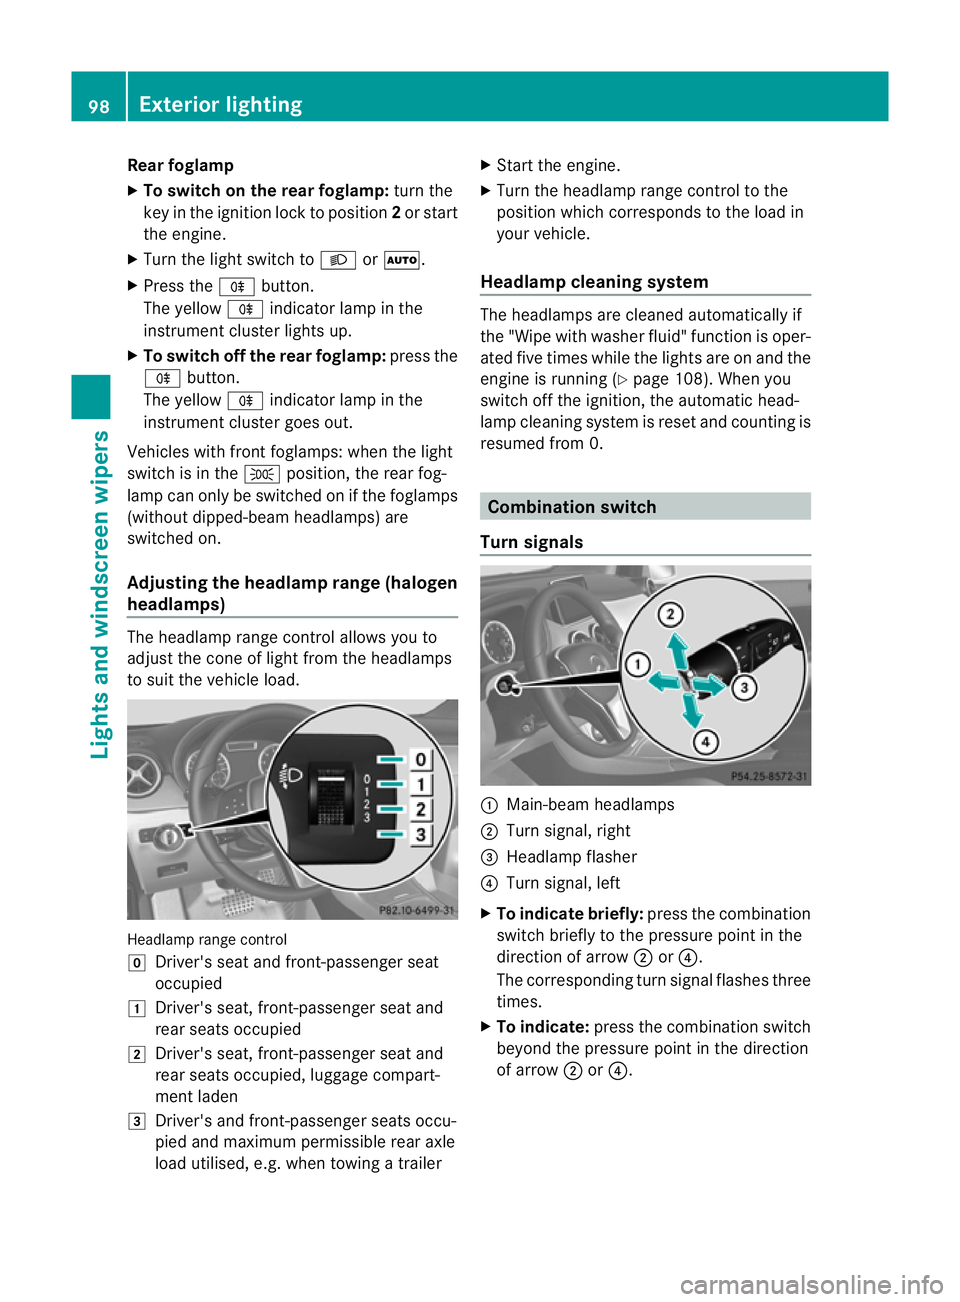
Adjusting the headlam prange (halogen
headlamps) The headlamp range control allows you to
adjust the cone of light from the headlamps
to sui tthe vehicle load. Headlamp range control
g
Driver's seat and front-passenger seat
occupied
1 Driver's seat, front-passenger seat and
rear seats occupied
2 Driver's seat, front-passenger seat and
rear seats occupied, luggage compart-
ment laden
3 Driver's and front-passenger seats occu-
pied and maximum permissible rear axle
load utilised, e.g. when towing a trailer X
Start the engine.
X Turn the headlamp range control to the
position which corresponds to the load in
your vehicle.
Headlampc leaning system The headlamps are cleaned automatically if
the "Wipe with washer fluid" function is oper-
ated five times while the lights are on and the
engine is running (Y
page 108). When you
switch off the ignition, the automatic head-
lamp cleaning syste mis reset and counting is
resumed from 0. Combination switch
Turn signals :
Main-beam headlamps
; Turn signal, right
= Headlamp flasher
? Turn signal, left
X To indicate briefly: press the combination
switch briefly to the pressure point in the
direction of arrow ;or?.
The corresponding turn signal flashes three
times.
X To indicate: press the combination switch
beyond the pressure point in the direction
of arrow ;or?. 98
Exterior lightingLights and windscreen wipers
Page 102 of 329
Main-beam headlamps
X
To switch on the main-beam head-
lamps: turn the key in the ignition lock to
position 2or start the engine.
X Turn the light switch to LorÃ.
X Press the combination switch beyond the
pressure point in the direction of
arrow :.
In the Ãposition, the main-beam head-
lamps are only switched on when it is dark
and the engine is running.
The K indicator lamp in the instrument
cluster lights up when the main-beam head-
lamps are switched on.
X To switch off the main-beam head-
lamps: move the combination switch back
to its normal position.
The K indicator lamp in the instrument
cluster goes out.
Headlamp flasher X
To switch on: turn the key in the ignition
lock to position 1or 2, or start the engine.
X Pull the combination switch in the direction
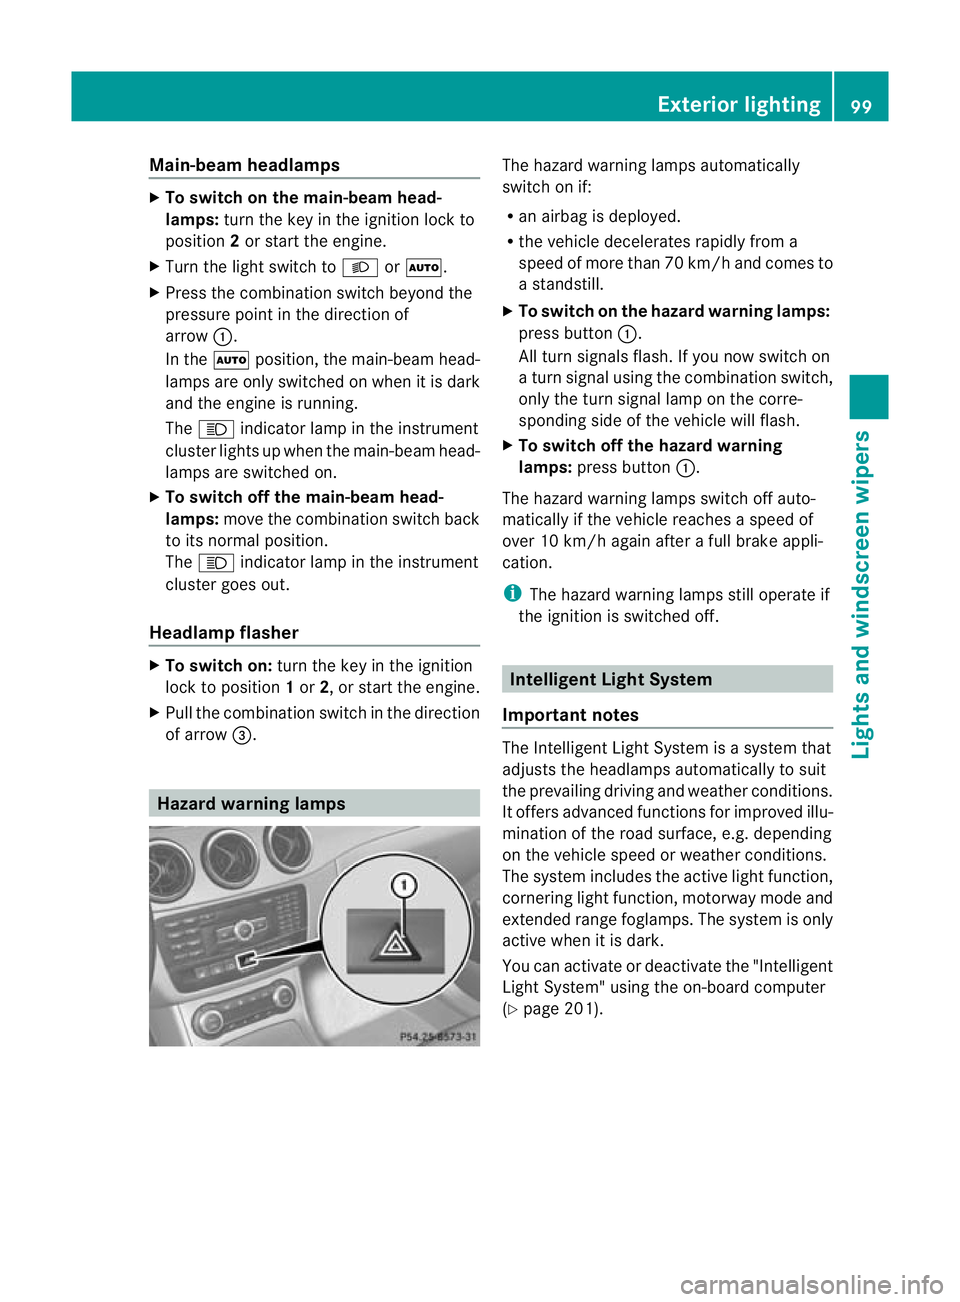
of arrow =. Hazard warning lamps The hazard warning lamps automatically
switch on if:
R
an airbag is deployed.
R the vehicle decelerates rapidly from a
speed of more than 70 km/h and comes to
a standstill.
X To switch on the hazard warnin glamps:
press button :.
All turn signals flash. If you now switch on
a turn signal using the combination switch,
only the turn signal lamp on the corre-
sponding side of the vehicle will flash.
X To switch off the hazard warning
lamps: press button :.
The hazard warning lamps switch off auto-
matically if the vehicle reaches a speed of
over 10 km/h again after a full brake appli-
cation.
i The hazard warning lamps still operate if
the ignition is switched off. Intelligen
tLight System
Important notes The Intelligent Light System is a syste
mthat
adjusts the headlamps automatically to suit
the prevailing driving and weather conditions.
It offers advanced functions for improved illu-
mination of the road surface, e.g. depending
on the vehicle speed or weather conditions.
The system includes the active light function,
cornering light function, motorway mode and
extended range foglamps. The system is only
active when it is dark.
You can activate or deactivate the "Intelligent
Light System" using the on-board computer
(Y page 201). Exterior lighting
99Lights and windscreen wipers Z
Page 103 of 329
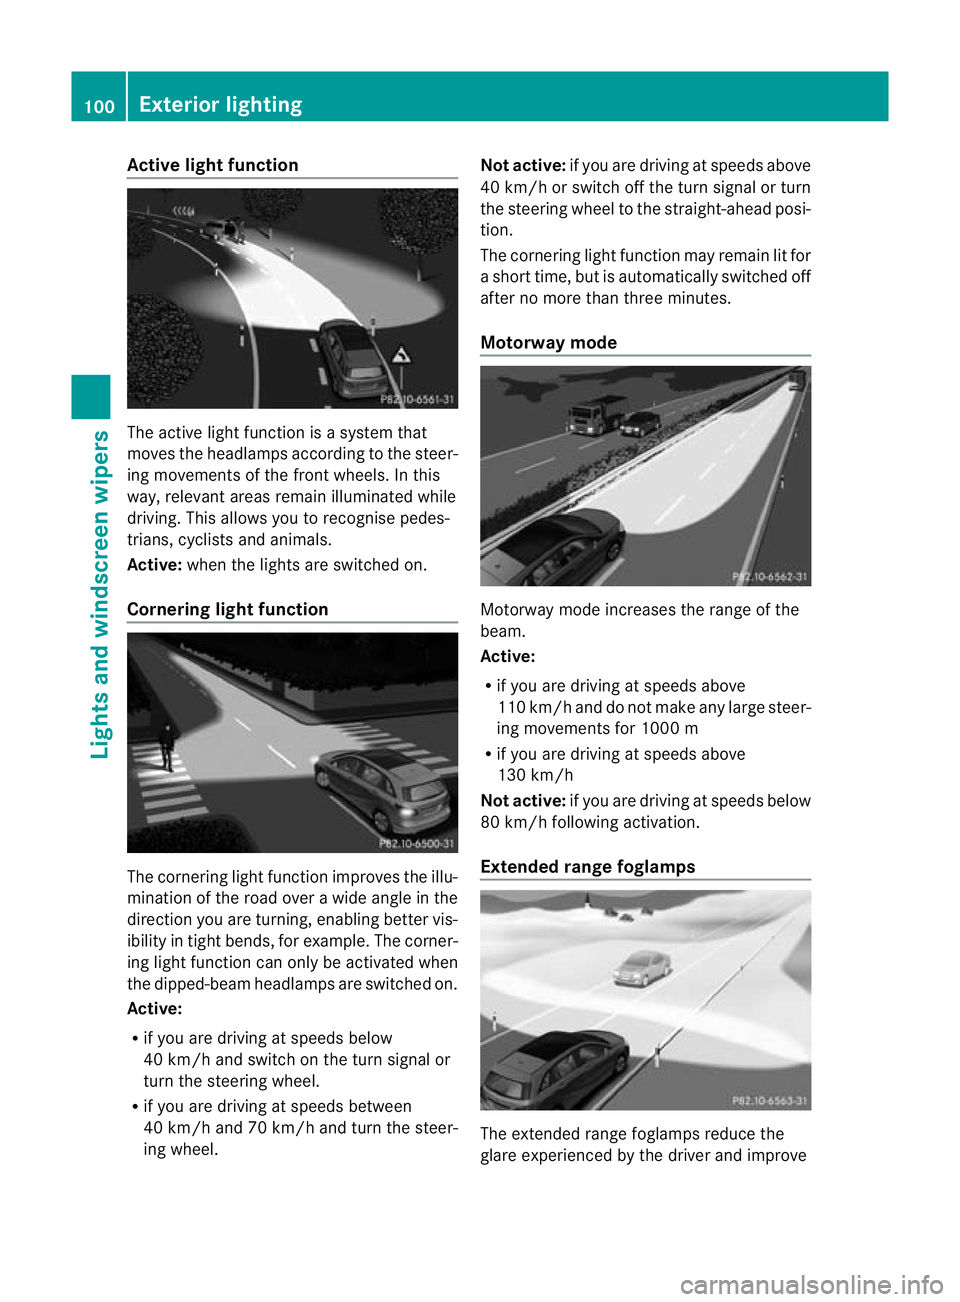
Active ligh
tfunction The active light function is a system that
moves the headlamps according to the steer-
ing movements of the front wheels. In this
way, relevant areas remai nilluminated while
driving. This allows you to recognise pedes-
trians, cyclists and animals.
Active: when the lights are switched on.
Cornering light function The cornering light function improves the illu-
mination of the road over a wide angle in the
direction you are turning, enabling better vis-
ibility in tigh
tbends, for example. The corner-
ing light function can only be activated when
the dipped-beam headlamps are switched on.
Active:
R if you are driving at speeds below
40 km/h and switch on the turn signal or
turn the steering wheel.
R if you are driving at speeds between
40 km/h and 70 km/h and turn the steer-
ing wheel. Not active:
if you are driving at speeds above
40 km/h or switch off the turn signal or turn
the steering wheel to the straight-ahead posi-
tion.
The cornering light function may remain lit for
a short time, but is automatically switched off
after no more than three minutes.
Motorway mode Motorway mode increases the range of the
beam.
Active:
R
if you are driving at speeds above
110 km/ha nd do not make any large steer-
ing movements for 1000 m
R if you are driving at speeds above
130 km/h
Not active: if you are driving at speeds below
80 km/h following activation.
Extended range foglamps The extended range foglamps reduce the
glare experienced by the driver and improve100
Exterior lightingLights and
windscreen wipers
Page 104 of 329
the illumination of the edge of the carriage-
way.
Active: if you are driving at speeds below
70 km/h and yo uswitch on the rear foglamp
Not active: if you are driving at speeds above
10 0k m/h or if you switch off the rear foglamp
following activation Adaptive Highbeam Assist
G
WARNING
Adaptive Highbeam Assist is only an aid
designed to assist driving. The driver is
responsible for adjusting the vehicle's lighting
to the prevailing light, visio nand traffic con-
ditions.
The system may be impaired or deactivated:
R if there is poor visibility, e.g .due to snow,
rain, fog or spray
R if the area of the windscree naround the
optical sensor is dirty, misted up or covered
up, e.g. by a sticker
The system may not recognise the following
road users:
R road users that have no lighting, e.g. pedes-
trians
R road users that have poor lighting, e.g.
cyclists
R road users whose lighting is not clearly visi-
ble, e.g. road users behind a crash barrier
R on rare occasions: road users that have
lights that may be recognised too late or not
at all
The automatic main-beam headlamps will not
be deactivated, or they may be activated
despite road users travelling in front of or
approaching the vehicle.
Thus, you could cause an accident and injure
yourself and others. Always observe traffic
conditions and, if necessary, dip the lights
manually.
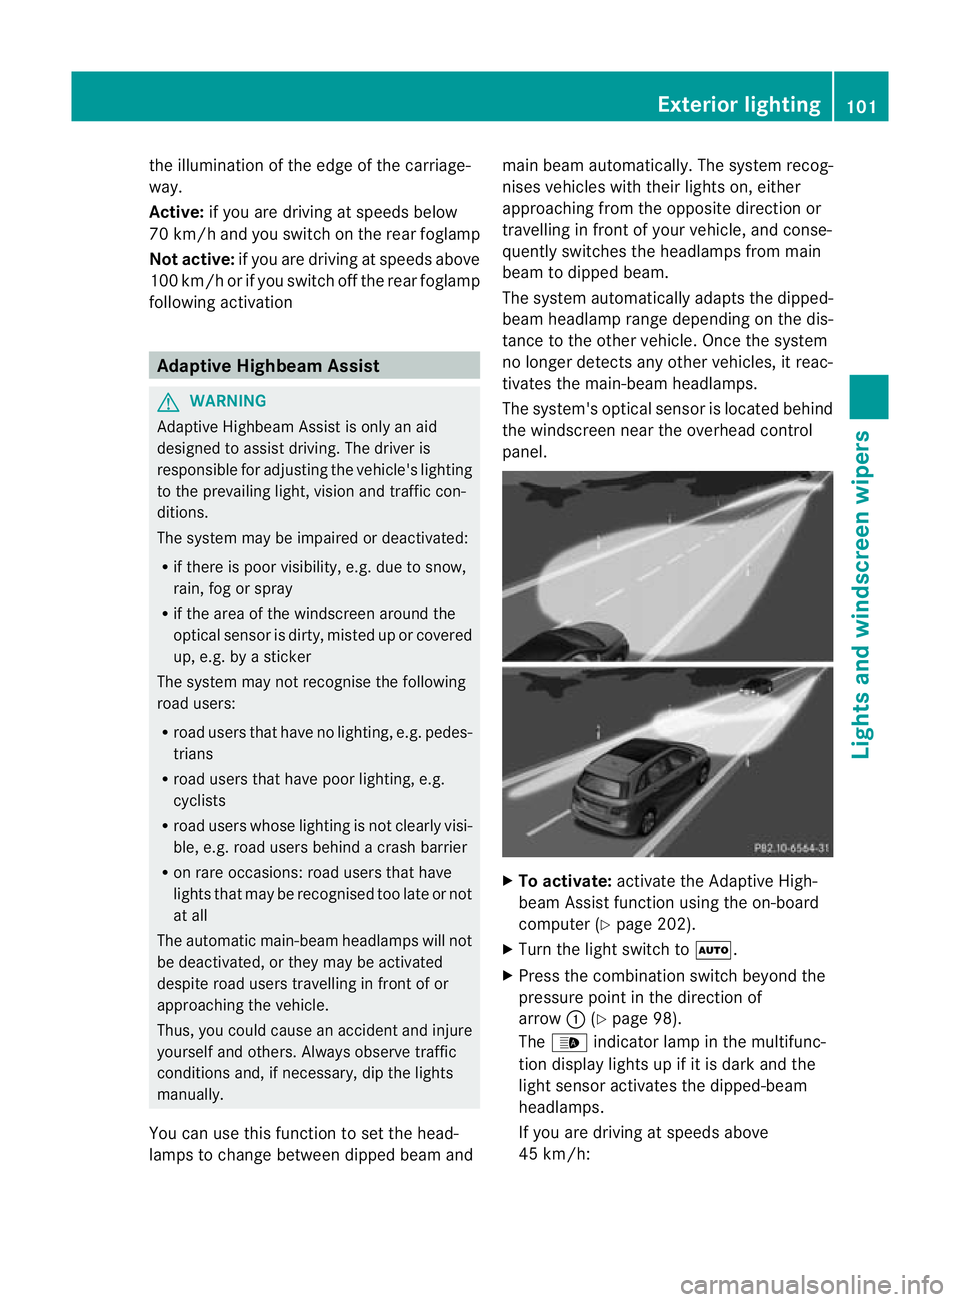
You can use this function to set the head-
lamps to change between dipped beama ndmain beam automatically. The system recog-
nises vehicles with thei
rlights on, either
approaching fro mthe opposite direction or
travelling in front of your vehicle, and conse-
quently switches the headlamps from main
beam to dipped beam.
The system automatically adapts the dipped-
beam headlamp range depending on the dis-
tance to the other vehicle. Once the system
no longer detects any other vehicles, it reac-
tivates the main-beam headlamps.
The system's optical sensor is located behind
the windscreen near the overhead control
panel. X
To activate: activate the Adaptive High-
beam Assist function using the on-board
computer (Y page 202).
X Turn the light switch to Ã.
X Press the combination switch beyond the
pressure point in the direction of
arrow :(Ypage 98).
The _ indicator lamp in the multifunc-
tion display lights up if it is dark and the
light sensor activates the dipped-beam
headlamps.
If you are driving at speeds above
45 km/h: Exterior lighting
101Lights and windscreen wipers Z
Page 151 of 329
New brake pads/linings
G
WARNING
New brake pads/linings onl yreach their opti-
mum braking effec tafter several hundred kil-
ometres of driving. Before this optimu mbrak-
ing effect is reached, you should compensate
for the reduced braking effect by applying
greater pressure when braking. This also
applies after the brake discs or the brake
pads/linings have been replaced.
For safety reasons, Mercedes-Benz recom-
mends that you only have brake pads/linings
fitted to yourv ehicle which have been
approved for Mercedes-Benz vehicles or
which correspond to an equivalent quality
standard. Brake pads/linings which have not
been approved for Mercedes-Benzv ehicles or
which are not of an equivalent quality could
affect your vehicle's operating safety. Tyre traction
G
WARNING
Whereas the vehicle can be fully controlled at
a certain speed on dry roads, you must reduce
your speed on wet or icy roads to achieve the
same road safety. You could otherwise cause
an accident.
Pay particular attention to the road conditions
at temperatures around freezing point.
If ice has formed on the road surface (e.g.
from fog), a thin film of water rapidly forms on
the ice when you brake, considerably reduc-
ing tyre traction. Drive with particular care in
such weather conditions. Driving on wet roads
Aquaplaning If water has accumulated to a certain depth
on the road surface, there is a danger of aqua-
planing occurring, even if:
R you are driving at low speeds.
R the tyres have adequate tread depth.
For this reason, do not drive in tyre ruts, and
brake carefully.
Driving on flooded roads !
Bear in mind that vehicles travelling in
front or in the opposite direction create
waves. This may cause the maximum per-
missible water depth to be exceeded.
These notes must be observed under all
circumstances. You could otherwise dam-
age the engine, the electronics or the trans-
mission.
If you have to drive on stretches of road on
which water has collected, please bear in
mind that:
R the maximum permissible still water depth
is 25 cm.
R you should drive no faster than at walking
pace. Winter driving
General notes G
WARNING
If the vehicle becomes trapped in snow,
ensure that snow is kept away from the
exhaust pipe and from around the vehicle as
long as the engine is running. Otherwise, poi-
sonous carbon monoxide (CO) may enter the
vehicle, resulting in loss of consciousness and
even death.
To assure sufficien tfresh air ventilation, open
a window slightly on the side of the vehicle
not facing the wind. 148
Driving tipsDriving and parking