roof MERCEDES-BENZ B-CLASS HATCHBACK 2015 Owners Manual
[x] Cancel search | Manufacturer: MERCEDES-BENZ, Model Year: 2015, Model line: B-CLASS HATCHBACK, Model: MERCEDES-BENZ B-CLASS HATCHBACK 2015Pages: 293, PDF Size: 10.83 MB
Page 8 of 293
Care
Automatic car wash ...................... .243
Carpets .......................................... 247
Display .......................................... .246
Exterior lighting ............................ .245
Gear or selector lever .................... 247
High-pressure cleaner .................... 243
Interior .......................................... .246
Matt paintwork .............................. 244
Notes ............................................. 242
Paint .............................................. 244
Plastic trim ................................... .246
Reversing camera .......................... 246
Roof lining ...................................... 247
Seat belt ........................................ 247
Seat cover ..................................... 247
Sensors ......................................... 245
Steering wheel ............................... 247
Trim pieces ................................... .247
Washing by hand ........................... 243
Wheels .......................................... .244
Windows ........................................ 244
Wiper blades .................................. 245
Wooden trim .................................. 247
CD player (on-board computer) ........180
Central locking
Automatic locking (on-board com-
puter) ............................................. 187
Locking/unlocking (key ).................. 72
Centre console
Lower section .................................. 31
Upper section .................................. 30
Changing bulbs
Cornering light function ................. 106
Dipped-beam headlamp s............... 105
Licence plate lighting ..................... 108
Main-beam headlamp s................... 105
Parking lamps (front) ..................... 106
Rear foglamp ................................. 107
Reversing lamps ............................ 107
Standing lamps .............................. 106
Turn signals (front) ......................... 106
Turn signals (rear) .......................... 107
Charge level display .......................... 174
Charge socket flap
Emergency release ........................ 143
Charging
with RANGE PLUS .......................... 184 see Charging the high-voltage battery
Charging cable
Connection .................................... 141
Control panel ................................. 140
Disconnecting ................................ 142
Heating up ..................................... 135
Important safety notes .................. 139
Indicator lamps .............................. 141
Storing ........................................... 140
Charging the high-voltage battery
(important safety notes) ................... 134
Child
Restraint system .............................. 49
Child seat
Forward-facing restraint system ...... 54
ISOFIX .............................................. 50
On the front-passenger sea t............ 52
Rearward-facing restraint system .... 53
Recommendations ........................... 58
Suitable positions ............................ 54
Top Tether ....................................... 51
Child-proof locks
Important safety notes .................... 60
Rear doors ....................................... 60
Cigarette lighter ................................ 235
Cleaning
Mirror turn signal ........................... 245
Climate control
Auxiliary climate control (on-
board computer) ............................ 185
Controlling automaticall y............... 117
Convenience opening/closing
(air-recirculation mode) ................. 120
Cooling with air dehumidification .. 116
Demisting the windows .................. 118
Demisting the windscreen ............. 118
Immediate pre-entry climate con-
trol ................................................. 121
Indicator lamp ................................ 117
Information on using
THERMOTRONIC automatic cli-
mate control .................................. 115
Overview of systems ...................... 114
Pre-entry climate control at
departure time ............................... 121
Pre-entry climate control at time
of departure (on-board computer) .. 185 Pre-entry climate control via key ... 121 Index
5
Page 17 of 293
Displays in the Audio displa
y......... 162
Displays in the COMAND display ... 162
Function/note s............................. 162
Switching on/of f........................... 162
Reversing feature
Side windows ................................... 82
Reversing lamp
Changing bulb s.............................. 107
Reversing lamps
Display message ............................ 202
Roof carrier ........................................ 232
Roof lining and carpets (cleaning
instructions) ...................................... 247
Roof load (maximum) ........................ 284S
Safety Children in the vehicle ..................... 49
Safety net
Attaching ....................................... 230
Important safety information ......... 230
Safety system
see Driving safety systems
Seat
Folding the backrest (rear com-
partment) forwards/back .............. 228
Seat belt
Centre rear-compartment sea t........ 38
Correct usage .................................. 37
Switching belt adjustment on/off
(on-board computer) ...................... 188
Seat belts
Adjusting the driver's and front-
passenger seat belt ......................... 38
Adjusting the height ......................... 37
Cleaning ......................................... 247
Display message ............................ 197
Fastening ......................................... 37
Important safety guidelines ............. 36
Introduction ..................................... 35
Rear seat belt status indicator ......... 39
Releasing ......................................... 38
Warning lamp ................................. 214
Warning lamp (function) ................... 39
Seats
Adjusting (electrically) ..................... 88
Adjusting (manually) ........................ 88 Adjusting the 4-way lumbar sup-
port .................................................. 90
Adjusting the head restraint ............ 89
Cleaning the cover ......................... 247
Correct driver's seat position ........... 86
Important safety notes .................... 87
Seat heating problem ...................... 92
Storing settings (memory func-
tion) ................................................. 96
Switching seat heating on/of
f......... 90
Securing a load .................................. 229
Securing luggage ............................... 229
Selector lever
Cleaning ......................................... 247
see DIRECT SELECT lever
Sensors (cleaning instructions) ....... 245
Service
see ASSYST PLUS
Service Centre
see Qualified specialist workshop
Service menu (on-board com-
puter) .................................................. 184
Service message
see ASSYST PLUS
Service products
Brake fluid ..................................... 283
Coolant (engine) ............................ 283
Important safety notes .................. 282
Washer fluid ................................... 284
Setting the air distribution ............... 117
Setting the airflow ............................ 118
Setting the maximum charge cur-
rent (on-board computer) ................. 185
Settings
Factory (on-board computer) ......... 188
On-board compute r....................... 184
Side lamps
Switching on/of f.............................. 98
Side windows
Convenience closing ........................ 83
Convenience opening ...................... 83
Important safety notes .................... 82
Opening/closing .............................. 83
Problem (malfunction) ..................... 85
Resetting ......................................... 84
Reversing feature ............................. 82
Sidebag ................................................ 41 14
Index
Page 20 of 293
Summer tyres ................................ 268
Tyre size (data
).............................. 277
Tyre tread ...................................... 267
Wheel and tyre combinations ........ 279
see Flat tyre U
Unlocking Emergency unlocking ....................... 80
From inside the vehicle (central
unlocking button) ............................. 79 V
Vanity mirror (in sun visor) .............. 234
Variable SPEEDTRONIC
see SPEEDTRONIC
Vehicle
Correct use ...................................... 23
Data acquisition ............................... 23
Display message ............................ 210
Electronics ..................................... 280
Equipment ....................................... 20
Implied warranty .............................. 23
Individual settings .......................... 184
Leaving parked up ......................... 147
Locking (in an emergency) ............... 80
Locking (key) ................................... 72
Lowering ........................................ 276
Raising ........................................... 274
Registration ..................................... 23
Securing from rolling away ............ 274
Transporting .................................. 263
Unlocking (in an emergency) ........... 80
Unlocking (key) ................................ 72
Vehicle data ................................... 284
Vehicle data
Boot load (maximum) ..................... 284
Roof load (maximum) ..................... 284
Vehicle dimensions ........................... 284
Vehicle emergency locking ................ 80
Vehicle identification number
see VIN
Vehicle identification plate .............. 281
Vehicle tool kit .................................. 249
Ventilation
Setting the vents ........................... 123 Video
Operating the DVD ......................... 180
VIN
Seat ............................................... 282
Type plate ...................................... 281 W
Warning and indicator lamps ABS ................................................ 216
Brakes ........................................... 215
Distance warning signal ................. 222
ESP ®
.............................................. 218
ESP ®
OFF ....................................... 219
LIM (cruise control )........................ 151
LIM (variable SPEEDTRONIC) ......... 153
Overview .......................................... 28
PASSENGER AIR BAG ...................... 35
RBS (Recuperative Brake Sys-
tem) ............................................... 215
Seat belt ........................................ 214
Tyre pressure monitor ................... 223
Warning triangle ................................ 248
Washer fluid
Display message ............................ 212
Wheel and tyre combinations
Tyres .............................................. 279
Wheel bolt tightening torque ........... 276
Wheel chock ...................................... 274
Wheels
Changing a whee l.......................... 273
Changing/replacing ....................... 273
Checking ........................................ 267
Cleaning ......................................... 244
Fitting a new wheel ........................ 276
General notes ................................ 277
Important safety notes .................. 266
Information on driving .................... 266
Removing a wheel .......................... 276
Storing ........................................... 274
Tightening torque ........................... 276
Wheel size/tyre size ...................... 277
Windowbag
Display message ............................ 198
Operation ......................................... 42
Windows
Cleaning ......................................... 244
see Side windows Index
17
Page 22 of 293
Protection of the environment
General notes
H
Environmental note
Daimler's declared policy is one of compre-
hensive environmental protection.
Our objectives are to use the natural resour-
ces which form the basis of our existence on
this planet sparingly and in a manner which
takes the requirements of both nature and
humanity into consideration.
You too can help to protect the environment
by operating your vehicle in an environmen-
tally-responsible manner.
Energy consumption and the rate of engine,
transmission, brake and tyre wear depend on
the following factors:
R operating conditions of your vehicle
R your personal driving style
You can influence both factors. Therefore,
please bear the following in mind:
Operating conditions:
R observe the correct tyre pressure.
R do not carry any unnecessary weight in the
vehicle
R remove the roof rack once you no longer
need it.
R a regularly serviced vehicle will contribute
to environmental protection. You should
therefore adhere to the service intervals.
R all maintenance work should be carried out
at a qualified specialist workshop.
Personal driving style:
R drive carefully and maintain a safe distance
from the vehicle in front.
R avoid frequent, sudden acceleration and
braking.
R monitor the vehicle's energy consumption. H
Environmental note
Have defective high-voltage batteries dis-
posed of in an environmentally responsible
manner. Consult a qualified specialist work- shop which has the necessary specialist
knowledge and tools to carry out the work
required. Mercedes-Benz recommends that
you use a Mercedes-Benz Service Centre for
this purpose.
Returning an end-of-life vehicle
EU countries only:
Mercedes-Benz will take back your old vehicle to dispose of it in an environmentally-responsible
manner in accordance with the European Union
(EU) End of Life Vehicles Directive.
There is a network of return points and disas-
sembly plants available. You can return your
vehicle to these plants free of charge. This
makes a valuable contribution to the recycling
process and the conservation of resources.
For further information on recycling old vehi-
cles, recovery and the terms of the policy, visit
the Mercedes-Benz homepage. Genuine Mercedes-Benz parts
H
Environmental note
Daimler AG also supplies reconditioned
assemblies and parts which are of the same
quality as new parts. For these, the same war-
ranty applies as for new parts.
! Airbags and seat belt tensioners, as well as
control units and sensors for these restraint
systems, may be installed in the following
areas of your vehicle:
R doors
R door pillars
R door sills
R seats
R dashboard
R instrument cluster
R centre console
Do not install accessories such as audio sys-
tems in these areas. Do not carry out repairs
or welding. You could impair the operating
efficiency of the restraint systems.
Have accessories retrofitted at a qualified
specialist workshop. Introduction
19 Z
Page 45 of 293
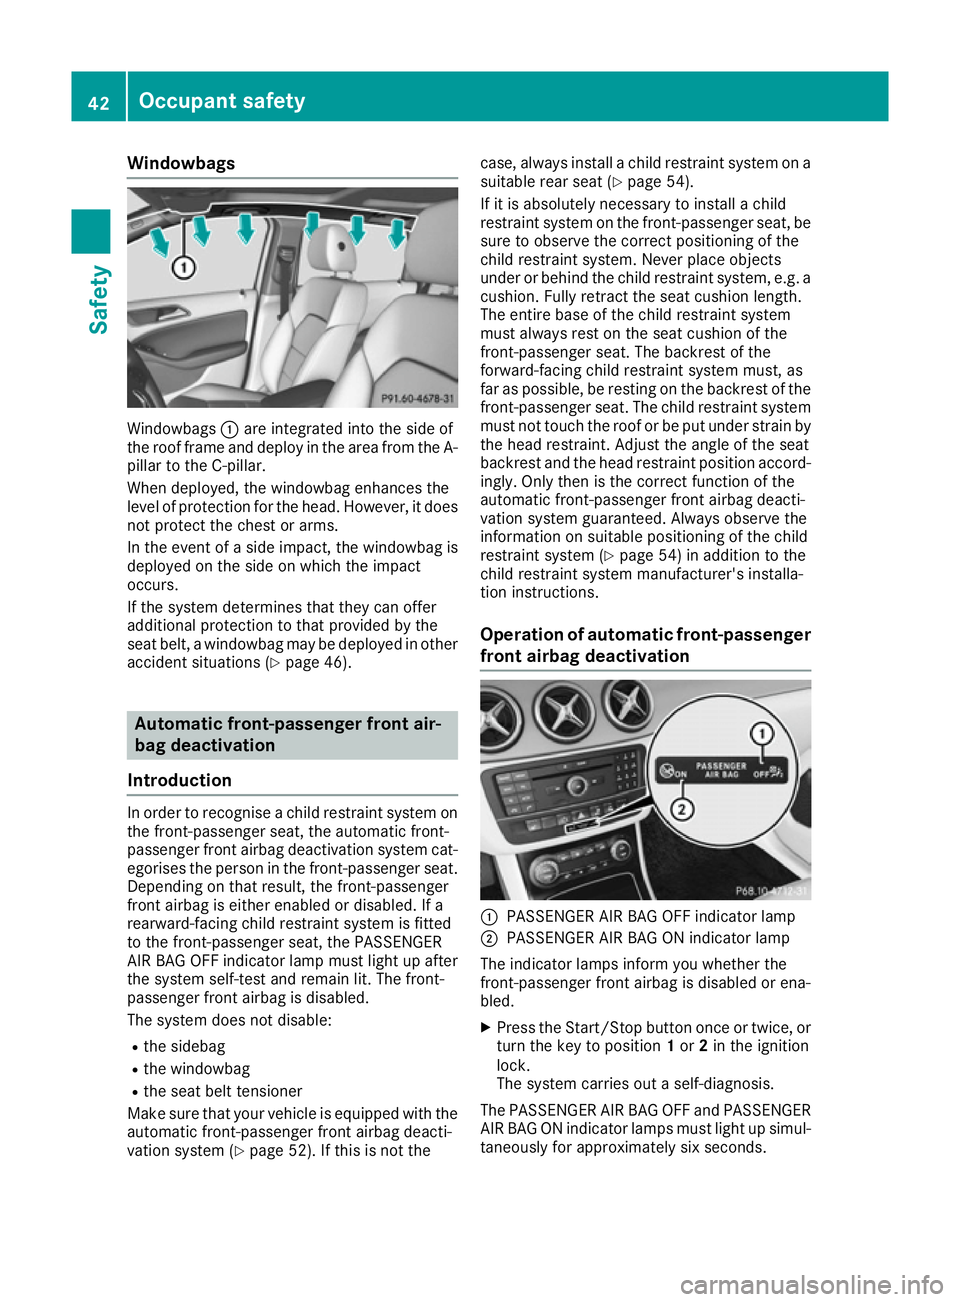
Windowbags
Windowbags
:are integrated into the side of
the roof frame and deploy in the area from the A-
pillar to the C-pillar.
When deployed, the windowbag enhances the
level of protection for the head. However, it does
not protect the chest or arms.
In the event of a side impact, the windowbag is
deployed on the side on which the impact
occurs.
If the system determines that they can offer
additional protection to that provided by the
seat belt, a windowbag may be deployed in other accident situations (Y page 46).Automatic front-passenger front air-
bag deactivation
Introduction In order to recognise a child restraint system on
the front-passenger seat, the automatic front-
passenger front airbag deactivation system cat- egorises the person in the front-passenger seat.
Depending on that result, the front-passenger
front airbag is either enabled or disabled. If a
rearward-facing child restraint system is fitted
to the front-passenger seat, the PASSENGER
AIR BAG OFF indicator lamp must light up after
the system self-test and remain lit. The front-
passenger front airbag is disabled.
The system does not disable:
R the sidebag
R the windowbag
R the seat belt tensioner
Make sure that your vehicle is equipped with the automatic front-passenger front airbag deacti-
vation system (Y page 52). If this is not the case, always install a child restraint system on a
suitable rear seat (Y page 54).
If it is absolutely necessary to install a child
restraint system on the front-passenger seat, be sure to observe the correct positioning of the
child restraint system. Never place objects
under or behind the child restraint system, e.g. a
cushion. Fully retract the seat cushion length.
The entire base of the child restraint system
must always rest on the seat cushion of the
front-passenger seat. The backrest of the
forward-facing child restraint system must, as
far as possible, be resting on the backrest of the
front-passenger seat. The child restraint system
must not touch the roof or be put under strain by the head restraint. Adjust the angle of the seat
backrest and the head restraint position accord- ingly. Only then is the correct function of the
automatic front-passenger front airbag deacti-
vation system guaranteed. Always observe the
information on suitable positioning of the child
restraint system (Y page 54) in addition to the
child restraint system manufacturer's installa-
tion instructions.
Operation of automatic front-passenger
front airbag deactivation :
PASSENGER AIR BAG OFF indicator lamp
; PASSENGER AIR BAG ON indicator lamp
The indicator lamps inform you whether the
front-passenger front airbag is disabled or ena-
bled. X Press the Start/Stop button once or twice, or
turn the key to position 1or 2in the ignition
lock.
The system carries out a self-diagnosis.
The PASSENGER AIR BAG OFF and PASSENGER AIR BAG ON indicator lamps must light up simul-
taneously for approximately six seconds. 42
Occupant safetySafety
Page 57 of 293
Forward-facing child restraint system
If it is absolutely necessary to fit a forward-
facing child restraint system to the front-
passenger seat, always move the front-
passenger seat as far back as possible. Fully
retract the seat cushion length. The entire base of the child restraint system must always rest on
the seat cushion of the front-passenger seat.
The backrest of the child restraint system must, as far as possible, lie flat against the backrest of
the front-passenger seat. The child restraint sys- tem must not touch the roof or be put under
strain by the head restraint. Adjust the angle of
the seat backrest and the head restraint posi-
tion accordingly. Always make sure that the
shoulder belt strap is correctly routed from the
vehicle belt outlet to the shoulder belt guide on the child restraint system. The shoulder belt
strap must be routed forwards and downwards
from the vehicle belt outlet. If necessary, adjust
the vehicle belt outlet and the front-passenger
seat accordingly.
Always observe the information on suitable
positioning of the child restraint system
(Y page 54) in addition to the child restraint
system manufacturer's installation and operat-
ing instructions. Suitable positioning of the child
restraint system
Introduction Only child restraint systems approved in accord-
ance with the ECE standards ECE R44 or ECE
R129 (i-Size child restraint systems) are permit- ted for use in the vehicle.
For certain child restraint systems in weight cat-egories II or III, this can mean that the area of
use is restricted. The maximum size setting of
the child restraint system is not possible due to
possible contact with the roof.
"Universal" category child restraint systems can be recognised by their orange approval label and
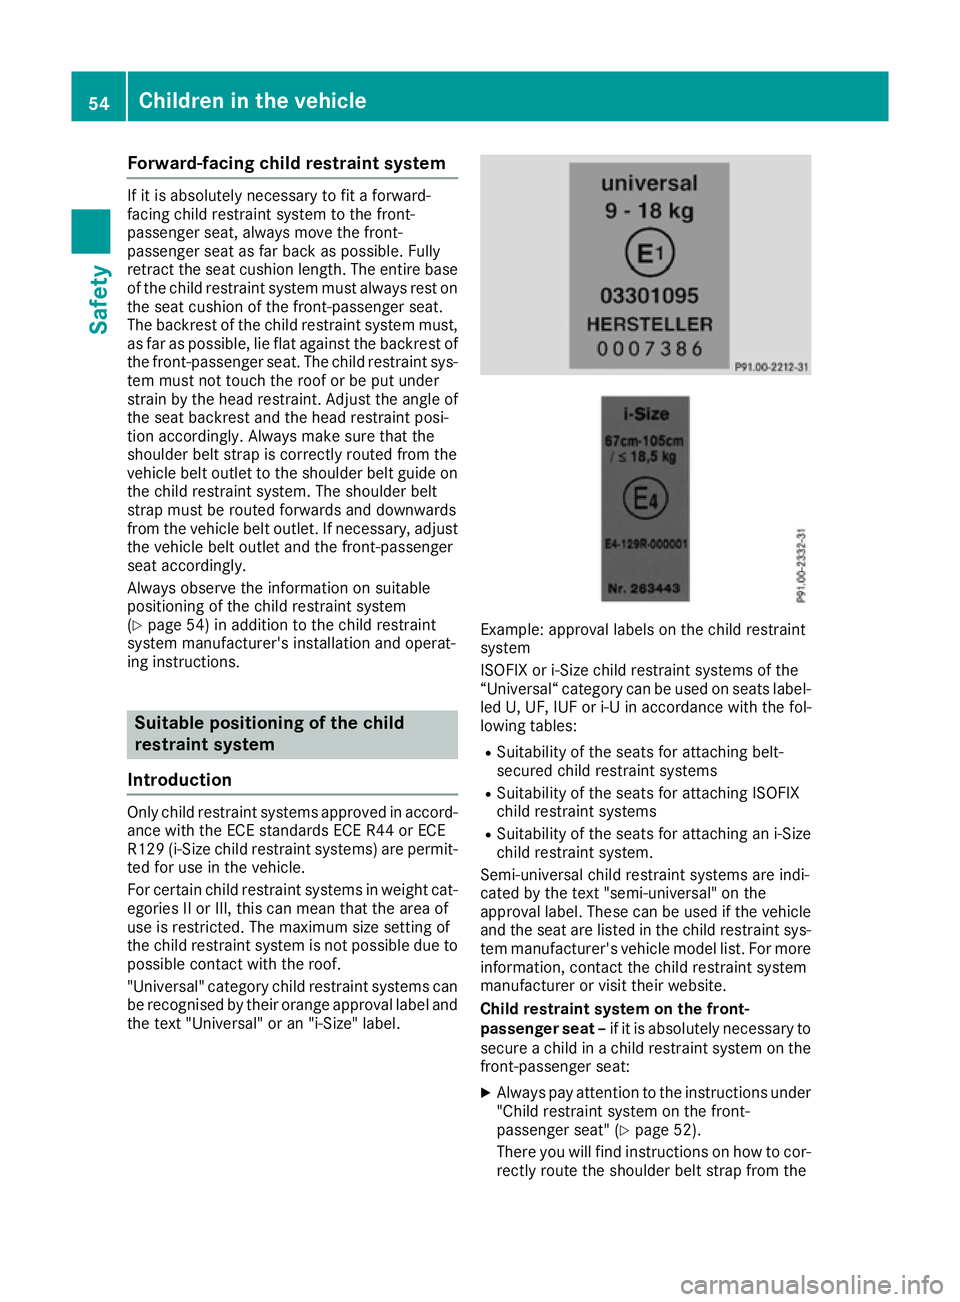
the text "Universal" or an "i-Size" label. Example: approval labels on the child restraint
system
ISOFIX or i-Size child restraint systems of the
“Universal“ category can be used on seats label-
led U, UF, IUF or i-U in accordance with the fol-
lowing tables:
R Suitability of the seats for attaching belt-
secured child restraint systems
R Suitability of the seats for attaching ISOFIX
child restraint systems
R Suitability of the seats for attaching an i-Size
child restraint system.
Semi-universal child restraint systems are indi-
cated by the text "semi-universal" on the
approval label. These can be used if the vehicle and the seat are listed in the child restraint sys-
tem manufacturer's vehicle model list. For more
information, contact the child restraint system
manufacturer or visit their website.
Child restraint system on the front-
passenger seat – if it is absolutely necessary to
secure a child in a child restraint system on the front-passenger seat:
X Always pay attention to the instructions under
"Child restraint system on the front-
passenger seat" (Y page 52).
There you will find instructions on how to cor- rectly route the shoulder belt strap from the 54
Children in the vehicleSafety
Page 58 of 293
vehicle belt outlet to the shoulder belt guide
on the child restraint system (Y
page 54).
X Move the front-passenger seat as far back as
possible and fully retract the seat cushion
length.
If you secure a child in a forward-facing child
restraint system on the front-passenger seat,
you must also move the front-passenger seat to the highest position.
X Move the backrest to an almost vertical posi-
tion.
The entire base of the child restraint system
must always rest on the seat cushion of the
front-passenger seat. The backrest of the
forward-facing child restraint system must, as far as possible, be resting on the backrest of
the front-passenger seat. The child restraint
system must not touch the roof or be put
under strain by the head restraint. Adjust the angle of the seat backrest and the head
restraint position accordingly. Also observe
the child restraint system manufacturer's
installation instructions.
X If possible, move the seat cushion angle to the
highest, most vertical position (Y page 88). Children in the vehicle
55Safety Z
Page 60 of 293
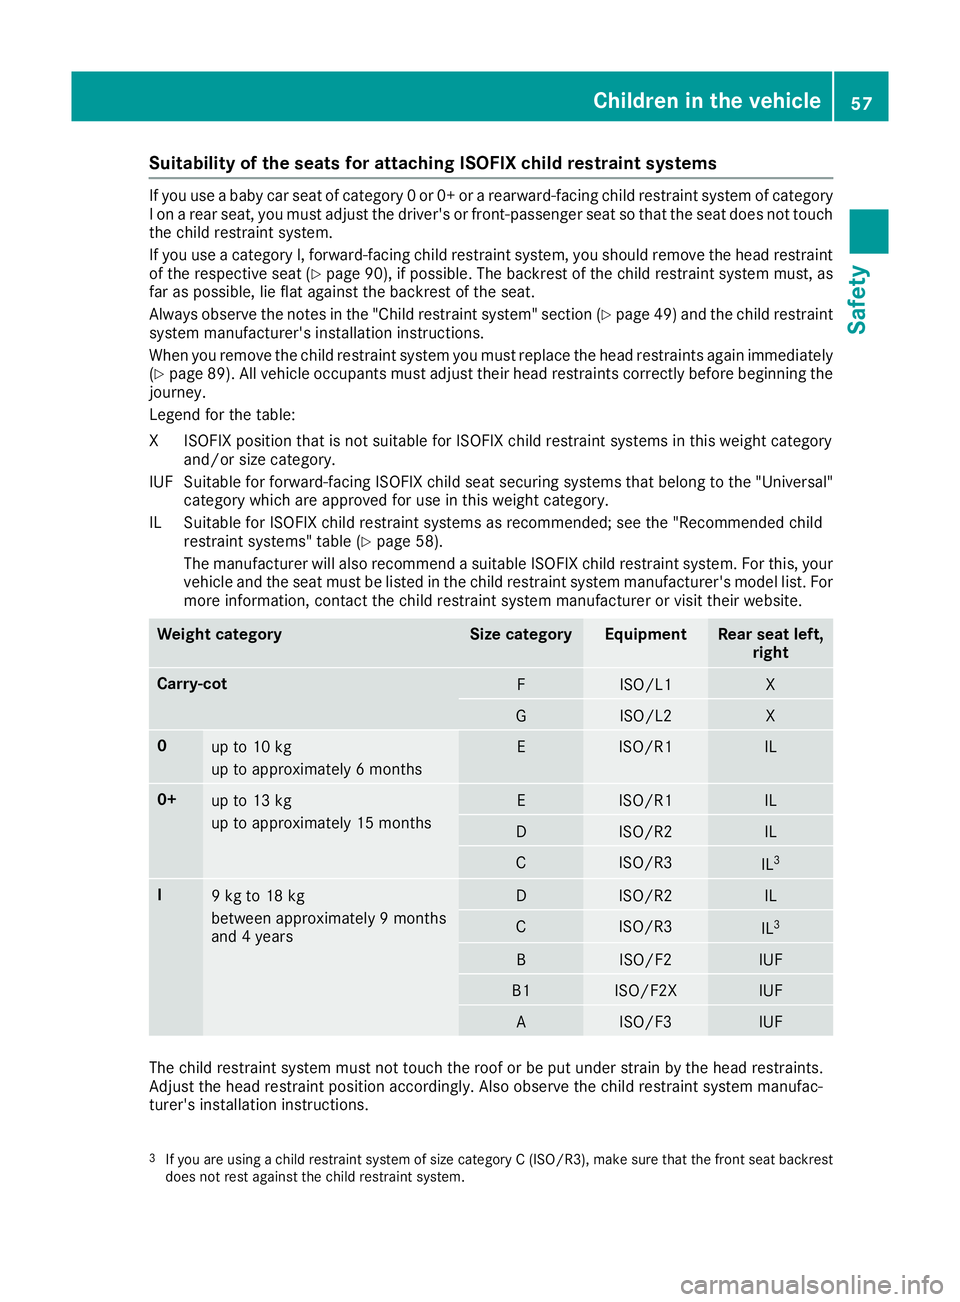
Suitability of the seats for attaching ISOFIX child restraint systems
If you use a baby car seat of category 0 or 0+ or a rearward-facing child restraint system of category
I on a rear seat, you must adjust the driver's or front-passenger seat so that the seat does not touch the child restraint system.
If you use a category I, forward-facing child restraint system, you should remove the head restraint
of the respective seat (Y page 90), if possible. The backrest of the child restraint system must, as
far as possible, lie flat against the backrest of the seat.
Always observe the notes in the "Child restraint system" section (Y page 49) and the child restraint
system manufacturer's installation instructions.
When you remove the child restraint system you must replace the head restraints again immediately
(Y page 89). All vehicle occupants must adjust their head restraints correctly before beginning the
journey.
Legend for the table:
XI SOFIX position that is not suitable for ISOFIX child restraint systems in this weight category
and/or size category.
IUF Suitable for forward-facing ISOFIX child seat securing systems that belong to the "Universal" category which are approved for use in this weight category.
IL Suitable for ISOFIX child restraint systems as recommended; see the "Recommended child restraint systems" table (Y page 58).
The manufacturer will also recommend a suitable ISOFIX child restraint system. For this, your vehicle and the seat must be listed in the child restraint system manufacturer's model list. For
more information, contact the child restraint system manufacturer or visit their website. Weight category Size category Equipment Rear seat left,
right Carry-cot
F ISO/L1 X
G ISO/L2 X
0
up to 10 kg
up to approximately 6 months E ISO/R1 IL
0+
up to 13 kg
up to approximately 15 months E ISO/R1 IL
D ISO/R2 IL
C ISO/R3
IL
3 I
9 kg to 18 kg
between approximately 9 months
and 4 years D ISO/R2 IL
C ISO/R3
IL
3 B ISO/F2 IUF
B1 ISO/F2X IUF
A ISO/F3 IUF
The child restraint system must not touch the roof or be put under strain by the head restraints.
Adjust the head restraint position accordingly. Also observe the child restraint system manufac-
turer's installation instructions.
3 If you are using a child restraint system of size category C (ISO/R3), make sure that the front seat backrest
does not rest against the child restraint system. Children in the vehicle
57Safety Z
Page 63 of 293
Child-proof locks
Important safety notes G
WARNING
If children are travelling in the vehicle, they
could:
R open doors, thus endangering other people
or road users
R exit the vehicle and be caught by oncoming
traffic
R operate vehicle equipment and become
trapped, for example
There is a risk of an accident and injury.
Always activate the child-proof locks and
override feature if children are travelling in the vehicle. When leaving the vehicle, always take the key with you and lock the vehicle. Never
leave children unattended in the vehicle.
Override feature for:
R the rear doors (Y page 60)
R the rear side windows (Y page 61)G
WARNING
If you leave children unattended in the vehi-
cle, they may be able to set the vehicle in
motion, for example, if they:
R release the parking brake
R shift the transmission out of park position P
R start the vehicle's drive system
In addition, they may operate vehicle equip-
ment. There is a risk of an accident and injury.
When leaving the vehicle, always take the key
with you and lock the vehicle. Never leave
children unattended in the vehicle. G
WARNING
If persons (particularly children) are exposed
to heat or cold for a prolonged period, there is a risk of serious or even fatal injuries. Never
leave persons (particularly children) unatten-
ded in the vehicle. G
WARNING
If the child restraint system is placed in direct sunlight, the parts could become very hot.
Children could be suffer burns by touching
these parts, in particular on the metallic parts
of the child restraint system. There is a risk of injury.
If you and your child leave the vehicle, always
make sure that the child restraint system is
not in direct sunlight. Cover it with a blanket, for example. If the child restraint system has
been exposed to direct sunlight, leave it to
cool down before securing the child in it.
Never leave children unattended in the vehi-
cle.
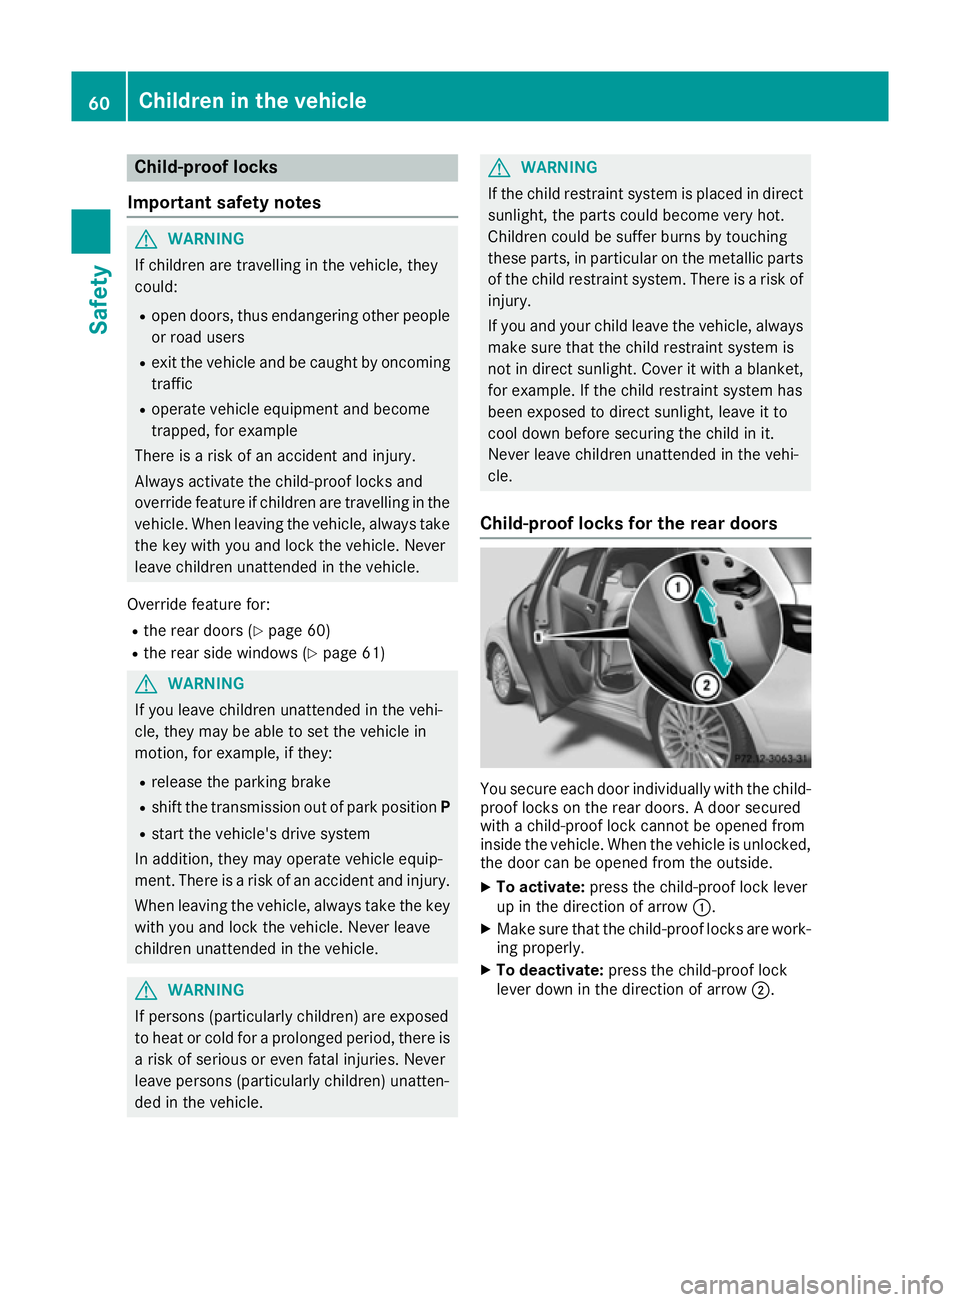
Child-proof locks for the rear doors You secure each door individually with the child-
proof locks on the rear doors. A door secured
with a child-proof lock cannot be opened from
inside the vehicle. When the vehicle is unlocked, the door can be opened from the outside.
X To activate: press the child-proof lock lever
up in the direction of arrow :.
X Make sure that the child-proof locks are work-
ing properly.
X To deactivate: press the child-proof lock
lever down in the direction of arrow ;.60
Children in the vehicleSafety
Page 72 of 293
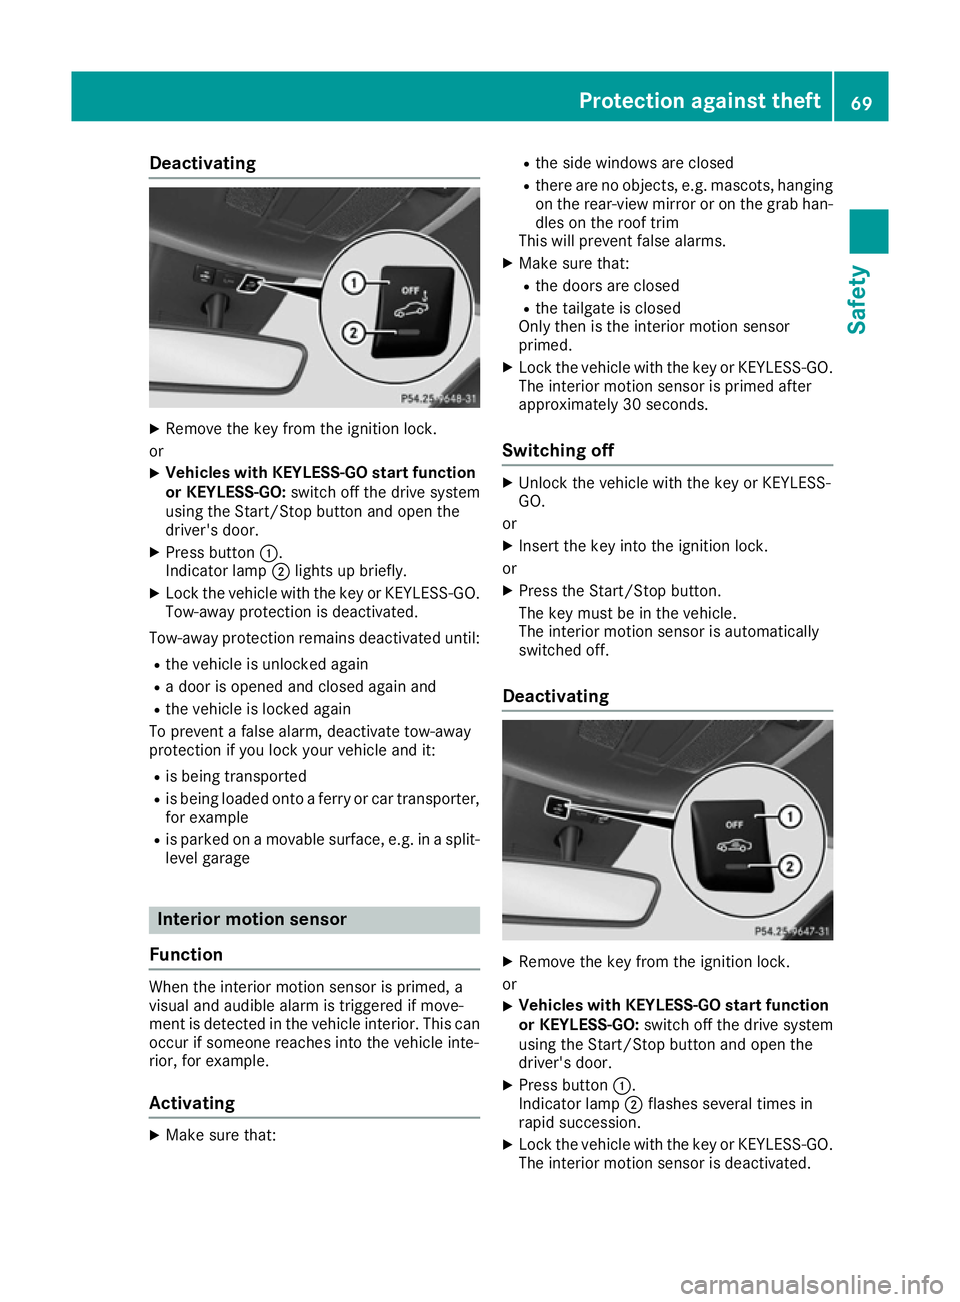
Deactivating
X
Remove the key from the ignition lock.
or X Vehicles with KEYLESS-GO start function
or KEYLESS-GO: switch off the drive system
using the Start/Stop button and open the
driver's door.
X Press button :.
Indicator lamp ;lights up briefly.
X Lock the vehicle with the key or KEYLESS-GO.
Tow-away protection is deactivated.
Tow-away protection remains deactivated until: R the vehicle is unlocked again
R a door is opened and closed again and
R the vehicle is locked again
To prevent a false alarm, deactivate tow-away
protection if you lock your vehicle and it:
R is being transported
R is being loaded onto a ferry or car transporter,
for example
R is parked on a movable surface, e.g. in a split-
level garage Interior motion sensor
Function When the interior motion sensor is primed, a
visual and audible alarm is triggered if move-
ment is detected in the vehicle interior. This can occur if someone reaches into the vehicle inte-
rior, for example.
Activating X
Make sure that: R
the side windows are closed
R there are no objects, e.g. mascots, hanging
on the rear-view mirror or on the grab han- dles on the roof trim
This will prevent false alarms.
X Make sure that:
R the doors are closed
R the tailgate is closed
Only then is the interior motion sensor
primed.
X Lock the vehicle with the key or KEYLESS-GO.
The interior motion sensor is primed after
approximately 30 seconds.
Switching off X
Unlock the vehicle with the key or KEYLESS-
GO.
or X Insert the key into the ignition lock.
or X Press the Start/Stop button.
The key must be in the vehicle.
The interior motion sensor is automatically
switched off.
Deactivating X
Remove the key from the ignition lock.
or X Vehicles with KEYLESS-GO start function
or KEYLESS-GO: switch off the drive system
using the Start/Stop button and open the
driver's door.
X Press button :.
Indicator lamp ;flashes several times in
rapid succession.
X Lock the vehicle with the key or KEYLESS-GO.
The interior motion sensor is deactivated. Protection against theft
69Safety Z