Button MERCEDES-BENZ C-Class 2000 W202 User Guide
[x] Cancel search | Manufacturer: MERCEDES-BENZ, Model Year: 2000, Model line: C-Class, Model: MERCEDES-BENZ C-Class 2000 W202Pages: 130, PDF Size: 2.43 MB
Page 25 of 130

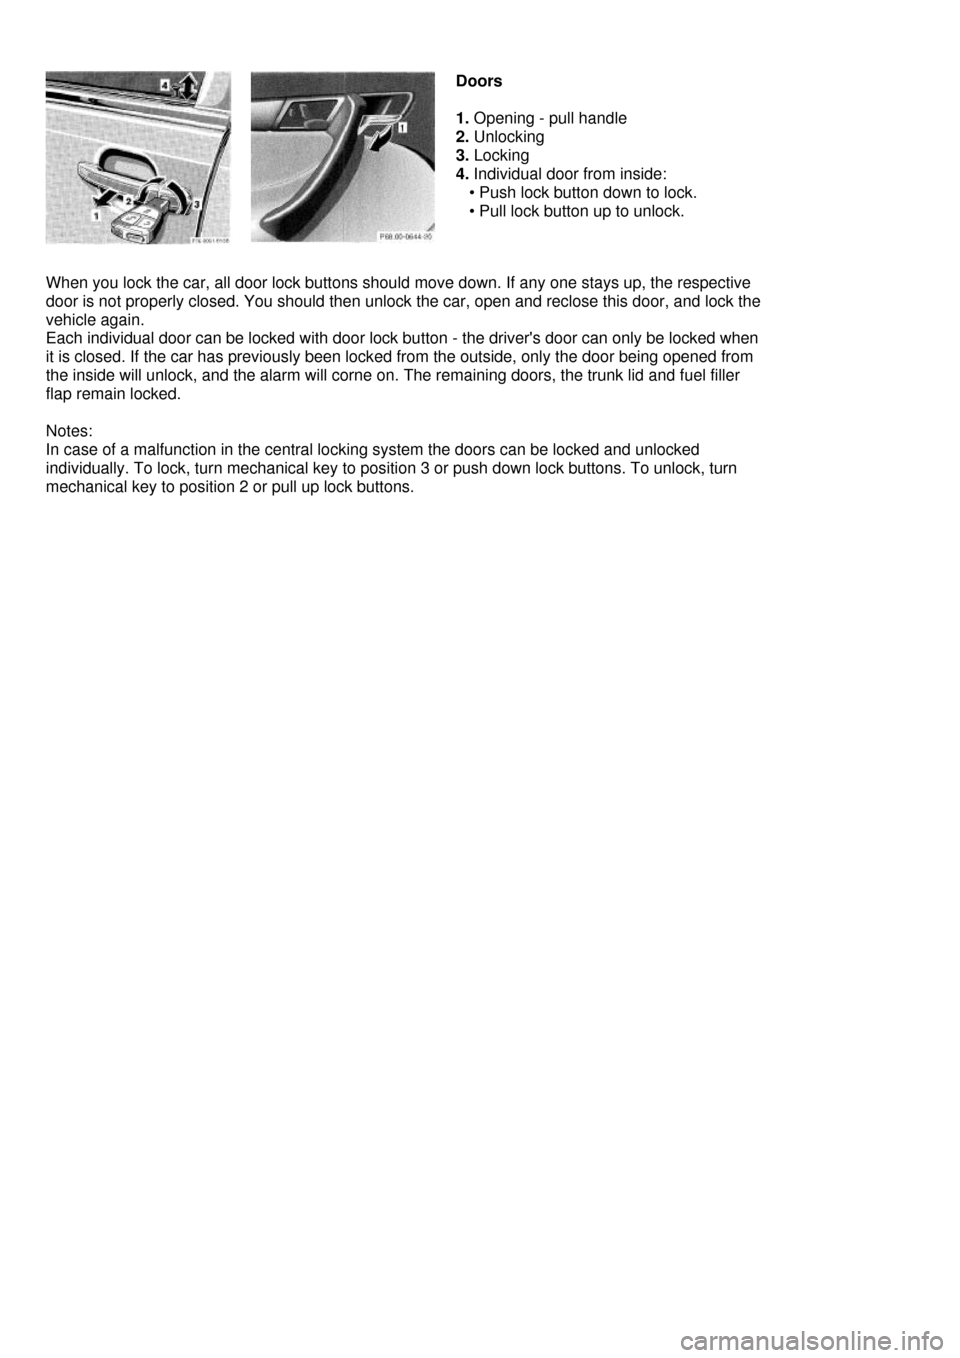
Doors
1. Opening - pull handle
2. Unlocking
3. Locking
4. Individual door from inside:
• Push lock button down to lock.
• Pull lock button up to unlock.
When you lock the car, all door lock buttons should move down. If any one stays up, the respective
door is not properly closed. You should then unlock the car, open and reclose this door, and lock the
vehicle again.
Each individual door can be locked with door lock button - the driver's door can only be locked when
it is closed. If the car has previously been locked from the outside, only the door being opened from
the inside will unlock, and the alarm will corne on. The remaining doors, the trunk lid and fuel filler
flap remain locked.
Notes:
In case of a malfunction in the central locking system the doors can be locked and unlocked
individually. To lock, turn mechanical key to position 3 or push down lock buttons. To unlock, turn
mechanical key to position 2 or pull up lock buttons.
Page 32 of 130

Manual Seat
(Standard equipment on Model C 230 Kompressor passenger side)
We recommend to adjust the seat in the following order:
1. Seat height adjustment
2. Fore/aft adjustment
3. Seat cushion tilt
4. Backrest tilt
5. Head restraint inclination
6. Head restraint height
Fore/aft Adjustment
Lift handle (2), slide seat to desired position and allow handle to reengage.
Check for proper engagement before driving.
Seat Height Adjustment
Raise or lower lever (1). The seat will be raised or lowered one notch at a time.
Allow lever to re-engage. Check for proper engagement before driving.
Seat Cushion Tilt
Turn handwheel (3) forward or backward.
Backrest Tilt
Turn handwheel (4).
Head Restraint Height
Raising:
Pull up on head restraint.
Lowering:
Push button (6) and push down on head restraint.
Adjust head restraint to support the back of the head approximately at ear level.
The head restraint inclination can also be adjusted manually (5).
Caution !
Do not remove head restraints except when mounting seat covers. For removal refer to Head
Restraints in Index. Whenever restraints have been removed be sure to reinstall them before driving.
Page 38 of 130

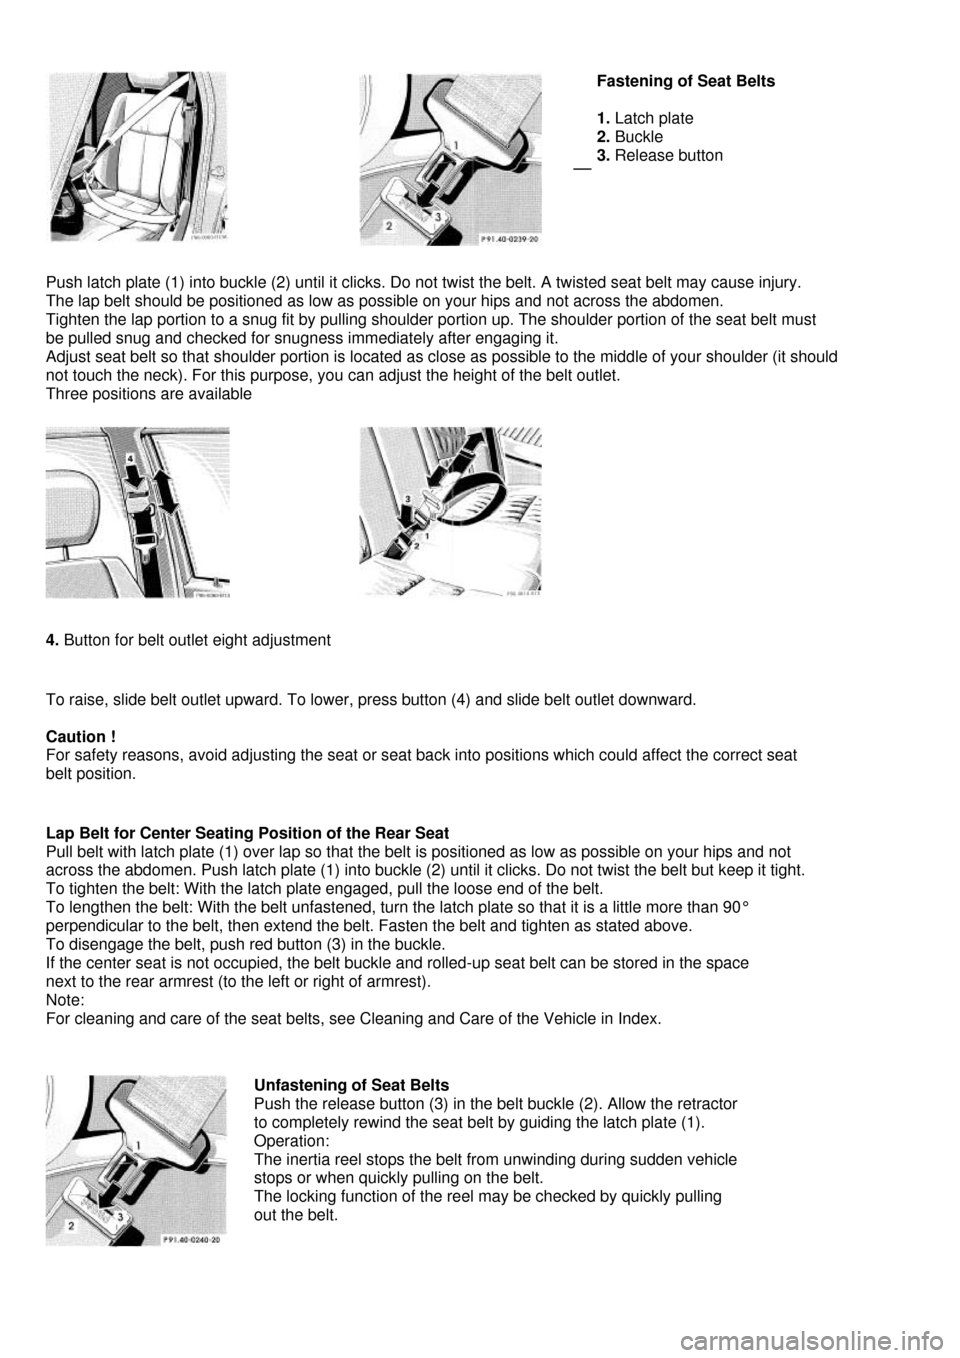
Fastening of Seat Belts
1. Latch plate
2. Buckle
3. Release button
Push latch plate (1) into buckle (2) until it clicks. Do not twist the belt. A twisted seat belt may cause injury.
The lap belt should be positioned as low as possible on your hips and not across the abdomen.
Tighten the lap portion to a snug fit by pulling shoulder portion up. The shoulder portion of the seat belt must
be pulled snug and checked for snugness immediately after engaging it.
Adjust seat belt so that shoulder portion is located as close as possible to the middle of your shoulder (it should
not touch the neck). For this purpose, you can adjust the height of the belt outlet.
Three positions are available
4. Button for belt outlet eight adjustment
To raise, slide belt outlet upward. To lower, press button (4) and slide belt outlet downward.
Caution !
For safety reasons, avoid adjusting the seat or seat back into positions which could affect the correct seat
belt position.
Lap Belt for Center Seating Position of the Rear Seat
Pull belt with latch plate (1) over lap so that the belt is positioned as low as possible on your hips and not
across the abdomen. Push latch plate (1) into buckle (2) until it clicks. Do not twist the belt but keep it tight.
To tighten the belt: With the latch plate engaged, pull the loose end of the belt.
To lengthen the belt: With the belt unfastened, turn the latch plate so that it is a little more than 90°
perpendicular to the belt, then extend the belt. Fasten the belt and tighten as stated above.
To disengage the belt, push red button (3) in the buckle.
If the center seat is not occupied, the belt buckle and rolled-up seat belt can be stored in the space
next to the rear armrest (to the left or right of armrest).
Note:
For cleaning and care of the seat belts, see Cleaning and Care of the Vehicle in Index.
Unfastening of Seat Belts
Push the release button (3) in the belt buckle (2). Allow the retractor
to completely rewind the seat belt by guiding the latch plate (1).
Operation:
The inertia reel stops the belt from unwinding during sudden vehicle
stops or when quickly pulling on the belt.
The locking function of the reel may be checked by quickly pulling
out the belt.
Page 55 of 130

Exterior Rear View Mirrors
The switch is located on the center console.
Turn electronic key in steering lock to position 2.
First select the mirror to be adjusted - press button:
Left mirror
Right mirror
To adjust, toggle the switch forward, backward or to either side. With the electronic key in steering lock position 2, the
driver's side mirror reflection brightness responds to changes in light sensitivity. With gear selector lever in position
"R",
or with the interior lamp switched on, the driver's side mirror brightness does not respond to changes in light
sensitivity.
Warning !
Exercise care when using the passenger-side mirror. The passenger-side exterior mirror is convex
(outwardly curved surface for a wider field of view). Objects in mirror are closer than they appear.
Check your inside rear view mirror or glance over your shoulder before changing lanes.
Notes:
The exterior mirrors have electrically heated glass. The heater switches on automatically, depending on outside
temperature. If an exterior mirror housing is forcibly pivoted from its normal position, it must be repositioned by
applying firm pressure until it snaps into place.
Page 59 of 130

Storage Compartments and Cupholder
Glove Box
1. Unlocking: Turn mechanical key to vertical position and remove.
2. Locking: Turn mechanical key to the right and remove.
3. Opening: Pull on handle.
Caution !
Keep compartment lids closed. This will prevent stored objects from being thrown about and
injuring vehicle occupants during an accident and sudden maneuvres.
Storage Compartments in Center Console
To open compartment in armrest: Lift lid with handle (4).
To open compartment under armrest: Lift lid with handle (5).
To close: Lower lid until it engages in lock.
Cupholder in Center Console
To open cover:
Touch top of cover (6) slightly. The cover opens automatically.
To open cup holder:
Briefly press button (7). The cup holder opens automatically.
To store cup holder:
Push button (7) down until cup holder engages. Close cover (6).
Caution !
Keep cup holder closed while travelling. Place only containers that fit into the cup holder to
prevent spills. Do not fill containers to a height where the contents could spill during vehicle
maneuvers, especially hot liquids.
Page 60 of 130

Sliding/Pop-Up Roof (optional)
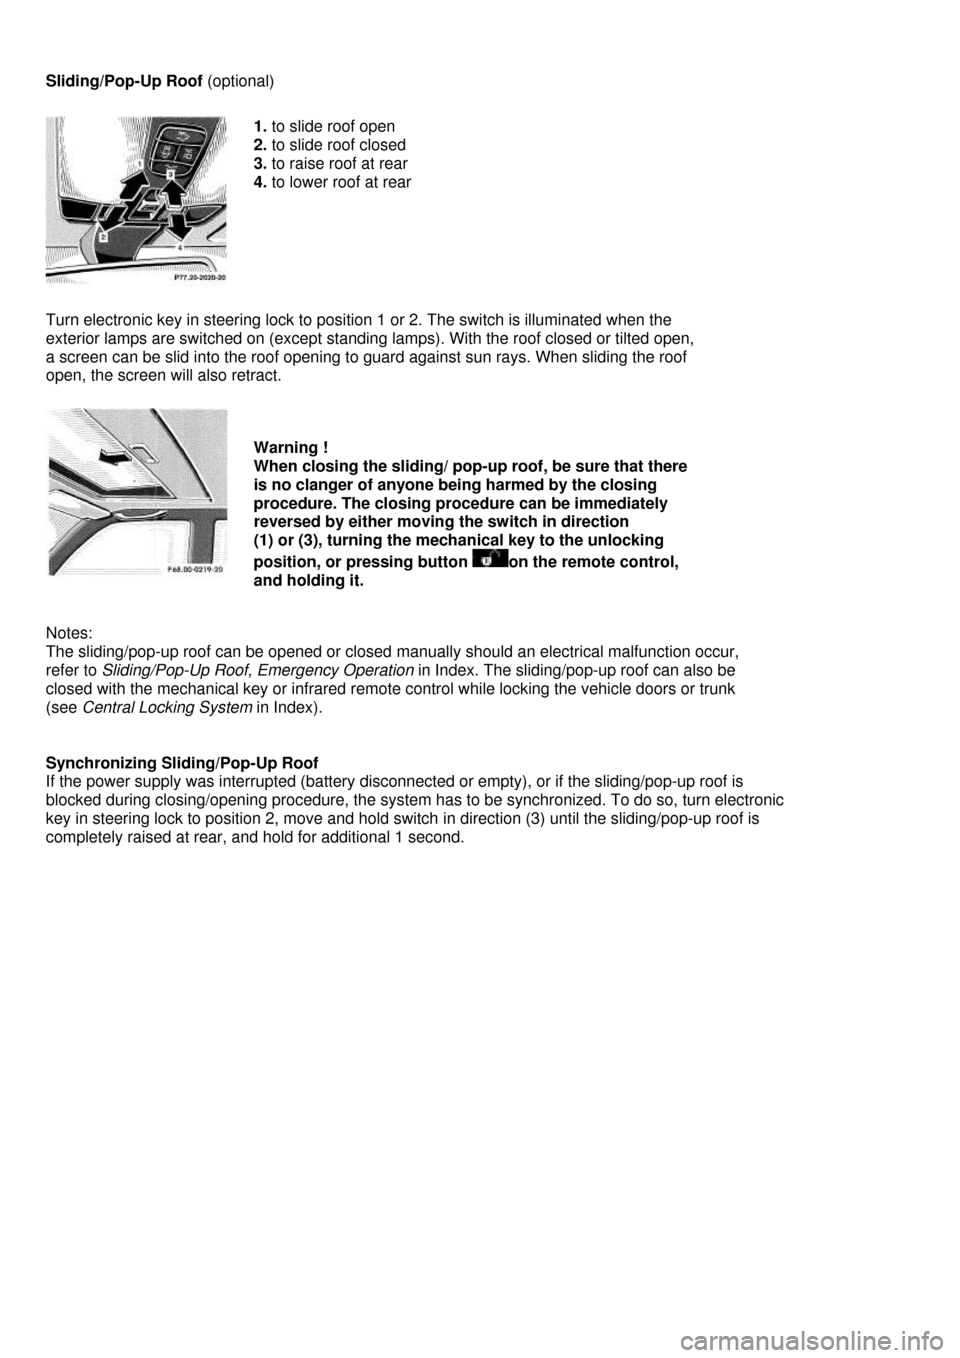
1. to slide roof open
2. to slide roof closed
3. to raise roof at rear
4. to lower roof at rear
Turn electronic key in steering lock to position 1 or 2. The switch is illuminated when the
exterior lamps are switched on (except standing lamps). With the roof closed or tilted open,
a screen can be slid into the roof opening to guard against sun rays. When sliding the roof
open, the screen will also retract.
Warning !
When closing the sliding/ pop-up roof, be sure that there
is no clanger of anyone being harmed by the closing
procedure. The closing procedure can be immediately
reversed by either moving the switch in direction
(1) or (3), turning the mechanical key to the unlocking
position, or pressing button on the remote control,
and holding it.
Notes:
The sliding/pop-up roof can be opened or closed manually should an electrical malfunction occur,
refer to Sliding/Pop-Up Roof, Emergency Operation in Index. The sliding/pop-up roof can also be
closed with the mechanical key or infrared remote control while locking the vehicle doors or trunk
(see Central Locking System in Index).
Synchronizing Sliding/Pop-Up Roof
If the power supply was interrupted (battery disconnected or empty), or if the sliding/pop-up roof is
blocked during closing/opening procedure, the system has to be synchronized. To do so, turn electronic
key in steering lock to position 2, move and hold switch in direction (3) until the sliding/pop-up roof is
completely raised at rear, and hold for additional 1 second.
Page 61 of 130

Power Windows
on center console, front
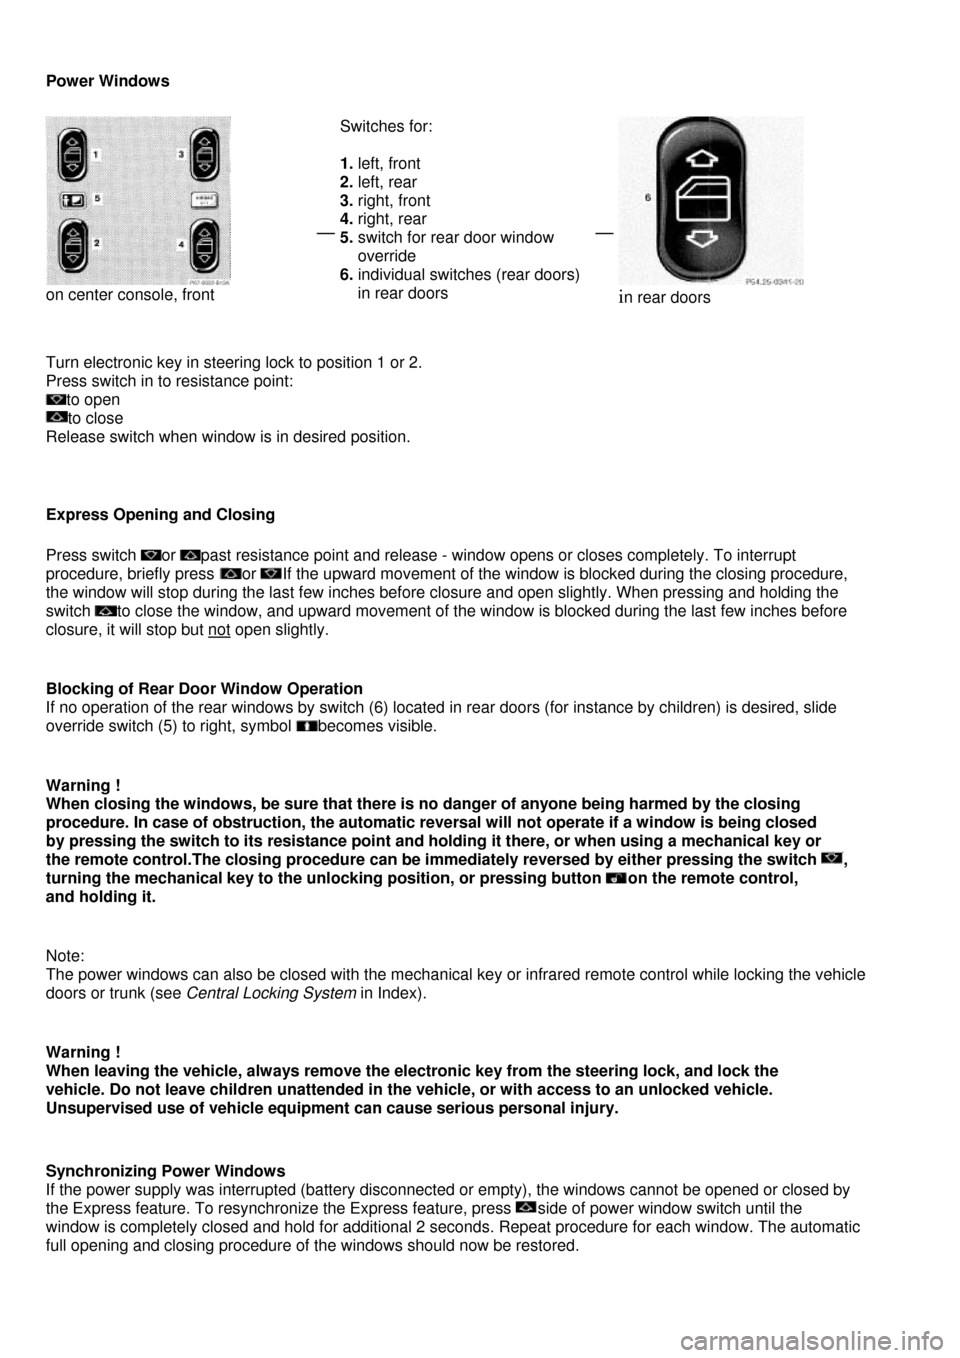
Switches for:
1. left, front
2. left, rear
3. right, front
4. right, rear
5. switch for rear door window
override
6. individual switches (rear doors)
in rear doors
in rear doors
Turn electronic key in steering lock to position 1 or 2.
Press switch in to resistance point:
to open
to close
Release switch when window is in desired position.
Express Opening and Closing
Press switch or past resistance point and release - window opens or closes completely. To interrupt
procedure, briefly press or If the upward movement of the window is blocked during the closing procedure,
the window will stop during the last few inches before closure and open slightly. When pressing and holding the
switch to close the window, and upward movement of the window is blocked during the last few inches before
closure, it will stop but not open slightly.
Blocking of Rear Door Window Operation
If no operation of the rear windows by switch (6) located in rear doors (for instance by children) is desired, slide
override switch (5) to right, symbol becomes visible.
Warning !
When closing the windows, be sure that there is no danger of anyone being harmed by the closing
procedure. In case of obstruction, the automatic reversal will not operate if a window is being closed
by pressing the switch to its resistance point and holding it there, or when using a mechanical key or
the remote control.The closing procedure can be immediately reversed by either pressing the switch ,
turning the mechanical key to the unlocking position, or pressing button on the remote control,
and holding it.
Note:
The power windows can also be closed with the mechanical key or infrared remote control while locking the vehicle
doors or trunk (see Central Locking System in Index).
Warning !
When leaving the vehicle, always remove the electronic key from the steering lock, and lock the
vehicle. Do not leave children unattended in the vehicle, or with access to an unlocked vehicle.
Unsupervised use of vehicle equipment can cause serious personal injury.
Synchronizing Power Windows
If the power supply was interrupted (battery disconnected or empty), the windows cannot be opened or closed by
the Express feature. To resynchronize the Express feature, press side of power window switch until the
window is completely closed and hold for additional 2 seconds. Repeat procedure for each window. The automatic
full opening and closing procedure of the windows should now be restored.
Page 62 of 130

Instrument Lamps
Press + or - button to vary intensity of instrument lamps.
Display illumination
The display for temperature, odometer, oil level indicator, FSS indicator and clock is illuminated briefly when opening
the
driver door. The display illumination brightness responds automatically according to changes in the surrounding light
sensitivity. To briefly illuminate the display (with electronic key removed or in steering lock position 0 or 1),
pressbutton
O, +,- , h or m.
Trip Odometer
• To reset:
• Press button O once and hold (with display illuminated).
• Press button O twice and hold (with display not illuminated).
Clock
Adjusting clock (display illuminated): Press button m or h briefly. The display flashes to indicate that the clock
can be adjusted.
Minute: Press button m briefly.
Minutes: Press and hold button m.
Hour: Press button h briefly.
Hours: Press and hold button h .
Page 63 of 130

Trunk Lid Release Switch
The switch is located on the center console. A minimum height clearance of 5.9 ft (1.8 m) is required to open
the trunk lid. To open the trunk, the vehicle must be parked and unlocked. Pull up on switch until trunk lid is open.
The indicator lamp remains on with trunk lid open.
Notes:
With vehicle centrally locked, the trunk can also be opened by using the remote control. Press button.
The trunk lid cannot be opened by the switch when previously locked separately with the mechanical key.
To open, refer to Trunk, separately locked (in Index).
Page 64 of 130

Garage Door Opener
1. Integrated remote control transmitter
2. Portable remote control transmitter
Warning !
When programming a garage door opener, the door moves up or down. When programming or operating
the remote control make sure there is no possibility of anyone being harmed by the moving door.
The built-in remote control is capable of operating up to three separately controlled objects.
Notes:
Certain types of garage door openers are incompatible with the integrated opener. If you should experience
difficulties
with programming the transmitter, contact your authorized Mercedes-Benz dealer or call Mercedes-Benz Customer
Assistance Center (in the U.S.A. only) at 1-800-FOR-MERCedes. For operation in the USA only:
This devise complies with Part 15 of the FCC Rules. Operation is subject to the following two conditions:
(1) This device may not cause harmful interference, and (2) this device must accept any interference received,
including interference that may cause undesired operation. Any unauthorized modification to this device could void
the user's
authority to operate the equipment.
Programming or reprogramming the integrated remote control:
1. Turn electronic key in steering lock to position 1 or 2.
2. Press and hold one button of the integrated remote control located on the sun visor until its control light begins to
flash at a
rate of about once a second. Continue holding down the button.
Note:
The light blinks immediately if the integrated remote control is being programmed
for the first time, or if its memory was previously erased. If you
are reprogramming a previously used button, the light will flash after
about 20 seconds.
3. Aim portable remote control transmitter at the integrated remote control transmitter to be programmed. While still
holding down the button on the transmitter on the inside rear view mirror, press down the button on you r portable
remote control transmitter, until the integrated remote control light starts to flash rapidly. This means that the
integrated transmitter has accepted the frequency and code of the portable transmitter.
4. If you wish, repeat the procedure for each remaining button.
Note:
If the garage door opener is equipped with the "rolling code feature", it needs to be trained to accept the remote
control
command. To do so, the assistance of a second person is required.
1. Locate training button (part of the opener unit in the garage).
2. Press and hold training button until training light next to the button begins to flash (in two seconds).
3. Now have the second person press and hold the previously programmed button on the integrated remote control
transmitter until the training light on the garage door opener is lit continuously (in two seconds).
4. Release and press the programmed button on the integrated remote control transmitter once again to turn off
the training light in the garage door opener.
5. Confirm the garage door operation by pressing the programmed button on the integrated remote control
transmitter.