brake MERCEDES-BENZ C CLASS 2018 Owners Manual
[x] Cancel search | Manufacturer: MERCEDES-BENZ, Model Year: 2018, Model line: C CLASS, Model: MERCEDES-BENZ C CLASS 2018Pages: 370, PDF Size: 6.25 MB
Page 355 of 370
Tire-mounting tools should not be used near
the valve. This could damage the electronic
components.
Only have tires changed at a qualified spe-
cialist workshop.
Always observe the instructions and safety
notes in the "Mounting a wheel" section
(
Ypage 353).
The wear patterns on the front and rear tires
differ, depending on the operating conditions.
Rotate the wheels before a clear wear pattern
has formed on the tires. Front tires typically
wear more on the shoulders and the rear tires in the center.
On vehicles that have the same size front and
rear wheels, you can rotate the wheels accord-
ing to the intervals in the tire manufacturer's
warranty book in your vehicle documents. If no
warranty book is available, the tires should be
rotated every 3,000 to 6,000 miles (5,000 to
10,000 km). Depending on tire wear, this may
be required earlier. Do not change the direction
of wheel rotation.
Clean the contact surfaces of the wheel and the
brake disc thoroughly every time a wheel is rota-
ted. Check the tire pressure and, if necessary,
restart the tire pressure loss warning system
(
Ypage 340) or the tire pressure monitor
(Ypage 342).
Direction of rotation
Tires with a specified direction of rotation have
additional benefits, e.g. if there is a risk of hydro- planing. These advantages can only be gained if
the tires are installed corresponding to the
direction of rotation.
An arrow on the sidewall of the tire indicates its
correct direction of rotation.
Storing wheels
Store wheels that are not being used in a cool,
dry and preferably dark place. Protect the tires
from oil, grease, gasoline and diesel.
Mounting a wheel
Preparing the vehicle
XStop the vehicle on solid, non-slippery and
level ground.
XApply the electric parking brake manually.
XBring the front wheels into the straight-ahead position.
XShift the transmission to position j.
XMake sure that the vehicle level is set to "Nor-
mal" on vehicles with AIRMATIC (Ypage 182).
XSwitch off the engine.
XVehicles without KEYLESS-GO:remove the
SmartKey from the ignition lock.
XVehicles with KEYLESS-GO start-function
or KEYLESS-GO: open the driver's door.
The vehicle electronics are now in key posi-
tion u. This is the same as the key having
been removed.
XVehicles with KEYLESS-GO start-function
or KEYLESS-GO: remove the Start/Stop but-
ton from the ignition lock (
Ypage 137).
XMake sure that the engine cannot be started
via your smartphone (Ypage 139).
XIf included in the vehicle equipment, remove
the tire-change tool kit from the vehicle.
XSafeguard the vehicle against rolling away.
Securing the vehicle to prevent it from
rolling away
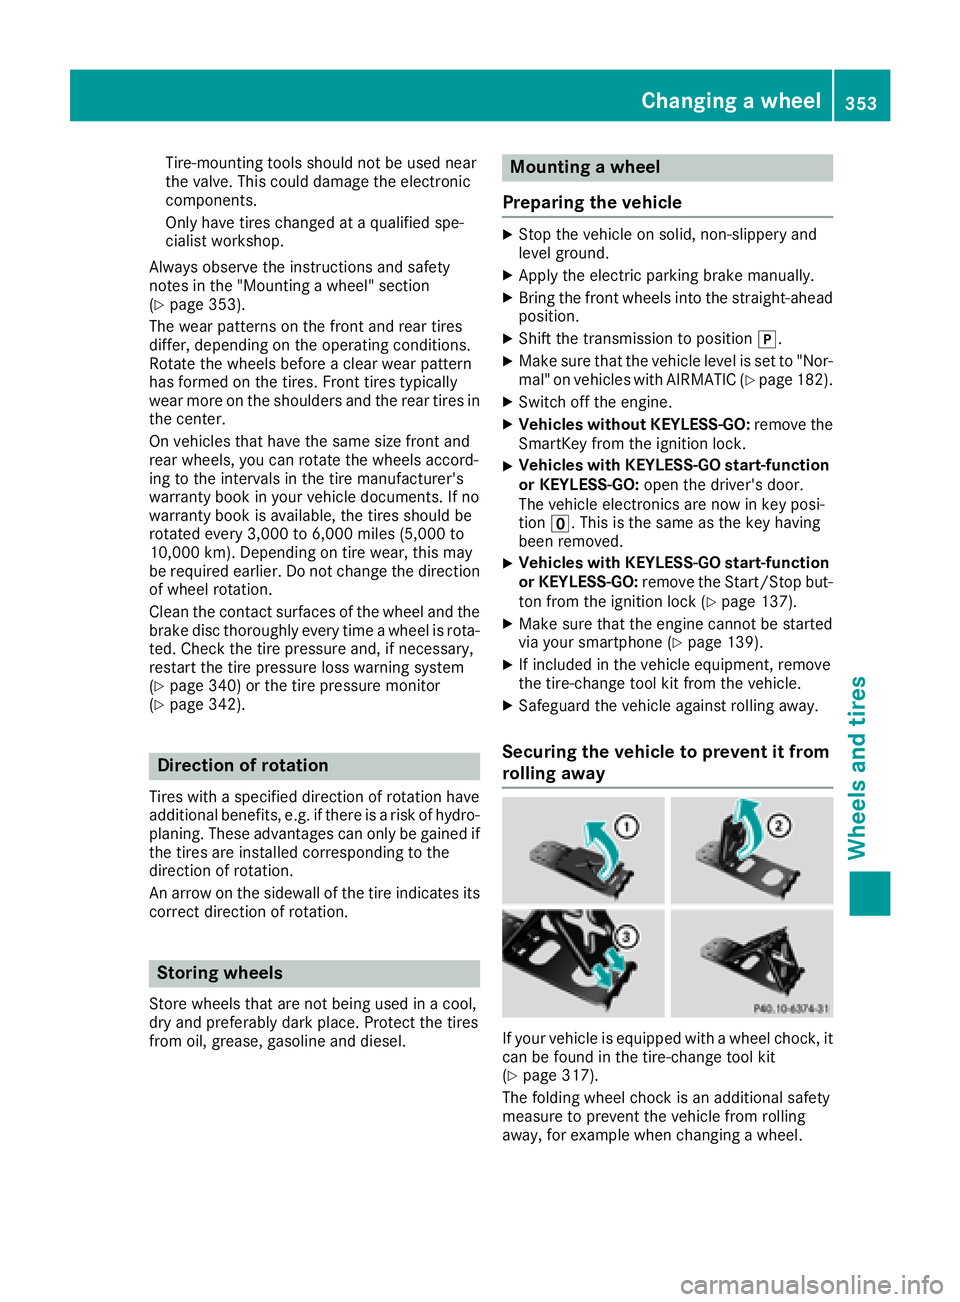
If your vehicle is equipped with a wheel chock, it
can be found in the tire-change tool kit
(
Ypage 317).
The folding wheel chock is an additional safety
measure to prevent the vehicle from rolling
away, for example when changing a wheel.
Changing a wheel353
Wheels and tires
Z
Page 356 of 370
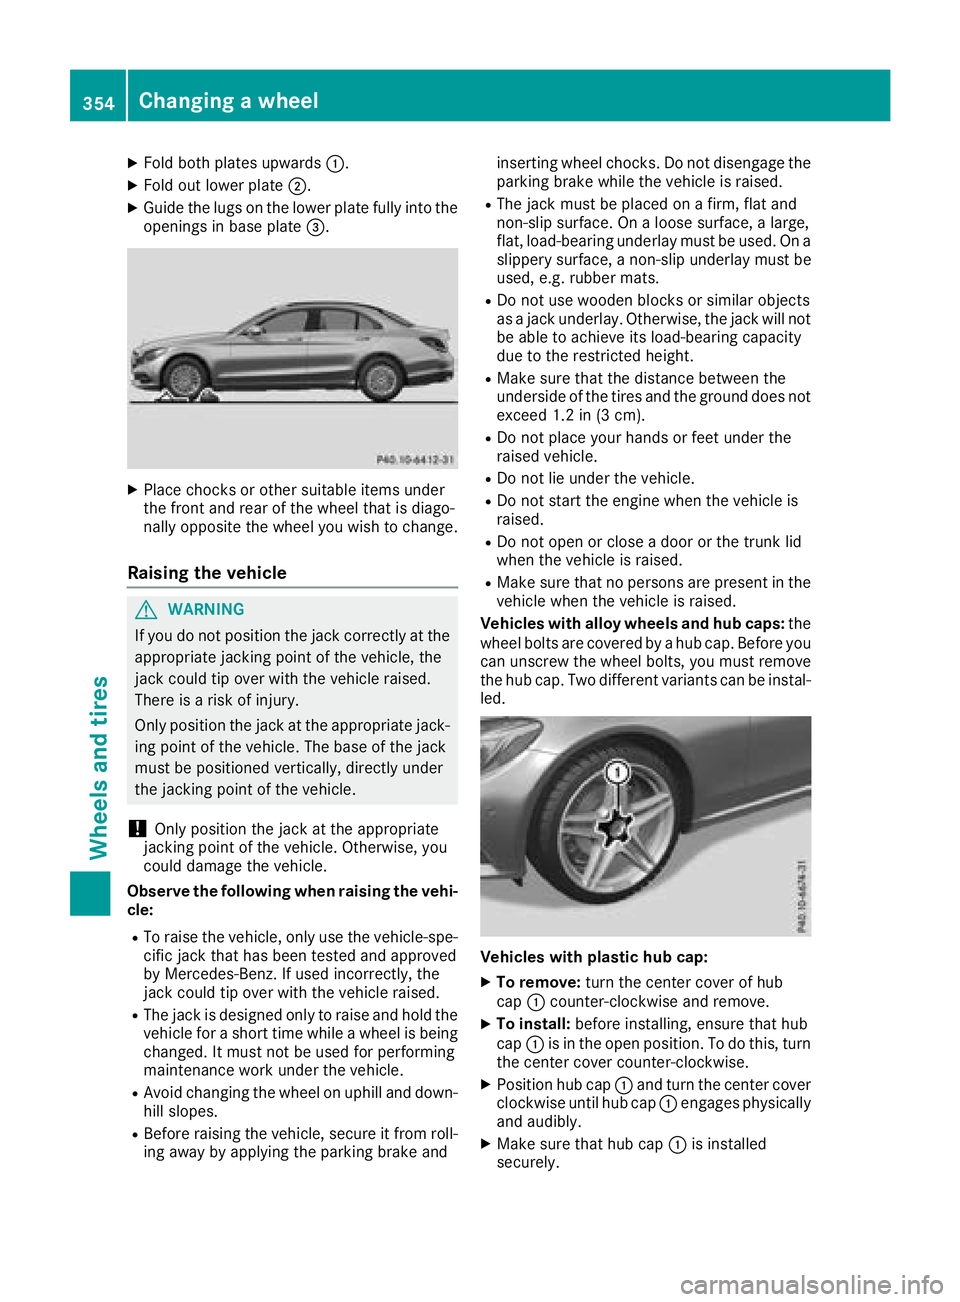
XFold both plates upwards:.
XFold out lower plate;.
XGuide the lugs on the lower plate fully into the
openings in base plate =.
XPlace chocks or other suitable items under
the front and rear of the wheel that is diago-
nally opposite the wheel you wish to change.
Raising the vehicle
GWARNING
If you do not position the jack correctly at the
appropriate jacking point of the vehicle, the
jack could tip over with the vehicle raised.
There is a risk of injury.
Only position the jack at the appropriate jack-
ing point of the vehicle. The base of the jack
must be positioned vertically, directly under
the jacking point of the vehicle.
!Only position the jack at the appropriate
jacking point of the vehicle. Otherwise, you
could damage the vehicle.
Observe the following when raising the vehi-
cle:
RTo raise the vehicle, only use the vehicle-spe-
cific jack that has been tested and approved
by Mercedes-Benz. If used incorrectly, the
jack could tip over with the vehicle raised.
RThe jack is designed only to raise and hold the
vehicle for a short time while a wheel is being
changed. It must not be used for performing
maintenance work under the vehicle.
RAvoid changing the wheel on uphill and down- hill slopes.
RBefore raising the vehicle, secure it from roll-
ing away by applying the parking brake and inserting wheel chocks. Do not disengage the
parking brake while the vehicle is raised.
RThe jack must be placed on a firm, flat and
non-slip surface. On a loose surface, a large,
flat, load-bearing underlay must be used. On a
slippery surface, a non-slip underlay must be
used, e.g. rubber mats.
RDo not use wooden blocks or similar objects
as a
jack underlay. Otherwise, the jack will not
be able to achieve its load-bearing capacity
due to the restricted height.
RMake sure that the distance between the
underside of the tires and the ground does not
exceed 1.2 in (3 cm).
RDo not place your hands or feet under the
raised vehicle.
RDo not lie under the vehicle.
RDo not start the engine when the vehicle is
raised.
RDo not open or close a door or the trunk lid
when the vehicle is raised.
RMake sure that no persons are present in the
vehicle when the vehicle is raised.
Vehicles with alloy wheels and hub caps: the
wheel bolts are covered by a hub cap. Before you
can unscrew the wheel bolts, you must remove
the hub cap. Two different variants can be instal- led.
Vehicles with plastic hub cap:
XTo remove: turn the center cover of hub
cap :counter-clockwise and remove.
XTo install: before installing, ensure that hub
cap :is in the open position. To do this, turn
the center cover counter-clockwise.
XPosition hub cap :and turn the center cover
clockwise until hub cap :engages physically
and audibly.
XMake sure that hub cap :is installed
securely.
354Changing a wheel
Wheels and tires
Page 358 of 370
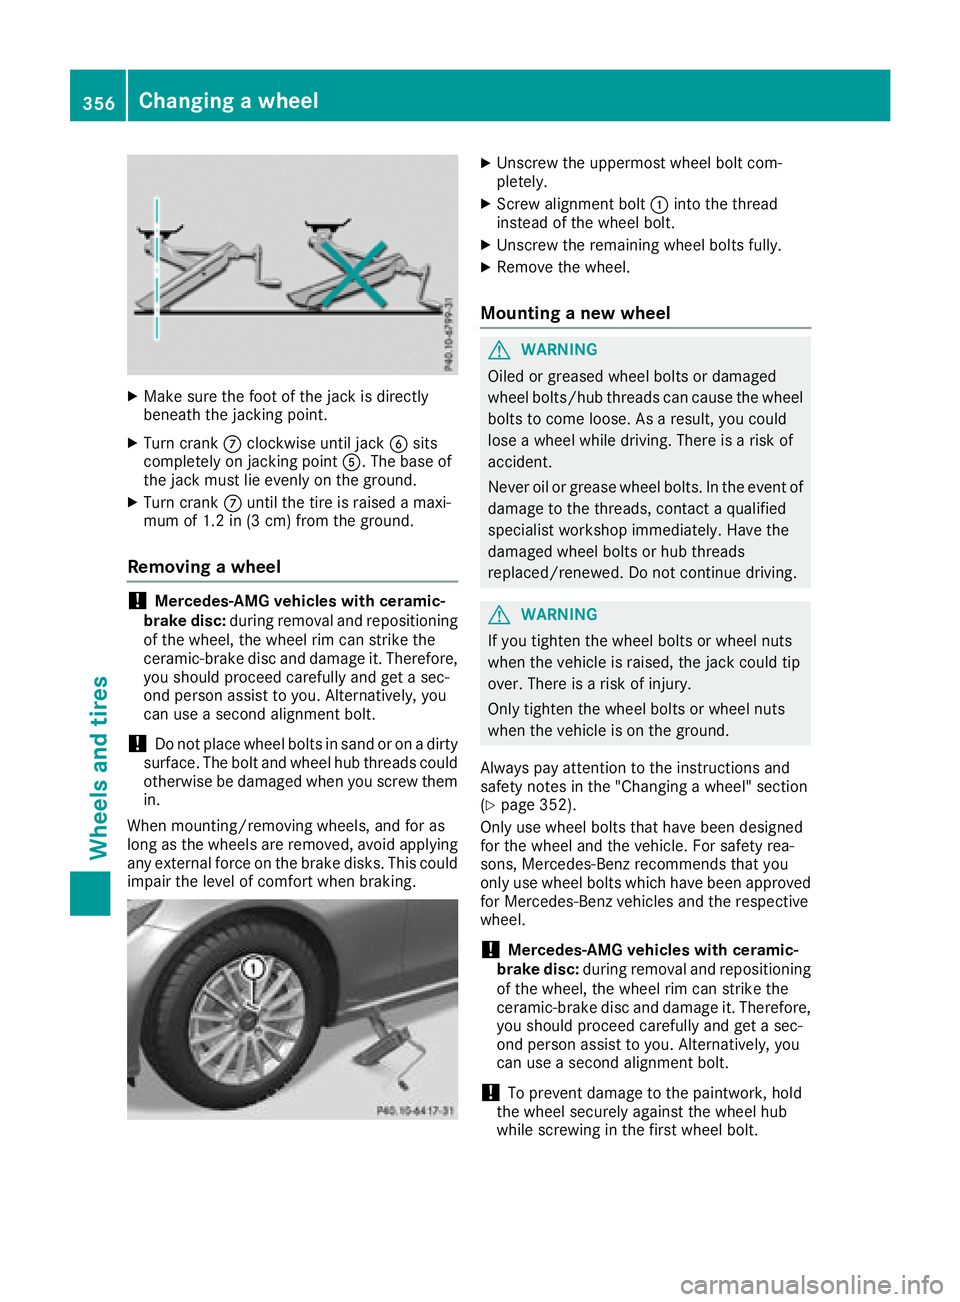
XMake sure the foot of the jack is directly
beneath the jacking point.
XTurn crankCclockwise until jack Bsits
completely on jacking point A. The base of
the jack must lie evenly on the ground.
XTurn crank Cuntil the tire is raised a maxi-
mum of 1.2 in (3 cm) from the ground.
Removing a wheel
!Mercedes-AMG vehicles with ceramic-
brake disc: during removal and repositioning
of the wheel, the wheel rim can strike the
ceramic-brake disc and damage it. Therefore,
you should proceed carefully and get a sec-
ond person assist to you. Alternatively, you
can use a second alignment bolt.
!Do not place wheel bolts in sand or on a dirty
surface. The bolt and wheel hub threads could
otherwise be damaged when you screw them
in.
When mounting/removing wheels, and for as
long as the wheels are removed, avoid applying
any external force on the brake disks. This could
impair the level of comfort when braking.
XUnscrew the uppermost wheel bolt com-
pletely.
XScrew alignment bolt :into the thread
instead of the wheel bolt.
XUnscrew the remaining wheel bolts fully.
XRemove the wheel.
Mounting a new wheel
GWARNING
Oiled or greased wheel bolts or damaged
wheel bolts/hub threads can cause the wheel bolts to come loose. As a result, you could
lose a wheel while driving. There is a risk of
accident.
Never oil or grease wheel bolts. In the event of
damage to the threads, contact a qualified
specialist workshop immediately. Have the
damaged wheel bolts or hub threads
replaced/renewed. Do not continue driving.
GWARNING
If you tighten the wheel bolts or wheel nuts
when the vehicle is raised, the jack could tip
over. There is a risk of injury.
Only tighten the wheel bolts or wheel nuts
when the vehicle is on the ground.
Always pay attention to the instructions and
safety notes in the "Changing a wheel" section
(
Ypage 352).
Only use wheel bolts that have been designed
for the wheel and the vehicle. For safety rea-
sons, Mercedes-Benz recommends that you
only use wheel bolts which have been approved for Mercedes-Benz vehicles and the respective
wheel.
!Mercedes-AMG vehicles with ceramic-
brake disc: during removal and repositioning
of the wheel, the wheel rim can strike the
ceramic-brake disc and damage it. Therefore,
you should proceed carefully and get a sec-
ond person assist to you. Alternatively, you
can use a second alignment bolt.
!To prevent damage to the paintwork, hold
the wheel securely against the wheel hub
while screwing in the first wheel bolt.
356Changing a wheel
Wheels and tires
Page 363 of 370
iThe data shown on the vehicle identification
plate is used only as an example. This data is
different for every vehicle and can deviate
from the data shown here. You can find the
data applicable to your vehicle on the vehicle
identification plate.
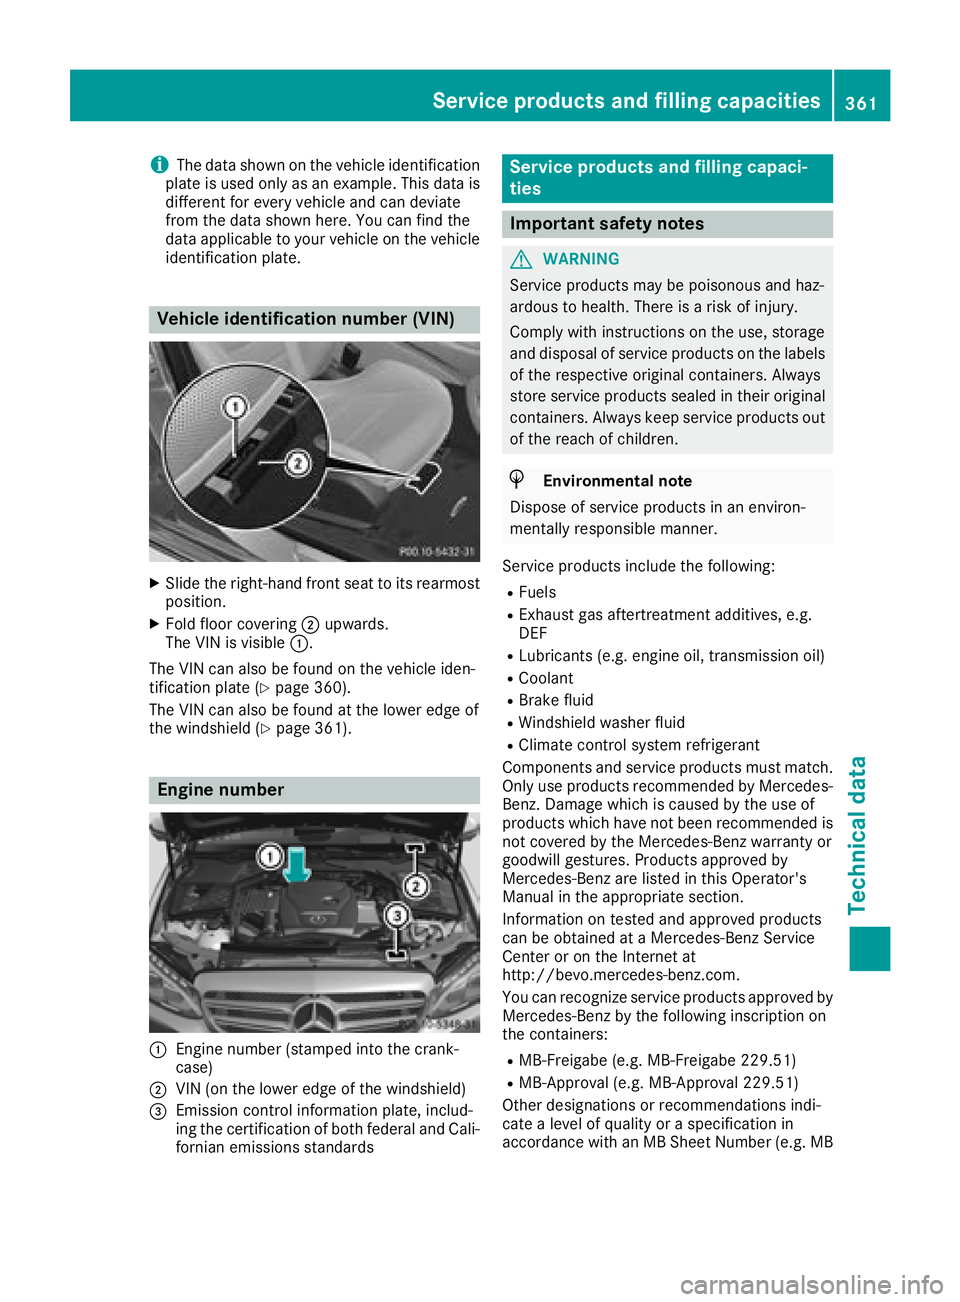
Vehicle identification number (VIN)
XSlide the right-hand front seat to its rearmost
position.
XFold floor covering ;upwards.
The VIN is visible :.
The VIN can also be found on the vehicle iden-
tification plate (
Ypage 360).
The VIN can also be found at the lower edge of
the windshield (
Ypage 361).
Engine number
:Engine number (stamped into the crank-
case)
;VIN (on the lower edge of the windshield)
=Emission control information plate, includ-
ing the certification of both federal and Cali-
fornian emissions standards
Service products and filling capaci-
ties
Important safety notes
GWARNING
Service products may be poisonous and haz-
ardous to health. There is a risk of injury.
Comply with instructions on the use, storage
and disposal of service products on the labels
of the respective original containers. Always
store service products sealed in their original
containers. Always keep service products out
of the reach of children.
HEnvironmental note
Dispose of service products in an environ-
mentally responsible manner.
Service products include the following:
RFuels
RExhaust gas aftertreatment additives, e.g.
DEF
RLubricants (e.g. engine oil, transmission oil)
RCoolant
RBrake fluid
RWindshield washer fluid
RClimate control system refrigerant
Components and service products must match.
Only use products recommended by Mercedes-
Benz. Damage which is caused by the use of
products which have not been recommended is
not covered by the Mercedes-Benz warranty or
goodwill gestures. Products approved by
Mercedes-Benz are listed in this Operator's
Manual in the appropriate section.
Information on tested and approved products
can be obtained at a Mercedes-Benz Service
Center or on the Internet at
http://bevo.mercedes-benz.com.
You can recognize service products approved by
Mercedes-Benz by the following inscription on
the containers:
RMB-Freigabe (e.g. MB-Freigabe 229.51)
RMB-Approval (e.g. MB-Approval 229.51)
Other designations or recommendations indi-
cate a level of quality or a specification in
accordance with an MB Sheet Number (e.g. MB
Service products and filling capacities361
Technical data
Z
Page 367 of 370
When handling engine oil, observe the important
safety notes on service products (Ypage 361).
The engine oils are matched to the performance
of Mercedes-Benz engines and service intervals.
You should therefore only use engine oils and oil filters that are approved for vehicles with main-
tenance systems.
For a list of approved engine oils and oil filters,
consult an authorized Mercedes-Benz Center.
Or visit the website
http://bevo.mercedes-benz.com.
The table shows which engine oils have been
approved for your vehicle.
Gasoline enginesMB-Freigabe or MB-Approval
All models229.5, 229.6
Diesel enginesMB-Freigabe orMB-Approval
All models228.51, 229.31,229.51, 229.52
Use only SAE 0W-40 or SAE 5W-40 engine oils
for Mercedes-AMG vehicles.
iMB approval is indicated on the oil contain-
ers.
Filling capacities
The following values refer to an oil change
including the oil filter.
ModelCapacity
C 300 4MATIC
Mercedes-AMG
C 43 4MATIC6.9 US qt (6.5 l)
C 300 d 4MATIC6.3 US qt (6.0l)
Mercedes-AMG
C 63
Mercedes-AMG
C 63 S9.5 US qt (9.0l)
Allot her models7.4 US qt (7.0 l)
Additives
!Do not use any additives in the engine oil.
This could damage the engine.
Brake fluid
GWARNING
The brake fluid constantly absorbs moisture
from the air. This lowers the boiling point of
the brake fluid. If the boiling point of the brake
fluid is too low, vapor pockets may form in the
brake system when the brakes are applied
hard. This would impair braking efficiency.
There is a risk of an accident.
You should have the brake fluid renewed at
the specified intervals.
When handling brake fluid, observe the impor-
tant safety notes on service products
(
Ypage 361).
The brake fluid change intervals can be found in
the Maintenance Booklet.
Only use brake fluid approved by Mercedes-
Benz in accordance with MB-Freigabe or MB-
Approval 331.0.
Information about approved brake fluid can be
obtained at any qualified specialist workshop or
on the Internet at
http://bevo.mercedes-benz.co m.
iHave the brake fluid regularly replaced at a
qualified specialist workshop in accordance
with the replacement intervals and the
replacement confirmed in the Maintenance
Booklet.
Coolant
Important safety notes
GWARNING
If antifreeze comes into contact with hot com- ponents in the engine compartment, it may
ignite. There is a risk of fire and injury.
Let the engine cool down before you add anti-
freeze. Make sure that antifreeze is not spilled
next to the filler neck. Thoroughly clean the
antifreeze from components before starting
the engine.
!Only add coolant that has been premixed
with the desired antifreeze protection. You
could otherwise damage the engine.
Service products and filling capacities365
Technical data
Z