ignition MERCEDES-BENZ C-CLASS COUPE 2015 Owners Manual
[x] Cancel search | Manufacturer: MERCEDES-BENZ, Model Year: 2015, Model line: C-CLASS COUPE, Model: MERCEDES-BENZ C-CLASS COUPE 2015Pages: 385, PDF Size: 13.12 MB
Page 327 of 385
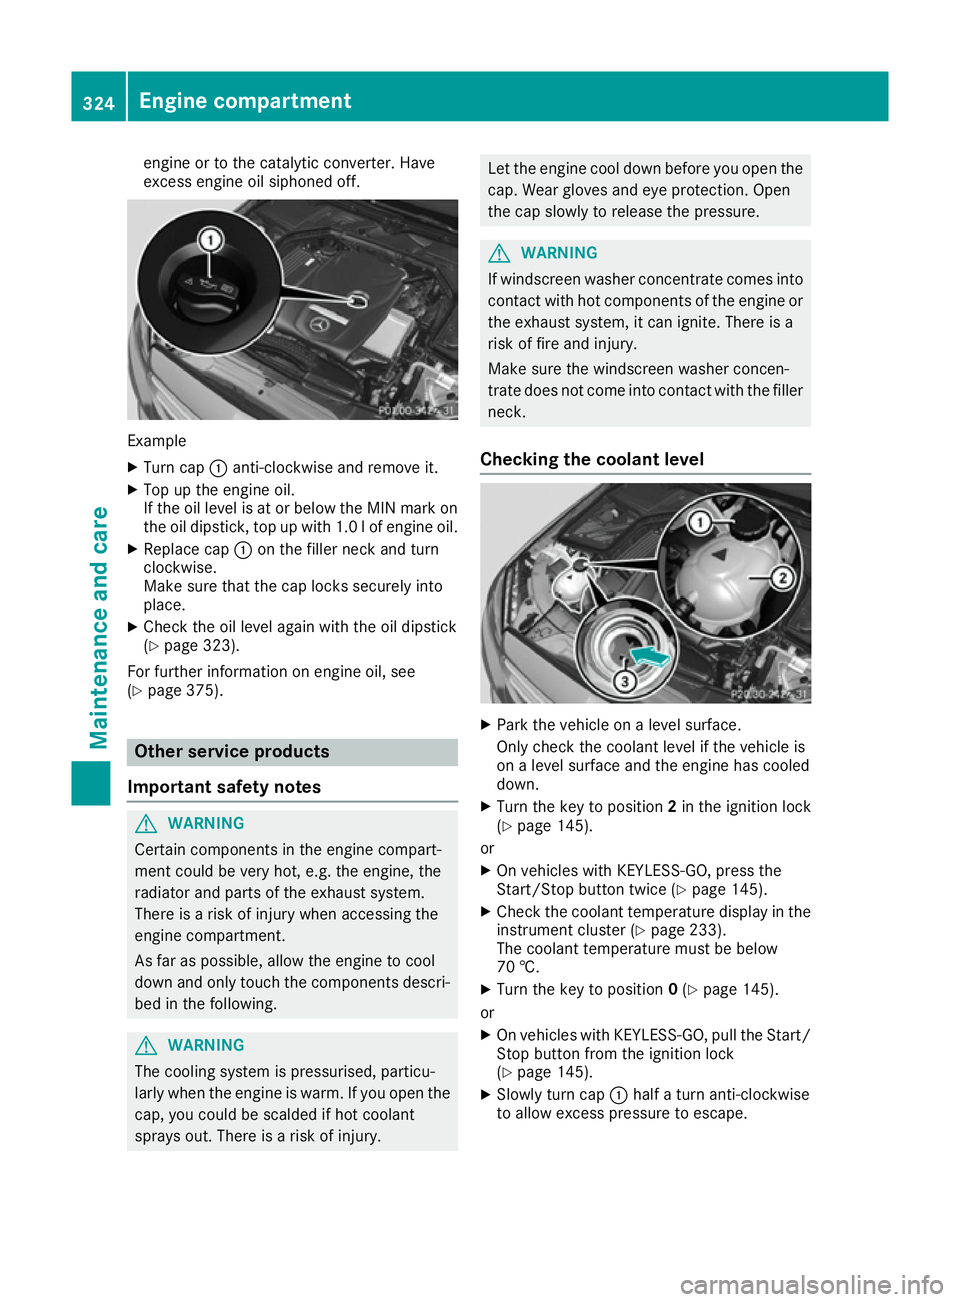
engine or to the catalytic converter. Have
exces
sengine oil siphoned off. Example
X Turn cap :anti-clockwise and remove it.
X Top up the engine oil.
If the oil level is at or below the MIN mark on
the oil dipstick ,top up with 1.0 lofe ngine oil.
X Replace cap :on the filler neck and turn
clockwise.
Make sure that the cap locks securely into
place.
X Check the oil leve lagain with the oil dipstick
(Y pag e323).
For further information on engine oil ,see
(Y pag e375). Other service products
Important safety notes G
WARNING
Certain components in the engine compart-
ment coul dbevery hot, e.g. the engine, the
radiator and parts of the exhaust system.
There is arisk of injury when accessing the
engine compartment.
As far as possible ,allow the engine to cool
dow nand only touch the components descri-
bed in the following. G
WARNING
The cooling system is pressurised, particu-
larl yw hen the engine is warm. If you open the
cap, you coul dbescalded if hot coolant
sprays out. There is arisk of injury. Let the engine cool dow
nbefore you open the
cap. Wea rglove sand eye protection. Open
the cap slowly to release the pressure. G
WARNING
If windscreen washer concentrate comes into contact with hot components of the engine or
the exhaust system, it can ignite. There is a
risk of fire and injury.
Make sure the windscreen washer concen-
trate does not come into contact with the filler neck.
Checking the coolan tlevel X
Park the vehicl eonalevelsurface.
Only check the coolant leve lifthe vehicl eis
on aleve lsurface and the engine has cooled
down.
X Turn the key to position 2in the ignition lock
(Y pag e145).
or
X On vehicles with KEYLESS-GO, press the
Start/Stop button twice (Y page145).
X Check the coolant temperature display in the
instrument cluster (Y page233).
The coolant temperature must be below
70 †.
X Turn the key to position 0(Y pag e145).
or
X On vehicles with KEYLESS-GO, pul lthe Start/
Stop button from the ignition lock
(Y pag e145).
X Slowl yturn cap :halfat urn anti-clockwise
to allow excess pressure to escape. 324
Engine compartmentMaintenance and care
Page 328 of 385
X
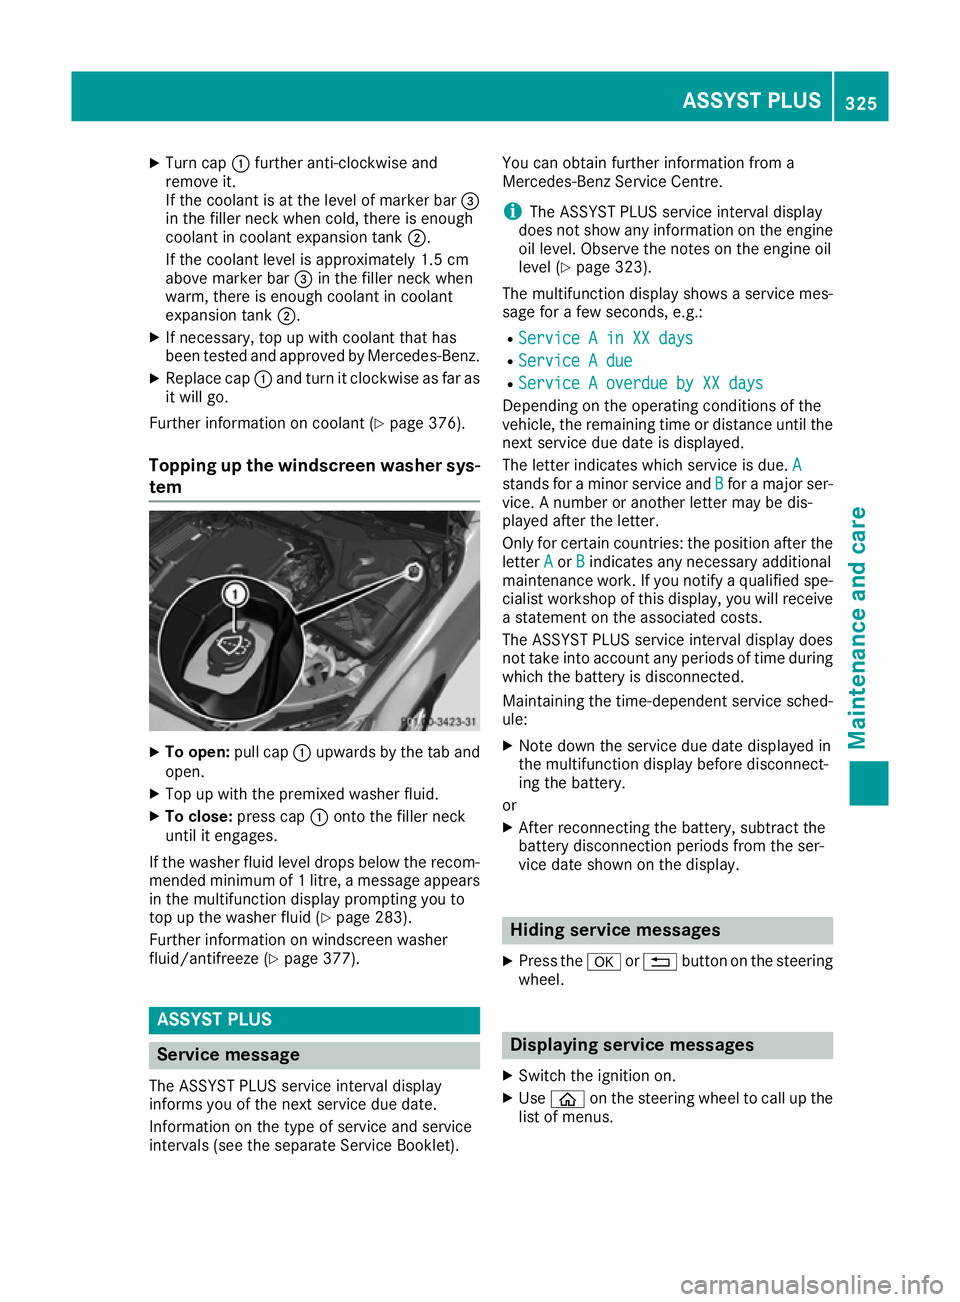
Turn cap :further anti-clockwise and
remove it.
If the coolant is at the level of marker bar =
in the filler neck when cold, there is enough
coolant in coolant expansion tank ;.
If the coolant level is approximately 1.5 cm
above marker bar =in the filler neck when
warm, there is enough coolant in coolant
expansion tank ;.
X If necessary, top up with coolant that has
been tested and approved by Mercedes-Benz.
X Replace cap :and turn it clockwise as far as
it will go.
Further information on coolant (Y page 376).
Topping up the windscreen washer sys- tem X
To open: pull cap:upwards by the tab and
open.
X Top up with the premixed washer fluid.
X To close: press cap :ontot he filler neck
until it engages.
If the washer fluid level drops below the recom- mended minimum of 1litre, amessage appears
in the multifunction display promptin gyou to
top up the washer fluid (Y page 283).
Further information on windscreen washer
fluid/antifreez e(Ypage 377). ASSYST PLUS
Service message
The ASSYST PLUS service interval display
inform syou of the next service due date.
Information on the type of service and service
intervals (see the separate Servic eBooklet). You can obtain further information from a
Mercedes-Benz Servic
eCentre.
i The ASSYST PLUS service interval display
does not show any information on the engine oil level. Observe the notes on the engine oil
level (Y page 323).
The multifunction display shows aservice mes-
sage for afew seconds, e.g.:
R Service AinXXd ays
Service AinXXd ays
R Service Adue
Service Adue
R Service Aoverdue by XX days
Service Aoverdue by XX days
Dependin gonthe operating conditions of the
vehicle, the remaining time or distance until the
next service due date is displayed.
The letter indicates which service is due. A A
stands for aminor service and B
Bfor am ajor ser-
vice. Anumber or another letter may be dis-
played after the letter.
Only for certain countries: the position after the
letter A
A or B Bindicates any necessary additional
maintenance work. If you notify aqualified spe-
cialist workshop of this display ,you will receive
as tatement on the associated costs.
The ASSYST PLUS service interval display does
not take into account any periods of time during which the battery is disconnected.
Maintaining the time-dependent service sched-
ule:
X Note down the service due date displayed in
the multifunction display before disconnect-
ing the battery.
or
X After reconnecting the battery, subtract the
battery disconnection periods from the ser-
vice date shown on the display. Hiding service messages
X Press the aor% button on the steering
wheel. Displaying service messages
X Switch the ignition on.
X Use ò on the steerin gwheel to call up the
list of menus. ASSYST PLUS
325Maintenance and care Z
Page 330 of 385
Washing the vehiclea
nd cleaning the
paintwork
Automatic car wash G
WARNING
Braking efficiency is reduced after the vehicle has been washed .There is arisk of an acci-
dent.
After washing the vehicle, brake carefully
while paying attention to the traffic conditions in order to restore full braking efficiency.
! When DISTRONIC PLUS or the HOLD func-
tion is activated, the vehicl ebrakes automat-
ically in certain situations.
To avoi ddamage to the vehicle, deactivate
DISTRONIC PLUS and the HOLD function in
the following or similar situations:
R when towing away
R in ac ar wash
! Make sure:
R the side windows and sliding sunroo fare
close dcompletely.
R the blower for the ventilation/heating is
switched off (OFF button is depressed).
R the windscreen wiper switch is at position
0
R the 360° camera or reversing camera is
switched off.
The vehicl ecouldo therwise be damaged.
! If the key is withi
nthe rear detection range
of KEYLESS-GO, the following situations, for
example, coul dleadtot he boot lid opening
unintentionally:
R using acar wash
R using ahigh-pressure cleaner
Make sure that the key is at least 3maway
from the vehicle.
! Make sure that the automatic transmission
is in neutral position Nwhen washing your
vehicl einat ow-through car wash. The vehicle
may otherwise be damaged.
R Operating with the key:
Do not remove the key from the ignition
lock. Do not open the driver's door when
the engine is switched off or at very low
speeds. Otherwise, whe nintransmission position
Dor Rthe automatic transmission
wil lautomatically switch to park position P
and block the wheels.
R Operating with the Start/Stop button:
Do not open the driver's door whe nthe
engine is switched off or at very low
speeds. Otherwise, whe nintransmission
position Dor Rthe automatic transmission
wil lautomatically switch to park position P
and block the wheels.
Observe the following to make sure that the
automatic transmission stay sinneutral position
N:
Operating with the key and Start/Stop button:
X Make sure the ignition is switched on.
X Make sure that the vehicl eisstationary.
X Depress the brake peda land keep it
depressed.
Operating with the Start/Stop button only: X Engage park position P.
X Releas ethe brake pedal.
X Remove the Start/Stop button from the igni-
tion lock (Y page145).
X Insert the key into the ignition lock.
X Switch on the ignition.
X Depress the brake peda land keep it
depressed.
Operating with the key and Start/Stop button:
X Select neutral N.
X Releas ethe brake pedal.
X Releas ethe electric parking brake, if neces-
sary.
X Switch off the ignition and leave the key in the
ignition lock.
You can wash the vehicl einanautomatic car
wash from the very start.
Was hoff excess dirt before cleaning the vehicle
in an automatic car wash.
After using an automatic car wash, wip eoff wax
from the windscreen and the wiper blades. This
wil lprevent smears and reduce wiping noises
caused by residue on the windscreen.
Washing by hand In some countries
,washing by hand is only
allowe datspeciall yequipped washing bays. Care
327Maintenance and care Z
Page 333 of 385
Alway
sswitch off the windscree nwiper sand
the ignition before cleaning the windscree nor
wipe rblade s.
! Do not pull on the wipe
rblade .Otherwise,
the wipe rblade could be damaged.
! Do not clean wipe
rblade stoo ofte nand do
not ru bthem too hard. Otherwise, the graph-
ite coating could be damaged .Thisc ould
cause wipe rnoise.
! Hol
dthe wipe rarm securel ywhenf olding
back. The windscree ncould be damaged if
the wipe rarm hits against it suddenly.
X Fol dthe wipe rarm sa wayfrom the wind-
screen (Y page 126).
X Clea nthe wipe rblade scarefull yusing adamp
cloth.
X Fol dthe windscree nwiper sbacka gain before
switching on the ignition.
Cleanin gthe exterior lighting !
Onl
yusecleaning agents or cleaning cloths
tha tare suitabl efor plastic lenses .Unsuitable
cleaning agents or cleaning cloths could
scratch or damage the plastic lenses of the
exterio rlighting.
X Clea nthe plastic lenses of the exterio rlight-
ing using awetsponge and amildc leaning
agent, e.g .Mercedes-Benz car shampo oor
cleaning cloths.
Cleanin gthe mirro rturn signal !
Onl
yusecleaning agents or cleaning cloths
tha tare suitabl efor plastic lenses .Unsuitable
cleaning agents or cleaning cloths could
scratch or damage the plastic lenses of the
mirror turn signals.
X Clea nthe plastic lenses of the mirror turn sig-
nal sint he exterio rmirror housing using awet
sponge and mil dcleaning agent, e.g.
Mercedes-Benz car shampo oorcleaning
cloths.
Cleanin gthe sensors !
If yo
uclean the sensors with ahigh-pressure
cleaner, make sure tha tyou kee pad istance
of at leas t30cmb etween the vehicl eand the
high-pressure cleane rnozzle. Information abou
tthe correct distance is availabl efrom
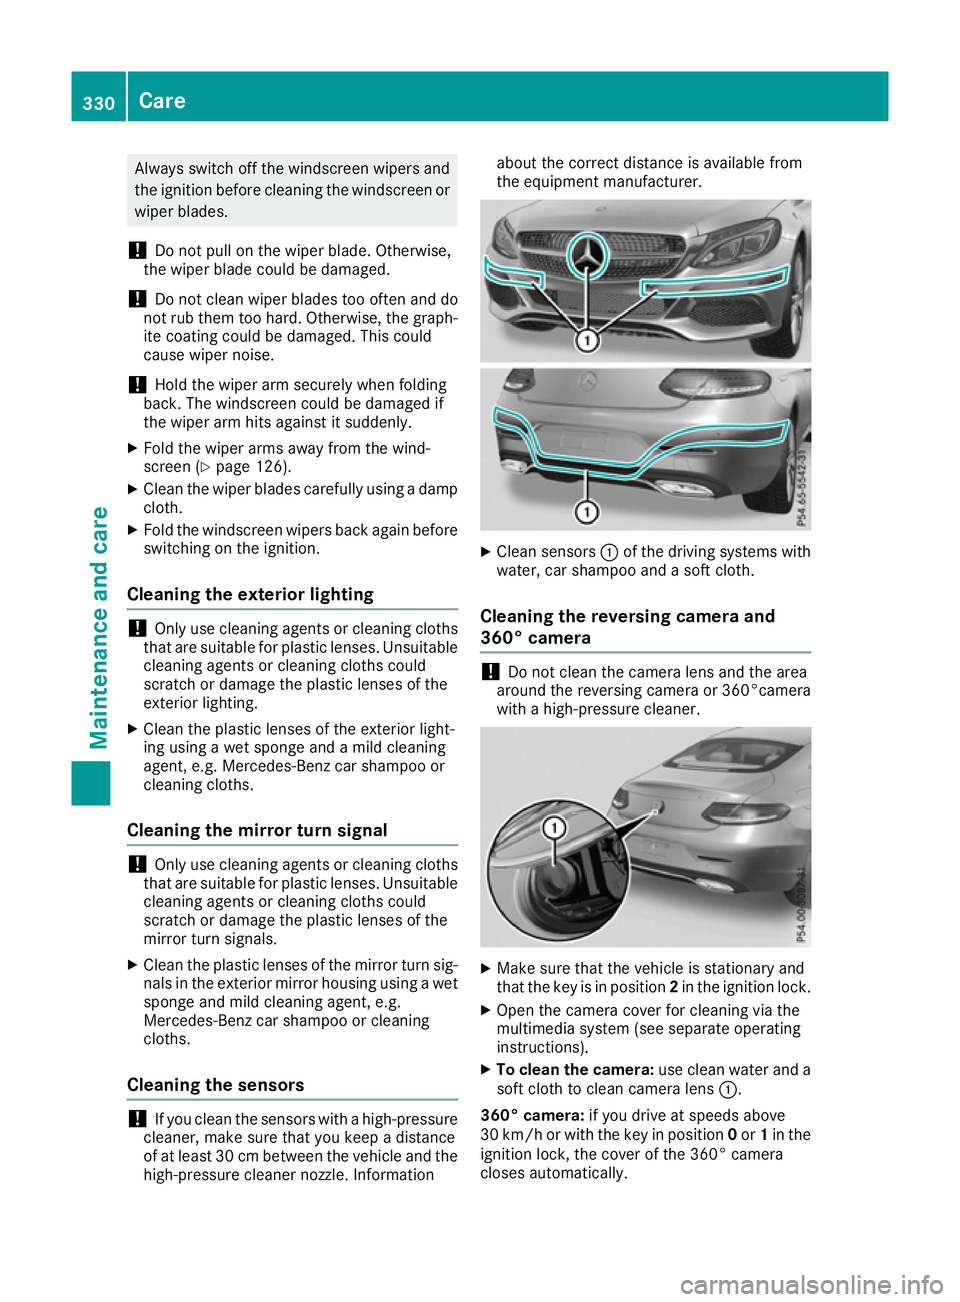
the equipment manufacturer. X
Clea nsensors :of the driving system swith
water, car shampo oand asoftc loth.
Cleanin gthe reversin gcamera and
360° camera !
Do not clean the camera lens and the area
around the reversing camera or 360°camera
with ahigh-pressure cleaner. X
Make sure tha tthe vehicl eisstationar yand
tha tthe key is in position 2in the ignition lock.
X Ope nthe camera cove rfor cleaning via the
multimedia system (se eseparate operating
instructions).
X To clean the camera: usec lean water and a
sof tcloth to clean camera lens :.
360° camera: if youdrive at speed sabove
30 km/h or with the key in position 0or 1in the
ignition lock, the cove rofthe 360° camera
closes automatically. 330
CareMaintenance and care
Page 340 of 385
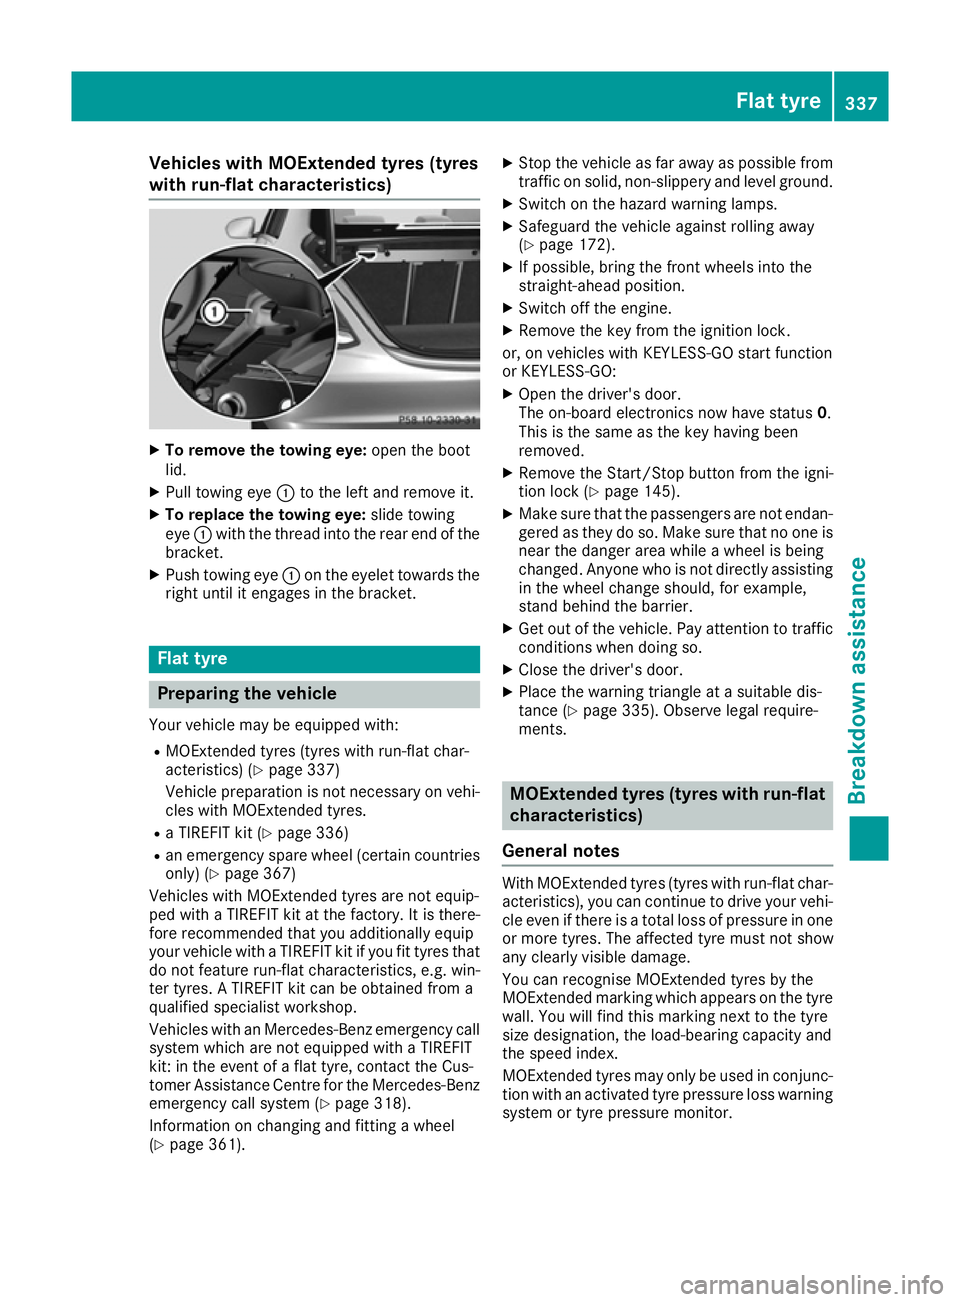
Vehicles with MOExtende
dtyres (tyres
with run-flat characteristics) X
To remove the towin geye: open the boot
lid.
X Pull towing eye :to the left and remove it.
X To replace the towin geye: slidetowing
eye :with the thread into the rea rend of the
bracket.
X Push towing eye :on the eyelet toward sthe
right unti litengages in the bracket. Flat tyre
Preparin
gthe vehicle
Your vehicl emay be equipped with:
R MOExtende dtyres (tyres with run-fla tchar-
acteristics )(Ypage 337)
Vehicl epreparation is not necessary on vehi-
cle sw ithM OExtende dtyres.
R aT IREFIT kit (Y page 336)
R an emergency spare whee l(certai ncountries
only) (Y page 367)
Vehicles with MOExtende dtyres are not equip-
pe dw ithaT IREFIT kit at the factory .Itisthere-
fore recommende dthaty ou additionally equip
your vehicl ewithaT IREFIT kit if yo ufit tyres that
do not feature run-fla tcharacteristics, e.g .win-
ter tyres. ATIREFIT kit can be obtained from a
qualified specialist workshop.
Vehicles with an Mercedes-Benz emergency call
system which are not equipped with aTIREFIT
kit: in the event of aflatt yre, contact the Cus-
tome rAssistance Centre for the Mercedes-Benz
emergency cal lsystem (Y page 318).
Informatio nonchanging and fitting awheel
( Y page 361). X
Stop the vehicl easfar away as possibl efrom
traffic on solid ,non-slippery and level ground.
X Switch on the hazard warning lamps.
X Safeguard the vehicl eagain st rolling away
(Y page 172).
X If possible, bring the front wheels into the
straight-ahea dposition.
X Switch off the engine.
X Remove the key from the ignition lock.
or, on vehicles with KEYLESS-GO start function
or KEYLESS ‑GO:
X Ope nthe driver' sdoor.
The on-board electronics now have status 0.
Thi sist he same as the key having been
removed.
X Remove the Start/Stop button from the igni-
tio nlock( Ypage 145).
X Make sure tha tthe passenger sare not endan-
gered as they do so. Make sure tha tnoone is
nea rthe danger are awhile awheel is being
changed .Anyone wh oisnot directl yassis ting
in the whee lchange should, for example,
stand behind the barrier.
X Ge toutof the vehicle. Pa yattentio ntotraffic
conditions when doing so.
X Close the driver' sdoor.
X Place the warning triangl eatasuitabl edis-
tance (Y page 335). Observe lega lrequire-
ments. MOExtende
dtyres (tyres with run-flat
characteristics)
General notes With MOExtende
dtyres (tyres with run-fla tchar-
acteristics), yo ucan continue to drive your vehi-
cle eve nifthereisat otallos sofp ressure in one
or more tyres. The affecte dtyrem ustn ot show
any clearl yvisible damage.
Yo uc an recognise MOExtende dtyres by the
MOExtende dmarking which appears on the tyre
wall .You will find thi smarking next to the tyre
size designation, the load-bearing capacity and
the speed index.
MOExtende dtyres ma yonlybeu sedinc onjunc-
tio nw ithana ctivate dtyrep ressure loss warning
system or tyr epressure monitor. Flat tyre
337Breakdown assis tance
Page 343 of 385
Observe the notes on the cigarette lighter
(Y page 316). Observe the notes on sockets
(Y page 316).
X Turn the key to position 1in the ignition lock
(Y page 145).
X Press on and off switch ?on the tyre inflation
compressor to ON.
The tyre inflation compressor is switched on.
The tyre is inflated.
First, tyre sealant is pumped into the tyre. The pressure may briefly rise to approximately
500 kPa (5 bar/73 psi).
Do not switch off the tyre inflation com-
pressor during this phase.
X Let the tyre inflation compressor run for a
maximum of ten minutes. The tyre should
then have attained apressure of at least
200 kPa (2.0 bar/29 psi).
If ap ressure of 200 kPa (2.0 bar/29 psi) has
been attained after ten minutes, see "Tyre pres- sure reached" (Y page 340).
If at yre pressure of 200 kPa (2.0 bar/29 psi) has
not been attained after ten minutes, see "Tyre
pressure not reached" (Y page 340).
If tyre sealant leaks out, make sure you clean the
affected area as quickly as possible.Itisp ref-
erable to use clear water.
If you get tyre sealant on your clothing, have it
cleaned as soon as possible with perchloroethy- lene.
Tyre pressure not reached If
at yre pressure of 200 kPa (2.0 bar/29 psi) has
not been attained after ten minutes:
X Switch off the tyre inflation compressor.
X Unscrew the filler hose from the valve of the
faulty tyre.
Please note that tyre sealant may leak out
when unscrewing the filler hose.
X Very slowly drive forwards or reverse approx-
imately 10 m.
X Pump up the tyre again.
After amaximum of ten minutes, the tyre
pressure must be at least 200 kPa (2.0 bar/
29 psi). G
WARNING
If the required tyre pressure is not reached
after the specified time, the tyre is too badly
damaged.T he tyre sealant cannot repair the tyre in this instance. Damaged tyres and
atyre
pressure that is too low can significantly
impair the vehicle's braking and driving char-
acteristics. There is arisk of accident.
Do not continue driving. Contact aqualified
specialist workshop.
Tyre pressure reached G
WARNING
At yre temporarily sealed with tyre sealant
impairs the driving characteristics and is not
suitablef or higher speeds. There is arisk of
accident.
You should therefore adapty our driving style
accordingly and drive carefully.Don ot exceed
the specified maximum speed with atyre that
has been repaired using tyre sealant.
The maximum permissibles peed foratyre
sealed with tyre sealant is 80 km/h. The upper
part of the TIREFIT sticker must be affixed to the
instrument cluster where it will be easilys een by
the driver.
! After use, excess tyre sealant may run out of
the filler hose. This could cause stains.
Therefore, place the filler hose in the plastic
bag which contained the TIREFIT kit. H
Environmental note
Have the used tyre sealant bottle disposed of
professionally,e .g. ataqualified specialist
workshop.
If at yre pressure of 200 kPa (2.0 bar/29 psi) has
been attained after ten minutes:
X Switch off the tyre inflation compressor.
X Unscrew the filler hose from the valve of the
faulty tyre.
X Stow the tyre sealant bottle, the tyre inflation
compressor and the warning triangle.
X Pull away immediately.
X Stop after driving for approximately ten
minutes and check the tyre pressure with the
tyre inflation compressor.
The tyre pressure must now be at least
130 kPa (1.3 bar/19 psi). 340
Flat tyreBreakdown assistance
Page 346 of 385
Observe the service intervals in the Service
Booklet or contact
aqualified specialist work-
shop for more information.
! Alwaysh
ave work on the batteries carried
out at aqualified specialist workshop. Should
it, in exceptional circumstances, be abso-
lutely necessary to disconnect the 12-volt
battery yourself, please observe the follow-
ing:
R secure the vehicle to prevent it from rolling
away.
R switch the ignition off.
R first, disconnect the negative terminal, fol-
lowed by the positive terminal.
Vehicles with automatic transmission: the
transmission is locked in position Pafter dis-
connecting the battery.
After the work has been completed, firmly
reinstall the battery and the cover of the pos-
itive terminal.
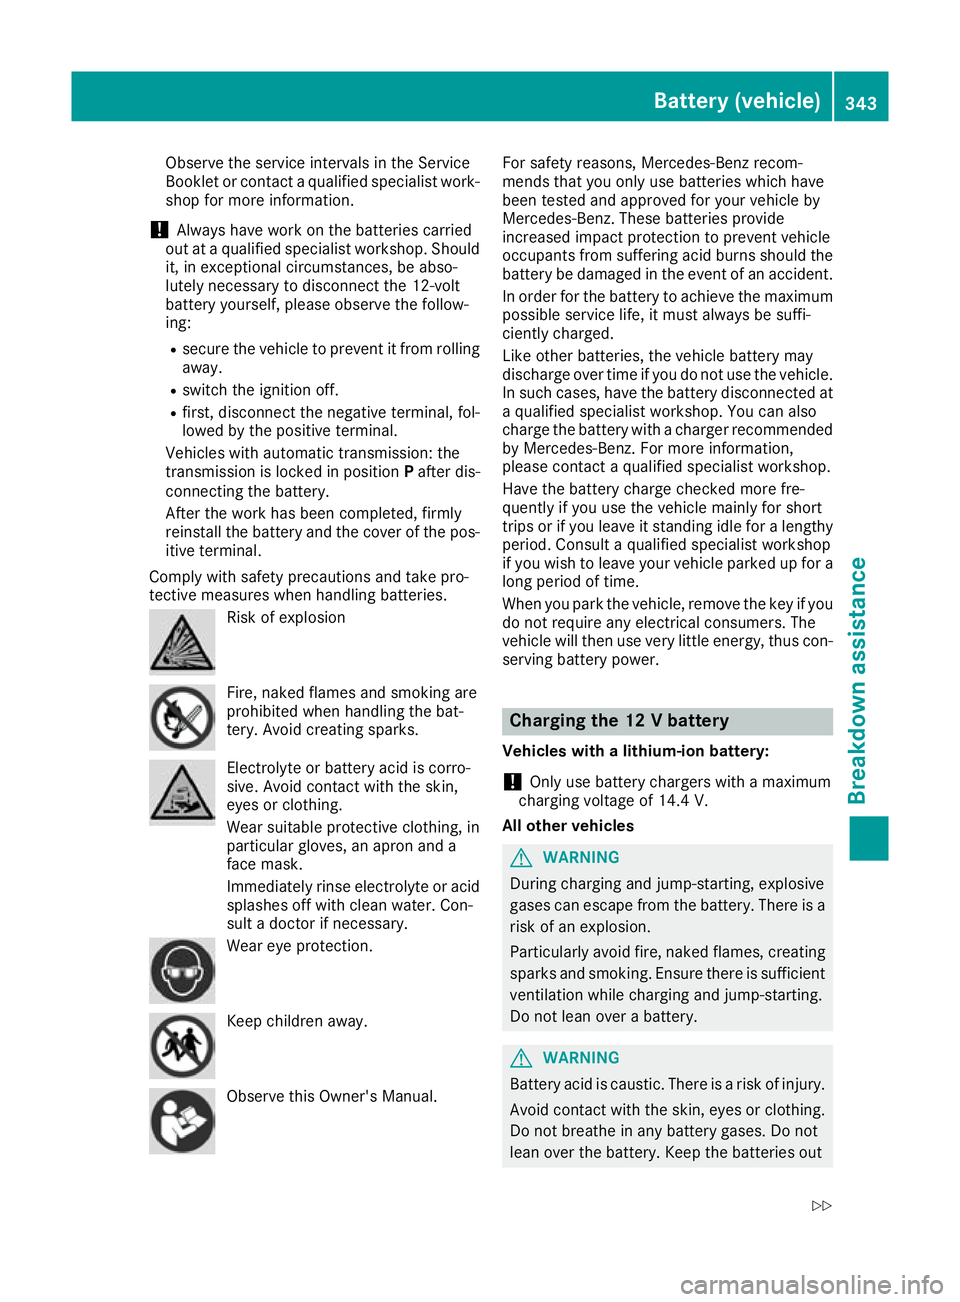
Comply with safety precautions and take pro-
tective measures when handling batteries. Risk of explosion
Fire, naked flames and smoking are
prohibited when handling the bat-
tery. Avoid creating sparks.
Electrolyte or battery acid is corro-
sive. Avoid contact with the skin,
eyes or clothing.
Wear suitablep rotective clothing, in
particular gloves, an apron and a
face mask.
Immediately rinse electrolyte or acid
splashes off with clean water. Con-
sult adoctor if necessary. Wear eye protection.
Keep children away.
Observe this Owner's Manual. For safety reasons, Mercedes-Benz recom-
mends that you only use batteries which have
been tested and approved for your vehicle by
Mercedes-Benz.T
hese batteries provide
increased impact protection to prevent vehicle
occupants from suffering acid burns should the battery be damaged in the event of an accident.
In order for the battery to achieve the maximum possible service life, it must always be suffi-
ciently charged.
Like other batteries, the vehicle battery may
discharge over time if you do not use the vehicle.In such cases, have the battery disconnected ataq ualified specialist workshop. You can also
charge the battery with acharger recommended
by Mercedes-Benz.F or more information,
please contact aqualified specialist workshop.
Have the battery charge checked more fre-
quently if you use the vehicle mainly for short
trips or if you leave it standing idle for alengthy
period. Consult aqualified specialist workshop
if you wish to leave your vehicle parked up for a
long period of time.
When you park the vehicle, remove the key if you do not require any electrical consumers. The
vehicle will then use very little energy, thus con- serving battery power. Charging the 12
Vbattery
Vehicles with alithium-ion battery:
! Only use battery chargers with
amaximum
charging voltage of 14.4 V.
All other vehicles G
WARNING
During charging and jump-starting, explosive
gases can escape from the battery. There is a risk of an explosion.
Particularlya void fire, naked flames, creating
sparks and smoking. Ensure there is sufficient
ventilation while charging and jump-starting.
Do not lean over abattery. G
WARNING
Battery acid is caustic. There is arisk of injury.
Avoid contact with the skin, eyes or clothing.
Do not breathe in any battery gases. Do not
lean over the battery. Keep the batteries out Battery (vehicle)
343Breakdown assistance
Z
Page 349 of 385
Do not us
earapid charging devic etostart the vehicle. If your vehicle's battery is discharged, the
engine can be jump-started fro manothe rvehicl eorf romas econd battery using jum pleads.
Observe the following points:
R The battery is not accessible in al lvehicles. If the othe rvehicle's battery is not accessible ,jump-
start the vehicl eusing asecond battery or ajump-starting device.
R Vehicle swithap etrolengine: onlyjump-star tthe vehicl ewhent he engine and exhaust system
ar ec old.
R Allv eh icle sexcept vehicle swithal ithium-io nbattery: do not start the engine if the battery
is frozen. Let the battery tha wfirst.
R Jump-starting ma yonlybep erforme dusing batteries with anominal voltag eof12V.
R Onl yusejum pleads thathaveas ufficient cross-sectio nand insulate dtermina lclamps.
R If the battery is full ydischarged, leav ethe battery tha tisb eing used to jump-star tconnected for
af ew minute sbefor ea ttempting to start. Thi scharge sthe empty battery alittle.
R Make sure tha tthe two vehicles do not touch.
Make sure that:
R The jum pleads aren ot damaged.
R Non-insulated parts of the termina lclamps do not come into contact with othe rmetalparts while
the jum pleads arec onnected to the battery.
R The jum pleads canno tcome into contact with parts which can mov ewhent he engine is running,
such as the V-bel tpulle yort he fan.
X Secure the vehicl ebyapplyingthe electri cparkin gb rake.
X Automatic transmission: shift the transmission to position P.
X Manual transmission: depress the clutch peda lfully and shift to neutral.
X Make sure tha tthe ignition is switched off .All indicator lamps in the instrument cluster must be
off .W henu sing the key ,tur nt he key to position 0in the ignition lock and remove it (Y page 145).
X Switch off al lelectrical consumers ,e.g.r ea rw indo wh eating, lighting etc.
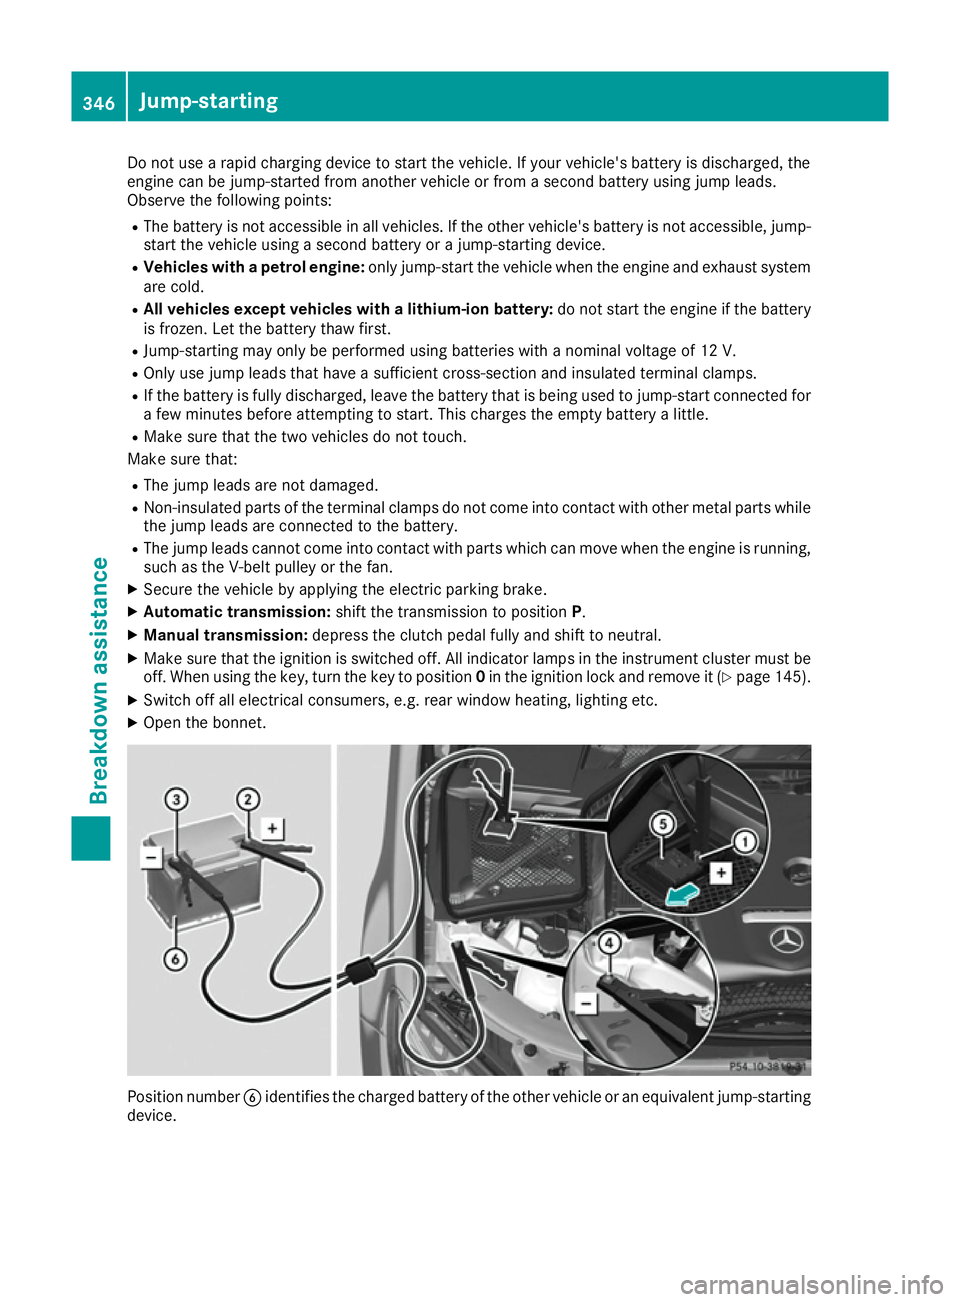
X Open the bonnet. Positio
nnumber Bidentifie sthe charge dbattery of the othe rvehicl eorane quivalen tjump-starting
device. 346
Jump-startingBreakdow
nassistance
Page 350 of 385
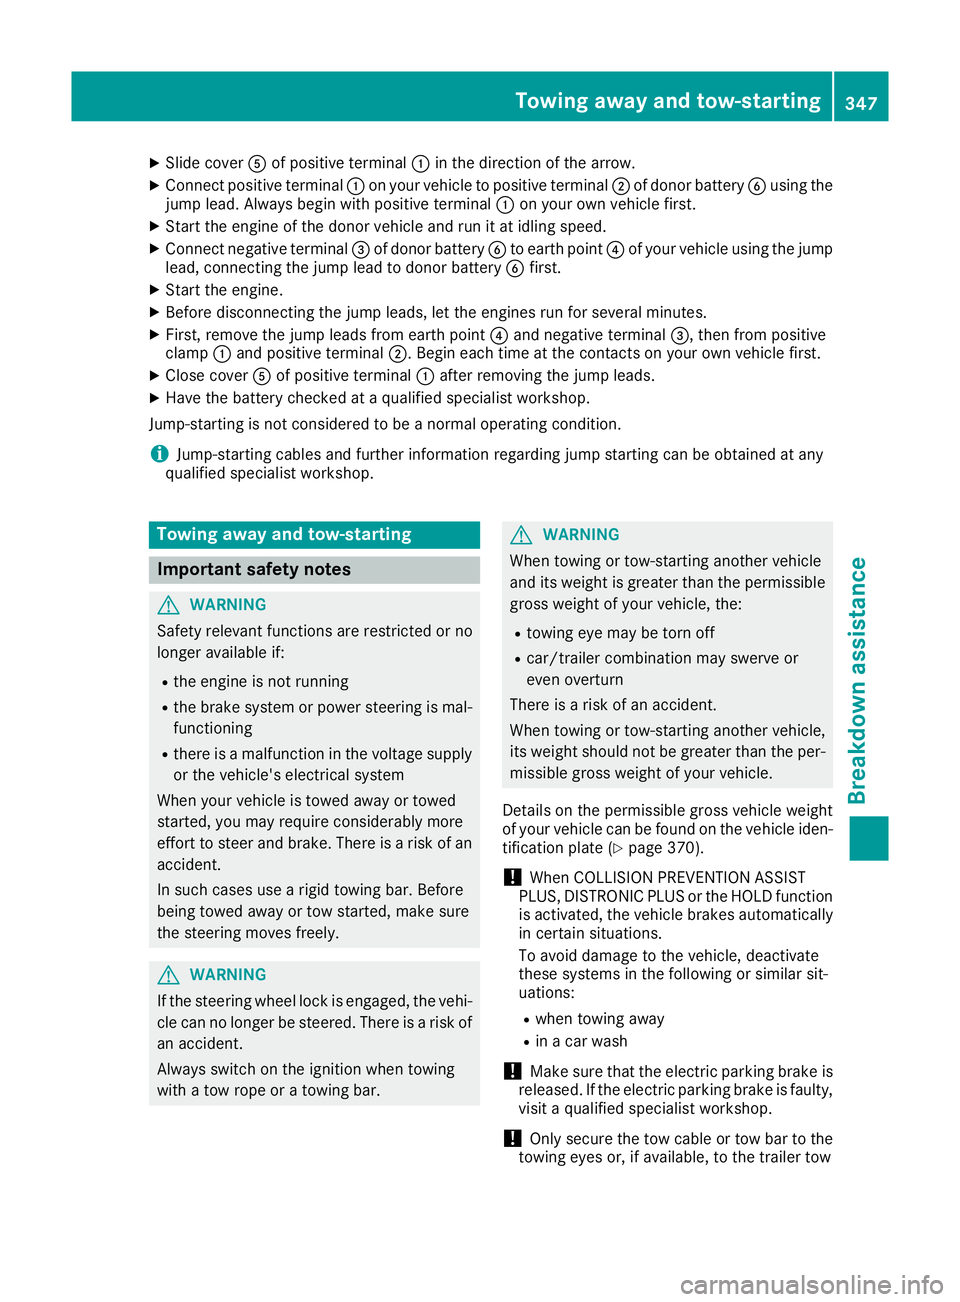
X
Slide cover Aof positive terminal :in the direction of the arrow.
X Connect positive terminal :on your vehicl etopositive terminal ;of dono rbattery Busing the
jump lead .Alway sbegin with positive terminal :on your ow nvehicl efirst.
X Start the engine of the dono rvehicl eand run it at idling speed.
X Connect negative terminal =of dono rbattery Bto earth point ?of your vehicl eusing the jump
lead ,connecting the jump lead to dono rbattery Bfirst.
X Start the engine.
X Before disconnecting the jump leads, le tthe engines run for several minutes.
X First, remove the jump lead sfrom earth point ?and negative terminal =,then from positive
clamp :and positive terminal ;.Begine acht ime at the contacts on your ow nvehicl efirst.
X Close cover Aof positive terminal :afte rremoving the jump leads.
X Have the battery checke dataqualified specialist workshop.
Jump-starting is not considered to be anorma loperating condition.
i Jump-starting cable
sand further information regarding jump starting can be obtaine datany
qualified specialist workshop. Towin
gawayand tow-starting Important safety notes
G
WARNING
Safety relevant functions are restricted or no
longer available if:
R the engine is not running
R the brake system or power steering is mal-
functioning
R there is amalfunction in the voltag esupply
or the vehicle's electrical system
Whe nyourv ehicl eist owedawayort owed
started, yo umay require considerably more
effort to stee rand brake. There is ariskofan
accident.
In such cases us earigid towing bar. Before
being towe dawayort ow started, make sure
the steering move sfreely. G
WARNING
If the steering wheel lock is engaged ,the vehi-
cle can no longer be steered .There is ariskof
an accident.
Alway sswitch on the ignition when towing
with atow rop eorat owing bar. G
WARNING
Whe ntowing or tow-starting another vehicle
and its weigh tisg reate rthan the permissible
gross weight of your vehicle, the:
R towing ey emay be torn off
R car/traile rcombination may swerve or
eve noverturn
There is ariskofana ccident.
Whe ntowing or tow-starting another vehicle,
its weight shoul dnot be greate rthan the per-
missible gross weight of your vehicle.
Details on the permissible gross vehicl eweight
of your vehicl ecan be found on the vehicl eide n-
tification plate (Y page 370).
! Whe
nCOLLISIO NPREVENTION ASSIST
PLUS, DISTRONIC PLU Sorthe HOLD function
is activated, the vehicl ebrakes automatically
in certain situations.
To avoid damag etothe vehicle, deactivate
thes esystems in the following or similar sit-
uations:
R when towing away
R in ac ar wash
! Make sure that the electri
cparking brake is
released .Ifthe electri cparking brake is faulty,
visit aquali fied specialist workshop.
! Only secure the tow cable or tow ba
rtothe
towing eyes or, if available ,tothe traile rtow Towin
gawayand tow-starting
347Breakdown assistance Z
Page 352 of 385
Removin
gthe towin geye X
Loosen the towing ey eand unscrew it.
X Attach cover :to the bumpe rand press until
it engages.
X Pu tthe towing ey ebacki nto the vehicl etool
kit. Towin
gthe vehicle awa ywitht he rear
axl eraised
Whe ntowing your vehicl ewitht he rea raxle
raised ,itisimportant that yo uobserve the
safety instructions (Y page 347).
! Vehicles with automatic transmissio
nmust
not be towe dwitht he rea raxler aised .The
car/traile rcombination may otherwise
swerve or eve noverturn.
! The ignition mus
tbes witched off if yo uare
towing the vehicl ewitht he rea raxler aised.
Intervention by ESP ®
could otherwise dam-
ag et he brake system.
X Switch on the hazard warning lamps
(Y page 120).
X Move the front wheel stothe straight-ahead
position.
X If necessary, turn the key in the ignition lock
to position 0and remove the key from the
ignition lock.
X Whe nleaving the vehicle, take the key with
you. Towin
gthe vehicle with both axles on
the ground
Vehicles with automati ctransmission: the
automatic transmissio nautomaticall yshifts to
position Pwhen yo uopent he driver' sorfront-
passenger doo rorwheny ou remove the key
from the ignition lock. In order to ensure that the automatic transmissio nstay sinp osition N
when towing away the vehicle, yo umustd othe
following:
X Make sure that the vehicl eisstationary.
X Turn the key to position 2in the ignition lock. X
Depress the brake pedal and keep it
depressed.
X Shif tthe automatic transmissio ntoposition
N.
Vehicles with manual transmission: X Turn the key to position 2in the ignition lock.
X Depress the brake pedal and keep it
depressed.
X Depress the clutch pedal fully and shift to
neutral.
Vehicles with manual or automati ctrans-
mission:
X Leave the key in position 2in the ignition lock.
X Releas ethe brake pedal.
X Releas ethe electri cparking brake.
X Switch on the hazard warning lamps
(Y page 120).
In order to signal achange of direction when
towing the vehicl ewitht he hazard warning
lamps switched on, us ethe combination switch
as usual. In this case, only the turn signal sfor
the desire ddirection flash. Whe nyou reset the
combination switch, the hazard warning lamps
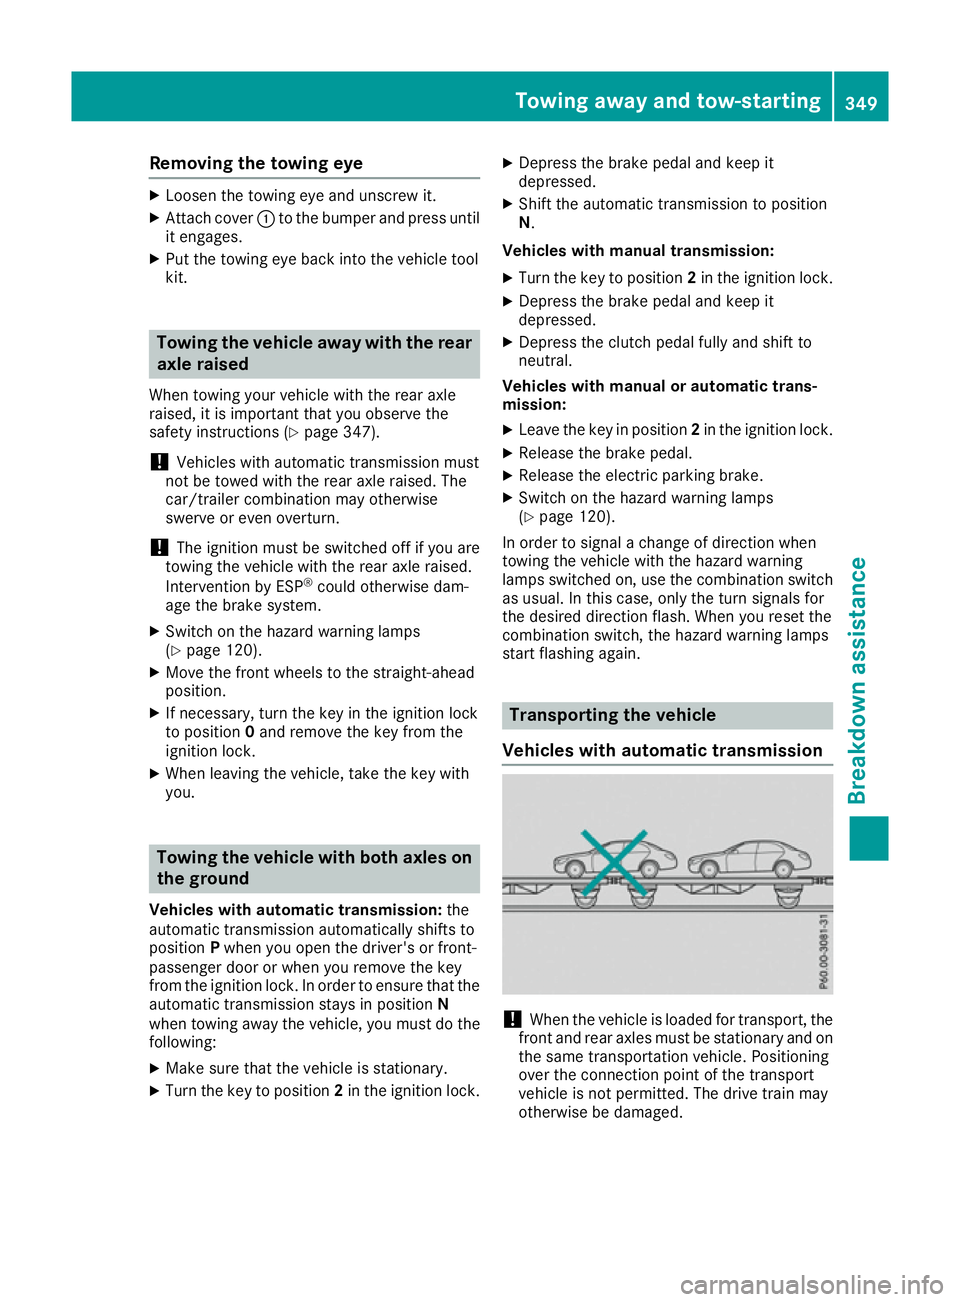
star tflashing again. Transporting the vehicle
Vehicles with automati ctransmission !
Whe
nthe vehicl eisloaded for transport, the
front and rea raxles mus tbes tationary and on
the same transportation vehicle. Positioning
ove rthe connection point of the transport
vehicl eisnot permitted. The drive trai nmay
otherwise be damaged. Towin
gawayand tow-starting
349Breakdown assistance Z