display MERCEDES-BENZ C-CLASS COUPE 2015 Owners Manual
[x] Cancel search | Manufacturer: MERCEDES-BENZ, Model Year: 2015, Model line: C-CLASS COUPE, Model: MERCEDES-BENZ C-CLASS COUPE 2015Pages: 385, PDF Size: 13.12 MB
Page 300 of 385
Adjusting th
evolume X
Turn th ethumbwheel on th eright of th econ-
troller.
The volume is adjusted:
R for th ecurrentl yselected media source
R during traffic or navigation announcements
R in hands-free mod eduring aphone call
Switchin gthe soun don/off This function is no
tavailable for Mercedes-AMG
vehicles wit hselectable AM GPerformance
exhaust system.
X Press th ethumbwheel to th eright of th econ-
troller.
If th eaudio output is switched off ,the status
lin ew ill sho wthe 8 symbol. If you switch
th em edia source or set th evolume, th esound
is automatically switched on.
i Navigation message
swill be hear devenif
th es oun dism uted.
Functions The multimedia system has th
efollowin gfunc-
tions:
R radi omode
R media mod ewithm edia search
R soun dsystems
R navigation system
COMAND Online: navigation via th ehardd rive
Audio 20 :navigation via SD card
R communication functions
R vehicl efunction swiths ystem settings
R favourite sfunctions
Controller The controller in th
ecentre console let syou:
R select men uitems on th edisplay
R ente rcharacters
R select adestination on th emap
R sav eentries
The controller can be:
R turned 3
R slid lef torright1
R slid forward sorback4 R
slid diagonally 2
R presse dbriefl yorp ressedand held 7
Back button You can use the
%buttontoe xitam enuorto
call up th ebasic display of th ecurren toperating
mode.
X To exit th emenu: brieflypress the %
button.
The multimedia system changes to th enext
higher men ulevel in th ecurren toperating
mode.
X To call up th ebasic display: press the%
butto nfor longer than two seconds.
The multimedia system changes to th ebasic
display of th ecurren toperating mode. Touchpad
Switchin gthe touchpad on/off Multimedia system:
X Select Vehicle
VehicleQSy stem set‐
System set‐
tings tingsQ Activate touchpad
Activate touchpad.
The touchpad is activated Oor deactivated
ª.
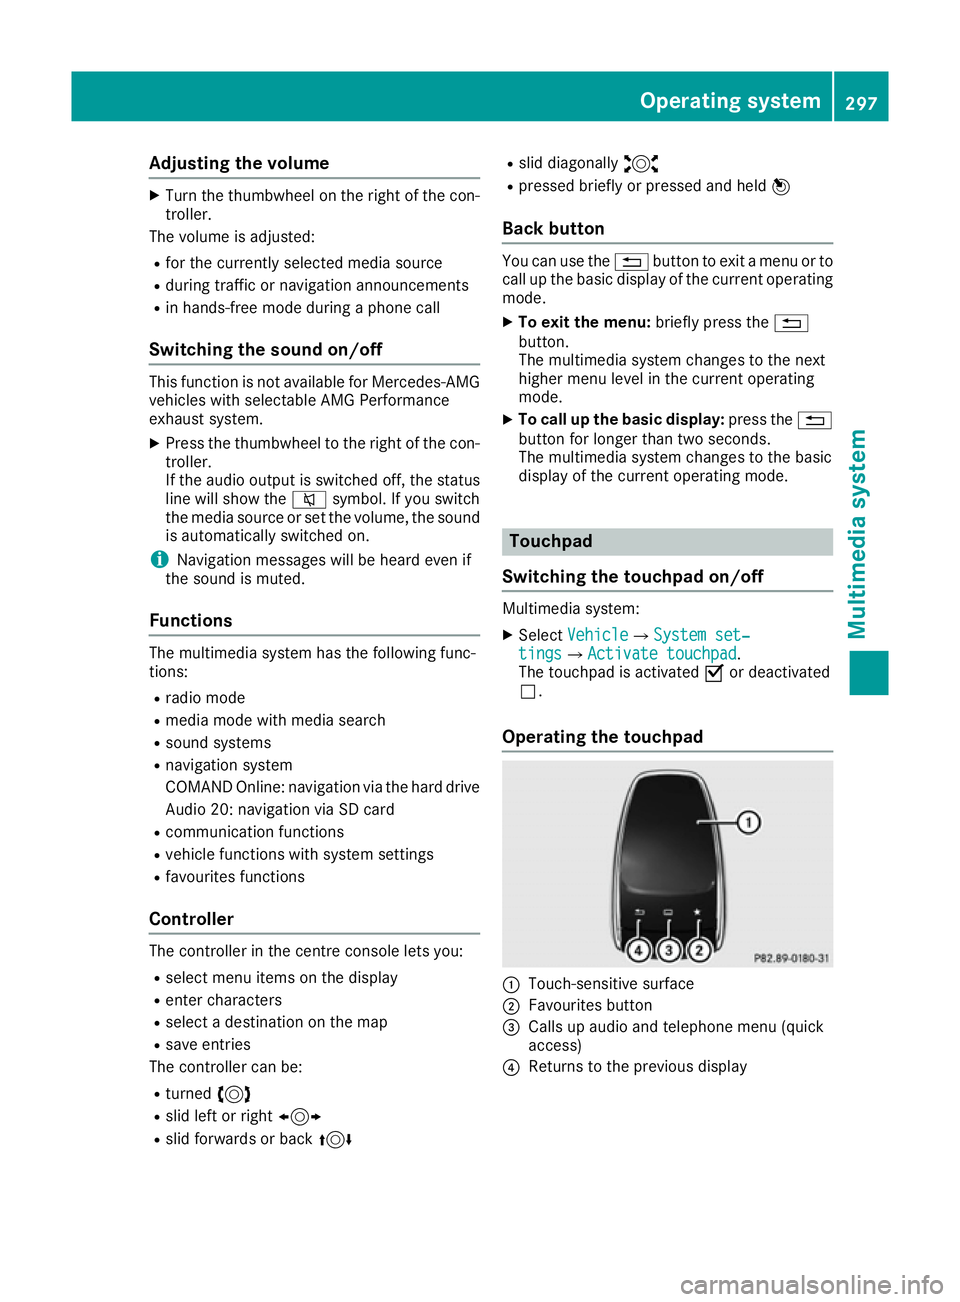
Operating th etouchpad :
Touch-sensitive surface
; Favourite sbutton
= Calls up audio and telephon emenu( quick
access)
? Return stotheprevious display Operating system
297Multimedia system Z
Page 301 of 385
You can navigate in menus and lists via touch-
sensitiv esurface :by using asingle finger
swiping gesture .
X To select th emenu item: swipe up, down, to
the left or right.
X Press the touchpad.
X To move th edigital map: swipe in all direc-
tions.
Use atwo-finger swiping gesture ,e.g. to use
these functions:
X To show or hide th eaudio menu: swipe up
or down with two fingers.
X To increase or reduce th
evehicle settings
and sound settings: turn two fingers clock-
wise or anti-clockwise.
X To zoom in and out of th emap:move two
fingers together or apart.
Character inpu twith handwriting rec-
ognition Entering characters
X Use one finger to write characters on the sur-
face.
The character is entered in the input line. If
the character that you have entered can be
interpreted in differen tways, the suggested
characters are displayed.
X If character suggestions are shown ,turn and
press the controller.
X Resume character input on the touchpad.
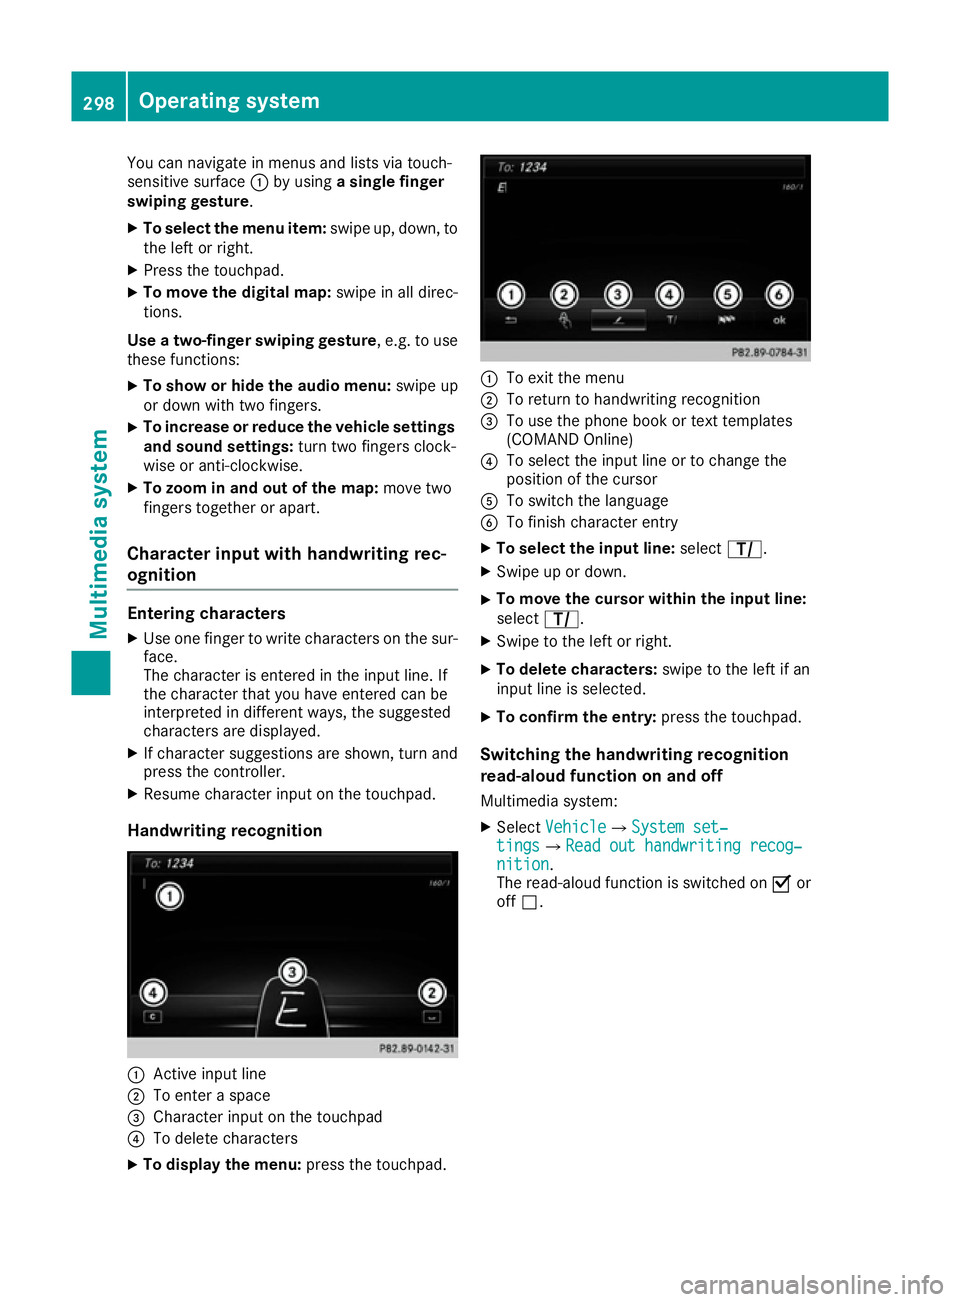
Handwriting recognition :
Activ einput line
; To enter aspace
= Character input on the touchpad
? To delete characters
X To display th emenu: press the touchpad. :
To exit the menu
; To return to handwritin grecognition
= To use the phon ebook or tex ttemplates
(COMAN DOnline)
? To selec tthe input line or to change the
position of the cursor
A To switc hthe language
B To finish character entry
X To select th einpu tline: select p.
X Swipe up or down.
X To move th
ecursor within th einpu tline:
select p.
X Swipe to the left or right.
X To delet echaracters: swipe to the left if an
input line is selected.
X To confirm th eentry: press the touchpad.
Switchin gthe handwriting recognition
read-aloud function on and off
Multimedia system:
X Select Vehicle VehicleQ System set‐ System set‐
tings
tingsQRead out handwriting recog‐ Read out handwriting recog‐
nition
nition.
The read-aloud function is switched on Oor
off ª. 298
Operating systemMultimedia system
Page 302 of 385
Quick access for audio
Changing the station/music track
Dependin
gonthe audio source that is currently
activated, you can use this function to select the next station or music track.
X Swipe upwards with two fingers on the touch-
pad.
The curren taudio source is displayed.
X To select the previous or next station/
music track:
swipe to the left or right.
The selected station/music trac kisplayed.
Switching the character entry between
touchpad and controller Prerequisite: an input line for text, numbers or
characters has been selected.
X To switch to the controller: press the con-
troller.
Character entry using the controller is active.
X To switch to the touchpad: press the touch-
pad with your finger.
Handwriting recognition on the touchpad is
active. Favourites
Calling up and exiting favourites X
To call up: press theòbutton on the con-
troller or on the touchpad.
X Select afavourite, e. g. Vehicle
Vehicle.
The favourites are displayed.
X To exit: press the òbutton again. Adding favourites Adding
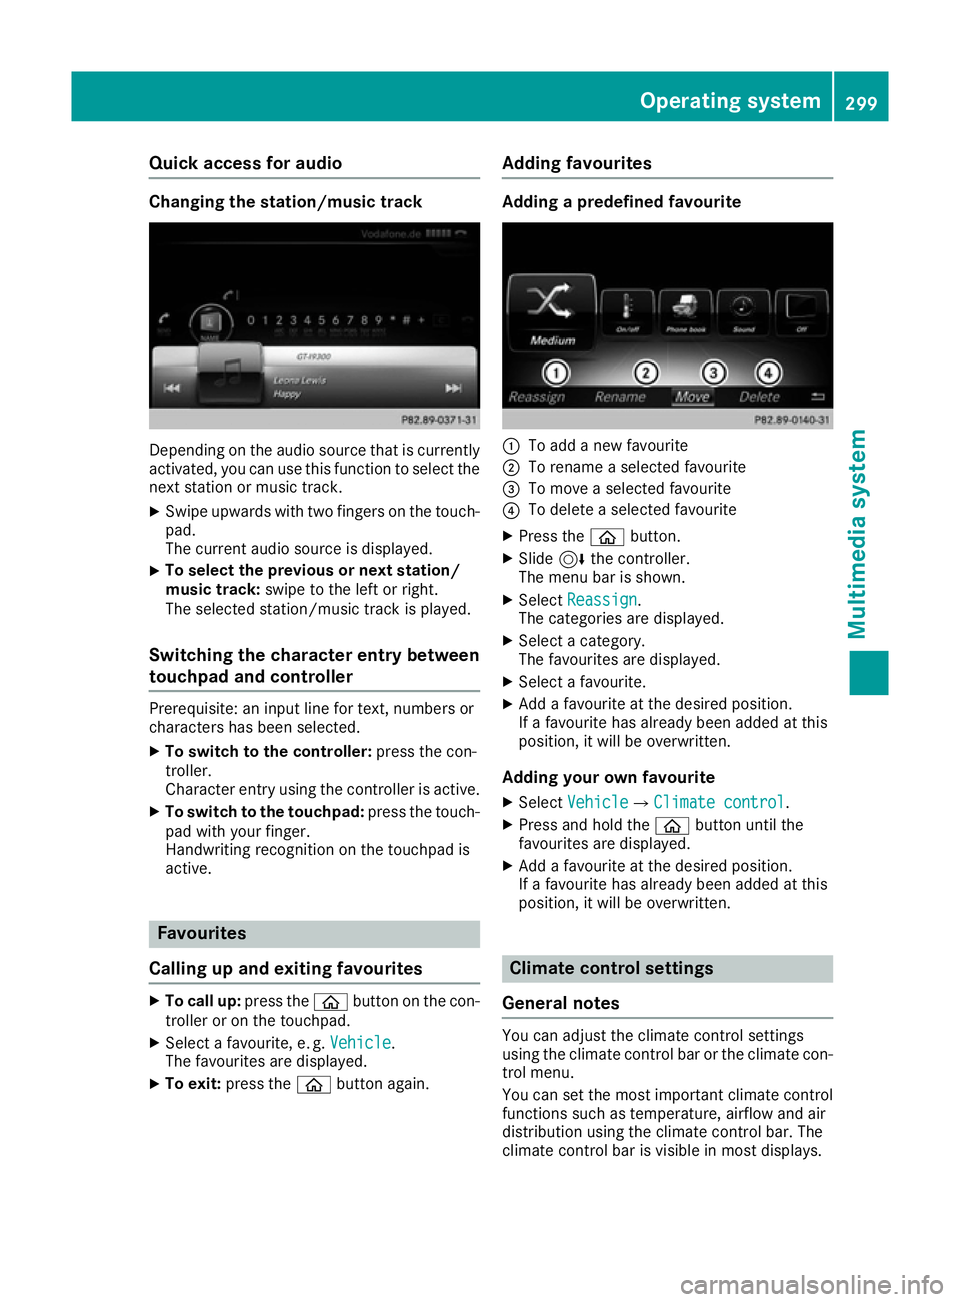
apredefined favourite :
To add anew favourite
; To rename aselected favourite
= To move aselected favourite
? To delete aselected favourite
X Press the òbutton.
X Slide 6the controller.
The menu bar is shown.
X Select Reassign Reassign .
The categories are displayed.
X Select acategory.
The favourites are displayed.
X Select afavourite.
X Add afavourite at the desired position.
If af avourite has already been added at this
position, it will be overwritten.
Adding your own favourite
X Select Vehicle
VehicleQ Climate control
Climate control.
X Press and hold the òbutton until the
favourites are displayed.
X Add afavourite at the desired position.
If af avourite has already been added at this
position, it will be overwritten. Climate control settings
General notes You can adjust the climate control settings
using the climate control bar or the climate con-
trol menu.
You can set the most importan tclimate control
functions such as temperature, airflow and air
distribution using the climate control bar. The
climate control bar is visible in most displays. Operating system
299Multimedia system Z
Page 303 of 385
You can fin
dall available climat econtrol func-
tion sint he climat econtrol menu. You can use
the climat econtrol bar to switc htothe climate
control menu.
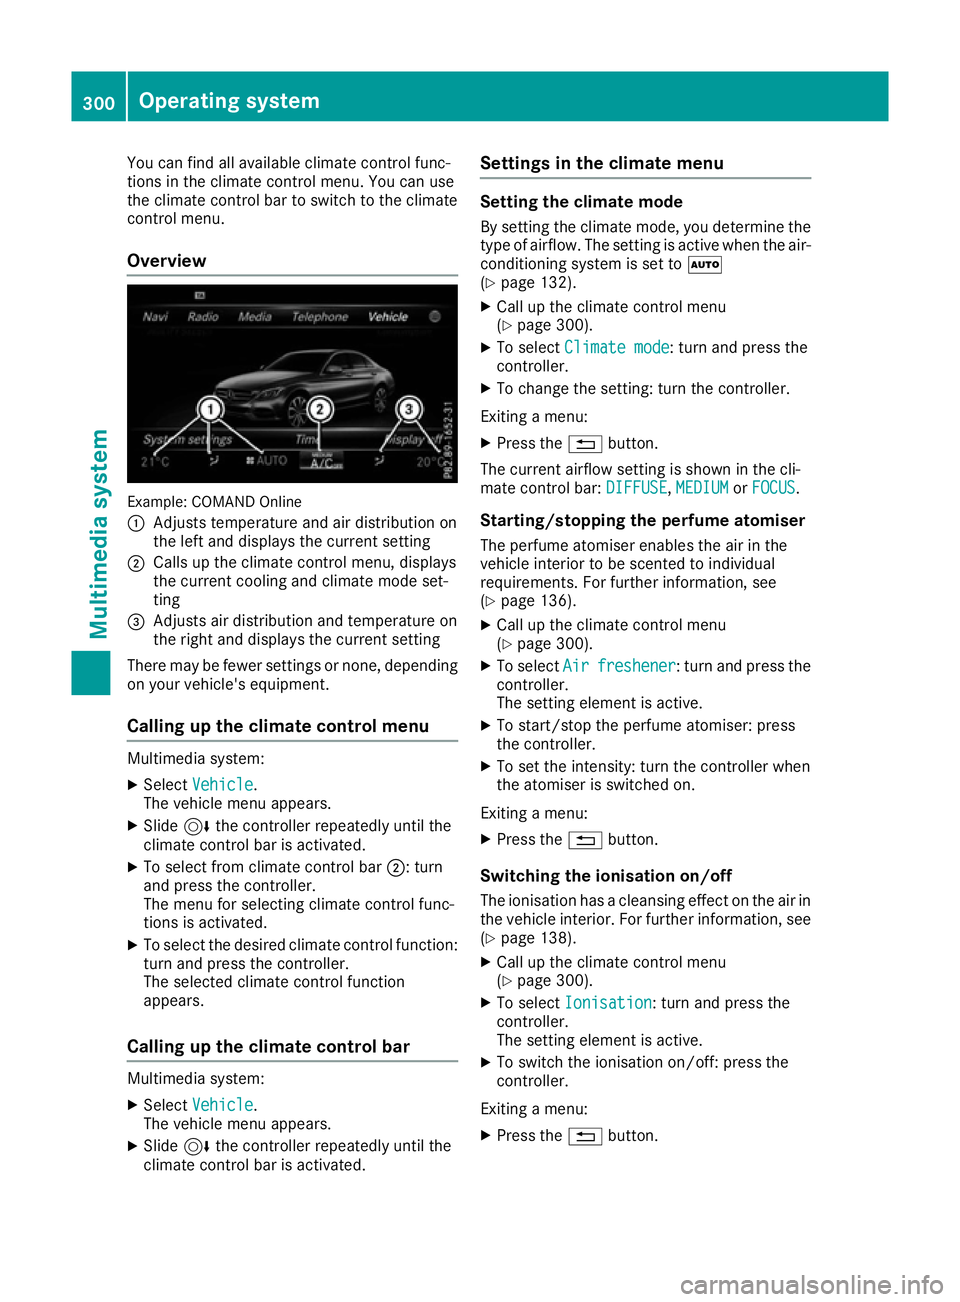
Overview Example: COMAN
DOnline
: Adjusts temperature and air distribution on
the left and displays the current setting
; Calls up the climat econtrol menu, displays
the current coolin gand climat emode set-
ting
= Adjusts air distribution and temperature on
the right and displays the current setting
There may be fewer settings or none, depending
on your vehicle's equipment.
Calling up th eclimate control menu Multimedia system:
X Select Vehicle
Vehicle.
The vehicle men uappears.
X Slide 6the controller repeatedly until the
climat econtrol bar is activated.
X To select from climat econtrol bar ;:turn
and press the controller.
The men ufor selecting climat econtrol func-
tion sisa ctivated.
X To select the desired climat econtrol function:
turn and press the controller.
The selected climat econtrol function
appears.
Calling up th eclimate control bar Multimedia system:
X Select Vehicle Vehicle.
The vehicle men uappears.
X Slide 6the controller repeatedly until the
climat econtrol bar is activated. Settings in th
eclimate menu Setting th
eclimate mode
By settin gthe climat emode, you determine the
type of airflow. The settin gisactive when the air-
conditioning syste misset toÃ
(Y page 132).
X Call up the climat econtrol menu
(Y page 300).
X To select Climate mode
Climate mode :turn and press the
controller.
X To change the setting: turn the controller.
Exitin gam enu:
X Press the %button.
The current airflow settin gisshown in the cli-
mate control bar: DIFFUSE
DIFFUSE,MEDIUM
MEDIUMorFOCUS
FOCUS.
Starting/stopping th eperfum eatomiser
The perfum eatomiser enables the air in the
vehicle interior to be scented to individual
requirements. For further information, see
(Y page 136).
X Call up the climat econtrol menu
(Y page 300).
X To select Air
Air freshener freshener:t urn and press the
controller.
The settin gelemen tisactive.
X To start/sto pthe perfum eatomiser: press
the controller.
X To set the intensity: turn the controller when
the atomiser is switched on.
Exitin gam enu:
X Press the %button.
Switchin gthe ionisation on/off
The ionisation has acleansing effect on the air in
the vehicle interior .For further information, see
(Y page 138).
X Call up the climat econtrol menu
(Y page 300).
X To select Ionisation
Ionisation:t urn and press the
controller.
The settin gelemen tisactive.
X To switc hthe ionisation on/off: press the
controller.
Exitin gam enu:
X Press the %button. 300
Operating systemMultimedia system
Page 304 of 385
Settings in the bottom bar of the cli-
matec ontrol menu Activating/deactivating cooling with air
dehumidification
X Call up the climate control menu
(Y page 300).
X Slide 6the controller repeatedly until the
bottom bar is activated.
X To select O
O A/C
A/C:t urn and press the control-
ler.
X Switch cooling with air dehumidification on
O or off ª.
i The current status of the cooling function is
displayed in the climate control bar: A/C ON
–a ctivated, A/C OFF –deactivated.
i Deactivating the cooling with air dehumidi-
fication function reduces fuel consumption.
Synchronising the climate control set-
tings Use O
O Sync. Sync. (synchronisation )toselect the
climate control settingf or all zones togetherO
or separately ª.
X Call up the climate control menu
(Y page 300).
X Slide 6the controller repeatedly until the
bottom bar is activated.
X To select O
O Sync. Sync.:t urn and press the con-
troller.
X Switch the synchronisation function on Oor
off ª.
For further information on synchronising cli-
mate control settings, see (Y page 133).Navigation mode
Important safety notes G
WARNING
Operating the integrated information systems and communications equipment in the vehicle
while driving will distract you from traffic con-
ditions. You could then lose control of the
vehicle. There is arisk of an accident.
Only operate these devices if road traffic con-
ditions permit. If you are unsure about the surrounding conditions, pull over to
asafe
location and make entries only while the vehi- cle is stationary.
You must observe the legal requirements for the countryinw hich you are currently driving when
operating the navigation system.
General notes Correct functioning of the navigation system
depends, amongst other things, on GPS recep-
tion. In certain situations, GPS reception may be
impaired, there may be interference or there
may be no reception at all, e.g. in tunnels or
multi-storey car parks.
Audio 20 is equippedw ith Garmin®
MAP PILOT
(see the manufacturer's operating instructions).
The Garmin ®
MAP PILOT operating instructions
are stored on the SD memory card as aPDF file.
The SD card box contains aquick guide.
The following descriptions apply to navigation
with COMAND Online. Further information can
be found in the Digital Owner's Manual.
Selecting aroute type and route options Multimedia system:
X Select Navi NaviQNavigation Navigation.
The map displayst he current vehicle position.
X Slide 6the controller.
X Select Options
OptionsQRoute settings Route settings.
Notes for route types:
R Eco route
Eco route
R Dynamic route
Dynamic route
Traffic reports on the route for the route guid-
ance are taken into account.
R Calculate alternative routes Calculate alternative routes
Differen troutes are being calculated. Instead
of Start Start select the Continue Continue menu item.
Notes for route options:
R Use toll roads
Use toll roads
The route calculation includes roads which
require you to pay ausage fee (toll).
R Use vignette roads
Use vignette roads (not available in all
countries)
The route calculation includes roads which
require you to pay atime-based fee (vignette).
Av ignett eallowst emporary use of the route
network,e .g.10d ays or 1year. Operating system
301Multimedia system Z
Page 305 of 385
Enterin
ganaddress Multimedia system:
X Select Navi
NaviQNa vigation
Navigation.
The map displays th ecurren tvehicle position.
X Slide 6thec ontroller.
X Select Destination
DestinationQ Addressentry
Addres sentry.
Ente rana ddress, e.g .asfollows:
R town or postcode, street ,house number
R country, town or postcode
R town or postcode, centre
R street ,tow norp ostcode, junction
X Select Town
Town.
The town in whic hthe vehicle is currently
locate d(curren tvehicle position )isatthetop.
Below this, you will see locations for which
rout eguidance has alread ybeen carried out.
X Ente rthe town.
The Gsymbol: th elocatio niscontained on
th ed igital map multiple times.
X To switch to th elist: slide 5thec ontrol-
ler.
X Select th elocation.
If available, th epostcod eisshown. If there
are differen tpostcodes availabl efor th eloca-
tion, th ecorrespondin gdigitsare displayed
with an X
X.
X Ente rthe street and house number.
The address is in th emenu.
Further options for destination entry:
R search for akeyword
The keyword search finds destination susing
fragment sofwords.
R selec tthe last destination
R selec tacontact
R selec taPOI
You can search for aPOI by location, nam eor
telephone number.
R selec tadestination on th emap
R enter an intermediat edestination
You can map th erout etot hedestination
yourself with up to four intermediat edestina-
tions.
R selec tatravel guide destination (only availa-
ble for selecte dEuropean countries)
R selec tdestination sfromM ercedes-Benz
Apps
R selec tgeo-coordinates Calculating th
eroute Prerequisite: th
eaddress has been entered and
is in th emenu.
X Select Start
StartorContinue
Continue.
The rout eiscalculate dwith th eselecte droute
type and th eselecte drout eoptions.
If rout eguidance has alread ybeen activated,
ap rompt will appear asking whether you wish
to end th ecurren trout eguidance.
X Select Yes
YesorSet as intermediate des‐
Set as intermediate des‐
tination
tination.
Yes Yes cancel sthe curren trout eguidance and
start srout ecalculation to th enew destina-
tion.
Set as intermediate destination Set as intermediate destination adds
th en ew destination in addition to th eexisting
destination and open sthe intermediat edes-
tinations list. Connecting th
emobile phone
Requirements For telephony via th
eBluetooth ®
interface, you
require aBluetooth ®
-capable mobile phone. The
mobile phon emust support Hands-Free Profile
1. 0ora bove.
Multimedia system:
X Select Vehicle
VehicleQSy stem set‐
System set‐
tings
tingsQ Activate Bluetooth
Activate Bluetooth .
X Activate Bluetooth ®
O.
Mobil ephone:
X Activate Bluetooth ®
and, if necessary, Blue-
tooth ®
visibilit yfor other devices (see the
manufacturer' soperatin ginstructions).
The Bluetooth ®
device names for all of on eman-
ufacturer' sproduct smightbei dentical. To
mak eitp ossible to clearly identif yyour mobile
phone, chang ethe device nam e(see th eman-
ufacturer' soperatin ginstructions).
If th emobile phon esupport sthe PBA P(Phone
Book Access Profile) and MA P(Message
Acc ess Profile) Bluetooth ®
profiles ,the follow-
ing informatio nwill be transmitte dafter you
connect:
R phon ebook
R call lists
R messages 302
Operating systemMultimedia system
Page 306 of 385
i
Furthe
rinformation on suitabl emobile
phones can be obtained on the Internet at:
http://www.mercedes-benz.com/
connect
Searching for and authorisin gamobile
phone Befor
eusing your mobile phone with the multi-
media system for the firs ttime, yo uwilln eed to
search for the phone and then authorise (con-
nect) it. Depending on the mobile phone, author- isation takes place by means of Secure Simple
Pairing or by entering apasskey .The multimedia
system automaticall ymake sthe procedure that
is relevant for your mobile phone available. The
mobile phone is always connected automati-
cally afte rauthorisation. Furthe rinformation on
using amobile phone with the multimedia sys-
tem (se ethe Digital Owner's Manual).
If the multimedia system doe snot detect your
mobile phone, this may be du etoparticular
security setting sonyourm obile phone (se ethe
manufacturer's operating instructions).
Only one mobile phone can be connected to the
multimedia system at any one time.
Searching for amobile phone
Audio 20:
X Select Tel/
Tel/ ®QConnect Connect
device deviceQSe archfor phones
Search for phonesQSt art
Start
search
search.
The available mobile phones are displayed.
COMAND Online:
X Select Telephone TelephoneQConnect Connect
device
deviceQSe archfor phones
Search for phonesQSt art
Start
search
search.
The available mobile phones are displayed.
Symbols in the device list Sym-
bol Explanation
Ï
New mobile phone found, not yet
authorised. Ñ
Mobil
ephone is authorised ,but is
not connected. #
Mobil
ephone is authorised and
connected. Connecting the mobile phone Authorisation using Secure Simple Pairing:
X Select the mobile phone.
Ac ode is displaye dinthe multimedia system
and on the mobile phone.
X If the codes match: selectYes Yeson the mul-
timedia system.
X Confirm the code on the mobile phone.
Depending on the mobile phone used, con-
firm the connectio ntothe multimedia system
and for the PBAP and MAP Bluetooth ®
pro-
files. The prompt to confir mmay take up to
two minutes to be displaye d(seet he manu-
facturer's operating instructions).
X If the codes are different: selectNo
No on the
multimedia system.
The process is cancelled.
Repea tauthorisation.
Authorisation by entering apasskey:
X Select the Bluetooth ®
name of the mobile
phone.
The inpu tmenu for the passkey is displayed.
X Choose aone- to sixteen-digit number com-
bination as apasskey.
X Enter the passkey on the multimedia system.
X Press ¬to confirm.
X Enter and confir mthe passkey on the mobile
phone. Depending on the mobile phone used,
confir mthe connectio ntothe multimedia sys-
tem and for the PBAP and MAP Bluetooth ®
profiles. The prompt to confir mmay take up
to two minutes to be displaye d(seet he man-
ufacturer's operating instructions).
i Mobil
ephones that are connected to the
optionally available telephone module with
Bluetooth ®
(SAP profile) are displaye dsepa-
rately in the device list. These are found below
the entry MB SAP module phones MB SAP module phones.
Switchin gbetween mobile phones If yo
uhavea uthorised more than one mobile
phone, yo ucan switch between the individual
phones.
Multimedia system:
X Select Connect device Connect device.
X Select amobile phone from the device list. Operating system
303Multimedia system Z
Page 309 of 385
Dat
am odem mode X
Connect th emobile phone to th emodule
(Y page 305).
or
X Inser tthe SIMc ardi ntot he SIMc ards loton
th em odule (Y page 305).
X Before connecting fo rthe first time, enable
th em odule fo rInterne taccess and selec tthe
networ kprovider in th emultimedia system
(se ethe manufacturer's operatin ginstruc-
tions).
Use as adatam odem is automatically activa-
ted.
X Activate/deactivat edatar oamin g(seet he
manufacturer's operatin ginstructions).
Fo rfurther information on dat amodew ithout
telephon ywithC OMAN DOnlin e( seet he man-
ufacturer's operatin ginstructions).
Settings Storing/deleting th
eSIM car dPIN
Multimedia system:
X Select Connect Connect device
deviceQMBMBSAP
SAP module
module
phones
phones .
X Highlight th emobile phone.
X To select G:navigatetotheright.
X Activate Oor deactivate ªStore PINStore PIN .
Transferring th ephone book In order to use th
ephone boo kofthemobile
phone via th emultimedia system, th ephone
boo kmustbet ransferred usin gthe module.
The dat atransfe rmay take up to te nminutes.
Transmissio noccursa utomatically after aBlue-
tooth ®
connection is automatically established.
Text messages Requirements
The module is connecte dwitht he mobile phone
(Y page 305) or is bein gused in th eSIMcard
mode (Y page 305). Activating/deactivating text message
downloading from th emobile phone Dial number Function
00080 Tex
tmessag edown-
loadin gisdeactiva-
ted. 00081 Tex
tmessag edown-
loadin gisactivated. Fo
rfurther information on receivin gtextm es-
sages when usin gthe telephon emodule (see
th em anufacturer's operatin ginstructions).
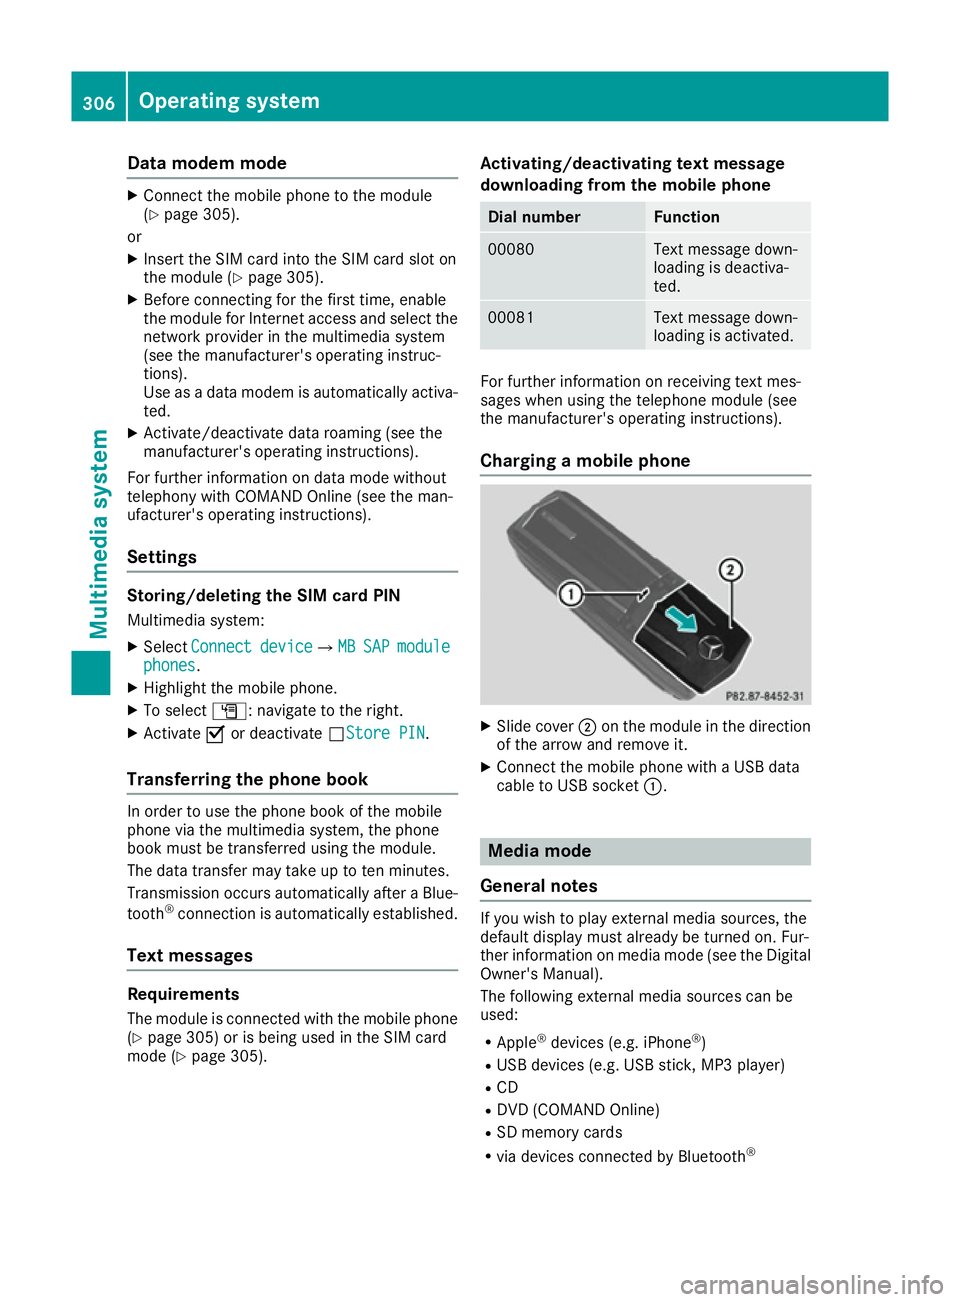
Charging amobile phone X
Slide cover ;on th emodule in th edirection
of th earrow and remov eit.
X Connect th emobile phone wit haUSBdata
cable to US Bsocket :. Media mode
General notes If you wish to play external media sources, the
default display mus
talready be turned on .Fur-
ther information on media mode (se ethe Digital
Owner' sManual).
The followin gexternal media source scan be
used:
R Apple ®
devices (e.g. iPhone ®
)
R US Bd evices (e.g. US Bstick ,MP3 player)
R CD
R DV D(COMAN DOnline)
R SD memor ycards
R via devices connecte dbyBluetooth ® 306
Operating systemMultimedi
asystem
Page 314 of 385
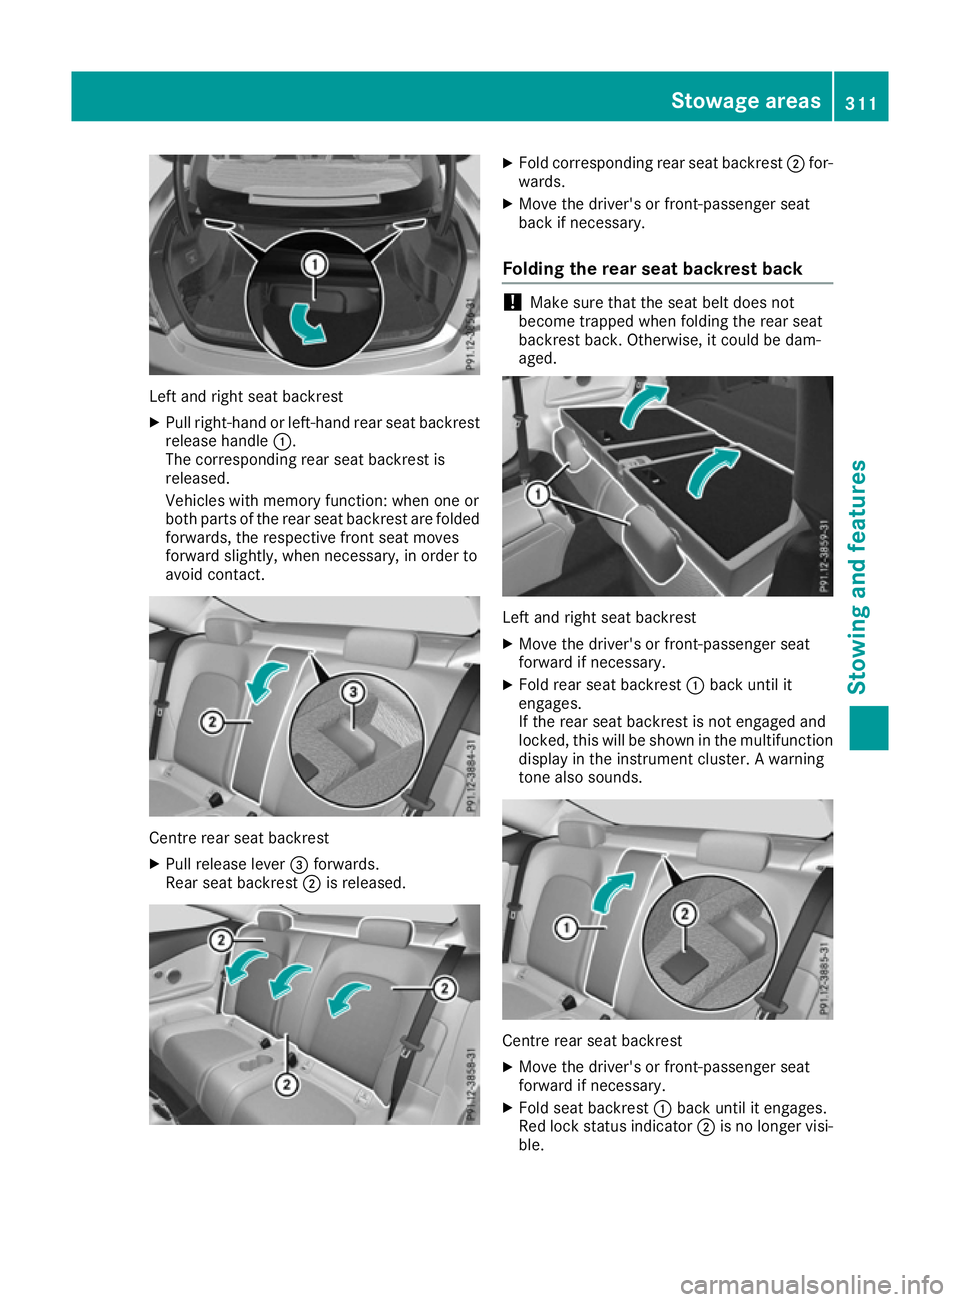
Left and right seat backrest
X Pullr ight-hand or left-hand rear seat backrest
release handle :.
The corresponding rear seat backrest is
released.
Vehicle swith memory function: when one or
both parts of the rear seat backrest are folded
forwards, the respective front seat moves
forward slightly, when necessary ,inorder to
avoid contact. Centre rear seat backrest
X
Pullr elease lever =forwards.
Rears eat backrest ;is released. X
Fold corresponding rear seat backrest ;for-
wards.
X Move the driver's or front-passenger seat
back if necessary.
Folding the rear seat backrest back !
Make sure that the seat belt does not
become trapped when folding the rear seat
backrest back. Otherwise ,itcould be dam-
aged. Left and right seat backrest
X Move the driver's or front-passenger seat
forward if necessary.
X Fold rear seat backrest :back until it
engages.
If the rear seat backrest is not engaged and
locked, this willbes hown in the multifunction
display in the instrument cluster. Awarning
tone also sounds. Centre rear seat backrest
X
Move the driver's or front-passenger seat
forward if necessary.
X Fold seat backrest :back until it engages.
Red lock status indicator ;is no longer visi-
ble. Stowagea
reas
311Stowing and features Z
Page 322 of 385
for example, request an appointment or call for
help in the event of abreakdown.
The Audi o20/COMAND Online display indi-
cates that acall is active. During the call ,you
can change to the navigation menu by pressing
the NAVI button on the multimedi asystem ,for
example.
Voice outpu tisnot available in this case.
You can find more information on Mercedes-
Benz Contact in the separate multimedi asys-
tem operating instructions.
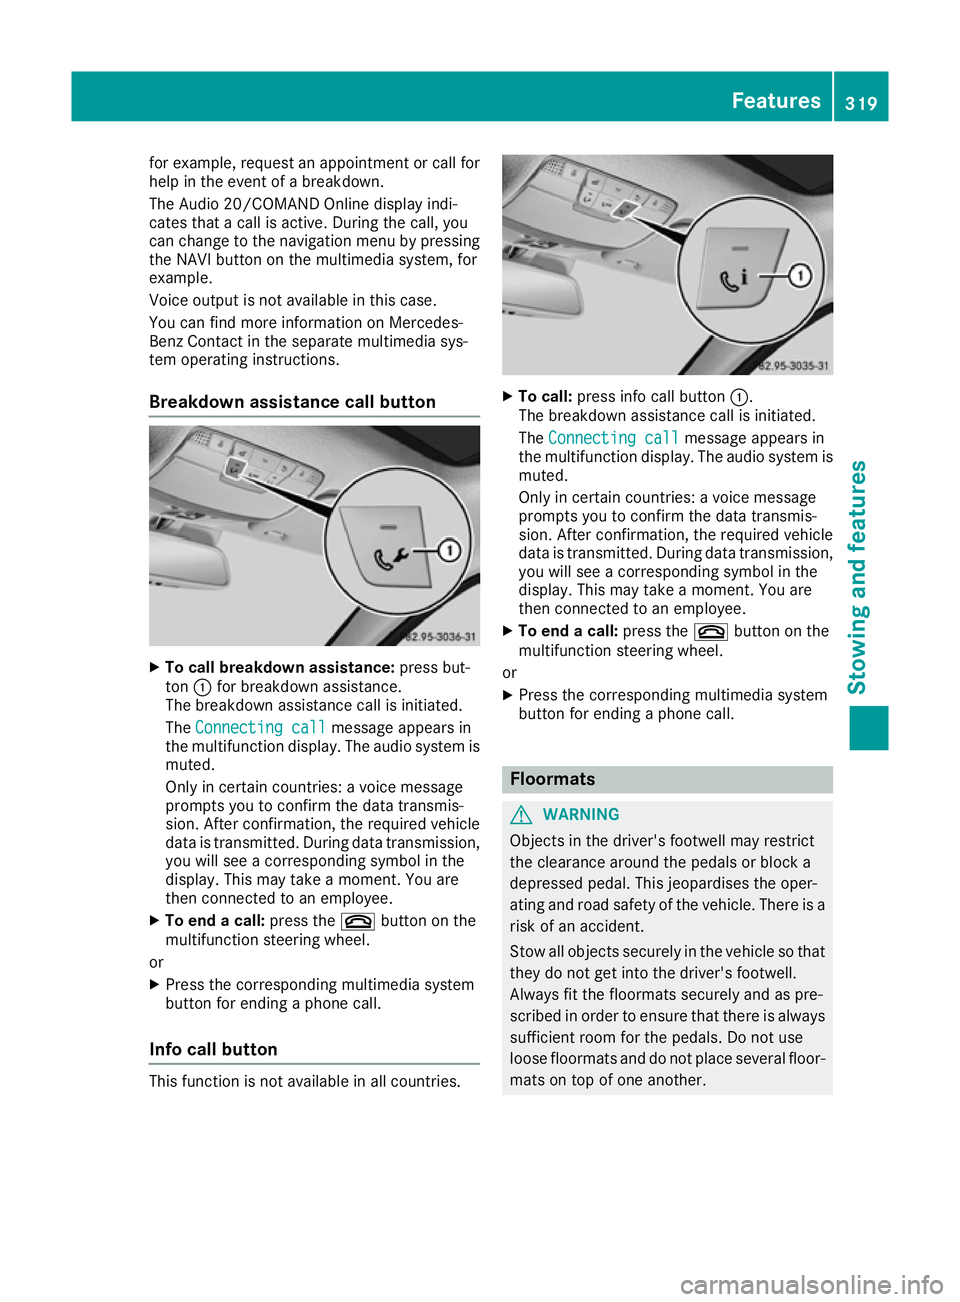
Breakdown assistance call button X
To call breakdow nassistance: press but-
ton :for breakdown assistance.
The breakdown assistance call is initiated.
The Connecting call
Connecting call message appears in
the multifunction display .The audio system is
muted.
Only in certain countries :avoice message
prompts you to confirm the data transmis-
sion. After confirmation, the required vehicle
data is transmitted. During data transmission, you wil lsee acorresponding symbol in the
display .This may take amoment. You are
then connected to an employee.
X To end acall: press the ~button on the
multifunction steering wheel.
or X Press the corresponding multimedi asystem
button for ending aphone call.
Info call button This function is not available in all countries. X
To call: press info call button :.
The breakdown assistance call is initiated.
The Connecting call Connecting call message appears in
the multifunction display .The audio syste mis
muted.
Only in certain countries :avoice message
prompts you to confirm the data transmis-
sion. After confirmation, the required vehicle
data is transmitted. During data transmission,
you wil lsee acorresponding symbol in the
display .This may take amoment. You are
then connected to an employee.
X To end acall: press the ~button on the
multifunction steering wheel.
or
X Press the corresponding multimedi asystem
button for ending aphone call. Floormats
G
WARNING
Objects in the driver's footwell may restrict
the clearance around the pedals or block a
depressed pedal. This jeopardise sthe oper-
ating and road safety of the vehicle. There is a risk of an accident.
Stow all objects securely in the vehicl esothat
they do not get into the driver's footwell.
Always fit the floormats securely and as pre-
scribe dinorder to ensure that there is always
sufficient room for the pedals. Do not use
loos efloormats and do not place severa lfloor-
mats on top of one another. Features
319Stowing and features Z