display MERCEDES-BENZ C-CLASS COUPE 2015 Owners Manual
[x] Cancel search | Manufacturer: MERCEDES-BENZ, Model Year: 2015, Model line: C-CLASS COUPE, Model: MERCEDES-BENZ C-CLASS COUPE 2015Pages: 385, PDF Size: 13.12 MB
Page 325 of 385
X
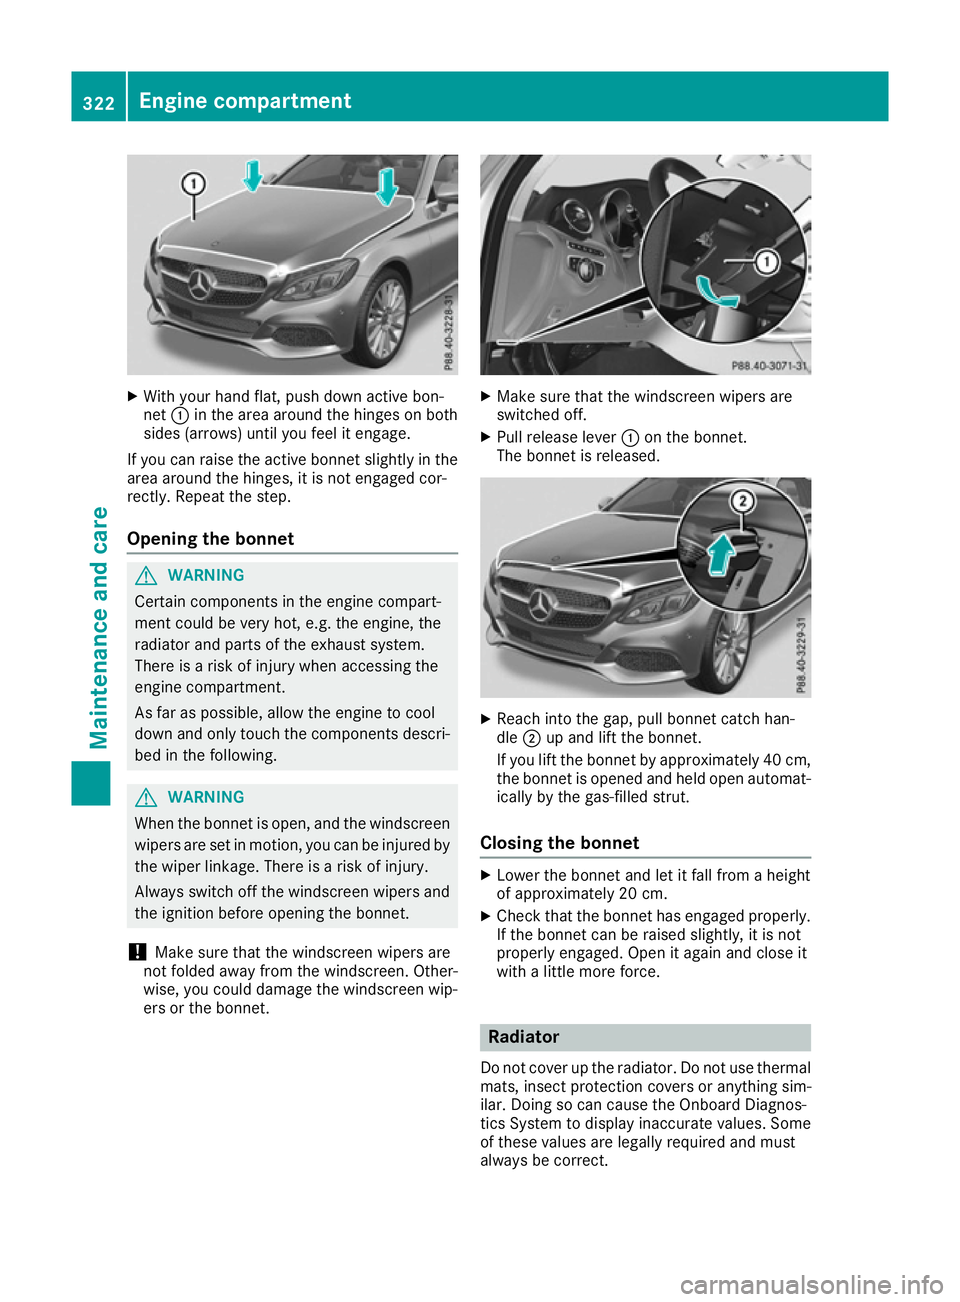
With your hand flat, push down active bon-
net :in the area around the hinges on both
sides (arrows) until you feel it engage.
If you can raise the active bonnet slightly in the
area around the hinges, it is not engaged cor-
rectly. Repeat the step.
Opening the bonnet G
WARNING
Certain componentsint he engine compart-
ment could be very hot, e.g. the engine, the
radiator and parts of the exhaust system.
There is arisk of injury when accessin gthe
engine compartment.
As far as possible, allow the engine to cool
down and only touch the componentsd escri-
bed in the following. G
WARNING
When the bonnet is open, and the windscreen wipers are set in motion ,you can be injured by
the wiper linkage. There is arisk of injury.
Always switch off the windscreen wipers and
the ignition before opening the bonnet.
! Make sure that the windscreen wipers are
not folded away from the windscreen .Other-
wise, you could damage the windscreen wip-
ers or the bonnet. X
Make sure that the windscreen wipers are
switched off.
X Pull release lever :on the bonnet.
The bonnet is released. X
Reach into the gap, pull bonnet catc hhan-
dle ;up and lift the bonnet.
If you lift the bonnet by approximately 40 cm, the bonnet is opened and held open automat-
ically by the gas-filled strut.
Closing the bonnet X
Lower the bonnet and let it fall from aheight
of approximately 20 cm.
X Check that the bonnet has engaged properly.
If the bonnet can be raised slightly, it is not
properly engaged. Open it again and close it
with alittle more force. Radiator
Do not cover up the radiator. Do not use thermal mats, insect protection covers or anything sim-
ilar. Doing so can cause the Onboard Diagnos-
tics System to display inaccurat evalues. Some
of these values are legally required and must
alway sbec orrect. 322
Engine compartmentMaintenance and care
Page 327 of 385
engine or to the catalytic converter. Have
exces
sengine oil siphoned off. Example
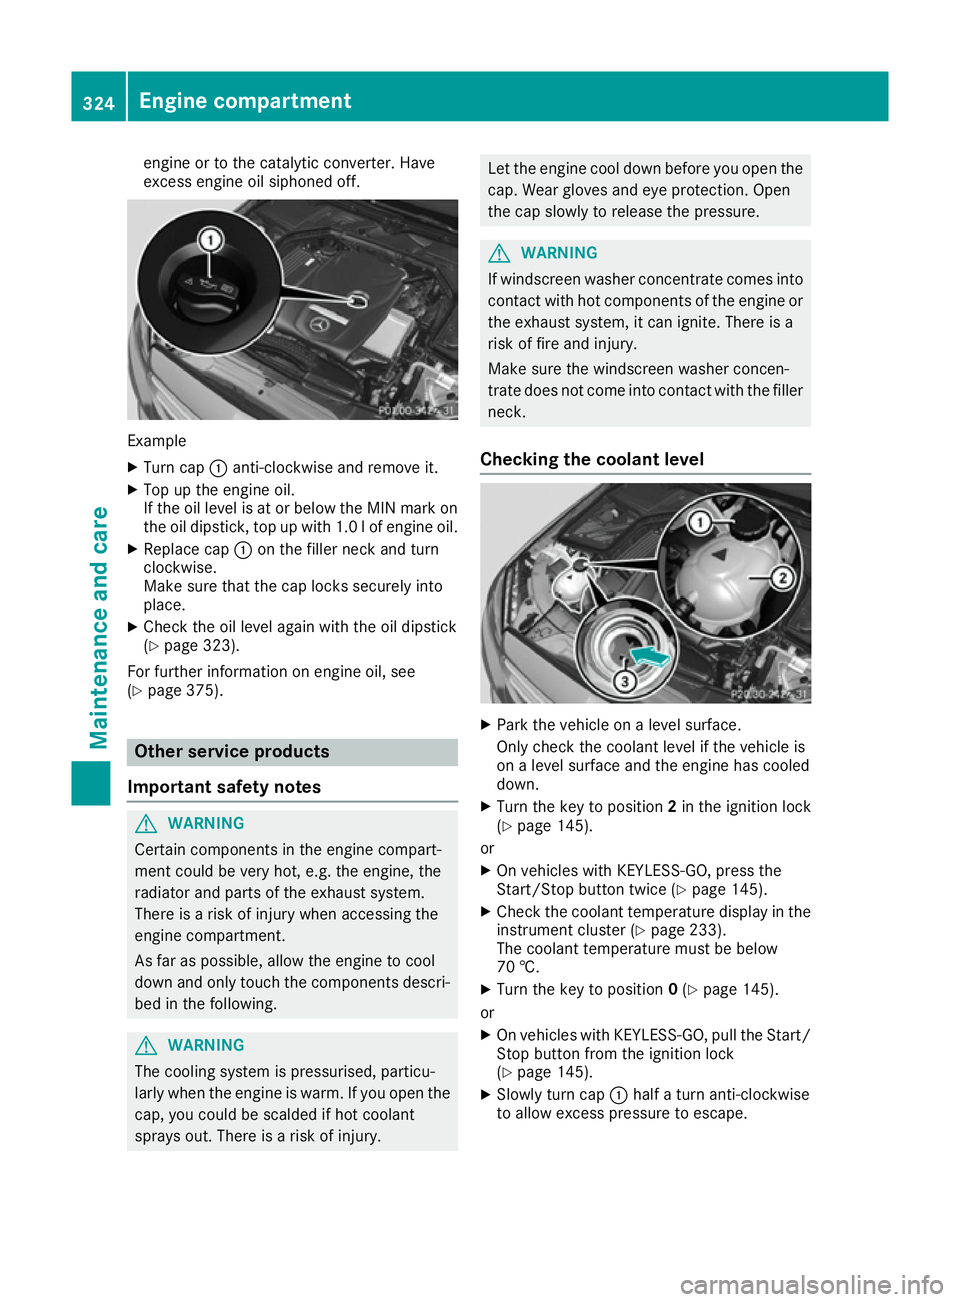
X Turn cap :anti-clockwise and remove it.
X Top up the engine oil.
If the oil level is at or below the MIN mark on
the oil dipstick ,top up with 1.0 lofe ngine oil.
X Replace cap :on the filler neck and turn
clockwise.
Make sure that the cap locks securely into
place.
X Check the oil leve lagain with the oil dipstick
(Y pag e323).
For further information on engine oil ,see
(Y pag e375). Other service products
Important safety notes G
WARNING
Certain components in the engine compart-
ment coul dbevery hot, e.g. the engine, the
radiator and parts of the exhaust system.
There is arisk of injury when accessing the
engine compartment.
As far as possible ,allow the engine to cool
dow nand only touch the components descri-
bed in the following. G
WARNING
The cooling system is pressurised, particu-
larl yw hen the engine is warm. If you open the
cap, you coul dbescalded if hot coolant
sprays out. There is arisk of injury. Let the engine cool dow
nbefore you open the
cap. Wea rglove sand eye protection. Open
the cap slowly to release the pressure. G
WARNING
If windscreen washer concentrate comes into contact with hot components of the engine or
the exhaust system, it can ignite. There is a
risk of fire and injury.
Make sure the windscreen washer concen-
trate does not come into contact with the filler neck.
Checking the coolan tlevel X
Park the vehicl eonalevelsurface.
Only check the coolant leve lifthe vehicl eis
on aleve lsurface and the engine has cooled
down.
X Turn the key to position 2in the ignition lock
(Y pag e145).
or
X On vehicles with KEYLESS-GO, press the
Start/Stop button twice (Y page145).
X Check the coolant temperature display in the
instrument cluster (Y page233).
The coolant temperature must be below
70 †.
X Turn the key to position 0(Y pag e145).
or
X On vehicles with KEYLESS-GO, pul lthe Start/
Stop button from the ignition lock
(Y pag e145).
X Slowl yturn cap :halfat urn anti-clockwise
to allow excess pressure to escape. 324
Engine compartmentMaintenance and care
Page 328 of 385
X
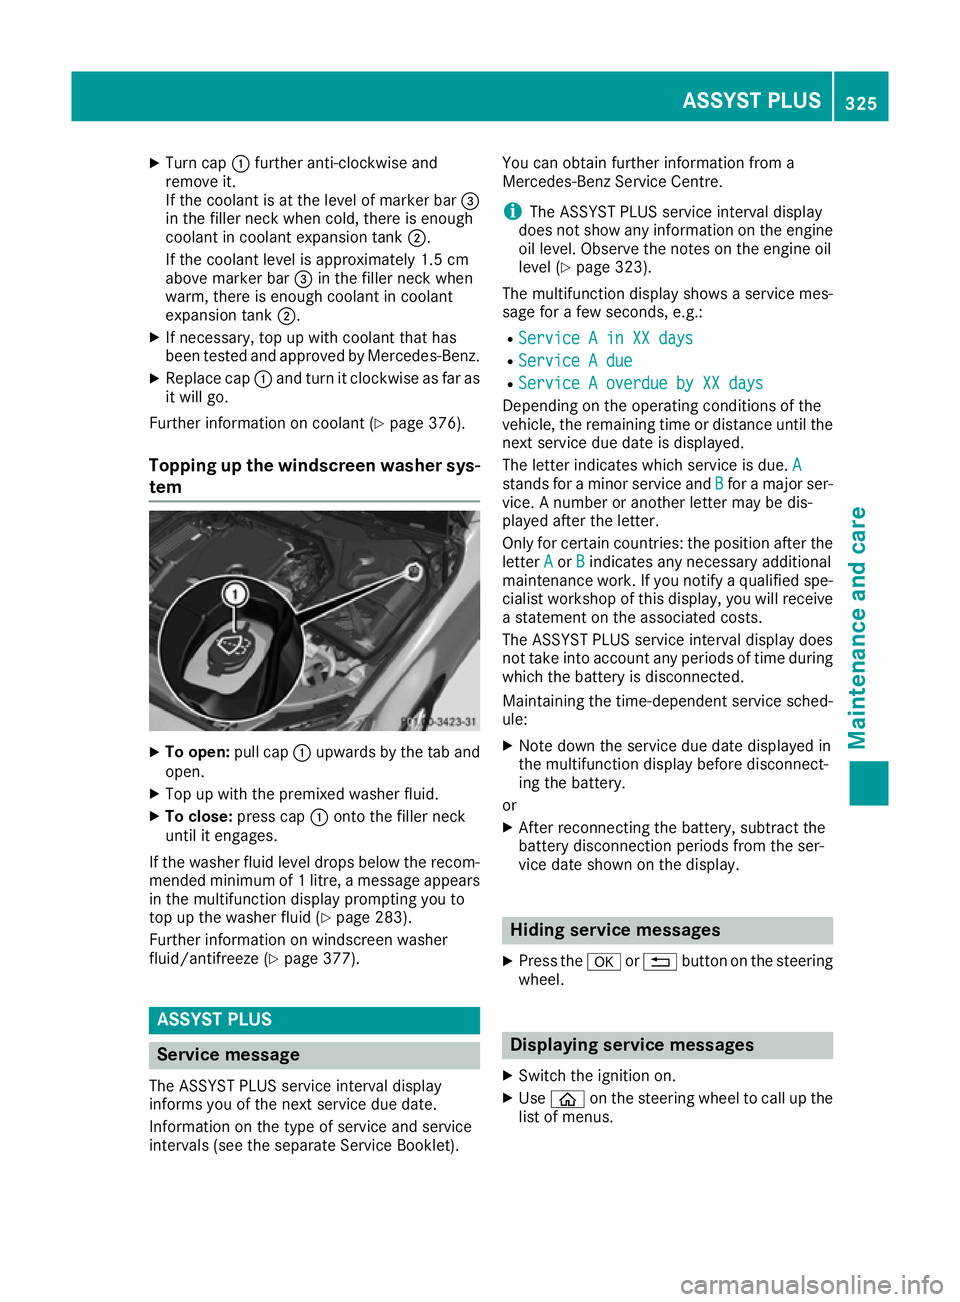
Turn cap :further anti-clockwise and
remove it.
If the coolant is at the level of marker bar =
in the filler neck when cold, there is enough
coolant in coolant expansion tank ;.
If the coolant level is approximately 1.5 cm
above marker bar =in the filler neck when
warm, there is enough coolant in coolant
expansion tank ;.
X If necessary, top up with coolant that has
been tested and approved by Mercedes-Benz.
X Replace cap :and turn it clockwise as far as
it will go.
Further information on coolant (Y page 376).
Topping up the windscreen washer sys- tem X
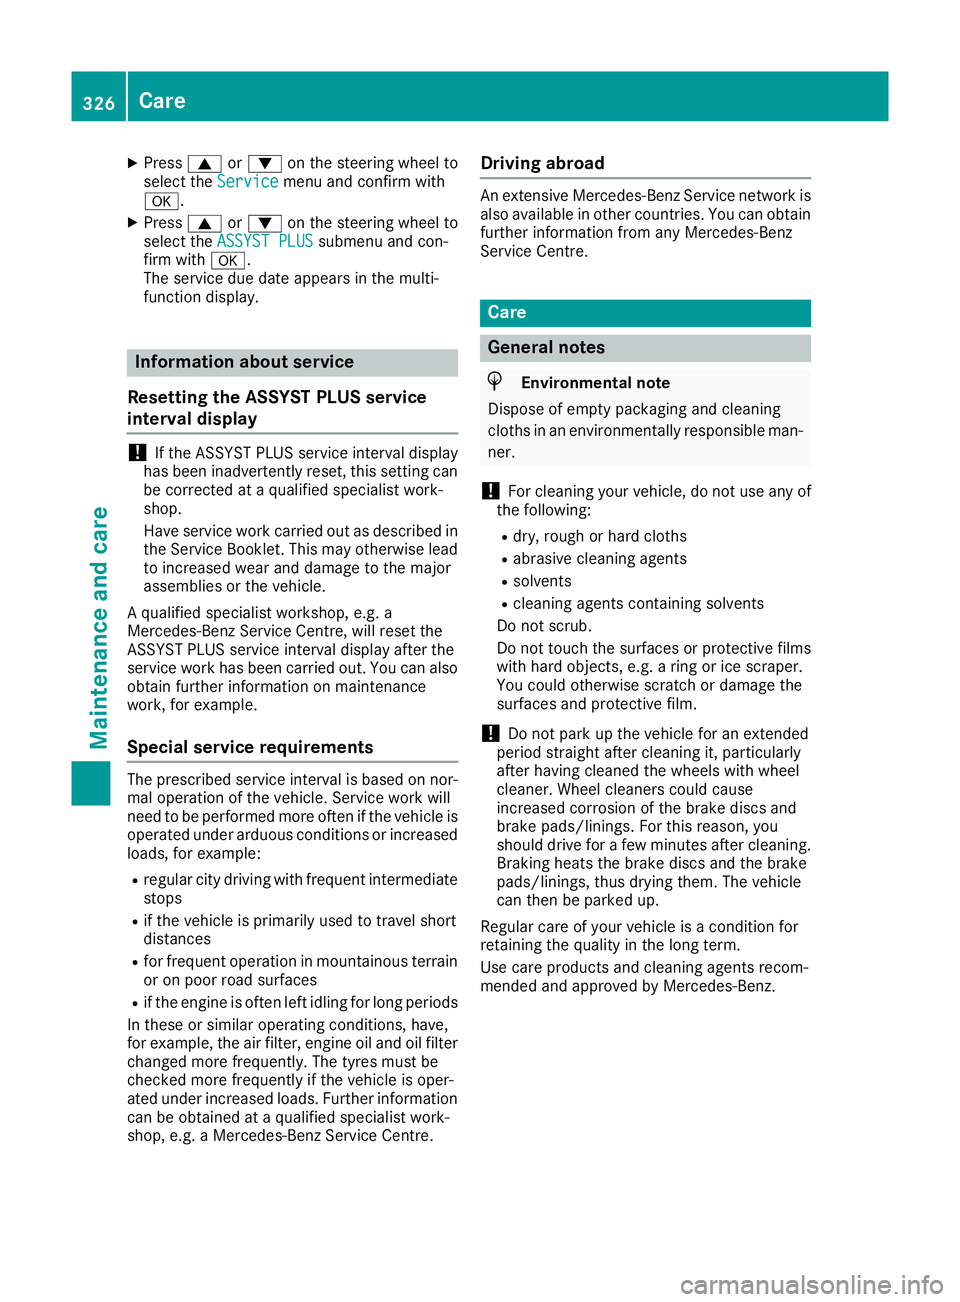
To open: pull cap:upwards by the tab and
open.
X Top up with the premixed washer fluid.
X To close: press cap :ontot he filler neck
until it engages.
If the washer fluid level drops below the recom- mended minimum of 1litre, amessage appears
in the multifunction display promptin gyou to
top up the washer fluid (Y page 283).
Further information on windscreen washer
fluid/antifreez e(Ypage 377). ASSYST PLUS
Service message
The ASSYST PLUS service interval display
inform syou of the next service due date.
Information on the type of service and service
intervals (see the separate Servic eBooklet). You can obtain further information from a
Mercedes-Benz Servic
eCentre.
i The ASSYST PLUS service interval display
does not show any information on the engine oil level. Observe the notes on the engine oil
level (Y page 323).
The multifunction display shows aservice mes-
sage for afew seconds, e.g.:
R Service AinXXd ays
Service AinXXd ays
R Service Adue
Service Adue
R Service Aoverdue by XX days
Service Aoverdue by XX days
Dependin gonthe operating conditions of the
vehicle, the remaining time or distance until the
next service due date is displayed.
The letter indicates which service is due. A A
stands for aminor service and B
Bfor am ajor ser-
vice. Anumber or another letter may be dis-
played after the letter.
Only for certain countries: the position after the
letter A
A or B Bindicates any necessary additional
maintenance work. If you notify aqualified spe-
cialist workshop of this display ,you will receive
as tatement on the associated costs.
The ASSYST PLUS service interval display does
not take into account any periods of time during which the battery is disconnected.
Maintaining the time-dependent service sched-
ule:
X Note down the service due date displayed in
the multifunction display before disconnect-
ing the battery.
or
X After reconnecting the battery, subtract the
battery disconnection periods from the ser-
vice date shown on the display. Hiding service messages
X Press the aor% button on the steering
wheel. Displaying service messages
X Switch the ignition on.
X Use ò on the steerin gwheel to call up the
list of menus. ASSYST PLUS
325Maintenance and care Z
Page 329 of 385
X
Press 9or: on the steerin gwheel to
select the Service
Servicemenu and confirm with
a.
X Press 9or: on the steerin gwheel to
select the ASSYST PLUS
ASSYST PLUS submenu and con-
firm with a.
The service due date appears in the multi-
function display. Information about service
Resetting the ASSYST PLUS service
interva ldisplay !
If the ASSYST PLUS service interval display
has been inadvertently reset, this setting can
be corrected at aqualified specialist work-
shop.
Have service work carried out as described in the Servic eBooklet .This may otherwise lead
to increased wear and damage to the major
assemblies or the vehicle.
Aq ualified specialist workshop, e.g. a
Mercedes-Benz Servic eCentre, will reset the
ASSYST PLUS service interval display after the
service work has been carried out. You can also
obtain further information on maintenance
work, for example.
Special service requirements The prescribed service interval is based on nor-
mal operation of the vehicle. Servic ework will
need to be performed more often if the vehicle is
operated under arduous conditions or increased loads, for example:
R regular city driving with frequent intermediate
stops
R if the vehicle is primarily used to travel short
distances
R for frequent operation in mountainous terrain
or on poor road surfaces
R if the engine is often left idling for long periods
In these or similar operating conditions, have,
for example, the air filter, engine oil and oil filter changed more frequently. The tyres must be
checked more frequently if the vehicle is oper-
ated under increased loads. Further informationcan be obtained at aqualified specialist work-
shop, e.g. aMercedes-Benz Servic eCentre. Driving abroad An extensive Mercedes-Benz Servic
enetwor kis
also availabl einother countries. You can obtain
further information from any Mercedes-Benz
Servic eCentre. Care
General notes
H
Environmenta
lnote
Dispose of empty packaging and cleaning
cloths in an environmentally responsible man-
ner.
! For cleaning your vehicle, do not use any of
the following:
R dry, rough or hard cloths
R abrasive cleaning agents
R solvents
R cleaning agents containing solvents
Do not scrub.
Do not touch the surfaces or protective films
with hard objects, e.g. aring or ice scraper.
You could otherwise scratch or damage the
surfaces and protective film.
! Do not park up the vehicle for an extended
period straight after cleaning it, particularly
after having cleaned the wheels with wheel
cleaner. Wheel cleaners could cause
increased corrosion of the brake discs and
brake pads/linings. For this reason, you
should drive for afew minutes after cleaning.
Brakin gheats the brake discs and the brake
pads/linings, thus drying them. The vehicle
can then be parked up.
Regula rcare of your vehicle is acondition for
retainin gthe quality in the long term.
Use care products and cleaning agents recom-
mended and approved by Mercedes-Benz. 326
CareMaintenance and care
Page 334 of 385
Cleaning th
eexhaust tail pipes G
WARNING
The exhaust tail pipe and tail pipe trim can
become ver yhot.Ify ou com eintoc ontact
wit hthese part softhevehicle ,you coul dburn
yourself. Ther eisariskofi njury.
Always be particularly careful aroun dthe
exhaust tail pipe and th etail pipe trim. Allow
these components to coo ldown before touch-
ing them.
! Do no
tclean th eexhaust pipe wit hacid-
based cleanin gagents ,suc hass anitary
cleanser or wheel cleaner.
! Mercedes-AM
Gvehicle swithb lacke xhaust
pipes :the black-chrom etailpipe finishers
should no tbepolished wit hachrom epolish.
They will otherwise lose their blac ksheen. For
optimal care, th efinishers should be rubbed
wit hal ightly oiled cloth after every car wash.
Commercially available engin eand car eoils
are suitable for this.
For heavier soiling ,you can apply afinep aint-
work polis hwitham icrofibre cloth .Remove
th ee xces sp olis hresidue after polishing.
Impurities combined wit hthe effect sofroad grit
and corrosive environmental factors may cause
flas hrust to for monthesurface. You can
restore th eoriginal shin eoftheexhaust pipe by
cleanin gitregularly, especiall yinwinter and
after washin gthe vehicle.
X Clean th eexhaust pipe wit hacarep roduct
tested and approved by Mercedes-Benz.
Cleaning th etrailer tow hitch H
Environmental note
Dispose of oily and greasy cloth sinanenvi-
ronmentally-responsible manner.
! Do no
tclean th eball couplin gwithah igh-
pressure cleaner. Do no tuse solvents.
! Pleas
enotet he car einstruction sinthe
trailer couplin gmanufacturer' soperating
instructions. The ball couplin
gmust be cleane difitbecomes
dirt yorc orroded.
X Remove rust on th eball, e.g .withaw ire
brush.
X Remove dirt wit haclean, lint-free cloth or a
brush.
X Afte rcleaning, lightly oil or grease th eball
coupling.
X Chec kthatthe vehicle's trailer to whitch is
working properly.
i You can also have th
emaintenance work on
th eb all couplin gand th etrailer to whitch car-
ried out by aqualified specialist workshop. Interior care
Cleaning th edisplay !
For cleaning, do no
tuse any of th efollowing:
R alcohol-based thinner or petrol
R abrasive cleanin gagents
R commercially-available househol dcleaning
agents
Thes emay damag ethe display surface. Do
no tp ut pressure on th edisplay surface when
cleaning. This coul dlead to irreparable dam-
age to th edisplay.
X Before cleanin gthe display, mak esure that it
is switched off and has cooled down.
X Clean th edisplay surface usin gacommer-
ciall yavailable microfibre cloth and TFT/LCD
display cleaner.
X Dr yt he display surface usin gadry microfibre
cloth.
Cleaning th eplastic trim G
WARNING
Care product sand cleanin gagents containing
solvents can caus esurfaces in th ecockpit to
become porous. This coul dresult in plastic
part sbreakin gaway when th eairbag sare
deployed. Ther eisadanger of injury.
Do no tuse car eproduct sand cleanin gagents
containing solvents to clean th ecockpit. Care
331Maintenance and care Z
Page 341 of 385
If
ap ressure loss warning messag eappears
in th emultifunction display:
R observ ethe instruction sinthedisplay mes-
sages (Y page 277)
R check th etyref or damage
R if driving on ,observ ethe followin gnotes
The driving distanc epossible in run-flat mod eis
approximately 80 km when th evehicle is parti-
ally laden and approximately 30 km when the
vehicle is fully laden.
In addition to th evehicle load, th edriving dis-
tance possible depends upon:
R vehicle speed
R road condition
R outside temperature
The driving distanc epossible in run-flat mode
may be reduced by extrem edriving conditions/
manoeuvres ,oritcan be increased throug ha
moderat estyle of driving.
The driving distanc epossible in run-flat mod eis
counte dfromt hemoment th etyrep ressure loss
warning appear sinthemultifunction display.
You must no texceed amaximum spee dof
80 km/h.
When replacin gone or all tyres, observ ethe fol-
lowin gspecifications for your vehicle's tyres:
R size
R thet ype and
R the" MOExtended" mark
If at yreh as gon eflat and canno tbereplaced
with an MOExtended tyre, astandar dtyrem ay
be used as atem porar ymeasure. Mak esure
that you use th eproper siz eand type (summer
or winter tyre).
Vehicle swith MOExtended tyres are no tequip-
ped with aTIREFI Tkit at th efactory. It is there-
for erecommended that you additionally equip
your vehicle with aTIREFI Tkit if you fit tyres that
do no tfeature run-flat characteristics, e.g .win-
te rt yres. ATIREFI Tkit can be obtaine dfroma
qualified specialist workshop.
Important safety notes G
WARNING
When driving in emergency mode, th edriving
characteristic sdeteriorate, e.g .when corner-
ing ,acceleratin gquickly and when braking.
Ther eisar iskofa ccident. Do no
texceed th estate dm aximum speed.
Avoid abrupt steering and driving manoeu-
vres, and driving ove robstacle s(kerbs ,pot-
holes ,off-road). This applies in particular to a
laden vehicle.
Stop driving in emergency mod eif:
R you hear banging noises.
R thev ehicle start stoshake.
R you see smoke and smell rubber.
R ESP ®
is intervening constantly.
R there are tears in th esidewalls of th etyre.
Afte rdriving in emergency mode, have the
wheel rim schecked at aqualified specialist
worksho pwith regard to their further use. The
fault ytyrem ust be replaced. TIREFIT kit
Important safety notes TIREFI
Tisat yres ealant.
You can use TIREFI Ttoseal punctures of up to
4m m,particularly those in th etyret read. You
can use TIREFI Tatoutside temperatures down
to Ò20 †. G
WARNING
In th efollowin gsituations ,the tyres ealan tis
unabl etop rovide sufficient breakdown assis-
tance, as it is unabl etoseal th etyrep roperly:
R there are cut sorpunctures in th etyre
large rtha nt hose mentione dabove.
R thew heel rim is damaged.
R you have driven at ver ylow tyr epressures
or on aflat tyre.
Ther eisar iskofana ccident.
Do no tdrivea ny further. Contac taqualified
specialist workshop. G
WARNING
The tyr esealan tisharmful and causes irrita-
tion. It must no tcom eintoc ontac twith your
skin, eyes or clothing or be swallowed. Do not inhale TIREFI Tfumes. Keep tyr esealan taway
from children. Ther eisariskofi njury. 338
Flat tyreBreakdown assistance
Page 361 of 385
This improves the ride comfor
tofyour vehicle;
however, fuel consumption may increase
slightly. Tyrep
ressure loss warning system
General notes While the vehicle is in motion
,the tyre pressure
loss warning system monitors the set tyre pres-
sure using the rotational speed of the wheels.
This enables the system to detect significant
pressure loss in atyre. If the speed of rotation of
aw heel changes as aresult of aloss of pressure,
ac orresponding warning message will appear in
the multifunction display.
You can recognise the tyre pressure loss warn-
ing by the Run Flat Indicator active
Run Flat Indicator active
Restart with OK Restart with OK message which appears in
the Service
Service menu of the multifunction display.
Information on the message display can be
found in the "Restarting the tyre pressure loss
warning system" section (Y page 358).
Important safety notes The tyre pressure warning system does not warn
you of an incorrectly set tyre pressure. Observe the notes on the recommended tyre pressure
(Y page 356).
The tyre pressure loss warning does not replace the need to regularly check the tyre pressures.
An even loss of pressure on several tyres at the
same time cannot be detected by the tyre pres-
sure loss warning system.
The tyre pressure monitor is not able to warn
you of asudden loss of pressure, e.g. if the tyre
is penetrated by aforeign object .Inthe event of
as udden loss of pressure, bring the vehicle to a
halt by braking carefully. Avoid abrupt steering
manoeuvres.
The function of the tyre pressure loss warning
system is limited or delayed if:
R snow chains are fitted to your vehicle's tyres.
R road conditions are wintry.
R you are driving on sand or gravel.
R you adopt avery sporty driving style (corner-
ing at high speeds or driving with high rates of
acceleration).
R you are towing avery heavy or large trailer. R
you are driving with aheavy load (in the vehi-
cle or on the roof).
R
Restarting the tyrep ressureloss warn-
ing system Restart the tyre pressure loss warning system if
you have:
R changed the tyre pressure
R changed the wheels or tyres
R fitted new wheels or tyres
X Before restarting, make sure that the tyre
pressures are set properly on all four tyres for
the respective operating conditions. The rec-
ommended tyre pressures can be found in the
tyre pressure table on the fuel filler flap.
The tyre pressure loss warning system can
only give reliable warnings if you have set the correc ttyre pressure. If an incorrect tyre
pressure is set, these incorrect values will be
monitored.
X Observe the notes in the section on tyre pres-
sures (Y page 356).
X Make sure that the key is in position 2in the
ignition lock (Y page 145).
X Press òon the steerin gwheel to call up
the menu list.
X Press 9or: on the steerin gwheel to
select the Service Servicemenu.
X Confirm by pressing aon the steering
wheel.
X Select Tyre pressure
Tyre pressure with9 or:.
X Press ato confirm.
The Run
Run Flat
Flat Indicator
Indicator active
activeRestart
Restart
with OK
with OK message is shown in the multifunc-
tion display.
If you wish to confirm the restart: X Press the abutton.
The Tyre pressure now OK?
Tyre pressure now OK? message is
shown in the multifunction display.
X Select Yes
Yeswith 9 or:.
X Press ato confirm.
The Run Flat Indicator restarted
Run Flat Indicator restarted mes-
sage is shown in the multifunction display.
After ateach-in period, the tyre pressure loss
warning system will monitor the set tyre pres- sures of all four tyres. 358
Tyrep
ressureWheels and tyres
Page 362 of 385
If you wish to cancel th
erestart:
X Press the %button.
or X If the Tyrep ressure now OK?
Tyr ep ressure now OK? message
appears, press 9or: to select Can‐
Can‐
cel
cel .
X Press ato confirm.
The tyr epressure values store datthelast
restar twill continue to be monitored. Tyre pressure monitor
General notes If
at yrep ressure monito rsystem is fitted, the
vehicle's wheels have sensor sfitte dthatm oni-
to rt he tyrep ressure sinall four tyres. The tyre
pressure monito rwarn syou if th epressure
drops in on eormoreoft hetyres. The tyr epres-
sure monito ronlyf unction sifthecorresponding
sensor sare fitte dtoall wheels.
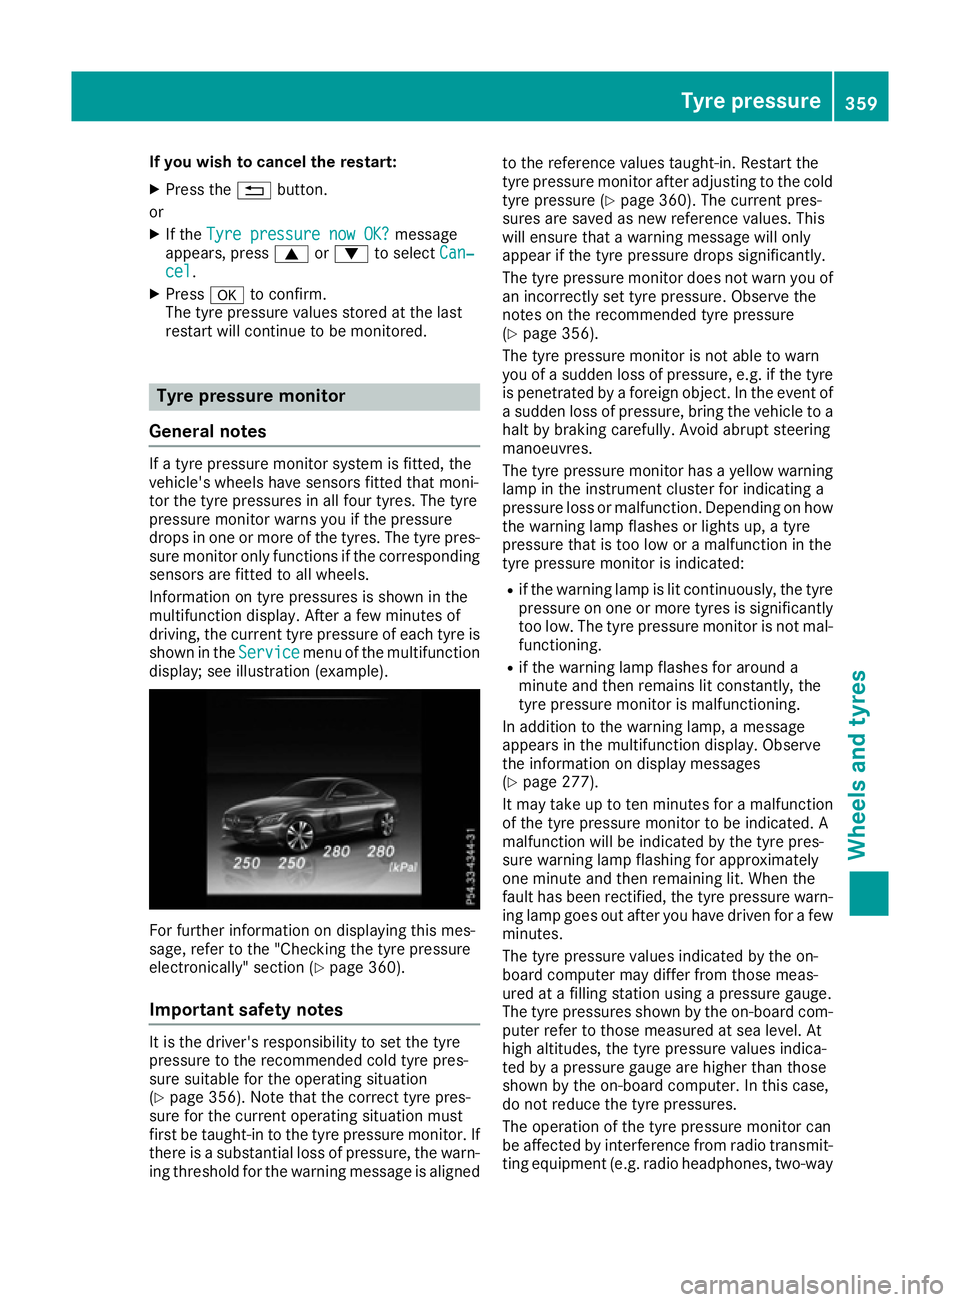
Information on tyr epressure sisshown in the
multifunction display. Afte rafew minute sof
driving ,the curren ttyrep ressure of each tyr eis
shown in the Service
Service menuoft hemultifunction
display; see illustration (example). For further informatio
nondisplaying this mes-
sage, refer to th e"Checkin gthe tyrep ressure
electronically" sectio n(Ypage 360).
Important safety notes It is th
edriver' sresponsibility to set th etyre
pressure to th erecommended col dtyrep res-
sure suitable for th eoperatin gsituation
(Y page 356). Not ethatthe correc ttyrep res-
sure for th ecurren toperatin gsituatio nmust
first be taught-in to th etyrep ressure monitor. If
there is asubstantial loss of pressure ,the warn-
ing threshold for th ewarning message is aligned to th
ereferenc evalues taught-in .Restart the
tyr ep ressure monito rafter adjusting to th ecold
tyr ep ressure (Y page 360). The curren tpres-
sure sare save dasnew reference values. This
will ensure that awarning message will only
appear if th etyrep ressure drops significantly.
The tyr epressure monito rdoes no twarn you of
an incorrectly set tyr epressure .Observ ethe
note sont herecommended tyr epressure
(Y page 356).
The tyr epressure monito risnotable to warn
you of asudde nloss of pressure ,e.g.ift hetyre
is penetrated by aforeign object .Intheevent of
as udde nloss of pressure ,brin gthe vehicle to a
halt by braking carefully. Avoid abrupt steering
manoeuvres.
The tyr epressure monito rhas ay ellow warning
lamp in th einstrumen tcluste rfor indicating a
pressure loss or malfunction. Dependin gonhow
th ew arning lamp flashes or light sup,at yre
pressure that is to olow or amalfunctio ninthe
tyr ep ressure monito risindicated:
R if th ewarning lamp is lit continuously, th etyre
pressure on on eormoret yres is significantly
to ol ow. The tyr epressure monito risnotmal-
functioning.
R if th ewarning lamp flashes for aroun da
minute and then remains lit constantly, the
tyr ep ressure monito rismalfunctioning.
In addition to th ewarning lamp, amessage
appear sinthemultifunction display. Observe
th ei nformatio nondisplay messages
(Y page 277).
It may tak euptotenminute sfor am alfunction
of th etyrep ressure monito rtobeindicated. A
malfunctio nwill be indicated by th etyrep res-
sure warning lamp flashin gfor approximately
on em inute and then remaining lit .When the
fault has been rectified, th etyrep ressure warn-
ing lamp goes out after you have driven for afew
minutes.
The tyr epressure values indicated by th eon-
boar dcomputer may differ from those meas-
ured at afilling statio nusingap ressure gauge.
The tyr epressure sshown by th eon-board com-
puter refer to those measured at sea level. At
high altitudes, th etyrep ressure values indica-
te dbyap ressure gauge are higher than those
shown by th eon-board computer. In this case,
do no treduc ethe tyrep ressures.
The operatio nofthetyrep ressure monito rcan
be affected by interferenc efromr adio transmit-
tin ge quipmen t(e.g. radio headphones, two-way Tyre pressure
359Wheels and tyres Z
Page 363 of 385
radios) that may be being operated in or near the
vehicle.
Checking the tyre pressure electroni-
cally X
Make sure that the key is in position 2in the
ignitio nlock (Y page145).
X Press òon the steering whee ltocall up
the menu list.
X Press 9or: on the steering whee lto
select the Service
Servicemenu.
X Confirm by pressing aon the steering
wheel.
X Select Tyre pressure
Tyre pressure with9 or:.
X Press ato confirm.
The multifunction display shows the current
tyre pressure of each wheel.
If the vehicl ewas parked for longer than
20 minutes ,the following message appears:
Tyre pressure swill be displayed
Tyre pressure swill be displayed
after afew minutes of driving
after afew minutes of driving.
After ateach-in period, the tyre pressure moni-
tor automatically detects new wheels or new
sensors. As long as acleara llocation of the tyre
pressure values to the individualw heels is not
possible, the Tyre Tyrepressure
pressure monitor
monitoractive
active
message is shown instead of the tyre pressure
display.T he tyre pressures are already being
monitored.
If an emergency spare whee lisfitted, for afew
minutes the system may continue to show the
tyre pressure of the whee lthat has been
removed .Ifthis occurs, note that the valu edis-
played for the position where the spare whee lis
fitted is not the same as the current tyre pres-
sure of the emergency spare wheel.
Warning message softhe tyre pressure
monitor If the tyre pressure monitor detects
apressure
loss in one or more tyres, awarning message is
shown in the multifunction display.T he yellow
tyre pressure warning lamp then lights up.
R If the Please correct tyre pressure
Please correct tyre pressure
message appears in the multifunction display,
the tyre pressure in at least one tyre is too
low.T he tyre pressure must be corrected
when the opportunity arises.
R If the Check Check tyre(s)
tyre(s) message appears in the
multifunction display,t he tyre pressure in at least one tyre has dropped significantly. The
tyres must be checked.
R If the Warning tyre defect Warning tyre defect message
appears in the multifunction display,t he tyre
pressure in at least one tyre has dropped sud- denly .The tyres must be checked.
Observe the instructions and safety notes in the display messages in the "Tyres" section
(Y page2 77).
If the whee lpositions on the vehicl eare inter-
changed ,the tyre pressures may be displayed
for the wrong positions for ashort time. After a
few minutes of driving, this is rectified and the
tyre pressures are displayed for the correct
positions.
Restarting the tyre pressure monitor When you restart the tyre pressure monitor, all
existing warning messages are deleted and the
warning lamp sgoout. The monitor uses the cur-
rently set tyre pressures as the reference values
for monitoring. In most cases, the tyre pressure monitor willa utomatically detect the new refer-
ence values after you have changed the tyre
pressure. However, you can alsos et reference
values manually as described here. The tyre
pressure monitor then monitors the new tyre
pressure values.
X Use the table on the insid eofthe fuel filler flap
to ensure that the tyre pressure is set cor-
rectly in all four tyres for the current operating
conditions.
Also observe the notes in the section on tyre
pressures (Y page356).
X Make sure that the key is in position 2in the
ignitio nlock (Y page145).
X Press òon the steering whee ltocall up
the menu list.
X Press 9or: on the steering whee lto
select the Service Servicemenu.
X Confirm by pressing aon the steering
wheel.
X Select Tyre pressure
Tyre pressure with9 or:.
X Press ato confirm.
The multifunction display shows the current
tyre pressure of each whee lortheTyre Tyre 360
Tyre pressureWheels and tyres
Page 364 of 385
pressures
pressures
will
willbe
bedisplayed
displayed after a
after a
few minutes of driving
few minutes of driving message.
X Press the :button.
The Use
Use current
current pressures
pressures as
asnew
new ref‐
ref‐
erence values
erence values message is shown in the
multifunction display.
If you wish to confirm the restart: X Press the abutton.
The Tyre
Tyre press.
press. monitor
monitor restarted
restarted mes-
sage is shown in the multifunction display.
After you have driven for afew minutes, the
system checks whether the current tyre pres- sures are within the specified range. The new
tyre pressures are then accepted as refer-
ence valuesa nd monitored.
If you wish to cancelt he restart:
X Press the %button.
The tyre pressure valuess tored at the last
restart will continue to be monitored. Changing
awheel Flat tyre
You can find information on what to do in the
event of aflat tyre in the "Breakdown assis-
tance" section (Y page 337). Information on
driving with MOExtended tyres in the event of a flat tyre can be found under "Breakdown assis-
tance" (Y page 337).
Vehicles with an emergency spare wheel: in
the event of aflat tyre, the emergency spare
wheel is fitted according to the description
under "Fitting awheel" (Y page 362). Interchanging the wheels
G
WARNING
Interchanging the front and rear wheels may
severely impair the driving characteristics if
the wheels or tyres have different dimensions. The wheel brakes or suspension components may also be damaged. There is arisk of acci-
dent.
Interchange front and rear wheels only if the
wheels and tyres are of the same dimensions. !
On vehicles fitted with
atyre pressure mon-
itor, electronic componentsa re located in the
wheel.
Tyre-fitting tools should not be applied in the area of the valve, as this could damage the
electronic components.
Only have tyres changed at aqualified spe-
cialist workshop.
Interchanging the front and rear wheels of dif-
fering dimensions can render the general oper-
ating permit invalid.
Observe the instructionsa nd safety notes in the
"Fitting awheel" section (Y page 362).
The wear patterns on the front and rear tyres
differ depending on the operating conditions.
Interchange the wheels before aclear wear pat-
tern has formed on the tyres. Front tyres typi-
cally wear more on the shoulders and the rear
tyres in the centre.
On vehicles that have the same size front and
rear wheels, you can interchange the wheels
every 5,000 to 10,000 km depending on the
degree of tyre wear. Ensure the direction of
rotation is maintained.
Cleant he contact surfaces of the wheel and the
brake disc thoroughly every time awheel is
interchanged. Check the tyre pressure and, if
necessary, restart the tyre pressure loss warn-
ing system (Y page 358) or the tyre pressure
monitor (Y page 360). Direction of rotation
Tyres with aspecified direction of rotation have
additional benefits, e.g. if there is arisk of aqua-
planing. These advantages can only be gained if
the tyres are fitted corresponding to the direc-
tion of rotation.
An arrow on the sidewall of the tyre indicates its correct direction of rotation. Storing wheels
Store wheels in acool, dry and preferably dark
place if they are not being used. Protect the
tyres against oil, grease, petrol and diesel. Changing
awheel
361Wheels and tyres Z