ESP MERCEDES-BENZ C-Class COUPE 2017 CL205 Owner's Manual
[x] Cancel search | Manufacturer: MERCEDES-BENZ, Model Year: 2017, Model line: C-Class COUPE, Model: MERCEDES-BENZ C-Class COUPE 2017 CL205Pages: 354, PDF Size: 8.66 MB
Page 287 of 354
Notesonp rogrammin gthe remote con-
trol
Canadia nradio frequency laws require a"break"
(o ri nterruption) of the transmission signals
after broadcasting for afew seconds. Therefore,
these signals mayn ot last long enoughfor the
integrated garage door opener. Th esigna lisn ot
recognize dduringp rogramming. Comparable
with Canadia nlaw ,som eU .S. garage door open-
ers also featur ea"break".
Procee dasfollows:
Rif youliveinC anada
Rif yo uhaved ifficultie sprogramming the
garage door opene r(regardles sofwhere you
live) when using the programming steps
XPress and hol done of buttons ;to? on the
integrated garage door opener.
After ashort time, indicator lamp :lights up
yellow.
XReleas ethe button.
Indicato rlam p: flashe syellow.
XPress button Bof garage door remote con-
trol Afor two seconds, thenr elease it for two
seconds.
XPress button Bagai nfor two seconds.
XRepeat thiss equence on button Bof remote
control Aunti lindicator lamp :lights up
green.
When indicator lamp :lights up green: pro-
gramming is finished.
When indicator lamp :flashe sgreen: pro-
gramming wa ssuccessful. Th enext stepi
sto
s
ynchronize the rolling code.
XReleas ebutton Bof remote control Aof the
garage door drive.
If indicator lamp :lights up red :repea tthe
programming proces sfor the corresponding
button on the rear-view mirror. When doing
so, vary the distance between remote control
A and the rear-view mirror.
Th er equired distance between remote con-
trol Aand the integrated garage door opener
depends on the garage door drive system.
Severala ttempts might be necessary.Y ou
shoul dteste very positio nfor at least
25 second sbefor etrying another position.
Problems whe nprogramming
If you are experiencing problems programing
the integrated garage door opener on the rear-
view mirror, take note of the following instruc-
tions:
RCheck the transmitter frequency use dby
garage door drive remote control Aand
whethe ritissupported. The transmitter fre-
quency can usuall ybefound on the back of
the garage door drive remote control.
The integrated garage door opener is com-
patible with devices that have units which
operate in the frequency range of 280 to
433 MHz.
RReplace the batteries in garage door remote
control A.This increases the likelihoo dthat
garage door remote control Awilltransmit a
strong and precis esigna ltot he integrated
garage door opener.
RWhen programming, hold remote control A
at varying distances and angle sfrom the but-
ton which you are programming. Try various
angle satad istance between 2and 12 inches
(5to 30 cm) or at the same angle but at varying
distances.
RIf another remote control is available for the
same garage door drive ,repeatt he same pro-
gramming steps with this remote control.
Before performing these steps, make sure
that new batteries have been installed in
garage door drive remote control A.
RNote that some remote controls only transmit
foralimited amount of time (the indicator
lam pont he remote control goes out). Press
button Bon remote control Aagain before
transmission ends.
RAlign the antenna cabl eofthe garage door
opener unit. This can improve signa lrecep-
tion/transmission.
Opening/closingt he garage door
After it has been programmed, the integrated
garage door opener performs the function of the
garage door system remote control. Please also
read the operating instructions for the garage
door system.
XTurn the SmartKey to position 2in the ignition
lock (Ypag e131).
XPress button ;,=or? which you have
programmed to operate the garage door.
Garage door syste mwithafixed code: indi-
cator lamp :lights up green.
Features285
Stowage and features
Z
Page 294 of 354
Drivingabroad
An extensive Mercedes-Ben zService networ kis
also available in other countries. You can obtain
further information from any authorized
Mercedes-Ben zCenter.
Car e
General notes
HEnvironmental not e
Dispose of empty packagin gand cleanin g
cloths in an environmentally responsible man -
ner.
!Fo rc leanin gyour vehicle, do no tuse any of
th ef ollowing:
Rdry, rough or har dcloths
Rabrasiv ecleanin gagents
Rsolvents
Rcleanin gagents containin gsolvents
Do no tscrub .
Do no ttou ch th esurfaces or protective films
wit hh ardo bjects ,e.g.a ringori cescraper.
You could otherwise scratch or damage th e
surfaces and protective film.
!Do no tparkt he vehicle fo ranextende d
period straight after cleanin git,particularly
after havin gcleaned th ewheels wit hwhee l
cleaner. Wheel cleaners could cause
increase dcorro sion of th ebrake discs and
brake pads/linings. Fo rthisr eason ,you
should drive fo rafewminutes after cleaning.
Brakin gheat sthe brake discs and th ebrake
pads/linings, thus drying them. The vehicle
can then be parked.
Regular car eofyour vehicle is aconditi on for
retainin gthe qualit yint he longterm.
Use car eproducts and cleanin gagents recom -
mended and approved by Mercedes-Benz.
Washing th evehicle an dcleaning th e
paintwor k
Automatic car was h
GWARNING
Brakin gefficiency is reduce dafter washin g
th ev ehicle. There is ariskofana ccident.
Afte rthe vehicle has bee nwashed, brake
carefully whil epayin gattenti on to th etraffic
condition suntil full braking powe risrestored .
!If DISTRONIC PLU SortheHOLD function is
activated, th evehicle brake sautomatically in
certain situations.
To preven tdamage to th evehicle, deactivat e
DISTRONIC PLU Sand th eHOLDf unction in
th ef ollowin goro ther similar situations:
Rwhen towin gthe vehicle
Rin th ecar wash
!Never clean your vehicle in aTouchless
Automatic Car Wash as these use special
cleanin gagents .These cleanin gagents can
damage th epaintwor korplasticparts .
!Mak esuret hat:
Rthes idew indows and th eslidin gsunroof
are full yclosed.
Rth ev entilation/heatin gisswitched of f(th e
OF Fb utto nhas bee npressed).
Rthew indshield wipe rswitch is at position 0.
Rthe3 60°c amera or rea rviewc amera is
switched off.
The vehicle may otherwise be damaged .
!If theSmartKey is within th ereard etection
range of KEYLESS-GO ,the followin gsitua-
tions, fo rexample, could lead to th euninte
n
-
tional opening of th etrunk :
Rusin gac ar wash
Rusingap owerwasher
Mak esuret hatthe SmartKey is at leas t10ft
(3 m) away from th evehicle.
!Mak esuret hatthe automatic transmissio n
is in neutral position Nwhen washin gyour
vehicle in atow-throu gh car wash .The vehicle
may otherwise be damaged .
ROperatingwitht he SmartKey:
Do no tremov ethe SmartKey from th eigni-
tion lock. Do no topent he driver's doo r
292Care
Maintenance an dcare
Page 295 of 354
when theengine is switche doff or at very
low speeds.O therwise, when in transmis-
sion position Dor Rthea utomatic trans-
mission will automatically switch to park
position Pand blockt hewheels.
ROperatin gwith th eStart/Stop button:
Do not open th edriver's door when the
engine is switche doff or at veryl ow
speeds.O therwise, when in transmission
position Dor Rth ea utomatic transmission
will automatically switch to park position P
and blockt hewheels.
Observe th efollowing to makes ure that the
automatic transmission stays in position Nneu-
tral:
Operatin gwith th eSmartKey and th eStart/
Stop button:
XMake sure that th eignitio nisswitche don.
XMake sure that th evehicle is stationary.
XDepress and hold th ebrakep edal.
Operatin gwith th eStart/Stop button only:
XEngage park position P.
XRelease thebrakep edal.
XRemoveS tart/Stop button fromi gnitionlock
(Ypage 131).
XInsert th eSmartKey int othe ignitio nlock.
XSwitch on th eignition.
XDepress and hold th ebrakep edal.
Operatin gwith th eSmartKey and th eStart/
Stop button:
XShif tton eutral N.
XRelease th ebrakep edal.
XRelease th eelectric parking brake, if neces-
sary.
XSwitch off th eignitio nand leave th eSma rtKey
in th eignitio nlock.
You can wash th evehicle in an automatic car
wash fromt heverys tart.
If th evehicle is veryd irty, pre-wash it bef
ore
cleaning it in an automatic car wash.
After using an automatic car wash, wipe off wax
fromt hewindshield and th ewiper blades. This
will prevent smearsa nd reducewiping noises
caused by residue on th ewindshield.
Washing by hand
In some countries, washingbyh and is only
allowed at specially equipped washingb ays.
Observe th elegal requirements in each country.
XDo not use hot water and do not wash the
vehicle in directs unlight.
XUseasofts ponge to clean.
XUse amild cleaning agent, such as acar
shampoo approved by Mercedes-Benz.
XThoroughly hose down th evehicle with agen-
tle jet of water.
XDo not pointt hewater jet directly towards the
air inlet.
XUse plenty of water and rinse out th esponge
frequently.
XRinse th evehicle with clean water and dry
thoroughly with achamois.
XDo not let th ecleaning agentd ry on thepaint-
work.
Carefull yremove all deposits of road salt as
soon as possible when driving in winter.
Power washers
GWARNING
The water jet fromac ircular jet nozzle (dirt
blasters) can cause invisible exterior damage
to th etires or chassis components. Compo-
nents damaged in this way may fail unexpect-
edly. Thereisar isk of an accident.
Do not use power washersw ith circular jet
nozzles to clean th evehicle. Have damaged
tires or chassis component sreplaced imme-
diately.
!Always maintain adistanc eofatl east
11.8 in (30 cm) between th evehicle and the
power washer nozzle. Information about the
correctd istanceisavailable fromt heequip-
mentm anufacturer.
Move th epower washer nozzle aroundw hen
cleaning your vehicle.
Do not aim directly at any of th efollowing:
Rtires
Rdoor gaps, roof gaps, joints, etc.
Relectrical components
Rbattery
Rconnectors
Care293
Maintenance and care
Z
Page 299 of 354
Impurities combined with the effects of road grit
and corrosive environmental factors may causeflash rust to form on the surface. You can
restore the originals hine of the exhaust pipe by
cleaning it regularly ,especially in winter and
after washing.
XClean the exhaust pipe with acare product
tested and approved by Mercedes-Benz.
Interio rcare
Cleaning the display
!For cleaning, do not use any of the following:
Ralcohol-base dthinner or gasoline
Rabrasive cleaning agents
Rcommercially-availabl ehousehold cleaning
agents
These may damage the display surface. Do
not put pressure on the display surface when cleaning. This could leadtoi rreparabledam-
age to the display.
XBefore cleaning the display, make sure that it
is switched off and has cooled down.
XClean the display surface using acommer-
ciallya vailable microfiber cloth and TFT/LCD
display cleaner.
XDry the display surface using adry microfiber
cloth.
Cleaning the plastic trim
GWARNING
Care products and cleaning agents containing solvents cause surfaces in the cockpit to
become porous. As aresult, plastic parts may
come loose in the event of air bag deploy-
ment. There is arisk of injury.
Do not use any care products and cleaning
agents to clean the cockpit.
!Do not affix the following to plastic surfaces:
Rstickers
Rfilms
Rscented oil bottles or similar items
You can otherwise damage the plastic.
!Do not allow cosmetics, insect repellent or
sunscreen to come into contact with the plas- tic trim. This maintains the high-quality look of
the surfaces.
XWipe the plastic trim with
adamp, lint-free
cloth, e.g. amicrofiber cloth.
XHeavy soiling: use care and cleaning prod-
ucts recommended and approved by
Mercedes-Benz.
The surface may change color temporarily.
Wai tuntil the surface is dry again.
Cleaning the steering whee land gear or
selecto rlever
XThoroughly wipew ithadamp cloth or use
leather care agents that have been recom-
mended and approved by Mercedes-Benz.
Cleaning genuine wood and trim ele-
ments
!Do not use solvent-based cleaning agents
such as tar remover, wheel cleaners, polishes
or waxes. There is otherwise arisk of damag-
ing the surface.
!Do not use chrome polish on trim pieces.
The trim pieces have achrome look but are
mostly made of anodized aluminum and can
lose their shine if chrome polish is used .Use
ad amp, lint-free cloth instead when cleaning
the trim pieces.
If the chrome-plated trim pieces are very
dirty, you can use achrome polish. If you are
unsure as to whether the trim pieces are
chrome-plated or not, consult an authorized
Mercedes-Benz Center.
XWipe the wooden trim and trim pieces with a
damp, lint-free cloth, e.g. amicrofiber cloth.
XTrim elements with piano black finish:
clean with asoft, damp cloth and acommer-
ciallya vailable soap solution.
XHeavy soiling: use care and cleaning prod-
ucts recommended and approved by
Mercedes-Benz.
Cleaning the seat covers
General notes
!Do not use amicrofiber cloth to clean covers
made out of real leather, artificia lleather or
DINAMICA. If used often, these can damage
the cover.
Care297
Maintenancea nd care
Z
Page 301 of 354
Where willIfind...?
Reflective safety jacket
Removing/stowing the reflective
safety jackets
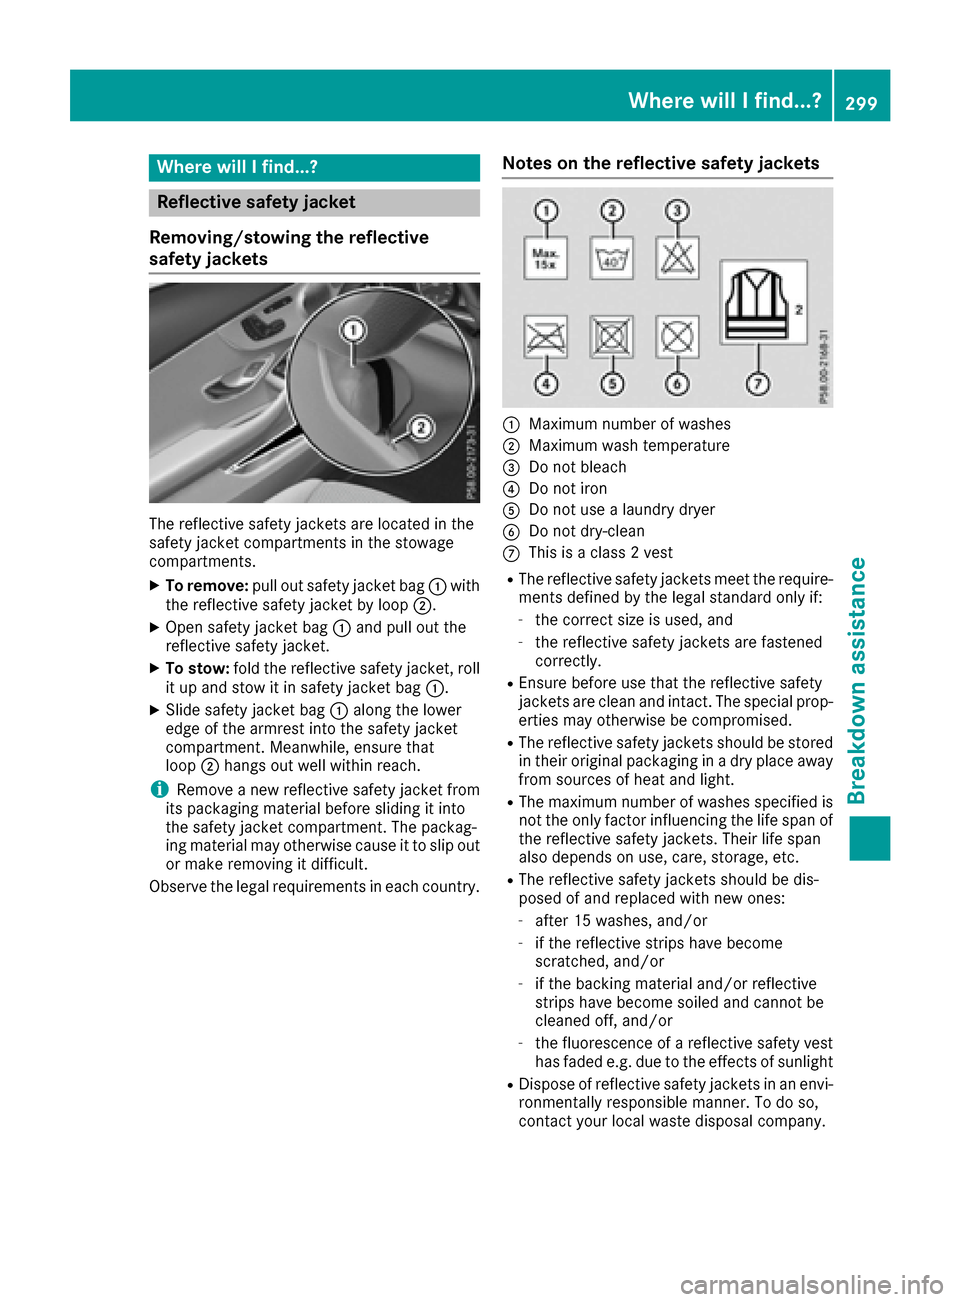
The reflective safety jackets are located in the
safety jacket compartments in the stowage
compartments.
XTo remove: pullout safety jacket bag :with
the reflective safety jacket by loop ;.
XOpen safety jacket bag:and pul lout the
reflective safety jacket.
XTo stow: fold the reflective safety jacket, roll
it up and stow it in safety jacket bag :.
XSlidesafety jacket bag :along the lower
edge of the armres tinto the safety jacket
compartment. Meanwhile, ensure that
loop ;hangs out wel lwithi nreach.
iRemove anew reflective safety jacket from
its packaging material before sliding it into
the safety jacket compartment. The packag-
ing material may otherwise caus eittoslipo ut
or make removing it difficult.
Observe the lega lrequirements in each country.
Notes on the reflective safety jackets
:Maximum numbe rofwashes
;Maximum wash temperature
=Do not bleach
?Do not iron
ADo not use alaundry dryer
BDo not dry-clean
CThis is aclass2v est
RThe reflective safety jackets meet the require-
ments defined by the lega lstandard only if:
-the correct size is used, and
-the reflective safety jackets are fastened
correctly.
REnsure before use that the reflective safety
jackets are cleana nd intact. The special prop-
erties may otherwise be compromised.
RThe reflective safety jackets should be stored
in their original packaging in adry place away
from sources of heata nd light.
RThe maximumnumbe rofwashes specified is
not the only factor influencing the life spano f
the reflective safety jackets. Theirl ife span
als od epends on use ,care, storage ,etc.
RThe reflective safety jackets should be dis-
posedofa nd replaced with new ones:
-after 15 washes, and/or
-if the reflective strips have become
scratched,and/or
-if the backing material and/or reflective
strips have become soiled and cannot be
cleaned off, and/or
-the fluorescence of areflective safety vest
has fade de.g. due to the effects of sunlight
RDispos eofreflective safety jackets in an envi-
ronmentall yresponsiblem anner. To do so,
contact you rlocalw aste disposal company.
Where will Ifind...?299
Breakdown assistance
Page 303 of 354
XSwitch off the engine.
XRemove the SmartKey from the ignition lock.
or, in vehicles with KEYLESS-G Ostart-function
or KEYLESS ‑GO
XOpenthe driver' sdoor.
The on-board electronics now have status 0.
Thi sist he same as the SmartKey having been
removed.
XRemove the Start/Sto pbutton from the igni-
tion lock (Ypage 131).
XMake sure that the engine canno tbes tarted
via your smartphone (Ypage 134).
XMake sure that the passenger sare not endan-
gered as they do so. Make sure that no one is neart he danger are awhile awheel is being
changed .Anyone wh oisnot directl yassisting
in the wheel change should, for example,
stand behind the barrier.
XGe toutof the vehicle. Paya ttention to traffic
conditions when doing so.
XClose the driver' sdoor.
MOExtended tires( tires with run-flat
properties)
General notes
With MOExtended tire s(tires with run fla tchar-
acteristics) ,you can continu etodrive your vehi-
cle eve nifthere is atotal loss of pressure in one
or more tires. The affected tire mus tnot show
any clearl yvisible damage.
You can recognize MOExtended tire sbythe
MOExtended marking which appears on the
sidewal lofthe tire .You will find this marking
next to the tire size designation, the load-bear-
ing capacity and the speed index (
Ypage 330).
MOExtended tire smay only be used in conjunc-
tion with an active tire pressure loss warning
system or with an active tire pressure monitor.
If ap ressure loss warnin gmessage appears
in the multifunctio ndisplay:
Robserve the instructions in the display mes-
sages (Ypage 241).
Rcheck the tire for damage.
Rif driving on, observe the following notes.
The driving distance possible in run-flat mod eis
approximately 50 miles (80 km )whent he vehi-
cle is partiall ylad en. Whe nthe vehicl eisfully
laden it is approximately 19 miles (30 km). In addition to the vehicl
eload, the driving dis-
tance possible depends upon:
Rvehicl espeed
Rroa dcondition
Routsid etemperature
The driving distance possible in run-flat mode
may be reduce dbyextremedriving conditions
or maneuvers, or it can be increased through a
moderate style of driving.
The driving distance possible in run-flat mod
eis
co
unted from the moment the tire pressure loss
warning appears in the multifunction display.
You mus tnot excee damaximum speed of
50 mph (80 km/h).
Whe nreplacing one or al ltires, please observe
the following specifications for your vehicle's
tires:
Rsize
Rthe typ eand
Rthe "MOExtended" mark
If at ire hasg one flatand canno tbereplaced
with aMOExtended tire ,astandard tire may be
used as atemporary measure. Make sure that
yo uu sethe proper size and typ e(summer or
winter tire).
Vehicles equipped with MOExtended tire sare
not equipped with aTIREFIT kit at the factory. It
is therefore recommended that yo uaddit ionally
equip your vehicl ewithaT IREFIT kit if yo umount
tire sthat do not feature run-flat properties ,e.g.
winter tires. ATIREFIT kit may be obtaine dfrom
aq uali fied specialist workshop.
Important safety notes
GWARNING
Whe ndriving in emergency mode, the driving
characteristics deteriorate ,e.g. when corner-
ing, accelerating quickl yand when braking.
There is ariskofana ccident.
Do not excee dthe state dmaximum speed.
Avoi dabrup tsteering and driving maneuvers,
and driving ove robstacles (curbs ,potholes,
off-road). Thi sapplies in particula rtoaladen
vehicle.
Stop driving in emergency mod eif:
Ryouh earb anging noises.
Rthe vehicl estarts to shake.
Flat tire301
Breakdown assistance
Z
Page 304 of 354
Ryou see smokeand smell rubber.
RESP®is intervenin gconstantly .
Rthere are tears in th esidewalls of th etire.
Afte rdrivin gine mergenc ymode, hav ethe
whee lrim sc hecked ataq ualified specialist
workshop wit hregard to their further use. The
defective tire mus tbereplaced in every case.
TIREFIT kit
Impor tant safety notes
TIREFITisat ires ealant .
You can use TIREFI Ttoseal punctures of up to
0.16 in (4 mm), particularly those in th etire
tread. You can use TIREFI Tatoutside tempera-
tures down to Ò4‡(Ò20 †).
GWARNIN G
In th efollowin gsituations, th etires ealant is
unable to provid esufficien tbreakdown assis-
tance ,asitisu nable to seal th etirep roperly:
Rthere are cut sorpunctures in th etirel arger
than those mentioned above.
Rth ew hee lrim is damaged.
Ryou hav edriven at ver ylow tire pressures or
on aflat tire.
There is ariskofana ccident.
Do no tdrive th evehicle. Contac taqualified
specialist workshop .
GWARNING
The tire sealant is harmful and causes irrita-
tion .Itm ustn otcome into contact wit hyour
skin ,eyes or clothin gorbeswallowed .Donot
inhale TIREFI Tfumes. Kee ptires ealant away
from children .There is ariskofi njury.
If you come into contact wit hthe tire sealant ,
observ ethe following:
RRinse off th etires ealant from your skin
immediately wit hwater.
RIf th etires ealant comes into contact wit h
your eyes ,immediately rinse them thor-
oughly wit hclean water.
RIf tire sealant is swallowed ,immediately
rinse your mout hout thoroughl yand drink
plenty of water. Do no tind ucev omiting,
and see kmedica lattention immediately.
RImmediately chang eout of clothin gwhich
has come into contact wit htires ealant .
RIf an allergic reaction occurs, see kmedica l
attention immediately.
!Do no toperate th etirei nflation compressor
for longer than te nminute satat imew ithout
ab reak. It may otherwise overheat.
The tire inflation compressor can be operate d
again once it has cooled down .
Comply wit hthe manufacturer’s safet yinstruc-
tion sont hesticker on th etirei nflation com-
pressor.
Usingt heTIREFIT kit
XDo no tremove any foreign objects whic hhave
penetrated th etire, e.g. screw sornails.
XRemove th etires ealant bottle, th eaccompa-
nying TIREFI Tsticker and th etirei nflation
compressor from th estowage well under-
neath th etrunk floor (
Ypage 300).
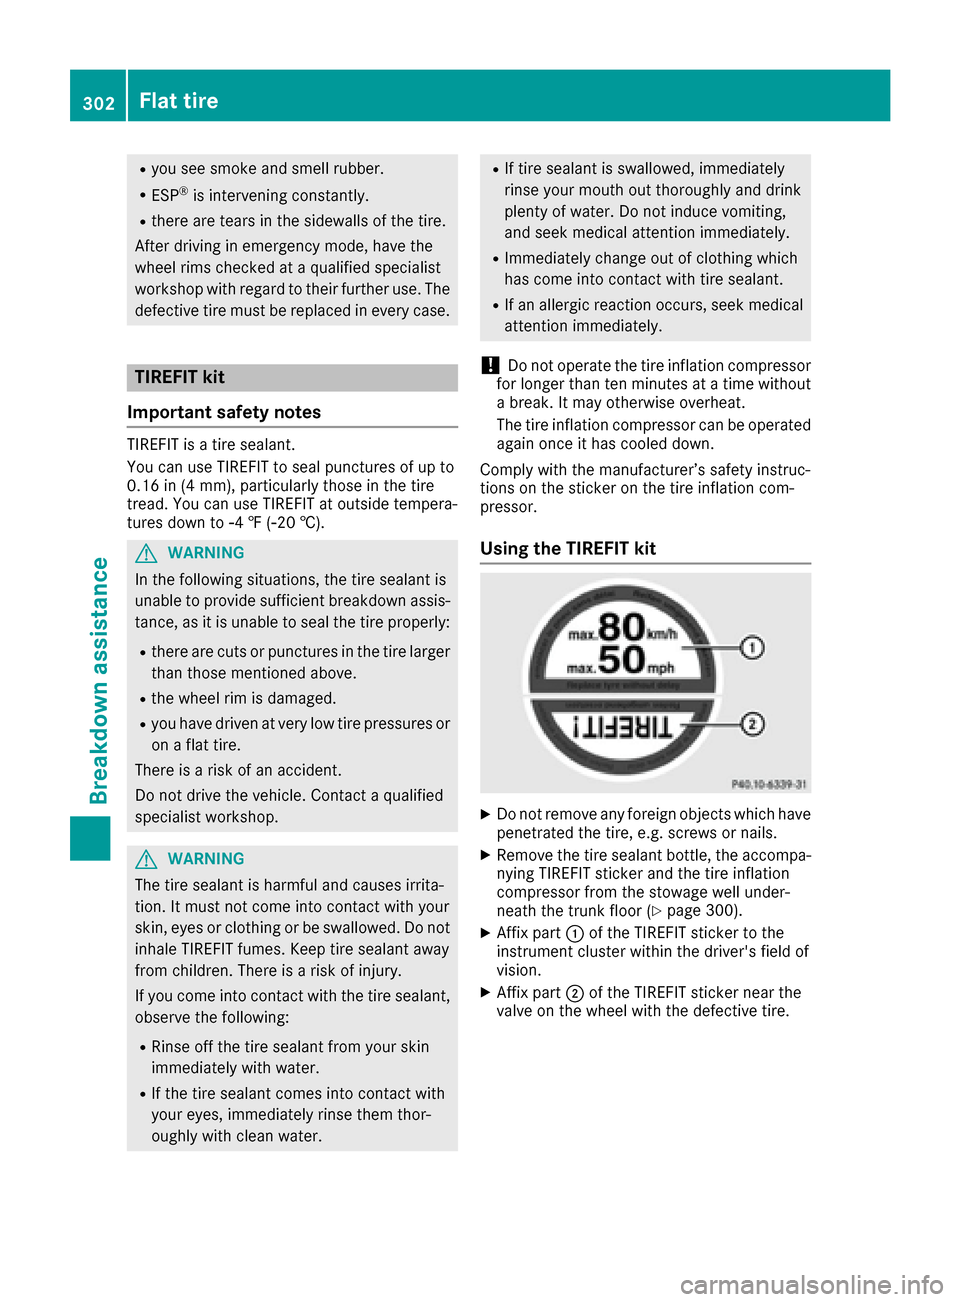
XAffix part :of th eTIREFI Tsticker to th e
instrumen tcluste rwithin th edriver's field of
vision .
XAffix part ;of th eTIREFI Tsticker near th e
valv eont hewhee lwitht he defective tire.
302Flat tire
Breakdown assis tance
Page 306 of 354
Tire pressure reached
GWARNING
At ire temporaril yseale dwitht ire sealant
impairs the drivin gcharacteristics and is not
suitabl efor highe rspeeds. There is arisko f
accident.
Yo us houl dtherefore adap tyou rd rivin gstyle
accordingly and drive carefully. Do not exceed the specifie dmaximum spee dwithat ire that
hasb eenr epaired using tire sealant.
The maximum permissibl espeed foratire
seale dwitht ire sealant is 50 mph (80 km/h).
The uppe rpartoft he TIREFIT sticker must be
affixe dtothe instrument cluster in the driver's
field of vision.
!Residu efromt he tire sealant mayc ome out
of the fille rhosea fter use. Thi scould cause
stains.
Therefore ,place the fille rhoseint he plastic
ba gw hich containe dthe TIREFIT kit.
HEnvironmental note
Hav ethe used tire sealant bottle dispose dof
professionally, e.g .ataqualified specialist
workshop.
If at ire pressure of 200 kPa (2.0 bar/29 psi) has
been attaine dafter ten minutes:
XSwitch off the tire inflation compressor.
XUnscrew the fille rhosef romt he valve of the
faulty tire.
XStow the tire sealant bottle and the tire infla-
tio nc ompressor.
XPul lawa yimmediately.
XStop after drivin gfor approximately ten
minute sand check the tire pressure with the
tire inflation compressor.
The tire pressure must now be at least
130 kPa (1.3 bar/19 psi).
GWARNING
If the required tire pressure is not reached
after drivin gfor as hort period, the tire is too
badl ydamaged .The tire sealant canno trepair
the tire in thisi nstance.Damaged tire sand a
tire pressure thati stoo lo wcan significantly
impai rthe vehicle's braking and drivin gchar-
acteristics .There is ariskofa ccident.
Do not continue driving. Contact aquali fied
specialis tworkshop.
iIn cases such as the one mentione dabove,
contact an authorize dMercedes-Benz Cen-
ter. Or cal l1-800-FOR-MERCede s(in the
USA) or 1-800-387-0100 (i nCanada).
XCorrect the tire pressure if it is stil latleast
130 kPa (1.3 bar/19 psi). See the Tire and
Loading Informatio nplacard on the driver's
side B-pillar or the tire pressure table in the
fue lfille rflapf or values.
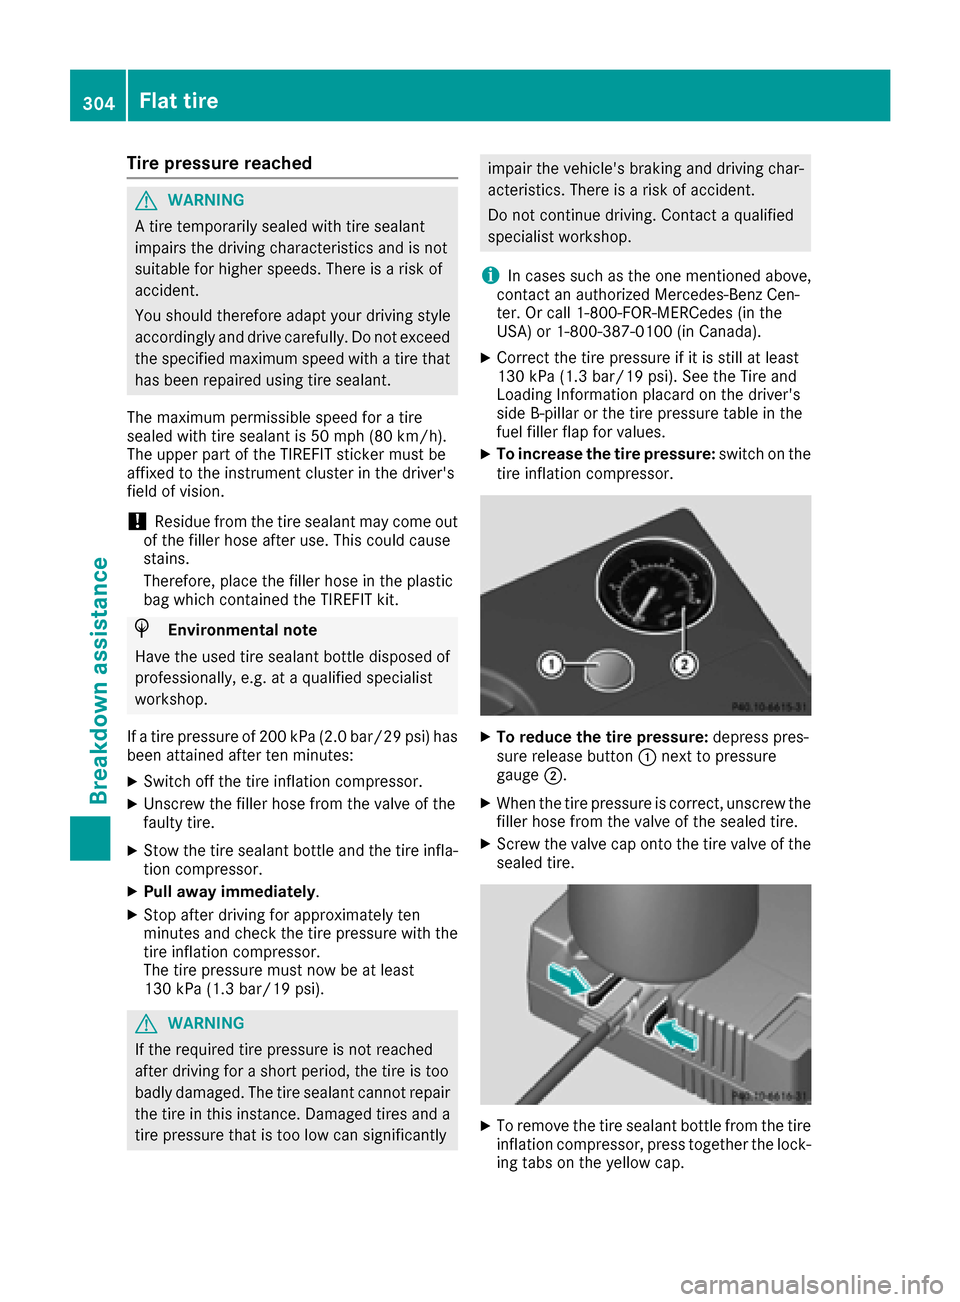
XTo increase the tire pressure: switch on the
tire inflation compressor.
XTo reduc ethe tire pressure: depress pres-
sure release button :next to pressure
gauge ;.
XWhenthe tire pressure is correct, unscrew the
fille rhosef rom the valve of the seale dtire.
XScrew the valve cap onto the tire valve of the
seale dtire.
XTo remove the tire sealant bottle from the tire
inflation compressor ,press together the lock-
ing tab sonthe yellow cap.
304Flat tire
Breakdo wn assis tance
Page 307 of 354
XPull the tire sealant bottle out of the tire infla-
tion compressor.
The filler hose remains attached to the tire
sealant bottle.
XDrive to the nearest qualified specialist work-
shop and have the tire changed there.
XHave the tire sealant bottle and the filler hosereplaced as soon as possible at aqualified
specialist workshop.
XHave the tire sealant bottle replaced every
four years at aqualified specialist workshop.
Battery (vehicle)
12 Vb attery –important safety notes
Special tools and expert knowledge are required
when working on the battery, e.g. removal and
installation .You should therefore have all work
involvin gthe battery carried out at aqualified
specialist workshop.
GWARNING
Work carried out incorrectly on the battery
can lead, for example, to ashort circuit and
thus damage the vehicle electronics. This can
lead to function restriction sapplying to
safety-relevant systems, e.g the lighting sys-
tem, the ABS (anti-loc kbraking system) or the
ESP
®(Electronic Stability Program). The oper-
ating safety of your vehicle may be restricted.
You could lose control of the vehicle, for
example:
Rwhen braking
Rin the event of abrupt steerin gmaneuvers
and/or when the vehicle's speed is not
adapted to the road conditions
There is arisk of an accident.
In the event of ashort circuit or asimilar inci-
dent, contact aqualified specialist workshop
immediately. Do not drive any further .You
should have all work involvin gthe battery car-
ried out at aqualified specialist workshop.
For further information about ABS and ESP
®,
see (Ypage 62) and (Ypage 67).
All vehicles except vehicles with alithium-
ion battery:
GWARNING
Electrostatic build-up can lead to the creation of sparks, which could ignite the highly explo-
sive gases of abattery. There is arisk of an
explosion.
Before handling the battery, touch the vehicle
body to remove any existin gelectrostatic
build-up.
The highly flammable gas mixture forms when
charging the battery as well as when jump-start-
ing.
Always make sure that neither you nor the bat-
tery is electrostatically charged. Abuild-up of
electrostatic charge can be caused, for exam-
ple:
Rby wearing clothin gmade from synthetic
fibers
Rdue to friction between clothin gand seats
Rif you push or pull the battery across the car-
pet or other synthetic materials
Rif you wipe the battery with acloth
GWARNING
During the charging process, abattery produ-
ces hydrogen gas. If ashort circuit occurs or
sparks are created, the hydrogen gas can
ignite. There is arisk of an explosion.
RMake sure that the positive terminal of a
connected battery does not come into con-
tact with vehicle parts.
RNever place metal object sortools on abat-
tery.
RIt is importan tthat you observe the descri-
bed order of the battery terminals when
connectin gand disconnectin gabattery.
RWhen jump-starting, make sure that the
battery poles with identical polarity are
connected.
RIt is particularly importan ttoobserve the
described order when connectin gand dis-
connectin gthe jumper cables.
RNever connect or disconnect the battery
terminals while the engine is running.
GWARNING
Battery acid is caustic. There is arisk of injury.
Battery (vehicle)305
Breakdown assistance
Z
Page 308 of 354
Avoidcontact with skin, eyes or clothing. Do
not inhal eany battery gases .Donot lean over
the battery .Keepc hildren away from batter-
ies. Wash away battery aci dimmediatelyw ith
plenty of clean water and see kmedica latten-
tion.
Al lv eh icles:
HEnvironmental note
Batterie scontain dangerous
substances .Itisagainst the
la wtod ispose of them with
the householdr ubbish.They
must be collected separately and recycle dtoprotect the
environment.
Dispose of batteries in an
environmentally friendly
manner. Take discharged
batteries to aquali fied spe-
cialist workshop or aspecial
collectio npoint for used bat-
teries.
!Hav ethe battery checked regularly at a
qualified specialist workshop.
Observ ethe service intervals in the Mainte-
nance Bookle torcontact aquali fied specialist
workshop for more information.
!Alway shavew orkonb atteries carrie doutat
aq uali fied specialist workshop.S hould it, in
exceptionalc ircumstances ,beabsolutely
necessary to disconnect the 12-volt battery
yourself, observe the following:
Rsecur ethe vehicl etoprevent it from rolling
away.
Rswitch off the ignition.
Ralways disconnect the negative terminal
clamp first, followe dbythe positive termi-
nal clamp.
After the battery hasb eend isconnected ,the
transmission is locked in position P.
After the work hasb eend one, instal lthe bat-
tery and replace the cove rofthe positive ter-
mina lclamp firmly.
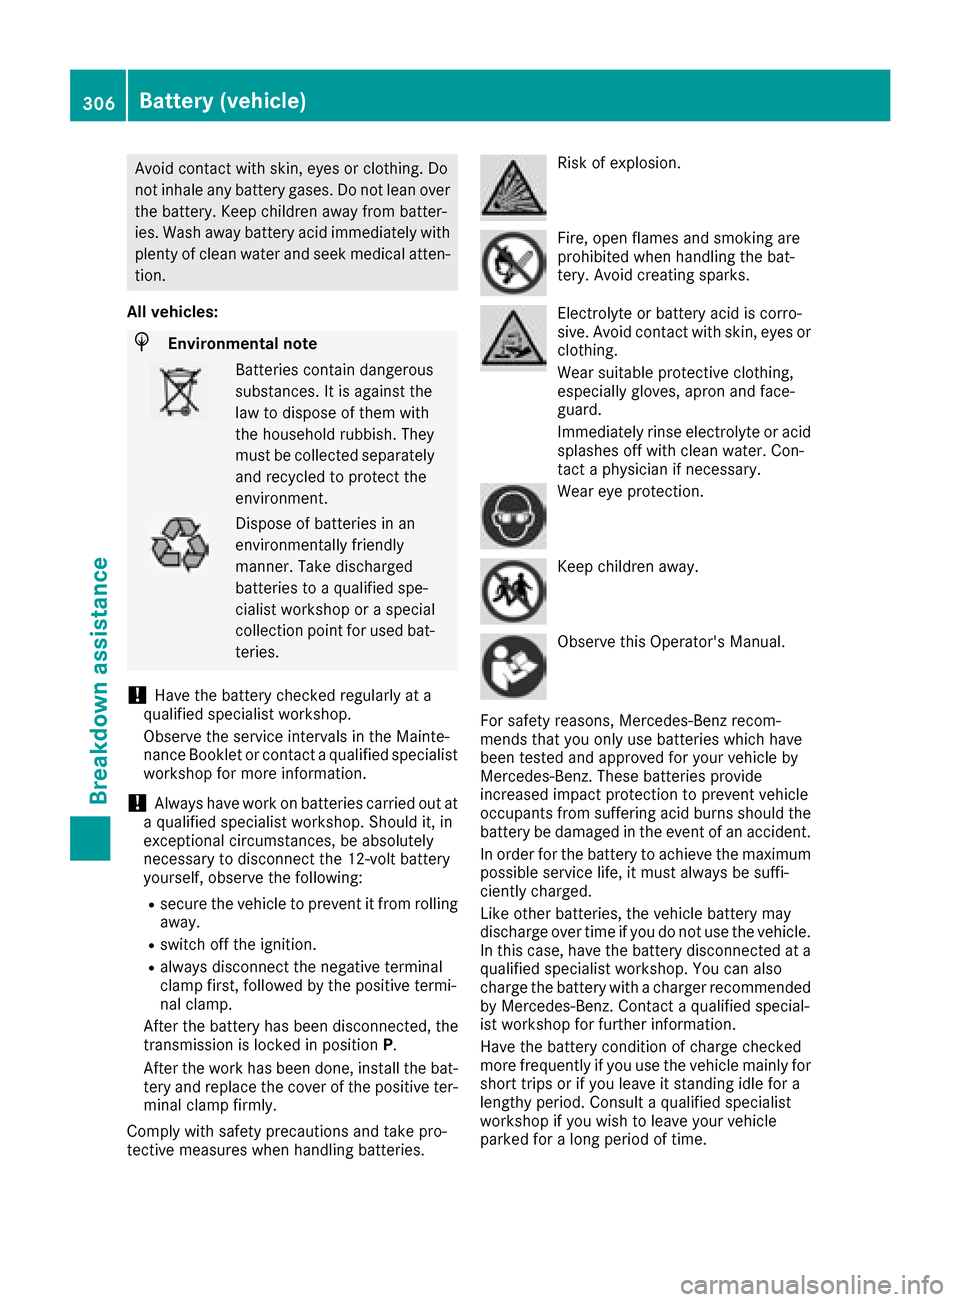
Compl ywiths afety precautions and take pro-
tective measures when handling batteries.
Risk of explosion.
Fire, open flames and smoking are
prohibited when handling the bat-
tery .Avoi dc reating sparks.
Electrolyte or battery aci discorro-
sive. Avoi dcontact with skin, eyes or
clothing.
Wear suitabl eprotective clothing,
especially gloves, apron and face-
guard.
Immediately rins eelectrolyte or acid
splashes off with clean water. Con-
tact aphysicia nifnecessary.
Wear ey eprotection.
Kee pchildren away.
Observ ethisO perator' sManual.
For safety reasons ,Mercedes-Benz recom-
mend sthaty ouonlyu sebatteries which have
been teste dand approved for your vehicl eby
Mercedes-Benz. These batteries provide
increased impact protection to prevent vehicle
occupants from suffering aci dburns shoul dthe
battery be damagedint he event of an accident.
In order for the battery to achieve the maximum
possibl eservice life, it must always be suffi-
ciently charged.
Like othe rbatteries, the vehicl ebattery may
discharge ove rtime if yo udonot usethe vehicle.
In thisc ase, have the battery disconnected at a
qualified specialist workshop.Y oucan also
charge the battery with acharge rrecommended
by Mercedes-Benz. Contact aquali fied special-
is tw orkshop for furthe rinformation.
Hav ethe battery condition of charge checked
more frequentlyify ouuset he vehicl emainl yf or
short trip sorifyouleav eits tanding idle for a
lengthy period. Consult aquali fied specialist
workshop if yo uwishtol eave your vehicle
parked for alon gp eriodoft ime.
306Battery (vehicle)
Breakdo wn assis tance