ESP MERCEDES-BENZ C-Class COUPE 2017 CL205 Owner's Manual
[x] Cancel search | Manufacturer: MERCEDES-BENZ, Model Year: 2017, Model line: C-Class COUPE, Model: MERCEDES-BENZ C-Class COUPE 2017 CL205Pages: 354, PDF Size: 8.66 MB
Page 266 of 354

is possible,park the vehicle paying attention
to traffic condition sand operatet he equip-
mentw hen the vehicle is stationary.
You must observe the legal requirements for the
countr yinwhich you are currently drivingw hen
operating the navigation system.
General notes
Among other things, correctf unctioning of the
navigation system depends on GPS reception. In
certain situations ,GPS receptio nmay be
impaired,t here may be interference or there
may be no receptio natall, e.g. in tunnels or
parking garages.
Audio 20 is equipped with MARGIN
®MAP PILOT
(see the manufacturer'so perating instructions).
The Garmin
®MAP PILOTo perating instructions
are stored on the SD memory card as aPDF file.
The SD card box contain saquick guide.
The followingd escriptions apply to navigation
with COMAND.F urther information can be
foundint he Digital Operator's Manual.
Selecting aroute typ eand route options
Multimedia system:
XSelect NaviQNavigation.
The map shows the vehicle's current position.
XSlide 6the controller.
XSelect OptionsQRouteS ettings.
Notes for routet ypes:
REco Route
RDynamic Traffic Route
Traffic reports on the routef or the routeguid-
anc eare taken int oaccount.
RCalculateA lternative Routes
Different routes are being calculated. Instead
ofStartselectt heContinuemenui tem.
Notes for routeo ptions:
RUse Toll Roads
The routecalculation includes roads which
require you to pay ausage fee (toll).
RUse Carpool Lanes(only available in the
USA)
Prerequisite: your vehicle meetst he access
condition sfor carpool lanes.
Carpool lanes will be included if the carpool
lanes optio nisactivated.
Entering an address
Multimedia system:
XSelect NaviQNavigation.
The map shows the vehicle's current position.
XSlide 6the controller.
XSelect DestinationQAddress Entry.
Enter an address,e .g. as follows:
RcityorZ IP code, street, house number
Rcountry, cit yorZIP code
RcityorZ IP code, center
Rstreet, cit yorZIP code, intersection
XSelect City.
The cit yinwhich the vehicle is currently loca-
ted (current vehicle position) is at the top.
Below this ,you will see locations for which
routeg uidancehas already been carried out.
XEnter the city.
The Gsymbol: the location is contained on
the digital map multiple times.
XTo switch to th elist: slide the 5control-
ler.
XSelec tthe location.
If available, the ZIP code is shown.Ift here are
differentZ IP codes available for the location,
the correspondin gdigits are displayed with an
X
.
XEnter the street and house number.
The address is in the menu.
Further options for destination entry:
Rsearchf orak eyword
The keywor dsearchf inds destinations using
fragment sofwords.
Rselectt he last destination
Rselectac ontact
RselectaP OI
You can searchf oraP OI by location, name or
telephonen umber.
Rselectdestination on the map
Renter intermediate destination
You can map the routetot he destination
yourself with up to four intermediate destina-
tions.
Rselectd estinations fromM ercedes-Benz
Apps
Rselectg eo-coordinates
264Operating system
Multimedia system
Page 269 of 354

the vehicle. Hightemperatures can damage
the card.
Insertin ganSDm emory card
The SD cardslotisl ocate dint he stowag ecom-
partment under the armrest.
XInsert the SD memory car dinto the SD card
slot unti litengages .The side with the con-
tacts must face downwards.
XSelect the media source (Ypage 266).
Ejecting an SD memory card
XPress the memory card.
The memory car disejected.
XRemov ethe memory card.
Connectin gUSBdevices
There ar etwo USB ports in the stowag espace
under the armrest.
XConnect the USB devic etothe USB port.
XSelect the media source (Ypage 266).
Operatin gsystem267
Multimedia system
Z
Page 270 of 354

Stowage areas
Loading guidelines
GWARNING
Combustion engines emit poisonous exhaust
gases such as carbon monoxide. Exhaust
gases can enter the vehicle interior if the
trunk lid is open when the engine is running,
especially if the vehicle is in motion. There is a
risk of poisoning.
Always switch off the engine before opening
the trunk lid. Never drive with the trunk lid
open.
GWARNING
If objects, luggage or loads are not secured or
not secured sufficiently, they could slip, tip
over or be flung around and thereby hit vehicle
occupants. There is arisk of injury, particu-
larly in the event of sudden braking or asud-
den change in direction.
Always store object ssothat they cannot be
flung around. Secure objects, luggage or
loads against slipping or tipping before the
journey.
GWARNING
The exhaust tail pipe and tail pipe trim can
become very hot. If you come into contact
with these parts of the vehicle, you could burn
yourself. There is arisk of injury.
Always be particularly careful around the
exhaust tail pipe and the tail pipe trim. Allow
these components to cool down before touch-
ing them.
The handling characteristics of aladen vehicle
are dependent on the distribution of the load
within the vehicle. For this reason, you should
observe the following notes when transporting a
load:
RNever exceed the maximum permissible
gross vehicle mass or the gross axle weight
rating for the vehicle (including occupants).
The values are specified on the vehicle iden- tification plate on the B-pillar of the driver's
door.
RThe trunk is the preferred place to carry
objects.
RPosition heavy loads as far forwards as pos-
sible and as low down in the trunk as possible.
RThe load must not protrude above the upper
edge of the seat backrests.
RAlways place the load behind unoccupied
seats if possible.
RSecure the load with sufficiently stron
gand
wear-resistant tie-downs. Pad sharp edges for
protection.
Stowage spaces
Important safety notes
GWARNING
If object sinthe passenger compartmenta re
stowed incorrectly, they can slide or be
thrown around and hit vehicle occupants. In
addition, cupholders, open stowage spaces
and mobile phone brackets cannot always
retain all object sthey contain. There is arisk
of injury, particularly in the event of sudden
braking or asudden change in direction.
RAlways stow object ssothat they cannot be
thrown around in such situations.
RAlways make sure that object sdonot pro-
trude from stowage spaces, parcel nets or
stowage nets.
RClose the lockable stowage spaces before
startin gajourney.
RAlways stow and secure heavy, hard, poin-
ted, sharp-edged, fragile or bulky object sin
the trunk.
Observe the loading guidelines (
Ypage 268).
268Stowage areas
Stowage and features
Page 272 of 354

Depending on the vehicle's equipment, the fol-
lowing maybeinthe stowagespace:
Ram ultimedia connector uni twith2U SB ports
and aSDc ards lot, e.g .for us ewithani Pod®,
iPhone®or MP3 player, see the separate
Operator' sManual
Ras mall stowag espace in the uppe rfront sec-
tion
Stowage compartment in the doors
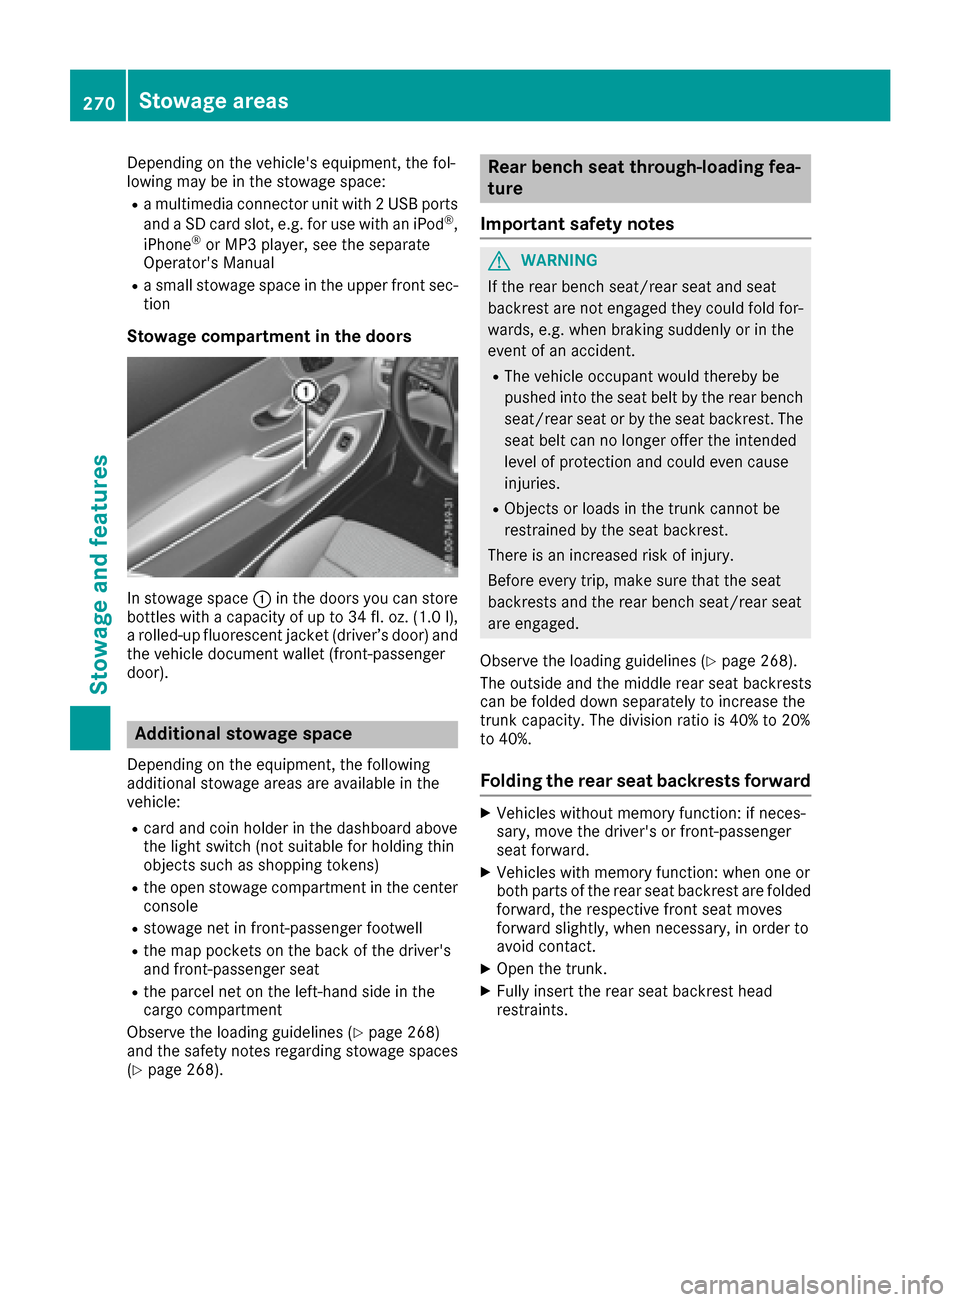
In stowag espace : in the doors yo ucan store
bottle swithac apacity of up to 34 fl. oz. (1.0 l),
ar olled-up fluorescent jacke t(driver’s door)a nd
th ev ehicle documentw allet (front-passenger
door).
Additional stowage space
Dependingont heequipment ,the following
additional stowage areas are availabl einthe
vehicle:
Rcar dand coi nholderint hedashboard above
th el ight switch (no tsuitable for holding thin
object ssuchass hoppingt okens)
Rtheo pen stowage compartmentint hecenter
console
Rstowage net in front-passenger footwell
Rth em ap pockets on th eback of th edriver's
and front-passenger seat
Rth ep arcel net on th eleft-hand side in the
cargo compartment
Observ ethe loadingg uidelines (
Ypage 268)
and th esafety note sregardin gstowage spaces
(
Ypage 268).
Rea rbench seat through-loading fea-
ture
Important safety notes
GWARNING
If th erear bench seat/rear seat and seat
backres tare no tengaged they coul dfold for-
wards ,e.g.w hen braking suddenly or in the
eventofana ccident.
RThe vehicle occupant would therebyb e
pushedi ntot he seat belt by th erear bench
seat/rear seat or by th eseat backrest. The
seat belt can no longer offer th eintended
levelofp rotection and coul deven cause
injuries.
RObject sorloads in th etrunk canno tbe
restraine dbytheseat backrest.
Thereisani ncreased risk of injury.
Before everyt rip, makes ure that th eseat
backrests and th erear bench seat/rear seat
are engaged.
Observ ethe loadingg uidelines (
Ypage 268).
The outside and th emiddle rear seat backrests
can be folded down separately to increas ethe
trunk capacity. The division ratio is 40 %to20%
to 40%.
Foldin gthe rea rseat backrests forward
XVehicle swithout memory function:ifn eces-
sary, movet hedriver'sorf ront-passenger
seat forward.
XVehicle swith memory function:w hen oneor
bothp artsoft herear seat backres tare folded
forward, th erespectiv efront seat moves
forward slightly, when necessary, in orde rto
avoid contact.
XOpen th etrunk.
XFully insert th erear seat backres thead
restraints.
270Stowage areas
Stowage and features
Page 273 of 354

Left and right seat backrest
XPullright-hand or left-hand rear seat backrest
release handle :.
The corresponding rear seat backrest is
released.
Vehiclesw ith memory function: when one or
both parts of the rear seat backrest are folded
forward ,the respective front seat moves
forward slightly, when necessary ,inorder to
avoid contact.
Middle rear seat backrest
XPul lrelease lever =forwards.
Rea rseat backrest ;is released.
XFold corresponding rear seat backrest ;
forward.
XMove the driver's or front-passenger seat
back if necessary.
Folding the rear seat backrest back
!Make sure that the seat belt does not
become trapped when folding the rear seat
backrest back. Otherwise ,itcould be dam-
aged.
Left and right seat backrest
XMove the driver's or front-passenger seat
forward if necessary.
XFold rear seat backrest :back until it
engages.
If the rear seat backrest is not engaged and
locked, this wil lbeshown in the multifunction
display in the instrument cluster. Awarning
tone also sounds.
Middle rear seat backrest
XMove the driver's or front-passenger seat
forward if necessary.
XFold seat backrest :back until it engages.
Red lock status indicator ;is no longer visi-
ble.
Stowag eareas271
Stowag eand features
Z
Page 278 of 354

There isarisk of fire and injury.
Always hold the cigarettel ighter by the knob.
Always make sure that the cigarettel ighter is
out of reach of children. Never leave children
unsupervised in the vehicle.
Your attention must alwaysbef ocused on the
traffic conditions. Only use the cigarettel ighter
when road and traffic conditions permit.
Example
XTurn the SmartKey to position 2in the ignition
lock (Ypage 131).
XTo open: open the stowage compartment
(Ypage 269).
XPress in cigarettel ighter;.
Cigarette lighter ;will pop out automatically
when the heating element is red-hot.
XTo close: push cover :of the stowage com-
partmen tclosed.
12 Vsockets
General notes
XTurn the SmartKey to position 1in the ignition
lock (Ypage 131).
The socket scan be used for accessories with a
maximum draw of 180 W(15 A). Accessories
include such items as chargers for mobile
phones.
If you use the socketsf or long periods when the
engine is switched off, the battery may dis-
charge.
An emergencyc ut-out ensures that the on-
board voltage does not drop too low. If the on-
board voltage is too low, the power to the sock-
ets is automatically cut. This ensures that there is sufficient power to start the engine. If you have connected
adevice to the 12 V
socket,l eave the cover of the stowage com-
partmen topen. This prevent sthe cover from
being blocked.
Socket in the front center console
XTo open: open the stowage compartment
(Ypage 269).
XLift up the cover of the socket.
XTo close: push the cover of the stowage com-
partmen tclosed.
Socket in the rear compartment center
console
XPull the cover out by the top of the handle
edge.
XLift up the cover of the socket.
mbrace
General notes
The mbrace system is only availableint he USA.
You must have alicense agreement to activate
the mbrace service. Make sure that your system
is activated and operational. To log in, press the
ï MB Info call button .Ifany of the steps
mentioned are not carried out, the system may
not be activated.
If you have questions about the activation ,con-
tact one of the following telephone hotlines:
Mercedes-Benz Customer Assistance Center at
1-800-FOR-MERCedes (1-800-367-6372)o r
1-866-990-9007
Shortly after successfully registerin gwith the
mbrace service, auser ID and password will be
sent to you by mail. You can use this password
to log ontot he mbrace area under "Owners
Online" at http://www.mbusa.com.
The system is availablei f:
Rit has been activated and is operational
Rthe corresponding mobile phone network is
available for transmitting data to the Cus-
tomer Center
Raservice subscription is available
276Features
Stowage and features
Page 280 of 354

All important informationonthe emergency is
transmitted, for example:
Rcurrent location of the vehicl e(as determined
by the GP Ssystem)
Rvehicl eide ntificatio nnumber
Rinformatio nonthe severity of the accident
Shortly afte rthe emergency cal lhas been initi-
ated, avoice connectio nisa utomaticall yestab-
lishe dbetween the Customer Assistance Center
and the vehicl eoccupants.
RIf the vehicl eoccupants respond, the
Mercedes-Benz Customer Assistance Center
attempts to get more informatio nonthe
emergency.
RIf ther eisnor esponse from the vehicl eoccu-
pants, an ambulance is immediatelys ent to
the vehicle.
If no voice connectio ncan be established to the
Mercedes-Benz Customer Assistance Center,
the system hasb eenu nabl etoi nitiate an emer-
gency call.
Thi scan occur, for example, if the relevant
mobil ephone network is not available. The indi-
cato rlam pint he SOS button flashe scontinu-
ously.
The CallFailed
message appear sinthe mul-
tifunctio ndisplay and must be confirmed.
In thisc ase, summon assistance by other
means.
Making an emergenc ycall
XTo initiate an emergenc ycallm anually:
press cover :briefl ytoo pen.
XPress and hol dthe SOS button for at leas tone
second ;.
The indicator lamp in SOS button ;flashes
unti lthe emergency cal lisconcluded.
XWait for avoice connectio ntothe Mercedes-
Benz Customer Assistance Center.
XAfter the emergency call, close cover :.
If the mobil ephone network is unavailable,
mbrace will not be able to make the emergency
call. If yo uleave the vehicl eimmediatelya fter
pressing the SOS button, yo uwilln ot know
whethe rmbrace place dthe emergency call. In
thisc ase, always summona ssistance by other
means.
Roadside Assistance button
XTo cal lRoadside Assistance: press Road-
side Assistance button :.
Thi sinitiates acalltot he Mercedes-Benz Cus-
tome rAssistance Center.
The indicator lamp in Roadside Assistance
button :flashe swhile the cal lisactive. The
Connectin gCall
message appear sinthe
multifunctio ndisplay .The audi ooutputi s
muted.
If ac onnectio ncan be made ,the Cal lCon‐
nectedmessage appear sinthe multifunction
display.
If am obilephone network and GP Sreception
ar ea vailable, the system transfer sdatatot he
Mercedes-Benz Customer Assistance Center,
for example:
Rcurrent location of the vehicle
Rvehicl eide ntificatio nnumber
The multimedia system display indicates thata
cal lisa ctive. During the call, yo ucan change to
the navigation menu by pressing the NAVI but-
ton on the multimedia system ,for example.
Voice outpu tisn ot availabl einthiscase.
Av oice connectio nise stablished between the
Mercedes-Benz Customer Assistance Center
and the vehicl eoccupants.
278Features
Stowag eand featur es
Page 281 of 354

From the remote malfunction diagnosis, the
Mercedes-Benz CustomerAssistance Center
can ascertai nthe nature of the problem
(
Ypage 282).
The Mercedes-Benz CustomerA ssistance Cen-
ter either send saqualified Mercedes-Benz tech-
nicia norm akesarrangements for your vehicle
to be transported to the nearest authorized
Mercedes-Benz Center.
You may be charged for services such as repair
wor kand/o rtowing.
You can find more information in the separate
mbrace manual.
The system has not bee nabletoi nitiate aRoad-
sid eA ssistance call, if:
Rthe indicator lamp for Roadsid eAssistance
cal lbutton Fis flashing continuously.
Rno voice connectio ntothe Mercedes-Benz
CustomerA ssistance Center wa sestab-
lished.
Thisc an occur if the relevant mobile phone net-
wor kisn ot available, for example.
The Call Failed
messag eappears in the mul-
tifunction display.
XTo end acall: press the ~button on the
multifunction steering wheel.
or
XPres sthe corresponding multimedia system
button for ending aphone call.
MB Info cal lbutton
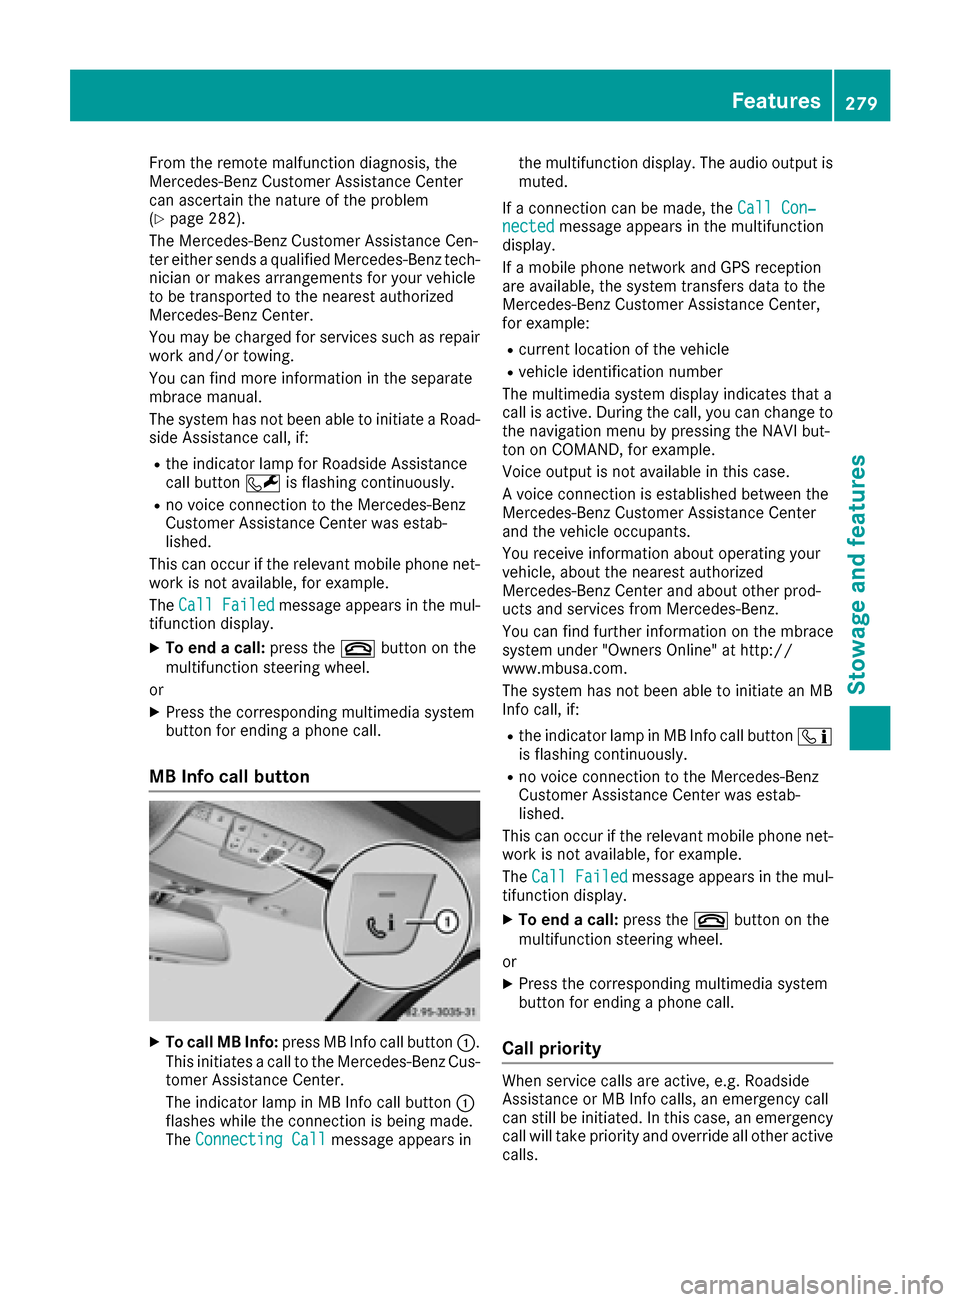
XTo cal lMBInfo: press MB Info cal lbutton :.
Thisi nitiates acalltot he Mercedes-Benz Cus-
tomer Assistance Center.
The indicator lamp in MB Info cal lbutton :
flashesw hile the connectio nisbeing made.
The Connecting Call
messag eappears in the multifunction display. The audio output is
muted.
If ac onnectio ncan be made, the Call Con‐
nectedmessageappears in the multifunction
display.
If am obile phone network and GP Sreception
are available, the system transfers data to the
Mercedes-Benz CustomerA ssistance Center,
for example:
Rcurrent location of the vehicle
Rvehicle identification number
The multimedia system displa yindicates that a
cal lisa ctive. During the call, yo ucan chang eto
the navigation menu by pressing the NAVI but-
ton on COMAND, for example.
Voice output is not available in this case.
Av oice connectio nisestablishedb etween the
Mercedes-Benz CustomerA ssistance Center
and the vehicle occupants.
You receive information abouto perating your
vehicle, aboutt he nearest authorized
Mercedes-Benz Center and abouto ther prod-
ucts and services from Mercedes-Benz.
You can find further information on the mbrace
system under "Owners Online" at http://
www.mbusa.com.
The system has not bee nabletoi nitiate an MB
Info call, if:
Rthe indicator lamp in MB Info cal lbutton ï
is flashing continuously.
Rno voice connectio ntothe Mercedes-Benz
CustomerA ssistance Center wa sestab-
lished.
Thisc an occur if the relevant mobile phone net-
wor kisn ot available, for example.
The Call Failed
messag eappears in the mul-
tifunction display.
XTo en dacall:press the ~button on the
multifunction steering wheel.
or
XPres sthe corresponding multimedia system
button for ending aphone call.
Cal lpriority
Whe nservice calls are active, e.g. Roadside
Assistance or MB Info calls, an emergency call
can stil lbeinitiated .Inthis case ,anemergency
cal lwillt ake priority and overrid eallother active
calls.
Features279
Stowage and features
Z
Page 282 of 354

The indicator lamp of the respective button
flashes until the call is ended.
An emergencycall can only be terminated by the
Mercedes-Benz Customer Assistance Center.
All other calls can be ended by pressing:
Rthe ~ button on the multifunction steering
wheel
Rthe corresponding button in the multimedia
system to end the voice call
When acall is initiated, the audio system is
muted.
The mobile phone is no longer connected to the
multimedia system.
However, if you want to use your mobile phone,
do so only when the vehicle is stationary and in
as afe location.
Downloading destinations
Downloading destinations
Downloading destinations gives you access to a
database with over 15 million points of interest
(POIs). These can be downloaded on the navi-
gation system in your vehicle. If you know the
destination, the address can be downloaded.
Alternatively, you can obtain the location of
Points of Interest (POIs)/important destinations
in the vicinity.
Furthermore, you can download routes with up
to four way points.
You are prompted to confirm route guidance to
the address entered.
XSelect Yesby turning 3or sliding 1
the controller and confirm with 7.
The system calculates the route and subse-
quently start sthe route guidance with the
address entered.
If you select No
the address can be stored in
the address book.
The destination download function is available
if:
Rthe vehicle is equipped with anavigation sys-
tem.
Rthe relevant mobile phone network is availa-
ble and data transfer is possible.
Route Assistance
This service is part of the mbrace PLUS Package
and cannot be purchased separately. You can use the route assistance function even
if the vehicle is not equipped with anavigation
system.
Within the framework of this service, you receive
ap rofessional and reliable form of navigation
support without having to leave your vehicle.
The customer service representative finds a
suitable route depending on your vehicle's cur-
rent position and the desired destination. You
will then be guided live through the current route
section.
Search &Send
General notes
To use "Search &Send", your vehicle must be
equipped with mbrace and anavigation system.
Additionally, an mbrace service subscription
must be completed.
"Search &Send" is adestination entr yservice. A
destination address which is found on Google
Maps
®can be transferred via mbrace directly to
your vehicle's navigation system.
Specifying and sending the destination
address
XGo to the website http://maps.google.com
and enter adestination address into the entry
field.
XTo send the destination address to the e-
mail address of your mbrace account:
click on the corresponding button on the web-
site.
Example:
If you select 'Send to vehicle' and then
'Mercedes-Benz', the destination address will
be sent to your vehicle.
XWhen the "Send" dialog window appears:
Enter the e-mail address you specified when
setting up your mbrace account into the cor-
responding field.
XClick "Send".
Information on specific commands such as
"Address entry" or "Send" can be found on the
website.
Calling up atransmitted destination
address
XTurn the SmartKey to position 2in the ignition
lock (Ypage 131).
The transmitted destination address is loaded
into the vehicle's navigation system.
280Features
Stowage and features
Page 286 of 354

these exhaust gasesleadsto poisoning. There
is ar iskoff atal injury.T herefore neve rleave
the engine running in enclose dspacesw ith-
ou tsufficient ventilation.
Programming
Programming buttons
Pa ya ttentio ntothe "Important safety notes"
(Ypage 283).
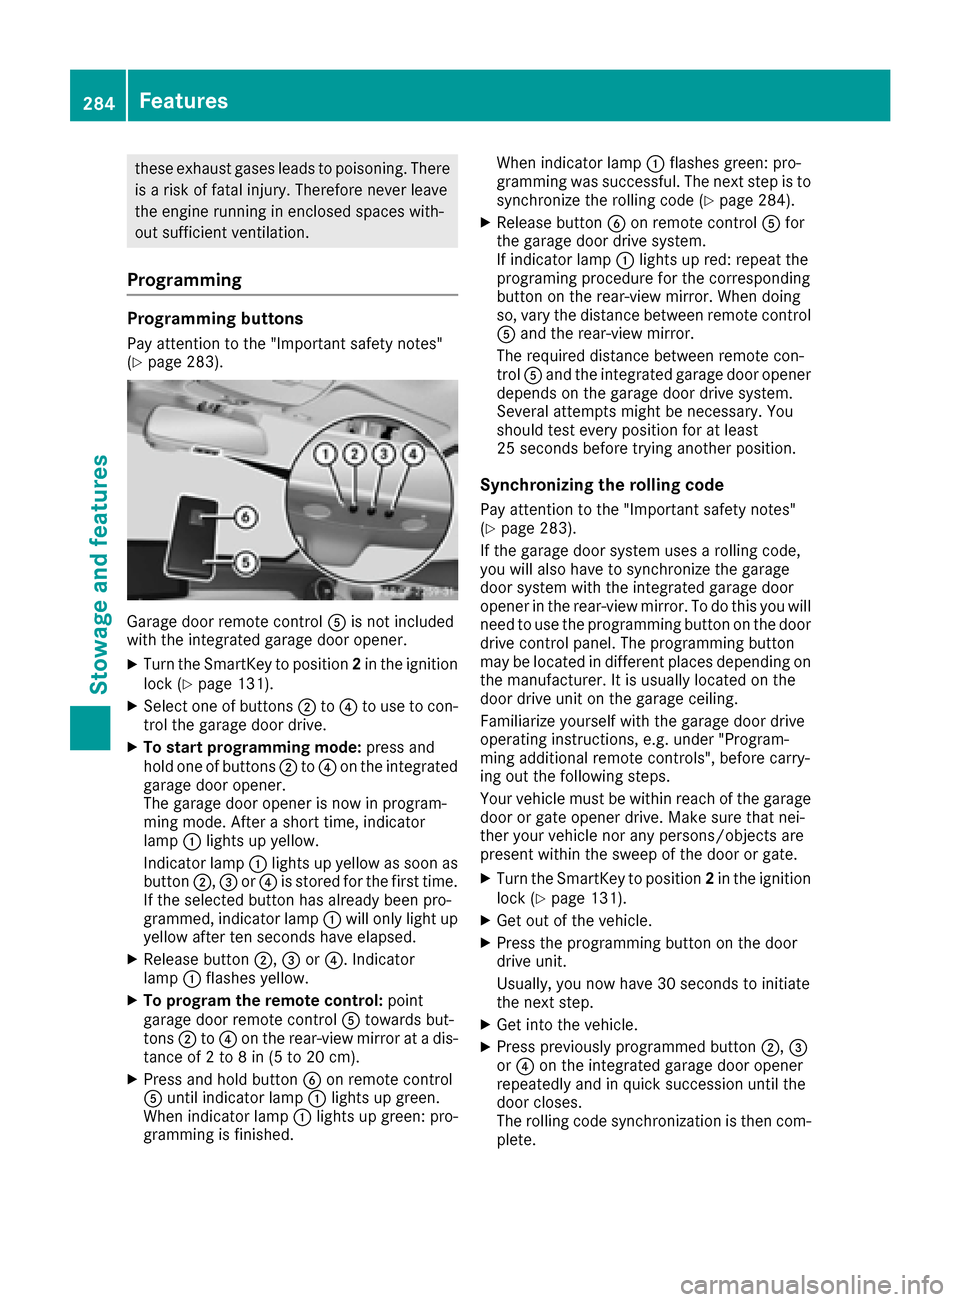
Garage door remote control Ais not included
with the integrated garage door opener.
XTurn the SmartKeytop osition2in the ignition
lock (Ypage 131).
XSelect one of buttons ;to? to us etoc on-
trol the garage door drive.
XTo start programmin gmode: press and
hol done of buttons ;to? on the integrated
garage door opener.
The garage door opene risnow in program-
ming mode. After ashort time, indicator
lamp :lights up yellow.
Indicato rlam p: lights up yellow as soo nas
button ;,=or? is stored for the first time.
If the selected button hasa lready been pro-
grammed, indicator lamp :will onl ylight up
yellow after ten second shavee lapsed .
XReleas ebutton ;, =or?.I ndicator
lamp :flashe syellow.
XTo program the remote control: point
garage door remote control Atowards but-
tons ;to? on the rear-view mirrorata dis-
tance of 2to8in(5t o20cm).
XPress and hol dbutton Bon remote control
A unti lindicator lamp :lights up green.
When indicator lamp :lights up green: pro-
gramming is finished. When indicator lamp
:flashe sgreen: pro-
gramming wa ssuccessful. Th enext stepist o
synchronize the rolling cod e(
Ypage 284).
XReleasebutton Bon remote control Afor
the garage door drive system.
If indicator lamp :lights up red :repea tthe
programing procedur efor the corresponding
button on the rear-view mirror. When doing
so, vary the distance between remote control
A and the rear-view mirror.
Th er equired distance between remote con-
trol Aand the integrated garage door opener
depends on the garage door drive system.
Severala ttempts might be necessary.Y ou
shoul dteste very positio nfor at least
25 second sbefor et rying anotherp osition.
Synchronizing the rolling code
Paya ttentio ntothe "Important safety notes"
(Ypage 283).
If the garage door systemu sesar olling code,
yo uw illa lsoh avetos ynchronize the garage
door systemw itht he integrated garage door
opene rinthe rear-view mirror. To do thisy ouwill
nee dtou sethe programming button on the door
drive contro lpan el.T he programming butto n
may be located in differen tplace sd epen ding on
the manufacturer .Itisusually locatedonthe
door drive uni tonthe garage ceiling.
Familiariz eyoursel fwitht he garage door drive
operating instructions, e.g .under "Program-
ming additional remo
te controls",b
efor ec arry-
ing ou tthe following steps.
Your vehicl emustbew ithinr each of the garage
door or gate opene rdrive. Make sure thatn ei-
thery ourv ehicl enor any persons/objects are
present withint he sweepofthe door or gate.
XTurn the SmartKeytop osition2in the ignition
lock (Ypage 131).
XGe toutof the vehicle.
XPress the programming button on the door
drive unit.
Usually ,you now have 30 second stoinitiate
the next step.
XGe tinto the vehicle.
XPress previously programmedb utton ;, =
or ? on the integrated garage door opener
repeatedly and in quick succession unti lthe
door closes.
Th er olling cod esynchronizatio nist henc om-
plete.
284Features
Stowag eand featur es