stop start MERCEDES-BENZ C-Class COUPE 2017 CL205 Repair Manual
[x] Cancel search | Manufacturer: MERCEDES-BENZ, Model Year: 2017, Model line: C-Class COUPE, Model: MERCEDES-BENZ C-Class COUPE 2017 CL205Pages: 354, PDF Size: 8.66 MB
Page 253 of 354

Warning/
indicator
lampNSignal type
Possiblec auses/consequences and M
Solutions
åNThe yellow ESP®OFF warning lamp is lit while the engine is running or the ECO
start/stop function is activated.
ESP
®is deactivated.
GWARNING
If ESP
®is switched off, ESP®is unable to stabilize the vehicle.
Further driving systems or driving safety systems are thus restricted, e.g. Active
Blind Spot Assist. The system does not perform braking actions.
There is an increased risk of skidding and an accident.
XReactivate ESP®.
In rare cases it may be better to deactivate ESP®:
Rall vehicles except Mercedes-AMG vehicles (Ypag e67)
RMercedes-AMG vehicles (Ypag e68)
Observe the important safety notes on ESP®(Ypag e67).
XAdapt you rdriving style to sui tthe road and weather conditions.
If ESP
®cannot be activated:
XDrive on carefully.
XContact aqualified specialist worksho pand have ESP®checked.
MNMercedes-AMG vehicles only:
The yellow SPORT handling mode warning lamp is lit while the engine is running.
SPORT handling mode is activated.
GWARNING
When SPORT handling mode is switched on, ESP
®is unable to stabilize the vehicle.
There is an increased risk of skidding and an accident.
XOnly switch to SPORT handling mode in accordance with the conditions descri-
bed in the "Activating/deactivating ESP" section (Ypag e68).
Warning and indicator lamps in the instrument cluster251
On-board computer and displays
Z
Page 255 of 354
Warning/
indicator
lampNSignal type
Possiblec auses/consequences and M
Solutions
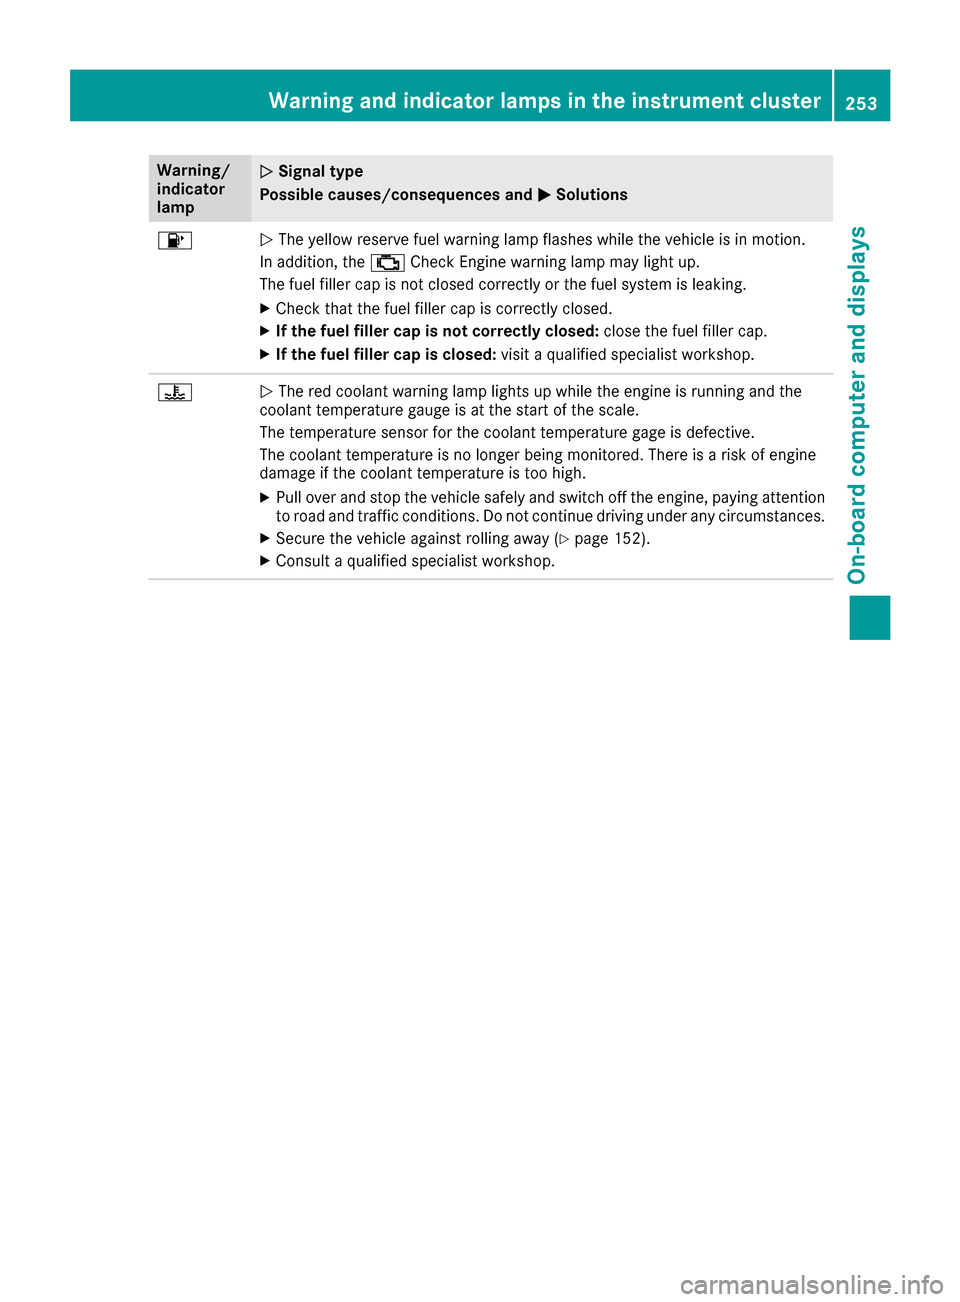
8NThe yellow reserve fuel warning lamp flashes while the vehicleisinm otion.
In addition, the ;Check Engine warning lamp may light up.
The fuel filler cap is not closed correctly or the fuel system is leaking.
XCheck that the fuel filler cap is correctly closed.
XIf the fuel filler cap is not correctly closed: close the fuel filler cap.
XIf the fuel filler cap is closed:visitaqualified specialist workshop.
?NThe red coolant warning lamp lights up while the engine is running and the
coolant temperature gauge is at the start of the scale.
The temperature sensor for the coolant temperature gage is defective.
The coolant temperature is no longer being monitored .There is arisk of engine
damage if the coolant temperature is too high.
XPul lover and stop the vehicles afelyand switch off the engine, paying attention
to road and traffic conditions. Do not continue driving under any circumstances.
XSecure the vehiclea gainst rolling away(Ypage152).
XConsult aqualified specialist workshop.
Warning and indicator lamps in the instrument cluster253
On-board computer and displays
Z
Page 256 of 354
Warning/
indicator
lampNSignal type
Possiblec auses/consequences and M
Solutions
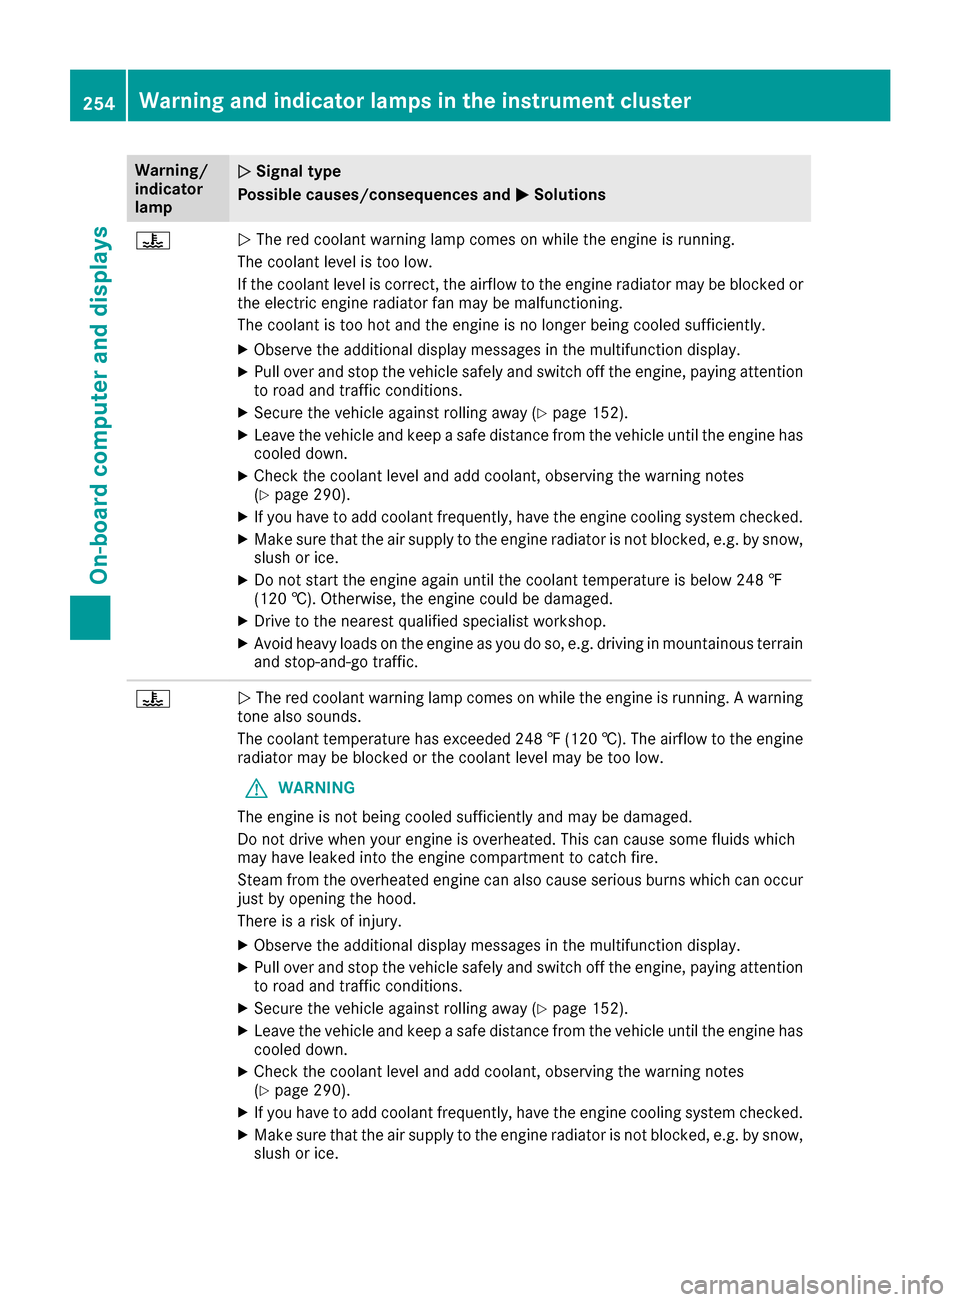
?NThe red coolant warning lamp comes on while the engine is running.
The coolant leve listoo low.
If the coolant leve liscorrect, the airflow to the engine radiator may be blocked or
the electric engine radiator fan may be malfunctioning.
The coolant is too hot and the engine is no longer being cooleds ufficiently.
XObserve the additionaldisplay messages in the multifunction display.
XPul lover and stop the vehicles afelyand switch off the engine, paying attention
to road and traffic conditions.
XSecure the vehiclea gainst rolling away(Ypage152).
XLeave the vehiclea nd keepasafe distance from the vehicleu ntil the engine has
cooledd own.
XCheck the coolant leve land add coolant, observing the warning notes
(Ypag e290).
XIf you have to add coolant frequently, have the engine cooling system checked.
XMake sure that the air supply to the engine radiator is not blocked ,e.g. by snow,
slush or ice.
XDo not start the engine again until the coolant temperature is below 248 ‡
(120 †). Otherwise, the engine coul dbedamaged.
XDrive to the neares tqualified specialist workshop.
XAvoid heavy loads on the engine as you do so, e.g. driving in mountainous terrain
and stop-and-go traffic.
?NThe red coolant warning lamp comes on while the engine is running. Awarning
tone als osounds.
The coolant temperature has exceeded2 48‡(120 †). The airflow to the engine
radiator may be blocked or the coolant leve lmay be too low.
GWARNING
The engine is not being cooleds ufficiently and may be damaged.
Do not drive whe nyoure ngine is overheated. This can cause some fluids which
may have leaked into the engine compartment to catch fire.
Steam from the overheated engine can also cause serious burns which can occur
just by opening the hood.
There is arisk of injury.
XObserve the additiona ldisplaym essages in the multifunction display.
XPullover and stop the vehicle safely and switch off the engine, paying attention
to road and traffic conditions.
XSecure the vehicle against rolling away (Ypag e152).
XLeav ethe vehicle and keep asafe distance from the vehicle until the engine has
coole ddown.
XCheck the coolant leve land add coolant, observing the warning notes
(Ypag e290).
XIf you have to add coolant frequently, have the engine cooling system checked.
XMake sure that the ai rsupply to the engine radiator is not blocked, e.g. by snow,
slush or ice.
254Warning and indicator lamps in the instrument cluster
On-board computer and displays
Page 265 of 354
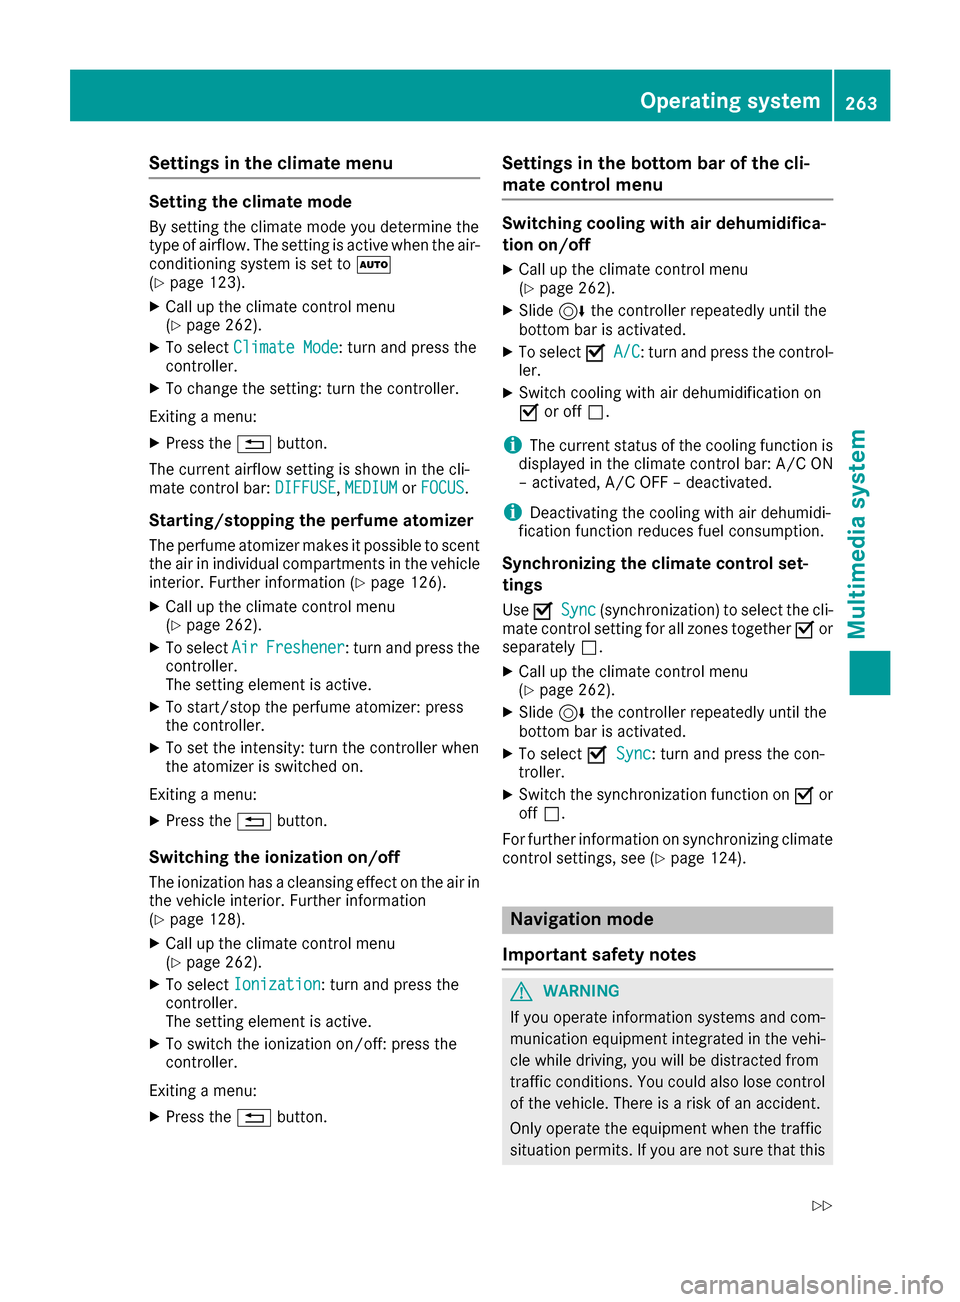
Settings in the climate menu
Setting the climate mode
By settingthe climate mode you determine the
type of airflow. The settingisa ctive when the air-
conditioning system is set to Ã
(
Ypage 123).
XCall up the climate control menu
(Ypage 262).
XTo select Climate Mode:turn and press the
controller.
XTo change the setting: turn the controller.
Exiting amenu:
XPress the %button.
The current airflow settingiss hown in the cli-
mate control bar: DIFFUSE
,MEDIUMor FOCUS.
Starting/stopping the perfume atomizer
The perfume atomizer makes it possible to scent
the air in individual compartments in the vehicle
interior. Further information (
Ypage 126).
XCall up the climate control menu
(Ypage 262).
XTo select AirFreshener:turn and press the
controller.
The settinge lement is active.
XTo start/stop the perfume atomizer: press
the controller.
XTo set the intensity: turn the controller when
the atomizer is switched on.
Exiting amenu:
XPress the %button.
Switching the ionization on/off
The ionization has acleansing effect on the air in
the vehicle interior. Further information
(
Ypage 128).
XCall up the climate control menu
(Ypage 262).
XTo select Ionization:turn and press the
controller.
The settinge lement is active.
XTo switch the ionization on/off:p ress the
controller.
Exiting amenu:
XPress the %button.
Settings in the bottom bar of the cli-
matec ontrol menu
Switching cooling with air dehumidifica-
tion on/off
XCall up the climate control menu
(Ypage 262).
XSlide6the controller repeatedly until the
bottom bar is activated.
XTo select OA/C:turn and press the control-
ler.
XSwitch cooling with air dehumidification on
O or off ª.
iThe current status of the cooling function is
displayed in the climate control bar: A/C ON
–a ctivated, A/C OFF –deactivated.
iDeactivating the cooling with air dehumidi-
fication function reduces fuel consumption.
Synchronizing the climate control set-
tings
Use OSync(synchronization) to select the cli-
mate control settingf or all zones togetherOor
separately ª.
XCall up the climate control menu
(Ypage 262).
XSlide6the controller repeatedly until the
bottom bar is activated.
XTo select OSync:turn and press the con-
troller.
XSwitch the synchronization function on Oor
off ª.
For further information on synchronizing climate
control settings, see (
Ypage 124).
Navigation mode
Important safety notes
GWARNING
If you operate information systems and com-
munication equipment integrated in the vehi-
cle while driving, you will be distracted from
traffic conditions. You could also lose control
of the vehicle. There is arisk of an accident.
Only operate the equipment when the traffic
situation permits. If you are not sure that this
Operating system263
Multimedia system
Z
Page 292 of 354
Let the engine cool down before you open the
cap. Wear gloves and eye protection. Slowly
open the cap to relieve pressure.
GWARNING
Windshield washer concentrate could ignite if it comes into contact with hot engine compo-
nents or the exhaust system. There is arisk of
fire and injury.
Make sure that no windshield washer con-
centrate is spilled next to the fillern eck.
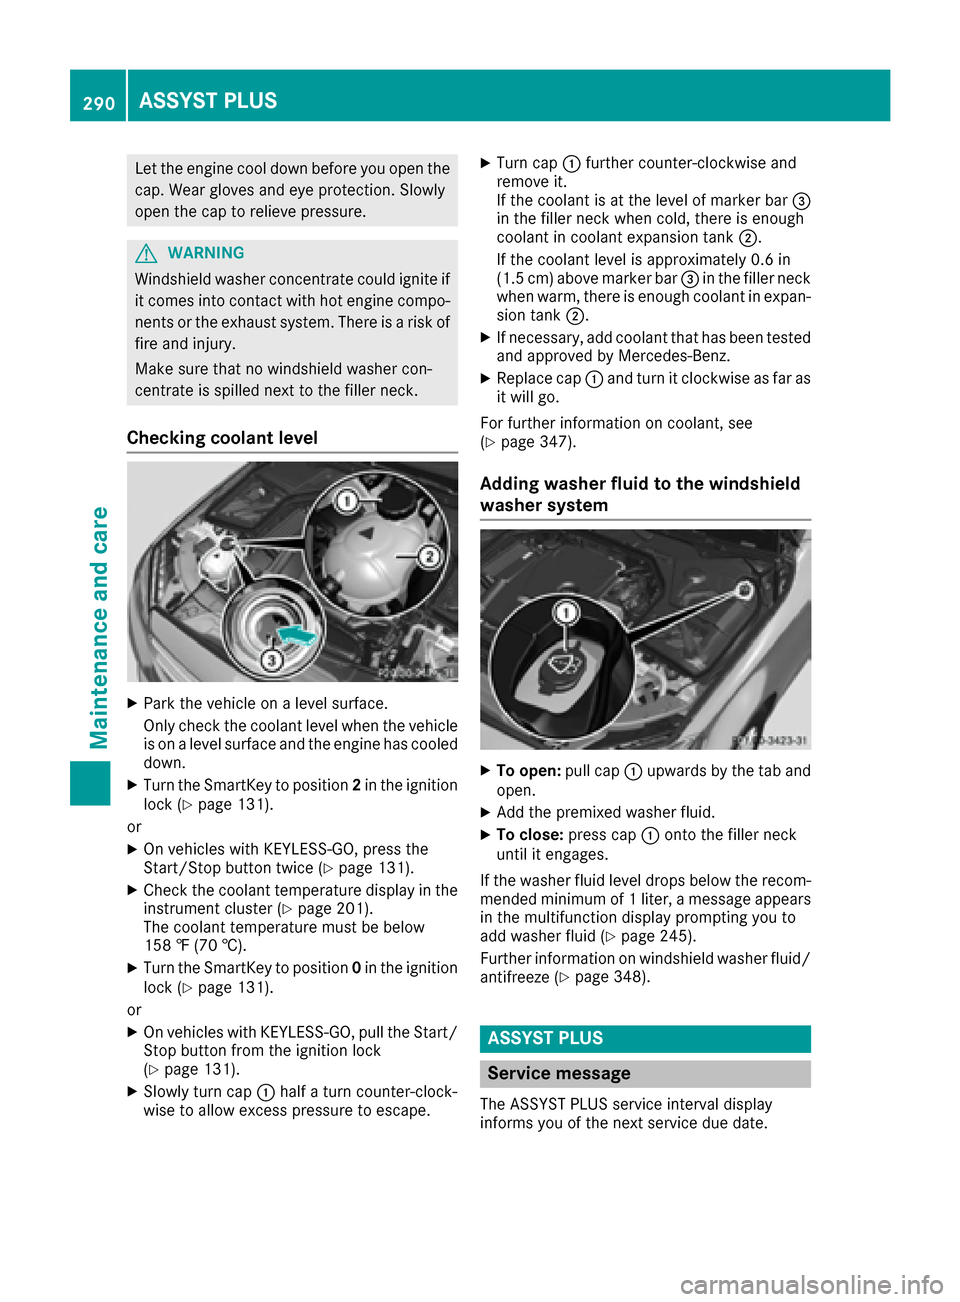
Checking coolant level
XPark the vehicle onalevel surface.
Only check the coolant level when the vehicle
is on alevel surface and the engine has cooled
down.
XTurn the SmartKey to position 2in the ignition
lock (Ypage 131).
or
XOn vehiclesw ith KEYLESS-GO, press the
Start/Stop button twice (Ypage 131).
XCheck the coolant temperature display in the
instrument cluster (Ypage 201).
The coolant temperature must be below
158 ‡(70 †).
XTurn the SmartKey to position 0in the ignition
lock (Ypage 131).
or
XOn vehiclesw ith KEYLESS-GO, pul lthe Start/
Stop button from the ignition lock
(
Ypage 131).
XSlowl yturn cap :half aturn counter-clock-
wise to allow excess pressure to escape.
XTurn cap :further counter-clockwise and
remove it.
If the coolant is at the level of marker bar =
in the fillern eck when cold, there is enough
coolant in coolant expansio ntank ;.
If the coolant level is approximately 0.6 in
(1.5 cm) above marker bar =in the fillern eck
when warm, there is enough coolant in expan-
sion tank ;.
XIf necessary ,add coolant that has been tested
and approved by Mercedes-Benz.
XReplace cap :and turn it clockwise as far as
it wil lgo.
For further information on coolant, see
(
Ypage 347).
Adding washe rfluid to the windshield
washe rsystem
XTo open: pullcap : upwards by the tab and
open.
XAdd the premixed washer fluid.
XTo close: press cap :onto the fillern eck
until it engages.
If the washer flui dlevel drops belowt he recom-
mended minimum of 1liter, amessag eappears
in the multifunction display prompting you to
add washer flui d(
Ypage 245).
Further information on windshield washer fluid/
antifreeze (
Ypage 348).
ASSYST PLUS
Servic emessage
The ASSYST PLUS service interval display
informs you of the next service due date.
290ASSYST PLUS
Maintenancea nd care
Page 295 of 354
when theengine is switche doff or at very
low speeds.O therwise, when in transmis-
sion position Dor Rthea utomatic trans-
mission will automatically switch to park
position Pand blockt hewheels.
ROperatin gwith th eStart/Stop button:
Do not open th edriver's door when the
engine is switche doff or at veryl ow
speeds.O therwise, when in transmission
position Dor Rth ea utomatic transmission
will automatically switch to park position P
and blockt hewheels.
Observe th efollowing to makes ure that the
automatic transmission stays in position Nneu-
tral:
Operatin gwith th eSmartKey and th eStart/
Stop button:
XMake sure that th eignitio nisswitche don.
XMake sure that th evehicle is stationary.
XDepress and hold th ebrakep edal.
Operatin gwith th eStart/Stop button only:
XEngage park position P.
XRelease thebrakep edal.
XRemoveS tart/Stop button fromi gnitionlock
(Ypage 131).
XInsert th eSmartKey int othe ignitio nlock.
XSwitch on th eignition.
XDepress and hold th ebrakep edal.
Operatin gwith th eSmartKey and th eStart/
Stop button:
XShif tton eutral N.
XRelease th ebrakep edal.
XRelease th eelectric parking brake, if neces-
sary.
XSwitch off th eignitio nand leave th eSma rtKey
in th eignitio nlock.
You can wash th evehicle in an automatic car
wash fromt heverys tart.
If th evehicle is veryd irty, pre-wash it bef
ore
cleaning it in an automatic car wash.
After using an automatic car wash, wipe off wax
fromt hewindshield and th ewiper blades. This
will prevent smearsa nd reducewiping noises
caused by residue on th ewindshield.
Washing by hand
In some countries, washingbyh and is only
allowed at specially equipped washingb ays.
Observe th elegal requirements in each country.
XDo not use hot water and do not wash the
vehicle in directs unlight.
XUseasofts ponge to clean.
XUse amild cleaning agent, such as acar
shampoo approved by Mercedes-Benz.
XThoroughly hose down th evehicle with agen-
tle jet of water.
XDo not pointt hewater jet directly towards the
air inlet.
XUse plenty of water and rinse out th esponge
frequently.
XRinse th evehicle with clean water and dry
thoroughly with achamois.
XDo not let th ecleaning agentd ry on thepaint-
work.
Carefull yremove all deposits of road salt as
soon as possible when driving in winter.
Power washers
GWARNING
The water jet fromac ircular jet nozzle (dirt
blasters) can cause invisible exterior damage
to th etires or chassis components. Compo-
nents damaged in this way may fail unexpect-
edly. Thereisar isk of an accident.
Do not use power washersw ith circular jet
nozzles to clean th evehicle. Have damaged
tires or chassis component sreplaced imme-
diately.
!Always maintain adistanc eofatl east
11.8 in (30 cm) between th evehicle and the
power washer nozzle. Information about the
correctd istanceisavailable fromt heequip-
mentm anufacturer.
Move th epower washer nozzle aroundw hen
cleaning your vehicle.
Do not aim directly at any of th efollowing:
Rtires
Rdoor gaps, roof gaps, joints, etc.
Relectrical components
Rbattery
Rconnectors
Care293
Maintenance and care
Z
Page 303 of 354
XSwitch off the engine.
XRemove the SmartKey from the ignition lock.
or, in vehicles with KEYLESS-G Ostart-function
or KEYLESS ‑GO
XOpenthe driver' sdoor.
The on-board electronics now have status 0.
Thi sist he same as the SmartKey having been
removed.
XRemove the Start/Sto pbutton from the igni-
tion lock (Ypage 131).
XMake sure that the engine canno tbes tarted
via your smartphone (Ypage 134).
XMake sure that the passenger sare not endan-
gered as they do so. Make sure that no one is neart he danger are awhile awheel is being
changed .Anyone wh oisnot directl yassisting
in the wheel change should, for example,
stand behind the barrier.
XGe toutof the vehicle. Paya ttention to traffic
conditions when doing so.
XClose the driver' sdoor.
MOExtended tires( tires with run-flat
properties)
General notes
With MOExtended tire s(tires with run fla tchar-
acteristics) ,you can continu etodrive your vehi-
cle eve nifthere is atotal loss of pressure in one
or more tires. The affected tire mus tnot show
any clearl yvisible damage.
You can recognize MOExtended tire sbythe
MOExtended marking which appears on the
sidewal lofthe tire .You will find this marking
next to the tire size designation, the load-bear-
ing capacity and the speed index (
Ypage 330).
MOExtended tire smay only be used in conjunc-
tion with an active tire pressure loss warning
system or with an active tire pressure monitor.
If ap ressure loss warnin gmessage appears
in the multifunctio ndisplay:
Robserve the instructions in the display mes-
sages (Ypage 241).
Rcheck the tire for damage.
Rif driving on, observe the following notes.
The driving distance possible in run-flat mod eis
approximately 50 miles (80 km )whent he vehi-
cle is partiall ylad en. Whe nthe vehicl eisfully
laden it is approximately 19 miles (30 km). In addition to the vehicl
eload, the driving dis-
tance possible depends upon:
Rvehicl espeed
Rroa dcondition
Routsid etemperature
The driving distance possible in run-flat mode
may be reduce dbyextremedriving conditions
or maneuvers, or it can be increased through a
moderate style of driving.
The driving distance possible in run-flat mod
eis
co
unted from the moment the tire pressure loss
warning appears in the multifunction display.
You mus tnot excee damaximum speed of
50 mph (80 km/h).
Whe nreplacing one or al ltires, please observe
the following specifications for your vehicle's
tires:
Rsize
Rthe typ eand
Rthe "MOExtended" mark
If at ire hasg one flatand canno tbereplaced
with aMOExtended tire ,astandard tire may be
used as atemporary measure. Make sure that
yo uu sethe proper size and typ e(summer or
winter tire).
Vehicles equipped with MOExtended tire sare
not equipped with aTIREFIT kit at the factory. It
is therefore recommended that yo uaddit ionally
equip your vehicl ewithaT IREFIT kit if yo umount
tire sthat do not feature run-flat properties ,e.g.
winter tires. ATIREFIT kit may be obtaine dfrom
aq uali fied specialist workshop.
Important safety notes
GWARNING
Whe ndriving in emergency mode, the driving
characteristics deteriorate ,e.g. when corner-
ing, accelerating quickl yand when braking.
There is ariskofana ccident.
Do not excee dthe state dmaximum speed.
Avoi dabrup tsteering and driving maneuvers,
and driving ove robstacles (curbs ,potholes,
off-road). Thi sapplies in particula rtoaladen
vehicle.
Stop driving in emergency mod eif:
Ryouh earb anging noises.
Rthe vehicl estarts to shake.
Flat tire301
Breakdown assistance
Z
Page 315 of 354
Noteson4 MATIC vehicles
!
Vehicle swith4 MATIC must not be towed
with eithe rthe front or the rea raxler aised, as
doing so will damage the transmission.
Vehicle swith4 MATIC maye ithe rbet owed away
with both axles on the ground or be loaded up
and transported.
If the vehicle' stransmission, front, or rea raxlei s
damaged, have the vehicl etransporte dona
truck or trailer.
In the even tofdamagetot he electrical sys-
tem: if the battery is defective, the automatic
transmission will be locked in position P.Tos hift
the automatic transmission to position N,you
must provide powe rtothe vehicle' selectrical
syste mint he same wa yaswhenj ump-starting
(
Ypage 308).
Have the vehicl etransporte donatransporte ror
trailer.
Tow-startin g(em ergency engine
starting)
!
Vehicle switha utomatic transmission must
not be tow-started .You could otherwis edam -
ag et he automatic transmission.
iYouc an find information on "Jump-starting"
under (Ypage 308).
Fuses
Important safety notes
GWARNING
If yo umanipulate or bridg eafaulty fuse or if
yo ur eplace it with afusew ithah igheramper -
age, the electric cable scould be overloaded.
This could resul tinafire. There is ariskofa n
accident and injury.
Alway sreplace faulty fusesw itht he specified
new fusesh avingthe correc tamperage.
Blown fusesm ustber eplaced with fusesoft he
same rating ,which yo ucan recognize by the
color and value. Th efuser ating sarelistedint he
fuse allocatio nchart.
Th efus ea lloc atio nchart is on the fuse bo xinthe
trunk (
Ypage 315). If
an ewly inserte dfusea lsob lows ,havet he
cause traced and rectifie dataqualified special-
is tw orkshop ,e.g.ana uthorized Mercedes-Benz
Center.
!Onl yusefusest hath aveb eena pproved for
Mercedes-Benz vehicles and which have the
correc tfus er ating for the systemc oncerned.
Otherwise, components or systems could be
damaged.
!Make sure tha tnomoisture can ente rthe
fuse bo xwhent he cover is open.
!When closing the cover, make sure tha titis
lying correctly on the fuse box. Moistur eseep-
ing in or dirt could otherwis eimpair theope
r-
ation of the fuses.
Th ef uses in your vehicl eserve to close down
faulty circuits .Ifafuse blows, al lthe compo-
nents on the circuit and their functions stop
operating.
Before changin gafuse
Observe the important safety notes
(Ypage 313)
XSwitch off the engine.
XSwitch off al lelectrica lconsumers.
XSecure the vehicl eagain st rolling away
(Ypage 152).
XRemov ethe SmartKeyf romthe ignition lock.
or, in vehicles with KEYLESS-GOs tart-function
or KEYLESS ‑GO
XOpen the driver's door.
Theo n-board electronics now have status 0.
This is the same as the SmartKeyh avingbeen
removed.
Th ed river’s door can be closeda gain.
All indicator lamps in the instrumen tcluster
must be off.
Th ef uses arel oc ated in variou sfuseb oxes:
RFuse bo xonthe driver's side of the dashboard
RFuse bo xinthe front-passenge rfootwell
RFuse bo xinthe engine compartment on the
driver's side
RFuse bo xunder the trunk floo ronthe right-
hand side of the vehicle, when viewed in the
directio noftravel
Fuses313
Breakdow nassistance
Z
Page 326 of 354
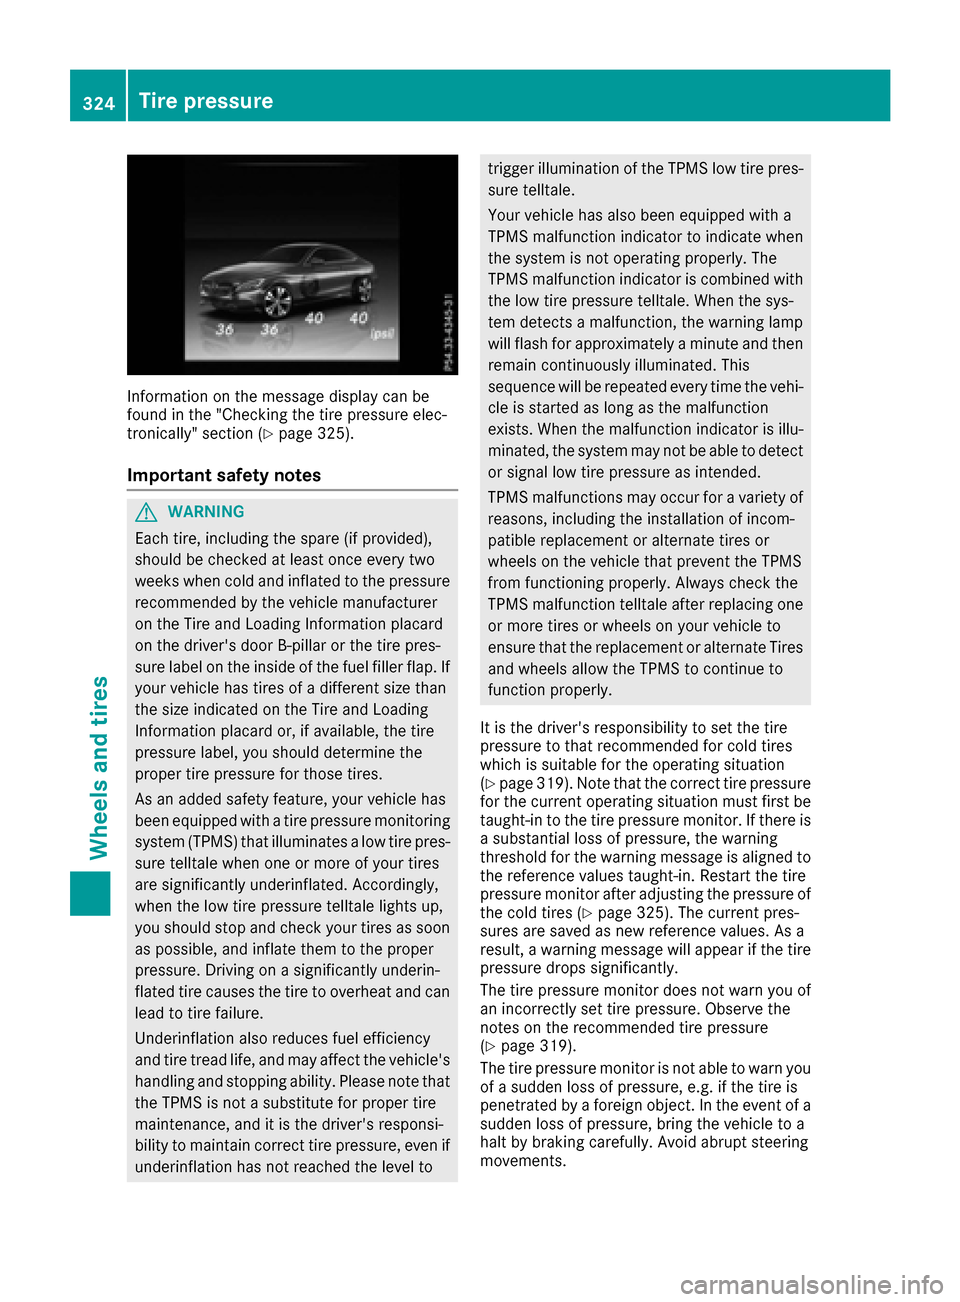
Information on the message display can be
found in the "Checking the tire pressure elec-
tronically"section (
Ypage 325).
Important safety notes
GWARNING
Each tire, including the spare (if provided),
shoul dbec hecked at least once every two
weeks when cold and inflated to the pressure recommended by the vehicle manufacturer
on the Tire and Loading Information placard
on the driver's door B-pillaro rthe tire pres-
sure label on the inside of the fuel fillerf lap. If
you rvehicle has tires of adifferent size than
the size indicated on the Tire and Loading
Information placard or, if available, the tire
pressure label, you shoul ddetermine the
proper tire pressure for those tires.
As an adde dsafety feature, you rvehicle has
been equipped with atire pressure monitoring
system (TPMS) that illuminates alow tire pres-
sure telltal ewhen one or more of you rtires
are significantly underinflated. Accordingly,
when the low tire pressure telltal elights up,
you shoul dstop and check you rtires as soon
as possible, and inflate them to the proper
pressure. Driving on asignificantly underin-
flated tire cause sthe tire to overheata nd can
leadtot ire failure.
Underinflation also reduces fuel efficiency
and tire tread life, and may affect the vehicle's
handling and stopping ability. Please note that the TPMS is not asubstitute for proper tire
maintenance, and it is the driver's responsi-
bility to maintain correct tire pressure, even if
underinflation has not reached the level to
trigger illuminatio nofthe TPMS low tire pres-
sure telltale.
Your vehicle has also been equipped with a
TPMS malfunction indicator to indicate when
the system is not operating properly. The
TPMS malfunction indicator is combined with
the low tire pressure telltale. When the sys-
tem detects amalfunction, the warning lamp
wil lflash for approximately aminute and then
remain continuously illuminated .This
sequence wil lberepeated every time the vehi-
cle is started as long as the malfunction
exists. When the malfunction indicator is illu-
minated, the system may not be abl etodetect
or signal low tire pressure as intended.
TPMS malfunctions may occur for avariety of
reasons, including the installation of incom-
patibl ereplacement or alternate tires or
wheel sonthe vehicle that prevent the TPMS
from functioning properly. Alway scheck the
TPMS malfunction telltal eafter replacing one
or more tires or wheel sonyourv ehicle to
ensure that the replacement or alternate Tires
and wheelsa llow the TPMS to continue to
function properly.
It is the driver's responsibility to set the tire
pressure to that recommended for cold tires
which is suitable for the operating situation
(
Ypage 319). Note that the correct tire pressure
for the current operating situation must first be
taught-in to the tire pressure monitor. If there is
as ubstantial loss of pressure, the warning
threshold for the warning messag eisaligned to
the reference values taught-in. Restart the tire
pressure monitor after adjusting the pressure of
the cold tires (
Ypage 325). The current pres-
sures are saved as new reference values. As a
result, awarning messag ewillappear if the tire
pressure drops significantly.
The tire pressure monitor does not warn you of
an incorrectly set tire pressure. Observe the
notes on the recommended tire pressure
(
Ypage 319).
The tire pressure monitor is not abl etowarn you
of as udden loss of pressure, e.g. if the tire is
penetrated by aforeign object. In the event of a
su
dden loss of pressure, bring the vehicle to a
halt by braking carefully. Avoid abrupt steering
movements.
324Tire pressure
Wheelsa nd tires
Page 338 of 354
Tire-mounting tools should not be used near
the valve. This could damage the electronic
components.
Only have tires changed ataqualified spe-
cialist workshop.
Always observe the instructions and safety
notes in the "Mounting awheel" section
(
Ypage 336).
The wear pattern sonthe front and rear tires
differ, depending on the operating conditions.
Rotate the wheels before aclear wear pattern
has formed on the tires. Frontt ires typically
wear more on the shoulders and the rear tires in the center.
On vehicles that have the same size front and
rear wheels, you can rotatet he wheels accord-
ing to the intervals in the tire manufacturer's
warranty book in your vehicle documents. If no
warranty book is available, the tires should be
rotated every 3,000 to 6,000 miles (5,000 to
10,000k m).Earlier may be necessary, depend-
ing on the degree of tire wear. Do not change the
direction of wheel rotation.
Clean the contact surfaces of the wheel and the
brake disc thoroughly every time awheel is rota-
ted. Check the tire pressure and, if necessary,
restart the tire pressure loss warning system
(
Ypage 323) or the tire pressure monitor
(Ypage 325).
Direction of rotation
Tires with aspecified direction of rotation have
additional benefits ,e.g. if there is arisk of hydro-
planing. These advantages can only be gained if
the tires are installed corresponding to the
direction of rotation.
An arrow on the sidewall of the tire indicates its
correctd irection of rotation.
Storing wheels
Storewheels that are not being used in acool,
dry and preferably dark place. Protectt he tires
from oil, grease, gasoline and diesel.
Mounting awheel
Preparing the vehicle
XStop the vehicle on solid, non-slippery and
level ground.
XApply the electric parking brake manually.
XBring the front wheels into the straight-ahead position.
XShift the transmission to position P.
XMake sure that the vehicle level is set to "Nor-
mal" on vehicles with AIRMATIC(Ypage 172).
XSwitch off the engine.
XVehicles without KEYLESS-GO: remove the
SmartKey from the ignition lock.
XVehicles with KEYLESS-GO start-function
or KEYLESS-GO: open the driver's door.
The on-board electronics now have status 0.
This is the same as the SmartKey having been
removed.
XVehicles with KEYLESS-GO start-function
or KEYLESS-GO: remove the Start/Stop but-
ton from the ignition lock (
Ypage 131).
XMake sure that the engine cannot be started
via your smartphon e(Ypage 134).
XIf included in the vehicle equipment, remove
the tire-change tool kit from the vehicle.
XSafeguard the vehicle against rolling away.
Securing the vehicle to prevent it from
rolling away
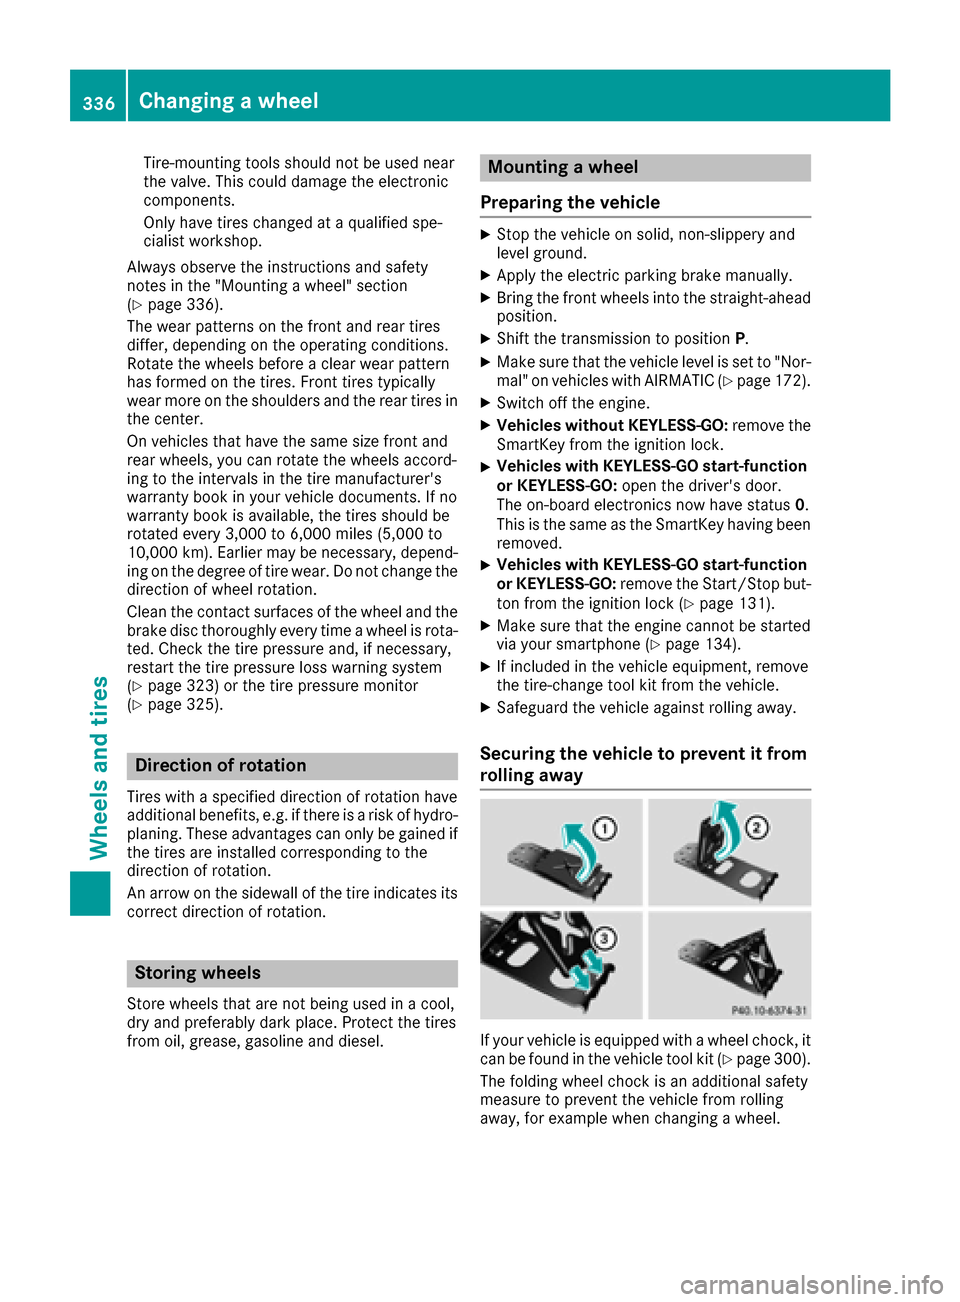
If your vehicle is equipped with awheel chock,i t
can be found in the vehicle tool kit (Ypage 300).
The folding wheel chock is an additional safety
measure to prevent the vehicle from rolling
away,f or example when changing awheel.
336Changing awheel
Wheels and tires