MERCEDES-BENZ C-CLASS SALOON 2011 Owners Manual
Manufacturer: MERCEDES-BENZ, Model Year: 2011, Model line: C-CLASS SALOON, Model: MERCEDES-BENZ C-CLASS SALOON 2011Pages: 401, PDF Size: 9.74 MB
Page 321 of 401
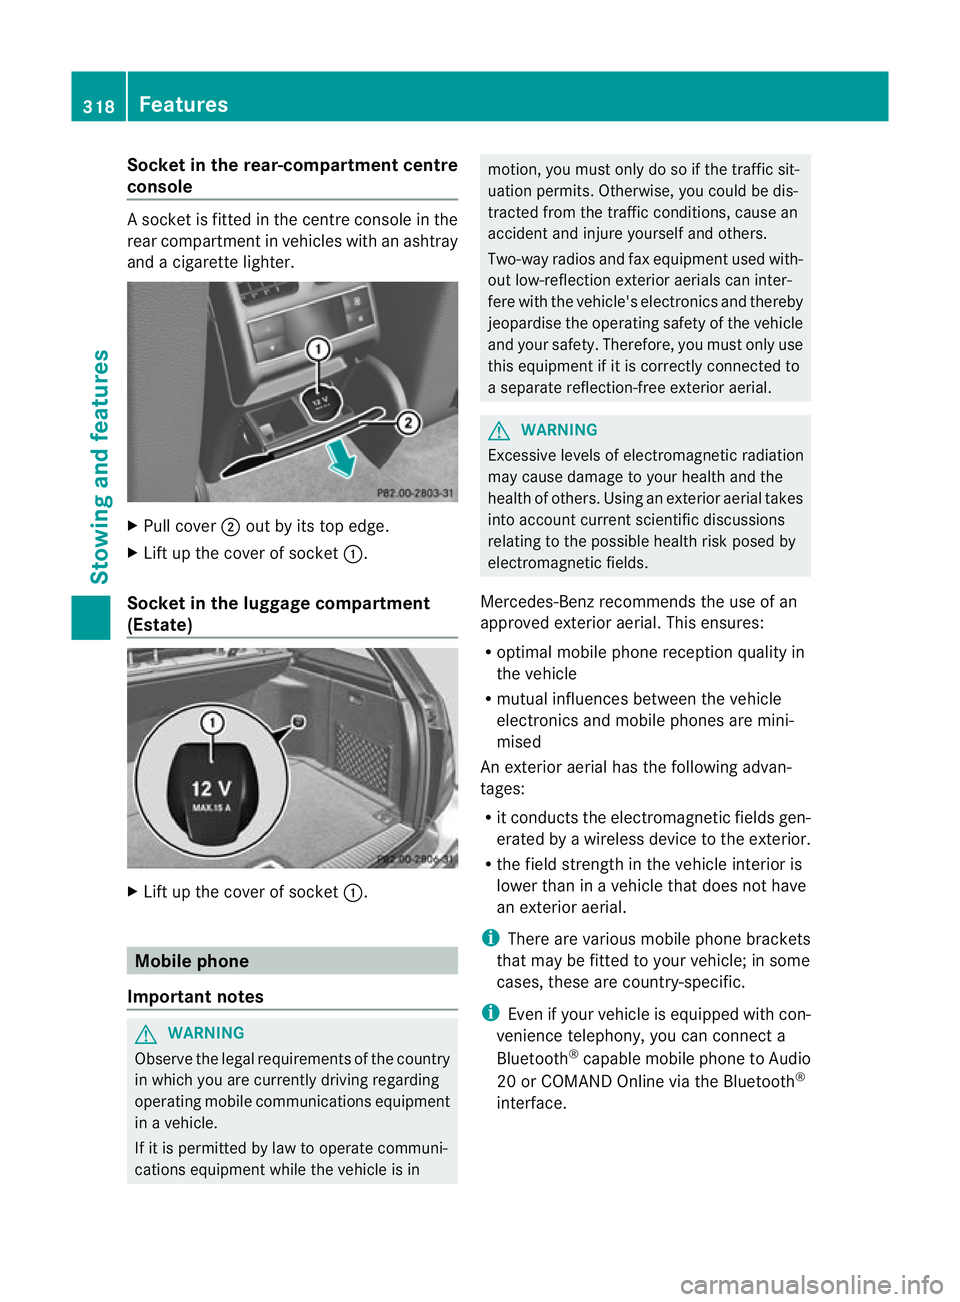
Socket in the rear-compartment centre
console As
ocket is fitted in the centre console in the
rear compartment in vehicles with an ashtray
and a cigarette lighter. X
Pull cover ;out by its top edge.
X Lift up the cover of socket :.
Socket in the luggage compartment
(Estate) X
Lift up the cover of socket :.Mobile phone
Important notes G
WARNING
Observe the legal requirements of the country
in which you are currently driving regarding
operating mobile communications equipment
in a vehicle.
If it is permitted by law to operate communi-
cations equipment while the vehicle is in motion, you must only do so if the traffic sit-
uation permits. Otherwise, you could be dis-
tracted from the traffic conditions, cause an
accident and injure yourself and others.
Two-way radios and fax equipment used with-
out low-reflection exterior aerials can inter-
fere with the vehicle's electronics and thereby
jeopardise the operating safety of the vehicle
and your safety. Therefore, you must only use
this equipment if it is correctly connected to
a separate reflection-free exterior aerial.
G
WARNING
Excessive levels of electromagnetic radiation
may cause damage to your health and the
health of others. Using an exterior aerial takes
into account current scientific discussions
relating to the possible health risk posed by
electromagnetic fields.
Mercedes-Benz recommends the use of an
approved exterior aerial. This ensures:
R optimal mobile phone reception quality in
the vehicle
R mutual influences between the vehicle
electronics and mobile phones are mini-
mised
An exterior aerial has the following advan-
tages:
R it conducts the electromagnetic fields gen-
erated by a wireless device to the exterior.
R the field strength in the vehicle interior is
lower than in a vehicle that does not have
an exterior aerial.
i There are various mobile phone brackets
that may be fitted to your vehicle; in some
cases, these are country-specific.
i Even if your vehicle is equipped with con-
venience telephony, you can connect a
Bluetooth ®
capable mobile phone to Audio
20 or COMAND Online via the Bluetooth ®
interface. 318
FeaturesStowing and features
Page 322 of 401
More information on suitable mobile phones,
mobile phone brackets and on connecting
Bluetooth ®
capable mobile phones to Audio
20 or COMAND Online can be obtained:
R at your Mercedes-Benz Service Centre
R on the Internet at http://www.mercedes-
benz.com/connect
i The functions and services available when
you use the phone depend on your mobile
phone model and service provider.
Inserting the mobile phone X
Open the telephone compartment
(Y page 303).
X Place the mobile phone bracket into the
pre-installed bracket (see the separate
mobile phone bracket installation instruc-
tions).
X Insert the mobile phone into the mobile
phone bracket (see the separate mobile
phone bracket installation instructions).
If the mobile phone is inserted in the mobile
phone bracket, you can speak to the person
you are calling using the hands-free system.
i On some mobile phone brackets, you first
have to connect the mobile phone via Blue-
tooth ®
to a mobile phone bracket (see the
separate operating instructions for the
mobile phone bracket).
On these mobile phone brackets, the
mobile phone does not have to be inserted
into the bracket for you to be able to use
the telephone functions. In this case, the
charging function and aerial function are
not available.
Operating the mobile phone You can operate the telephone using the
6 and~ buttons on the luxury multi-
function steering wheel. You can operate
other mobile phone functions via the on-
board computer (Y page 235). If you take the key out of the ignition lock, the
mobile phone stays on but you can no longer
use the hands-free system.
If you are making a call and you would like to
take the key out of the ignition lock, first
remove the mobile phone from the bracket.
Otherwise, the call will be ended.
i When a mobile phone bracket is used that
is connected to the mobile phone via Blue-
tooth ®
: if you want to continue a call in
"Private mode", you have to perform the
necessary steps on the mobile phone (see
the separate mobile phone operating
instructions).
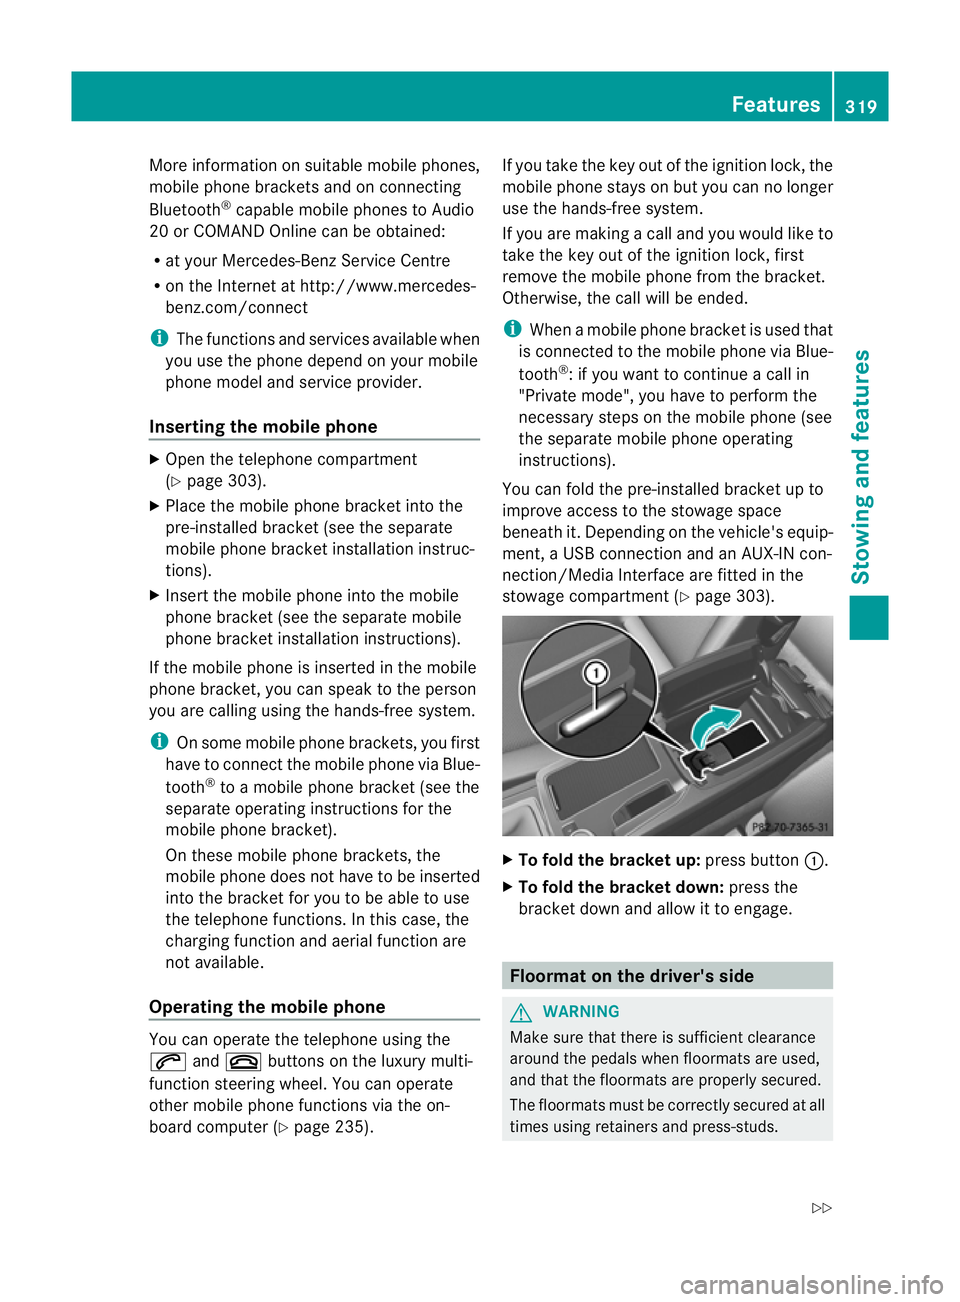
You can fold the pre-installed bracket up to
improve access to the stowage space
beneath it. Depending on the vehicle's equip-
ment, a USB connection and an AUX-IN con-
nection/Media Interface are fitted in the
stowage compartmen t(Ypage 303). X
To fold the bracket up: press button:.
X To fold the bracket down: press the
bracket down and allow it to engage. Floormat on the driver's side
G
WARNING
Make sure that there is sufficient clearance
around the pedals when floormats are used,
and that the floormats are properly secured.
The floormats must be correctly secured at all
times using retainers and press-studs. Features
319Stowing and features
Z
Page 323 of 401
Before you drive off, check the floormats and
secure if necessary.
Afloormat which is not
properly secured can slip and, thereby, inter-
fere with the movemen tofthe pedals.
Do not place floormats on top of one another. X
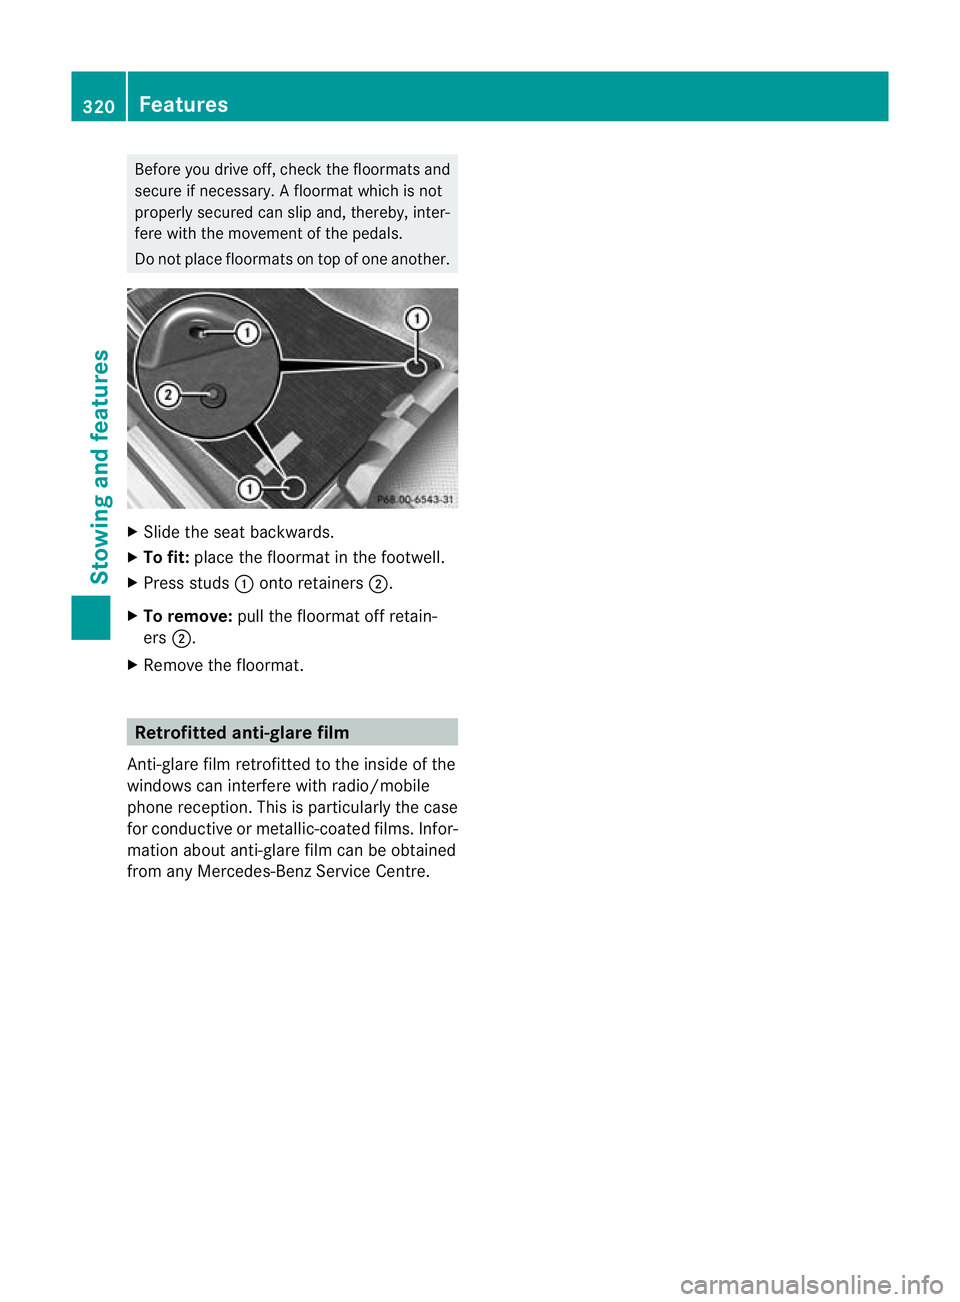
Slide the seat backwards.
X To fit: place the floormat in the footwell.
X Press studs :onto retainers ;.
X To remove: pull the floormat off retain-
ers ;.
X Remove the floormat. Retrofitted anti-glare film
Anti-glare film retrofitted to the inside of the
windows can interfere with radio/mobile
phone reception. This is particularly the case
for conductive or metallic-coated films. Infor-
mation about anti-glare film can be obtained
from any Mercedes-Benz Service Centre. 320
FeaturesStowing and features
Page 324 of 401
Useful information
............................322
Engine compartment ........................322
Maintenance ...................................... 326
Care .................................................... 327 321Maintenance and care
Page 325 of 401
Useful information
i This Owner's Manual describes all models
and all standard and optional equipment
available to your vehicle at the time of pub-
lication of the Owner's Manual. Country-
specific deviations are possible. Please
note that your vehicle may not be equipped
with all features described. This also
applies to safety-relevan tsystems and
functions.
i Please read the information on qualified
specialist workshops (Y page 28).Engine compartment
Bonnet
Opening the bonnet G
WARNING
Do no tpull the release leve rwhile the vehicle
is in motion. If you do so, the bonnet may open
up and block your view. G
WARNING
There is a risk of injury if the bonnet is open,
even if the engine is not running.
Some engine components can become very
hot.
To avoid the risk of burns, only touch those
components described in the Owner's Manual
and observe the relevant safety notes. G
WARNING
The radiator fan between the radiator and the
engine can start automatically, even if the key
has been removed from the ignition lock. For
this reason, you must not reach into the fan
rotation area. You could otherwise be injured. Vehicles with
apetrol engine: The elec-
tronic ignitio nsystem uses high voltage. For
this reason, you mus tnever touch ignition
system components (ignition coil, ignition
cables, spark plug connectors or test socket)
while:
R the engine is running
R the engine is being started
R the ignition is switched on and the engine
is being cranked by hand
You could otherwise suffer an electric shock
and be seriously or even fatally injured.
Vehicles with adiesel engine: The elec-
tronic injection control uses high voltage. For
this reason, you must never touch injection
system components while:
R the engine is running
R the engine is being started
R the ignition is switched on
You could otherwise suffer an electric shock
and be seriously or even fatally injured.
X Make sure that the windscreen wipers are
switched off. G
WARNING
The windscreen wipers and wiper linkage
could be set in motion.
When the bonnet is open, you or others could
be injured by the wiper linkage.
Make sure that the windscreen wipers are
switched off. Remove the key or make sure
that no ignition position has been selected
with KEYLESS-GO. All indicator lamps must be
off in the instrument panel. 322
Engine compartmentMaintenance and care
Page 326 of 401
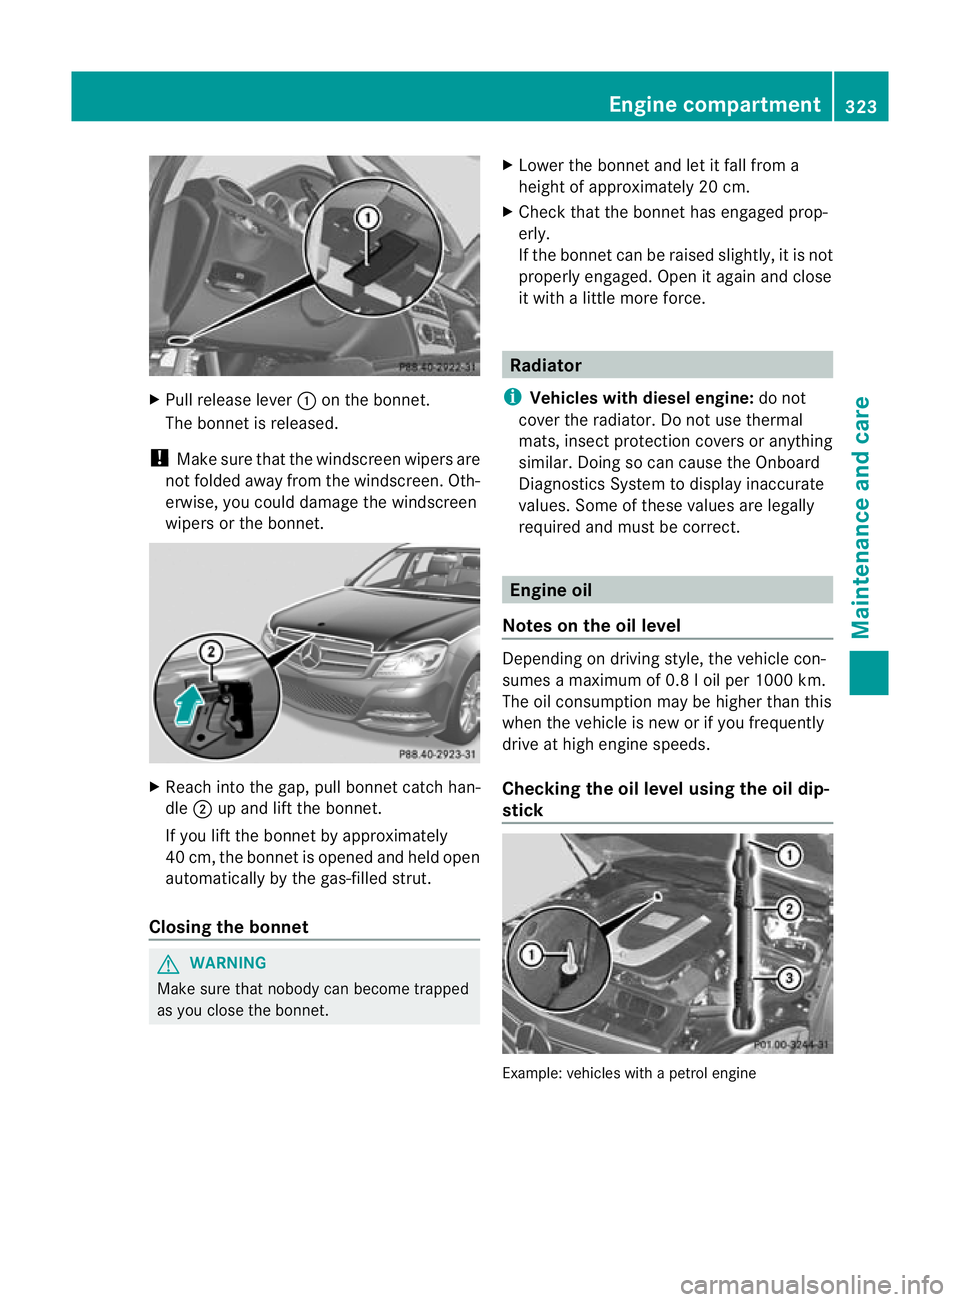
X
Pull release lever :on the bonnet.
The bonnet is released.
! Make sure that the windscreen wipers are
not folded away from the windscreen .Oth-
erwise, you could damage the windscreen
wipers or the bonnet. X
Reach into the gap, pull bonnet catch han-
dle ;up and lift the bonnet.
If you lift the bonnet by approximately
40 cm, the bonnet is opened and held open
automatically by the gas-filled strut.
Closing the bonnet G
WARNING
Make sure tha tnobody can become trapped
as you close the bonnet. X
Lower the bonnet and let it fall from a
height of approximately 20 cm.
X Check that the bonnet has engaged prop-
erly.
If the bonnet can be raised slightly, it is not
properly engaged. Open it again and close
it with a little more force. Radiator
i Vehicles with diesel engine: do not
cover the radiator. Do not use thermal
mats, insect protection covers or anything
similar. Doing so can cause the Onboard
Diagnostics System to display inaccurate
values. Some of these values are legally
required and must be correct. Engine oil
Notes on the oil level Depending on driving style, the vehicle con-
sumes a maximum of 0.8 l oil per 1000 km.
The oil consumption may be higher than this
when the vehicle is new or if you frequently
drive at high engine speeds.
Checking the oil level using the oil dip-
stick
Example: vehicles with a petrol engine Engine compartment
323Maintenance and care Z
Page 327 of 401
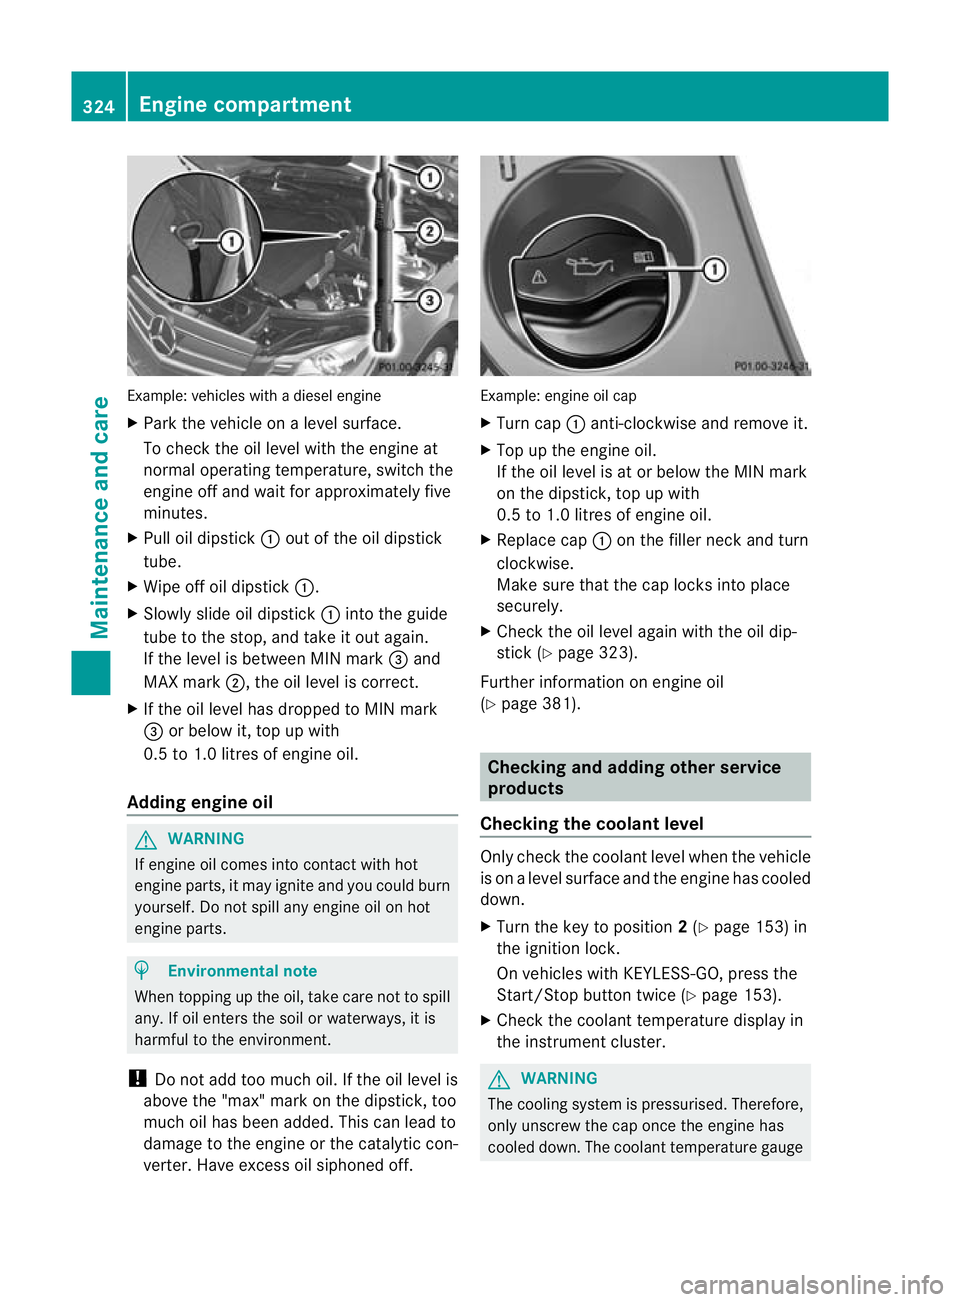
Example: vehicles with a diesel engine
X
Park the vehicle on a level surface.
To check the oil level with the engine at
normal operating temperature, switch the
engine off and wait for approximately five
minutes.
X Pull oil dipstick :outoft he oil dipstick
tube.
X Wipe off oil dipstick :.
X Slowly slide oil dipstick :into the guide
tube to the stop, and take it out again.
If the level is between MIN mark =and
MAX mark ;, the oil level is correct.
X If the oil level has dropped to MIN mark
= or below it, top up with
0.5 to 1.0 litres of engine oil.
Adding engine oil G
WARNING
If engine oil comes into contact with hot
engine parts, it may ignite and you could burn
yourself. Do not spill any engine oil on hot
engine parts. H
Environmental note
When topping up the oil, take care not to spill
any. If oil enters the soil or waterways, it is
harmful to the environment.
! Do not add too much oil. If the oil level is
above the "max" mark on the dipstick, too
much oil has been added. This can lead to
damage to the engine or the catalytic con-
verter. Have excess oil siphoned off. Example: engine oil cap
X
Turn cap :anti-clockwise and remove it.
X Top up the engine oil.
If the oil level is at or below the MIN mark
on the dipstick, top up with
0.5 to 1.0 litres of engine oil.
X Replace cap :on the filler neck and turn
clockwise.
Make sure that the cap locks into place
securely.
X Check the oil level again with the oil dip-
stick (Y page 323).
Further information on engine oil
(Y page 381). Checking and adding other service
products
Checking the coolant level Only check the coolant level when the vehicle
is on a level surface and the engine has cooled
down.
X Turn the key to position 2(Y page 153) in
the ignition lock.
On vehicles with KEYLESS-GO, press the
Start/Stop button twice (Y page 153).
X Check the coolant temperature display in
the instrument cluster. G
WARNING
The cooling system is pressurised. Therefore,
only unscrew the cap once the engine has
cooled down. The coolant temperature gauge 324
Engine compartmentMaintenance and care
Page 328 of 401

must display less than 70
†.Otherwise, you
could be scalded if hot coolant escapes. X
Slowly tur ncap : half a turn anti-clock-
wise and allow excess pressure to escape.
X Turn cap :further anti-clockwise and
remove it.
If the coolant is at the level of marker bar
= in the fille rneck when cold, there is
enough coolant in coolant expansion
tank ;.
If the coolant level is approximately 1.5 cm
above marker bar =in the filler neckw hen
warm, there is enough coolant in coolant
expansion tank ;.
X If necessary, top up with coolant that has
been tested and approved by Mercedes-
Benz.
X Replace cap :and turn it clockwise as far
as it will go.
For further information on coolant, see
(Y page 383).
Windscreen washer system and head-
lamp cleaning system The washer fluid reservoir is used for both the
windscreen washer system and the headlamp
cleaning system.
i
Components and service products must
be matched. Mercedes-Benz recommends
that you use products tested and approved
by Mercedes-Benz. They are listed in this
Mercedes-Ben zOwner's Manual in the
appropriate section. You can identify service products approved
by Mercedes-Ben
zby th efollowing inscrip-
tions on the container:
R MB-Freigabe (e.g. MB-Freigabe 371.0)
R MB-Approval (e.g. MB-Approval 371.0)
Other labels and recommendations that
make reference to quality level or a speci-
fication according to an MB Sheet no. (e.g.
MB 371.0) are not necessarily approved by
Mercedes-Benz.
You can obtain further information from
any Mercedes-Benz Service Centre. G
WARNING
Windscreen washer fluid is highly flammable.
Fire, naked flames and smoking are prohibi-
ted when handling washer fluid concentrate.
! Only use washer fluid concentrate which
is suitable for plastic lamp lenses. Unsuit-
able washer fluid concentrate could dam-
age the plastic lamp lenses of the head-
lamps.
! Do not use distilled or de-ionised water in
the washer fluid reservoir. Otherwise, the
level sensor may be damaged.
i Add windscreen washer concentrate, e.g.
MB SummerFit, to the washer fluid all year
round. Example: washer fluid reservoir
X
Mix the windscreen washer fluid in a con-
tainer beforehand.
X At temperatures above freezing: fill the
washer fluid reservoir with amix of water Engine compartment
325Maintenance and care Z
Page 329 of 401
and windscree
nwasher concentrate (e.g.
MB SummerFit).
X At temperatures below freezing: fill the
washe rfluid reservoir with amix of water
and windscreen washer concentrate (e.g.
MB WinterFit). Adapt the mixing ratio to the
outside temperatures.
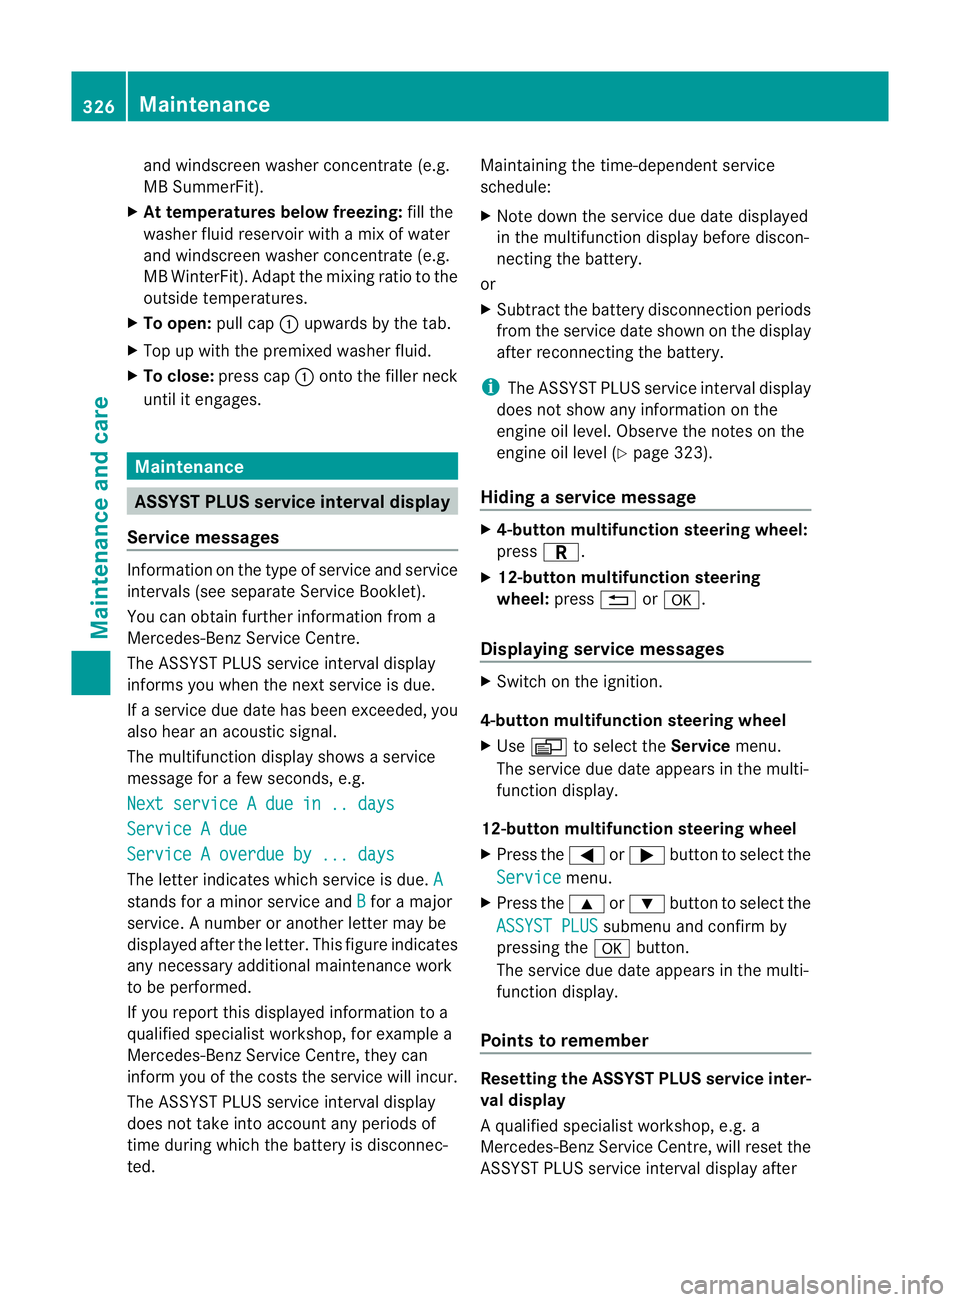
X To open: pull cap:upwards by the tab.
X Top up with the premixed washer fluid.
X To close: press cap :onto the filler neck
until it engages. Maintenance
ASSYST PLUS service interval display
Service messages Information on the type of service and service
intervals (see separate Service Booklet).
You can obtain further information from a
Mercedes-Benz Service Centre.
The ASSYST PLUS service interval display
informs you when the nex
tservice is due.
If a service due date has been exceeded, you
also hear an acoustic signal.
The multifunction display shows a service
message for a few seconds, e.g.
Next service A due in .. days Service A due
Service A overdue by ... days
The letter indicates which service is due.
Astands for a minor service and
B for a major
service. A number or another letter may be
displayed after the letter. This figure indicates
any necessary additional maintenance work
to be performed.
If you report this displayed information to a
qualified specialist workshop, for example a
Mercedes-Benz Service Centre, they can
infor myou of the costs the service will incur.
The ASSYST PLUS service interval display
does not take into account any periods of
time during which the battery is disconnec-
ted. Maintaining the time-dependent service
schedule:
X
Note down the service due date displayed
in the multifunction display before discon-
necting the battery.
or
X Subtract the battery disconnection periods
from the service date shown on the display
after reconnecting the battery.
i The ASSYST PLUS service interval display
does not show any information on the
engine oil level. Observe the notes on the
engine oil level (Y page 323).
Hiding aservice message X
4-button multifunction steering wheel:
press C.
X 12-button multifunction steering
wheel: press%ora.
Displaying service messages X
Switch on the ignition.
4-button multifunction steering wheel
X Use V to selec tthe Service menu.
The service due date appears in the multi-
function display.
12-button multifunction steering wheel
X Press the =or; button to select the
Service menu.
X Press the 9or: button to select the
ASSYST PLUS submenu and confirm by
pressing the abutton.
The service due date appears in the multi-
function display.
Points to remember Resetting the ASSYST PLUS service inter-
val display
Aq
ualified specialist workshop, e.g. a
Mercedes-Ben zService Centre, will reset the
ASSYST PLUS service interval display after 326
MaintenanceMaintenance and care
Page 330 of 401
the necessary service work has been carried
out.
You can obtain further information, e.g.
regarding service work, fro maMercedes-
Benz Service Centre or directly from
Mercedes-Benz.
! If the ASSYST PLUS service interval dis-
play has been inadvertently reset, this set-
ting can be corrected at a Mercedes-Benz
Service Centre.
Have service work carried out as described
in the Service Booklet. This may otherwise
lead to increased wear and damage to the
major assemblies or the vehicle.
Driving abroad
An extensive Mercedes-Benz Service network
is also available in other countries. The
Service Hotline's current telephone numbers
for use when you are abroad are to be found
in the "Mercedes-Benz Service24h" section
of the Service Booklet. Care
Notes on care
Regular care of your vehicle is a condition for
retaining the quality in the long term.
Use care products and cleaning agents rec-
ommended and approved by Mercedes-Benz.
! For cleaning your vehicle, do not use any
of the following:
R dry, rough or hard cloths
R abrasive cleaning agents
R solvents
R cleaning agents containing solvents
Do not scrub.
Do not touch the surfaces or protective
films with hard objects, e.g. a ring or ice
scraper. You could otherwise scratch or
damage the surfaces and protective film. H
Environmental note
Dispose of empty packaging and cleaning
cloths in an environmentally responsible man-
ner.
! Do not park up the vehicle for an extended
period straight after cleaning it, particularly
after having cleaned the wheels with wheel
cleaner. Wheel cleaners could cause
increased corrosion of the brake discs and
brake pads/linings. For this reason, you
should drive for a few minutes after clean-
ing. Braking heats the brake discs and the
brake pads/linings, thus drying them. The
vehicle can then be parked up. Care of the exterior
Automatic car wash G
WARNING
Braking efficiency is reduced after washing
the vehicle. This could cause an accident. For
this reason, following a car wash, drive with
particular care until the brakes are dry.
You can wash the vehicle in an automatic car
wash from the very start.
If the vehicle is very dirty, pre-wash it before
cleaning it in an automatic car wash.
! Make sure that the automatic transmis-
sion is in position Nwhen washing your
vehicle in a tow-through car wash. The vehi-
cle could be damaged if the transmission is
in another position.
! Make sure that:
R the side windows and sliding sunroof are
closed completely.
R the blower for the ventilation/heating is
switched off (OFF button is depressed).
R the windscreen wiper switch is at posi-
tion 0.
The vehicle could otherwise be damaged.
After using an automatic car wash, wipe off
wax from the windscreen and the wiper Care
327Maintenance and care Z