MERCEDES-BENZ C-CLASS SALOON 2018 Owners Manual
Manufacturer: MERCEDES-BENZ, Model Year: 2018, Model line: C-CLASS SALOON, Model: MERCEDES-BENZ C-CLASS SALOON 2018Pages: 609, PDF Size: 11.19 MB
Page 191 of 609

000E
NO
TEDama gecaused bythe wrong fuel Ve
hicles with a petrol engine:
Even small amounts of the wrong fuel could
re sult in damage tothe fuel sy stem, the
engine and the emission control sy stem. 0007
Only refuel using unleaded, sulphu r-free
fuel that con form sto European EN 228,
or an equi valent specification. 0007
The RONrequ irement is located in the
fuel filler flap.
Fu el of this specification may con tain up to
10 %ethanol. Your vehicle is suitable for use
with E10 fuel.
Ne verre fuel using any of thefo llowing fuels:
R diesel
R regular petrol with an octane number
lo we rth an 91 RON
R petrol with more than 10%ethanol byvol‐
ume, e.g. E15, E30, E85, E100 R
petrol with more than 3% me thanol by
vo lume, e.g. M15, M30
R petrol with additives con taining me tal
If yo u acciden tally refuel with the wrong fuel: 0007
Do not switch the ignition on. 0007
Consult a qualified specialist workshop. 000E
NO
TEDama gecaused bythe wrong fuel Ve
hicles with a diesel engine:
Even small amounts of the wrong fuel could
re sult in damage tothe fuel sy stem, the
engine and the emission control sy stem. 0007
Only refuel using sulphu r-free diesel
fuel that con form sto European stand‐
ard EN 590, or an equivalent specifica‐
tion.
In countries without sulphur-f ree diesel
fuel, refuel using only lo w-sulphur diesel
fuel with a sulphur content less than
50 ppm. 0007
Vehicles without diesel particulate
fi lter: refuel using only diesel fuel with
a sulphur content less than 500 ppm.
Ne verre fuel using any of thefo llowing fuels:
R petrol
R marine diesel
R heating oil
R pure bio-diesel fuel or vege table oil
R paraf fin or kerosene
If yo u accidentally refuel with the wrong fuel: 0007
Do not switch the ignition on. 0007
Consult a qualified specialist workshop. 000E
NO
TEDo not use diesel torefuel vehi‐
cles with a petrol engine. If
yo u acciden tally refuel with the wrong fuel:
R Do not switch the ignition on. Otherwise
fuel can enter the engine. 18 8
Driving and pa rking
Page 192 of 609
Even small amounts of
the wrong fuel
could result in damage tothe fuel sy stem
and the engine. The repair costs are high. 0007
Consult a qualified specialist workshop. 0007
Have the fuel tank and fuel lines
drained compl etely. 000E
NO
TEDo not use petrol torefuel vehi‐
cles with a diesel engine. If
yo u acciden tally refuel with the wrong fuel:
R Do not switch the ignition on. Otherwise,
fuel can enter the fuel sy stem.
Even small amounts of the wrong fuel
could result in damage tothe fuel sy stem
and the engine. The repair costs are high. 0007
Consult a qualified specialist workshop. 0007
Have the fuel tank and fuel lines
drained compl etely. 000E
NO
TEFuel may spr ayout when you
re mo vethe fuel pump nozzle. 0007
Only fill th e fuel tank until the pump
nozzle switches off. Re
quirements:
R The vehicle is unloc ked.
0009 Do not get into theve hicle again during the
re fuelling process. Otherwise, electros tatic
ch arge could build up again.
Obser vethe no tes on operating fluids
(0013 page475).
Plug-in hybrid: obser vethe no tes in the Supple‐
ment. Otherwise, you may failto recognise dan‐
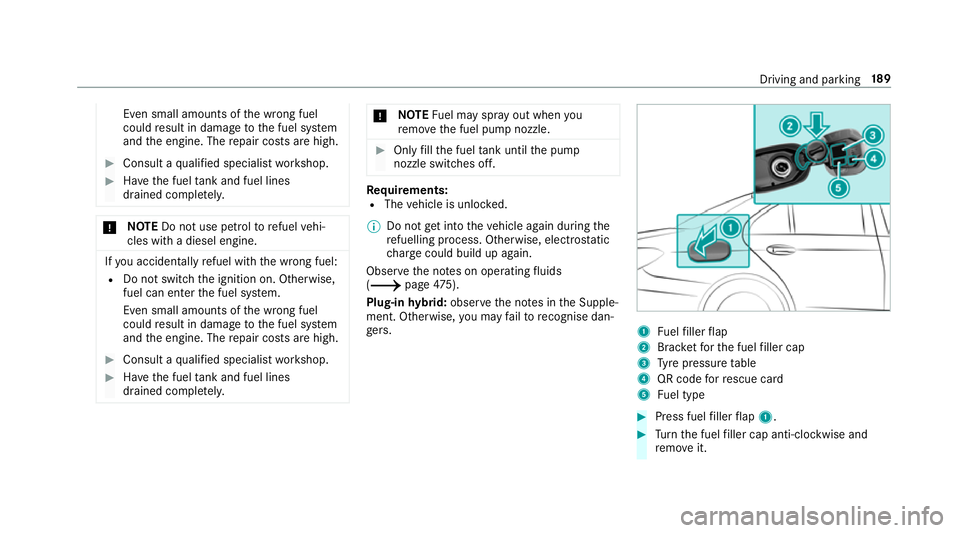
ge rs. 1
Fuelfiller flap
2 Brac ketfo rth e fuel filler cap
3 Tyre pressure table
4 QR code forre scue card
5 Fuel type 0007
Press fuel filler flap 1. 0007
Turn the fuel filler cap anti-clockwise and
re mo veit. Driving and parking
18 9
Page 193 of 609
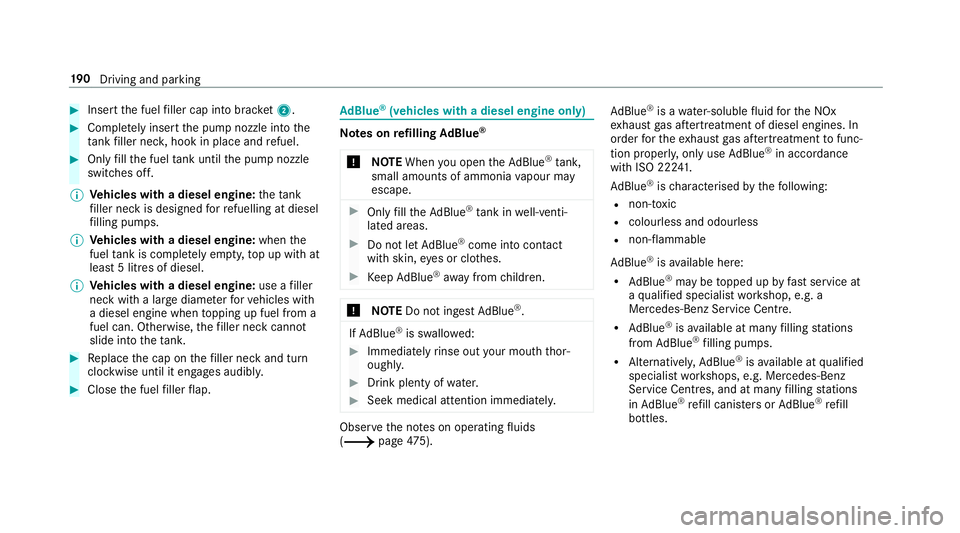
0007
Insert the fuel filler cap into brac ket2. 0007
Comp lete ly inse rtthe pump nozzle into the
ta nk filler nec k,hook in place and refuel. 0007
Only fill th e fuel tank until the pump nozzle
switches off.
0009 Vehicles with a diesel engine: theta nk
fi ller neck is designed forre fuelling at diesel
fi lling pumps.
0009 Vehicles with a diesel engine: whenthe
fuel tank is compl etely em pty, top up with at
least 5 litres of diesel.
0009 Vehicles with a diesel engine: use afiller
neck with a lar gediame terfo rve hicles with
a diesel engine when topping up fuel from a
fuel can. Otherwise, thefiller neck cannot
slide into theta nk. 0007
Replace the cap on thefiller neck and turn
clockwise until it engages audibl y.0007
Close the fuel filler flap. Ad
Blue ®
(vehicles with a diesel engine on ly) Note
s onrefilling AdBlue ®
000E NOTEWhen you open theAd Blue ®
tank,
small amounts of ammonia vapour may
escape. 0007
Only fill th eAd Blue ®
tank in well-venti‐
lated areas. 0007
Do not let AdBlue ®
come into contact
wi th skin, eyes or clo thes. 0007
Keep AdBlue ®
aw ay from children. 000E
NOTEDo not ingest AdBlue ®
. If
Ad Blue ®
is swallo wed: 0007
Immediately rinse out your mouth thor‐
oughl y. 0007
Drink plenty of water. 0007
Seek medical attention immediately. Obser
vethe no tes on operating fluids
(0013 page475). Ad
Blue ®
is a wate r-soluble fluid forth e NOx
ex haust gas af tertre atment of diesel engines. In
order forth eex haust gas af tertre atment tofunc‐
tion proper ly, only use AdBlue ®
in acco rdance
with ISO 22 241.
Ad Blue ®
is ch aracterised bythefo llowing:
R non-t oxic
R colourless and odourless
R non-flammable
Ad Blue ®
is available here:
R AdBlue ®
may be topped up byfast service at
a qu alified specialist workshop, e.g. a
Mercedes-Benz Service Centre.
R AdBlue ®
is available at many filling stations
from AdBlue ®
filling pumps.
R Alternativel y,Ad Blue ®
is available at qualified
specialist workshops, e.g. Mercedes-Benz
Service Centres, and at many filling stations
in Ad Blue ®
re fill canis ters or AdBlue ®
re fill
bottles. 19 0
Driving and pa rking
Page 194 of 609
0009
Ensu rethe connection between there fill
con tainer and vehicle filler neck does not
drip.
To pping up AdBlue ®
000E NOTEEngine dama gedue toAd Blue ®
being in the fuel 0007
AdBlue ®
must not be used tofill the
fuel tank. 0007
Only use AdBlue ®
to fill th eAd Blue ®
ta nk. 0007
Do not overfill theAd Blue ®
tank. 000E
NO
TEContamination of theve hicle inte‐
ri or due toAd Blue ®
lea kage 0007
Afterto pping up, carefully close the
Ad Blue ®
re fill con tainer. 0007
Avoid car rying AdBlue ®
re fill con tainers
permanently in theve hicle. Re
quirements:
R The vehicle is unloc ked. The
following messages appear in order in the
multifunction display when theAd Blue ®
tank
requ iresrefilling:
R Refill AdBlue See Owner's Manual . The
Ad Blue ®
tank is down tothere ser veleve l.
R Refill AdBlue No start in XXX km. You can
on ly drive theve hicle over the dis tance
shown. Refill Ad Blue ®
as soon as possible.
R Refill AdBlue Start not possible. The vehicle
can no longer be star ted.
Yo u can see theAd Blue ®
ra nge and le vel in the
multifunction display (0013 page274).
0009 The AdBlue ®
ra nge shown depends strongly
on the driving style and operating condi‐
tions. The actual range can therefore deviate
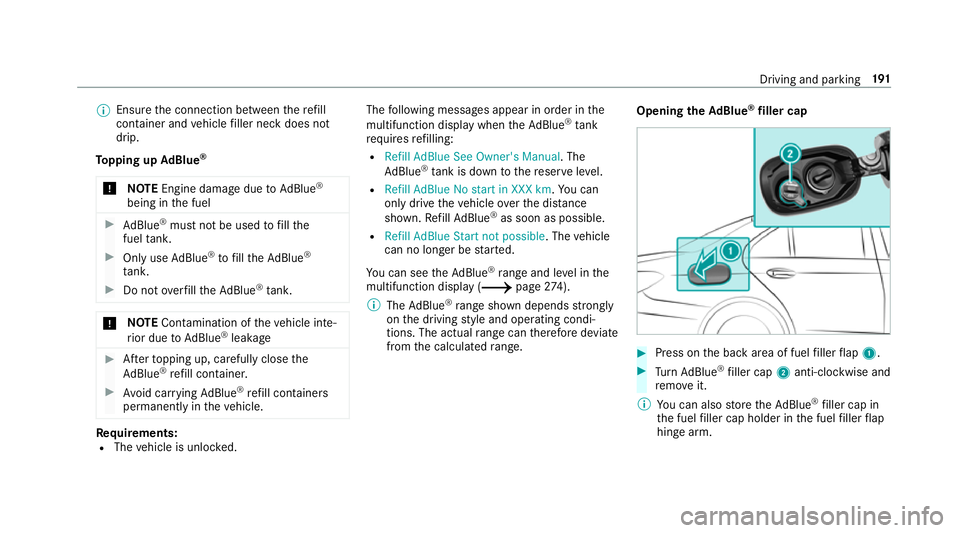
from the calculated range. Opening the
AdBlue ®
filler cap 0007
Press on the back area of fuel filler flap 1. 0007
Turn AdBlue ®
filler cap 2anti-clockwise and
re mo veit.
0009 You can also store theAd Blue ®
filler cap in
th e fuel filler cap holder in the fuel filler flap
hin gearm. Driving and parking
191
Page 195 of 609
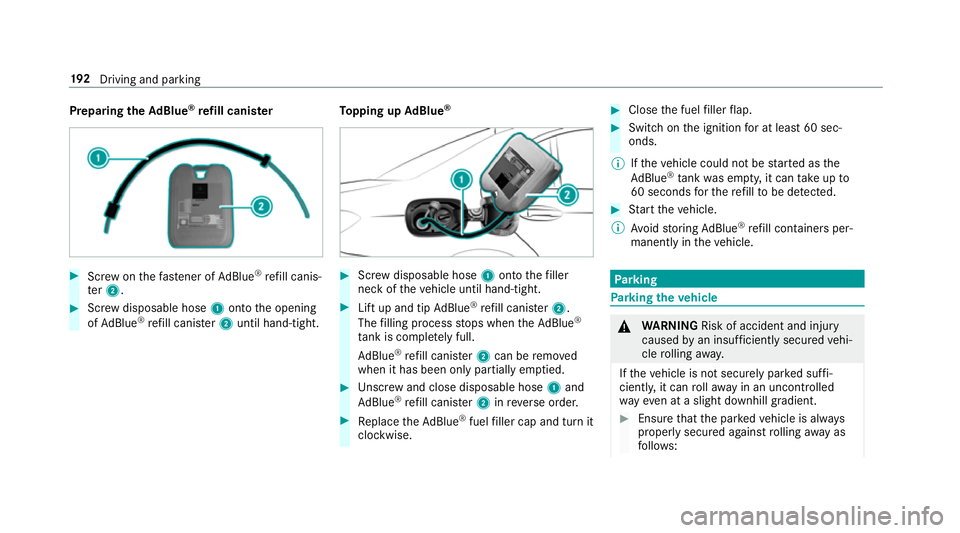
Preparing
theAd Blue ®
re fill canis ter 0007
Screw onthefast ener of AdBlue ®
re fill canis‐
te r2. 0007
Screw disposable hose 1onto the opening
of Ad Blue ®
re fill canis ter2 until hand-tight. To
pping up AdBlue ® 0007
Screw disposable hose 1onto thefiller
neck of theve hicle until hand-tight. 0007
Lift up and tip AdBlue ®
re fill canis ter2.
The filling process stops when theAd Blue ®
ta nk is compl etely full.
Ad Blue ®
re fill canis ter2 can be remo ved
when it has been only partially em ptied. 0007
Unscr ew and close disposable hose 1and
Ad Blue ®
re fill canis ter2 inreve rse order. 0007
Replace theAd Blue ®
fuel filler cap and turn it
clockwise. 0007
Close the fuel filler flap. 0007
Swit chon the ignition for at least 60 sec‐
onds.
0009 Ifth eve hicle could not be star ted as the
Ad Blue ®
tan kwa s em pty, it can take up to
60 seconds forth ere fill to be de tected. 0007
Start theve hicle.
0009 Avoid storing AdBlue ®
re fill con tainers per‐
manently in theve hicle. Pa
rking Pa
rking theve hicle 000A
WARNING Risk of accident and inju ry
caused byan insuf ficiently secu redve hi‐
cle rolling away.
If th eve hicle is not securely par ked suf fi‐
ciently, it can rollaw ay in an uncont rolled
wa yev en at a slight downhill gradient. 0007
Ensure that the par kedve hicle is alw ays
properly secured against rolling away as
fo llo ws: 19 2
Driving and pa rking
Page 196 of 609
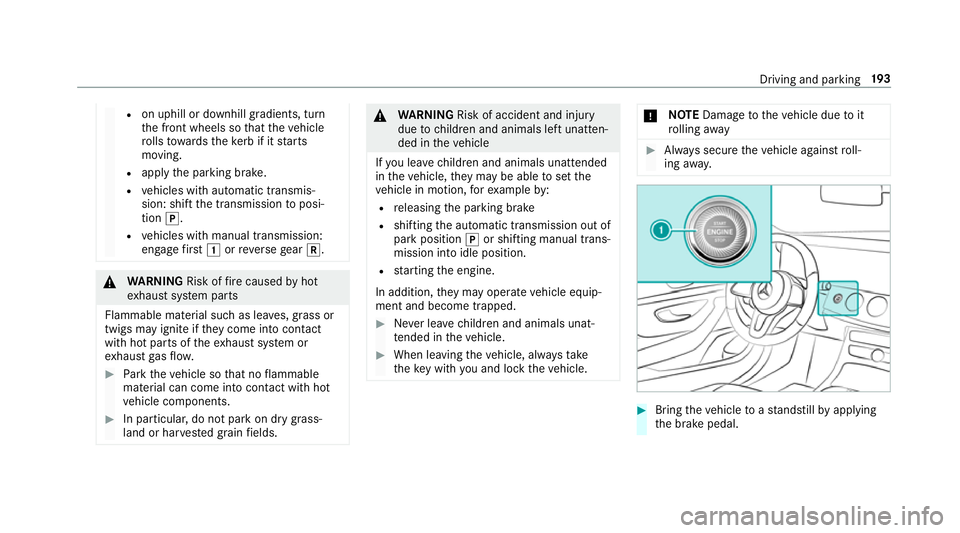
R
on uphill or downhill gradients, turn
th e front wheels so that theve hicle
ro lls towa rdsth eke rb if it starts
moving.
R apply the parking brake.
R vehicles with automatic transmis‐
sion: shift the transmission toposi‐
tion 005D.
R vehicles with manual transmission:
engage firs t0047 orreve rsege ar 005E. 000A
WARNING Risk offire caused byhot
ex haust sy stem parts
Flammable material such as lea ves, grass or
twigs may ignite if they come into contact
wi th hot parts of theex haust sy stem or
ex haust gasflow. 0007
Park theve hicle so that no flammable
material can come into con tact wi thhot
ve hicle components. 0007
In particular, do not park on dry grass‐
land or har vested grain fields. 000A
WARNING Risk of accident and inju ry
due tochildren and animals left unat ten‐
ded in theve hicle
If yo u lea vechildren and animals unat tended
in theve hicle, they may be able toset the
ve hicle in motion, forex ample by:
R releasing the parking brake
R shifting the automatic transmission out of
park position 005Dor shifting manual trans‐
mission into idle position.
R starting the engine.
In addition, they may operate vehicle equip‐
ment and become trapped. 0007
Never lea vechildren and animals unat‐
te nded in theve hicle. 0007
When leaving theve hicle, alw aysta ke
th eke y with you and lock theve hicle. 000E
NO
TEDama getotheve hicle due toit
ro lling away 0007
Alw ays secure theve hicle against roll‐
ing away. 0007
Bring theve hicle toast andstill byapplying
th e brake pedal. Driving and parking
19 3
Page 197 of 609
0007
On uphill or downhill gradients, turn the front
wheels so that theve hicle rolls towa rdsthe
ke rb if it starts moving. 0007
App lythe electric parking brake. 0007
Vehicles with manual transmission:
engage firs t0047 orreve rsege ar 005E. 0007
Vehicles with automatic transmission:
engage transmission position 005Din a station‐
ary vehicle with the brake pedal applied
(0013 page183). 0007
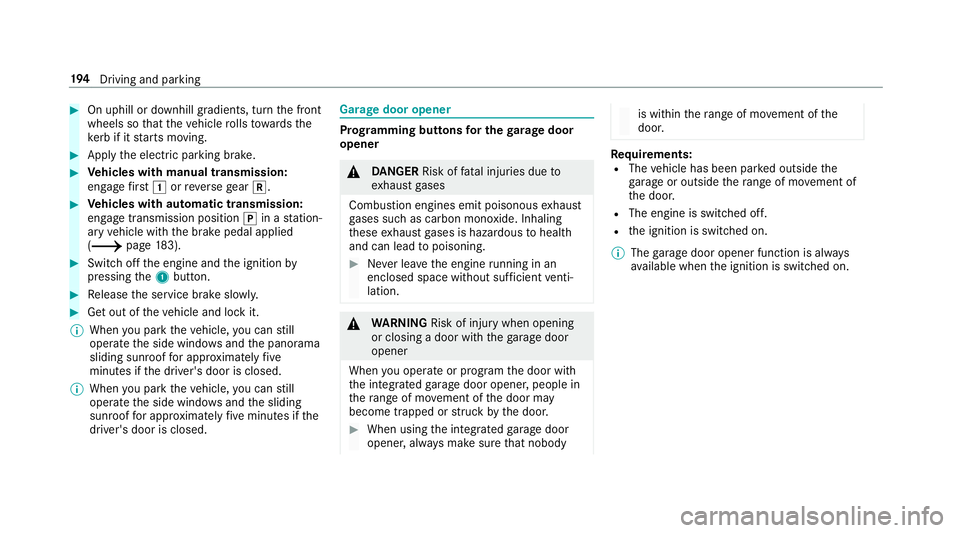
Switch off the engine and the ignition by
pressing the1 button. 0007
Release the service brake slowl y.0007
Get out of theve hicle and lock it.
0009 When you park theve hicle, you can still
opera tethe side windo wsand the panorama
sliding sunroof for appro ximately five
minutes if the driver's door is closed.
0009 When you park theve hicle, you can still
opera tethe side windo wsand the sliding
sunroof for appro ximately five minutes if the
driver's door is closed. Garage door opener
Prog
ramming buttons for the garage door
opener 000A
DANG ER Risk of fata l injuries due to
ex haust gases
Combustion engines emit poisonous exhaust
ga ses such as carbon monoxide. Inhaling
th ese exhaust gases is hazardous tohealth
and can lead topoisoning. 0007
Never lea vethe engine running in an
enclosed space wi thout suf ficient venti‐
lation. 000A
WARNING Risk of inju rywhen opening
or closing a door with thega rage door
opener
When you operate or program the door with
th e integrated garage door opener, people in
th era nge of mo vement of the door may
become trapped or stru ck bythe door. 0007
When using the integrated garage door
opener, alw ays make sure that nobody is within
thera nge of mo vement of the
door. Re
quirements:
R The vehicle has been par ked outside the
ga rage or outside thera nge of mo vement of
th e door.
R The engine is switched off.
R the ignition is switched on.
0009 The garage door opener function is alw ays
av ailable when the ignition is switched on. 194
Driving and pa rking
Page 198 of 609
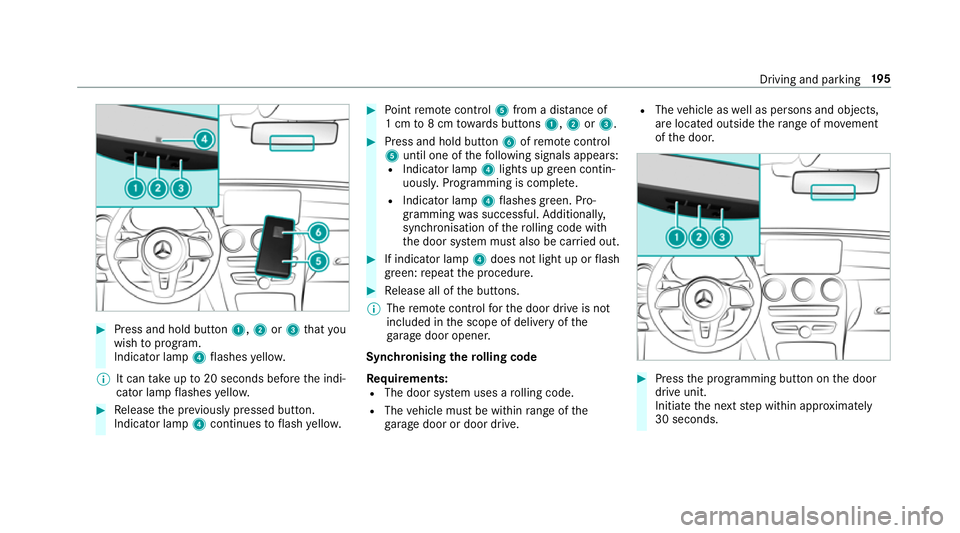
0007
Press and hold button 1,2or3 that you
wish toprog ram.
Indicator lamp 4flashes yello w.
0009 It can take up to20 seconds before the indi‐
cator lamp flashes yello w. 0007
Release the pr eviously pressed button.
Indicator lamp 4continues toflash yello w. 0007
Point remo tecontrol 5from a di stance of
1 cm to8 cm towa rds buttons 1,2or3. 0007
Press and hold button 6ofremo tecontrol
5 until one of thefo llowing signals appears:
R Indicator lamp 4lights up green contin‐
uousl y.Programming is comple te.
R Indicator lamp 4flashes green. Pro‐
gramming was successful. Additionall y,
synchronisation of thero lling code with
th e door sy stem must also be car ried out. 0007
If indicator lamp 4does not light up or flash
green: repeat the procedure. 0007
Release all of the buttons.
0009 The remo tecontrol forth e door drive is not
included in the scope of delivery of the
ga rage door opener.
Synchronising thero lling code
Re quirements:
R The door sy stem uses a rolling code.
R The vehicle must be within range of the
ga rage door or door drive. R
The vehicle as well as persons and objects,
are located outside thera nge of mo vement
of the door. 0007
Press the programming button on the door
drive unit.
Initiate the next step within appr oximately
30 seconds. Driving and parking
19 5
Page 199 of 609
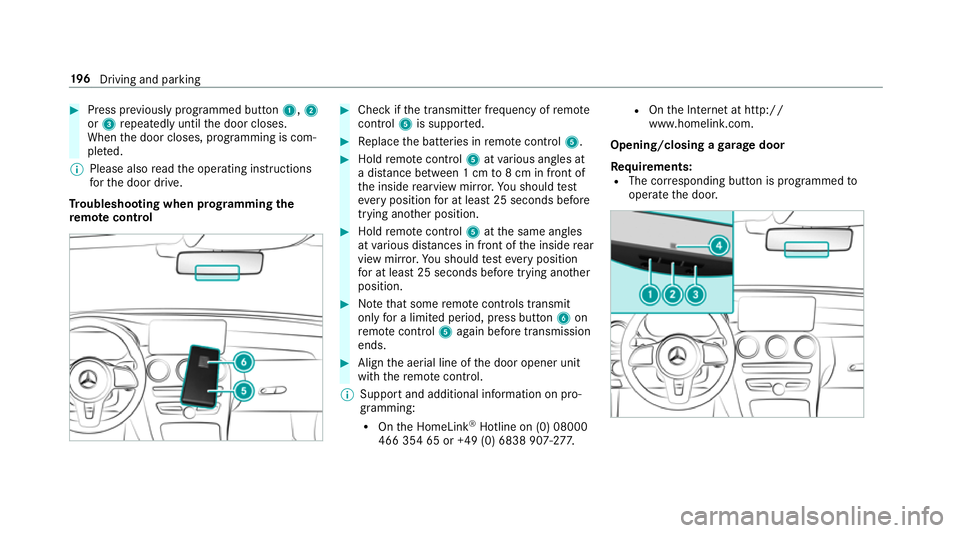
0007
Press pr eviously prog rammed button 1,2
or 3 repeatedly until the door closes.
When the door closes, programming is com‐
ple ted.
0009 Please also read the operating instructions
fo rth e door drive.
Tr oubleshooting when prog ramming the
re mo tecont rol 0007
Check if the transmit ter frequency of remo te
control 5is suppo rted. 0007
Replace the batteries in remo tecontrol 5. 0007
Hold remo tecontrol 5atvarious angles at
a dis tance between 1 cm to8 cm in front of
th e inside rearview mir ror.Yo u should test
eve ryposition for at least 25 seconds before
trying ano ther position. 0007
Hold remo tecontrol 5atthe same angles
at various dis tances in front of the inside rear
view mir ror.Yo u should test eve ryposition
fo r at least 25 seconds before trying ano ther
position. 0007
Notethat some remo tecontrols transmit
only for a limi ted period, press button 6on
re mo tecontrol 5again before transmission
ends. 0007
Align the aerial line of the door opener unit
with there mo tecontrol.
0009 Support and additional information on pro‐
gramming:
R Onthe HomeLink ®
Hotline on (0) 08000
466 354 65 or +49 (0) 6838 907-2 77.R
Onthe Internet at http://
www.homelin k.com.
Opening/closing a garage door
Requ irements:
R The cor responding button is programmed to
operate the door. 19 6
Driving and pa rking
Page 200 of 609
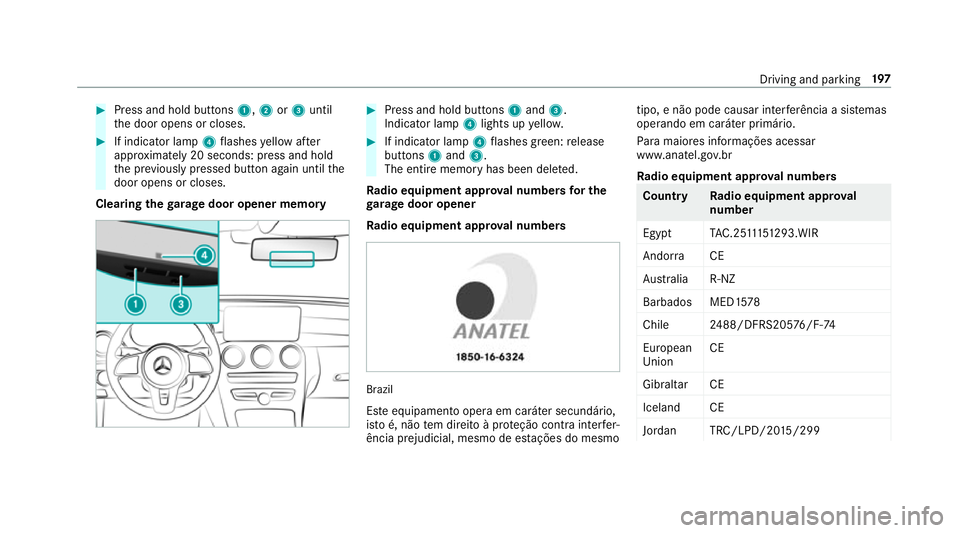
0007
Press and hold buttons 1,2or3 until
th e door opens or closes. 0007
If indicator lamp 4flashes yellow af ter
appr oximately 20 seconds: press and hold
th e pr eviously pressed button again until the
door opens or closes.
Clearing thega rage door opener memo ry 0007
Press and hold buttons 1and 3.
Indicator lamp 4lights up yello w. 0007
If indicator lamp 4flashes green: release
buttons 1and 3.
The entire memo ryhas been dele ted.
Ra dio equipment appr oval numbers for the
ga rage door opener
Ra dio equipment appr oval numbers Brazil
Es te equipamento opera em caráter secundário,
is to é, não tem direito à pr oteção contra inter fer‐
ência prejudicial, mesmo de es tações do mesmo tipo, e não pode causar inter
ferê ncia a si stemas
operando em caráter primário.
Pa ra maio res informações acessar
www.anatel.go v.br
Ra dio equipment appr oval numbers Countr
yRadio equipment appr oval
number
Egyp tT AC.25 111 51293.WIR
Andor ra CE
Au stra lia R-NZ
Barbados MED1 578
Chile 2488/DFRS205 76/F-74
European
Union CE
Gibral tarCE
Iceland CE
Jordan TRC/LPD/20 15/299 Driving and pa
rking 197