inflation pressure MERCEDES-BENZ C-CLASS SALOON 2018 Owners Manual
[x] Cancel search | Manufacturer: MERCEDES-BENZ, Model Year: 2018, Model line: C-CLASS SALOON, Model: MERCEDES-BENZ C-CLASS SALOON 2018Pages: 609, PDF Size: 11.19 MB
Page 432 of 609
Driving distance possible in eme
rgency
mode af ter the pressure loss warning: Load condition Driving distance pos‐
sible in emergency
mode
Pa rtially laden 80 km
Fu lly laden 30 kmThe driving dis
tance possible in emergency
mode may vary depending on the driving style.
Obser vethe maximum permissible speed of
80 km/h.
If a tyre has gone flat and cannot be replaced
with an MOEx tended tyre, you can use a stand‐
ard tyre as a temp orary measure. TIREFIT kit
storage location Plug-in
hybrid: be sure toobser vethe no tes in
th e Supplement. Otherwise, you may failto rec‐
ognise dangers. Mercedes
-AMG vehicles: observeth e no tes in
th e Supplement. Otherwise, you may failto rec‐
ognise dangers.
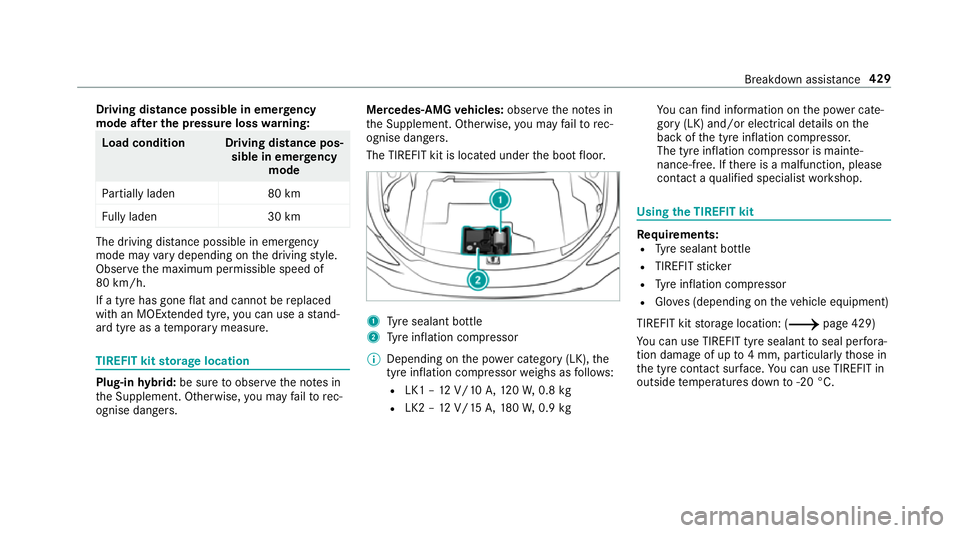
The TIREFIT kit is loca ted under the boot floor. 1
Tyre sealant bottle
2 Tyre inflation compressor
0009 Depending on the po wer category (LK), the
tyre inflation compressor weighs as follo ws:
R LK1 – 12V/10 A,120W, 0.8 kg
R LK2 – 12V/15 A,180W, 0.9 kg Yo
u can find information on the po wer cate‐
gory (LK) and/or electrical de tails on the
back of the tyre inflation compressor.
The tyre inflation compressor is mainte‐
nance-free. If there is a malfunction, please
conta ct aqualified specialist workshop. Using
the TIREFIT kit Re
quirements:
R Tyre sealant bottle
R TIREFIT sticker
R Tyre inflation compressor
R Gloves (depending on theve hicle equipment)
TIREFIT kit storage location: (0013 page 429)
Yo u can use TIREFIT tyre sealant toseal per fora‐
tion dama geof up to4 mm, particularly those in
th e tyre conta ct surface. You can use TIREFIT in
outside temp eratures down to-20 °C. Breakdown assi
stance 429
Page 434 of 609
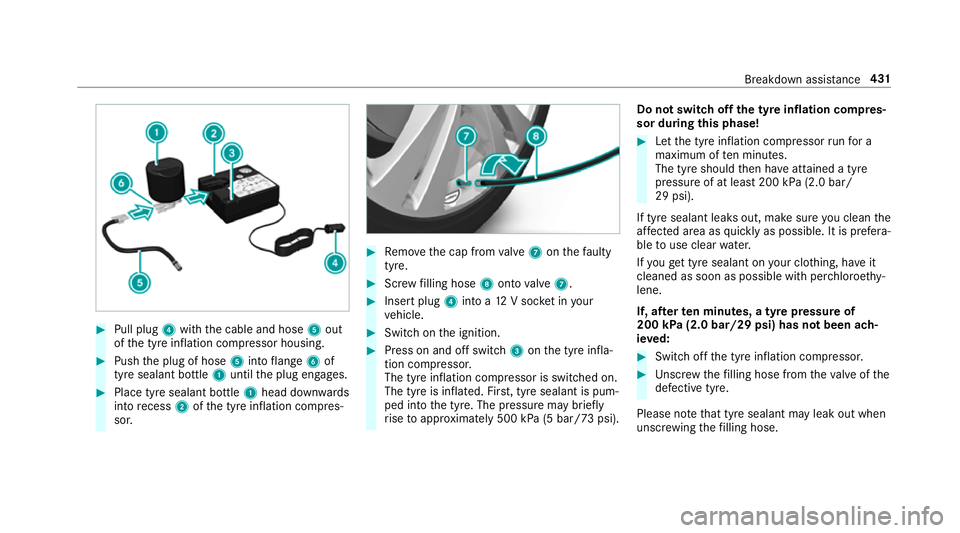
0007
Pull plug 4with the cable and hose 5out
of the tyre inflation compressor housing. 0007
Push the plug of hose 5into flange 6of
tyre sealant bottle 1until the plug engages. 0007
Place tyre sealant bottle 1head down wards
into recess 2ofthe tyre inflation compres‐
sor. 0007
Remo vethe cap from valve 7 onthefa ulty
tyre. 0007
Screw filling hose 8onto valve 7. 0007
Insert plug 4into a 12V soc ket in your
ve hicle. 0007
Switch on the ignition. 0007
Press on and off switch 3onthe tyre infla‐
tion compressor.
The tyre inflation compressor is switched on.
The tyre is inflated. Fir st, tyre sealant is pum‐
ped into the tyre. The pressure may brief ly
ri se toappr oximately 500 kPa (5 bar/73 psi). Do not switch off
the ty reinflation compres‐
sor during this phase! 0007
Let the tyre inflation compressor runfo r a
maximum of ten minu tes.
The tyre should then ha veattained a tyre
pressure of at least 200 kPa (2.0 bar/
29 psi).
If tyre sealant leaks out, make sure you clean the
af fected area as quickly as possible. It is prefera‐
ble touse clear water.
If yo uge t tyre sealant on your clo thing, ha veit
cleaned as soon as possible with per chloroe thy‐
lene.
If, af terte n minutes, a tyre pressure of
200 kPa (2.0 bar/29 psi) has not been ach‐
ie ve d: 0007
Switch off the tyre inflation compressor. 0007
Unscr ew thefilling hose from theva lve of the
defective tyre.
Please no tethat tyre sealant may leak out when
unscr ewing thefilling hose. Breakdown assis
tance 431
Page 435 of 609
0007
Very slowly drive forw ards or reve rse appr ox‐
imately 10m. 0007
Pump up the tyre again.
Af ter a maximum of ten minu testh e tyre
pressure must be at least 200 kPa (2.0 bar/
29 psi). 000A
WARNING Risk of accident due tothe
specified tyre pressure not being ach‐
ie ved
If th e specified tyre pressure is not achie ved
af te rth e specified time, the tyre is too badly
damaged. The tyre sealant cannot repair the
tyre in this ins tance.
Dama ged tyres and a tyre pressure that is
to o low can significantly impair braking and
handling characteristics. 0007
Do not drive on. 0007
Consult a qualified specialist workshop. If, af
terte n minutes, a tyre pressure of
200 kPa (2.0 bar/29 psi) has been achie ved: 000A
WARNING Risk of accident from driving
wi th sealed tyres
A tyre temp orarily sealed with tyre sealant
impairs driving characteristics and is not
suitable for higher speeds. 0007
Adapt your driving style according lyand
drive carefull y. 0007
Do not exceed the maximum speed
limit with a tyre that has been repaired
using tyre sealant. 0007
Obser vethe maximum permissible speed for
a tyre sealed with tyre sealant 80 km/h. 0007
Affix th e upper section of the TIREFIT sticker
to the instrument clus ter in a location where
it will be easi lyseen bythe driver.
000E NO
TEStaining from leaking tyre sealant Af
ter use, excess tyre sealant may leak out
from thefilling hose. 0007
Therefore, place thefilling hose in the
plastic bag that con tained the TIREFIT
kit. 000F
ENVIRONMEN
TALNO TEEnvironmental
pollution caused byenvironmen tally ir re‐
sponsible disposal Ty
re sealant contains polluta nts. 0007
Have the tyre sealant bottle disposed of
professionall y,e.g. at a Mercedes-Benz
Service Centre. 0007
Switch off the tyre inflation compressor. 0007
Unscr ew thefilling hose from theva lve of the
defective tyre. 0007
Stow th e tyre sealant bottle, the tyre inflation
compressor and thewa rning triangle. 0007
Pull away immediatel y. 0007
Stop driving af ter appro ximately ten minu tes
and check the tyre pressure using the tyre
inflation compressor.
The tyre pressure must now be at least
13 0 kPa (1.3 bar/19 psi). 432
Breakd own assi stance
Page 436 of 609
000A
WARNING Risk of accident due tothe
specified tyre pressure not being ach‐
ie ved
If th e specified tyre pressure is not achie ved
af te r a brief drive, the tyre is too badly dam‐
aged. The tyre sealant cannot repair the tyre
in this ins tance.
Dama ged tyres and a tyre pressure that is
to o low can significantly impair braking and
handling characteristics. 0007
Do not drive on. 0007
Consult a qualified specialist workshop. Countries
that ha veMercedes-Benz
Service24h: you will find a sticke r with thete le‐
phone number, e.g. on the B‑pillar on the driver's
side. 0007
Cor rect the tyre pressure if it is still at least
13 0 kPa (1.3 bar/19 psi). See the tyre pres‐
sure table on the fuel filler flap forva lues. 0007
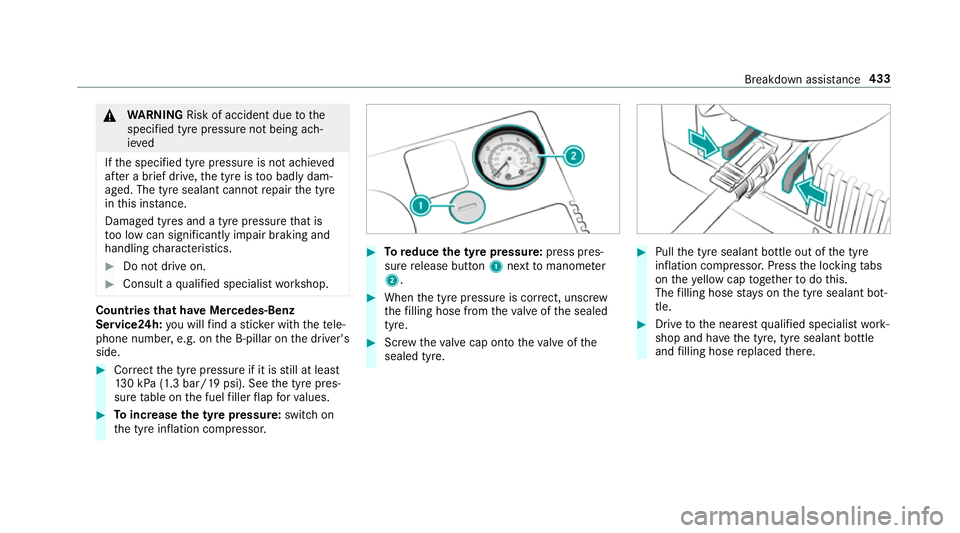
Toincrease the ty repressure: switch on
th e tyre inflation compressor. 0007
Toreduce the tyre pressure: press pres‐
su re re lease button 1next tomanome ter
2 . 0007
When the tyre pressure is cor rect, unscr ew
th efilling hose from theva lve of the sealed
tyre. 0007
Screw theva lve cap onto theva lve of the
sealed tyre. 0007
Pull the tyre sealant bottle out of the tyre
inflation compressor. Press the locking tabs
on theye llow cap toget her todo this.
The filling hose stay s on the tyre sealant bot‐
tle. 0007
Drive tothe nearest qualified specialist work‐
shop and ha vethe tyre, tyre sealant bottle
and filling hose replaced there. Breakdown assis
tance 433
Page 472 of 609
Ve
hicles with a tyre pressure monitoring
sy stem: For a few minutes af ter an emer‐
ge ncy spa rewheel is fitted, the sy stem may
st ill display the tyre pressure of there mo ved
wheel.
Be sure toalso obse rveth efo llowing fur ther
re lated subjects:
R Notes on tyre pressure (0013 page449)
R Tyre pressure table (0013 page 450) Re
moving the eme rgency spa rewheel The eme
rgency spare wheel is secured in the
emer gency spa rewheel bag in the boot. 0007
Obser vethe information on mounting tyres
(0013 page 458). 0007
Open the boot. 0007
Detach thefast ening stra ps. 0007
Unhook there taining spring hooks of thefa s‐
te ning stra ps from the brac kets. 0007
Remo vethe emer gency spa rewheel bag with
th e emer gency spa rewheel. 0007
Open the emer gency spa rewheel bag and
re mo vethe emer gency spa rewheel. Collapsible spa
rewheel Inflating
the collapsible emer gency spare
wheel 000E
NO
TEDama getothe collapsible spare
wheel when lo wering theve hicle Lo
we ring theve hicle without pr eviously
inflating the collapsible spare wheel can
damage its rim. 0007
Inflate the collapsible spare wheel using
th e tyre inflation compressor before
lo we ring theve hicle. 000E
NO
TEOverheating due tothe tyre infla‐
tion compressor running too long 0007
Do not runth e tyre inflation compres‐
sor for longer than eight minutes with‐
out inter ruption. Re
quirements:
R Obser vethe manufacturer's saf ety no tes on
th e tyre inflation compressor label and on
th e tyre sealant bottle.
R Mount the collapsible emer gency spa re
wheel as desc ribed (0013 page 466).
The collapsible emer gency spa rewheel must
be moun ted before it is inflated.
R Remo vethe tyre inflation compressor from
th estow age space under the boot floor
(0013 page 429). Wheels and tyres
469
Page 473 of 609
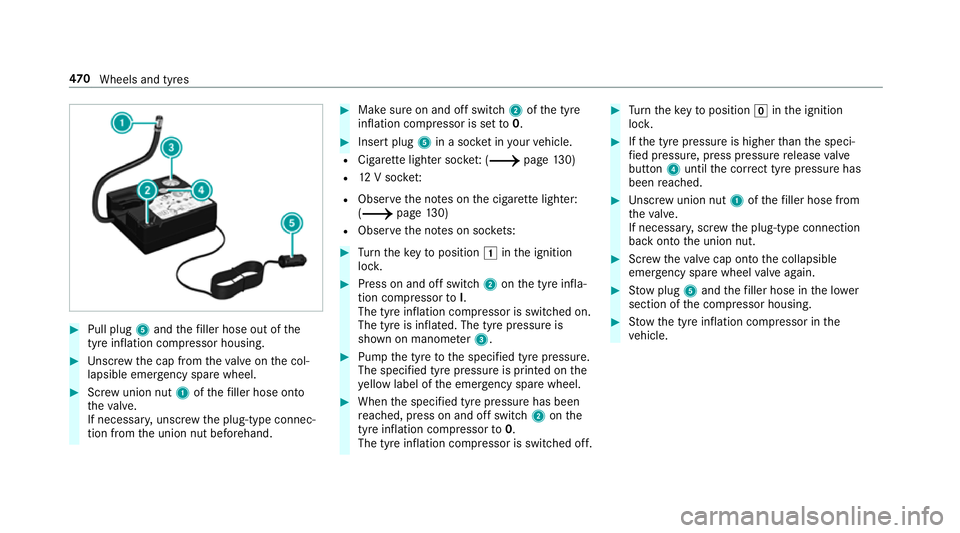
0007
Pull plug 5and thefiller hose out of the
tyre inflation compressor housing. 0007
Unscr ew the cap from theva lve on the col‐
lapsible emer gency spa rewheel. 0007
Screw union nut 1ofthefiller hose onto
th eva lve.
If necessar y,unscr ewthe plug-type connec‐
tion from the union nut beforehand. 0007
Make sure on and off switch 2ofthe tyre
inflation compressor is set to0. 0007
Insert plug 5in a soc ket in your vehicle.
R Cigar ette lighter soc ket: ( 0013 page130)
R 12V soc ket:
R Obser vethe no tes on the cigar ette lighter:
(0013 page130)
R Obse rveth e no tes on soc kets: 0007
Turn theke yto position 0047inthe ignition
loc k. 0007
Press on and off switch 2onthe tyre infla‐
tion compressor toI.
The tyre inflation compressor is switched on.
The tyre is inflated. The tyre pressure is
shown on manome ter3. 0007
Pump the tyre tothe specified tyre pressure.
The specified tyre pressure is printed on the
ye llow label of the emer gency spa rewheel. 0007
When the specified tyre pressure has been
re ached, press on and off swit ch2 onthe
tyre inflation compressor to0.
The tyre inflation compressor is switched off. 0007
Turn theke yto position 005Ainthe ignition
loc k. 0007
Ifth e tyre pressure is higher than the speci‐
fi ed pressure, press pressure release valve
bu tton 4until the cor rect tyre pressure has
been reached. 0007
Unscr ew union nut 1ofthefiller hose from
th eva lve.
If necessar y,scr ew the plug-type connection
back onto the union nut. 0007
Screw theva lve cap onto the collapsible
emer gency spa rewheel valve again. 0007
Stow plug 5and thefiller hose in the lo wer
section of the compressor housing. 0007
Stow th e tyre inflation compressor in the
ve hicle. 47 0
Wheels and tyres
Page 599 of 609

Soc
ket ................................................. 264
Tr ailer stabilisation
Fu nction/no tes ................................... 207
Tr ansfer redve hicle data
Android Auto ....................................... 364
Apple CarPl ay™ ................................... 364
Tr ansmission (problem) ..........................186
Tr ansmission position display ................181
Tr anspo rting
Ve hicle ................................................ 442
Tr im element (Care) ................................ 422
Tr ip
Menu (on-board computer) .................. 275
Tr ip computer
Displaying ............................................ 275
Re setting ............................................. 276
Tr ip distance ............................................ 275
Displ aying ............................................ 275
Re setting ............................................. 276
Tr ip me ter
see Trip dis tance Tu
rn signal indicator
see Turn signal lights
Tu rn signal lights .....................................1 37
Changing bulbs (front) ........................ .146
Changing bulbs (rear) .......................... 147
Switching on/off ................................. 137
TV ............................................................. 290
Ac tivating ............................................ 397
Ad justing the brightness ..................... 403
Calling up the menu (CI+ module) .......4 03
Displ ays in theTV control menu .......... 399
Fu nction/no tes (audio language,
subtitles) ............................................. 401
Information .......................................... 395
Overview ............................................. 398
Picture settings ................................... 403
Picture settings overview .................... 402
Setting subtitles .................................. 402
Setting the audio language .................. 401
Showing telete xt ................................. .402
Showing/hiding full screen ................. 399
Te lete xt overview ................................. 402
Vo ice commands (LINGU ATRO NIC) .....2 90
TV channel
Ac tivating/deactivating channel fix ..... 400 Channel
fix .......................................... 400
Channel li stove rview .......................... 400
EPG (elect ronic programme guide) ...... 400
Overview of favo urites ........................ .400
Quick sa ve........................................... 401
Selecting from thech annel list ............ 399
Selecting from the control menu ......... 399
Selecting from thefa vo urites .............. 399
Selecting in the bac kground ................ 399
St oring .................................................4 01
Tw o phone mode
see Second telephone
Tw o-w ayradios
Fr equencies ......................................... 472
No tes on ins tallation ............................ 471
Tr ansmission output (maximum) .......... 472
Ty re inflation compressor
see TIREFIT kit
Ty re pressure ........................................... 450
Checking (ty repressure monitoring
sy stem) ................................................ 451
No tes .................................................. 449
Re starting the tyre pressure loss
wa rning sy stem ................................... 457 596
Index