spare tire MERCEDES-BENZ C-Class SEDAN 2013 W204 Owner's Manual
[x] Cancel search | Manufacturer: MERCEDES-BENZ, Model Year: 2013, Model line: C-Class SEDAN, Model: MERCEDES-BENZ C-Class SEDAN 2013 W204Pages: 358, PDF Size: 4.85 MB
Page 12 of 358
Folding in/ou
t(electrically) ...........104
Folding in whe nlocking (on-board
computer) ...................................... 212
Out of position (troubleshooting) ...105
Setting ........................................... 104
Storing settings (memory function) 106
Storing the parking position ..........105
Eyeglasses compartment .................257 F
Fille rcap
see Fuel filler flap
First-aid kit ......................................... 296
Flat tire MOExtended run-fla tsystem ......... 297
Preparing the vehicle .....................297
see Emergency spare wheel
Floormats ........................................... 279
Fog lamps Switching on/off ........................... 111
Front fog lamps
Display message ............................ 225
Switching on/off ........................... 111
Fuel
Additives ........................................ 349
Consumption statistics ..................201
Displaying the current
consumption .................................. 202
Displaying the range ......................202
Driving tips .................................... 160
Flexible fuel vehicles ......................350
Fuel gauge ....................................... 31
Grade (gasoline) ............................ 349
Important safety notes ..................348
Notes for AMG vehicles .................349
Premium-grade unleaded gasoline .349
Problem (malfunction) ...................158
Refueling ........................................ 156
Tank content/reserve fuel .............348
Fuel filler flap
Emergency release ........................157
Opening/closing ............................ 156
Fuel level
Calling up the range (on-board
computer) ...................................... 202Fuel tank
Capacity ........................................ 348
Problem (malfunction) ...................158
see Fuel tank
Fuse allocation chart (vehicle tool
kit) ...................................................... 296
Fuses Allocation chart ............................. 306
Before changing ............................. 306
Dashboard fuse box .......................307
Fuse box in the engine
compartment ................................. 307
Fuse box in the trunk .....................308
Important safety notes ..................306
see Fuses G
Garage door opener Clearing the memory .....................278
Important safety notes ..................275
Opening/closing the garage door ..277
Programming (button in the rear-
view mirror) ................................... 275
Gear indicator (on-board computer) 212
Gear or selector lever (cleaning
guidelines) ......................................... 292
Genuine parts ...................................... 21
Glove box ........................................... 257 H
Handbrake see Parking brake
Hazard warning lamps ......................113
Headlamps Adding fluid to cleaning system .....287
Cleaning system (function) ............113
Cleaning system (notes) ................353
Fogging up ..................................... 115
see Automatic headlamp mode
Head restraints
Adjusting ......................................... 97
Adjusting (electrically). ....................98
Adjusting (manually). .......................98
Adjusting (rear) ................................ 9810
Index
Page 19 of 358
Stowage compartments
Armrest (under) ............................. 257
Cuph olders ................................... 261
Eyeglasses compartment ...............257
Glove box ...................................... .257
Important safety information .........256
Rea r............................................... 258
Stowage net ................................... 258
Under driver's seat/front-
passenger sea t.............................. 258
Stowage net ....................................... 258
Stowage well beneath the trunk
floor .................................................... 260
Summer opening see Convenience opening feature
Summer tires ..................................... 312
Sun visor ............................................ 262
Surround lighting (on-board
computer) .......................................... 210
Switching air-recirculation mode
on/off ................................................. 136
Switching off the alarm (ATA) ............71 T
Tachometer ........................................ 199
Tail lamps Display message ............................ 225
Tank content
Fuel gauge ....................................... 31
Technical data
Capacities ...................................... 347
Emergency spare wheel .................344
Information .................................... 346
Tires/wheels ................................. 338
Vehicle data ................................... 355
TELEAID
Call priority .................................... 271
Downloading destinations
(COMAND) ..................................... 271
Downloading route s....................... 274
Emergency call .............................. 268
Geo fencing ................................... 274
Important safety notes ..................267
Locating astolen vehicl e............... 273
MB info call button ........................270
Remote vehicle locking ..................272
Roadside Assistance button ..........270 Search
&Send ............................... 272
Self-test ......................................... 268
Speed alert .................................... 274
System .......................................... 268
Triggering the vehicle alarm ........... 275
Vehicle remote malfunction
diagnosi s....................................... 273
Vehicle remote unlocking ..............272
Telephone
Accepting acall............................. 205
Display message ............................ 240
Menu (on-board computer) ............205
Number from the phone book ....... .206
Redialing ........................................ 206
Rejecting/ending acall................. 205
Temperature
Coolant .......................................... 198
Coolant (on-board computer) ......... 212
Engine oil (on-board computer) ...... 212
Outside temperature ..................... .199
Setting (climate control) ................133
Theft deterrent systems
ATA (Anti-Theft Alarm system) .........71
Immobilize r...................................... 71
Through-loading feature ...................258
Time see separate operating instructions
Timing (RACETIMER) .........................213
Tire pressure Calling up (on-board computer) .....318
Checking manually ........................317
Display message ............................ 236
Maximum ....................................... 316
Notes ............................................. 315
Pressure loss warning ....................317
Recommended ............................... 313
see Tire pressure
Tire pressure loss warning
system
Important safety notes ..................317
Restarting ...................................... 318
Tire pressure monitoring system
Checking the tire pressure
electronically ................................. 320
Function/notes ............................. 318
Restarting ...................................... 320
Warning lamp ................................. 254
Warning message .......................... 320 Index
17
Page 21 of 358
Trunk
Emergency release ..........................84
Important safety notes ....................82
Locking separatel y........................... 84
Opening (automatically from
inside) .............................................. 83
Opening (automatically from
outside) ............................................ 83
Trunk lid
Display message ............................ 239
Opening/closing .............................. 82
Opening dimensions ......................355
Trunk load (maximum) ......................355
Turn signals Display message ............................ 224
Switching on/off ........................... 112
see Turn signals
Type identification plate
see Vehicle identification plate U
Unlocking Emergency unlocking .......................81
From inside the vehicle (central
unlocking button) ............................. 80 V
Vanity mirror (in the sun visor) ........262
Vehicle Data acquisition ............................... 26
Display message ............................ 238
Emergency locking ........................... 81
Emergency unlocking .......................81
Equipment ....................................... 22
Individua lsettings .......................... 208
Limited Warranty ............................. 26
Loading .......................................... 321
Locking (in an emergency) ...............81
Locking (SmartKey) .......................... 74
Lowering ........................................ 338
Maintenance .................................... 23
Parking for a long period ................ 160
Pulling away ................................... 144
Raising ........................................... 335
Reporting problems .........................26
Securing from rolling away ............335 Towing away
.................................. 304
Transporting .................................. 306
Unlocking (in an emergency) ...........81
Unlocking (SmartKey) ......................74
Vehicle data ................................... 355
Vehicle data ....................................... 355
Vehicle dimensions ...........................355
Vehicle emergency locking ................81
Vehicle identification number see VIN
Vehicle identification plate ..............346
Vehicle tool kit .................................. 296
Video (DVD) ........................................ 205
VIN ...................................................... 346 W
Warning and indicator lamps ABS ................................................ 244
Brakes ........................................... 244
Check Engine ................................. 250
Coolant .......................................... 251
Distance warning ........................... 253
DISTRONI CPLUS ........................... 253
ESP ®
.............................................. 246
ESP ®
OFF ....................................... 247
Fuel tank ........................................ 250
Overview .......................................... 32
PASSENGER AIR BAG OFF
indicator lamp .................................. 47
Reserve fuel ................................... 250
Seat bel t........................................ 242
SPORT handling mode ...................247
SRS ................................................ 249
Tire pressure monitor ....................254
Warranty ............................................ 346
Washer fluid Display message ............................ 240
Wheel bol ttightening torque ...........338
Wheel chock ...................................... 335
Wheels Changing awheel .......................... 334
Checking ........................................ 311
Cleaning ......................................... 289
Cleaning (warning) .........................334
Emergency spare wheel .................342
Important safety notes ..................310
Interchanging/changing ................334 Index
19
Page 185 of 358
Use Parking Guidance for parking spaces:
R that are parallel to the direction of travel
R that are on straight roads, not bends
R that are on the same level as the road, i.e.
not on the pavement, for example. Parking
Guidance may not detect flat curbs
Parking tips:
R On narrow roads, drive as close to the
parking space as possible.
R Parking spaces that are littered, overgrown
or partially occupied by trailer drawbars
might be identified incorrectly or not at all.
R Snowfall or heavy rain may lead to a parking
space being measured inaccurately.
R Pay attention to the PARKTRONIC
(Y page 180) warning messages during the
parking procedure.
R When transporting a load which protrudes
from your vehicle, you must not use Parking
Guidance.
R Never use Parking Guidance with snow
chains or an emergency spare wheel
mounted.
R Make sure that the tire pressures are
always correct.T his hasadirec teffect on
the steering instructions.
R The way you rvehicle is positioned in the
parking space after parkin gis dependent
on various factors. These include the
position and shape of the vehicles parked
in front and behind it and the conditions of
the location. In some cases, Parking
Guidance may guide you too far or not far
enough into a parking space. In some
cases, it may also lead you across or onto
the curb. If necessary, cancel the parking
procedure with Parking Guidance.
! If unavoidable, you should drive over
obstacles such as curbs slowly and not at
a sharp angle. Otherwise, you may damage
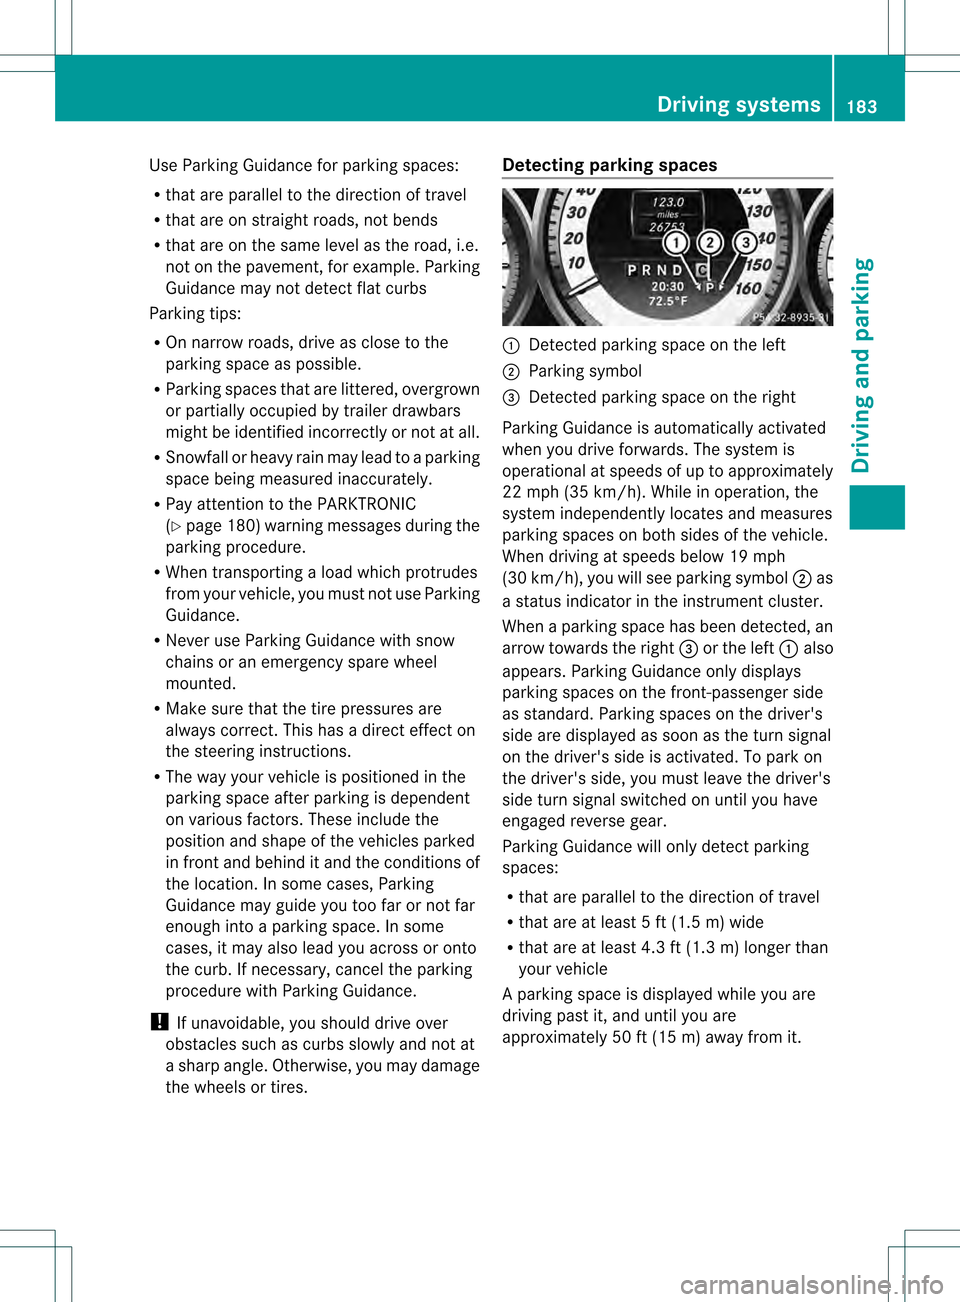
the wheels or tires. Detecting parking spaces 0002
Detected parking space on the left
0003 Parking symbol
0022 Detected parking space on the right
Parking Guidance is automatically activated
when you drive forwards. The system is
operational at speeds of up to approximately
22 mph (35 km/h). While in operation, the
system independently locates and measures
parking spaces on both sides of the vehicle.
When driving at speeds below 19 mph
(30 km/h), you will see parking symbol 0003as
a status indicator in the instrument cluster.
When a parking space has been detected, an
arrow towards the right 0022or the left 0002also
appears. Parking Guidance only displays
parking spaces on the front-passenger side
as standard. Parking spaces on the driver's
side are displayed as soon as the turn signal
on the driver's side is activated. To park on
the driver's side, you must leave the driver's
side turn signal switched on until you have
engaged reverse gear.
Parking Guidance will only detect parking
spaces:
R that are parallel to the direction of travel
R that are at least 5 ft (1.5 m) wide
R that are at least 4.3 ft (1.3 m) longer than
your vehicle
Ap arking space is displayed while you are
driving past it, and until you are
approximately 50 ft (15 m) away from it. Driving systems
183Driving and parking Z
Page 299 of 358
R
Lug wrench
R Towing eye Flat tire
Preparing the vehicle
Yourv ehicle may be equipped with:
R MOExtended tires (tires with run-flat
properties) (Y page 297)
Vehicle preparation is not necessary on
vehicles with MOExtended tires.
R a "Minispare" emergency spare wheel
R
R an emergency spare wheel (only for certain
countries) (Y page 342)
Information on changing/mounting a wheel
(Y page 334).
X Stop the vehicle on solid, non-slippery and
level ground, as far away as possible from
traffic.
X Switch on the hazard warning lamps.
X Secure the vehicle against rolling away
(Y page 158).
X If possible, bring the fron twheels into the
straight-ahead position.
X Switch off the engine.
X Vehicles without KEYLESS-GO: remove
the SmartKey from the ignition lock.
X Vehicles with KEYLESS-GO: open the
driver's door.
The on-board electronics have status 0,
which is the same as the SmartKey having
been removed.
X Vehicles with KEYLESS-GO: remove the
Start/Stop button from the ignition lock
(Y page 142).
X All occupants must get out of the vehicle.
Make sure that they are not endangered as
they do so.
X Make sure that no one is near the danger
area while a wheel is being changed.
Anyone who is not directly assisting in the wheel change should, for example, stand
behind the barrier.
X Get out of the vehicle. Pay attention to
traffic conditions when doing so.
X Close the driver's door. MOExtended tires (tires with run-flat
properties)
General notes With MOExtended tires (tires with run flat
characteristics), you can continue to drive
your vehicle even if there is a total loss of
pressure in one or more tires. The affected
tire must not show any clearly visible damage.
You can recognize MOExtended tires by the
MOExtended marking which appears on the
sidewall of the tire. You will find this marking
next to the tire size designation, the load-
bearing capacity and the speed index
(Y
page 328).
MOExtended tires may only be used in
conjunction with an active tire pressure loss
warning system or with an active tire pressure
monitor.
If the pressure loss warning message
appears in the multifunction display:
R Observe the instructions in the display
messages (Y page 236).
R Check the tire for damage.
R If driving on, observe the following notes.
The maximum driving distance is
approximately 50 miles (80 km) when the
vehicle is partially laden and approximately
18 miles (30 km) when the vehicle is fully
laden.
In addition to the vehicle load, the driving
distance possible depends upon:
R Speed
R Road condition
R Outside temperature
The driving distance possible in run-flat mode
may be reduced by extreme driving Flat tire
297Breakdown assistance
Page 311 of 358
Useful information
............................310
Important safety notes ....................310
Operation ........................................... 310
Winter operation ............................... 312
Tire pressure ..................................... 313
Loading the vehicle ..........................321
Maximum load rating .......................325
Uniform Tire Quality Grading
Standards .......................................... 326
Tire labeling ....................................... 327
Definition of terms for tires and
loading ............................................... 331
Changing awheel ............................. 334
Mounting awheel ............................. 334
Wheel and tire combinations ...........338
Emergency spare wheel ...................342 309Wheels and tires
Page 312 of 358
Useful information
i This Operator's Manual describes all
models and all standard and optional
equipment of your vehicle available at the
time of publication of the Operator's
Manual. Country-specific differences are
possible. Please note that your vehicle may
not be equipped with all features
described. This also applies to safety-
related systems and functions.
i Read the information on qualified
specialist workshops: (Y page 25).Important safety notes
G
WARNING
If wheels and tires of the wrong size are used,
the wheel brakes or suspension components
may be damaged. There is arisk of an
accident.
Always replace wheels and tires with those
that fulfill the specifications of the original
part.
When replacing wheels, make sure to use the
correct:
R designation
R model
When replacing tires, make sure to use the
correct:
R designation
R manufacturer
R model G
WARNING
Af lat tire severely impairs the driving,
steering and braking characteristics of the
vehicle. There is a risk of accident.
Tires without run-flat characteristics:
R do not drive with aflat tire.
R immediately replace the flat tire with your
emergency spare wheel or spare wheel, or
consult a qualified specialist workshop. Tires with run-flat characteristics:
R
pay attention to the information and
warning notices on MOExtended tires (tires
with run-flat characteristics).
Accessories that are not approved for your
vehicle by Mercedes-Ben zorare not being
used correctly can impair the operating
safety.
Before purchasing and using non-approved
accessories, visi taqualified specialist
workshop and inquire about:
R suitability
R legal stipulations
R factory recommendations
Information on the dimensions and types of
wheels and tires for your vehicle can be found
in the "Wheel/tire combinations" section
(Y page 338).
Information on air pressure for the tires on
your vehicle can be found:
R on the vehicle's Tire and Loading
Information placard on the B-pillar
R on the tire pressure label on the fuel filler
flap
R in the "Tire pressure" section
Modification work on the brake system and
wheels is not permitted. The use of wheel
spacers or brake dust shields is not
permitted. This invalidates the general
operating permit for the vehicle.
i Further information on wheels and tires
can be obtained at any qualified specialist
workshop. Operation
Information on driving
R If the vehicle is heavily loaded, chec kthe
tire pressures and correct them if
necessary.
R When parking your vehicle, make sure that
the tires do not get deformed by the curb 310
OperationWheels and tires
Page 313 of 358

or other obstacles. If it is necessary to drive
over curbs, speed humps or similar
elevations, try to do so slowly and at an
obtuse angle. Otherwise, the tires,
particularly the sidewalls, may be
damaged. Regular checking of wheels and tires
G
WARNING
Damaged tires can cause tire inflation
pressure loss. As a result, you could lose
control of your vehicle. There is a risk of
accident.
Check the tires regularly for signs of damage
and replace any damaged tires immediately.
R Regularly check the wheels and tires of
your vehicle for damage (e.g. cuts,
punctures, tears, bulges on tires and
deformation or cracks or severe corrosion
on wheels) at least once amonth, as well
as after driving off-road or on rough roads.
Damaged wheels can cause a loss of tire
pressure.
R Regularly check the tire tread depth and
the condition of the tread across the whole
width of the tire (Y page 311). If necessary,
turn the front wheels to full lock in order to
inspect the inner side of the tire surface.
R All wheels must have a valve cap to protect
the valve against dirt and moisture. Do not
mount anything onto the valve other than
the standard valve cap or other valve caps
approved by Mercedes-Benz for your
vehicle. Do not use any other valve caps or
systems, e.g. tire pressure monitoring
systems.
R Regularly check the pressure of all the tires
including the emergency spare wheel or the
spare wheel, particularly prior to long trips,
and correc tthe pressure as necessary
(Y page 313). Tire tread
G
WARNING
Insufficient tire tread will reduce tire traction.
The tire is no longer able to dissipate water.
This means that on wet road surfaces, the risk
of hydroplaning increases, in particular where
speed is not adapted to suit the driving
conditions. There is a risk of accident.
If the tire pressure is too high or too low, tires
may exhibit different levels of wear at
different locations on the tire tread. Thus, you
should regularly check the tread depth and
the condition of the tread across the entire
width of all tires.
Minimum tire tread depth for:
R Summer tires: 0009in (3 mm)
R M+S tires: 000Ain (4 mm)
For safety reasons, replace the tires before
the legally prescribed limit for the minimum
tire tread depth is reached.
Treadweari ndicators (TWI) are required by
law. Six indicators are positioned on the tire
tread. They are visible once the tread depth
is approximately 0008in (1.6 mm). If thi sisthe
case, the tire is so worn that it must be
replaced. Bar indicator
0002for tread wear is integrated
into the tire tread. Operation
311Wheels and tires Z
Page 314 of 358
Selecting, mounting and replacing
tires
R Only mount tires and wheels of the same
type and make.
Exception: it is permissible to install a
different type or make in the event of a flat
tire. Observe the "MOExtended tires (tires
with run-flat characteristics)" section
(Y page 297)
R Only mount tires of the correct size onto
the wheels.
R After mounting new tires, break them in at
moderate speeds for the first 60 miles
(100 km), as they only reach their full
performance after this distance.
R Do not drive with tires which have too little
tread depth, as this significantly reduces
the traction on wet roads (hydroplaning).
R Replace the tires after six years at the
latest, regardless of wear. This also applies
to the spare wheel/emergency spare
wheel.
The service life of tires depends on the
following factors amongst other things:
R Driving style
R Tire pressure
R Distance covered MOExtended tires (tires with run-flat
properties)
MOExtended tires (tires with run-flat
properties) allow you to continue driving your
vehicle even if one or more tires are entirely
deflated.
MOExtended tires may only be used in
conjunction with an active tire pressure loss
warning system or with an active tire pressure
monitor and on wheels specifically tested by
Mercedes-Benz.
Notes on driving with MOExtended tires in the
event of a flat tire can be found in the
"Breakdown assistance" section
(Y page 297). Winter operation
Points to remember
Have your vehicle winterproofed at a qualified
specialist workshop at the onset of winter.
Observe the notes in the "Changing a wheel"
section (Y page 334). Driving with summer tires
At temperatures below 45 ‡(+7 †), summer
tires lose elasticity and therefore traction and
braking power. Change the tires on your
vehicle to M+S tires. Using summer tires at
very cold temperatures could cause cracks to
form, thereby damaging the tires
permanently. Mercedes-Benz cannot accept
responsibility for this type of damage. M+S tires
G
WARNING
M+S tires with a tire tread depth of less than
000A in (4 mm) are not suitable for use in winter
and do not provide sufficient traction. There
is a risk of an accident.
M+S tires with a tread depth of less than 000A
in (4 mm) must be replaced immediately.
At temperatures below 45 ‡ (+7 †), use
winter tires or all-season tires. Both types of
tire are identified by the M+S marking.
Only winter tires bearing the 0002snowflake
symbol in addition to the M+S marking
provide the best possible grip in wintry road
conditions. Only these tires will allow driving
safety systems such as ABS and ESP ®
to
function optimally in winter. These tires have
bee ndeveloped specifically for driving in
snow.
Use M+S tires of the same make and tread on
all wheels to maintain safe handling
characteristics. 312
Winter operationWheels and tires
Page 315 of 358
Always observe the maximu
mpermissible
speed specified for the M+S tires you have
mounted.
When you have mounted M+S tires:
X Check the tire pressures (Y page 317).
X Vehicles for Canada: restart the tire
pressure loss warning system
(Y page 317).
X Vehicles for USA: restart the tire pressure
monitor (Y page 318).
For more information on driving with the
emergency spare wheel, see (Y page 342).Snow chains
G
WARNING
If snow chains are installed to the front
wheels, they may drag against the vehicle
body or chassis components. This could
cause damage to the vehicle or the tires.
There is a risk of an accident.
To avoid hazardous situations:
R never install snow chains to the front
wheels
R always install snow chains in pairs to the
rear wheels.
! On some tire sizes there is not enough
space for snow chains. To avoid damage to
the vehicle or tires, observe the "Wheel and
tire combinations" section under "Tires and
wheels".
! Vehicles with steel wheels: if you wish
to mount snow chains on steel wheels,
make sure that you remove the respective
wheels' hubcaps first .The hubcaps may
otherwise be damaged.
For safety reasons, Mercedes-Benz
recommends that you only use snow chains
that have been specially approved for your
vehicle by Mercedes-Benz, or are of a
corresponding standard of quality. If you intend to mount snow chains, please
bear the following points in mind:
R snow chains may not be mounted on all
wheel/tire combinations. Permissible
wheel-tire combinations (Y page 338).
R only use snow chains when driving on roads
completely covered by snow. Remove the
snow chains as soon as possible when you
come to a road that is not snow-covered.
R local regulations may restrict the use of
snow chains. Observe the appropriate
regulations if you wish to mount snow
chains.
R do not exceed the maximum permissible
speed of 30 mph (50 km/h).
i You may wish to deactivate
ESP ®
(Y page 66) when pulling away with
snow chains installed. You can thereby
allow the wheels to spin in a controlled
manner, achieving an increased driving
force (cutting action).
For more information on driving with the
emergency spare wheel, see (Y page 342). Tire pressure
Tire pressure specifications
G
WARNING
Underinflated or overinflated tires pose the
following risks:
R the tires may burst, especially as the load
and vehicle speed increase.
R the tires may wear excessively and/or
unevenly, which may greatly impair tire
traction.
R the driving characteristics, as well as
steering and braking, may be greatly
impaired.
There is a risk of an accident. Tire pressure
313Wheels and tires
Z