tires MERCEDES-BENZ C240 2002 W203 Owner's Guide
[x] Cancel search | Manufacturer: MERCEDES-BENZ, Model Year: 2002, Model line: C240, Model: MERCEDES-BENZ C240 2002 W203Pages: 406
Page 340 of 406
337 Tires, Wheels
Te ch n i c a l
data Instruments
and controlsOperation DrivingInstrument
cluster displayPractical hintsCar care Index TIREFIT
(C 32 AMG only)
Small punctures, particularly those in the tread can be
sealed with TIREFIT.
Foreign objects (e.g. screws or nails) should not be
removed from the tire.
TIREFIT can be used in ambient temperatures down to
approx. - 4
°F (- 20
°C).
Wa r n i n g !
Cuts or punctures larger than approx. 0.16 in
(4 mm), tire damage caused by driving with
extremely low tire pressure or on a flat tire, or a
damaged wheel can pose a hazard while driving.
TIREFIT should not be used in such circumstances.Do not drive the vehicle under such circumstances.Contact your nearest Mercedes-Benz Center for
assistance.Take care not to allow the contents of TIREFIT to
come in contact with hair, eyes or clothing.
TIREFIT is harmful if inhaled, swallowed or
absorbed through the skin - causes skin, eye and
respiratory irritation.
Any contact with eyes or skin should be flushed
immediately with plenty of water.If clothing comes in contact with TIREFIT, change
clothing as soon as possible.In case of allergic reaction or rash, consult a
physician immediately.Keep TIREFIT out of reach of children.
If swallowed, rinse mouth immediately with plenty
of water and drink plenty of water.Do not induce vomiting!Consult a physician immediately.Keep away from open flame or heat source.
OM_203.book Seite 337 Donnerstag, 31. Mai 2001 11:57 11
Page 341 of 406
338 Tires, Wheels
Te ch n i c a l
data Instruments
and controlsOperation DrivingInstrument
cluster displayPractical hintsCar care Index
Sealing tire with TIREFIT
1. Set parking brake and turn on hazard warning
flasher.
2. Move selector lever to position “P” and turn off
engine.
3. Take TIREFIT out of trunk, see page 326.
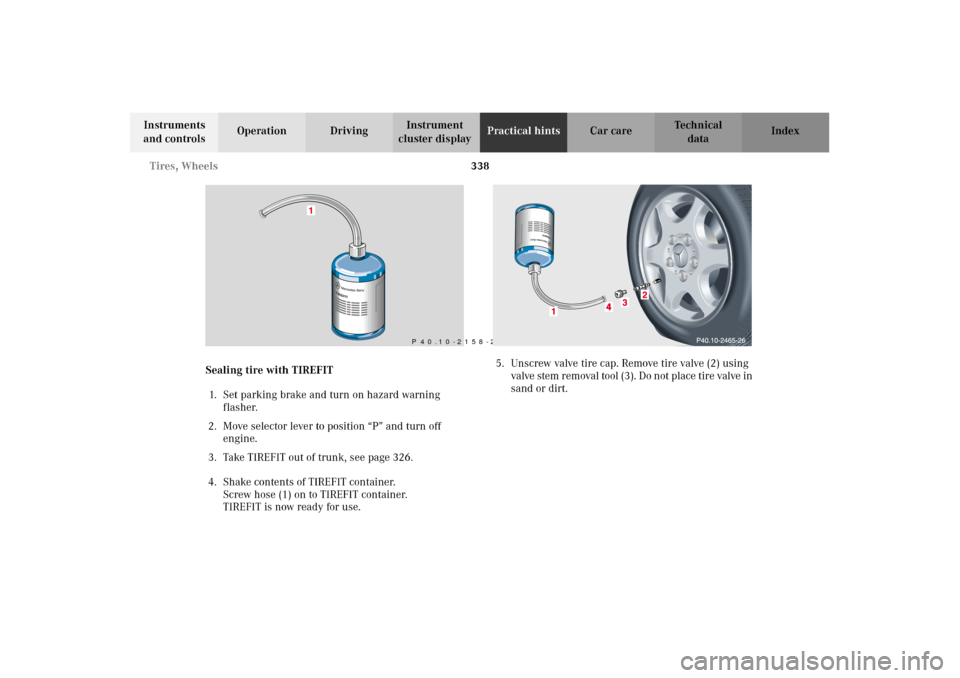
4. Shake contents of TIREFIT container.
Screw hose (1) on to TIREFIT container.
TIREFIT is now ready for use.5. Unscrew valve tire cap. Remove tire valve (2) using
valve stem r emoval tool (3 ). Do n ot p lace tir e valve in
sand or dirt.
1
P 40.10-2158-26
OM_203.book Seite 338 Donnerstag, 31. Mai 2001 11:57 11
Page 342 of 406
339 Tires, Wheels
Te ch n i c a l
data Instruments
and controlsOperation DrivingInstrument
cluster displayPractical hintsCar care Index 6. Remove plug (4) from end of hose (1) and push hose
(1) onto valve stem.
7. Hold container upside down (hose down) and
squeeze entire contents of container into tire.
8. Pull hose (1) off and screw tire valve (2) using valve
stem tool (3) into the valve stem.
Note:
A spare tire valve is stored with the valve stem tool.
9. Install plug (4) onto end of hose (1).
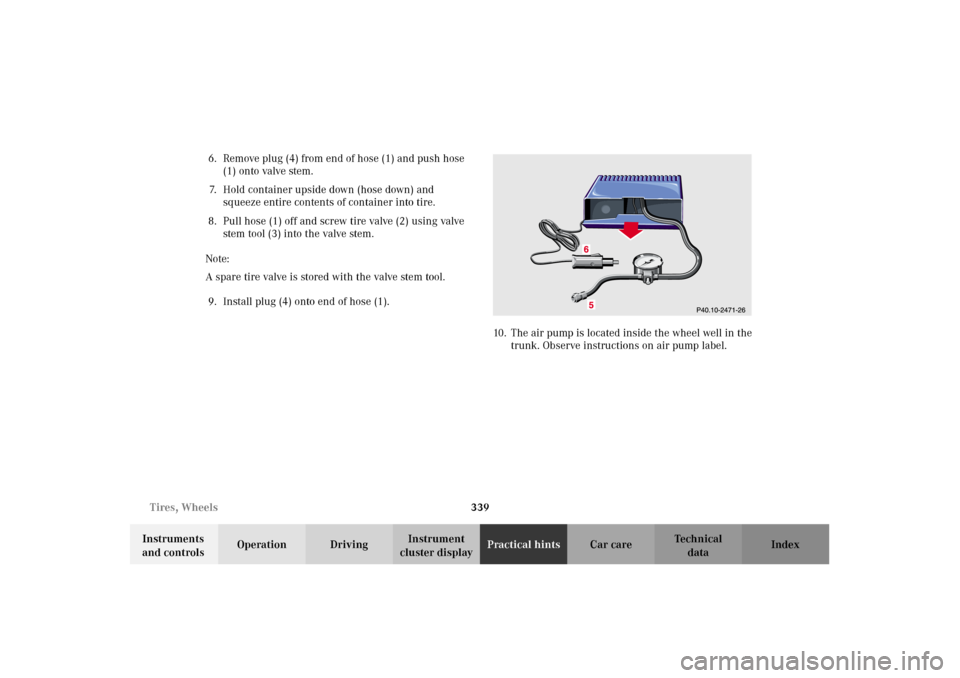
10. The air pump is located inside the wheel well in the
trunk. Observe instructions on air pump label.
OM_203.book Seite 339 Donnerstag, 31. Mai 2001 11:57 11
Page 343 of 406
340 Tires, Wheels
Te ch n i c a l
data Instruments
and controlsOperation DrivingInstrument
cluster displayPractical hintsCar care Index
11. Remove air pump from storage compartment inside
trunk.
12. Pull out air hose with pressure gauge (5) and
electrical plug (6).
13. Screw filler hose (5) onto tire valve.
14. Plug air pump electrical plug (6) into vehicle cigar
lighter.
15. To switch on air pump, turn key in steering lock to
position 1.
Note:
After 5 minutes, pressure gauge must display
26 psi (1.8 bar). Do not exceed the maximum pressure
of 36 psi (2.5 bar)!
If pressure is not attained, drive vehicle
approx. 394 in (10 m), so that the sealing material is
evenly distributed inside the tire. Reconnect air pump
and inflate tire.Note:
Do not operate electric air pump longer that 6 minutes
wit hout interruption. Air pump could overheat! Af ter air
pump has cooled off, operate air pump again.
16. To switch off air pump, turn key in steering lock to
position 0.
17. Reinstall valve tire cap.
18. Drive vehicle to distribute the sealant evenly inside
the tire.
Wa r n i n g !
If a tire pressure of 26 psi (1.8 bar) is not attained,
tire is too severely damaged for TIREFIT to provide
a reliable tire repair.In this case TIREFIT can not properly seal the tire.Do not drive the vehicle.Contact the nearest Mercedes-Benz Center or call
Roadside Assistance.
OM_203.book Seite 340 Donnerstag, 31. Mai 2001 11:57 11
Page 344 of 406
341 Tires, Wheels
Te ch n i c a l
data Instruments
and controlsOperation DrivingInstrument
cluster displayPractical hintsCar care Index Notes:
If TIREFIT is liquid, clean water and a damp cloth will
remove the material from the vehicle or tire and wheel
components. Once TIREFIT sealing material had dried,
it can easily be peeled off and properly discarded.
Replace TIREFIT every 3 years.Tire inflation pressure
A table (see fuel filler flap) lists the tire inflation
pressures specified for Mercedes-Benz recommended
tires as well as for the varying operating conditions.
Important!
Tire pressure changes by approximately 1.5 psi (0.1 bar)
per 18
°F (10
°C) of air temperature change. Keep this in
mind when checking tire pressure inside a garage –
especially in the winter.
Example:
If garage temperature = approximately +68
°F (+20
°C)
and ambient temperature = approximately +32
°F (0
°C)
then the adjusted air pressure = specified air pressure
+3 psi (+0.2 bar).
Tire pressures listed for light loads are minimum values
offering high driving comfort. Increased inflation
pressures for heavy loads produce favorable handling
characteristics with lighter loads and are perfectly
permissible. The ride of the vehicle, however, will
become somewhat harder.
Tire temperature and pressure increase with the vehicle
speed. Tire pressure should therefore only be checked
and corrected on cold tires. Correct tire pressure in
Wa r n i n g !
Do not exceed vehicle speed of 50 mph (80 km / h).
A TIREFIT repair is not designed to operate at
higher speeds.Vehicle handling characteristics may change.After driving vehicle for an initial 10 minutes,
check tire pressure. If tire pressure has fallen
below 20 psi (1.3 bar) do not continue to drive the
vehicle.If tire pressure is at least 20 psi (1.3 bar), inflate
tire to correct pressure (see label on fuel filler
flap), and drive vehicle to nearest tire repair
facility to have tire repaired or replaced.Recommended duration of use: 300 miles (500 km)
at 50 mph (80 km / h) with the recommended tire
pressure.
OM_203.book Seite 341 Donnerstag, 31. Mai 2001 11:57 11
Page 345 of 406
342 Battery
Te ch n i c a l
data Instruments
and controlsOperation DrivingInstrument
cluster displayPractical hintsCar care Index
warm tires only if pressure has dropped below the
pressure listed in the table and the respective operating
conditions are taken into consideration.
An underinflated tire due to a slow leak (e.g. due to a
nail in the tire) may cause damage such as tread
separation, bulging etc. Regular tire pressure checks
(including the spare tire) at intervals of no more than
14 days are therefore essential.
If a tire constantly loses air, it should be inspected for
damage.
The spare tire should be checked periodically for
condition and inflation. Spare tire will age and become
worn over time even if never used, and thus should be
inspected and replaced when necessary.Battery
Important!
Battery replacement information:
The maintenance-free battery is located in the engine
compartment on the right hand side.
The service life of the battery is dependent on its
condition of charge. The battery should always be kept
sufficiently charged, in order to last an optimum length
of time.
Wa r n i n g !
Do not overinflate tires. Overinflating tires can
result in sudden deflation (blowout) because they
are more likely to become punctured or damaged
by road debris, potholes etc. Follow recommended
inflation pressures.Do not overload the tires by exceeding the specified
vehicle capacity weight as indicated by the label on
the driver’s door latch post). Overloading the tires
can overheat them, possibly causing a blowout.
Wa r n i n g !
Failure to follow these instructions can result in
severe injury or death.Never lean over batteries while connecting, you
might get injured.Battery fluid contains sulfuric acid. Do not allow
this fluid to come in contact with eyes, skin or
clot hin g. In cas e i t d oes , i mm ed ia tely f lus h a f fected
area with water and seek medical help if necessary.A battery will also produce hydrogen gas, which is
flammable and explosive. Keep flames or sparks
away from battery, avoid improper connection of
jumper cables, smoking etc.
OM_203.book Seite 342 Donnerstag, 31. Mai 2001 11:57 11
Page 370 of 406
367 Cleaning and care of the vehicle
Te ch n i c a l
data Instruments
and controlsOperation DrivingInstrument
cluster displayPractical hintsCar careIndex Scratches, corrosive deposits, corrosion or damage due
to negligent or incorrect care cannot always be removed
or repaired with the car-care products recommended
here. In such cases it is best to seek aid at your
authorized Mercedes-Benz Center.
The following topics deal with the cleaning and care of
your vehicle and give important “how-to” information as
well as references to Mercedes-Benz approved car-care
products.
Ad d ition al in fo rm atio n can be foun d in t he boo klet titled
“Vehicle Care Guide”.
Power washer
When using a power washer for cleaning the vehicle
always observe manufacturer’s operating instructions.
Caution!
Never use a round nozzle to power wash tires. The
intense jet of water can result in damage to the tire.
Always replace a damaged tire.
Always keep the jet of water moving across the surface.
Do not aim directly at electrical parts, electrical
connectors, seals, or other rubber parts.Tar st ai ns
Quickly remove tar stains before they dry and become
more difficult to remove. A tar remover is
recommended.
Paintwork, painted body components
Mercedes-Benz approved Paint Care should be applied
when water drops on the paint surface do not “bead up”,
normally in 3 to 5 months, depending on climate and
washing detergent used.
Mercedes-Benz approved Paint Cleaner should be
applied if paint surface shows signs of dirt embedding
(i.e. loss of gloss).
Do not apply any of these products or wax if your
vehicle is parked in the sun or if the hood is still hot.
Use the appropriate MB-Touch-Up Stick for quick and
provisional repairs of minor paint damage (i.e. chips
from stones, vehicle doors etc.).
OM_203.book Seite 367 Donnerstag, 31. Mai 2001 11:57 11
Page 381 of 406
378 Technical data
Te ch n i c a l
data Instruments
and controlsOperation DrivingInstrument
cluster displayPractical hints Car care Index
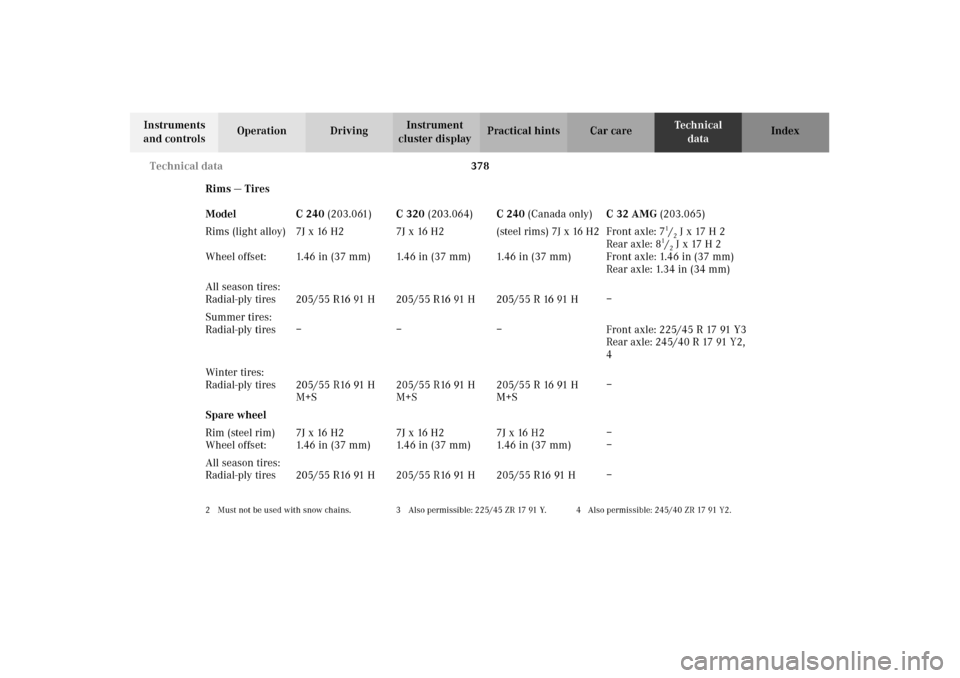
Rims — Tires
Model C 240 (203.061)C 320 (203.064)C 240 (Canada only)C 32 AMG (203.065)
Rims (light alloy)
Wheel offset:7J x 16 H2
1.46 in (37 mm)7J x 16 H2
1.46 in (37 mm)(steel rims) 7J x 16 H2
1. 4 6 i n ( 3 7 m m )Front axle: 71/2Jx17H2
Rear axle: 8
1/2Jx17H2
Front axle: 1.46 in (37 mm)
Rear axle: 1.34 in (34 mm)
All season tires:
Radial-ply tires 205/55 R16 91 H 205/55 R16 91 H 205/55 R 16 91 H –
Summer tires:
Radial-ply tires – – – Front axle: 225/45 R 17 91 Y3
Rear axle: 245/40 R 17 91 Y2,
4
Winter tires:
Radial-ply tires 205/55 R16 91 H
M+S205/55 R16 91 H
M+S205/55 R 16 91 H
M+S–
Spare wheel
Rim (steel rim)
Wheel offset:7J x 16 H2
1.46 in (37 mm)7J x 16 H2
1.46 in (37 mm)7J x 16 H2
1. 4 6 i n ( 3 7 m m )–
–
All season tires:
Radial-ply tires 205/55 R16 91 H 205/55 R16 91 H 205/55 R16 91 H –
2 Must not be used with snow chains. 3 Also permissible: 225/45 ZR 17 91 Y. 4 Also permissible: 245/40 ZR 17 91 Y2.
OM_203.book Seite 378 Donnerstag, 31. Mai 2001 11:57 11
Page 390 of 406
387 Consumer information
Te ch n i c a l
data Instruments
and controlsOperation DrivingInstrument
cluster displayPractical hints Car care Index Consumer information
This has been prepared as required of all manufactures
of passenger cars under Title 49, Code of U.S. Federal
Regulations, Part 575 pursuant to the “National Traffic
and Motor Vehicle Safety Act of 1966”.
Uniform tire quality grading
Quality grades can be found where applicable on the
tire sidewall between tread shoulder and maximum
section width. For example:
All passenger car tires must conform to federal safety
requirements in addition to these grades.
Treadwear
The treadwear grade is a comparative rating based on
the wear rate of the tire when tested under controlled
conditions on a specified government test course. For
example, a tire graded 150 would wear one and one-half
(1
1/2) times as well on the government course as a tire
graded 100. The relative performance of tires depends
upon the actual conditions of their use, however, and may depart significantly from the norm due to
variations in driving habits, service practices and
differences in road characteristics and climate.
Traction
The traction grades, from highest to lowest are AA, A, B,
and C. Those grades represent the tire’s ability to stop
on wet pavement as measured under controlled
conditions on specified government test surfaces of
asphalt and concrete. A tire marked C may have poor
traction performance.
Tread wear 200 Traction AA Temperature A
Wa r n i n g !
The traction grade assigned to this tire is based on
straightahead braking traction tests, and does not
include acceleration, cornering, hydroplaning, or
peak traction characteristics.
OM_203.book Seite 387 Donnerstag, 31. Mai 2001 11:57 11
Page 391 of 406
388 Consumer information
Te ch n i c a l
data Instruments
and controlsOperation DrivingInstrument
cluster displayPractical hints Car care Index
Tempera t u re
The temperature grades are A (the highest), B, and C,
representing the tire‘s resistance to the generation of
heat and its ability to dissipate heat when tested under
controlled conditions on a specified indoor laboratory
test wheel. Sustained high temperature can cause the
material of the tire to degenerate and reduce tire life,
and excessive temperature can lead to sudden tire
failure. The grade corresponds to a level of performance
which all passenger car tires must meet under the
Federal Motor Vehicle Safety Standard No. 109. Grades
B and A represent higher levels of performance on the
laboratory test wheel than the minimum required by
law.
Wa r n i n g !
The temperature grade for this tire is established
for a tire that is properly inflated and not
overloaded. Excessive speed, underinflation, or
excessive loading, either separately or in
combination, can cause excessive heat build up
and possible tire failure.
OM_203.book Seite 388 Donnerstag, 31. Mai 2001 11:57 11