stop start MERCEDES-BENZ CL CLASS 2010 User Guide
[x] Cancel search | Manufacturer: MERCEDES-BENZ, Model Year: 2010, Model line: CL CLASS, Model: MERCEDES-BENZ CL CLASS 2010Pages: 500, PDF Size: 9.32 MB
Page 109 of 500
R
Map: Using the map to enter a destination
(Y page 109)
i In this case, using the map for destination
entry is based on the city seen in the
address input menu.
R POI: Entering a point of interest
(Y page 111)
i In this case, entering a POI is based on the
city seen in the address input menu.
R Save: Saving a destination in the
destination memory (Y page 132)
R Start: Starting the route calculation
(Y page 107)
X Continuing or completing destination
entry: Select one of the menu items
mentioned above.
Starting the route calculation i
You cannot start the route calculation
until all the necessary address data has
been entered.
X After entering the destination, select
Start.
The route calculation will start if route
guidance has not already been activated.
If route guidance has already been
activated, a prompt will appear asking
whether you want to end the current route
guidance.
X Select Yes or No.
If you select Yes, COMAND will stop the
route guidance and start the route
calculation for the new destination.
If you select No, COMAND will continue
with the active route guidance.
The new destination is discarded.
During the route calculation, an arrow will
indicate the direction to the destination.
Below this, you will see the message The
route is being calculated....
Once the route has been calculated, route
guidance begins ( Y page 116). i
Route calculation requires time. The time
depends on factors such as the distance
from the destination.
COMAND calculates the route using the
digital map data. The calculated route may
differ from the actual road situation, e.g.
due to road construction or incomplete
map data. Please make sure that you
observe the notes about the digital map
(Y page 83).
i Routes to destinations that do not have
road or ferry access to the current position.
This applies, for example, to routes from
the mainland to Hawaii. Entering a destination from the
destination memory
X Select Navi Q Destination Q From
Memory.
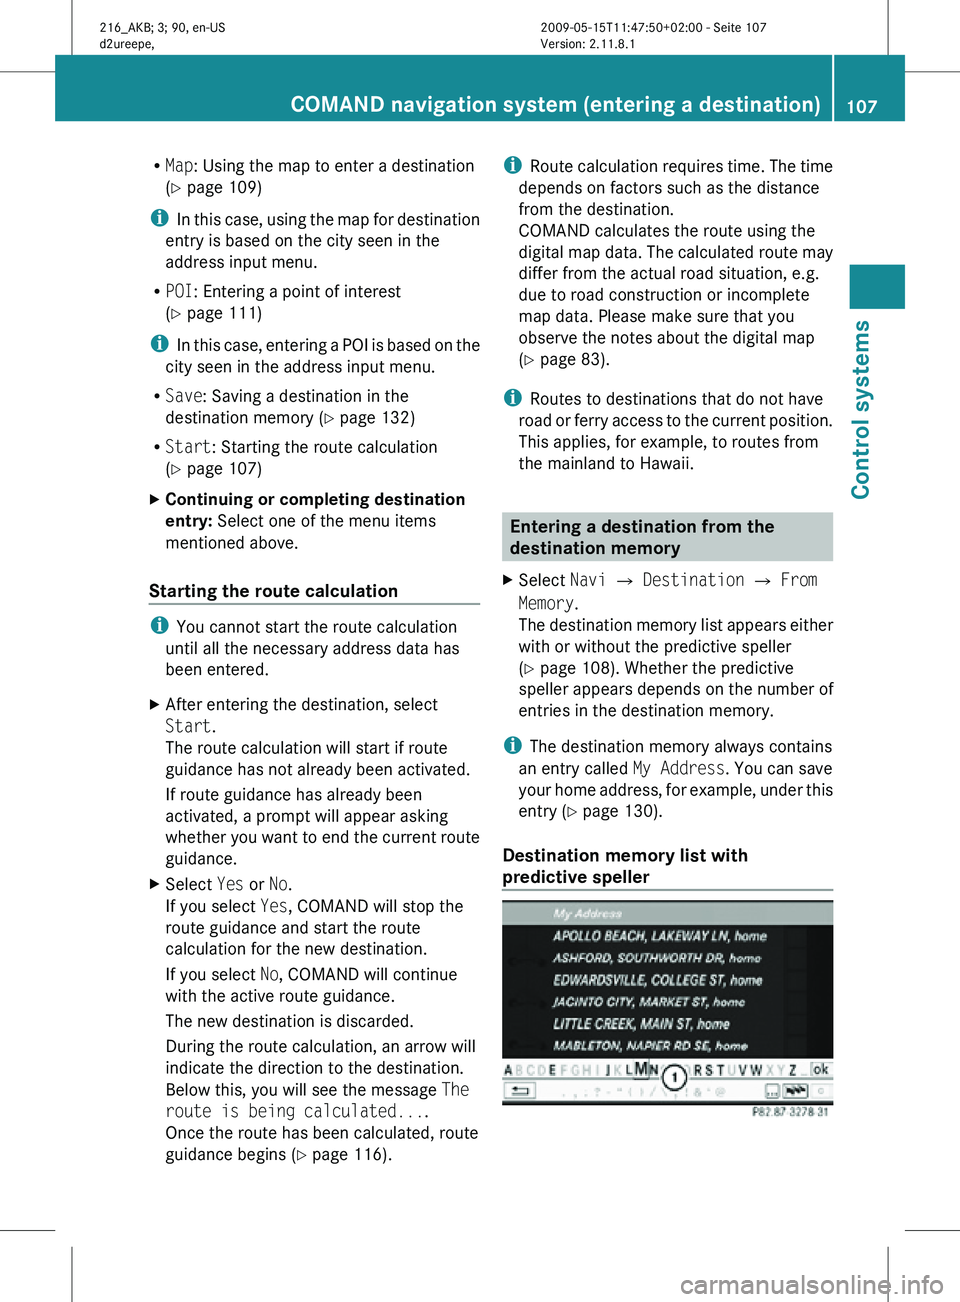
The destination memory list appears either
with or without the predictive speller
(Y page 108). Whether the predictive
speller appears depends on the number of
entries in the destination memory.
i The destination memory always contains
an entry called My Address. You can save
your home address, for example, under this
entry (Y page 130).
Destination memory list with
predictive speller COMAND navigation system (entering a destination)
107Control systems
216_AKB; 3; 90, en-US
d2ureepe,Version: 2.11.8.1 2009-05-15T11:47:50+02:00 - Seite 107 Z
Page 111 of 500

Entering a destination from the list of
last destinations
X Select Navi Q Destination Q From
Last Destinations.
The list of last destinations appears. The
most recent destination is at the top of the
list.
X Select desired destination.
X Starting route calculation: Select Start,
see also ( Y page 107). Entering a destination from the map
i Depending on the factory settings of the
vehicle, it may not be possible to enter a
destination while the vehicle exceeds a
preset speed. As soon as the vehicles
speed drops to below the preset speed, the
function is available again.
Calling up the map X
In the address input menu, select Map
(Y page 94).
You will see the map with a cross hair. The
map is set to the address set in the address
input menu.
or
X Select Navi Q Destination Q Via
Map.
You will see the map with a cross hair. :
Cross hair
; Details of the cross hair position
= Map scale i
Display ; may be the name of a road, for
example, provided the digital map contains
the necessary data.
If no data is available, display ; shows:
R the coordinates if the Geo
Coordinates display is switched on
(Y page 92)
R no display if the Geo Coordinates
display is switched off ( Y page 92)
Moving the map and selecting the
destination X
Moving map: Slide ZVÆ, XVY or aVb.
X Adjusting map scale: Rotate cVd.
Rotating clockwise enlarges the map,
rotating counterclockwise reduces it.
X Selecting a destination: Press W.
If the cross hair is located off the edge of
the digital map, a route cannot be
calculated to this destination and you will
see the message The destination is
located off the map..
X Select OK.
X Move the map and select a destination
again.
If the destination can be attributed, you will
see the address of the destination. If not,
you will see the display Destination
from map.
X Starting route calculation: Select Start,
see also ( Y page 107). Entering a stopover
When route guidance is active, you can enter
a stopover. Stopovers can be predefined
destinations from the following predefined
categories:
R Mercedes-Benz Service Center
R Hospital
R Gas Station
R Parking Lot COMAND navigation system (entering a destination)
109Control systems
216_AKB; 3; 90, en-US
d2ureepe,Version: 2.11.8.1 2009-05-15T11:47:50+02:00 - Seite 109 Z
Page 112 of 500
R
Restaurant
R Other
With the
option Other you can enter stopover
destinations from the destination memory,
last selected destinations, POIs, or via the
address ( Y page 110).
You can enter stopover destinations on the
route or in the vicinity of the route.
You can use the stopover function to
influence the route guidance calculation to
the main destination. When you have reached
your stopover, COMAND automatically
calculates the route to the main destination.
Entering predefined destinations X
Select Navi Q Destination Q
Stopover.
If a
stopover has already been entered, you
can change it.
Changing: Select Change Stopover.
You can now select a category.
X Selecting a category: Select category,
e.g. Gas station.
COMAND first looks for destinations along
the vehicle’s route and within the immediate
vicinity of the vehicle. If there are no
destinations available there, COMAND
searches for destinations in an area around
the vehicle position.
If COMAND does not find any destinations,
you will see a message to this effect.
X Select OK.
You can now select a different category.
If COMAND finds destinations, you will see a
list of the destinations and details of how far
away they are in the right-hand side of the
display. The information about how far away
the destinations are can take a few seconds
to be displayed.
The left-hand part of the display shows the
destinations on the map. The destination
marked in the list is highlighted in the map. X
Selecting a destination: Select the
desired destination from list.
The address of the destination appears.
X Starting route calculation: Select
Start
,
see also ( Y page 107).
Entering another destination as a
stopover X
Select Navi Q Destination Q
Stopover.
X Entering: Select Other.
You can
select between the following menu
items:
R Address Entry
R From Memory
R From Last Destinations
R From POIs
X Select a menu item.
Subsequent destination entries may differ,
depending on your selection:
R Address Entry selection:
XEnter a destination by address
(Y page 94).
R From Memory selection:
XEnter a destination from the
destination memory (Y page 107).
R From Last Destinations selection:
XEnter a destination from the list of last
destinations (Y page 109).
R From POIs selection:
XEnter a point of interest (POI)
(Y page 111).
X Starting route calculation: After
entering
a destination, select Start (Y page 107).
Changing a stopover If a stopover has already been entered, you
can change it.110
COMAND navigation system (entering a destination)
Control systems
216_AKB; 3; 90, en-US
d2ureepe,
Version: 2.11.8.1 2009-05-15T11:47:50+02:00 - Seite 110
Page 117 of 500
X
Switching manually to the POI list
without predictive speller: Slide ZV.
or
X Select ¬ in the second line from the
bottom and press W.
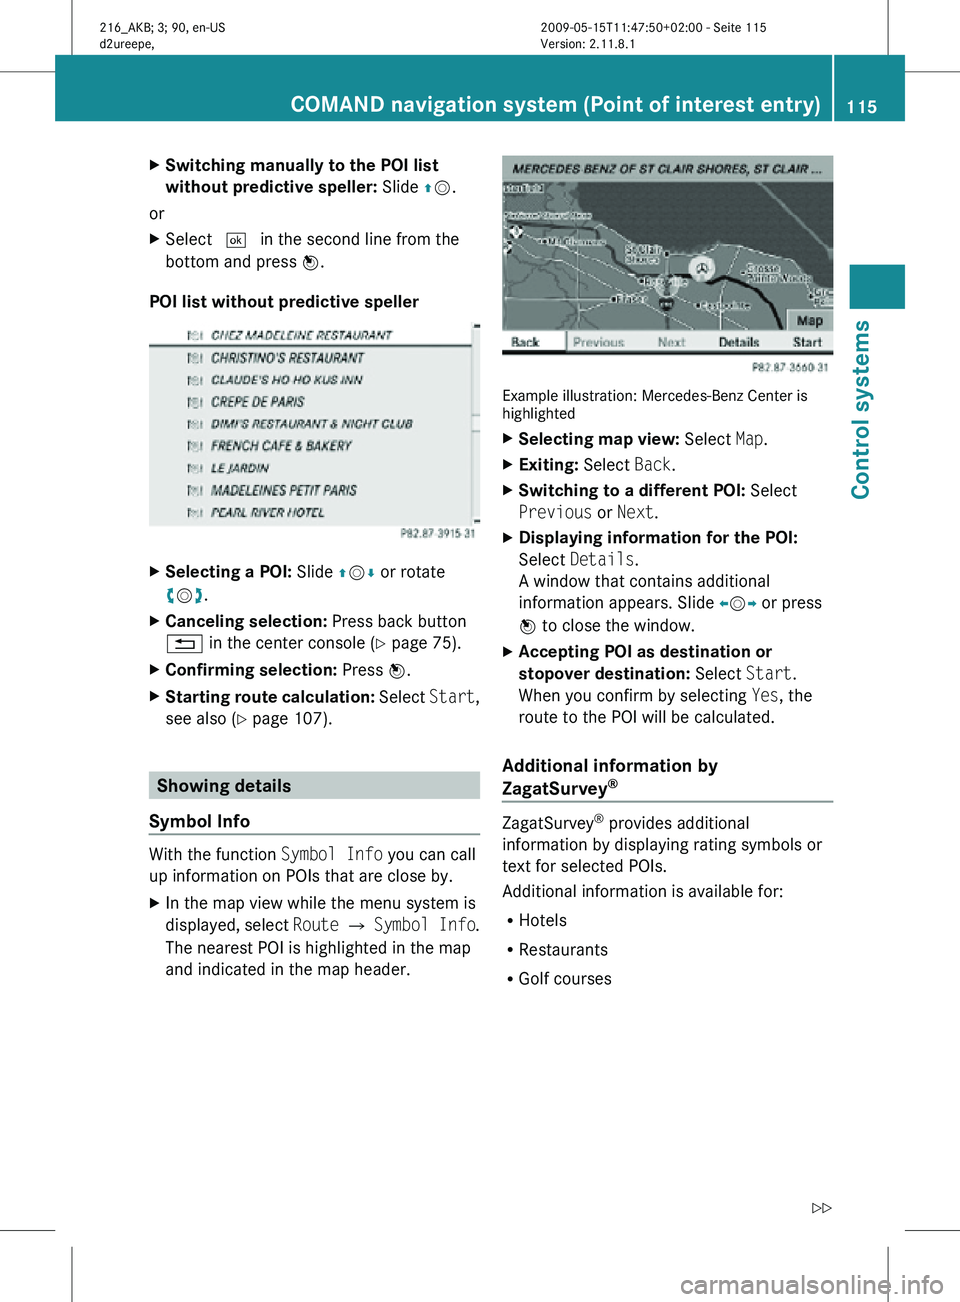
POI list without predictive speller X
Selecting a POI: Slide ZVÆ or rotate
cVd.
X Canceling selection: Press back button
% in the center console (Y page 75).
X Confirming selection: Press W.
X Starting route calculation: Select Start,
see also ( Y page 107). Showing details
Symbol Info With the function
Symbol Info you can call
up information on POIs that are close by.
X In the map view while the menu system is
displayed, select Route Q Symbol Info .
The nearest POI is highlighted in the map
and indicated in the map header. Example illustration: Mercedes-Benz Center is
highlighted
X
Selecting map view: Select Map.
X Exiting: Select Back.
X Switching to a different POI: Select
Previous or Next.
X Displaying information for the POI:
Select Details.
A window that contains additional
information appears. Slide omp or press
n to close the window.
X Accepting POI as destination or
stopover destination: Select Start.
When you confirm by selecting Yes, the
route to the POI will be calculated.
Additional information by
ZagatSurvey ®
ZagatSurvey
®
provides additional
information by displaying rating symbols or
text for selected POIs.
Additional information is available for:
R Hotels
R Restaurants
R Golf courses COMAND navigation system (Point of interest entry)
115Control systems
216_AKB; 3; 90, en-US
d2ureepe,Version: 2.11.8.1 2009-05-15T11:47:50+02:00 - Seite 115 Z
Page 169 of 500
X
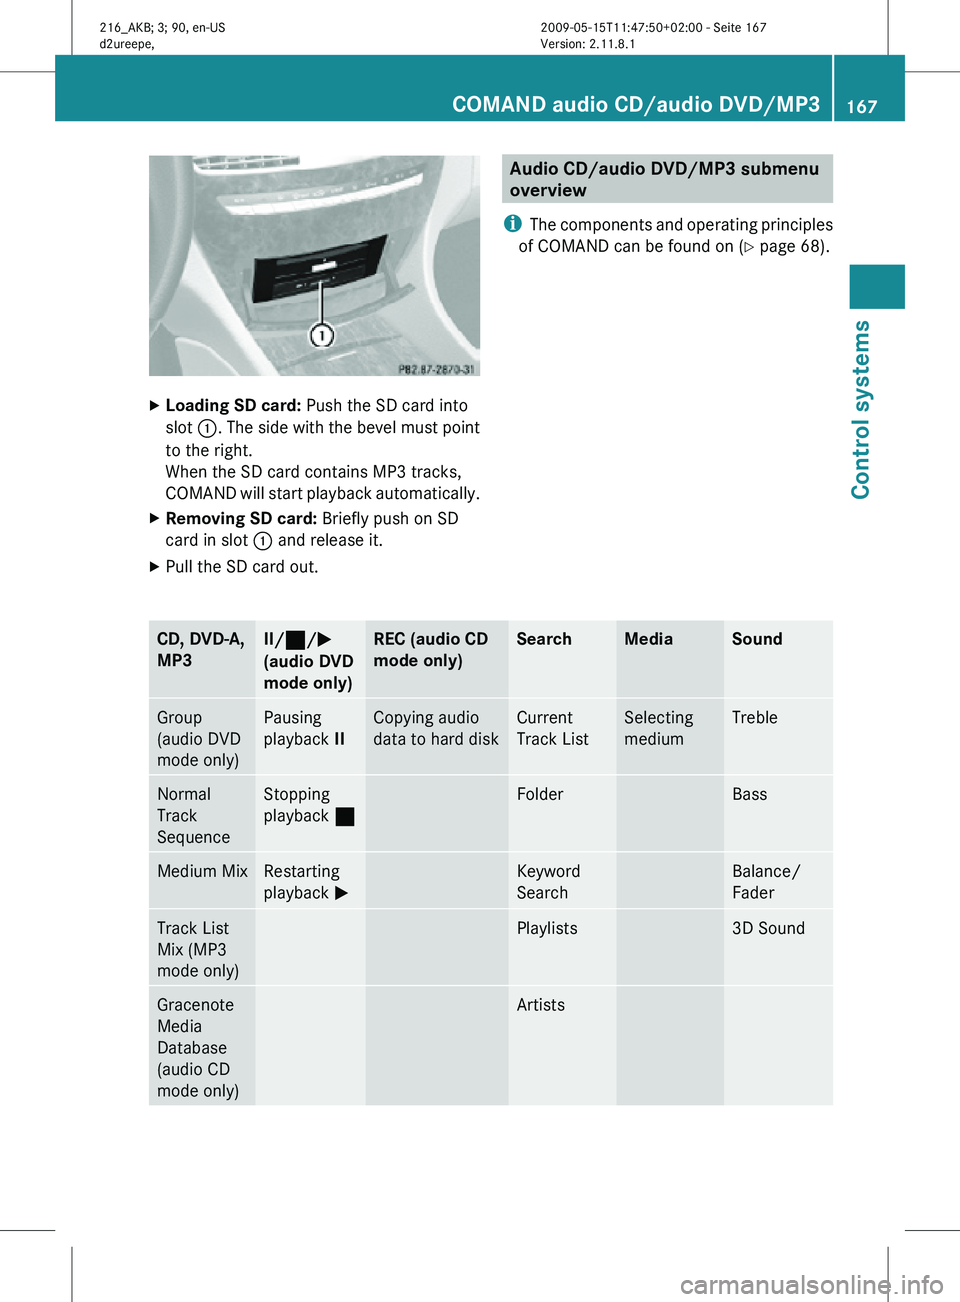
Loading SD card: Push the SD card into
slot :. The side with the bevel must point
to the right.
When the SD card contains MP3 tracks,
COMAND will start playback automatically.
X Removing SD card: Briefly push on SD
card in slot : and release it.
X Pull the SD card out. Audio CD/audio DVD/MP3 submenu
overview
i The components and operating principles
of COMAND can be found on ( Y page 68).CD, DVD-A,
MP3 II/
¯/M
(audio DVD
mode only) REC (audio CD
mode only) Search Media Sound
Group
(audio DVD
mode only) Pausing
playback
II Copying audio
data to hard disk Current
Track List Selecting
medium Treble
Normal
Track
Sequence Stopping
playback
¯ Folder Bass
Medium Mix Restarting
playback
M Keyword
Search Balance/
Fader
Track List
Mix (MP3
mode only) Playlists 3D Sound
Gracenote
Media
Database
(audio CD
mode only) ArtistsCOMAND audio CD/audio DVD/MP3
167Control systems
216_AKB; 3; 90, en-US
d2ureepe, Version: 2.11.8.1 2009-05-15T11:47:50+02:00 - Seite 167 Z
Page 171 of 500
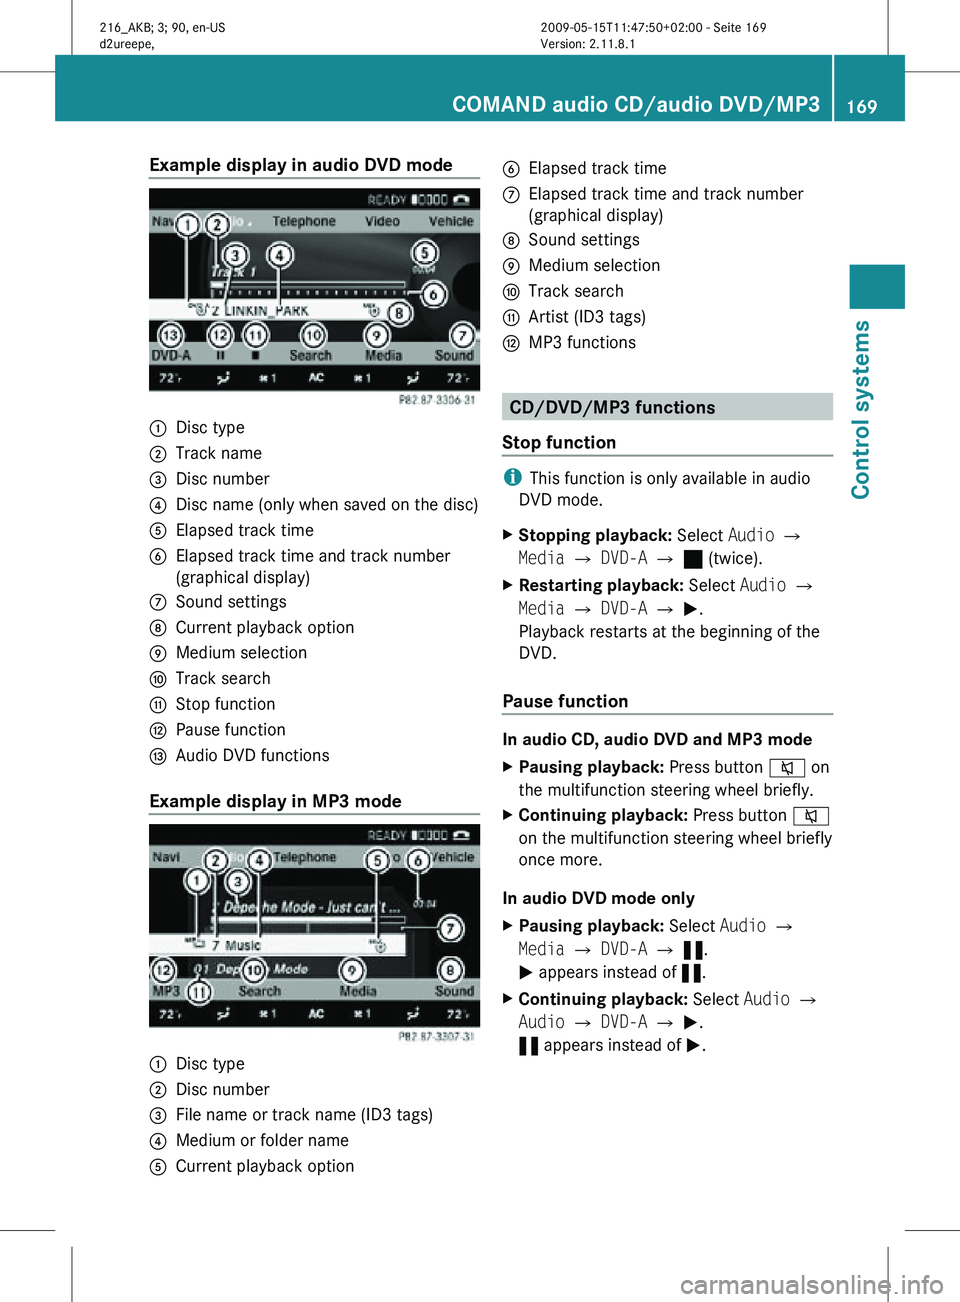
Example display in audio DVD mode
:
Disc type
; Track name
= Disc number
? Disc name (only when saved on the disc)
A Elapsed track time
B Elapsed track time and track number
(graphical display)
C Sound settings
D Current playback option
E Medium selection
F Track search
G Stop function
H Pause function
I Audio DVD functions
Example display in MP3 mode :
Disc type
; Disc number
= File name or track name (ID3 tags)
? Medium or folder name
A Current playback option B
Elapsed track time
C Elapsed track time and track number
(graphical display)
D Sound settings
E Medium selection
F Track search
G Artist (ID3 tags)
H MP3 functions CD/DVD/MP3 functions
Stop function i
This function is only available in audio
DVD mode.
X Stopping playback: Select Audio Q
Media Q DVD-A Q ± (twice).
X Restarting playback: Select Audio Q
Media Q DVD-A Q M.
Playback restarts at the beginning of the
DVD.
Pause function In audio CD, audio DVD and MP3 mode
X
Pausing playback: Press button 8 on
the multifunction steering wheel briefly.
X Continuing playback: Press button 8
on the multifunction steering wheel briefly
once more.
In audio DVD mode only
X Pausing playback: Select Audio Q
Media Q DVD-A Q «.
M appears instead of «.
X Continuing playback: Select Audio Q
Audio Q DVD-A Q M.
« appears instead of M. COMAND audio CD/audio DVD/MP3
169Control systems
216_AKB; 3; 90, en-US
d2ureepe, Version: 2.11.8.1 2009-05-15T11:47:50+02:00 - Seite 169 Z
Page 175 of 500
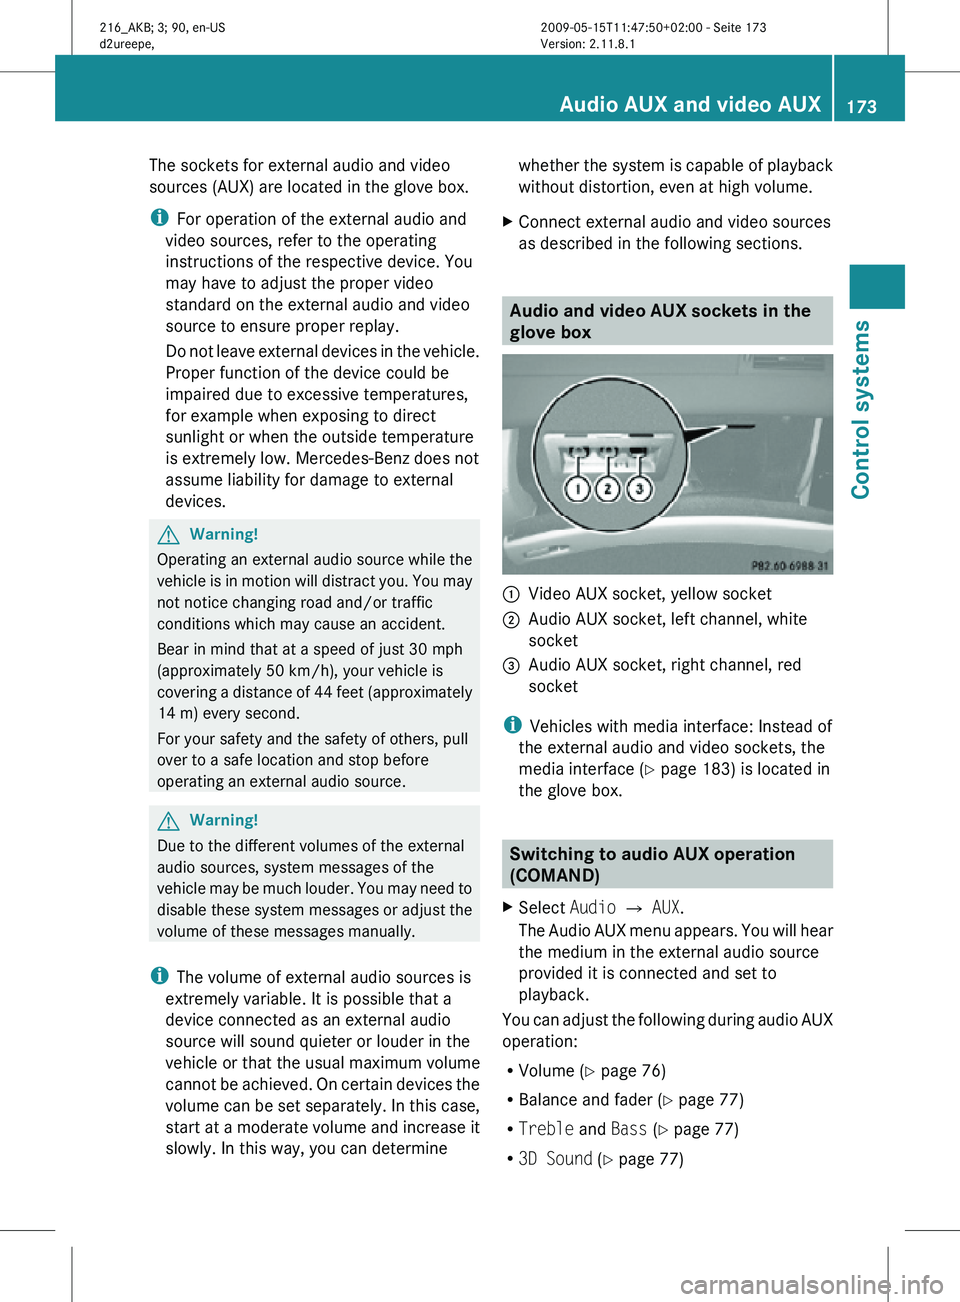
The sockets for external audio and video
sources (AUX) are located in the glove box.
i
For operation of the external audio and
video sources, refer to the operating
instructions of the respective device. You
may have to adjust the proper video
standard on the external audio and video
source to ensure proper replay.
Do not leave external devices in the vehicle.
Proper function of the device could be
impaired due to excessive temperatures,
for example when exposing to direct
sunlight or when the outside temperature
is extremely low. Mercedes-Benz does not
assume liability for damage to external
devices. G
Warning!
Operating an external audio source while the
vehicle is in motion will distract you. You may
not notice changing road and/or traffic
conditions which may cause an accident.
Bear in mind that at a speed of just 30 mph
(approximately 50 km/h), your vehicle is
covering a distance of 44 feet (approximately
14 m) every second.
For your safety and the safety of others, pull
over to a safe location and stop before
operating an external audio source. G
Warning!
Due to the different volumes of the external
audio sources, system messages of the
vehicle may be much louder. You may need to
disable these system messages or adjust the
volume of these messages manually.
i The volume of external audio sources is
extremely variable. It is possible that a
device connected as an external audio
source will sound quieter or louder in the
vehicle or that the usual maximum volume
cannot be achieved. On certain devices the
volume can be set separately. In this case,
start at a moderate volume and increase it
slowly. In this way, you can determine whether the system is capable of playback
without distortion, even at high volume.
X Connect external audio and video sources
as described in the following sections. Audio and video AUX sockets in the
glove box
:
Video AUX socket, yellow socket
; Audio AUX socket, left channel, white
socket
= Audio AUX socket, right channel, red
socket
i Vehicles with media interface: Instead of
the external audio and video sockets, the
media interface ( Y page 183) is located in
the glove box. Switching to audio AUX operation
(COMAND)
X Select Audio Q AUX.
The Audio AUX menu appears. You will hear
the medium in the external audio source
provided it is connected and set to
playback.
You can adjust the following during audio AUX
operation:
R Volume ( Y page 76)
R Balance and fader ( Y page 77)
R Treble and Bass (Y page 77)
R 3D Sound (Y page 77) Audio AUX and video AUX
173Control systems
216_AKB; 3; 90, en-US
d2ureepe, Version: 2.11.8.1 2009-05-15T11:47:50+02:00 - Seite 173 Z
Page 179 of 500
X
Continuing playback: Select M.
Play is
continued from the point at which it
was stopped.
X Stopping playback: Select ¯
again while
playback is stopped.
or
X Select ¯ twice in quick succession during
playback.
X Resuming playback:
Select M.
Playback starts again from the beginning. Pause playback
X Select Video Q Video DVD.
X Show the menu system, if necessary
(Y page 176).
X Pause playback: Select II.
In the display, II changes to M.
X Continue playback: Select M.
Play is
continued from the point at which it
was stopped. Selecting scene/chapter
Entering scene/chapter using the
COMAND controller X
Make sure that the control menu is shown
(Y page 176).
X Skipping forwards or back: Slide X
VY or
turn cVd.
or
X Press button 9 or : on the
multifunction steering wheel 22
. Entering the scene/chapter using the
telephone keypad X
Press button à on the telephone
keypad (
Y page 70).
X Enter scene/chapter using buttons j -
x.
COMAND tunes in to the scene/chapter
entered. Selecting film/track
i This function is only available if the DVD
is comprised of several films/tracks.
X Select Video Q Video DVD.
X Show the menu system, if necessary
(Y page 176).
X Select DVD-V Q DVD Functions Q
Title Selection.
A selection list appears.
X Select a film/track. Screen settings
Setting brightness, contrast and color X
Select Video Q Video DVD.
X Show the menu system, if necessary
(Y page 176).
X Select DVD-V Q Brightness Q
Contrast or Color.
X Changing settings: Slide ZVÆ or turn
cVd until you reach the desired setting.
X Saving settings: Press W.
Changing the picture format X
Select Video Q Video DVD.
X Show the menu system, if necessary
(Y page 176).
22 Function is only available if the Audio menu is selected in the instrument cluster. COMAND video DVD
177
Control systems
216_AKB; 3; 90, en-US
d2ureepe, Version: 2.11.8.1 2009-05-15T11:47:50+02:00 - Seite 177 Z
Page 182 of 500
Music Register
G
Observe Safety notes, see page 68.
You can save MP3 or WMA audio files in the
Music Register. The storage capacity is
approximately 7 gigabyte. !
Keep your original music files in a safe
place. A
fault with the COMAND may cause
the music files stored in the Music Register
to be lost. Mercedes-Benz USA, LLC is not
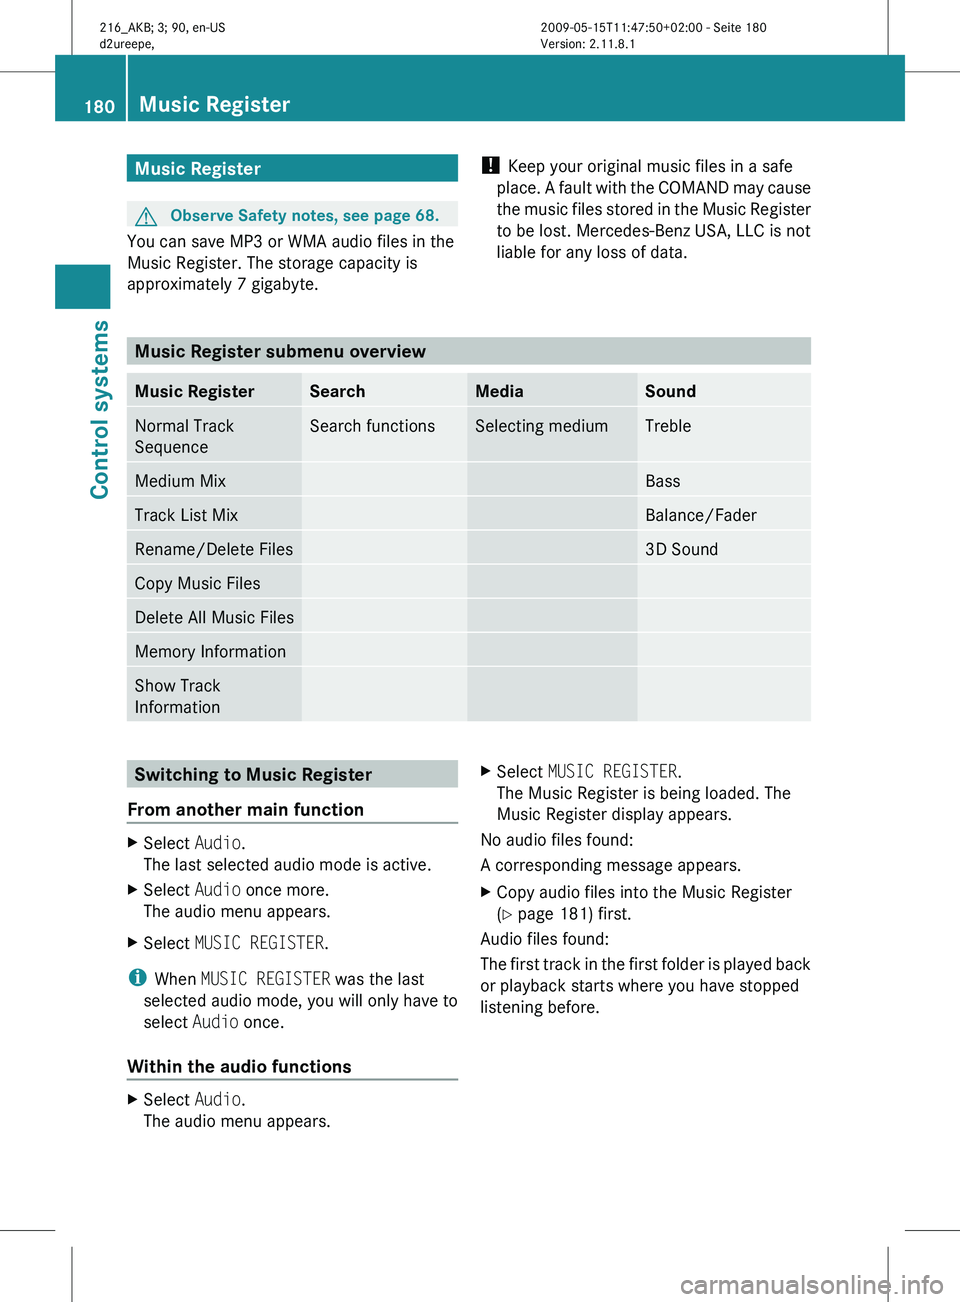
liable for any loss of data. Music Register submenu overview
Music Register Search Media Sound
Normal Track
Sequence Search functions Selecting medium Treble
Medium Mix Bass
Track List Mix Balance/Fader
Rename/Delete Files 3D Sound
Copy Music Files
Delete All Music Files
Memory Information
Show Track
Information
Switching to Music Register
From another main function X
Select Audio.
The last selected audio mode is active.
X Select Audio once more.
The audio menu appears.
X Select MUSIC REGISTER.
i When MUSIC REGISTER was the last
selected audio mode, you will only have to
select Audio once.
Within the audio functions X
Select Audio.
The audio menu appears. X
Select MUSIC REGISTER.
The Music Register is being loaded. The
Music Register display appears.
No audio files found:
A corresponding message appears.
X Copy audio files into the Music Register
(Y page 181) first.
Audio files found:
The first
track in the first folder is played back
or playback starts where you have stopped
listening before. 180
Music Register
Control systems
216_AKB; 3; 90, en-US
d2ureepe,
Version: 2.11.8.1 2009-05-15T11:47:50+02:00 - Seite 180
Page 186 of 500
For your safety and the safety of others, pull
over to a safe location and stop before
operating an external audio source.
Connections i
Always store the devices in a safe place.
Only use genuine Mercedes-Benz
connector cables.
Suitable connector cables are located in
the vehicle or can be purchased at any
authorized Mercedes-Benz Center.
The media interface allows for connection of
the following media to the COMAND:
R iPod ®
R USB devices
R MP3 player
i For further information on compatible
multimedia devices
R visit www.mbusa-mobile.com
R call the Mercedes-Benz Customer
Assistance Center at
1-800-FOR-MERCedes
(1-800-367-6372) (in the USA)
R call Customer Service at
1-800-387-0100 (in Canada)
Supported USB devices The following USB devices are supported:
R
USB flash drives
R USB hard drives (1", 1.8", and 2.5") with a
starting/steady current not to exceed
800 mA (separate power supply may be
necessary)
R selected MP3 players
i The media interface supports USB
storage devices of “USB Device
Subclass 6”. Information on “USB Device
Subclass 6” is available from the
manufacturer of the respective device. Supported file formats on USB devices The following file formats are supported:
R
MP3: CBR, VBR (up to 320 kbit/s)
R WMA: CBR, VBR (up to 320 kbit/s)
Special characteristics of USB devices
R Do not store data other than audio data on
a USB device. Doing so will increase the
time required to initialize the USB device.
R A maximum of 8 directory levels with up to
1000 tracks each are supported.
R Do not use USB extensions or adapters.
They could impair functionality.
R Playlists on the USB device will be searched
for in the background. Playlists that were
found will be available in separate
categories among the folders. The
initialization of large USB storage devices
that contain a large number of files may
take several minutes.
i Files that are protected via DRM
(Digital Rights Management) are not
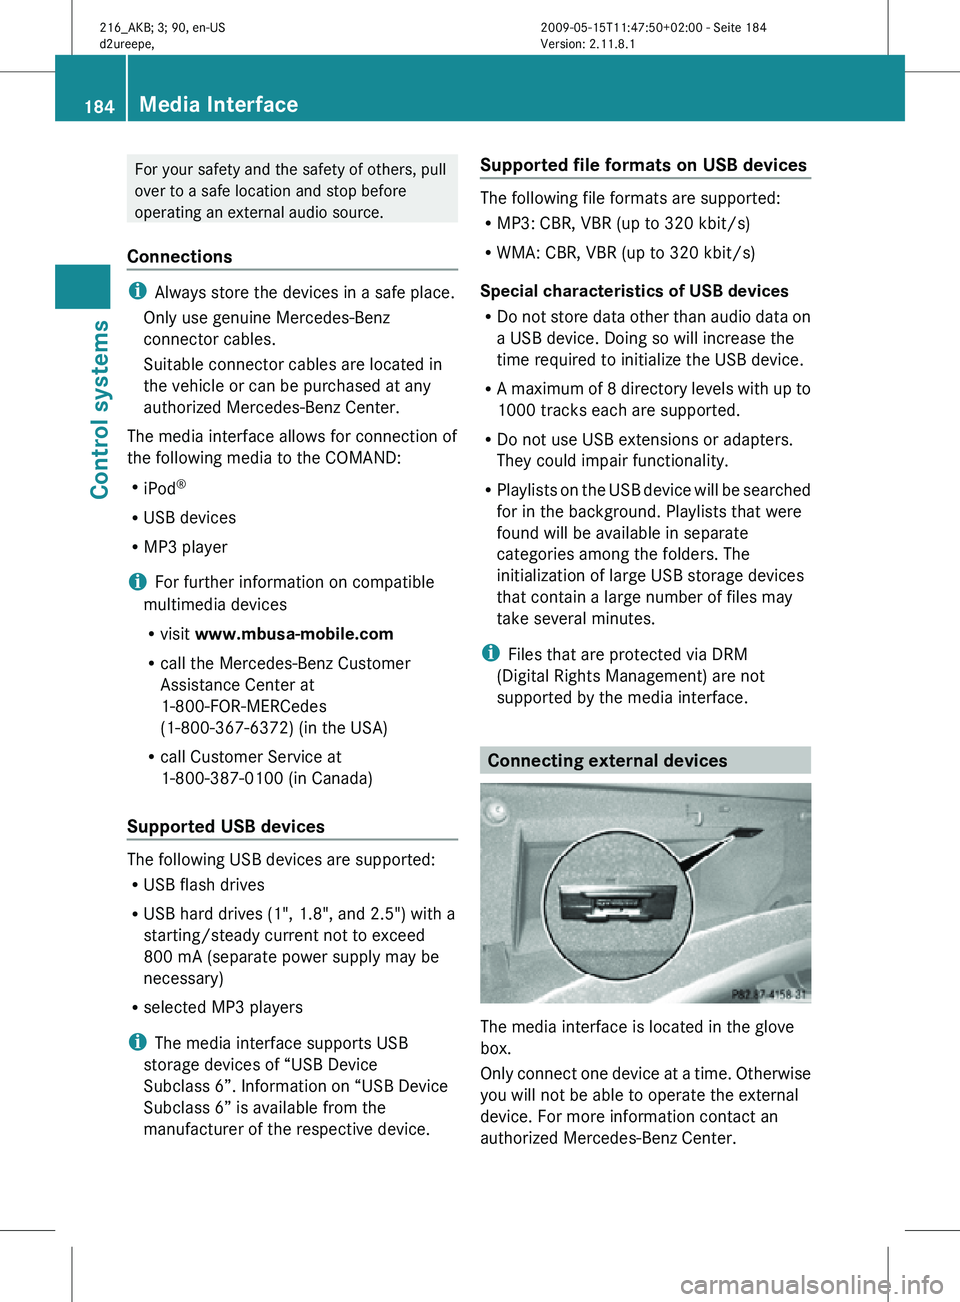
supported by the media interface. Connecting external devices
The media interface is located in the glove
box.
Only connect one device at a time. Otherwise
you will not be able to operate the external
device. For more information contact an
authorized Mercedes-Benz Center.184
Media InterfaceControl systems
216_AKB; 3; 90, en-US
d2ureepe,
Version: 2.11.8.1 2009-05-15T11:47:50+02:00 - Seite 184