stop start MERCEDES-BENZ CL CLASS 2010 Owners Manual
[x] Cancel search | Manufacturer: MERCEDES-BENZ, Model Year: 2010, Model line: CL CLASS, Model: MERCEDES-BENZ CL CLASS 2010Pages: 500, PDF Size: 9.32 MB
Page 9 of 500
Audio
............................................. 207
Navi ............................................... 206
Service ........................................... 214
Settings
......................................... 214
Telephone ...................................... 211
Trip ................................................ 204
Coolant
Anticorrosion/antifreeze ............... 495
Capacities ...................................... 491
Checking level ............................... 372
Messages in the multifunction
display ........................................... 442
Temperature gauge ........................ 300
Corner-illuminating lamps ................ 278
Cruise control .................................... 302
Activating ....................................... 302
Canceling ....................................... 303
Changing the set speed .................303
Last stored speed .......................... 304
Lever .............................................. 302
Messages in the multifunction
display ........................................... 420
Resume function ............................ 304
Setting current speed .................... 303
Cup holders ........................................ 350
Curb weight ....................................... 393
Customer Assistance Center (CAC) ...23
Customer Relations Department .......23 D
Dashboard see Instrument cluster
Data recording ..................................... 23
Daytime running lamp mode ............276
Switching on or off ......................... 215
Deep water
see Standing water
Defogging (windshield) .....................343
Defroster Front (Climate control system) ......343
Rear window .................................. 344
Department of Transportation
see DOT
Difficulties
While driving .................................. 288
With starting .................................. 286Digital speedometer
Additional speedometer ................. 215
Dimensions (vehicle)
see Vehicle specification
Direction of rotation (tires) ..............385
Displays
COMAND display ............................. 69
DISTRONIC PLUS ........................... 307
Maintenance service indicator .......402
Messages in the multifunction
display ........................................... 414
Multifunction display .....................203
Symbol messages .......................... 428
Text messages ............................... 416
Trip computer ................................ 204
Vehicle status message memory ...214
Display settings (COMAND) ................ 79
DISTRONIC PLUS ............................... 304
Cleaning system sensors ...............406
Displaying the distance graphic ..... 308
Displays in the multifunction
display ........................................... 307
Distance warning lamp .......... 307, 457
Driving ........................................... 310
Driving with .................................... 313
Lever .............................................. 309
Messages in the multifunction
display ........................................... 421
Resume function ............................ 312
Sensor cover .................................. 406
Speed settings ............................... 311
Stopping ........................................ 311
Door control panel .............................. 34
Doors
Locking/unlocking (KEYLESS-GO) . 253
Locking/unlocking (SmartKey) ...... 252
Messages in the multifunction
display ........................................... 439
Opening from inside ...................... 256
Remote door lock (Tele Aid) ........... 359
Remote door unlock (Tele Aid) ....... 359
Unlocking (Mechanical key) ........... 460
DOT (Department of
Transportation) .................................. 393
Drinking and driving .........................397
Drive-dynamic multicontour seats .. 199 Index
7 216_AKB; 3; 90, en-US
d2ureepe,
Version: 2.11.8.1 2009-05-15T11:47:50+02:00 - Seite 7
Page 29 of 500
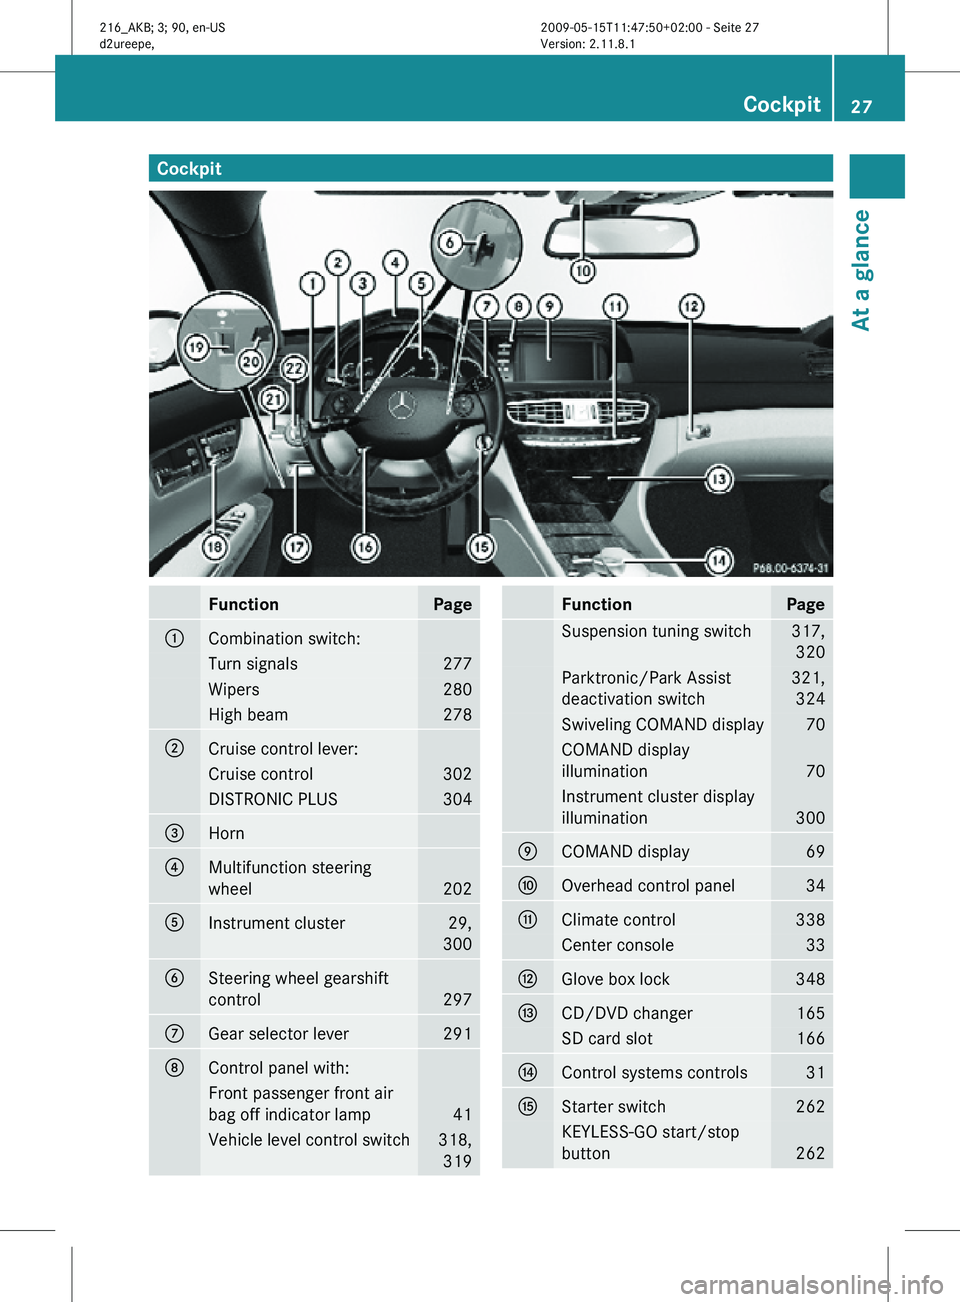
Cockpit
Function Page
:
Combination switch:
Turn signals 277
Wipers 280
High beam 278
;
Cruise control lever:
Cruise control 302
DISTRONIC PLUS 304
=
Horn
?
Multifunction steering
wheel
202
A
Instrument cluster 29,
300 B
Steering wheel gearshift
control
297
C
Gear selector lever 291
D
Control panel with:
Front passenger front air
bag off indicator lamp
41
Vehicle level control switch 318,
319 Function Page
Suspension tuning switch 317,
320 Parktronic/Park Assist
deactivation switch 321,
324 Swiveling COMAND display 70
COMAND display
illumination
70
Instrument cluster display
illumination
300
E
COMAND display 69
F
Overhead control panel 34
G
Climate control 338
Center console 33
H
Glove box lock 348
I
CD/DVD changer 165
SD card slot 166
J
Control systems controls 31
K
Starter switch 262
KEYLESS-GO start/stop
button
262Cockpit
27At a glance
216_AKB; 3; 90, en-US
d2ureepe, Version: 2.11.8.1 2009-05-15T11:47:50+02:00 - Seite 27 Z
Page 47 of 500
OCS Self-test
After turning the SmartKey in the starter
switch to position 1 or 2 or pressing the
KEYLESS-GO start/stop button once or
twice, the 42 indicator lamp
illuminates. If an adult occupant is properly
sitting on the front passenger seat and the
system classifies the occupant as an adult,
the 42 indicator lamp will
illuminate and go out after approximately
6 seconds.
If the seat is not occupied and the system
classifies the front passenger seat as being
empty, the 42 indicator lamp
will illuminate and not go out.
G
Warning!
If the 42 indicator lamp does not
illuminate, the system is not functioning. You
must contact an authorized Mercedes-Benz
Center before seating any child on the front
passenger seat.
For more information, see the “Practical
hints” section ( Y page 459). G
Warning!
Never place anything between seat cushion
and child seat (e.g. pillow), since it reduces
the effectiveness
of the OCS. The bottom and
back of the child seat must make full contact
with the passenger seat cushion and
backrest.
If necessary, adjust the tilt of the passenger
seat backrest.
An incorrectly mounted child seat could cause
injuries to the child in case of an accident,
instead of increasing protection for the child.
Follow the manufacturer’s instructions for
installation of child seats. Seat belts
Safety notes The use of seat belts and infant and child
restraint systems is required by law in all 50
states, the District of Columbia, the U.S.
territories and all Canadian provinces.
Even where this is not the case, all vehicle
occupants should have their seat belts
fastened whenever the vehicle is in motion.
i
See “Children in the vehicle”
(Y page 51) for information on
R infants and
children traveling with you in
the vehicle
R restraint systems for infants and children G
Warning!
Always fasten your seat belt before driving off.
Always make sure all of your passengers are
properly restrained.
You and your passengers
should always wear seat belts.
Failure to wear and properly fasten and
position your seat belt greatly increases your
risk of injuries and their likely severity in an
accident.
If you are ever in an accident, your injuries can
be considerably more severe without your
seat belt properly buckled. Without your seat
belt buckled, you are much more likely to hit
the interior of the vehicle or be ejected from
it. You can be seriously injured or killed.
In the same crash, the possibility of injury or
death is lessened if you are properly wearing
your seat belt. The air bags can only protect
as intended if the occupants are properly
wearing their seat belts. G
Warning!
Never ride in a moving vehicle with the seat
backrest in
an excessively reclined position as
this can be dangerous. You could slide under
the seat belt in a collision. If you slide under
it, the seat belt would apply force at the
abdomen or neck. That could cause serious
or even fatal injuries. The seat backrest and Occupant safety
45
Safety and security
216_AKB; 3; 90, en-US
d2ureepe, Version: 2.11.8.1 2009-05-15T11:47:50+02:00 - Seite 45 Z
Page 50 of 500
To release the seat belt with seat belt release
button
?, see ( Y page 48).
Releasing the seat belts X
Press seat belt release button ?
(Y page 47).
Allow the retractor to completely rewind
the seat belt by guiding latch plate ;
(Y page 47).
! Make sure the seat belt retracts
completely. Otherwise
the seat belt and/or
latch plate could get caught or pinched in
the door or in the seat mechanism. This can
damage the seat belt and impair its
effectiveness, and/or cause damage to the
door and/or door trim panel. Such damage
is not covered by the Mercedes-Benz
Limited Warranty.
Damaged seat belts must be replaced.
Contact an authorized Mercedes-Benz
Center.
Enhanced seat belt reminder system When the engine is started, the seat belt
telltale
7 will always illuminate for
6 seconds
to remind you and your passengers
to fasten your seat belts.
If the driver’s seat belt is not fastened when
the engine is started, an additional warning
chime will sound. The warning chime goes out
after approximately 6 seconds or once the
driver’s seat belt is fastened.
If after these 6 seconds the driver’s or the
front passenger’s seat belt (with the front
passenger seat occupied) is not fastened with
both doors closed,
R the seat belt telltale 7 remains
illuminated for as long as either the driver’s
or front passenger’s seat belt is not
fastened.
R and if the vehicle speed once exceeds
15 mph (25 km/h), the seat belt telltale
7 starts flashing and a warning chime
sounds with increasing intensity for a maximum of 60 seconds or until the
driver’s
and
front passenger’s seat belt are
fastened.
If you and/or your passenger release the
seat belt during driving, the seat belt
telltale 7 starts flashing and the
warning chime sounds as described before.
If the driver’s or the front passenger’s seat
belt remains unfastened after 60 seconds,
the warning chime stops sounding, the seat
belt telltale 7 stops flashing but
continues to be illuminated.
After a vehicle standstill, the warning chime
is reactivated and the seat belt telltale
7 is flashing again if the vehicle speed
once exceeds 15 mph (25 km/h).
The seat belt telltale 7 will only go out if
both the driver’s and the front passenger’s
seat belt (with the front passenger seat
occupied) are fastened, or the vehicle is
standing still and a door is opened.
For more information, see “Practical hints”
(Y page 454).
Emergency Tensioning Device (ETD),
seat belt force limiter The seat belts are equipped with ETDs and
seat belt force limiters.
The ETDs are designed to activate in the
following cases:
R
in frontal or rear-end impacts exceeding
the system’s preset deployment threshold
R in side impacts exceeding the system’s
preset deployment threshold on the far
side of the impact
R in certain vehicle rollovers
R if the
restraint systems are operational and
functioning correctly, see “SRS indicator
lamp” (Y page 36)
The ETDs for the front seats will only activate
if the front seat belts are fastened (latch plate
properly inserted into buckle). 48
Occupant safety
Safety and security
216_AKB; 3; 90, en-US
d2ureepe,
Version: 2.11.8.1 2009-05-15T11:47:50+02:00 - Seite 48
Page 57 of 500
X
Fold upholstery blend = upward to access
anchors ;.
X Turn installation device ? to a vertical
position so that upholstery blend = does
not fold down.
X Install a LATCH-type (ISOFIX) child seat
according to the manufacturer’s
instructions.
A rigid connection between the child seat
and the body of the vehicle is established.
Child safety Override switch
G
Observe Safety notes, see page 51.
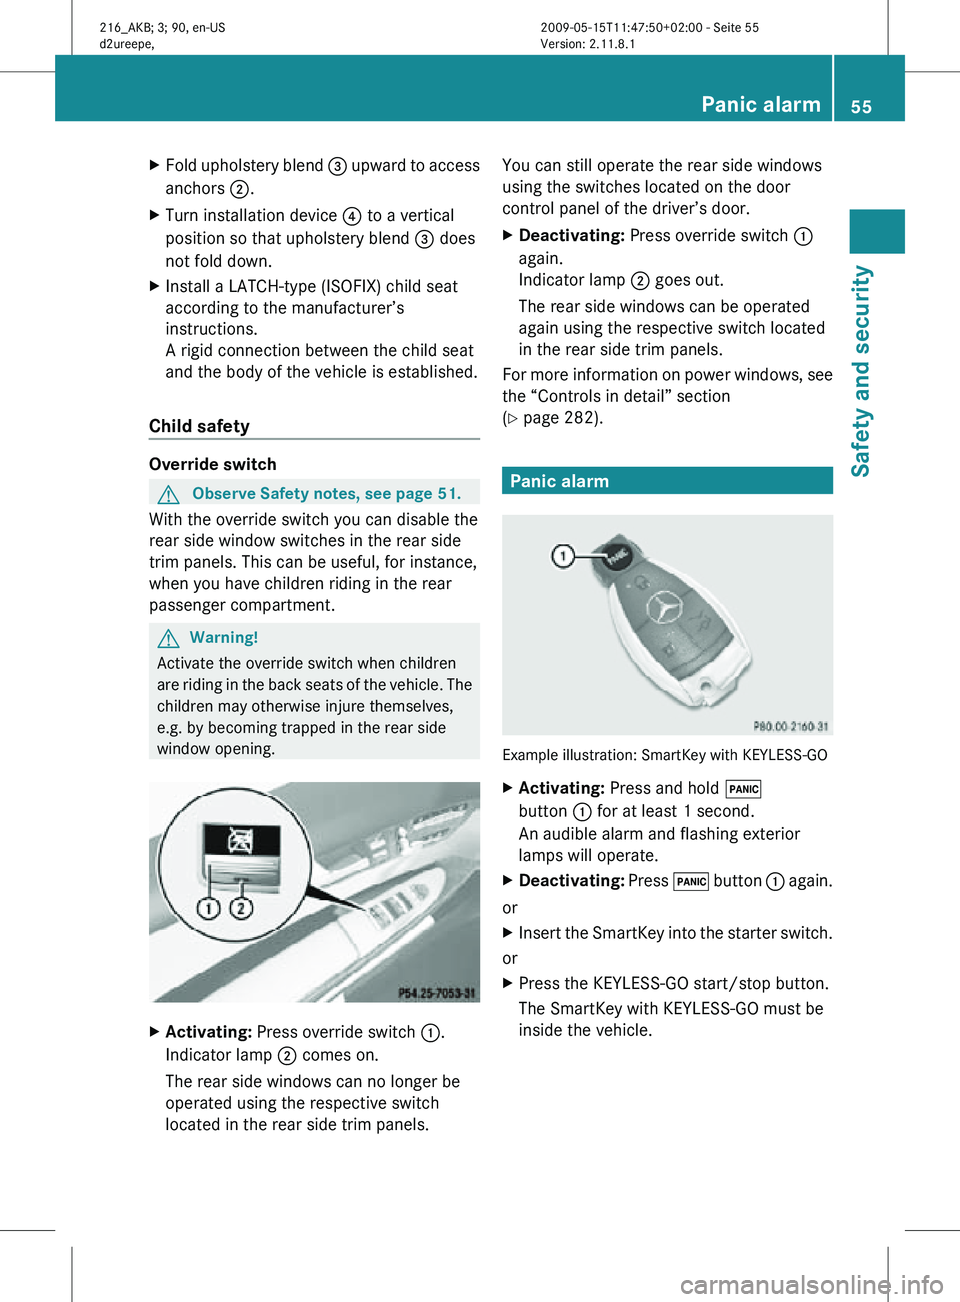
With the override switch you can disable the
rear side window switches in the rear side
trim panels. This can be useful, for instance,
when you have children riding in the rear
passenger compartment. G
Warning!
Activate the override switch when children
are riding in the back seats of the vehicle. The
children may otherwise injure themselves,
e.g. by becoming trapped in the rear side
window opening. X
Activating: Press override switch :.
Indicator lamp ; comes on.
The rear side windows can no longer be
operated using the respective switch
located in the rear side trim panels. You can still operate the rear side windows
using the switches located on the door
control panel of the driver’s door.
X
Deactivating: Press override switch :
again.
Indicator lamp ; goes out.
The rear side windows can be operated
again using the respective switch located
in the rear side trim panels.
For more information on power windows, see
the “Controls in detail” section
(Y page 282). Panic alarm
Example illustration: SmartKey with KEYLESS-GO
X
Activating: Press and hold !
button : for at least 1 second.
An audible alarm and flashing exterior
lamps will operate.
X Deactivating: Press ! button : again.
or
X Insert the SmartKey into the starter switch.
or
X Press the KEYLESS-GO start/stop button.
The SmartKey with KEYLESS-GO must be
inside the vehicle. Panic alarm
55Safety and security
216_AKB; 3; 90, en-US
d2ureepe, Version: 2.11.8.1 2009-05-15T11:47:50+02:00 - Seite 55 Z
Page 61 of 500

BAS PLUS uses radar signals that are not
reflected well by narrow objects and
absorptive materials. For this reason BAS
PLUS will not react to persons, animals, and
approaching traffic or cross-traffic.
BAS PLUS may not detect narrow vehicles
driving in front of you, such as motorcycles
and vehicles driving offset from your vehicle
center.
After a hard collision or damage to the front
of the vehicle from an accident, have the
adjustment and operation of the radar
sensors checked
by an authorized Mercedes-
Benz Center.
If BAS PLUS is not available due to a radar
sensor malfunction, the braking system will
continue to function normally with full brake
boost and full standard BAS function. Adaptive Brake
Adaptive Brake provides a high level of
braking safety as well as increased braking
comfort. Adaptive Brake takes driver and
vehicle characteristics into consideration,
thus achieving an optimal braking effect.
In addiditon, Adaptive Brake provides the
HOLD function
(Y page 316) and the hill-start
assist system ( Y page 315).
For more information on the brake system,
see ( Y page 398). Adaptive Brake Lights
i This function is only available for the
CL 600 (USA only).
The brake lamps flash in quick intervals
R while you are braking hard at a speed of
more than 30 mph (50 km/h)
R when you are braking with the aid of BAS
R when you are braking with the aid of BAS
PLUS.
This helps to alert drivers behind you. If you bring the car to a complete stop by hard
braking at a speed of more than 40 mph
(70
km/h),
the hazard warning flasher comes
on automatically as soon as the vehicle is at
a standstill. While the vehicle is stationary,
the brake lamps are continuously lit up. Once
you drive faster than 6 mph (10 km/h)
afterward, the hazard warning flasher goes
out. EBP
G
Observe Safety notes, see page 56.
The Electronic Brake Proportioning (EBP)
enhances braking effectiveness by allowing
the rear
brakes to supply a greater proportion
of the braking effort in straight-line braking
without a loss of vehicle stability. G
Warning!
If the EBP malfunctions, the brake system will
still function with full brake boost. However,
the rear wheels could lock up during
emergency braking situations, for example.
You could lose control of the vehicle and
cause an accident.
Adapt your driving style to the changed
driving characteristics. ESC
G
Observe Safety notes, see page 56.
The Electronic Stability Control (ESC) is
operational as
soon as the engine is running.
It monitors the vehicle’s traction (force of
adhesive friction between the tires and the
road surface) and handling.
The ESC recognizes that the vehicle deviates
from the direction of travel as intended by the
driver. By applying brakes to individual
wheels and by limiting the engine output, the
ESC works to stabilize the vehicle. The ESC is
especially useful while driving off and on wet
or slippery road surfaces. The ESC also
stabilizes the vehicle during braking and
steering maneuvers. Driving safety systems
59
Safety and security
216_AKB; 3; 90, en-US
d2ureepe, Version: 2.11.8.1 2009-05-15T11:47:50+02:00 - Seite 59 Z
Page 62 of 500

The ESC warning lamp
÷ in the instrument
cluster comes on when you switch on the
ignition. It goes out when the engine is
running. G
Warning!
Never switch off the ESC when you see the
ESC warning lamp ÷ flashing in the
instrument cluster. In this case proceed as
follows:
R When driving off, apply as little throttle as
possible.
R While driving, ease up on the accelerator
pedal.
R Adapt your speed and driving style to the
prevailing road conditions.
Failure to observe these guidelines could
cause the vehicle to skid. The ESC cannot
prevent accidents resulting from excessive
speed.
! Vehicles with 4MATIC:
Because the ESC operates automatically,
the engine and ignition must be shut off
(SmartKey in starter switch position 0 or
1 or KEYLESS-GO start/stop button in
position 0
or 1
) when the electronic parking
brake is being tested on a brake test
dynamometer.
Active braking action through the ESC may
otherwise seriously damage the brake
system which is not covered by the
Mercedes-Benz Limited Warranty.
! Vehicles without 4MATIC:
Because the ESC operates automatically,
the engine and ignition must be shut off
(SmartKey in starter switch position 0 or
1 or KEYLESS-GO start/stop button in
position 0 or 1) when the electronic parking
brake is being tested on a brake test
dynamometer or when the vehicle is being
towed with one axle raised.
Active braking action through the ESC may
otherwise seriously damage the brake system which is not covered by the
Mercedes-Benz Limited Warranty.
! The ESC will only function properly if you
use wheels of the recommended tire size
as specified
in the “Technical data” section
of this Operator’s Manual.
i The DISTRONIC PLUS and cruise control
switch off automatically when the ESC
engages.
Electronic Traction System
(ETS/4-ETS) G
Observe Safety notes, see page 56.
The ETS (Electronic Traction System) and
4-ETS (four-wheel Electronic Traction
System, vehicles with 4MATIC only) are
components of the ESC. The
ETS/4-ETS
improves the vehicle’s ability to utilize
available traction, especially under slippery
road conditions by applying the brakes to a
spinning wheel. Vehicles with 4MATIC also
transfer more power to the wheel(s) with
traction.
When you switch off the ESC, the
ETS/4-ETS is still enabled.
Switching off the ESC Switching off the ESC (except CL 63 AMG)
G
Warning!
The ESC should not be switched off during
normal driving other than in the
circumstances described below. Disabling
the system will reduce vehicle stability in
driving maneuvers.
Do not
switch off the ESC when a spare wheel
is mounted. 60
Driving safety systems
Safety and security
216_AKB; 3; 90, en-US
d2ureepe,
Version: 2.11.8.1 2009-05-15T11:47:50+02:00 - Seite 60
Page 68 of 500
i
Unless you open a door or the trunk within
approximately 40 seconds after unlocking
the vehicle:
R The vehicle will be locked again.
R The anti-theft alarm system will be
rearmed. Canceling the alarm
To cancel the alarm, do one of the following:
X Insert the SmartKey into the starter switch.
X Press button % or & on the
SmartKey.
In vehicles with KEYLESS-GO:
X Grasp an outside door handle.
The SmartKey must be within 3 ft (1 m) of
the vehicle.
X Press the KEYLESS-GO start/stop button.
The SmartKey must be inside the vehicle. 66
Anti-theft systemsSafety and security
216_AKB; 3; 90, en-US
d2ureepe,
Version: 2.11.8.1 2009-05-15T11:47:50+02:00 - Seite 66
Page 83 of 500
Individualization consists of two parts. You
train the system to recognize digits in the first
part and specific commands in the second
part.
Starting new individualization
i
The vehicle must be stationary to start
individualization. After starting the session,
acoustic instructions will guide you through
the individualization.
X Select Vehicle Q System Q Voice
Control Q Start New
Individualization.
A prompt appears asking whether you
would like further information.
X Select Yes or No.
If you select No, the first part of
individualization begins.
If you select Yes, an information display will
be shown with audio instruction.
X Closing display: Select OK.
The first part of individualization begins.
At the end of the first part, you will see a
prompt asking whether you want to begin
the second part.
X Select Yes or No.
If you select No, individualization will be
canceled. The data from the first part is
saved automatically.
If you select Yes, the second part begins.
Individualization is completed at the end of
the second part. You will see a message to
this effect. The data from the second part is
saved automatically.
Canceling during the first or second part
of individualization
X Select Cancel.
A prompt appears asking whether you
really do want to cancel.
X Select Yes or No.
If you select Yes, individualization will be
canceled. The data from the part at which
you exited is not saved. If you select
No, the part at which you
stopped begins again.
Deleting existing individualization data
X Select Vehicle Q System Q Voice
Control Q Delete
Individualization.
A prompt appears asking whether you
really do want to delete.
X Select Yes or No.
The individualization data will either be
deleted or not, depending on your
selection. Setting the system language
X Select Vehicle Q System Q
Language.
The language list appears. A dot #
indicates the current setting.
X Changing setting: Select the desired
language.
The language is set.
i For some system languages, the
navigation announcements are made in
English (Y page 122). Assigning the favorite button
You can assign the following predefined
functions to favorite button
g:
R Driver's Seat Massage (Y page 199) COMAND system settings
81Control systems
216_AKB; 3; 90, en-US
d2ureepe, Version: 2.11.8.1 2009-05-15T11:47:50+02:00 - Seite 81 Z
Page 96 of 500
i
It is possible to enter a destination
regardless of whether route guidance is
active or not.
The following destination entry options are
available:
R By address
R From the destination memory
R From a list of last destinations
R From a point on the map
R A stopover
R A POI Entering a destination by address
Introduction i
It is not possible to enter an address when
the vehicle has exceeded a certain speed.
As soon as the vehicle speed drops below
a certain value, the function is available
again.
i If Russian or Chinese is set as the system
language, the address must be entered
using Latin characters. Setting the system
language ( Y page 81).
To enter an address you may proceed as
follows:
R Enter state (USA) or province (Canada),
street and city
R Enter state (USA) or province (Canada), city
and street
R Enter state (USA) or province (Canada), city
and city center
R Enter state (USA) or province (Canada), zip
code/postal code and city center
R Enter state (USA) or province (Canada), zip
code/postal code and street
i As additional information to the street
entry, you can enter either a house number
or an intersection. A zip code/postal code entry replaces the
city entry.
Calling up the address input menu X
Select Navi Q Destination Q
Address Entry.
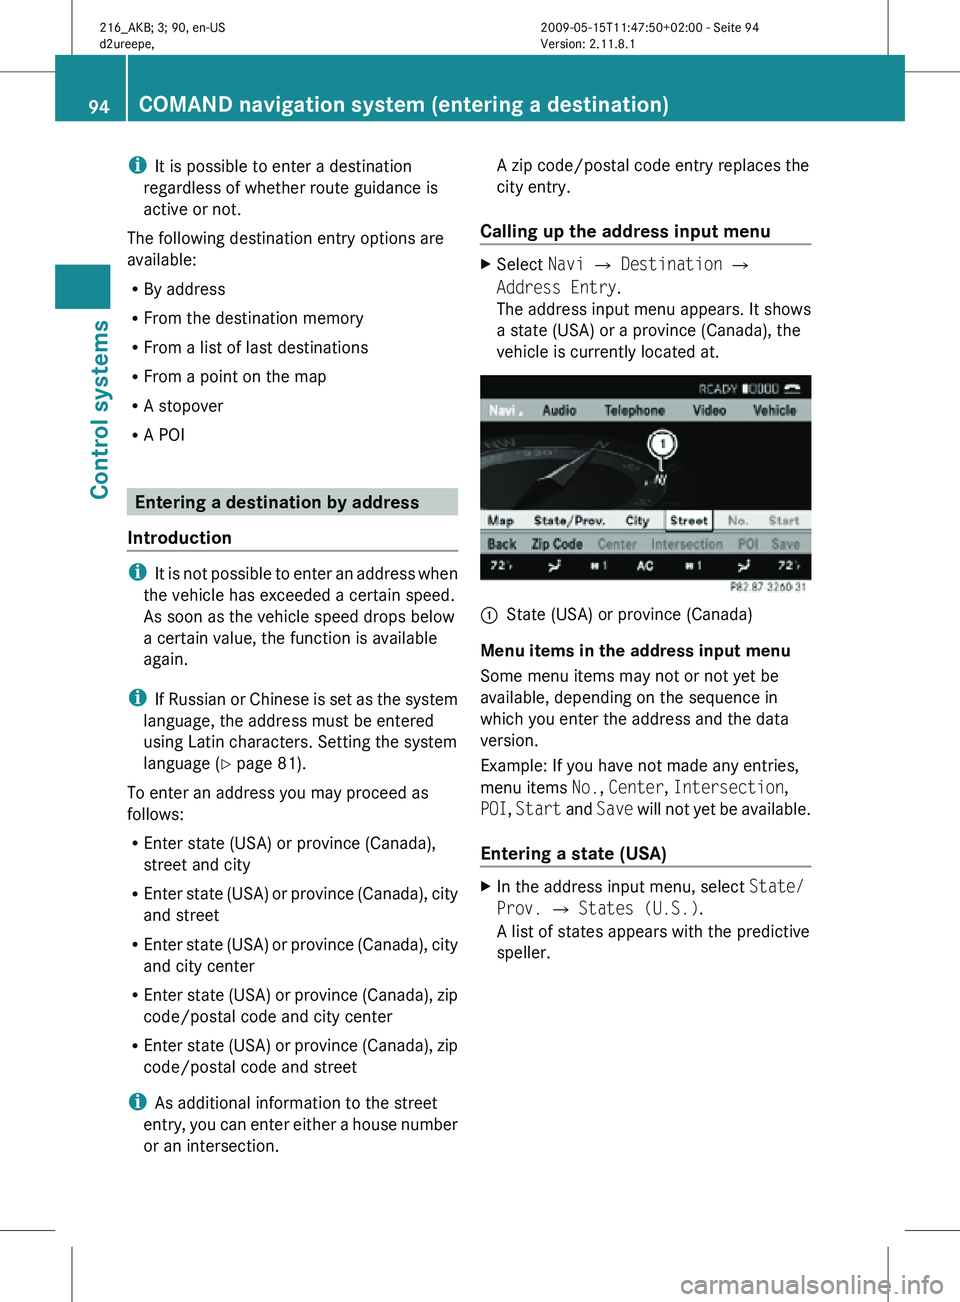
The address input menu appears. It shows
a state (USA) or a province (Canada), the
vehicle is currently located at. :
State (USA) or province (Canada)
Menu items in the address input menu
Some menu items may not or not yet be
available, depending on the sequence in
which you enter the address and the data
version.
Example: If you have not made any entries,
menu items No., Center, Intersection,
POI, Start and Save will not yet be available.
Entering a state (USA) X
In the address input menu, select State/
Prov. Q States (U.S.).
A list of states appears with the predictive
speller. 94
COMAND navigation system (entering a destination)Control systems
216_AKB; 3; 90, en-US
d2ureepe,
Version: 2.11.8.1 2009-05-15T11:47:50+02:00 - Seite 94