MERCEDES-BENZ CL CLASS 2010 Owners Manual
Manufacturer: MERCEDES-BENZ, Model Year: 2010, Model line: CL CLASS, Model: MERCEDES-BENZ CL CLASS 2010Pages: 500, PDF Size: 9.32 MB
Page 211 of 500
The engine oil temperature will be shown in
blue if the engine oil temperature has not yet
reached 176‡ (80†). During this time, avoid
driving at full engine speed.
If the engine reaches the overspeed range in
the manual shift program, you will see
up next
to gear indicator : as a reminder to upshift.
Use buttons : or 9 to select the
following functions in the AMG menu:
R RACETIMER (Y page 209)
R Overall analysis ( Y page 210)
R Lap analysis (Y page 210)
RACETIMER G
Warning!
The RACETIMER feature is only for use on
roads and in conditions where high speed
driving is permitted. Racing on public roads is
prohibited under all circumstances. The driver
is and must always remain responsible for
following posted speed limits.
The RACETIMER allows you to time and save
driving stretches.
X Press button = or ; to select the
AMG menu.
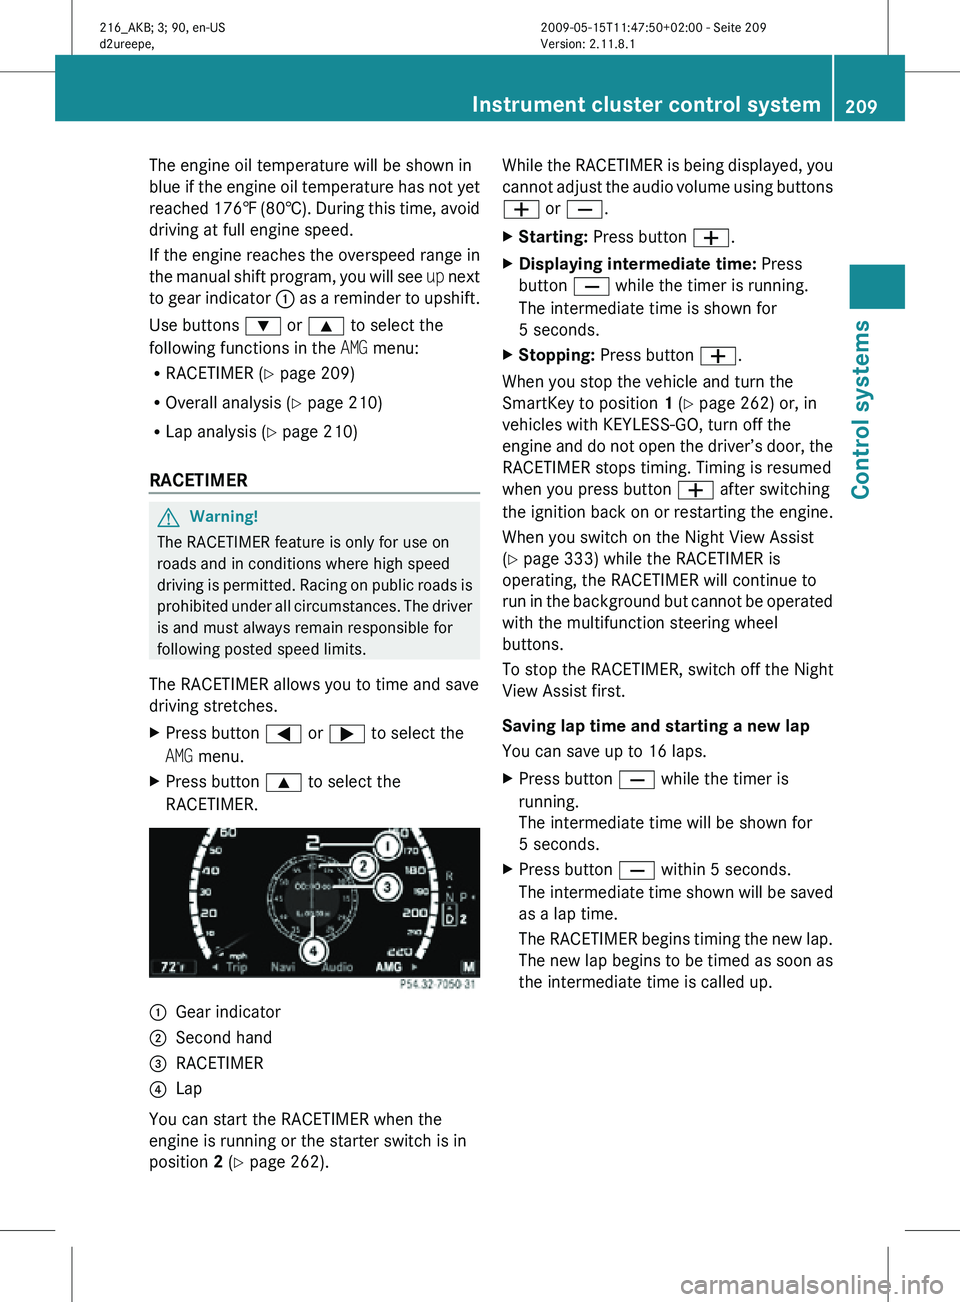
X Press button 9 to select the
RACETIMER. :
Gear indicator
; Second hand
= RACETIMER
? Lap
You can start the RACETIMER when the
engine is running or the starter switch is in
position 2 (Y page 262). While the RACETIMER is being displayed, you
cannot adjust the audio volume using buttons
W or X.
X
Starting: Press button W.
X Displaying intermediate time: Press
button X while the timer is running.
The intermediate time is shown for
5 seconds.
X Stopping: Press button W.
When you stop the vehicle and turn the
SmartKey to position 1 (Y page 262) or, in
vehicles with KEYLESS-GO, turn off the
engine and do not open the driver’s door, the
RACETIMER stops timing. Timing is resumed
when you press button W after switching
the ignition back on or restarting the engine.
When you switch on the Night View Assist
(Y page 333) while the RACETIMER is
operating, the RACETIMER will continue to
run in the background but cannot be operated
with the multifunction steering wheel
buttons.
To stop the RACETIMER, switch off the Night
View Assist first.
Saving lap time and starting a new lap
You can save up to 16 laps.
X Press button X while the timer is
running.
The intermediate time will be shown for
5 seconds.
X Press button X within 5 seconds.
The intermediate time shown will be saved
as a lap time.
The RACETIMER begins timing the new lap.
The new lap begins to be timed as soon as
the intermediate time is called up. Instrument cluster control system
209Control systems
216_AKB; 3; 90, en-US
d2ureepe, Version: 2.11.8.1 2009-05-15T11:47:50+02:00 - Seite 209 Z
Page 212 of 500
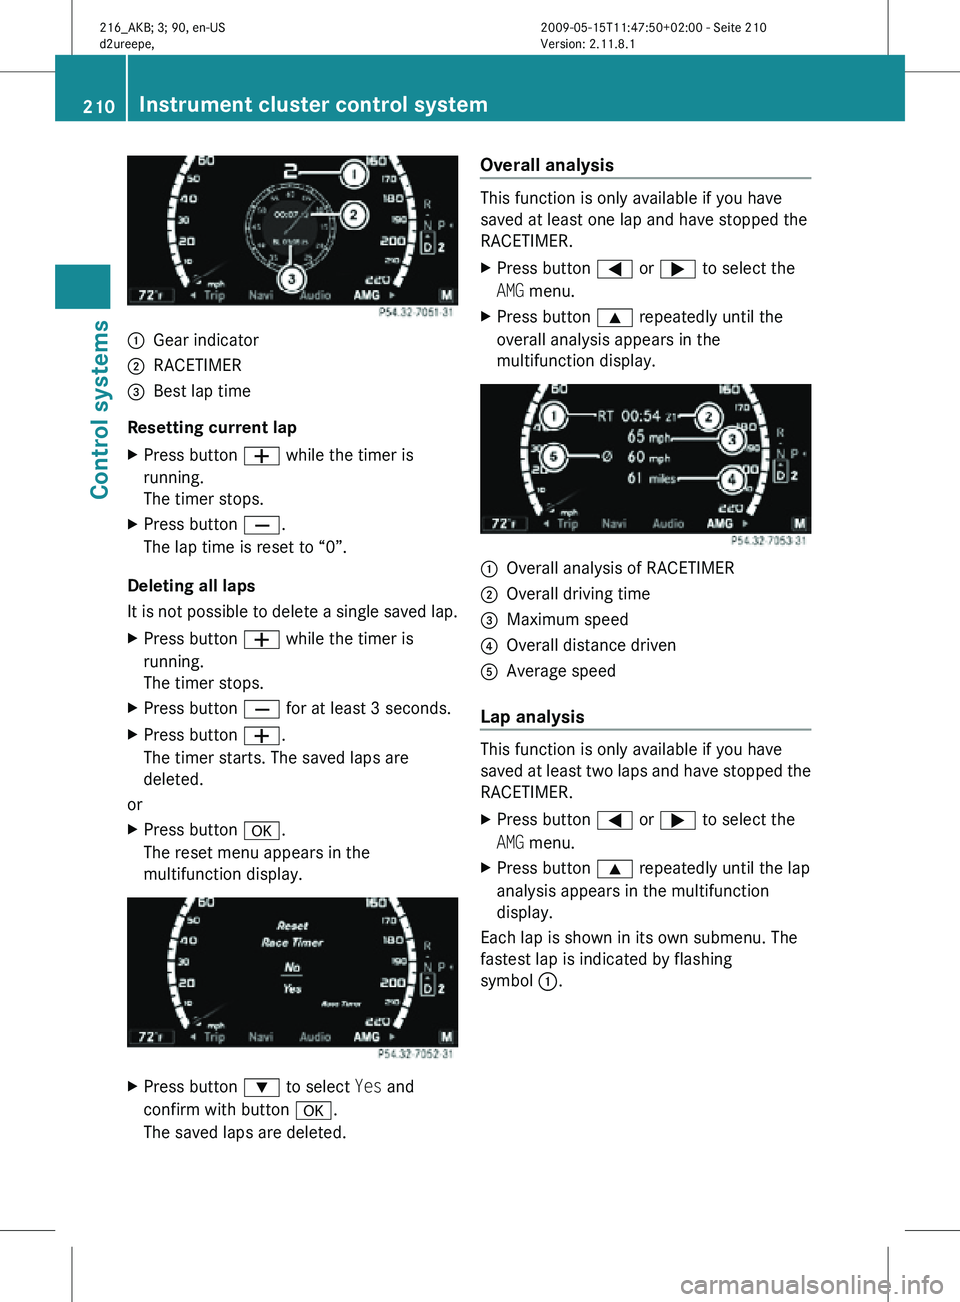
:
Gear indicator
; RACETIMER
= Best lap time
Resetting current lap
X Press button W while the timer is
running.
The timer stops.
X Press button X.
The lap time is reset to “0”.
Deleting all laps
It is not possible to delete a single saved lap.
X Press button W while the timer is
running.
The timer stops.
X Press button X for at least 3 seconds.
X Press button W.
The timer starts. The saved laps are
deleted.
or
X Press button a.
The reset menu appears in the
multifunction display. X
Press button : to select Yes and
confirm with button a.
The saved laps are deleted. Overall analysis This function is only available if you have
saved at least one lap and have stopped the
RACETIMER.
X
Press button = or ; to select the
AMG menu.
X Press button 9 repeatedly until the
overall analysis appears in the
multifunction display. :
Overall analysis of RACETIMER
; Overall driving time
= Maximum speed
? Overall distance driven
A Average speed
Lap analysis This function is only available if you have
saved at least two laps and have stopped the
RACETIMER.
X
Press button = or ; to select the
AMG menu.
X Press button 9 repeatedly until the lap
analysis appears in the multifunction
display.
Each lap is shown in its own submenu. The
fastest lap is indicated by flashing
symbol :. 210
Instrument cluster control systemControl systems
216_AKB; 3; 90, en-US
d2ureepe,
Version: 2.11.8.1 2009-05-15T11:47:50+02:00 - Seite 210
Page 213 of 500
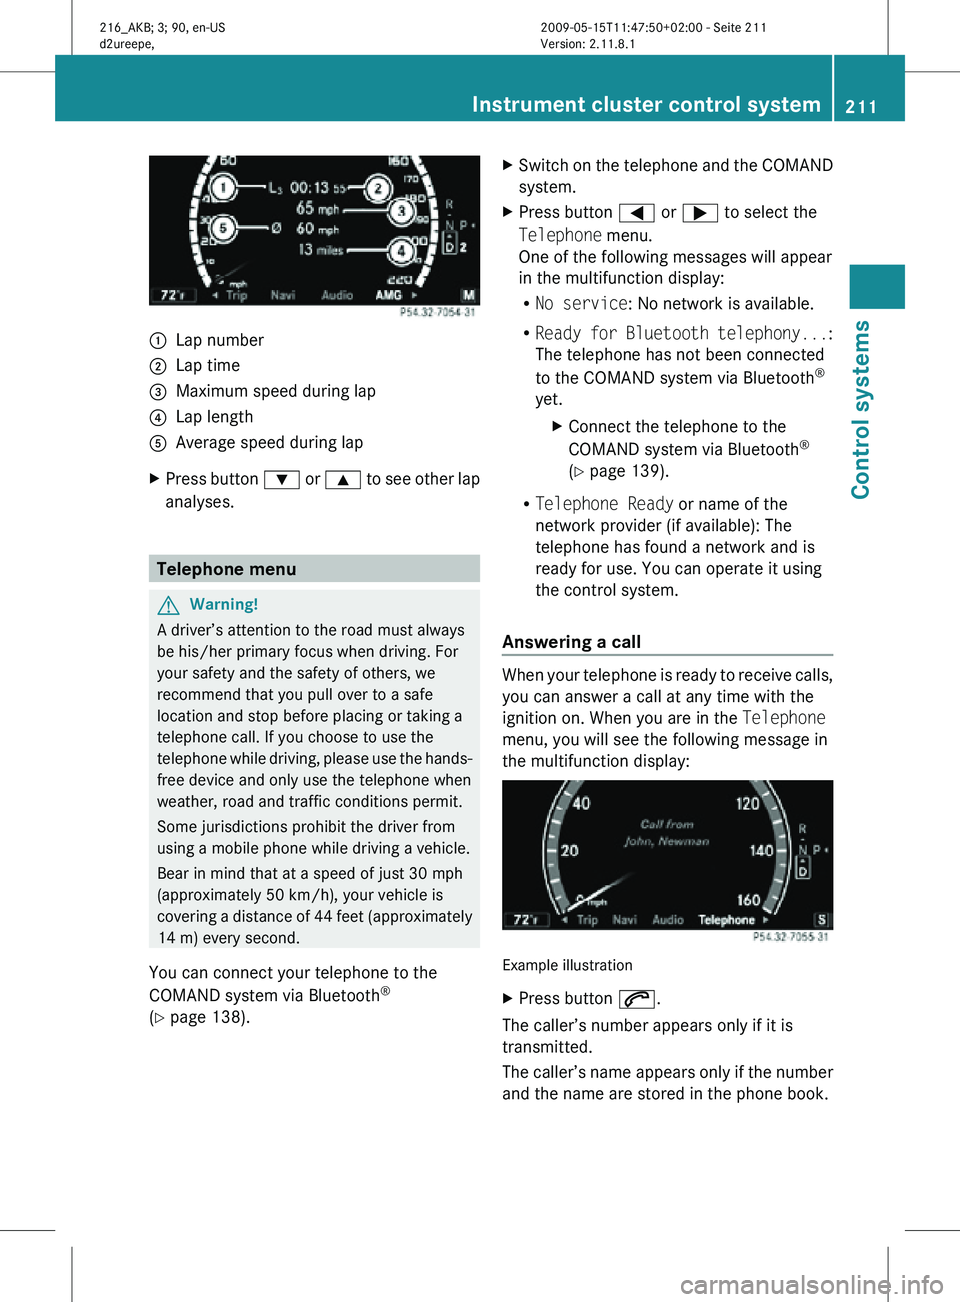
:
Lap number
; Lap time
= Maximum speed during lap
? Lap length
A Average speed during lap
X Press button : or 9 to see other lap
analyses. Telephone menu
G
Warning!
A driver’s attention to the road must always
be his/her primary focus when driving. For
your safety and the safety of others, we
recommend that you pull over to a safe
location and stop before placing or taking a
telephone call. If you choose to use the
telephone while driving, please use the hands-
free device and only use the telephone when
weather, road and traffic conditions permit.
Some jurisdictions prohibit the driver from
using a mobile phone while driving a vehicle.
Bear in mind that at a speed of just 30 mph
(approximately 50 km/h), your vehicle is
covering a distance of 44 feet (approximately
14 m) every second.
You can connect your telephone to the
COMAND system via Bluetooth ®
(Y page 138). X
Switch on the telephone and the COMAND
system.
X Press button = or ; to select the
Telephone menu.
One of the following messages will appear
in the multifunction display:
R
No service: No network is available.
R Ready for Bluetooth telephony... :
The telephone has not been connected
to the COMAND system via Bluetooth ®
yet. XConnect the telephone to the
COMAND system via Bluetooth ®
(Y page 139).
R Telephone Ready or name of the
network provider (if available): The
telephone has found a network and is
ready for use. You can operate it using
the control system.
Answering a call When your telephone is ready to receive calls,
you can answer a call at any time with the
ignition on. When you are in the Telephone
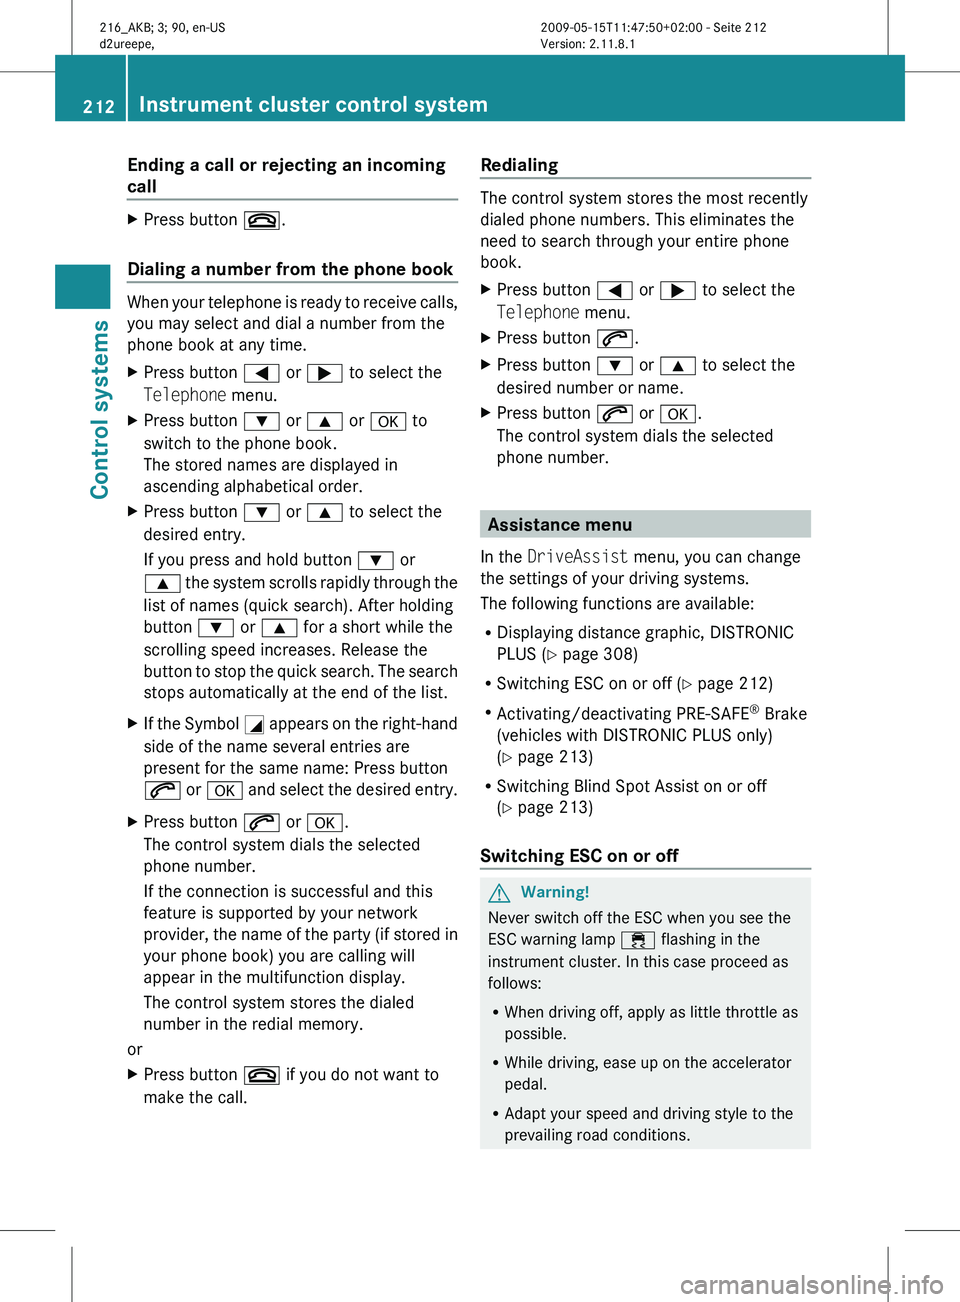
menu, you will see the following message in
the multifunction display:
Example illustration
X
Press button 6.
The caller’s number appears only if it is
transmitted.
The caller’s name appears only if the number
and the name are stored in the phone book. Instrument cluster control system
211Control systems
216_AKB; 3; 90, en-US
d2ureepe, Version: 2.11.8.1 2009-05-15T11:47:50+02:00 - Seite 211 Z
Page 214 of 500
Ending a call or rejecting an incoming
call
X
Press button ~.
Dialing a number from the phone book When your telephone is ready to receive calls,
you may select and dial a number from the
phone book at any time.
X
Press button = or ; to select the
Telephone menu.
X Press button : or 9 or a to
switch to the phone book.
The stored names are displayed in
ascending alphabetical order.
X Press button : or 9 to select the
desired entry.
If you press and hold button : or
9 the
system scrolls rapidly through the
list of names (quick search). After holding
button : or 9 for a short while the
scrolling speed increases. Release the
button to stop the quick search. The search
stops automatically at the end of the list.
X If the Symbol G appears
on the right-hand
side of the name several entries are
present for the same name: Press button
6 or a and select the desired entry.
X Press button 6 or a.
The control system dials the selected
phone number.
If the connection is successful and this
feature is supported by your network
provider, the
name of the party (if stored in
your phone book) you are calling will
appear in the multifunction display.
The control system stores the dialed
number in the redial memory.
or
X Press button ~ if you do not want to
make the call. Redialing The control system stores the most recently
dialed phone numbers. This eliminates the
need to search through your entire phone
book.
X
Press button = or ; to select the
Telephone menu.
X Press button 6.
X Press button : or 9 to select the
desired number or name.
X Press button 6 or a.
The control system dials the selected
phone number. Assistance menu
In the DriveAssist menu, you can change
the settings of your driving systems.
The following functions are available:
R Displaying distance graphic, DISTRONIC
PLUS (Y page 308)
R Switching ESC on or off (
Y page 212)
R Activating/deactivating PRE-SAFE ®
Brake
(vehicles with DISTRONIC PLUS only)
(Y page 213)
R Switching Blind Spot Assist on or off
(Y page 213)
Switching ESC on or off G
Warning!
Never switch off the ESC when you see the
ESC warning lamp ÷ flashing in the
instrument cluster. In this case proceed as
follows:
R When driving off, apply as little throttle as
possible.
R While driving, ease up on the accelerator
pedal.
R Adapt your speed and driving style to the
prevailing road conditions. 212
Instrument cluster control system
Control systems
216_AKB; 3; 90, en-US
d2ureepe,
Version: 2.11.8.1 2009-05-15T11:47:50+02:00 - Seite 212
Page 215 of 500
Failure to observe these guidelines could
cause the vehicle to skid. The ESC cannot
prevent accidents resulting from excessive
speed.
For more Information, see ( Y page 59)
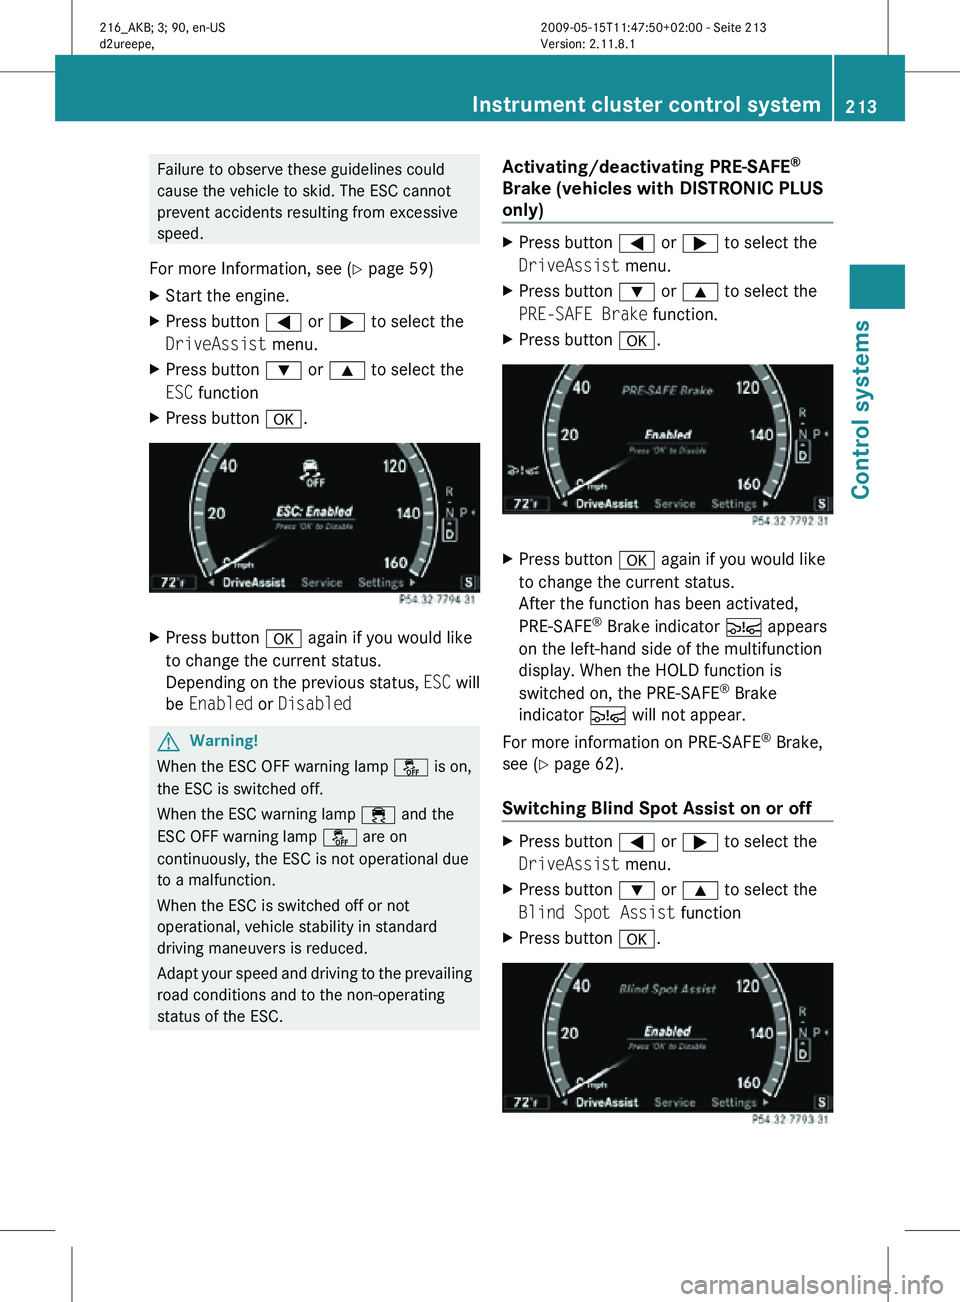
X Start the engine.
X Press button = or ; to select the
DriveAssist menu.
X Press button : or 9 to select the
ESC function
X Press button a. X
Press button a again if you would like
to change the current status.
Depending on the previous status, ESC will
be Enabled or Disabled G
Warning!
When the ESC OFF warning lamp å is on,
the ESC is switched off.
When the ESC warning lamp ÷ and the
ESC OFF warning lamp å are on
continuously, the ESC is not operational due
to a malfunction.
When the ESC is switched off or not
operational, vehicle stability in standard
driving maneuvers is reduced.
Adapt your speed and driving to the prevailing
road conditions and to the non-operating
status of the ESC. Activating/deactivating PRE-SAFE
®
Brake (vehicles with DISTRONIC PLUS
only) X
Press button = or ; to select the
DriveAssist menu.
X Press button : or 9 to select the
PRE-SAFE Brake function.
X Press button a. X
Press button a again if you would like
to change the current status.
After the function has been activated,
PRE-SAFE ®
Brake indicator Ä appears
on the left-hand side of the multifunction
display. When the HOLD function is
switched on, the PRE-SAFE ®
Brake
indicator Ä will not appear.
For more information on PRE-SAFE ®
Brake,
see ( Y page 62).
Switching Blind Spot Assist on or off X
Press button = or ; to select the
DriveAssist menu.
X Press button : or 9 to select the
Blind Spot Assist function
X Press button a. Instrument cluster control system
213Control systems
216_AKB; 3; 90, en-US
d2ureepe, Version: 2.11.8.1 2009-05-15T11:47:50+02:00 - Seite 213 Z
Page 216 of 500

X
Press button a again if you would like
to change the current status.
Depending on the previous status, Blind
Spot Assist will be Enabled or Disabled
For more information on Blind Spot Assist,
see ( Y page 335). Service menu
In the Service menu the following functions
are available:
R Vehicle status message memory
(Y page 214)
R Checking tire inflation pressure
electronically with the Advanced TPMS
(Y page 377)
R Calling up the maintenance service
indicator display ( Y page 402)
R Checking engine oil level (CL 600 and
CL 65 AMG) ( Y page 370)
Vehicle status message memory Use the vehicle status message memory
function to scan malfunction and warning
messages that may be stored in the system.
Such messages appear in the multifunction
display and are based on conditions or
system status the vehicle’s system has
recorded.
The vehicle status message memory function
only appears if there are any messages
stored.
G
Warning!
Malfunction and warning messages are only
indicated for certain systems and are
intentionally not very detailed. The
malfunction and warning messages are
simply a reminder with respect to the
operation of certain systems. They do not
replace the owner’s and/or driver’s
responsibility to maintain the vehicle’s
operating safety. Have all required
maintenance and safety checks performed on the vehicle. Bring the vehicle to an authorized
Mercedes-Benz Center to address the
malfunction and warning messages.
X Press button = or ; to select the
Service menu.
If conditions have occurred causing status
messages to be recorded, the number of
messages appears in the multifunction
display: 2 Messages.
X Press button : or 9 to select the
Messages function.
X Press button a to confirm.
For malfunction and warning messages,
see “Vehicle status messages in the
multifunction display” ( Y page 414).
X Use button : or 9 to scroll through
the messages.
If you turn the SmartKey in the starter switch
to position 0 and then back to position 2, all
messages will be deleted from the message
memory. Settings menu
In the
Settings menu the following functions
are available:
R Switching daytime running lamp mode on
or off (USA only) (Y page 215)
R Showing or hiding additional speedometer
(Y page 215)
R Selecting speedometer display mode
(Y page 215)
R Switching the radar sensors on or off
(Y page 216) 214
Instrument cluster control systemControl systems
216_AKB; 3; 90, en-US
d2ureepe,
Version: 2.11.8.1 2009-05-15T11:47:50+02:00 - Seite 214
Page 217 of 500

Switching daytime running lamp mode
on or off (USA only)
X
Press button = or ; to select the
Settings menu.
X Press button : or 9 to select the
Day Running Lamps function.
X Press button a. X
Press button a again if you would like
to change the current status.
Depending on the previous status, the
Daytime Running Lamps will be switched
on (Enabled) or off (Disabled).
With Daytime Running Lamps mode
Enabled selected and the exterior lamp
switch at position $ or c, the low-
beam headlamps are switched on when the
engine is running.
In low ambient light conditions the following
lamps will come on additionally:
R Parking lamps
R Tail lamps
R License plate lamps
R Side marker lamps
For more information on the daytime running
lamp mode, see “Lighting” ( Y page 276).
i Make sure the exterior lamp switch is set
to M or c when you switch off the
daytime running lamps while driving at
night.
Showing or hiding additional
speedometer You can have an additional digital
speedometer shown in the multifunction display. Depending on the setting for the
speedometer display mode (Y page 215), the
speed is shown in the unit of kilometers/hour
(setting
miles) or miles/hour (setting km).
X Press button = or ; to select the
Settings menu.
X Press button : or 9 to select the
Add. Speedometer function.
X Press button a. X
Press button a again if you would like
to change the current status.
Depending on the previous status, the
Add. Speedometer will be switched On or
Off.
Selecting speedometer display mode X
Press button = or ; to select the
Settings menu.
X Press button : or 9 to select the
Units function.
X Press button a. X
Press button a again if you would like
to change the current status.
Depending on the previous status, the
Display Unit Speed-/Odometer will be
switched to miles or km. Instrument cluster control system
215Control systems
216_AKB; 3; 90, en-US
d2ureepe, Version: 2.11.8.1 2009-05-15T11:47:50+02:00 - Seite 215 Z
Page 218 of 500

The additional speedometer (
Y page 215)
will be shown in the other unit.
Switching the radar sensors on or off If your vehicle is equipped with DISTRONIC
PLUS, BAS PLUS, or Park Assist it is equipped
with a radar sensor system which you can
switch on and off.
When traveling in Canada in a vehicle not
registered in Canada, you must switch off the
radar sensor system. Canadian law does not
permit the use of the radar sensor system for
vehicles from outside of Canada. When you
switch off the radar sensor system, the
following functions are deactivated:
R
BAS PLUS (Y page 57)
R PRE-SAFE ®
Brake (Y page 62)
R DISTRONIC PLUS (Y page 304)
R Park Assist ( Y page 324)
R Advanced Parking Guidance ( Y page 327)
R Blind Spot Assist (Y page 335)
i USA only:
This device has been approved by the FCC
as a “Vehicular Radar System”. The radar
sensor is intended for use in an automotive
radar system only. Removal, tampering, or
altering of the device will void any
warranties, and is not permitted by the
FCC. Do not tamper with, alter, or use in
any non-approved way.
Any unauthorized modification to this
device could void the user’s authority to
operate the equipment.
i Canada only:
This device complies with RSS-210 of
Industry Canada. Operation is subject to
the following two conditions:
1. This device may not cause interference, and
2. this device must accept any interference received, including interference that may cause undesired
operation of the device.
Removal, tampering, or altering of the
device will void any warranties, and is not
permitted. Do not tamper with, alter, or use
in any non-approved way.
Any unauthorized modification to this
device could void the user’s authority to
operate the equipment.
X Press button = or ; to select the
Settings menu.
X Press button : or 9 to select the
Radar Sensors function.
X Press button a. X
Press button a again if you would like
to change the current status.
Depending on the previous status, the
Radar Sensors will be switched on
(Enabled) or off (Disabled).
i The selected status of the radar sensors
remains stored in memory even if the
engine is turned off and restarted.
The following message appears in the
multifunction display if the radar sensors are
switched off and you attempt to activate
DISTRONIC PLUS, Park Assist, or PRE-
SAFE ®
Brake:
Radar Sensors
(See Oper. Manual)
Disabled 216
Instrument cluster control systemControl systems
216_AKB; 3; 90, en-US
d2ureepe,
Version: 2.11.8.1 2009-05-15T11:47:50+02:00 - Seite 216
Page 219 of 500
Voice Control System introduction
Safety notes
G
Warning!
Only use the Voice Control System when road
and traffic conditions permit you to do so.
Otherwise you could be involved in an
accident in which you or others could be
injured. G
Warning!
Please devote your attention first and
foremost to the traffic situation you are in.
While the system permits hands-free phone
operation, attention
to traffic may be diverted
not only by physical operation of a phone, but
also by the distraction of a phone
conversation while driving. As such, for safety
reasons, we encourage the driver to stop the
vehicle in a safe place before answering or
placing a phone call.
For safety reasons, you should only select a
destination when the vehicle is stationary.
While the navigation system provides
directional assistance, the driver must remain
focused on safe driving behavior, especially
attention to traffic and street signs, and
should utilize the system’s audio cues while
driving.
The navigation system does not supply any
information on stop signs, yield signs, traffic
regulations or traffic safety rules. Their
observance always remains in the driver’s
personal responsibility. Maps do not cover all
areas nor all routes within an area.
Traffic regulations always have priority over
any route recommendations given.
Bear in mind that at a speed of just 30 mph
(approximately 50 km/h), your vehicle is
covering a distance of 44 feet (approximately
14 m) every second. G
Warning!
Navigation announcements are intended to
direct you
while driving without diverting your
attention from the road and driving.
Please always use navigation announcements
instead of consulting the map display for
directions. Consulting the symbols or map
display for directions may cause you to divert
your attention from driving and increase your
risk of an accident. G
Warning!
Please do not use the Voice Control System
in an emergency, as the tone of your voice
may change
in a stressful situation. This could
cause a delay in completing your phone call
in a timely manner. This could distract you in
an emergency situation and cause you to be
involved in an accident. General information
Depending on vehicle equipment, you can
operate the following systems via the Voice
Control System:
R Telephone ( Y page 225)
R Navigation ( Y page 219)
R Address book (Y page 229)
R Audio ( Y page 231) (AM/FM radio,
Satellite radio, CD/DVD changer, MP3
mode (SD
card, USB, Music Register, Media
Interface), AUX)
R Video
You control these systems using spoken
commands. Moreover, controls such as the
buttons on the multifunction steering wheel
(Y page 218) allow you to keep your hands
on the steering wheel.
The Voice Control System recognizes
commands and number sequences,
irrespective of the speaker. To optimize
speech recognition for your voice follow the
individualization process ( Y page 250). Voice Control System introduction
217
Control systems
216_AKB; 3; 90, en-US
d2ureepe, Version: 2.11.8.1 2009-05-15T11:47:50+02:00 - Seite 217 Z
Page 220 of 500
You can use the Voice Control System to call
up all of COMAND’s main menu items.
The commands can be spoken without
pausing between the individual words. If an
unavailable or incorrect command is used,
the Voice Control System will prompt you for
a new command by asking “Please repeat” or
“Please repeat your entry”.
The Voice Control System will confirm
important commands and inform you in case
of incorrect entries.
i
To support the user, the Voice Control
System contains an extensive help function
(Y page 247).
You can use the commands “Continue” or
“Back” to scroll up or down in lists.
The command “Correction” lets you repeat
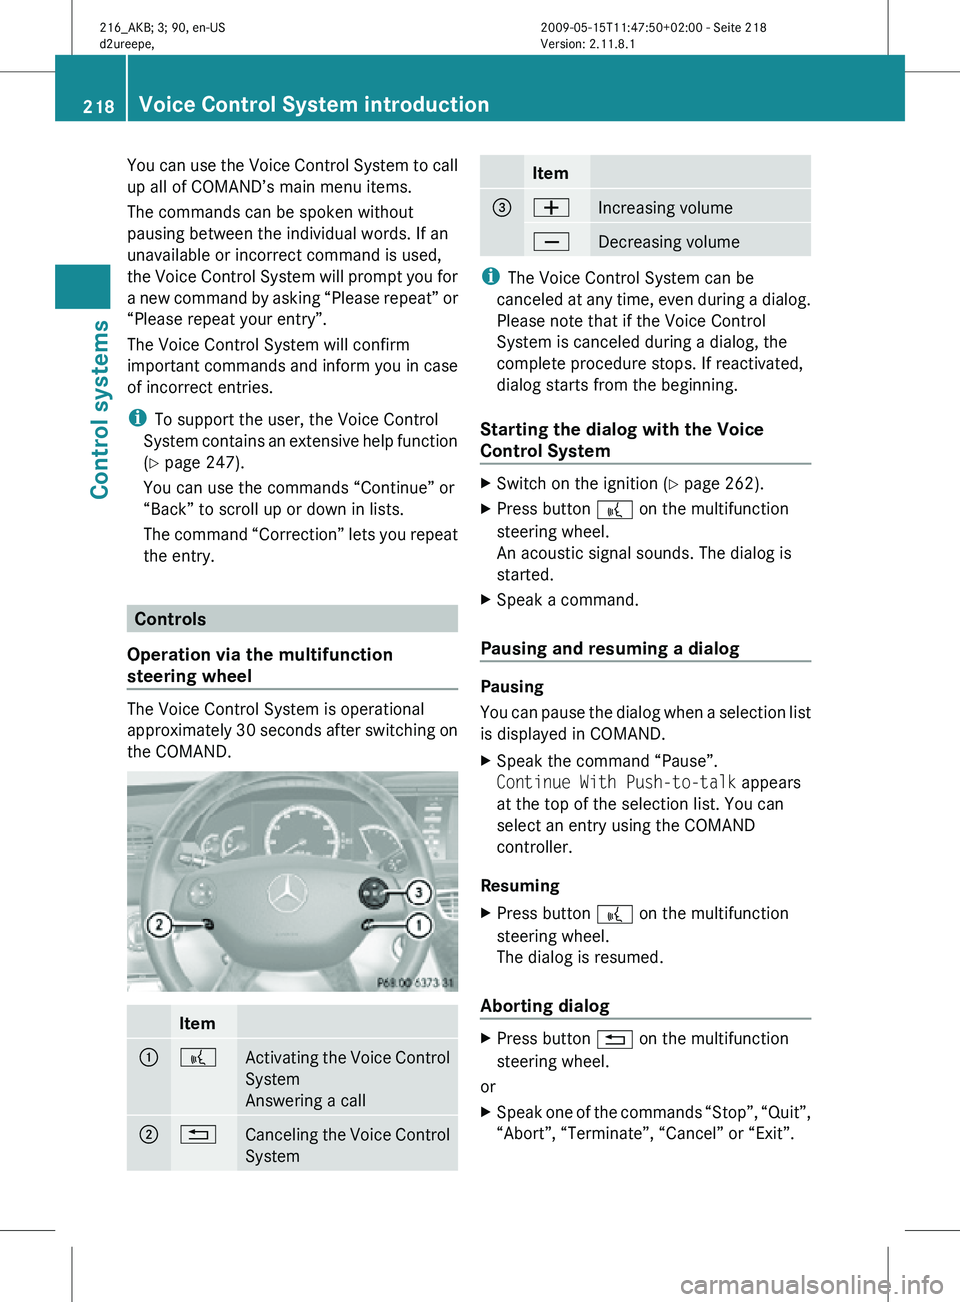
the entry. Controls
Operation via the multifunction
steering wheel The Voice Control System is operational
approximately 30 seconds after switching on
the COMAND.
Item
:
?
Activating the Voice Control
System
Answering a call
;
%
Canceling the Voice Control
System Item
=
W
Increasing volume
X
Decreasing volume
i
The Voice Control System can be
canceled at any time, even during a dialog.
Please note that if the Voice Control
System is canceled during a dialog, the
complete procedure stops. If reactivated,
dialog starts from the beginning.
Starting the dialog with the Voice
Control System X
Switch on the ignition (Y page 262).
X Press button ? on the multifunction
steering wheel.
An acoustic signal sounds. The dialog is
started.
X Speak a command.
Pausing and resuming a dialog Pausing
You can pause the dialog when a selection list
is displayed in COMAND.
X
Speak the command “Pause”.
Continue With Push-to-talk appears
at the top of the selection list. You can
select an entry using the COMAND
controller.
Resuming
X Press button ? on the multifunction
steering wheel.
The dialog is resumed.
Aborting dialog X
Press button % on the multifunction
steering wheel.
or
X Speak one of the commands “Stop”, “Quit”,
“Abort”, “Terminate”, “Cancel” or “Exit”. 218
Voice Control System introductionControl systems
216_AKB; 3; 90, en-US
d2ureepe,
Version: 2.11.8.1 2009-05-15T11:47:50+02:00 - Seite 218