change wheel MERCEDES-BENZ CL-Class 2011 C216 User Guide
[x] Cancel search | Manufacturer: MERCEDES-BENZ, Model Year: 2011, Model line: CL-Class, Model: MERCEDES-BENZ CL-Class 2011 C216Pages: 480, PDF Size: 19.76 MB
Page 102 of 480
motion. All steering wheel adjustment must
be completed before setting the vehicle in
motion. Driving off with the steering wheel
still adjusting could cause the driver to lose
control of the vehicle.
! Do not activate the EASY-ENTRY/EXIT
feature, if the seat backrest is reclined too
far backwards. This can damage the front
or rear seats. You must first move the
backrest to a vertical position.
Position of the steering wheel and the
driver's seat when the EASY-ENTRY/
EXIT feature is active
The steering wheel tilts upwards and the
driver's seat moves backwards when you:
R remove the SmartKey from the ignition lock
R open the driver's door when the SmartKey
is in the ignition lock or KEYLESS-GO is in
position 1
i The steering wheel only moves upwards if
it has not already reached the upper end
stop. The driver's seat only moves
backwards if it is not already in the
rearmost position.
Position of the steering wheel and the
driver's seat for driving
If you insert the SmartKey into the ignition
lock with the driver's door closed, depending
on the setting, the position of the steering
wheel and the driver's seat will be changed to
the previously set position.
The last position of the steering wheel or seat
is stored when:
R the ignition is switched off or
R the setting is stored with the memory
function.
Crash-responsive EASY-EXIT feature
If the crash-responsive EASY-EXIT feature is
triggered in an accident, the steering column
will move upwards when the driver's door is
opened. This occurs irrespective of the
position of the SmartKey in the ignition lock.
This makes it easier to exit the vehicle and
rescue the occupants.
The crash-responsive EASY-EXIT feature is
only operational if the EASY-EXIT/ENTRY
feature is activated in the on-board computer.
Mirrors
Exterior mirrors
Adjusting the exterior mirrors
GWarning
Exercise care when using the passenger-side
exterior rear view mirror. The mirror surface
is convex (outwardly curved surface for a
wider field of view). Objects in mirror are
closer than they appear. Check your interior
rear view mirror and glance over your
shoulder before changing lanes.
The exterior mirrors are automatically heated
if the rear window heating is switched on and
the outside temperature is low.
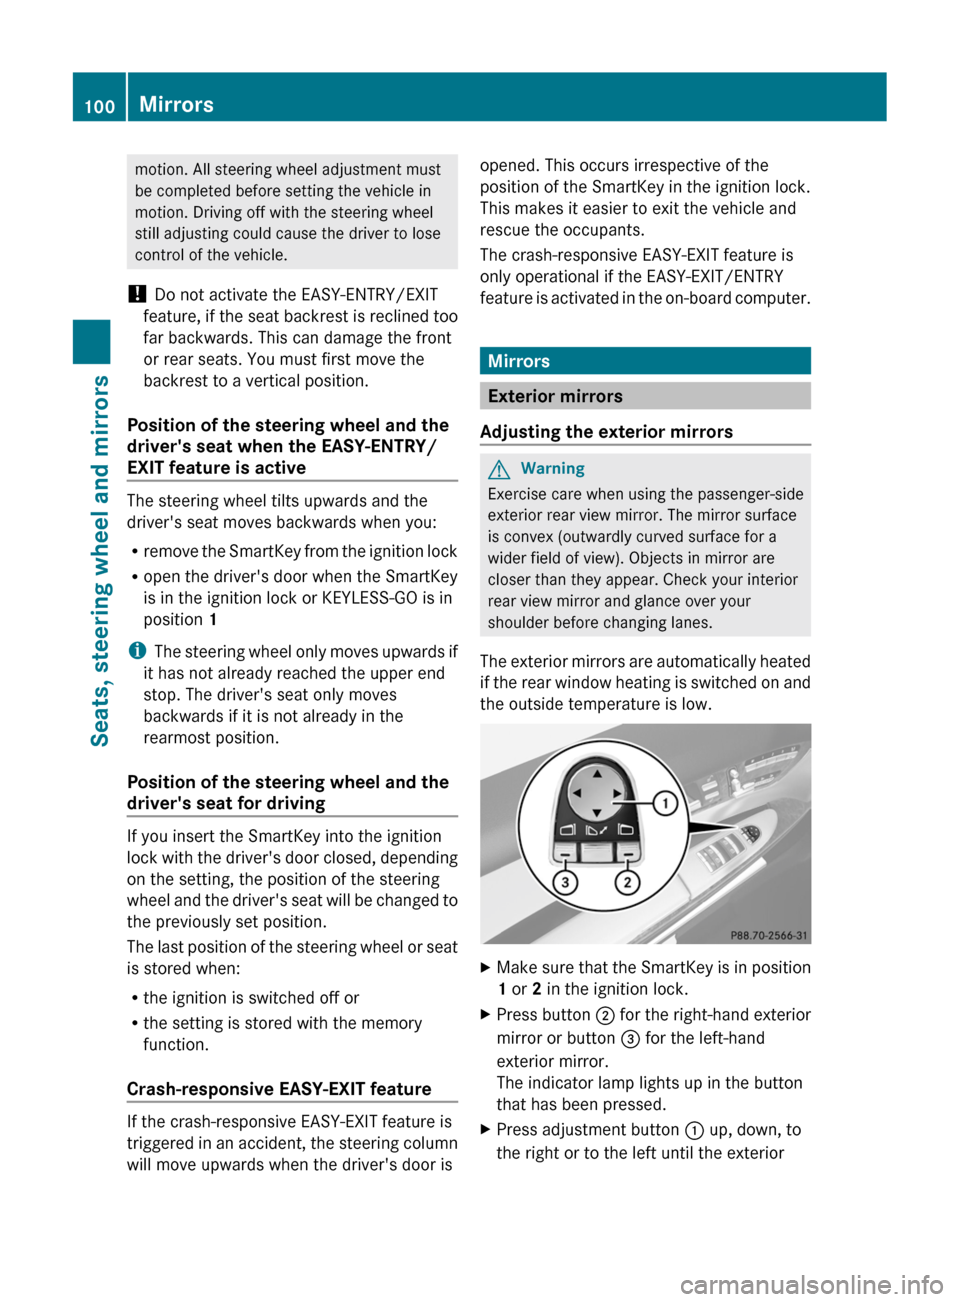
XMake sure that the SmartKey is in position
1 or 2 in the ignition lock.XPress button ; for the right-hand exterior
mirror or button = for the left-hand
exterior mirror.
The indicator lamp lights up in the button
that has been pressed.XPress adjustment button : up, down, to
the right or to the left until the exterior100MirrorsSeats, steering wheel and mirrors
Page 115 of 480
DVD function can be viewed from the front
passenger side.
Use the SPLITVIEW remote control to operate
COMAND from the front passenger side.
Points to remember:
RYour vehicle may be equipped with
SPLITVIEW. The use of SPLITVIEW is
currently not permitted in the following
states: AL, CO, IL, LA, MA, MD, NH, PA, VA,
VT, WA, WI, and WV as well as in the
Canadian provinces Manitoba,
Newfoundland, New Brunswick, and Prince
Edward Island. The driver is responsible for
complying with ALL regional laws. If your
vehicle is registered in a state or province
where SPLITVIEW is not permitted, this
function must be deactivated. Please
consult an authorized Mercedes-Benz
center to verify if the use of SPLITVIEW is
permitted in your state/province.
RThe SPLITVIEW remote control can be used
to adjust the volume of the front-passenger
side headphones. Before putting on the
headphones, make certain that the volume
has not been set too high.
RYou can only use media from the driver's
and front-passenger sides separately if the
media are from different sources. Example:
on the driver's side, an audio CD is being
played on the DVD changer. This means
that on the front-passenger side, the DVD
changer cannot be used to play a different
medium, for instance a video DVD.
However, other media can be used at the
same time on the front-passenger side,
including radio, memory card, MUSIC
REGISTER, Media Interface, USB or AUX.
RIf you use the same medium on both sides,
you can both carry out the respective
settings.
RThere must be clear line of sight between
the headphones and the display so that
COMAND can optimally transmit music and
speech via the infrared signal on the front-
passenger's headphones. For this reason,
please also observe that the headphones
have left and right sides, and use them
correctly.
RUsing SPLITVIEW you can only use
entertainment functions separately, such
as audio and video functions.
RThe multifunction steering wheel can only
used for functions which relate to the
driver's side.
Switching SPLITVIEW on/off
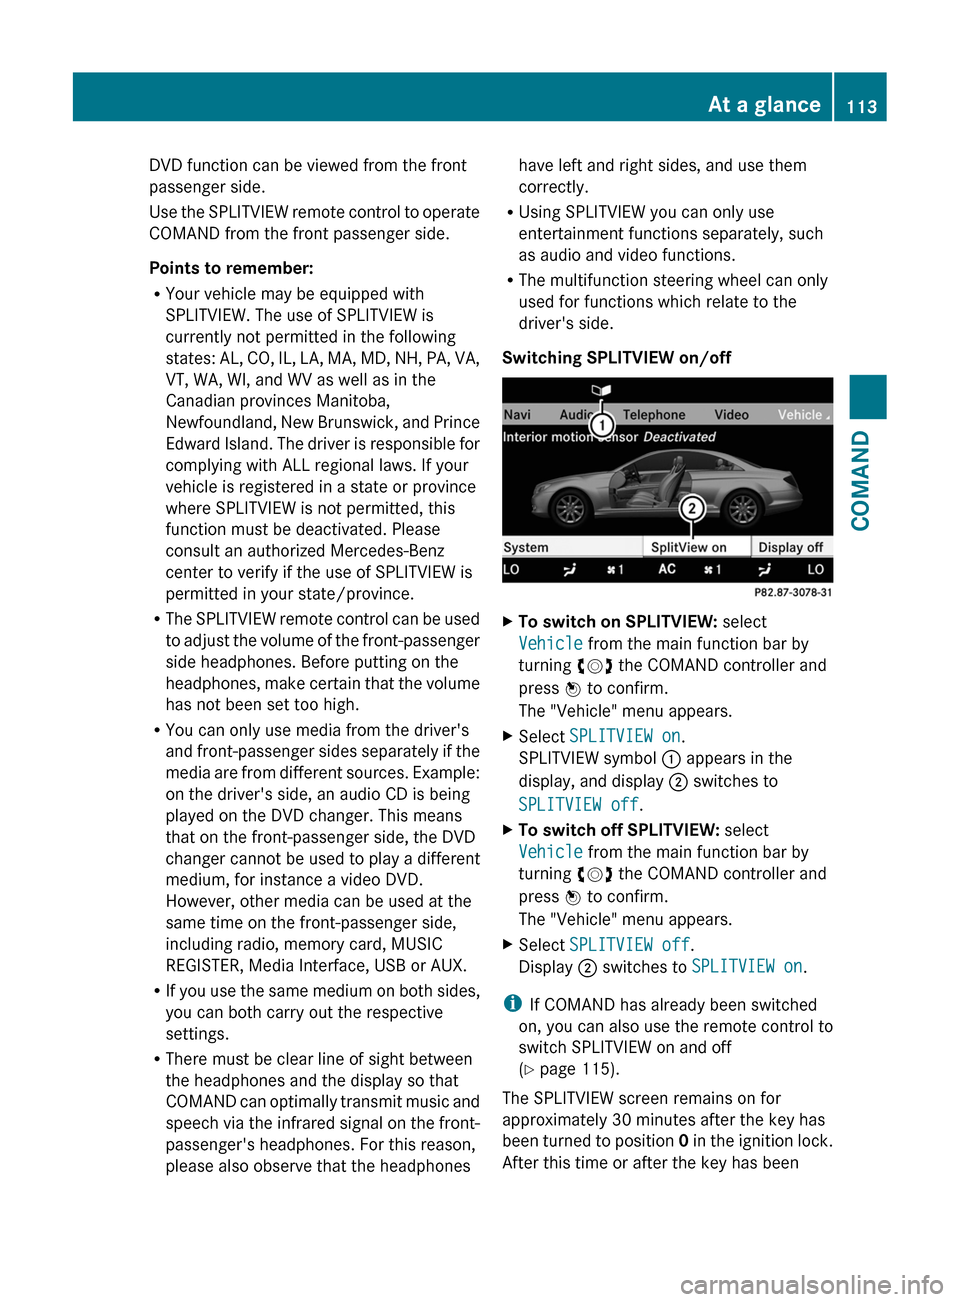
XTo switch on SPLITVIEW: select
Vehicle from the main function bar by
turning cVd the COMAND controller and
press W to confirm.
The "Vehicle" menu appears.
XSelect SPLITVIEW on.
SPLITVIEW symbol : appears in the
display, and display ; switches to
SPLITVIEW off.
XTo switch off SPLITVIEW: select
Vehicle from the main function bar by
turning cVd the COMAND controller and
press W to confirm.
The "Vehicle" menu appears.
XSelect SPLITVIEW off.
Display ; switches to SPLITVIEW on.
iIf COMAND has already been switched
on, you can also use the remote control to
switch SPLITVIEW on and off
(Y page 115).
The SPLITVIEW screen remains on for
approximately 30 minutes after the key has
been turned to position 0 in the ignition lock.
After this time or after the key has been
At a glance113COMANDZ
Page 117 of 480
Avoid using alcoholic thinners, gasoline or
abrasive cleaning agents. These products can
damage the display surface. Do not apply
pressure to the display surface when cleaning
it as this could cause irreversible damage.
Remote control
Overview
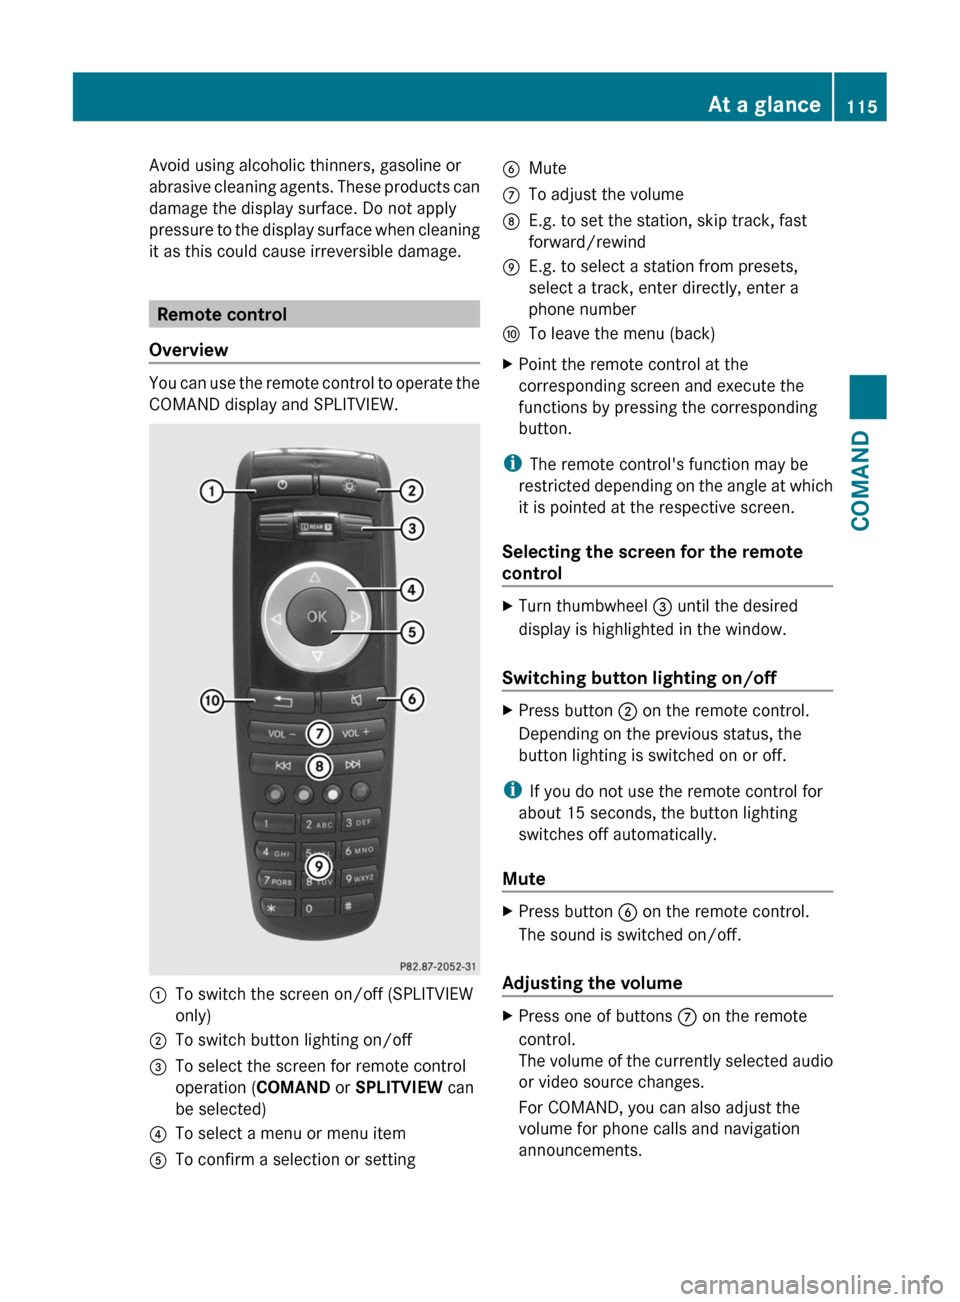
You can use the remote control to operate the
COMAND display and SPLITVIEW.
:To switch the screen on/off (SPLITVIEW
only)
;To switch button lighting on/off=To select the screen for remote control
operation (COMAND or SPLITVIEW can
be selected)
?To select a menu or menu itemATo confirm a selection or settingBMuteCTo adjust the volumeDE.g. to set the station, skip track, fast
forward/rewind
EE.g. to select a station from presets,
select a track, enter directly, enter a
phone number
FTo leave the menu (back)XPoint the remote control at the
corresponding screen and execute the
functions by pressing the corresponding
button.
iThe remote control's function may be
restricted depending on the angle at which
it is pointed at the respective screen.
Selecting the screen for the remote
control
XTurn thumbwheel = until the desired
display is highlighted in the window.
Switching button lighting on/off
XPress button ; on the remote control.
Depending on the previous status, the
button lighting is switched on or off.
iIf you do not use the remote control for
about 15 seconds, the button lighting
switches off automatically.
Mute
XPress button B on the remote control.
The sound is switched on/off.
Adjusting the volume
XPress one of buttons C on the remote
control.
The volume of the currently selected audio
or video source changes.
For COMAND, you can also adjust the
volume for phone calls and navigation
announcements.
At a glance115COMANDZ
Page 125 of 480
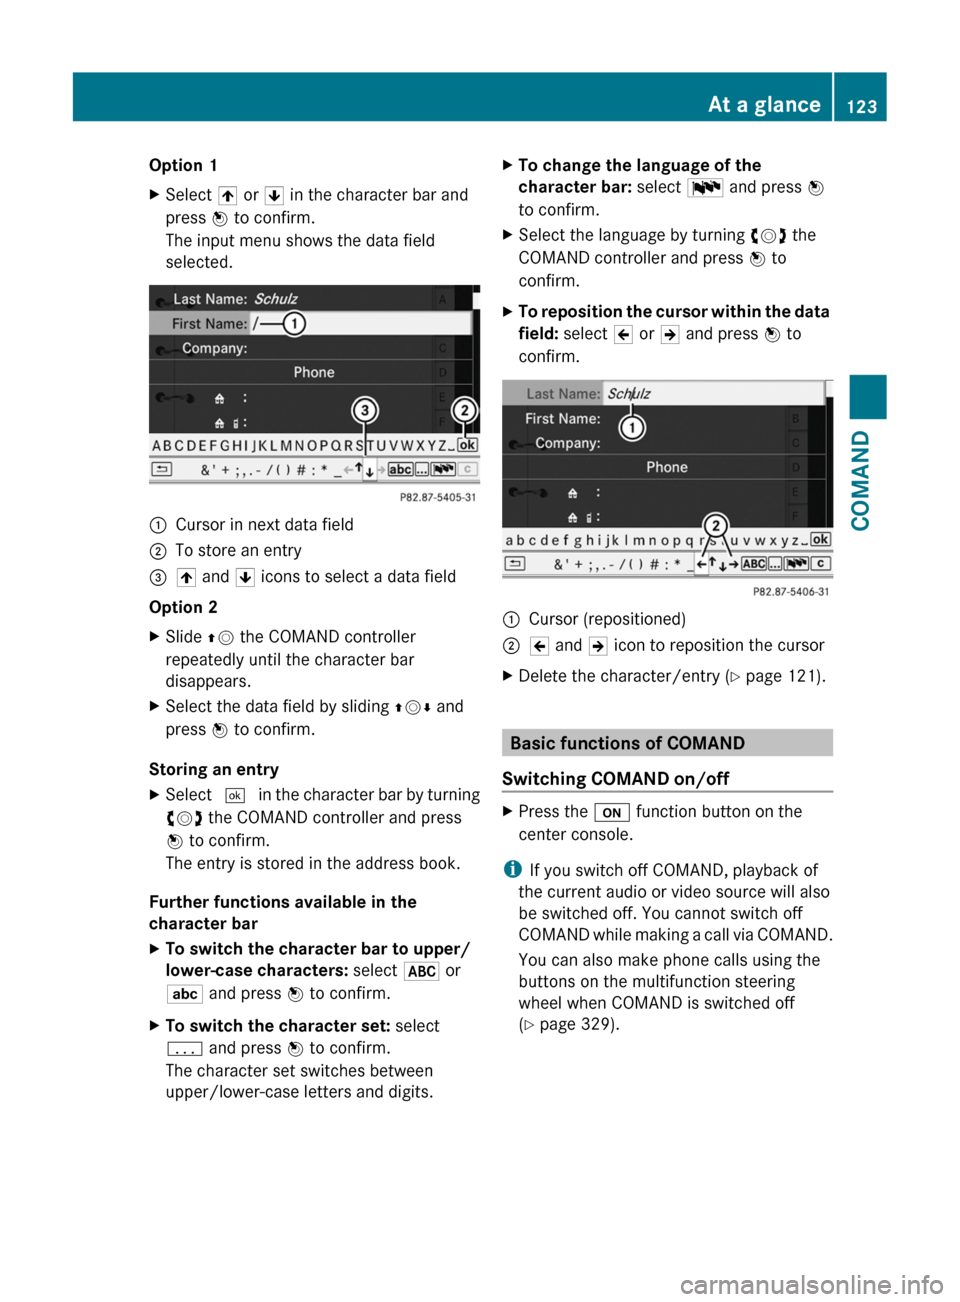
Option 1XSelect 4 or 5 in the character bar and
press W to confirm.
The input menu shows the data field
selected.
:Cursor in next data field;To store an entry=4 and 5 icons to select a data field
Option 2
XSlide ZV the COMAND controller
repeatedly until the character bar
disappears.
XSelect the data field by sliding ZVÆ and
press W to confirm.
Storing an entry
XSelect ¬ in the character bar by turning
cVd the COMAND controller and press
W to confirm.
The entry is stored in the address book.
Further functions available in the
character bar
XTo switch the character bar to upper/
lower-case characters: select * or
E and press W to confirm.
XTo switch the character set: select
p and press W to confirm.
The character set switches between
upper/lower-case letters and digits.
XTo change the language of the
character bar: select B and press W
to confirm.
XSelect the language by turning cVd the
COMAND controller and press W to
confirm.
XTo reposition the cursor within the data
field: select 2 or 3 and press W to
confirm.
:Cursor (repositioned);2 and 3 icon to reposition the cursorXDelete the character/entry (Y page 121).
Basic functions of COMAND
Switching COMAND on/off
XPress the u function button on the
center console.
iIf you switch off COMAND, playback of
the current audio or video source will also
be switched off. You cannot switch off
COMAND while making a call via COMAND.
You can also make phone calls using the
buttons on the multifunction steering
wheel when COMAND is switched off
(Y page 329).
At a glance123COMANDZ
Page 126 of 480
Mute
Switching audio and video sources on/off
XPress the 8 button on the multifunction
steering wheel.
The sound from the respective audio or
video source is switched on or muted.
iWhen the sound is off, the system
displays the , symbol in the status line.
When you change the audio or video
source, or adjust the volume, the sound
automatically switches on again.
iEven if the sound is switched off, you will
still hear traffic and navigation system
announcements.
Switching off Traffic program and
navigation announcements completely
XTraffic program: press and hold the
8 button until the . display
disappears from the status bar of the
display.
A confirmation tone sounds.
XNavigation announcements: during an
announcement, press the 8 button on
the multifunction steering wheel.
Switching Traffic program and navigation
announcements on again
XTraffic program: press and hold down the
8 button until the . display in the
status bar appears.
A confirmation tone sounds.
XNavigation announcements: press the
8 button again.
iThe navigation announcements are
activated again if you switch COMAND off
and on again or start a new route guidance.
Adjusting the volume
Adjusting the volume for the audio or
video source
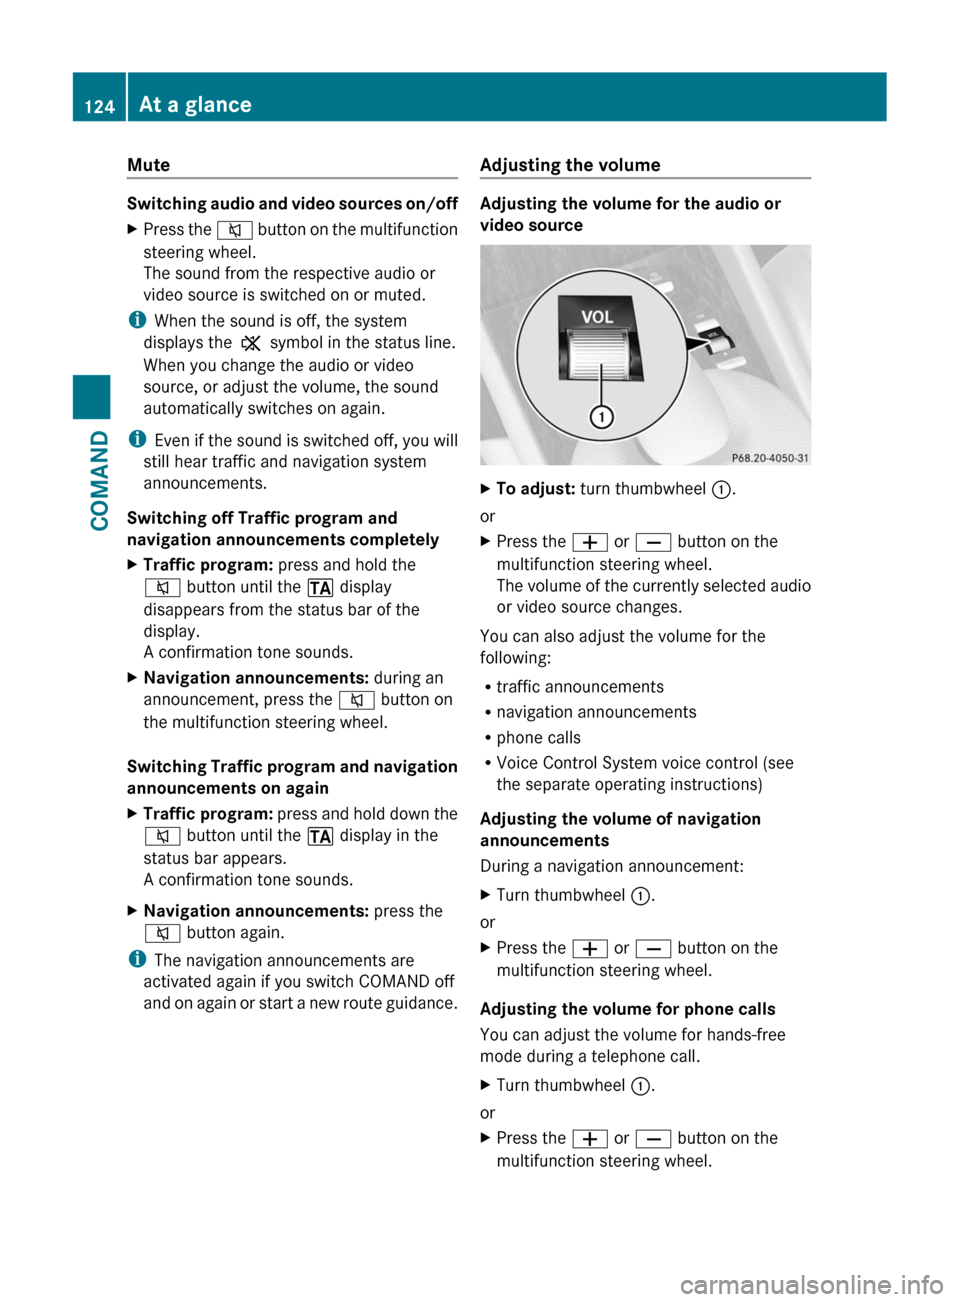
XTo adjust: turn thumbwheel :.
or
XPress the W or X button on the
multifunction steering wheel.
The volume of the currently selected audio
or video source changes.
You can also adjust the volume for the
following:
Rtraffic announcements
Rnavigation announcements
Rphone calls
RVoice Control System voice control (see
the separate operating instructions)
Adjusting the volume of navigation
announcements
During a navigation announcement:
XTurn thumbwheel :.
or
XPress the W or X button on the
multifunction steering wheel.
Adjusting the volume for phone calls
You can adjust the volume for hands-free
mode during a telephone call.
XTurn thumbwheel :.
or
XPress the W or X button on the
multifunction steering wheel.
124At a glanceCOMAND
Page 188 of 480
You can simultaneously switch back and forth
between two parties or conduct a conference
call with up to five others.
Toggling10
If you are on the telephone and you receive
another call, the call waiting display will
appear. You also hear an acoustic signal.
XTo reject: select Reject and press W to
confirm.
or
XPress the ~ button on the telephone
keypad or on the multifunction steering
wheel.
XTo accept: select Accept and press W to
confirm.
or
XPress the 6 button on the telephone
keypad or on the multifunction steering
wheel.
If you accept the waiting call, the active call
is ended.
iThe active call will also be ended if you
accept the waiting call using Voice Control
System (see the separate operating
instructions).
If you accept the waiting call using the mobile
phone, the active call will be put on hold.
Then, you have two calls, with the accepted
call being the active call.
The COMAND display changes. If you
continue to operate functions on the mobile
phone, the COMAND display may differ from
that of the mobile phone.
Calling additional parties
You can call a second person while on the
phone with someone else. This action puts
the previous call on hold.
XSelect NEW from the telephone basic menu
and press W to confirm.
or
XSelect SEND on the telephone keypad.XEnter the phone number manually
(Y page 184) or using the phone book
(Y page 191).
Switching between two parties (toggling)
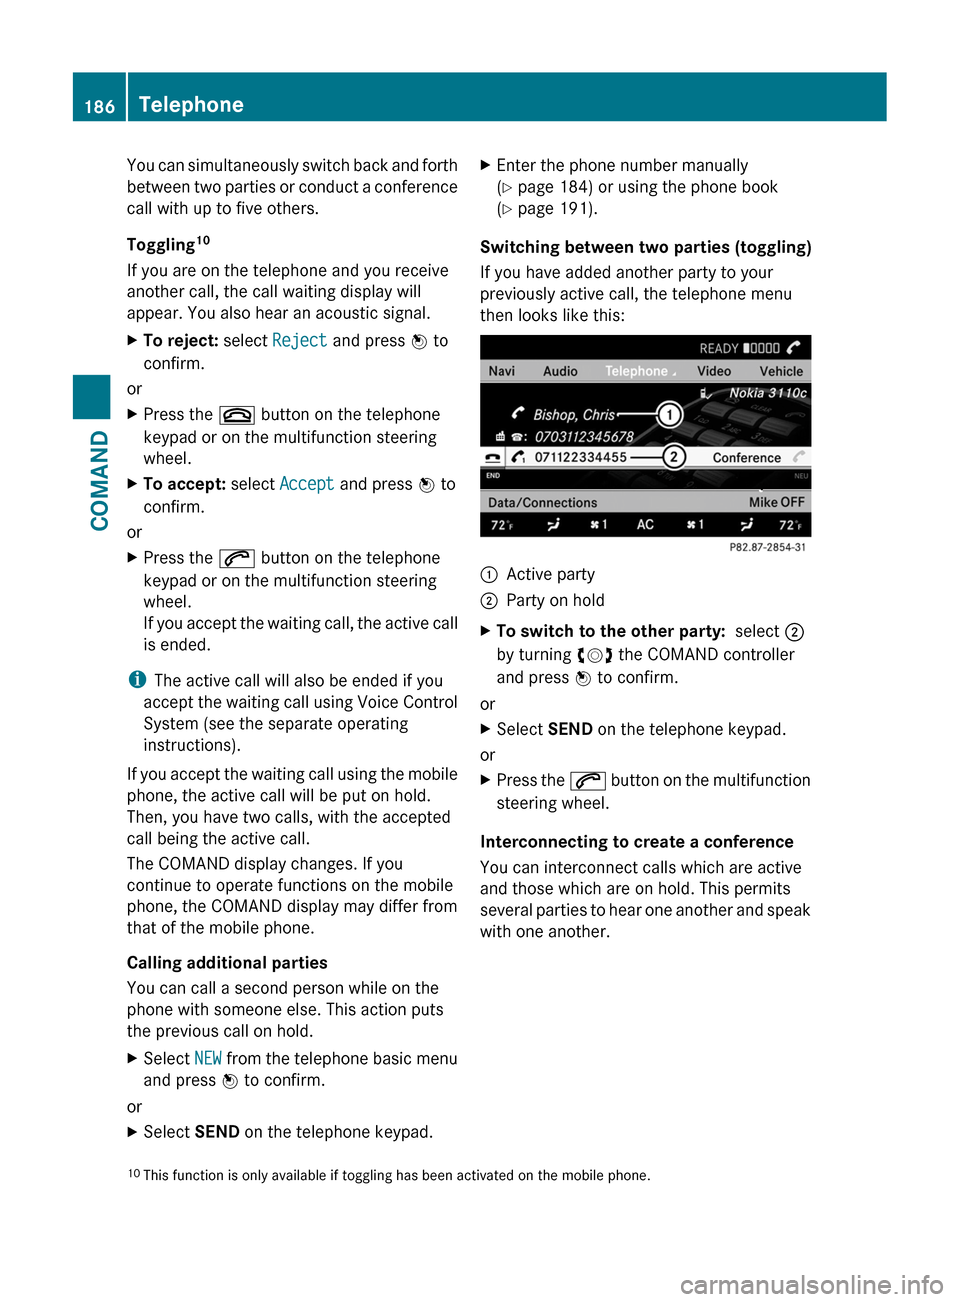
If you have added another party to your
previously active call, the telephone menu
then looks like this:
:Active party;Party on holdXTo switch to the other party: select ;
by turning cVd the COMAND controller
and press W to confirm.
or
XSelect SEND on the telephone keypad.
or
XPress the 6 button on the multifunction
steering wheel.
Interconnecting to create a conference
You can interconnect calls which are active
and those which are on hold. This permits
several parties to hear one another and speak
with one another.
10This function is only available if toggling has been activated on the mobile phone.186TelephoneCOMAND
Page 206 of 480
Using the multifunction steering wheelXUse = or ; to select the Audio
menu.
XPress 9 or : briefly.
Displaying information
XSelect Info in the submenu bar by turning
cVd the COMAND controller and press
W to confirm.
Information on the currently received
program is displayed.
XTo return to the SatRadio main display:
slide XVY the COMAND controller.
Displaying service information
If you have any questions or require version
information, you can call the provider's
customer service center at any time.
XSelect Sat. Radio in the submenu bar by
turning cVd the COMAND controller and
press W to confirm.
XSelect Service and press W to confirm.
The provider's details appear.
XTo return to the SatRadio main display:
slide XVY the COMAND controller.
Updating the channel list
When receiving a new channel list, the display
shows the Updating channel... message.
The station last selected is muted until the
update has been completed. Satellite radio
mode is not available during the update
process.
When the update has been completed, the
satellite radio main menu appears. The
station last selected is played.
Sound settings
You will find details on the sound settings in
the "At a glance" section (Y page 125).
Audio CD/DVD and MP3 mode
Important safety notes
GWarning!
COMAND is classified as a Class 1 laser
product. You must not open the casing. If you
open the casing, or if the casing is faulty or
damaged, there is a risk of exposure to
invisible laser radiation. This may damage
your eyes, or those of others.
COMAND does not contain any parts that can
be serviced by the user. For safety reasons,
all maintenance work must be carried out by
qualified aftersales technicians.
GWarning!
Only when the vehicle is stationary should
you:
Rload a disc
Reject a disc
There is a risk of being distracted from the
road and traffic conditions if this is done while
the vehicle is in motion.
Inserting/ejecting CDs/DVDs
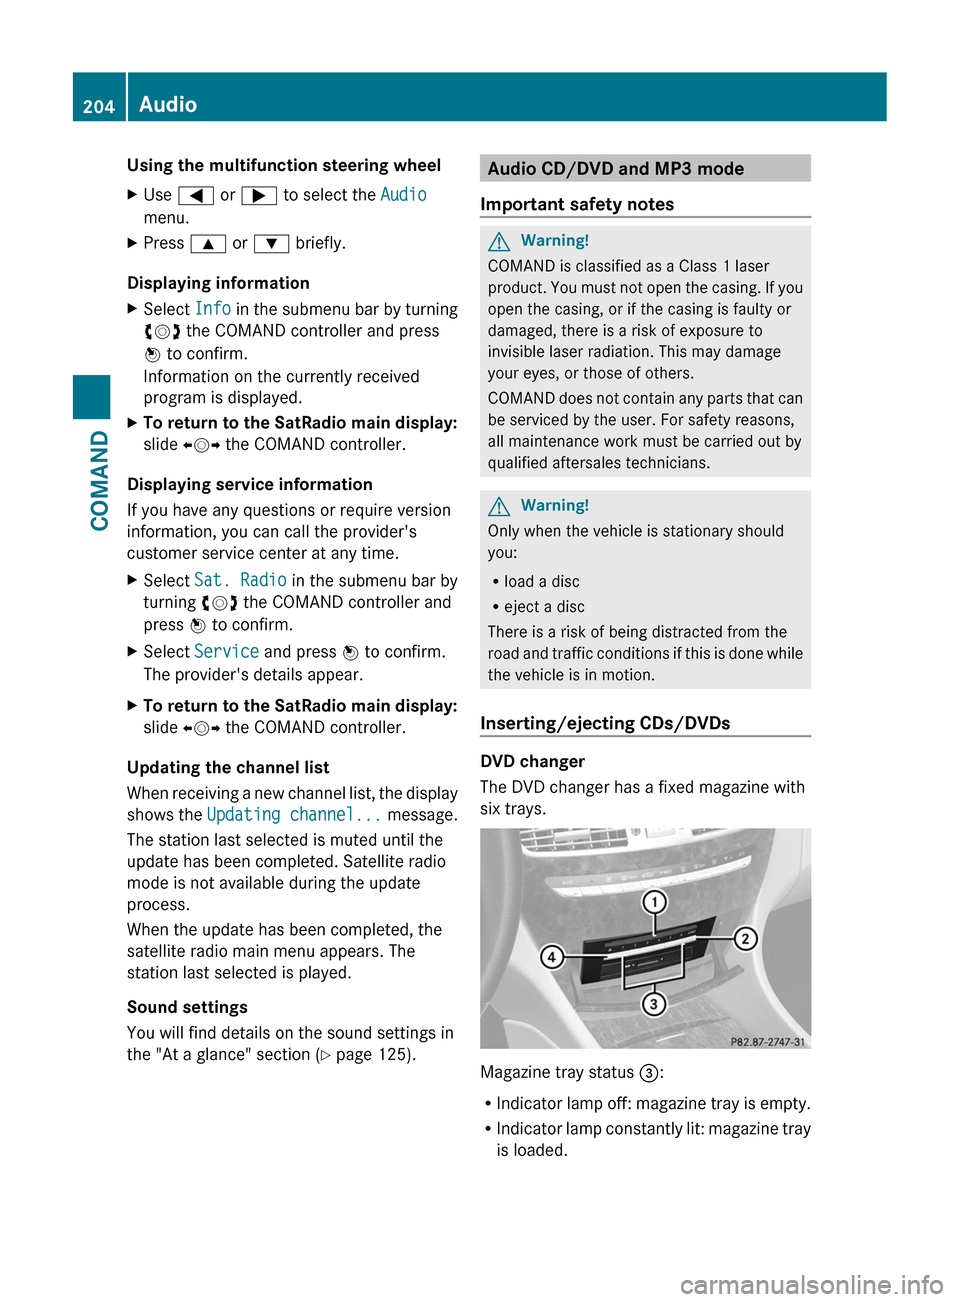
DVD changer
The DVD changer has a fixed magazine with
six trays.
Magazine tray status =:
RIndicator lamp off: magazine tray is empty.
RIndicator lamp constantly lit: magazine tray
is loaded.
204AudioCOMAND
Page 209 of 480
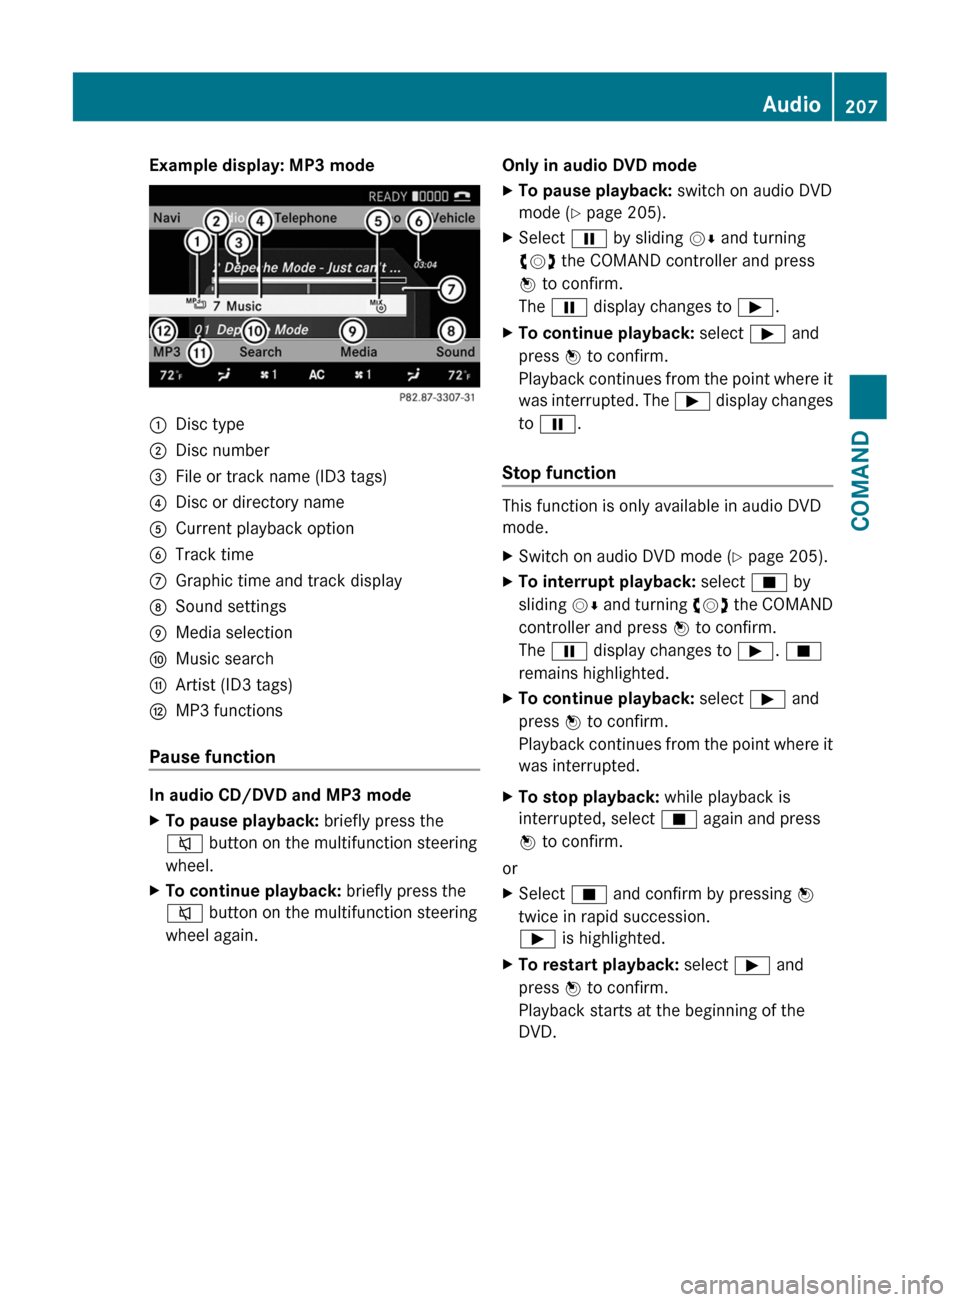
Example display: MP3 mode:Disc type;Disc number=File or track name (ID3 tags)?Disc or directory nameACurrent playback optionBTrack timeCGraphic time and track displayDSound settingsEMedia selectionFMusic searchGArtist (ID3 tags)HMP3 functions
Pause function
In audio CD/DVD and MP3 mode
XTo pause playback: briefly press the
8 button on the multifunction steering
wheel.XTo continue playback: briefly press the
8 button on the multifunction steering
wheel again.Only in audio DVD modeXTo pause playback: switch on audio DVD
mode ( Y page 205).XSelect Ë by sliding VÆ and turning
cVd the COMAND controller and press
W to confirm.
The Ë display changes to Ì.XTo continue playback: select Ì and
press W to confirm.
Playback continues from the point where it
was interrupted. The Ì display changes
to Ë .
Stop function
This function is only available in audio DVD
mode.
XSwitch on audio DVD mode ( Y page 205).XTo interrupt playback: select É by
sliding VÆ and turning cVd the COMAND
controller and press W to confirm.
The Ë display changes to Ì. É
remains highlighted.XTo continue playback: select Ì and
press W to confirm.
Playback continues from the point where it
was interrupted.XTo stop playback: while playback is
interrupted, select É again and press
W to confirm.
or
XSelect É and confirm by pressing W
twice in rapid succession.
Ì is highlighted.XTo restart playback: select Ì and
press W to confirm.
Playback starts at the beginning of the
DVD.Audio207COMANDZ
Page 210 of 480
Selecting CD/audio DVD/MP3 discs
Selecting via the media list
XIn CD/audio DVD and MP3 mode: select
Media by sliding VÆ or turning cVd the
COMAND controller and press W to
confirm.
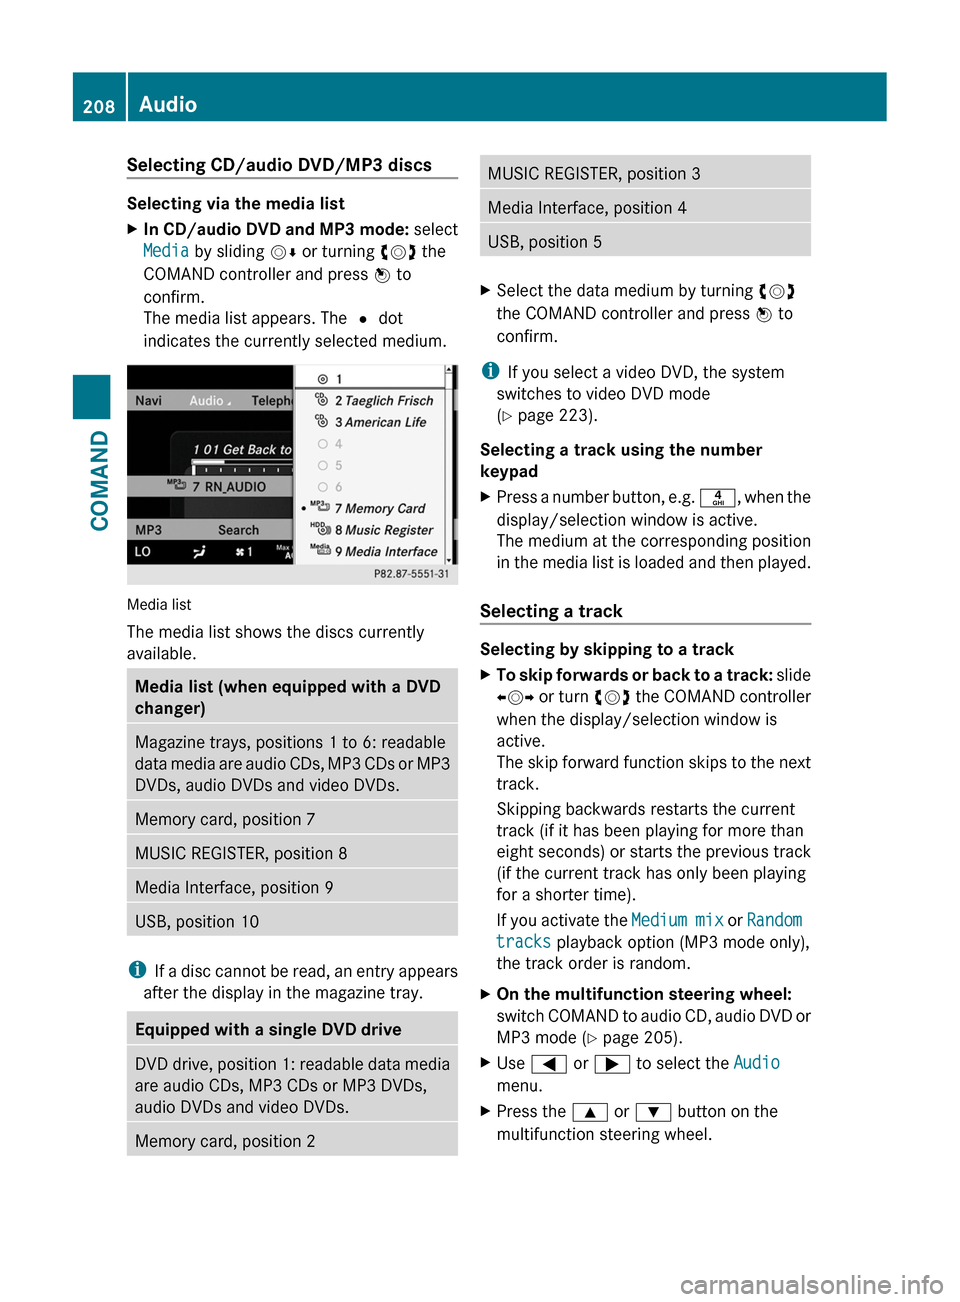
The media list appears. The # dot
indicates the currently selected medium.
Media list
The media list shows the discs currently
available.
Media list (when equipped with a DVD
changer)
Magazine trays, positions 1 to 6: readable
data media are audio CDs, MP3 CDs or MP3
DVDs, audio DVDs and video DVDs.
Memory card, position 7MUSIC REGISTER, position 8Media Interface, position 9USB, position 10
iIf a disc cannot be read, an entry appears
after the display in the magazine tray.
Equipped with a single DVD driveDVD drive, position 1: readable data media
are audio CDs, MP3 CDs or MP3 DVDs,
audio DVDs and video DVDs.
Memory card, position 2MUSIC REGISTER, position 3Media Interface, position 4USB, position 5XSelect the data medium by turning cVd
the COMAND controller and press W to
confirm.
iIf you select a video DVD, the system
switches to video DVD mode
(Y page 223).
Selecting a track using the number
keypad
XPress a number button, e.g. n, when the
display/selection window is active.
The medium at the corresponding position
in the media list is loaded and then played.
Selecting a track
Selecting by skipping to a track
XTo skip forwards or back to a track: slide
XVY or turn cVd the COMAND controller
when the display/selection window is
active.
The skip forward function skips to the next
track.
Skipping backwards restarts the current
track (if it has been playing for more than
eight seconds) or starts the previous track
(if the current track has only been playing
for a shorter time).
If you activate the Medium mix or Random
tracks playback option (MP3 mode only),
the track order is random.
XOn the multifunction steering wheel:
switch COMAND to audio CD, audio DVD or
MP3 mode (Y page 205).
XUse = or ; to select the Audio
menu.
XPress the 9 or : button on the
multifunction steering wheel.
208AudioCOMAND
Page 228 of 480
Stop functionXPress W the COMAND controller to show
the menu.
XTo interrupt playback: select ± by
turning cVd the COMAND controller and
press W to confirm.
The « display changes to M. The video
image is hidden.
XTo continue playback: select M and press
W to confirm.
Playback continues from the point where it
was interrupted.
XTo stop playback: while playback is
interrupted, select ± again and press W
to confirm.
or
XDuring playback, confirm ± by pressing
W twice in quick succession.
M is selected.
XTo restart playback: confirm M by
pressing W.
Playback restarts from the beginning.
Pause function
XPress W the COMAND controller to show
the menu.
XTo pause: select « by turning cVd the
COMAND controller and press W to
confirm.
The « display changes to M.
XTo continue playback: select M and press
W to confirm.
The menu is hidden.
Selecting a scene/chapter
If the film is divided into scenes or chapters,
you can select them directly while the film is
running, or skip forwards step-by-step. Some
DVDs do not permit this at certain points (e.g.
during the opening credits).
It may also be possible to select the scene/
chapter from within the menu stored on the
DVD.
XTo skip forwards or back: turn cVd or
slide XVY the COMAND controller.
The navigation menu (Y page 224) appears
for approximately eight seconds.
XOn the multifunction steering wheel:
switch on video DVD mode in COMAND
(Y page 224).
XUse the = or ; button to select the
Audio menu.
XPress 9 or : to select a scene/
chapter.
If you press and hold 9 or : for an
extended period, rapid scroll begins.
Selecting a film/title
This function is only available if the DVD is
divided into several films/tracks. If the DVD
contains several films, these can be selected
directly. A film can be selected either when
the DVD is being played back or when it is
stopped.
The film can also be selected from the menu
on the DVD itself.
XPress W the COMAND controller to show
the menu.
XSelect DVD-V by turning cVd the COMAND
controller and press W to confirm.
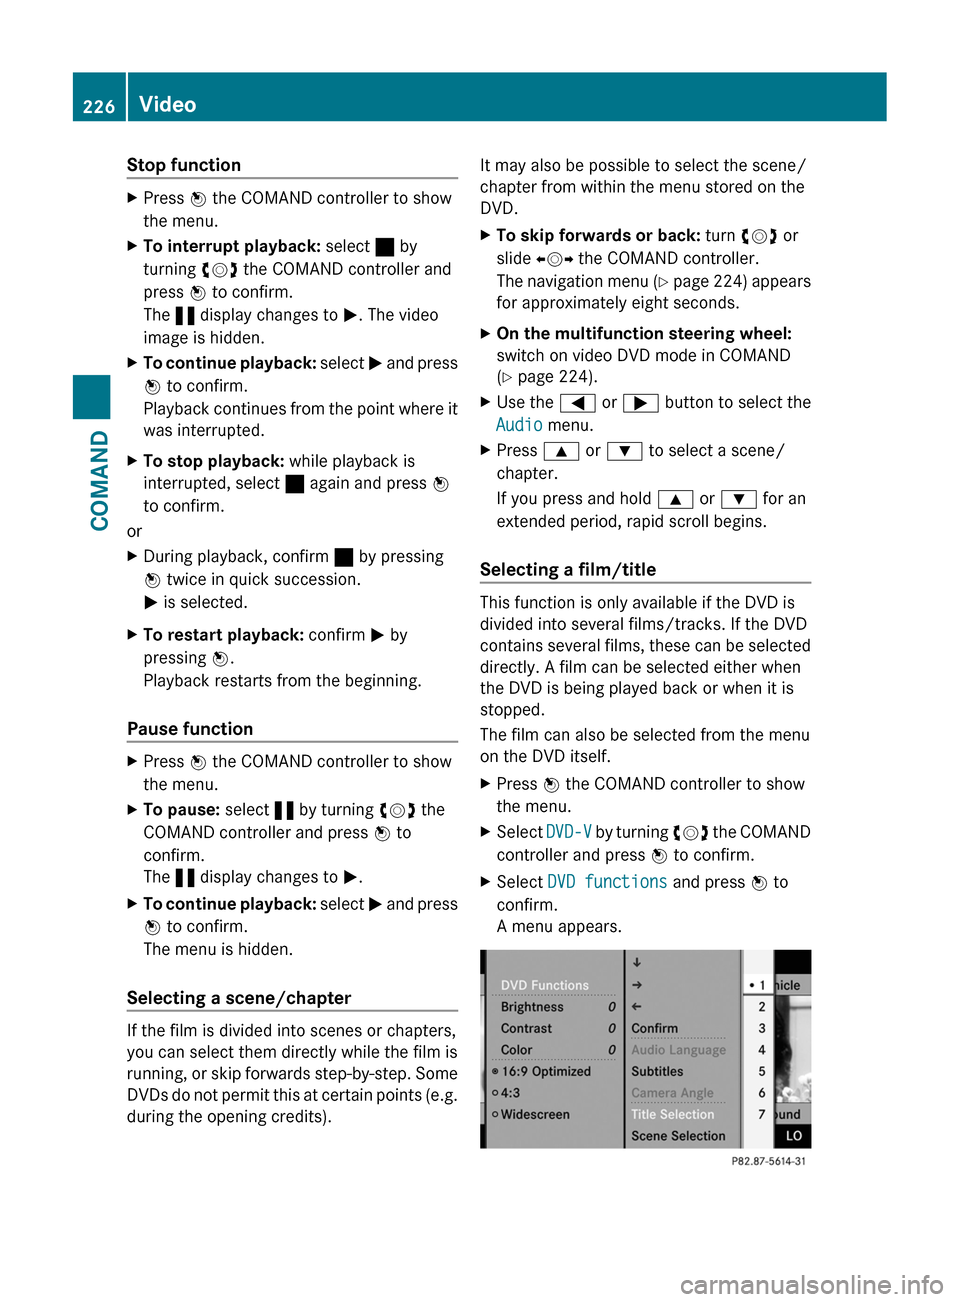
XSelect DVD functions and press W to
confirm.
A menu appears.
226VideoCOMAND