check engine MERCEDES-BENZ CL-Class 2012 C216 User Guide
[x] Cancel search | Manufacturer: MERCEDES-BENZ, Model Year: 2012, Model line: CL-Class, Model: MERCEDES-BENZ CL-Class 2012 C216Pages: 488, PDF Size: 21.88 MB
Page 156 of 488
XSelect Cancel Route Guidance and press
W to confirm.
Continuing route guidance
XTo activate navigation mode: press the
S function button once or twice.XTo show the menu: press W the COMAND
controller.XSelect Destination in the navigation
system menu bar by turning cVd the
COMAND controller and press W to
confirm.XSelect Continue Route Guidance and
press W to confirm.
COMAND calculates the route.
Destination or area of destination
reached
When you reach your destination, COMAND
displays a checkered flag and route guidance
is automatically ended.
For certain points of interest (e.g. airports),
the Destination Reached display is shown
as well as the checkered flag.
Navigation announcements
Repeating navigation announcements
GWARNING
Navigation announcements are intended to
direct you while driving without diverting your
attention from the road and driving.
Please always use this feature instead of
consulting the map display for directions.
Looking at the icons or map display can
distract you from traffic conditions and
driving, and increase the risk of an accident.
i Audible navigation announcements are
muted during a telephone call.
If you have missed an announcement, you can
call up the current announcement at any
time.
XTo show the menu: press W the COMAND
controller.XIn the navigation menu bar, confirm RPT
with W.
Switching navigation announcements
on/off
XTo switch off: during the announcement,
press the 8 button on the multifunction
steering wheel.
You will briefly see the message: The
driving instructions have been
muted .XTo switch on: press W the COMAND
controller.XIn the + navigation menu bar, press W
to confirm.
i COMAND automatically switches the
navigation announcements back on when:
R you have a new route calculated.
R you start the engine again after having
left the vehicle.
Reducing volume during a navigation
announcement
The volume of an active audio or video source
can be automatically reduced during a
navigation announcement.
XSelect Navi in the main function bar by
sliding ZV and turning cVd the COMAND
controller and press W to confirm.XSelect Audio Fadeout and press W to
confirm.
The function is switched on O or off ª,
depending on the previous status.
Setting the volume manually
XSet the volume during a navigation
announcement.
or
XIn the map display when the menu is
shown, select + and adjust the volume.154NavigationCOMAND
Page 175 of 488
You can install new map software yourself
which, depending on the scope, may consist
of one or more DVDs.
The installation process can take between
10 and 120 minutes, depending on the scope
of the map software. If the radio is switched
on before you start the installation process,
you can still adjust the volume. You can also
use COMAND to operate automatic climate
control and to cancel the process. Other
functions are not operational. If possible,
carry out the installation when the vehicle is
stationary. The DVD read speed is higher
when the vehicle is stationary than when it is
in motion, so less time is required. If the
starter battery is not sufficiently charged,
COMAND may end the process automatically
in order to protect the battery. Therefore, let
the engine idle during the installation
process.GWARNING
Never leave the engine running in enclosed
spaces. The exhaust gases contain toxic
carbon monoxide. Breathing in exhaust fumes
is a health hazard and can lead to
unconsciousness or death.
Displaying information on the map
version currently in use
XTo activate navigation mode: press the
S function button once or twice.XTo show the menu: press W the COMAND
controller.XSelect Navi in the main function bar by
sliding VÆ and turning cVd the COMAND
controller and press W to confirm.XSelect Map Version and press W to
confirm.
Notes on handling DVDs
R Only hold DVDs by the edge.
R Handle DVDs carefully to prevent reading
errors.
R Avoid getting scratches, fingerprints and
dust on DVDs.
R Use a commercially-available cleaning
cloth to clean discs. When cleaning CDs,
you should wipe in straight lines from the
center outwards rather than in a circular
motion.
R Place DVDs back in their cases after use.
R Protect DVDs from heat and direct sunlight.
Map software copy protection
Map software for COMAND is subject to a
charge. The map software has just one
activation code which is usable in one vehicle
only, and is not transferable. You can obtain
the six-digit activation code from your
authorized Mercedes-Benz Center. If you
have lost the activation code, or if COMAND
does not accept the activation code that you
have received, contact your authorized
Mercedes-Benz Center.
Your vehicle is supplied with map software at
the factory. Depending on the country, map
software for your region is either pre-installed
(Europe/USA) or the map software is
supplied as a DVD (all other countries). You
do not require an activation code for the map
software that is provided with your vehicle.
If the map software on your vehicle has been
installed at the factory and you wish to
reinstall it, this also does not necessitate
entry of the activation code.
Installation processXLoad the map software DVD in the DVD
drive ( Y page 204).
COMAND checks the DVD and shows a
corresponding message in the display.
Map software is not compatible with the
navigation system
You will see a message that the map software
cannot be installed.
XTo confirm the message: press W.
COMAND ejects the DVD.XTake the DVD out of the slot.XInsert a DVD which is compatible with the
vehicle’s navigation system.Navigation173COMANDZ
Page 252 of 488

Interior lighting control
Important notes
In order to prevent the vehicle's battery from
discharging, the interior lighting functions are
automatically deactivated after some time
except for when the SmartKey is in position
2 in the ignition lock.
Automatic interior lighting control
XTo switch on/off: press the | button.
The OFF indicator lamp shows whether the
automatic interior lighting control is
deactivated (indicator lamp on) or
activated (indicator lamp off).
The interior lighting automatically switches
on if you:
R unlock the vehicle
R open a door
R remove the SmartKey from the ignition lock
The interior light is activated for a short while
when the SmartKey is removed from the
ignition lock. You can activate this delayed
switch-off using COMAND ( Y page 233).
Manual interior lighting control
XTo switch the front interior lighting on/
off: press the c button.XTo switch the rear interior lighting on/
off: press the u button.XTo switch the reading lamps on/off:
press the p button.
Replacing bulbs
Important safety notes
Xenon bulbs
If your vehicle is equipped with Xenon bulbs,
you can recognize this by the following: the
cone of light from the Xenon bulbs moves
from the top to the bottom and back again
when you start the engine. For this to be
observed, the lights must be switched on
before starting the engine.GDANGER
Xenon bulbs carry a high voltage. You could
get an electric shock and be seriously or even
fatally injured if you touch the electric
contacts on Xenon bulbs. Therefore, never
remove the cover from Xenon bulbs.
Do not change Xenon bulbs yourself, but have
them replaced at a qualified specialist
workshop which has the necessary specialist
knowledge and tools to carry out the work
required.
Mercedes-Benz recommends that you use an
authorized Mercedes-Benz Center for this
purpose. In particular, work relevant to safety
or on safety-related systems must be carried
out at a qualified specialist workshop.
Bulbs and lamps are an important aspect of
vehicle safety. You must therefore make sure
that these function correctly at all times.
Have the headlamp setting checked regularly.
Other bulbs
There are bulbs other than the Xenon bulbs
that you cannot replace. Replace only the
bulbs listed (Y page 251). Have the bulbs that
you cannot replace yourself changed at a
qualified specialist workshop.
Mercedes-Benz recommends that you use an
authorized Mercedes-Benz Center for this
purpose. In particular, work relevant to safety
or on safety-related systems must be carried
out at a qualified specialist workshop.
If you require assistance changing bulbs,
consult a qualified specialist workshop.
Do not touch the glass tube of new bulbs with
your bare hands. Even minor contamination
can burn into the glass surface and reduce
the service life of the bulbs. Always use a lint-
free cloth or only touch the base of the bulb
when installing.
Only use bulbs of the correct type.
250Replacing bulbsLights and windshield wipers
Page 255 of 488

Replacing the wiper blades
Moving the wiper blades to a vertical
position
Vehicles without KEYLESS-GO
XTurn the SmartKey to position 1 or 2 in the
ignition lock.XSet the windshield wipers to
position °.XWhen the wiper arms have reached a
vertical position, turn the SmartKey to
position 0 and remove it from the ignition
lock.
Vehicles with KEYLESS-GO
XSwitch off the engine.XRemove your foot from the brake pedal.XSet the windshield wipers to
position °.XPress the Start/Stop button repeatedly
until the windshield wipers start.XWhen the wiper arms have reached a
vertical position, press the Start/Stop
button.
Removing the wiper blades
XFold the wiper arm away from the
windshield until it engages.XSet the wiper blade at right angles to the
wiper arm.XRemove the wiper blade from the retaining
pin on the wiper arm in the direction of the
arrow.Installing the wiper bladesXPush the new wiper blade onto the
retaining pin on the wiper arm in the
opposite direction to the arrow.
Make sure that the wiper blade slides fully
onto the retaining pin on the wiper arm.XTurn the wiper blade parallel to the wiper
arm.XFold the wiper arm back onto the
windshield.
Problems with the windshield wipers
The windshield wipers are obstructed
Leaves or snow, for example, may be
obstructing the windshield wiper movement.
The wiper motor has been deactivated.
XFor safety reasons, you should remove the
SmartKey from the ignition lock.
or
XSwitch off the engine using the Start/Stop
button and open the driver's door.XRemove the cause of the obstruction.XSwitch the windshield wipers back on.
The windshield wipers are inoperative
The windshield wiper drive is malfunctioning.
XSelect another wiper speed on the
combination switch.XHave the windshield wipers checked at a
qualified specialist workshop.
The spray nozzles are misaligned
The windshield washer fluid from the spray
nozzles no longer hits the center of the
windshield. The spray nozzles are misaligned.
XHave the spray nozzles adjusted at a
qualified specialist workshop.Windshield wipers253Lights and windshield wipersZ
Page 275 of 488
ProblemPossible causes/consequences and M SolutionsThe engine is not
running smoothly and
is misfiring.There is a malfunction in the engine electronics or a mechanical
component of the engine management system.XOnly depress the accelerator pedal slightly.XHave the cause rectified immediately at a qualified specialist
workshop, e.g. an authorized Mercedes-Benz Center.
Otherwise, non-combusted fuel may get into the catalytic
converter and damage it.The coolant
temperature gauge
shows a value above
248 ‡ (120 †).The coolant level is too low. The coolant is too hot and the engine
is no longer being cooled sufficiently.XStop as soon as possible and allow the engine and the coolant
to cool down.XCheck the coolant level ( Y page 411). Observe the warning
notes as you do so and add coolant if necessary.Automatic transmission
Important safety notes
GWARNING
It is dangerous to shift the automatic
transmission out of parking position P or
neutral position N if the engine speed is
higher than idle speed. If your foot is not firmly
on the brake pedal, the vehicle could
accelerate quickly forward or in reverse. You
could lose control of the vehicle and hit
someone or something. Only shift into gear
when the engine is idling normally and when
your right foot is firmly on the brake pedal.
GWARNING
Keep in mind that turning off the engine alone
only will shift the automatic transmission into
neutral position N automatically.
Always shift the automatic transmission into
park position P before turning off the engine.
Otherwise the vehicle could roll away which
could result in an accident and/or serious
personal injury.
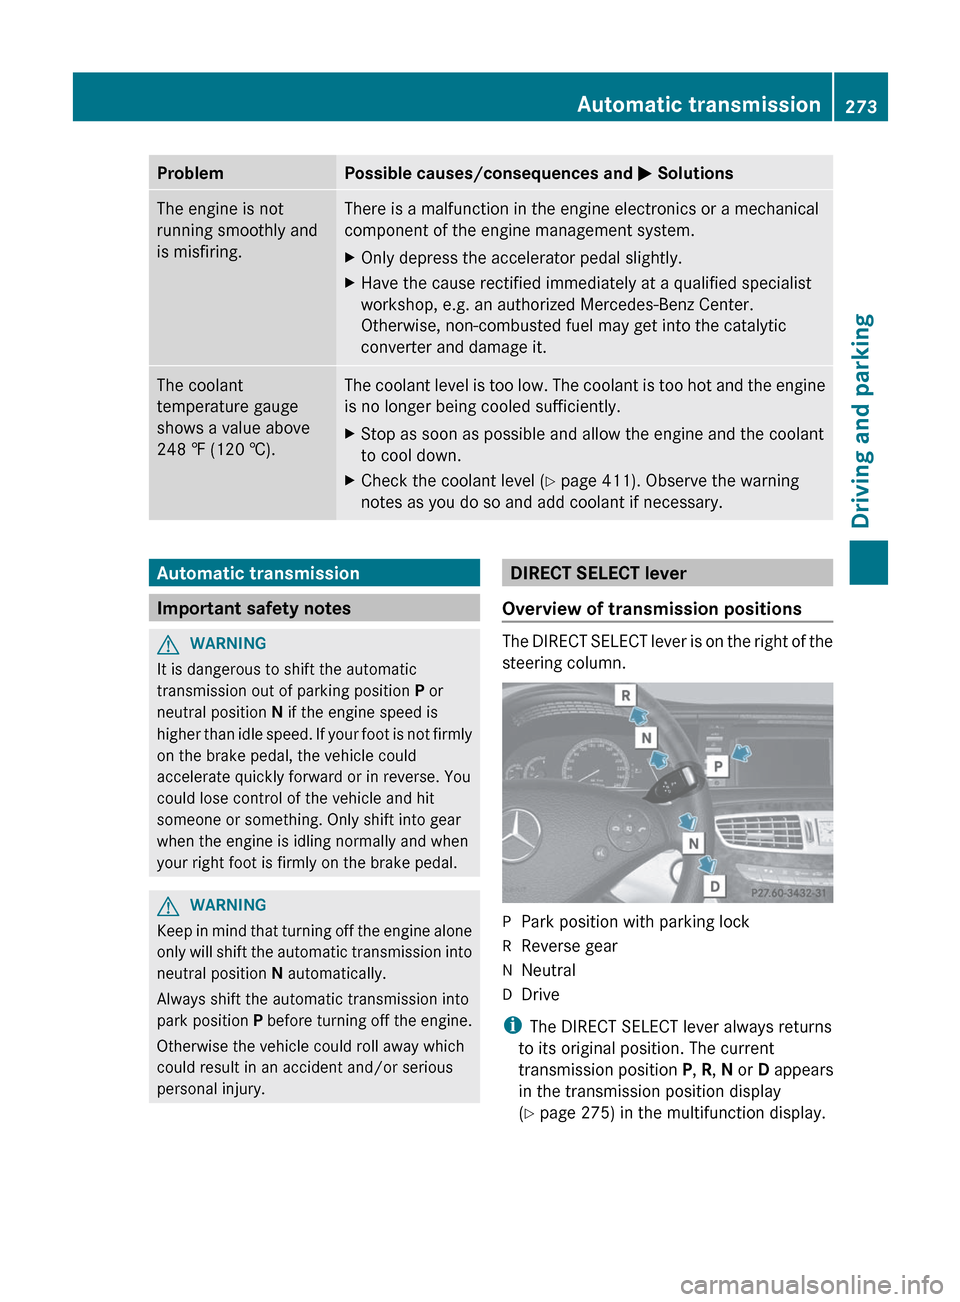
DIRECT SELECT lever
Overview of transmission positions
The DIRECT SELECT lever is on the right of the
steering column.
PPark position with parking lockRReverse gearNNeutralDDrive
i The DIRECT SELECT lever always returns
to its original position. The current
transmission position P, R , N or D appears
in the transmission position display
( Y page 275) in the multifunction display.
Automatic transmission273Driving and parkingZ
Page 277 of 488

Rif applied, release the electric parking
brake.
R switch off the ignition and leave the
SmartKey in the ignition lock.
Transmission position D with ECO
start/stop function activated
The ECO start/stop function switches the
engine off automatically if the vehicle is
braked to a standstill when in transmission
position D and the brake is still depressed.
For further information on the ECO start/stop
function ( Y page 270).
Shifting to transmission position D
XWhen the vehicle is stationary, depress the
brake pedal.XPush the DIRECT SELECT lever down past
the first point of resistance.
Transmission position display
The current transmission position is shown in
the multifunction display.
:Transmission position
i The arrows in the transmission position
display show how and into which
transmission positions you can change
using the DIRECT SELECT lever.
! If the transmission position display in the
multifunction display is not working, you
should pull away carefully to check whether
the desired transmission position is
engaged. Ideally, you should select
transmission position D and drive program
E (drive program C on AMG vehicles) or S.
Do not restrict the shift range.
Transmission positions
BPark position
Do not shift the transmission into
position P unless the vehicle is
stationary. The parking lock should
not be used as a brake when
parking. In addition to engaging the
parking lock, you must always
apply the electric parking brake to
secure the vehicle.
If the vehicle electronics are
malfunctioning, the transmission
may be locked in position P.
Have the vehicle electronics
checked at a qualified specialist
workshop, e.g. an authorized
Mercedes-Benz Center,
immediately.CReverse gear
Only shift the transmission to R
when the vehicle is stationary.Automatic transmission275Driving and parkingZ
Page 282 of 488
Problems with the transmissionProblemPossible causes/consequences and M SolutionsThe transmission has
problems shifting gear.The transmission is losing oil.XHave the transmission checked at a qualified specialist
workshop, e.g. an authorized Mercedes-Benz Center,
immediately.The acceleration ability
is deteriorating.
The transmission no
longer changes gear.The transmission is in emergency mode.
It is only possible to shift into second gear and reverse gear.XStop the vehicle.XShift the transmission to position P.XSwitch off the engine.XWait at least 10 seconds before restarting the engine.XShift the transmission to position D or R.
If D is selected, the transmission shifts into second gear; if R is
selected, the transmission shifts into reverse gear.XHave the transmission checked at a qualified specialist
workshop, e.g. an authorized Mercedes-Benz Center,
immediately.Transfer case
This section is only valid for vehicles with 4-
wheel drive (4MATIC). Power is always
transmitted to both axles.
! Performance tests may only be carried
out on a 2-axle dynamometer. The brake
system or transfer case could otherwise be
damaged. Contact a qualified specialist
workshop for a performance test.
Mercedes-Benz recommends that you use
an authorized Mercedes-Benz Center for
this purpose.
! To prevent ESP ®
from intervening, the
ignition must be switched off (SmartKey or
the Start/Stop button in position 0 or 1) if:
R the electric parking brake is being tested
on a brake dynamometer.
R the vehicle is being towed with only one
axle raised (not permitted for vehicles
with 4MATIC).The brake system could otherwise be
damaged.
Refueling
Important safety notes
GWARNING
Gasoline is highly flammable and poisonous.
It burns violently and can cause serious
personal injury.
Never allow sparks, flames or smoking
materials near gasoline.
Turn off the engine before refueling.
Whenever you are around gasoline, avoid
inhaling fumes and any skin or clothing
contact.
Direct skin contact with fuels and the
inhalation of fuel vapors are damaging to your
health.
280RefuelingDriving and parking
Page 283 of 488
GWARNING
Overfilling of the fuel tank may create
pressure in the system which could cause a
gas discharge. This could cause the gasoline
to spray back out when removing the fuel
pump nozzle, which could cause personal
injury.
! Do not use diesel to refuel vehicles with a
gasoline engine. Even small amounts of the
wrong fuel result in damage to the fuel
system and engine.
! Do not switch on the ignition if you
accidentally refuel with the wrong fuel.
Otherwise, the fuel will enter the fuel lines.
Notify a qualified specialist workshop and
have the fuel tank and fuel lines drained
completely.
Gasoline
Fuel grade
! You should only refuel with unleaded
premium-grade gasoline as this avoids
damaging the catalytic converter.
If engine running problems are apparent,
have the cause checked immediately and
repaired. Excess unburned fuel can
otherwise enter the catalytic converter,
leading to overheating and possibly
causing a fire.
! Use a filter when refueling from a fuel can.
Otherwise, the fuel lines and/or injection
system could be blocked by particles from
the fuel can.
i Only refuel with premium-grade unleaded
gasoline with a specified minimum octane
number of 91 (average value of 96 RON/
86 MON).
You will usually find information about the
fuel grade on the pump. If you cannot find
the label on the pump, ask the staff for
assistance.
You can find more information under "Fuel"
( Y page 477), or by contacting an
authorized Mercedes-Benz Service Center
or visiting http://www.mbusa.com (USA
only).
Refueling
Fuel filler flap
The fuel filler flap is unlocked or locked
automatically when you open or close the
vehicle with the SmartKey or using KEYLESS-
GO.
The position of the fuel filler cap is displayed
in the instrument cluster 8. The arrow
next to the filling pump indicates the side of
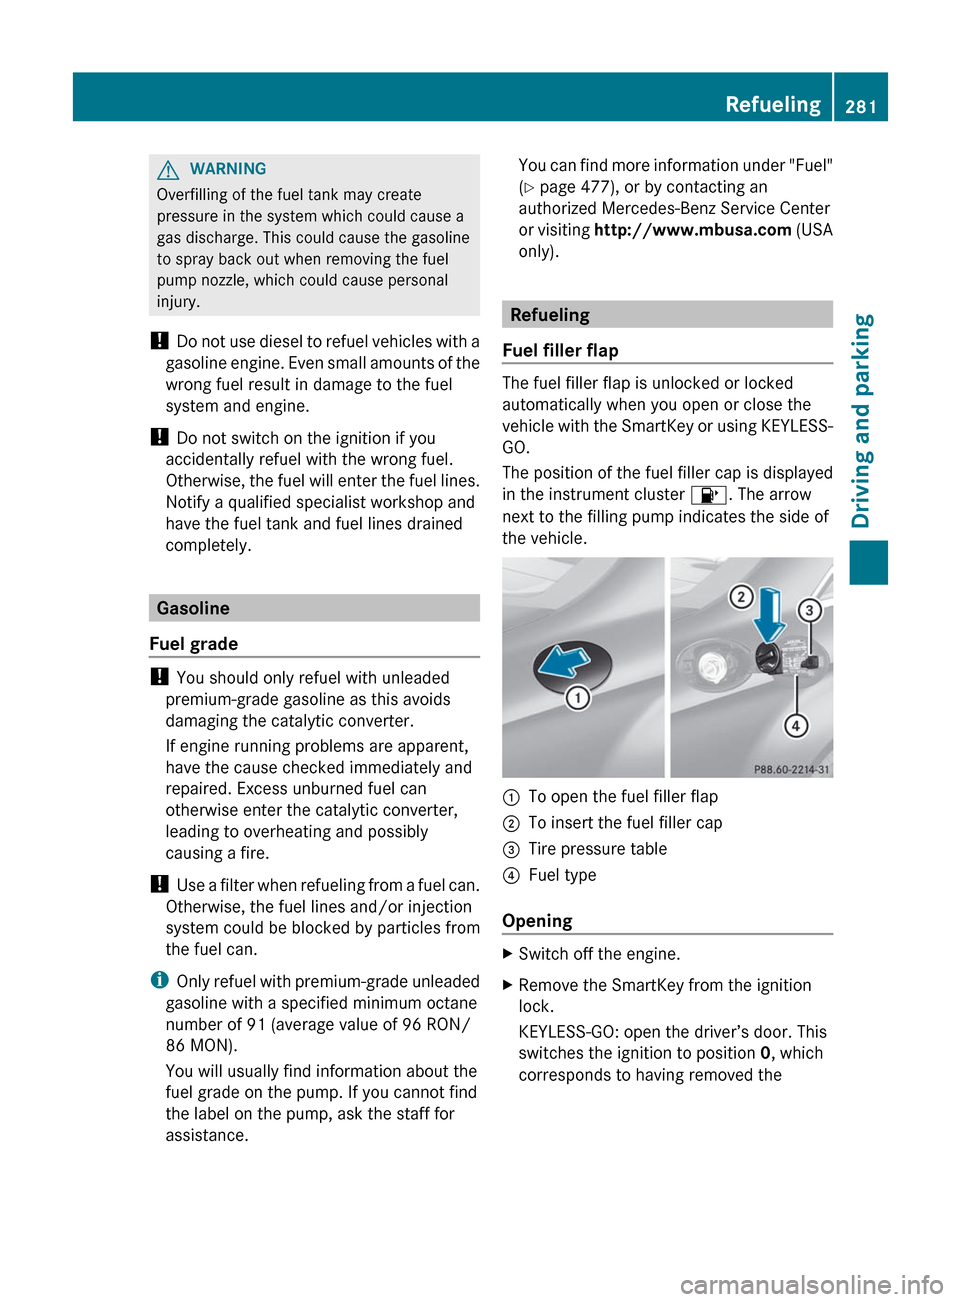
the vehicle.
:To open the fuel filler flap;To insert the fuel filler cap=Tire pressure table?Fuel type
Opening
XSwitch off the engine.XRemove the SmartKey from the ignition
lock.
KEYLESS-GO: open the driver’s door. This
switches the ignition to position 0, which
corresponds to having removed theRefueling281Driving and parkingZ
Page 284 of 488
SmartKey. The driver’s door can be closed
again.XPress the fuel filler flap in the direction of
arrow :.
The fuel filler flap opens slightly.XOpen the fuel filler flap.XTurn the fuel filler cap counter-clockwise
and remove it.XInsert the fuel filler cap into the holder
bracket on the inside of filler flap ;.XCompletely insert the pump nozzle into the
filler neck and refuel.XOnly fill the tank until the pump nozzle
switches off.
! Overfilling the fuel tank could damage the
fuel system.
Closing
XReplace the fuel filler cap and turn it
clockwise. The fuel filler cap audibly
engages.XClose the fuel filler flap.
i If you drive with the fuel filler cap open,
the reserve fuel warning lamp flashes. In
addition, the ; Check Engine warning
lamp may light up. A message appears in
the multifunction display ( Y page 365).
For further information on warning and
indicator lamps in the instrument cluster,
see ( Y page 384).
i Close the fuel filler flap before locking the
vehicle. A locking pin otherwise prevents
the fuel filler flap from closing after the
vehicle has been locked.
282RefuelingDriving and parking
Page 289 of 488
Steering and braking requires significantly
more effort and you could lose control of the
vehicle and cause an accident as a result.
Do not turn off the engine while the vehicle is
in motion.
Exhaust checkGWARNING
Inhalation of exhaust gas is hazardous to your
health. All exhaust gas contains carbon
monoxide (CO), and inhaling it can cause
unconsciousness and possible death.
Do not run the engine in confined areas (such
as a garage) which are not properly ventilated.
If you think that exhaust gas fumes are
entering the vehicle while driving, have the
cause determined and corrected
immediately. If you must drive under these
conditions, drive only with at least one
window fully open at all times.
Certain engine systems are designed to keep
the level of poisonous components in exhaust
fumes within legal limits.
These systems only work at peak efficiency
when they are maintained exactly in
accordance with the manufacturer's
specifications. For this reason, all work on the
engine must be carried out only by qualified
and authorized Mercedes-Benz technicians.
The engine settings must not be changed in
any circumstances. Furthermore, all specific
service work must be carried out at regular
intervals and in accordance with the
Mercedes-Benz service requirements. Details
can be found in the Service Booklet.
Brakes
Important safety notes
GWARNING
On slippery road surfaces, never downshift in
order to obtain braking action. This could
result in drive wheel slip and reduced vehicle
control. Your vehicle's ABS will not prevent
this type of loss of control.GWARNING
Make sure that you do not endanger other
road users when you apply the brakes.
Downhill gradients
! On long and steep gradients, you must
reduce the load on the brakes by shifting
early to a lower gear. This allows you to take
advantage of the engine braking effect and
helps avoid overheating and excessive
wear of the brakes.
When you take advantage of the engine
braking effect, a drive wheel may not turn
for some time, e.g. on a slippery road
surface. This could cause damage to the
drive train. This type of damage is not
covered by the Mercedes-Benz warranty.
Heavy and light loads
GWARNING
Depressing the brake pedal constantly results
in excessive and premature wear to the brake
pads.
It may also cause the brakes to overheat,
seriously impairing their effectiveness. It may
then not be possible to stop the vehicle in
sufficient time to avoid an accident.
If the brakes have been subjected to a heavy
load, do not stop the vehicle immediately, but
drive on for a short while. This allows the
airflow to cool the brakes more quickly.
Wet roads
GWARNING
After driving in heavy rain for some time
without applying the brakes or through water
deep enough to wet brake components, the
first braking action may be somewhat
reduced. You have to depress the brake pedal
Driving tips287Driving and parkingZ